View Twenty Seconds here:
https://editor.p5js.org/siyonagoel/full/VcTSl8x7V
My Concept:
Twenty Seconds is an immersive minigame experience that aims to make its users uncomfortable. Every part of the project has been developed with the intention that its use should ultimately make someone feel uneasy, and most of this logic is based on things that make me uncomfortable. 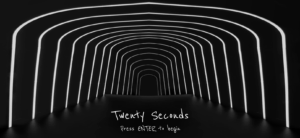 This also means that some parts of the project may not cause the same level of discomfort for everyone, and that’s okay, but I’ve tried my best to use things that make most of the population uncomfortable. The project essentially features 8 rooms, each of which has a 20-second timer running, and the user has to either complete some sort of a challenge, or sit through a bad
 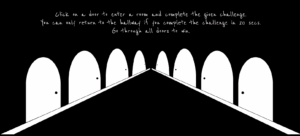 experience (like uncomfortable sounds) for 20 seconds. They cannot move to the next room until they complete the challenge in their current room, and they complete the experience only after going through all rooms.
There are some deliberate design choices within this project. To start with, I made sure that there is a very minimal use of color throughout the project. Hence, the only colors you will see are white, black, and red. 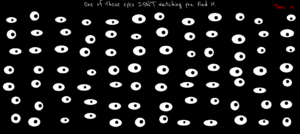 Initially, I was thinking of only white and black, but after I realised one more color is a necessity, I added red as I find it one of the most uncomfortable colors due to its association with violence. Also, there is no general background music that plays throughout the project, although there are some specific sounds for a few rooms and the pop-up messages. What can be more uncomfortable than silence, when people can actually hear their own thoughts? The font I used—Reenie Beanie—was the best mix I could find between a readable font and human handwriting, something that looks like it was scrawled on a blackboard with chalk.
For my midterm project, I wanted to do something that is a unique mix of both a game and interactive art, and I believe Twenty Seconds captures this quite nicely.
Technical and Game Design:
The project treats each room as a self-contained mini challenge while keeping a single central state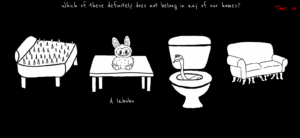 (the hallway leads to a door which leads to a room which leads back to the hallway). I am proud of the clear division in my code between different sections, such as resource loading, room initialization, and rendering. For example, preload() gathers all the images and sounds that I use, each initRoomX() sets up the state, and draw() delegates to the current room. Because of this structure, I could easily extend the code every time I wanted to add a new room, and made debugging predictable. Here’s an example:
function initRoom2() {
  roomItems = [];

  // Define positions and images for the 4 items
  let positions = [
    { x: 50, y: 130, w: 230, h: 192, img: bedImg, name: "bed" },
    { x: 320, y: 130, w: 230, h: 204, img: labubuImg, name: "labubu" },
    { x: 600, y: 130, w: 162, h: 263, img: toiletImg, name: "toilet" },
    { x: 810, y: 150, w: 220, h: 157, img: sofaImg, name: "sofa" }
  ];

  roomItems = positions;

  startTimer();
}

function drawRoom2() {
  background(0);

  // Instructions
  fill("white");
  textSize(30);
  textAlign(CENTER, TOP);
  text("Which of these definitely does not belong in any of our homes?", width / 2, 10);

  drawTimer();

  // Draw all room items
  for (let item of roomItems) {
    image(item.img, item.x, item.y, item.w, item.h);

    // show the item's name when hovering over it
    if (isMouseOverItem(item)) {
      if (item.name === "bed") {
        fill("white");
        textSize(30);
        text("Spiky bed", 190, 350);
      } else if (item.name === "labubu") {
        fill("white");
        textSize(30);
        text("A labubu", 480, 350);
      } else if (item.name === "toilet") {
        fill("white");
        textSize(30);
        text("Snake toilet", 755, 400);
      } else if (item.name === "sofa") {
        fill("white");
        textSize(30);
        text("Centipede sofa", 995, 350);
      }
    }

    // failure condition
    checkTimerExpired("You're trapped until you find the right answer >:)");
  }
}
So, every time I had to implement a new room, I would just add its required initRoomX() function and drawRoomX() function to the existing code, along with the required functionality and pop-up logic in the mousePressed() function. Since elements like the pop-ups and the timer were to be used repeatedly for all the rooms, I made sure to structure them as easily reusable functions that I can call in one line without having to paste the same 4-5 lines of code in the code for every room.
On the technical side, there are a couple of algorithms I’m proud of for some of the games. The first is the ones I used for room 1, the room filled with clocks. I used a circle packing algorithm, learnt from here, to generate the placement of the clocks without them overlapping.
// circle packing algorithm for generating non-overlapping clocks
while (attempts > 0) {
  // random position and size of circles
  let r = random(minR, maxR);
  let x = random(r, width - r);
  let y = random(r + topBuffer, height - r);

  // Check if position overlaps with existing clocks
  let valid = true;
  for (let c of clocks) {
    let d = dist(x, y, c.x, c.y);
    if (d < r + c.r) {
      valid = false;
      break;
    }
  }

  // generate a clock if the position is valid
  if (valid) {
    clocks.push(new Clock(x, y, r));
  }
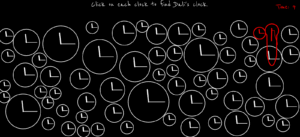 For the warping of the clock’s hands when the clock “melts”, I created a function called drawMeltingHand() in the Clock class that uses subtle bezier deformation for the cool effect. Before this I had no idea that something known as Bezier curves exist, and found out that there is a p5js function for it when i was searching for ways online to draw curved lines smoothly.
drawMeltingHand(x, y, length, angle, melt, weight) {
    push();
    stroke("red");
    strokeWeight(weight);

    // Midpoint of the hand
    let midLength = length * 0.5;
    let x1 = cos(angle) * midLength;
    let y1 = sin(angle) * midLength;
    // straight first half part of the hand
    line(0, 0, x1, y1);

    // curved tip that bends downwards
    let x2 = cos(angle) * length;
    let y2 = sin(angle) * length + melt * 0.5;
    // bezier(x1, y1, x2, y2, x3, y3, x4, y4)
    bezier(x1, y1, x1, y1 + melt * 0.3, x2, y2 - melt * 0.2, x2, y2);

    pop();
  }
Another interaction design choice I’m proud of is the reversed cursor for whack-a-mole. I thought it would be complicated to implement, but the math actually turned out to be very very simple. If I just subtract from the center of the canvas the distance between the center of the canvas and the user’s real cursor, it would give me the corresponding coordinate for the virtual reversed cursor.
// this calculates the reversed cursor position
// the virtual mouse moves opposite to the user's actual mouse
let centerX = width / 2;
let centerY = height / 2;
virtualMouseX = centerX - (mouseX - centerX);
virtualMouseY = centerY - (mouseY - centerY);
I also really like the implementation of the eyes in room no. 6. I learnt about using the atan2() function for this purpose from here. It’s probably one of my most favorite rooms, because the code wasn’t too complicated, and the resulting effect was still very cool.
if (this.isSpecial) {
  // Static pupil
  pupilX = this.x + this.staticPupilX;  // keep it centered
  pupilY = this.y + this.staticPupilY;
} else {
  // Following pupil
  // tracks the mouse
  // atan2() finds the angle formed by a point, origin, and positive x-axis
  // calculate the angle between the eye center and the mouse position
  let angle = atan2(mouseY - this.y, mouseX - this.x);

  // don't want pupil leaving the eyeball
  // Set a maximum distance that the pupil can move from the eye center
  // 15% of the eye’s width or height (whichever is smaller)
  let distance = min(this.w * 0.15, this.h * 0.15);

  // calculate new pupil position
  pupilX = this.x + cos(angle) * distance;
  pupilY = this.y + sin(angle) * distance;
}
Problems I ran into:
- I made the hallway doors on Canva. So the distance and angle between the doors was based on their relative orientation to each other on the canva surface size. What I didn’t realize was that I would need to have the exact same relative distance between the doors on my p5js canvas as well so that the perspective lines align, and due to this the hallway pathway ended up becoming much broader than I had planned. The only way to fix this would have been to remake all the doors again keeping this in mind, but since that wasn’t a time-feasible option, I left the hallway as is.
- Another problem I ran into was with drawing Dali’s clock. While I achieved the effect that I wanted with the clock hands, I cannot say the same for the circular frame of the clock. I wanted the bottom half of the clock to stretch downwards in a wavy shape so it would resemble Dali’s clocks, but I could not figure out how to achieve that effect. I tried asking large language models like ChatGPT and Claude to help with this but their attempts failed quite horrendously. Finally, I settled for the next best thing and just made the bottom part of the clock stretch downwards in a straight fashion. I did this using the following code:
if (angle > PI / 4 && angle < (3 * PI) / 4) {
  py += map(sin(angle), 0, 1, 0, this.meltAmount);
}
The if condition selects only the lower arc of the circle. map(sin(angle), 0, 1, 0, this.meltAmount) converts the gradient gotten from sin(angle) into a vertical offset that increases toward the bottom of the circle. So basically, the value returned by sin(angle) in the range 0-1 is mapped proportionally to a value in the range of 0- the melting amount value set by me, and by doing py += , I am able to pull the y-coordinate downwards.
- Figuring out the ideas for each room. It took some time, but here’s the reason each room has what it has:
- Room 1: Clocks and the sound of a ticking clock just makes me really uncomfortable, a room full of them is just terrible.
- Room 2: Self-explanatory.
- Room 3: Needle-in-a-haystack kind of a situation. I grew up hearing this phrase a lot, and I don’t like it.
- Room 4: I hate the feeling of disorientation. I wanted people to go through a similar feeling but making them deal with a reversed cursor.
- Room 5: I think there are some sounds that make you want to pull your hair out. I made sure they’re all in this one room.
- Room 6: The idea of being watched all the time is so uncomfortable.
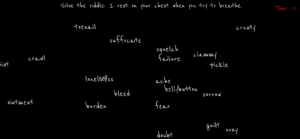
- Room 7: Some words in the English language just feel so wrong. I thought a collection of them floating around in a one place would be nice.
- Room 8: This room was technically to give people a break. So while they can relax and watch rain pouring for 15 seconds, that last 5 seconds the rain turns red, and I think red rain definitely doesn’t make anyone feel more comfortable.
Areas for improvement:
- A friend suggested this really cool idea for jumbling up the doors everytime someone returns back to the hallway. This would make the whole experience so much worse.
- Currently, the rooms aren’t manipulated by any kind of user input. What I mean by this is that yes the user interacts with the elements in the room, but it’s only through moving the cursor around or clicking. In the future, I would like to add more direct user interaction, such as user text input. I would also like to experiment with machine learning tools like computer vision and use the audience’s bodily movement or facial experiments as inputs.
- I purposely chose not to have background music that runs throughout the game, but I think if I really found the perfect music for the ambience I’m going for, I would be open to using it.
- In room 5, the sounds stop bluntly when crossing regions. In the future I would implement smooth crossfades, to create a more cohesive soundscape and reduce abruptness, which will make transitions feel intentional and less jarring.
