Week 11: Exercises – Shota and Isabella

EXERCISE 01: ARDUINO TO P5 COMMUNICATION

Concept:

For the first exercise we used a photoresistor as an analog sensor on Arduino to make our ellipse shape move on the horizontal axis in p5. For our code, we adjust it so that with every touch on the photoresistor, the ellipse would move on the canvas.

VIDEO:

video1

Code we’re proud of:

When it comes to the first exercise, the part we are most proud of is the block of code that controls the x-position of the ellipse using the light sensor value from the Arduino. We read the sensor value through the serial port that is connected to the Arduino and map it from 0 to the width of the canvas so that it never goes out of the dimension of the screen.

//read the data coming to the port until the newline character
   let data = port.readUntil("\n");
   //if there is a data
   if (data.length > 0) {
     //convert the clean data into integer
     rValue = int(trim(data));


     //store data of left and right into msg
     let msg = left + "," + right + "\n";
     //send the msg back to the Arduino
     port.write(msg);
   }


   text("rValue = " + rValue, 20, 50);
 }


 //move xpos depending on the sensor value (max = 640)
 let xpos = map(rValue, 550, 900, 0, width);
 fill(0, 0, 255);
 ellipse(xpos, height / 2, 100, 50);


EXERCISE 02: P5 TO ARDUINO COMMUNICATION
Make something that controls the LED brightness from p5

Concept:

For the second exercise we used the createSlide function to create a slider on the canvas of p5. This way, every time we moved the slider to the right, the brightness of the LED on the Arduino would increase, and every time the slider was moved to the left, the brightness would decrease.

VIDEO:

video2

Code we’re proud of:

For the second exercise, this block of code combines what we learned during the class about p5.js (createSlider) and Arduino. Since we remembered using a slider to control a value or game score, we decided to use it to control the brightness of the LED. We take the slider value, store it in a variable called brightness, and send it to the Arduino through the serial port, as shown in the block of the code below.

//read the slider value
 brightnessValue = brightnessSlider.value();


 //if the port is open
 if (port.opened()) {
   //store the brightness value from the slider
   let msg = brightnessValue + "\n";
   //send it to Arduino
   port.write(msg);
 }


EXERCISE 03: BI-DIRECTIONAL COMMUNICATION

Concept:

For the third exercise, we made use of a potentiometer ( analog sensor ) on Arduino and a LED light, connecting it on the corresponding pins and then connecting Arduino UNO with P5. After adding the necessary codes on P5, we adjusted our “ball” so that every time it bounced against the floor, the LED would light up, and once it stopped bouncing the LED turned off. With the potentiometer, we were able to control the “wind”, causing the ball to be pushed from side to side, depending on the direction in which we turned the potentiometer.

VIDEO:

video3

Code we’re proud of:

For the third exercise, we’re proud of the block of code below. It basically captures the main objective of this exercise. When the ball reaches the ground and the LED state is 0, meaning the LED is currently off, we turn it on by sending a 1 to the Arduino through the serial port. It is simple but we needed to understand the basics of what is going on in the vectors. 

//if the ball reached the floor and the led is currently off
 if (isBounced && ledStatus === 0) {
   //turn the LED on
   port.write("1");
   //set the state to 1
   ledStatus = 1;
 }
 else if (!isBounced && ledStatus === 1) {
   //turn the led off
   port.write("0");
   ledState = 0;
 }


Challenges and Further Improvements:

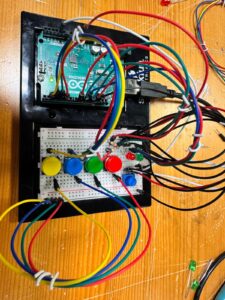
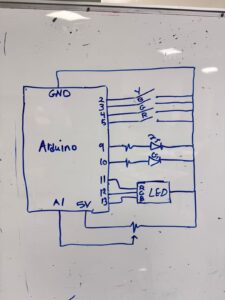
Fortunately, we were able to complete all the assignments successfully, and managed to achieve all the necessary responses of P5 and Arduino. For each exercise, we started by planning out which tools we would use, how to arrange them on our breadboard, and once this was done, our greatest challenges consisted of arranging and adding the codes required to make each response function. On the third assignment we especially struggled writing the codes required to make the potentiometer affect the “wind” and consequently the direction in which the ball was pushed. For future improvements, we would like to grasp a better understanding of the exchanges between P5 and Arduino in order to make more complex and interactive responses that can also satisfy the assignment’s requirements.


Github Link:

exercise1 Arduino

exercise1 p5

exercise2 arduino

exercise2 p5

exercise3 arduino

exercise3 p5

Reference:

We used ChatGPT to help us understand the bouncing ball template code since we hadn’t yet learned about the vector library in class. After understanding the foundation of it, we were able to integrate the isBounced logic into the template code to detect whether the ball was bouncing or not. Thus, we’re glad we were able to learn a lot about vectors library. We also used ChatGPT to learn about DOM library methods such as .position() and .style(). Although we had covered the basics of createSlider, we didn’t delve deeper into it during the class, so we needed to learn how to adjust its position and CSS styling of the ball.

Week 11 Reading Reflection

This week’s article made me see things in a new way. It used eyeglasses as its main example. Glasses are a medical tool, but they are also fashion items. The article asks why other aids, like hearing aids, can’t be the same. I had never really thought about it before, but it’s true. It feels like a failure that we treat these items so differently.

This made me think about how design makes people feel. When a device looks cold and medical, it can make a person feel like they are just a “patient” or that their needs are something to hide. The article shows that making these items beautiful or cool is not silly. It’s actually very important for giving people dignity and choice. It changes the focus from “fixing a problem” to just “living a life.”

Finally, the most interesting point was that this is a two-way street. Designing for disability can actually spark amazing new ideas for everyone. When designers have to solve a specific problem, it can lead to a brand new way of thinking. This means design for disability isn’t a small or separate thing; it’s a source of creativity that can make all design better.

Preliminary concept for Final Project

For my final project, I will design an interactive healthy-choice game using both Arduino and p5.js. The game features a Kazakh girl character positioned at the bottom of the screen while different items fall from the top. The healthy items, apples, dates, milk, and water are foods and drinks that people commonly consume in Kazakhstan, making the game culturally relevant and grounded in everyday life. These are contrasted with less healthy options such as burgers and Coca-Cola.

The game progresses in two alternating phases. In the first phase, apples, dates, and burgers fall from the sky. The player must collect apples and dates while avoiding burgers. After a set period, the game switches to a second phase, where milk, water, and Coca-Cola fall. In this phase, the player should collect milk and water while avoiding Coca-Cola. Each healthy item increases the score: apples give 20 points, dates 10, milk 20, and water 10. The player starts with three lives and loses one whenever they collide with an unhealthy item. When all lives are lost, the game ends, and p5 displays the final score.

Arduino provides the physical interaction through three buttons: one for start/restart and two for moving left and right. Arduino continuously senses button presses and sends serial messages to p5.js, which updates movement, animations, and game states.

Week 11 – Reading Reflection

This reading made me rethink how much design pretends to care about “everyone” while actually designing for some imaginary default person. The whole debate about hiding versus showing assistive devices hit me the most. The hearing aid example frustrated me. It reminded me of how often people, including me at times, feel pressured to tone themselves down just to blend in. Seeing designers hide assistive devices made that pressure feel even more obvious. If a device supports someone’s life, why shouldn’t it be allowed to exist proudly?

I liked how the reading returned to the idea that objects carry identity. Even in my IM projects, I can feel that tension between making something perfectly sleek or letting it look like something I actually touched. My work always ends up somewhere in the middle: functional, but still a little sentimental, a little messy, a little me.

The idea of bringing artists and fashion designers into accessibility design made complete sense. It made assistive tech feel less like “equipment” and more like something that can match someone’s personality. A prosthetic can be a tool, but it can also be a statement. A hearing aid can be medical, but it can also be stylish. That’s the kind of design I actually care about: things that work, but also let people feel like themselves.

Week 11 – 3 Exercises

The 3 tasks we worked on were practice on how to make both Arduino and P5j work together.

Group: Deema Al Zoubi and Rawan Al Ali 

Exercise 1 :

let connectButton;
let port;
let reader;
let sensorValue = 0;
let keepReading = false;

function setup() {
  createCanvas(600, 400);

  // Create a connect button 
  connectButton = createButton('Connect to Arduino');
  connectButton.position(10, 10);
  connectButton.mousePressed(connectSerial);

  textAlign(CENTER, CENTER);
  textSize(14);
}

async function connectSerial() {
  // If already connected, close first
  if (port && port.readable) {
    await closeSerial();
    connectButton.html('Connect to Arduino');
    return;
  }

  try {
  
    port = await navigator.serial.requestPort();
    await port.open({ baudRate: 9600 });

    console.log('Port opened', port);
    connectButton.html('Disconnect');

    const decoder = new TextDecoderStream();
    // Pipe the readable stream from the port to the decoder
    port.readable.pipeTo(decoder.writable);
    reader = decoder.readable.getReader();

    keepReading = true;
    readLoop(); // start read loop
  } catch (err) {
    console.error('Error opening serial port:', err);
    alert('Could not open serial port. Make sure your device is connected and try again.');
  }
}

async function closeSerial() {
  keepReading = false;
  try {
    if (reader) {
      await reader.cancel();
      reader.releaseLock();
      reader = null;
    }
    if (port && port.close) {
      await port.close();
      console.log('Port closed');
    }
    port = null;
  } catch (err) {
    console.warn('Error closing port:', err);
  }
}

async function readLoop() {
  let partial = '';
  try {
    while (keepReading && reader) {
      const { value, done } = await reader.read();
      if (done) {
        console.log('Reader closed');
        break;
      }
      if (!value) continue;

      // split by newline
      partial += value;
      let lines = partial.split(/\r?\n/);
      // Keep the last partial line in buffer
      partial = lines.pop();

      for (let line of lines) {
        line = line.trim();
        if (line === '') continue;        
        const num = parseInt(line, 10);
        if (!Number.isNaN(num)) {
          // clamp to expected range in case of weird data
          sensorValue = Math.max(0, Math.min(1023, num));
          console.log('sensorValue:', sensorValue);
        } else {
          console.log('non-numeric line ignored:', line);
        }
      }
    }
  } catch (err) {
    console.error('Read loop error:', err);
  }
}

function draw() {
  background(240);

  let x = map(sensorValue, 0, 1023, 25, width - 25);
  fill(100, 150, 240);
  ellipse(x, height / 2, 50, 50);
}
window.addEventListener('beforeunload', async (e) => {
  if (port && port.readable) {
    await closeSerial();
  }
});

We used one sensor (a potentiometer) on the Arduino to control the horizontal position of an ellipse in p5.js. The ellipse stayed in the middle of the screen vertically, and all movement was controlled by the Arduino sensor, p5 didn’t send any commands to Arduino.

Video 1: IMG_1012

Schematic 1:


Exercise 2:

let connectButton;
let port;
let writer;
let slider;

let targetBrightness = 0;
let currentBrightness = 0;

function setup() {
  createCanvas(400, 200);

  connectButton = createButton("Connect to Arduino");
  connectButton.position(10, 10);
  connectButton.mousePressed(connectSerial);

  slider = createSlider(0, 255, 0);
  slider.position(10, 60);
  slider.style('width', '300px');

  textSize(16);
}

async function connectSerial() {
  try {
    port = await navigator.serial.requestPort();
    await port.open({ baudRate: 9600 });
    writer = port.writable.getWriter();
    connectButton.html("Connected");
  } catch (err) {
    console.error("Connection error:", err);
  }
}

function draw() {
  background(230);

  // Slider sets the target brightness
  targetBrightness = slider.value();

  // Gradually move toward target (both up and down)
currentBrightness = lerp(currentBrightness, targetBrightness, 0.15);

  // Snap to 0/255 when very close so it truly turns off/on
  if (abs(currentBrightness - targetBrightness) < 1) {
    currentBrightness = targetBrightness;
  }

  fill(0);
  text("LED Brightness: " + int(currentBrightness), 10, 110);

  // Send brightness
  if (writer) {
    writer.write(new Uint8Array([int(currentBrightness)]));
  }
}

We created a slider in p5.js to control the brightness of an LED connected to the Arduino. Moving the slider to the right gradually increased the LED brightness, and moving it back to the left gradually turned it off.

Video 2: https://intro.nyuadim.com/wp-content/uploads/2025/11/IMG_1030.mov

Schematic 2:


Exercise 3:

let velocity;
let gravity;
let position;
let acceleration;
let drag = 0.99;
let mass = 50;

let brightnessValue = 512; // potentiometer value (0–1023)
let ballDropped = false;
let ledOn = false;

let port, writer, reader;
let serialActive = false;
let serialBuffer = '';

function setup() {
  createCanvas(640, 360);
  textSize(18);

  position = createVector(width / 2, 0);
  velocity = createVector(0, 0);
  acceleration = createVector(0, 0);
  gravity = createVector(0, 0.2 * mass);

  // Connect button
  let btn = createButton("Connect to Arduino");
  btn.position(10, 10);
  btn.mousePressed(connectAndStart);
}

function draw() {
  background(255);

  // Show instructions before dropping ball
  fill(0);
  if (!ballDropped) {
    text("Press B to drop the ball", 20, 30);
    return; // stop here until ball is dropped
  }

  // Show serial status
  if (serialActive) {
    text("Connected", 20, 30);
    text(`Potentiometer: ${brightnessValue}`, 20, 50);
  } else {
    text("Serial Port Not Connected", 20, 30);
  }

  // Apply gravity
  velocity.y += gravity;
  velocity.y *= drag;

  // Horizontal control from potentiometer
  let windX = map(brightnessValue, 0, 1023, -2, 2);
  velocity.x = windX;

  position.add(velocity);

  // Bounce on floor
  if (position.y >= height - mass / 2) {
    position.y = height - mass / 2;
    velocity.y *= -0.9;

    // Flash LED
    if (serialActive && !ledOn) {
      writeSerial("F");
      ledOn = true;
    }
  } else if (ledOn) {
    ledOn = false;
  }

  // Bounce on top
  if (position.y - mass / 2 < 0) {
    position.y = mass / 2;
    velocity.y *= -0.9;
  }

  // Keep ball inside canvas horizontally
  position.x = constrain(position.x, mass / 2, width - mass / 2);

  // Draw ball
  fill(100, 150, 240);
  ellipse(position.x, position.y, mass, mass);
}

function applyForce(force) {
  let f = p5.Vector.div(force, mass);
  acceleration.add(f);
}

function keyPressed() {
  if (key == "B" || key == "b") dropBall();
}

function dropBall() {
  position.set(width / 2, 0);
  velocity.set(0, 0);
  mass = 50;
  gravity = 0.05 * mass;
  ballDropped = true;
}

// Serial functions
async function connectAndStart() {
  try {
    port = await navigator.serial.requestPort();
    await port.open({ baudRate: 9600 });

    writer = port.writable.getWriter();

    const decoder = new TextDecoderStream();
    port.readable.pipeTo(decoder.writable);
    reader = decoder.readable.getReader();

    serialActive = true;

    // Start reading
    readLoop();
  } catch (err) {
    console.error("Serial error:", err);
  }
}

async function readLoop() {
  while (serialActive && reader) {
    const { value, done } = await reader.read();
    if (done) break;
    if (value) parseSerial(value);
  }
}

function writeSerial(msg) {
  if (writer) writer.write(new TextEncoder().encode(msg + "\n"));
}

function parseSerial(data) {
  serialBuffer += data;
  let lines = serialBuffer.split('\n');
  serialBuffer = lines.pop();

  for (let line of lines) {
    let val = parseInt(line.trim());
    if (!isNaN(val)) brightnessValue = val;
  }
}

We made the ball bounce continuously up and down in p5.js, and connected an LED on the Arduino that lights up briefly every time the ball hits the floor. A potentiometer on the Arduino was used to control the horizontal movement of the ball: turning the knob to higher values moves the ball to the right, and lower values move it to the left. The potentiometer’s outer pins were connected to 5V and GND, and the middle pin to A0. Using Web Serial, we read the potentiometer values in p5 and mapped them to the horizontal position of the ball while it keeps bouncing.

Video 3: IMG_1030

Schematic 3:

Reflection: 

These exercises helped us understand how p5.js and Arduino can work together. We saw that Arduino can send real-world sensor data, like potentiometer values, to p5 to control visuals or simulations, and that p5 can also send commands back to Arduino, like turning an LED on or off. This gave us a clear idea of how much influence p5 can have on Arduino outputs, and how Arduino inputs can drive digital interactions in p5. Practicing this will be really useful for our final project, as it shows how to combine physical sensors, real-time controls, and visual feedback in a simple interactive system.


3 exercises – Week 11

The 3 tasks we worked on were practice on how to make both Arduino and P5j work together.

Group: Deema Al Zoubi and Rawan Al Ali 

Exercise 1 :

let connectButton;
let port;
let reader;
let sensorValue = 0;
let keepReading = false;

function setup() {
  createCanvas(600, 400);

  // Create a connect button 
  connectButton = createButton('Connect to Arduino');
  connectButton.position(10, 10);
  connectButton.mousePressed(connectSerial);

  textAlign(CENTER, CENTER);
  textSize(14);
}

async function connectSerial() {
  // If already connected, close first
  if (port && port.readable) {
    await closeSerial();
    connectButton.html('Connect to Arduino');
    return;
  }

  try {
  
    port = await navigator.serial.requestPort();
    await port.open({ baudRate: 9600 });

    console.log('Port opened', port);
    connectButton.html('Disconnect');

    const decoder = new TextDecoderStream();
    // Pipe the readable stream from the port to the decoder
    port.readable.pipeTo(decoder.writable);
    reader = decoder.readable.getReader();

    keepReading = true;
    readLoop(); // start read loop
  } catch (err) {
    console.error('Error opening serial port:', err);
    alert('Could not open serial port. Make sure your device is connected and try again.');
  }
}

async function closeSerial() {
  keepReading = false;
  try {
    if (reader) {
      await reader.cancel();
      reader.releaseLock();
      reader = null;
    }
    if (port && port.close) {
      await port.close();
      console.log('Port closed');
    }
    port = null;
  } catch (err) {
    console.warn('Error closing port:', err);
  }
}

async function readLoop() {
  let partial = '';
  try {
    while (keepReading && reader) {
      const { value, done } = await reader.read();
      if (done) {
        console.log('Reader closed');
        break;
      }
      if (!value) continue;

      // split by newline
      partial += value;
      let lines = partial.split(/\r?\n/);
      // Keep the last partial line in buffer
      partial = lines.pop();

      for (let line of lines) {
        line = line.trim();
        if (line === '') continue;        
        const num = parseInt(line, 10);
        if (!Number.isNaN(num)) {
          // clamp to expected range in case of weird data
          sensorValue = Math.max(0, Math.min(1023, num));
          console.log('sensorValue:', sensorValue);
        } else {
          console.log('non-numeric line ignored:', line);
        }
      }
    }
  } catch (err) {
    console.error('Read loop error:', err);
  }
}

function draw() {
  background(240);

  let x = map(sensorValue, 0, 1023, 25, width - 25);
  fill(100, 150, 240);
  ellipse(x, height / 2, 50, 50);
}
window.addEventListener('beforeunload', async (e) => {
  if (port && port.readable) {
    await closeSerial();
  }
});
void setup() {
  Serial.begin(9600);
}

void loop() {
  int sensorValue = analogRead(A0);
  Serial.println(sensorValue);
  delay(50); // ~20Hz
}

We used one sensor (a potentiometer) on the Arduino to control the horizontal position of an ellipse in p5.js. The ellipse stayed in the middle of the screen vertically, and all movement was controlled by the Arduino sensor, p5 didn’t send any commands to Arduino.

Video 1: IMG_1012

Schematic 1:

Exercise 2:

let connectButton;
let port;
let writer;
let slider;

let targetBrightness = 0;
let currentBrightness = 0;

function setup() {
  createCanvas(400, 200);

  connectButton = createButton("Connect to Arduino");
  connectButton.position(10, 10);
  connectButton.mousePressed(connectSerial);

  slider = createSlider(0, 255, 0);
  slider.position(10, 60);
  slider.style('width', '300px');

  textSize(16);
}

async function connectSerial() {
  try {
    port = await navigator.serial.requestPort();
    await port.open({ baudRate: 9600 });
    writer = port.writable.getWriter();
    connectButton.html("Connected");
  } catch (err) {
    console.error("Connection error:", err);
  }
}

function draw() {
  background(230);

  // Slider sets the target brightness
  targetBrightness = slider.value();

  // Gradually move toward target (both up and down)
currentBrightness = lerp(currentBrightness, targetBrightness, 0.15);

  // Snap to 0/255 when very close so it truly turns off/on
  if (abs(currentBrightness - targetBrightness) < 1) {
    currentBrightness = targetBrightness;
  }

  fill(0);
  text("LED Brightness: " + int(currentBrightness), 10, 110);

  // Send brightness
  if (writer) {
    writer.write(new Uint8Array([int(currentBrightness)]));
  }
}
int ledPin = 9; // LED connected to PWM pin 9
int value = 0;  // variable to store incoming brightness

void setup() {
  pinMode(ledPin, OUTPUT);
  Serial.begin(9600); // match the baud rate in p5
}

void loop() {
  if (Serial.available() > 0) {
    // read incoming string until newline
    String data = Serial.readStringUntil('\n');
    data.trim(); // remove whitespace
    if (data.length() > 0) {
      value = data.toInt();          // convert to integer
      value = constrain(value, 0, 255); // keep within PWM range
      analogWrite(ledPin, value);   // set LED brightness
    }
  }
}

We created a slider in p5.js to control the brightness of an LED connected to the Arduino. Moving the slider to the right gradually increased the LED brightness, and moving it back to the left gradually turned it off.

Video 2: https://intro.nyuadim.com/wp-content/uploads/2025/11/IMG_1030.mov

Schematic 2:

Exercise 3:

let velocity;
let gravity;
let position;
let acceleration;
let drag = 0.99;
let mass = 50;

let brightnessValue = 512; // potentiometer value (0–1023)
let ballDropped = false;
let ledOn = false;

let port, writer, reader;
let serialActive = false;
let serialBuffer = '';

function setup() {
  createCanvas(640, 360);
  textSize(18);

  position = createVector(width / 2, 0);
  velocity = createVector(0, 0);
  acceleration = createVector(0, 0);
  gravity = createVector(0, 0.2 * mass);

  // Connect button
  let btn = createButton("Connect to Arduino");
  btn.position(10, 10);
  btn.mousePressed(connectAndStart);
}

function draw() {
  background(255);

  // Show instructions before dropping ball
  fill(0);
  if (!ballDropped) {
    text("Press B to drop the ball", 20, 30);
    return; // stop here until ball is dropped
  }

  // Show serial status
  if (serialActive) {
    text("Connected", 20, 30);
    text(`Potentiometer: ${brightnessValue}`, 20, 50);
  } else {
    text("Serial Port Not Connected", 20, 30);
  }

  // Apply gravity
  velocity.y += gravity;
  velocity.y *= drag;

  // Horizontal control from potentiometer
  let windX = map(brightnessValue, 0, 1023, -2, 2);
  velocity.x = windX;

  position.add(velocity);

  // Bounce on floor
  if (position.y >= height - mass / 2) {
    position.y = height - mass / 2;
    velocity.y *= -0.9;

    // Flash LED
    if (serialActive && !ledOn) {
      writeSerial("F");
      ledOn = true;
    }
  } else if (ledOn) {
    ledOn = false;
  }

  // Bounce on top
  if (position.y - mass / 2 < 0) {
    position.y = mass / 2;
    velocity.y *= -0.9;
  }

  // Keep ball inside canvas horizontally
  position.x = constrain(position.x, mass / 2, width - mass / 2);

  // Draw ball
  fill(100, 150, 240);
  ellipse(position.x, position.y, mass, mass);
}

function applyForce(force) {
  let f = p5.Vector.div(force, mass);
  acceleration.add(f);
}

function keyPressed() {
  if (key == "B" || key == "b") dropBall();
}

function dropBall() {
  position.set(width / 2, 0);
  velocity.set(0, 0);
  mass = 50;
  gravity = 0.05 * mass;
  ballDropped = true;
}

// Serial functions
async function connectAndStart() {
  try {
    port = await navigator.serial.requestPort();
    await port.open({ baudRate: 9600 });

    writer = port.writable.getWriter();

    const decoder = new TextDecoderStream();
    port.readable.pipeTo(decoder.writable);
    reader = decoder.readable.getReader();

    serialActive = true;

    // Start reading
    readLoop();
  } catch (err) {
    console.error("Serial error:", err);
  }
}

async function readLoop() {
  while (serialActive && reader) {
    const { value, done } = await reader.read();
    if (done) break;
    if (value) parseSerial(value);
  }
}

function writeSerial(msg) {
  if (writer) writer.write(new TextEncoder().encode(msg + "\n"));
}

function parseSerial(data) {
  serialBuffer += data;
  let lines = serialBuffer.split('\n');
  serialBuffer = lines.pop();

  for (let line of lines) {
    let val = parseInt(line.trim());
    if (!isNaN(val)) brightnessValue = val;
  }
}
int ledPin = 9; // LED connected to pin 9
int potPin = A0; // potentiometer connected to A0
int potValue = 0; 

void setup() {
  pinMode(ledPin, OUTPUT);
  Serial.begin(9600); // match baud rate with p5.js
}

void loop() {
  // Read potentiometer (optional if p5 reads directly)
  potValue = analogRead(potPin);
  Serial.println(potValue); // send to p5 for horizontal control

  // Check for serial input from p5
  if (Serial.available() > 0) {
    char command = Serial.read(); // read single character
    if (command == 'F') {        // 'F' = flash LED
      digitalWrite(ledPin, HIGH);
      delay(100);                // keep LED on briefly
      digitalWrite(ledPin, LOW);
    }
  }
  
  delay(10); // small delay for stability
}

We made the ball bounce continuously up and down in p5.js, and connected an LED on the Arduino that lights up briefly every time the ball hits the floor. A potentiometer on the Arduino was used to control the horizontal movement of the ball: turning the knob to higher values moves the ball to the right, and lower values move it to the left. The potentiometer’s outer pins were connected to 5V and GND, and the middle pin to A0. Using Web Serial, we read the potentiometer values in p5 and mapped them to the horizontal position of the ball while it keeps bouncing.

Video 3: IMG_1030

Schematic 3:

Reflection: 

These exercises helped us understand how p5.js and Arduino can work together. We saw that Arduino can send real-world sensor data, like potentiometer values, to p5 to control visuals or simulations, and that p5 can also send commands back to Arduino, like turning an LED on or off. This gave us a clear idea of how much influence p5 can have on Arduino outputs, and how Arduino inputs can drive digital interactions in p5. Practicing this will be really useful for our final project, as it shows how to combine physical sensors, real-time controls, and visual feedback in a simple interactive system.

Reading Reflection — Week 11

After reading Design Meets Disability, I noticed how it sheds light on an ongoing issue with how society views disabilities. The author explains how when design and disability meet, the outcome is always the most intricate and interesting. It’s an opportunity for designers to test out their skills in both creativity and functionality.

I loved the section where he criticizes designers for making many assistive technology (AT) devices, like hearing aids and prosthetics, hidden. I also believe that disabilities should not be shamed, but embraced. By prioritizing the concealment of these devices, we are discouraging disabled individuals rather than empowering them, making them feel like outsiders instead of supporting them. By making AT more visible and beautifully designed, I believe designers can help change how people perceive disabilities.

The idea to bring engineers and designers together (‘solving’ and ‘exploring’) to create AT devices is brilliant because the result will be assistive technologies that are both useful and inspiring. I also think designers will be very useful in coming up with a comfortable device for users, since they’ll be wearing or using them all day (sometimes all night).

I absolutely agree with the enforcement of universal design, meaning designing products that are usable by as many people as possible, which of course also includes people with disabilities. The author mentions that rather than making a device for a very specific disability only, we could make devices with designs that are simple enough to be broadly adapted but smart enough to serve people with different needs. Overall, I believe this approach to design makes devices more accessible and more human.

Week 11 – Group Exercises

Group Members: Joy, Yiyang

(Arduino codes are commented in the bottom of p5 links)

1. Make something that uses only one sensor on Arduino and makes the ellipse in p5 move on the horizontal axis, in the middle of the screen, and nothing on arduino is controlled by p5

p5 & Arduino Code: https://editor.p5js.org/joyzheng/sketches/63Yg60k8D
Video Demonstrative: IMG_9638

2. Make something that controls the LED brightness from p5

p5 & Arduino Code: https://editor.p5js.org/yiyang/sketches/dtftbIzaK

3. take the gravity wind example and make it so every time the ball bounces one led lights up and then turns off, and you can control the wind from one analog sensor

p5 & Arduino Code: https://editor.p5js.org/joyzheng/sketches/v77Sd41K4
Video Demonstrative: IMG_9640

Week 11: final project idea

For my final project, I plan to build an interactive installation called “Discover Nepal: Interactive Cultural Storyboard.” The goal is to create a small tabletop experience that teaches people about Nepali culture, history, geography, and fun facts in a playful, visual way. The project will use both Arduino and p5.js and will function like a tiny museum exhibit about Nepal.

Physically, I will create a flat board or “map” of Nepal with five labeled zones: Mountains, Festivals, Music & Dance, Food, and History & Fun Facts. Each zone will be connected to an Arduino input using either pushbuttons or simple touch pads made from aluminum foil. I will also add a single knob (potentiometer) that lets the user scroll through multiple facts within a category. When the user touches or presses one of the zones, the Arduino will detect which category was selected and read the knob position, then send this information as serial data to a p5.js sketch running on my laptop.

In the p5 sketch, I will draw a stylized interface representing Nepal, with icons or scenes for each category. Based on the messages from the Arduino, p5 will highlight the active category, display a short piece of text (such as a fun fact about the Himalayas, a description of Dashain or Tihar, information about Nepali instruments or foods like momo and dal bhat, or a historical event), and play a short sound that matches the theme (wind in the mountains, festival bells, a madal rhythm, etc.). Turning the physical knob will move through different facts inside that category, so the user can explore more than one piece of information in each area.

This project satisfies the course requirements because it is a physically interactive system that relies on a multimedia computer for processing and display. The Arduino “listens” to the user’s physical actions on the board (pressing zones and turning the knob), and the p5.js program “thinks” by interpreting those inputs and deciding what cultural content to show. The system “speaks” back to the user through animated graphics, text, and sound. My intention is to make the interaction feel like a fun, hands-on way to discover Nepal’s culture and history, rather than just reading a static page of information.

Final Idea

I want to create an immersive experience with space. I want users to come to an empty canvas and use pressure sensors to add planets, meteors and stars. These stars can be added and let’s say we have a minimum of 5 stars, a star constellation will be created and can grow if the user adds more stars. These will be floating around or soaring by (meteors) and so it feels like you’re in space. I want to have a projector to project the P5 screen so users can really feel the grandeur of it.

The Interaction

I will have 8 stepping stones on the floor that when the user steps on them they do different things:

Star Makers (Stones 1, 4, 6):

  • Quick tap: Adds one small white star to that stone’s constellation
  • Each stone creates its own independent star collection
  • When 5 stars are placed, they automatically connect with glowing lines to form a constellation
  • Can expand up to 9 stars, making the constellation more intricate and complex
  • Three unique constellations can exist simultaneously in different regions of the sky

Planet Makers (Stones 2, 5, 7):

  • Hold for 3+ seconds: Materializes a planet in space
  • Random planet type appears: gas giants, ringed planets, rocky worlds, ice planets, or mysterious alien worlds
  • Planets drift randomly through space, floating past your constellations
  • Creates a living, breathing solar system

Meteor Makers (Stones 3, 8):

  • Quick tap: Shoots one meteor across the sky in a random direction
  • Hold for 3+ seconds: Triggers a meteor shower with 5 meteors streaking across space
  • Adds dynamic movement and excitement to the scene

Atmosphere Control (Potentiometer dial):

  • Physical dial near the stepping area
  • Controls both the visual intensity and audio volume
  • Low: Clear, minimal space with silence
  • High: Rich nebula clouds, cosmic dust, and immersive ambient soundscape
  • Gives users creative control over the mood of their universe

The Experience

Users approach a darkened floor projection showing empty space. As they explore the stepping stones, they discover they can build their own universe, star by star, constellation by constellation. The moment when 5 stars connect into a glowing constellation creates a magical sense of achievement. Planets drift through the creations, meteors streak across the sky, and the atmosphere can be dialed from stark and minimal to rich and dramatic.