Week 8 Reading Reflection – Attractive Things Work Better

I didn’t expect to agree so much with Don Norman when I first read Attractive Things Work Better. The title itself almost sounds like clickbait; it feels like he’s just saying “make things pretty.” But as I went through the reading, I realized he wasn’t talking about surface-level beauty at all. He was talking about how our emotions actually change the way we think and interact with design. One thing that really stuck with me was his story about the three teapots. He describes one that’s intentionally unusable (the “coffeepot for masochists”), another that’s kind of ugly but works well, and a third that’s beautifully designed and practical at the same time. It sounds funny at first, but it captures something real about how we connect with the things we use.

Norman also connects emotion and cognition in a way that made a lot of sense. He explains how positive affect (basically being in a good mood) helps people think more creatively and handle problems better, while negative affect makes us focus and think more carefully but also more rigidly. I liked his point that when people are relaxed or happy, they become more flexible, patient, and open-minded; they’re even more forgiving of little design flaws. That feels true in life too. When I’m in a good mood, I don’t mind if my phone glitches or my m1 macbook gets loud; but, as you can imagine, when I’m stressed, every small thing feels like a disaster. When something looks and feels good to use, it changes our attitude toward it; we engage more willingly and think more clearly. I liked how Norman ended by saying that good design balances beauty and usability. A product shouldn’t be just functional or just nice to look at; it should feel right to use.

Week 8 Reading Reflection – Her Code Got Humans on the Moon

Well, that photo of Margaret Hamilton standing next to a pile of papers taller than she is has always amazed me as a kid. I remember seeing it everywhere online when I was younger; it circulated a lot in the Arab world, on Facebook and Tumblr especially. People shared it with captions about how her code took humans to the moon. Even before I knew who she was, I could feel that the image meant something special–this one person beside a literal mountain of her own work.

After reading Her Code Got Humans on the Moon, I finally understood why that picture had such an impact. Hamilton wasn’t just part of the Apollo program; she helped define what software engineering even was. Back in the 1960s, people didn’t really think of “software” as an important part of space missions; it wasn’t even included in NASA’s original budgets. But Hamilton and her team at MIT’s Instrumentation Lab changed that. They wrote the code that ran on the Apollo spacecraft, and their work made it possible for Neil Armstrong and Buzz Aldrin to land safely on the moon. What struck me most in the reading was how she handled the pressure. There’s a part where she talks about staying up late to fix a single line of code because she was afraid it could cause an error during a mission. And later, that actually happened—an error almost caused chaos during Apollo 11, but because of how Hamilton had designed the software to prioritize important tasks, the system recovered and saved the mission. That’s insane to think about; one person’s attention to detail made the difference between failure and success.

I also liked how the reading mentioned her bringing her daughter, Lauren, to the lab on weekends. It was such a human detail—this image of a mother working on code that would go to space while her kid slept next to her. People back then questioned her for it, asking how she could leave her daughter to work, but she just did what she believed in. That kind of dedication hit me.

Week 8- Unusual Switches + Reading Reflection

Concept:

For this week’s assignment to create an unusual switch, I built a jaw-activated LED circuit that lights up a red LED when the user opens or closes their mouth. The switch consists of two contact plates that complete the circuit when pressed together.

To construct this, I repurposed old highlighter tubes and wood pieces to create a frame that holds the contact plates. I attached this frame to a headband, which positions the mechanism alongside the user’s jaw when worn. When the headband is in place and the wearer moves their jaw (opening or closing their mouth), the jaw movement pushes the contact plates together. This completes the circuit and activates the red LED.

The design essentially turns jaw movement into a hands-free switch – the mechanical motion of opening and closing your mouth becomes the trigger for the electronic circuit. The highlighter tubes and wood pieces work as the structural components that translate the jaw’s movement into the pressing motion needed to activate the switch.

Implementation:

My Arduino circuit uses two pushbuttons to control an LED. Each button is connected to digital pins 2 and 3 on the Arduino, with 10 kΩ pull-down resistors ensuring the inputs stay LOW when not pressed. When a button is pressed, it sends a HIGH signal to the Arduino, which then turns the LED connected to pin 13 ON through a 330 Ω resistor that limits current. The LED’s short leg is connected to ground, and the red and blue rails on the breadboard distribute 5 V and GND from the Arduino. The setup allows the LED to light up when either button is pressed, demonstrating how digital inputs and outputs can be used together to build simple interactive circuits.

Code:

const int button1Pin = 2;
const int button2Pin = 3;
const int ledPin = 13;

void setup() {
  pinMode(button1Pin, INPUT);
  pinMode(button2Pin, INPUT);
  pinMode(ledPin, OUTPUT);
}

void loop() {
  int button1State = digitalRead(button1Pin);
  int button2State = digitalRead(button2Pin);

  if (button1State == LOW || button2State == LOW) {
    digitalWrite(ledPin, HIGH);
  } else {
    digitalWrite(ledPin, LOW);
  }
}

This Arduino code controls an LED using two pushbuttons. It first defines constants for each pin: button 1 on pin 2, button 2 on pin 3, and the LED on pin 13. In the setup() function, pinMode() sets the two button pins as inputs so they can read signals, and the LED pin as an output so it can turn ON or OFF. In the loop(), the program continuously reads each button’s state using digitalRead(), storing the result in button1State and button2State. The if statement checks if either button is pressed (returns LOW because the circuit uses pull-down or pull-up logic depending on wiring). If one or both buttons are pressed, the LED turns ON with digitalWrite(ledPin, HIGH); if neither is pressed, it turns OFF with digitalWrite(ledPin, LOW). This creates a simple interactive system where pressing any button lights the LED.

DEMO:

IMG_8130


Reading Reflection:

Both readings tell a story about why good design literally saves lives. Margaret Hamilton was programming the Apollo missions in the 1960s, juggling motherhood with rocket science – bringing her 4-year-old daughter Lauren to MIT on weekends while she coded. One day, Lauren was playing with the simulator and accidentally crashed it by hitting P01, a program that wasn’t supposed to run during flight. Hamilton immediately thought “we need to protect against this,” but NASA shut her down: “We had been told many times that astronauts would not make any mistakes… They were trained to be perfect”. Because stressed-out humans hurtling through space in a tin can are definitely going to be perfect. Sure enough, during Apollo 8, astronaut Jim Lovell accidentally selected P01 and wiped out all their navigation data. Hamilton’s backup procedures saved the day, but the whole mess could’ve been avoided if NASA had listened to her in the first place about building in safeguards.

This is exactly what Don Norman talks about in his design article – you can’t just assume people won’t make mistakes, especially under pressure. He points out that “products designed for use under stress follow good human-centered design, for stress makes people less able to cope with difficulties and less flexible in their approach to problem solving.” Hamilton understood this intuitively. She knew that even brilliant, highly trained astronauts are still human. Norman also argues that “attractive things work better” because when we’re in a good mental state, we’re actually better at problem-solving – “positive affect makes people more tolerant of minor difficulties and more flexible and creative in finding solutions.” The flip side is that badly designed systems become even worse under stress. The Apollo story shows how one woman’s insistence on human-centered design – despite everyone telling her the users would be “perfect” – literally got humans to the moon and back safely.


Week 8 Reading Reflection – Her Code Got Humans on the Moon

After reading “Her Code Got Humans on the Moon—And Invented Software Itself” by Robert McMillan, what made the biggest impression on me was how much Margaret Hamilton thought about human error. I couldn’t get over how NASA brushed off her warning that an astronaut might make a simple mistake and run the wrong program. As humans, we’re bound to make mistakes, especially under pressure, and it’s always better to be safe than sorry. They told her it couldn’t happen because astronauts were “trained to be perfect.” Of course, during the Apollo 8 mission, the exact thing she predicted actually happened. Instead of blaming anyone, Hamilton treated it as proof that software should be built to handle mistakes. I found that amazing – she didn’t just write code; she designed systems that expected humans to make mistakes.

Her story made me think about how I use and create technology. I’ve gotten frustrated when an app crashes or rejects input that seems fine, but I rarely stop to consider all the thought and safeguards behind it. Hamilton’s approach – designing for human error – is the basis for how we handle mistakes in programming now, such as with try/except statements in Python or input validation. It made me realize that good software isn’t just about making things work; it’s about making sure they still work when people slip up.

Her persistence and foresight were inspiring. She didn’t just follow rules; she questioned assumptions, planned for the unexpected, and thought about people using her code. That’s the kind of thinking I want to carry into my own work with technology: designing not just for perfection, but for real humans.

Week 8 Reading Reflection – Norman, “Emotion & Design: Attractive things work better”

When reading Norman’s “Emotion & Design: Attractive Things Work Better,” it got me thinking differently about how emotions affect the way we interact with design. Before this, I mostly thought good design just meant something that works well and is easy and intuitive to use. But Norman made me realise that how we feel when using something really matters too. I found his idea of positive affect interesting – when we’re in a good mood, we become more creative and open to solving problems. I’ve noticed this myself when I’m working on projects; if I’m relaxed and enjoying the process, I tend to come up with better ideas and find solutions more easily.

What also stood out to me was Norman’s explanation of negative affect – how stress or anxiety can actually help us focus. I totally agree with that because whenever I’m taking an exam or working under pressure, that little bit of nervous energy pushes me to concentrate harder and think faster.

Overall, this reading changed how I see both design and emotion. Emotions don’t just influence how we feel about something – they shape how we use it. Some designs are made to make us feel good – to relax us, inspire creativity, or make things enjoyable. Others use a bit of tension or urgency, like alarms or deadlines in digital design, to grab our attention and help us focus. It’s interesting to realise that designers often plan for these emotions on purpose. Good design isn’t just about working well; it’s about understanding how people feel.

Week 8 – Unusual Switch

Concept

For my project, I used the HC-SR04 ultrasonic sensor, which measures distance by sending out a sound wave and timing how long it takes for the echo to bounce back. I used it to detect how close a person’s body is to the sensor. When the person is far (but not too far), a yellow LED lights up. When they get close, a red LED turns on instead. I chose these two colors to mimic a childhood game where the closer you got to a hidden object, the ‘warmer’ you were, so red represents ‘hot,’ and yellow means ‘warm.’

Here’s my wiring and a video of my circuit in action 🙂
https://drive.google.com/drive/folders/1kgAL550ryRCarylolh-Xjpr2KqJABRaU?usp=drive_link

and here’s my GitHub repository

 Code I’m Proud Of

long readDistance() {
 //low for clean start
 digitalWrite(trigPin, LOW);
 delayMicroseconds(2);
 digitalWrite(trigPin, HIGH);
 delayMicroseconds(10);
 digitalWrite(trigPin, LOW);
 long duration = pulseIn(echoPin, HIGH);
 //convert to cm
 //sound speed ≈ 343 m/s → 0.034 cm/µs.
 //div 2 cause roundtrip
 return duration * 0.034 / 2;
}

The part of my code I’m most proud of is the readDistance() function. Through it, I learned how the ultrasonic sensor actually works, sending a pulse, waiting for the echo, and then calculating distance using the speed of sound. I followed a YouTube tutorial to understand the basics, and then used ChatGPT to help debug the issues I ran into. I even got to use some of my physics knowledge to convert time into distance, which made it extra fun since it reminded me of things I had learned before.

Further Improvements

Sometimes the sensor glitches a bit, and I suspect it’s because of my wiring. The HC-SR04 usually needs female-to-male jumper wires to connect properly to the Arduino, but I had to improvise with what I had. Using the Serial Monitor really helped me check if the sensor readings were accurate, but I’d like to clean up my circuit and test again to make it more stable. With proper connections, I think the readings would be much smoother and more consistent.

Another improvement I’d like to try is turning this setup into a Morse code interpreter. Instead of just showing colors for ‘close’ and ‘far,’ I could make the distance readings represent dots and dashes, and then have an LCD screen display the translated message. It would make the project more interactive and add a creative twist while still keeping the hands-free concept. I think it’d be really satisfying to build something that turns simple movements into an actual form of communication.

Week 8 Unusual switch

Concept

Planning an unconventional switch in which we had to open and close a circuit like a switch without using our hands seemed extremely challenging. However, after some planning, and examining the material available in the IM lab, I set myself the goal of creating two bracelets that upon touching they would “close” the circuit. I have always been fascinated by jewelry, so I thought this would be a cute way of integrating the concept of accessories with the Arduino interactivity.

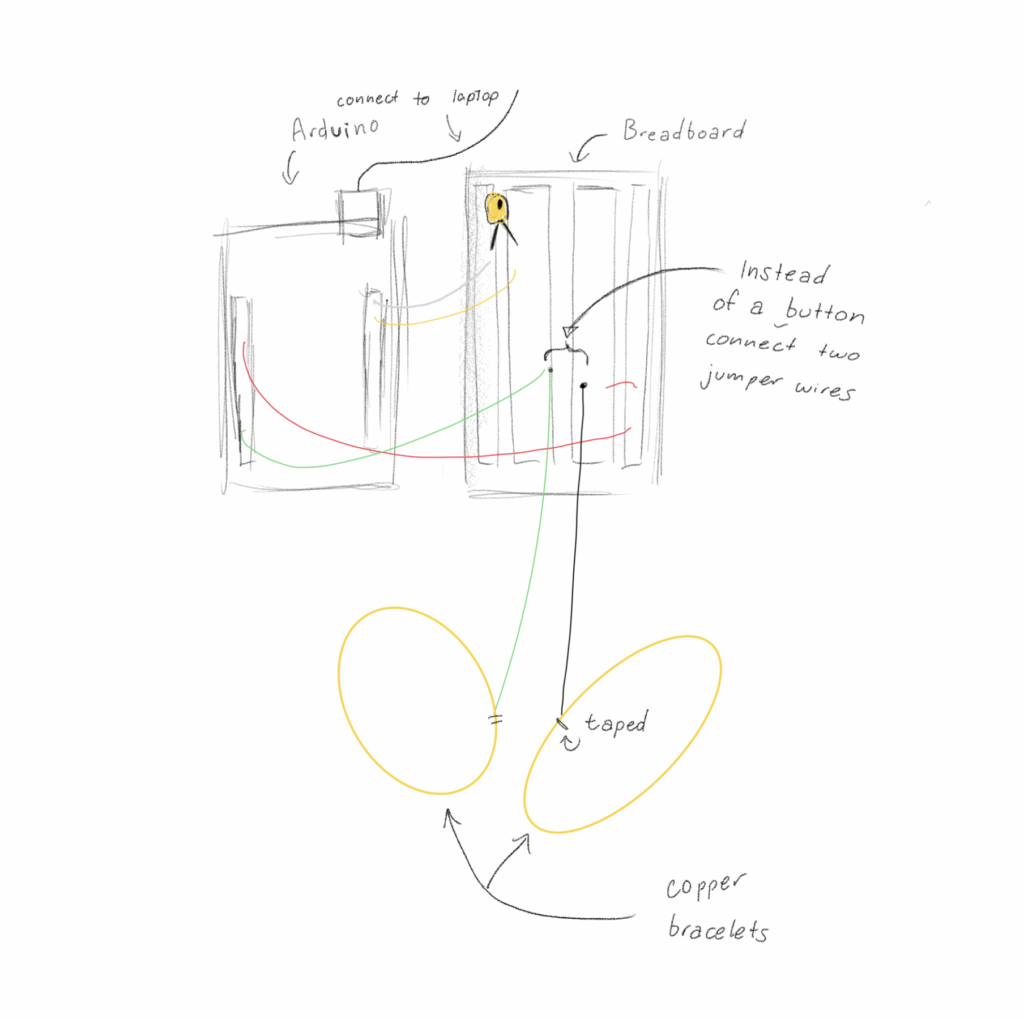
Circuit Illustration
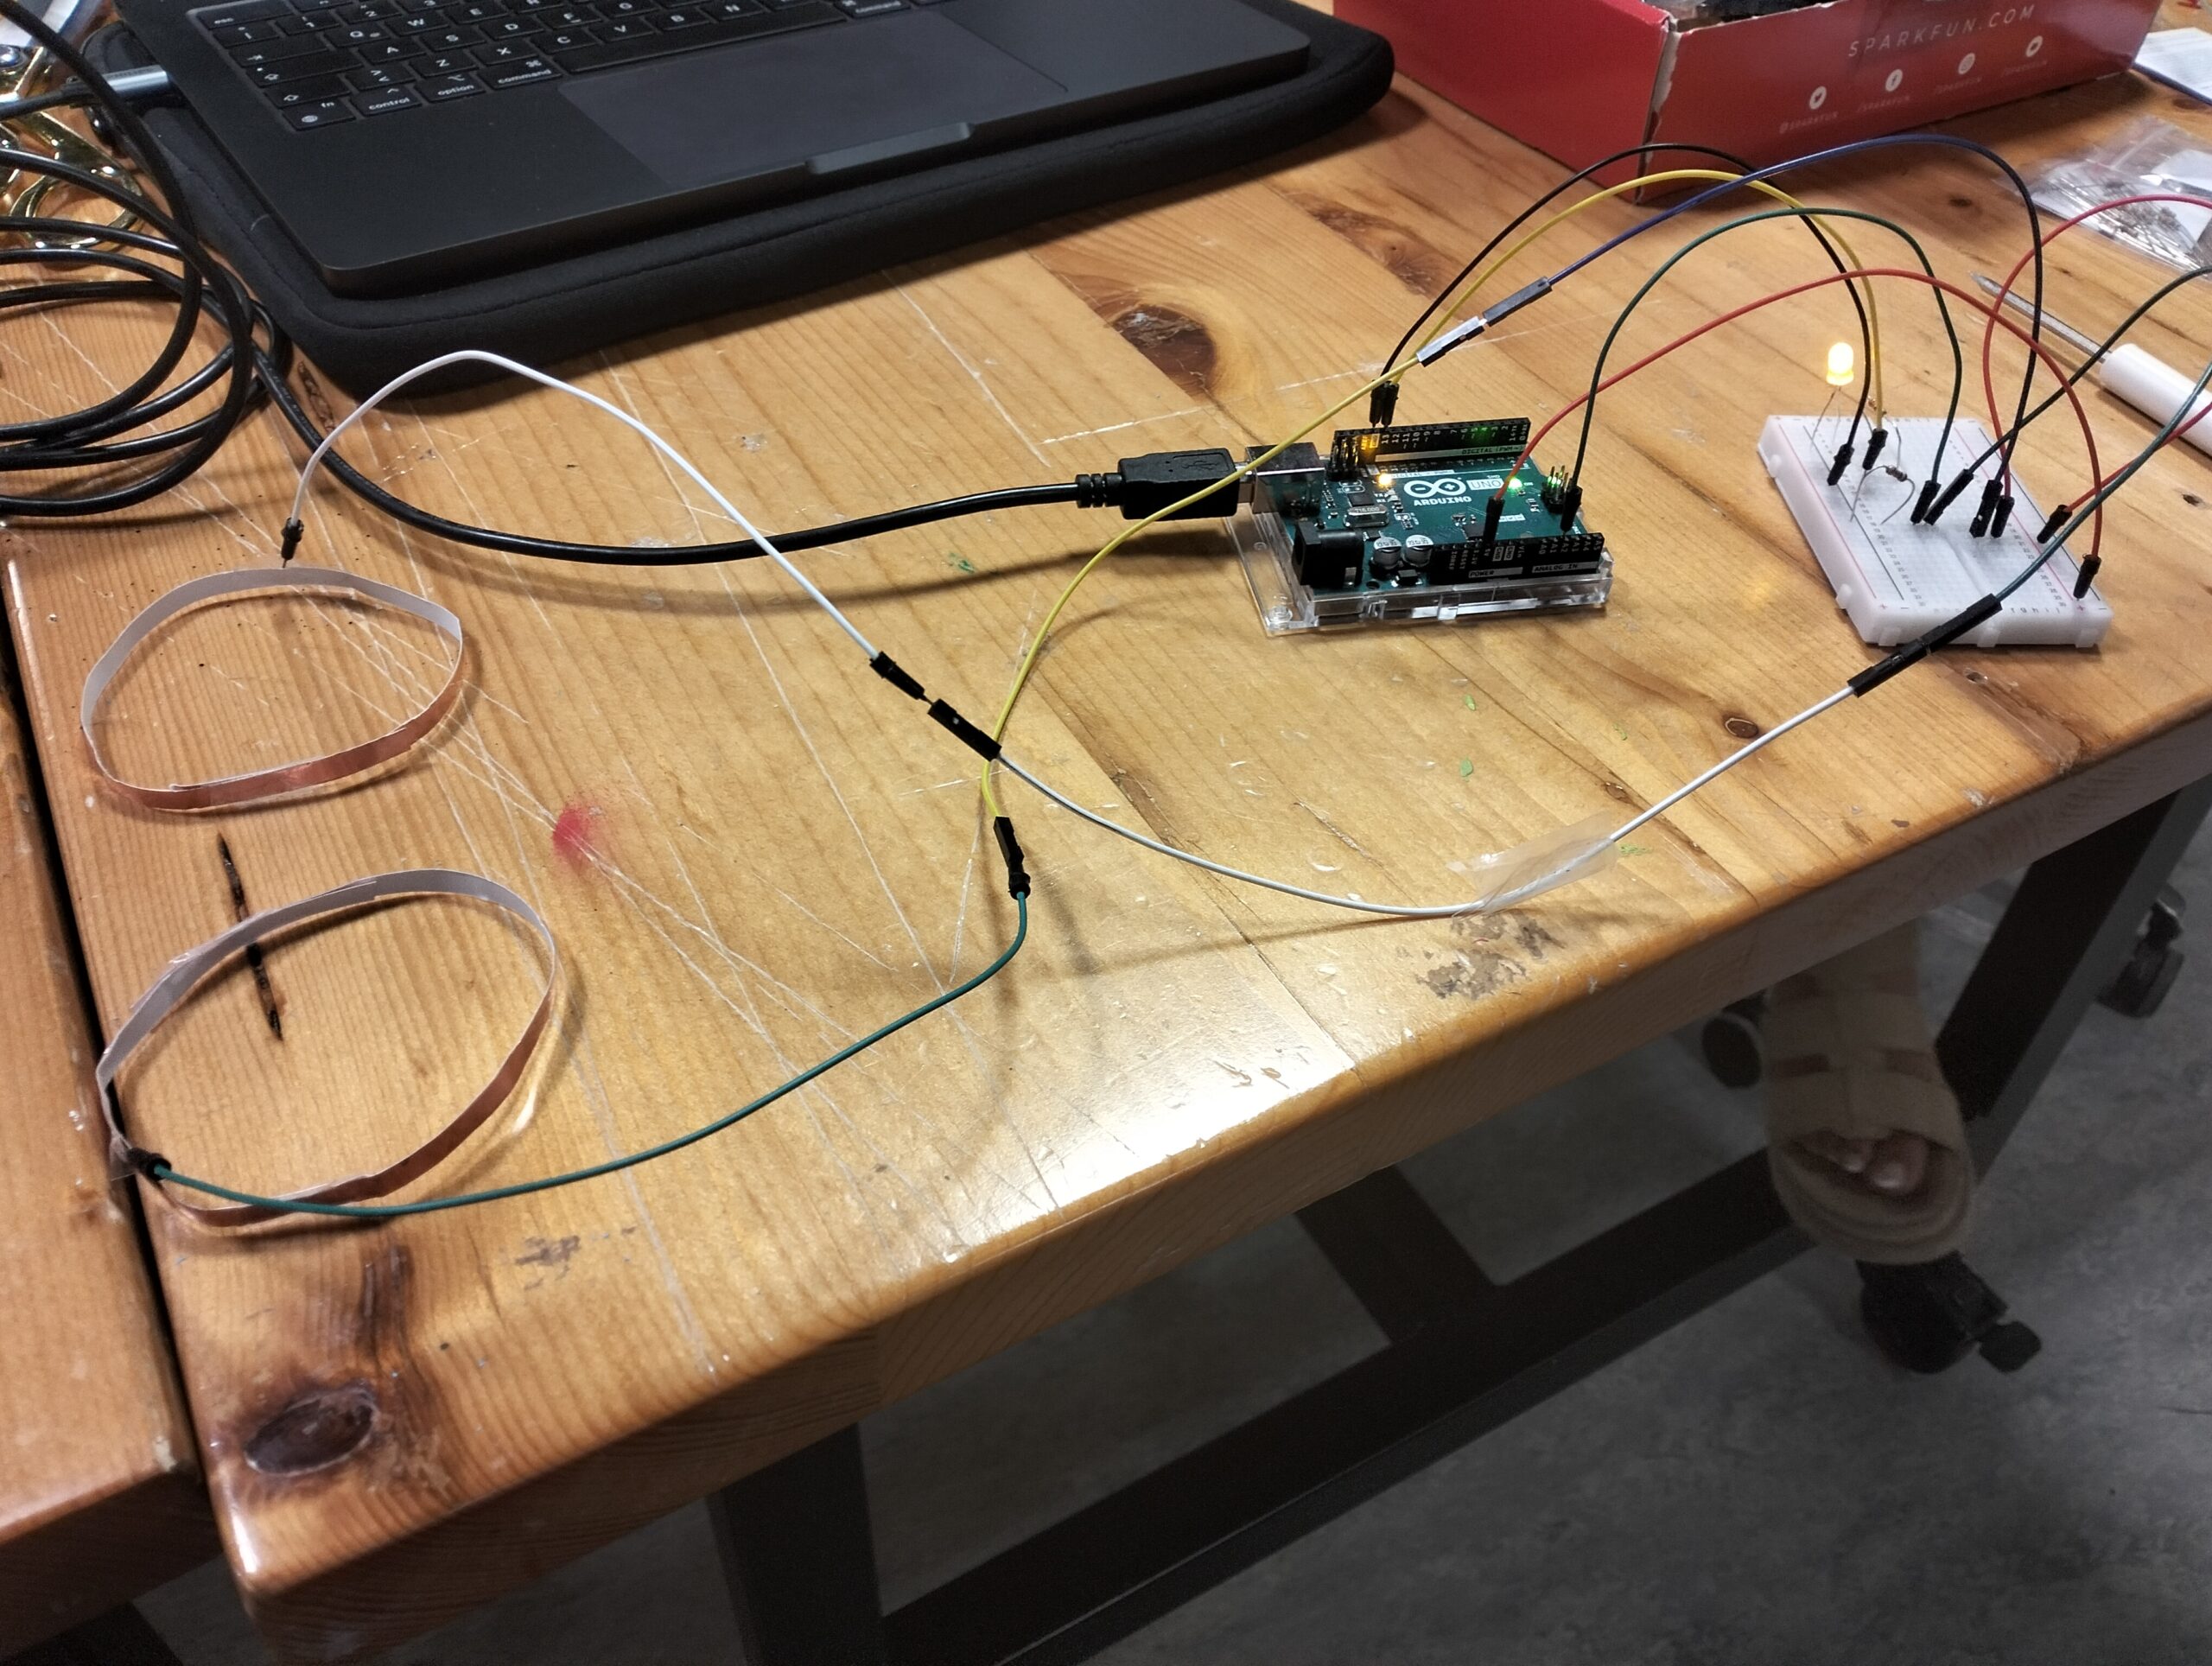
 

The part I struggled the most was finding a way of connecting bracelets to the breadboard and for them to react once they touched each other in response to the code in the digitalRead. After a long time of trial and error, I managed to make the LED light respond to the touch between the bracelets by inserting the jumper wires where the button would have been as we learned in class.

Final product

For the final result, every time the bracelets touched, by pressing my wrists together, the LED light would turn off. And when they were separated, the light would turn on.

Arduino code
void setup() {
  // put your setup code here, to run once:
pinMode(13,OUTPUT);
pinMode(A2,INPUT_PULLUP);

}

void loop() {
  int buttonState = digitalRead(A2);

  if(buttonState == LOW){         // button pressed
    digitalWrite(13, HIGH);
  } else {
    digitalWrite(13, LOW);
  }
}

GitHub PermaLink

https://github.com/imh9299-sudo/Intro-to-IM/blob/c27a407fe44541c3602992c664133ee011a63b8c/Assignment_8_Creative_Switch_copy_20251028080521.ino

Challenges and Further Improvements

One of the greatest challenges I faced happened while I tried to find the way of arranging the jumper wires and the wires connected to the copper bracelets so they would react on the LED light once they touched.

For my next project, I would like to make something more creative, and add some more responses such as making the lights blink or react to the movement of the wrists too.


Week 8 – Reading Reflection

Reading about Margaret Hamilton alongside Don Norman’s ideas made me reflect a lot on my own experiences as an IM major and CS minor. Hamilton’s work is astounding, not just in its technical brilliance, but in the stakes involved. I can’t imagine the pressure of knowing that a single error in your code could be catastrophic. That hit home for me when I thought back to my summer internship: I often felt anxious during functional testing, making sure that a feature actually worked before even thinking about optimizing it. Like Hamilton, I had to prioritize reliability over aesthetics at first, knowing that structure and efficiency could come later. Similarly, when working with Professor Moore on designing a robot extension, our creative vision for the robot was limited by its movements and what was functional, which was frustrating but also helped me come to the realization that function always had to come first.
Norman’s ideas about aesthetics and human experience made me notice the other side of this balance. I’ve realized that I learn better and retain information more effectively when it’s presented aesthetically, which is why I rewrite notes or design presentations carefully. I genuinely think it affects focus and engagement. Reflecting on Hamilton through Norman’s lens, I see that even in high-stakes work, there can be an “internal aesthetics” for the creator, like the satisfaction of elegantly structured, reliable code. This reading also made me think about how much balance is a part of my own work. I often want to implement my vision exactly, but my capabilities, time, and technical constraints sometimes get in the way. It can be frustrating, but I see now that navigating this tension, between function, reliability, and human experience, is a universal part of creating, whether you’re sending astronauts to the Moon or designing a robot extension. Hamilton’s example pushes me to aim for excellence under pressure, while Norman reminds me that design is also about how people, whether users or creators, experience the work.

Unusual Switch

Concept

For my unusual switch, I wanted to use a light sensor to create a simple “password” that isn’t typed or pressed in the usual way. Instead of a button, the user has to shine a flashlight on the sensor in a specific pattern to activate the LED. The idea is inspired by a morse-code style signal: the user must turn the light on for a set amount of time, then off for a set amount of time, and repeat this sequence to successfully trigger the switch. This makes the interaction more playful and unusual, relying on timing and attention rather than direct contact.

How it works

The project uses an LDR to detect light intensity and an LED as the output indicator. The Arduino reads the LDR value and compares it to a threshold to decide if the light is “on” or “off.” The user must follow the correct timing sequence: light on for three seconds, then off for three seconds, repeated three times. If the pattern is completed correctly, the green LED turns on for a few seconds to indicate success.

Github https://github.com/MohdAlkhatib/introtoim/blob/main/sketch.c

void loop() {
  int success = 0;

  for (int i = 0; i < 3; i++) {
    if (analogRead(ldrPin) > lightThreshold) {
      delay(3000); // light on for 3 seconds
      if (analogRead(ldrPin) < lightThreshold) {
        success++;
        delay(3000); // light off for 3 seconds
      }
    }
    delay(500); // brief pause between attempts
  }

  // if the user does the signal correctly 3 times in a row, turn on the LED
  if (success == 3) {
    digitalWrite(greenLED, HIGH);
    delay(3000);
    digitalWrite(greenLED, LOW);
  }

  delay(1000); // short pause before restarting
}
Future Improvements

In the future, I could make the switch more flexible by allowing different light patterns as “passwords” or adjusting the timing for each sequence. I could also add multiple LEDs or even a small sound to give feedback for each correct or incorrect step.

Week 8: Unusual Switch

Main Concept:

In Japan, the way you bow is really important when it comes to apologizing to someone older than you, and even some teachers in middle and high school teach their students how to bow properly. It is considered that bowing to 90 degrees is the most polite and respectful way to apologize to someone older than you. When I was coming up with the idea for this project, the first thing that came to mind was to teach people how to bow correctly to 90 degrees. The main concept is that the light can only be turned off if you bow to 90 degrees.

The link below is the video of me demonstrating my proper bowing detector.

My Proper Bowing Detector

Highlight of the code:

This is the code that I wrote. I wanted to use different pin numbers instead of pin 13 or different analog pins, such as  A1 or A3, but after changing them, my circuit suddenly stopped working. Thus, I chose to stick with pin 13 and A2. Inside the code, I used variables for pin numbers so that I can easily change them in the future. However, I want to figure out with my professor why my circuit suddenly stopped working just by changing the pin numbers.

int ledInput = 13; //variable to control LED
int sensorInput = A2; //variable to control sensor

void setup(){
  pinMode(13, OUTPUT); //send singnals from pin 13
  pinMode(A2, INPUT); //receive signals from A2
}

void loop(){
  //read signals from A2
  int buttonState = digitalRead(A2); 

  if(buttonState == HIGH){
    digitalWrite(13, LOW); //turn off LED if my forehead touches the foil 
  } else {
    digitalWrite(13, HIGH); //turn on LED
  }
}


Reflection and Future Improvements:

Since it was my first time building hardware using an Arduino, it took me a tremendous amount of time to understand how things work, especially the switch example we did in class. Thus, I spent a lot of time going through the slides and experimented for several hours to figure out which side of the jumper wire I can connect to the aluminum foil to make this project work. I really struggled with turning off the LED by placing my head on the A5-sized foil paper on the table for several reasons. First of all, the jumper wire was not long enough, so I had to connect multiple wires, but some of them got unplugged during the trials. Furthermore, since the tape is not conductive, when I covered the tip of the wire, the LED didn’t turn off. I tried using conductive tape because I thought it would allow electricity to go through the wire, but that didn’t work as well. At the end of the day, I made the foil paper on my forehead as large as possible to increase the surface area and only applied the tape to the sides of the foil so that it wouldn’t cover the tip of the wire. 

As for future improvements, I would like to use a sensor instead of a foil paper so that my users don’t have to put the wire on their forehead, which would be inconvenient to use. I also want to create a sensor that can precisely measure 90 degrees to detect the proper Japanese bowing style.