
Sketch(f for fullscreen): https://editor.p5js.org/joyzheng/full/tb0uwj2nP
Overall Concept
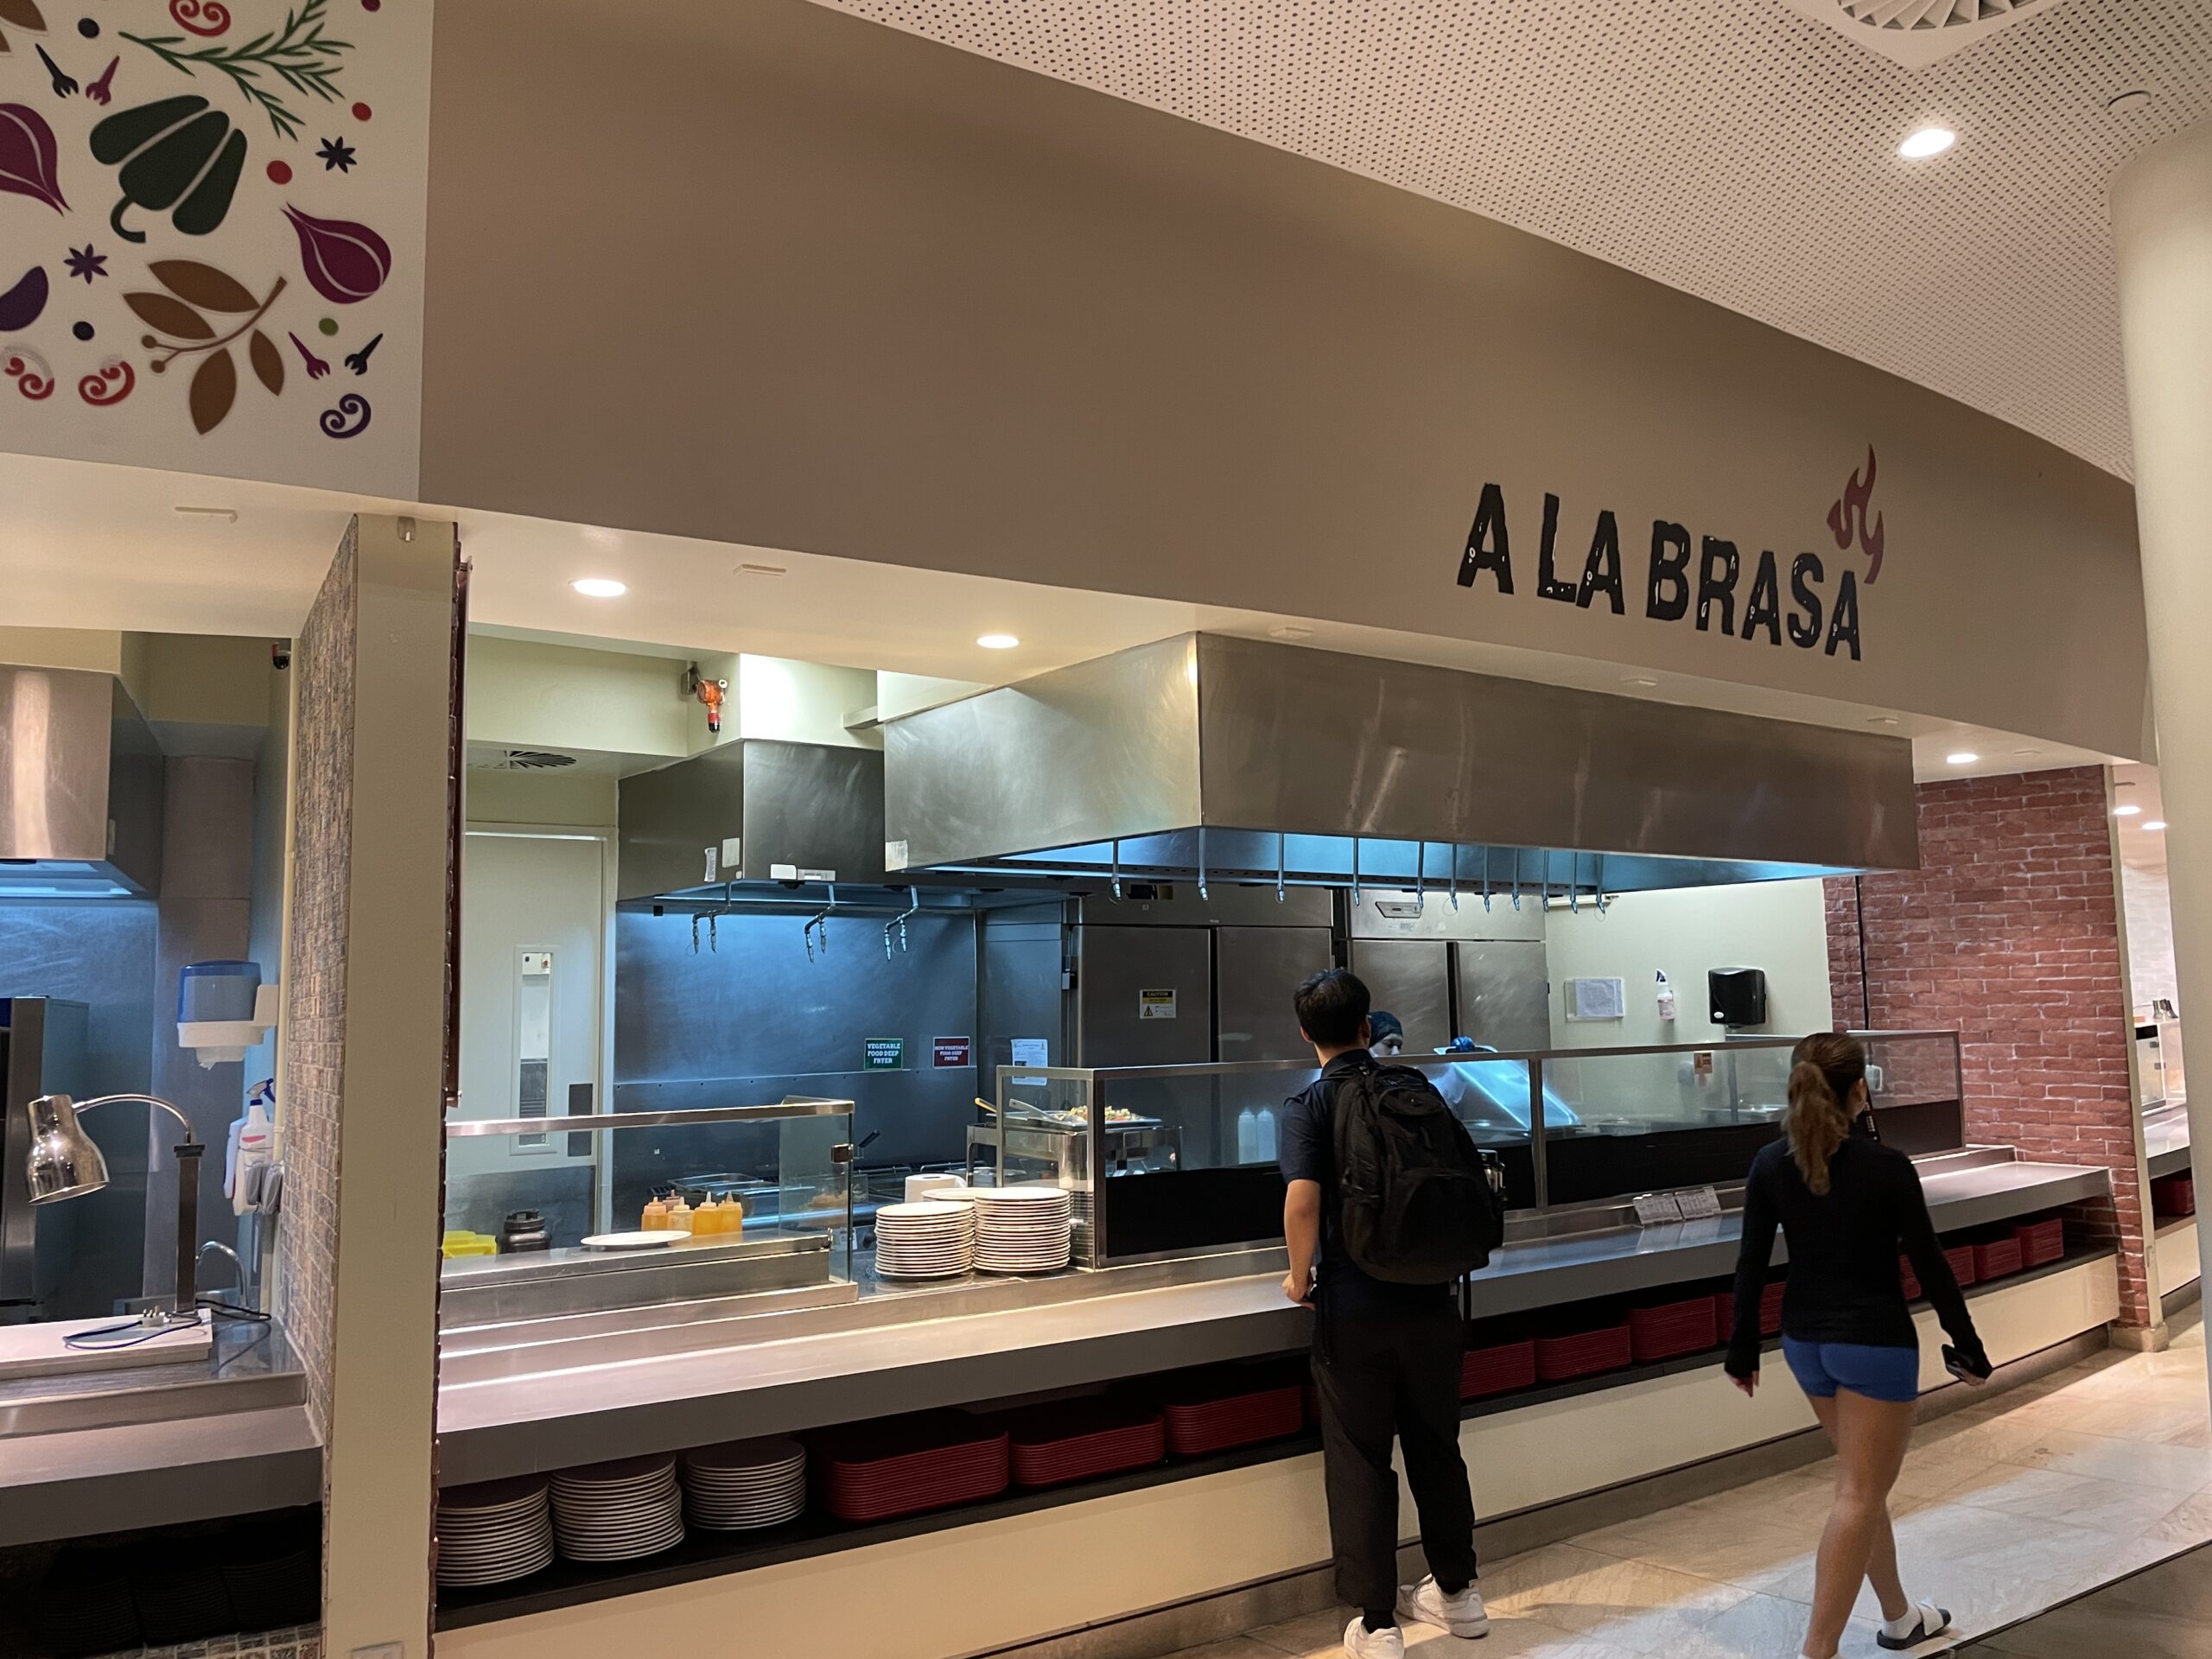
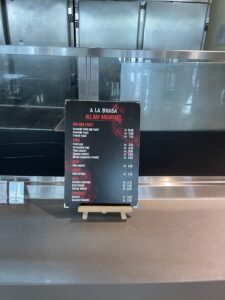
As a visiting student at NYUAD, I found the made-to-order dining system, particularly at the All Day Breakfast counter, to be very confused. Unlike the pre-made options I was used to, the text-only menus made it difficult to visualize my order. I always confused what and how many did I ordered if there’s no picture (some are arabic food I don’t know) and I often found myself pulling out a calculator to see if my selections added up to a full meal plan.
These frictions made me want to digitalize the experience to an interactive game that aims to gamify the ordering process. The core goal is to provide a more intuitive and visual way for players to assemble a meal, manage inventory, understand the costs, and manage their spending. By turning the process into a game with clear steps and rewards (badges), the project transforms a problem/demand discovered in my life into an engaging and replayable experience.
How It Works
The game guides the player through a six-scene narrative that mirrors the real-life process and menu of getting food at the D2 dining hall A LA BRASA All Day Breakfast Counter.
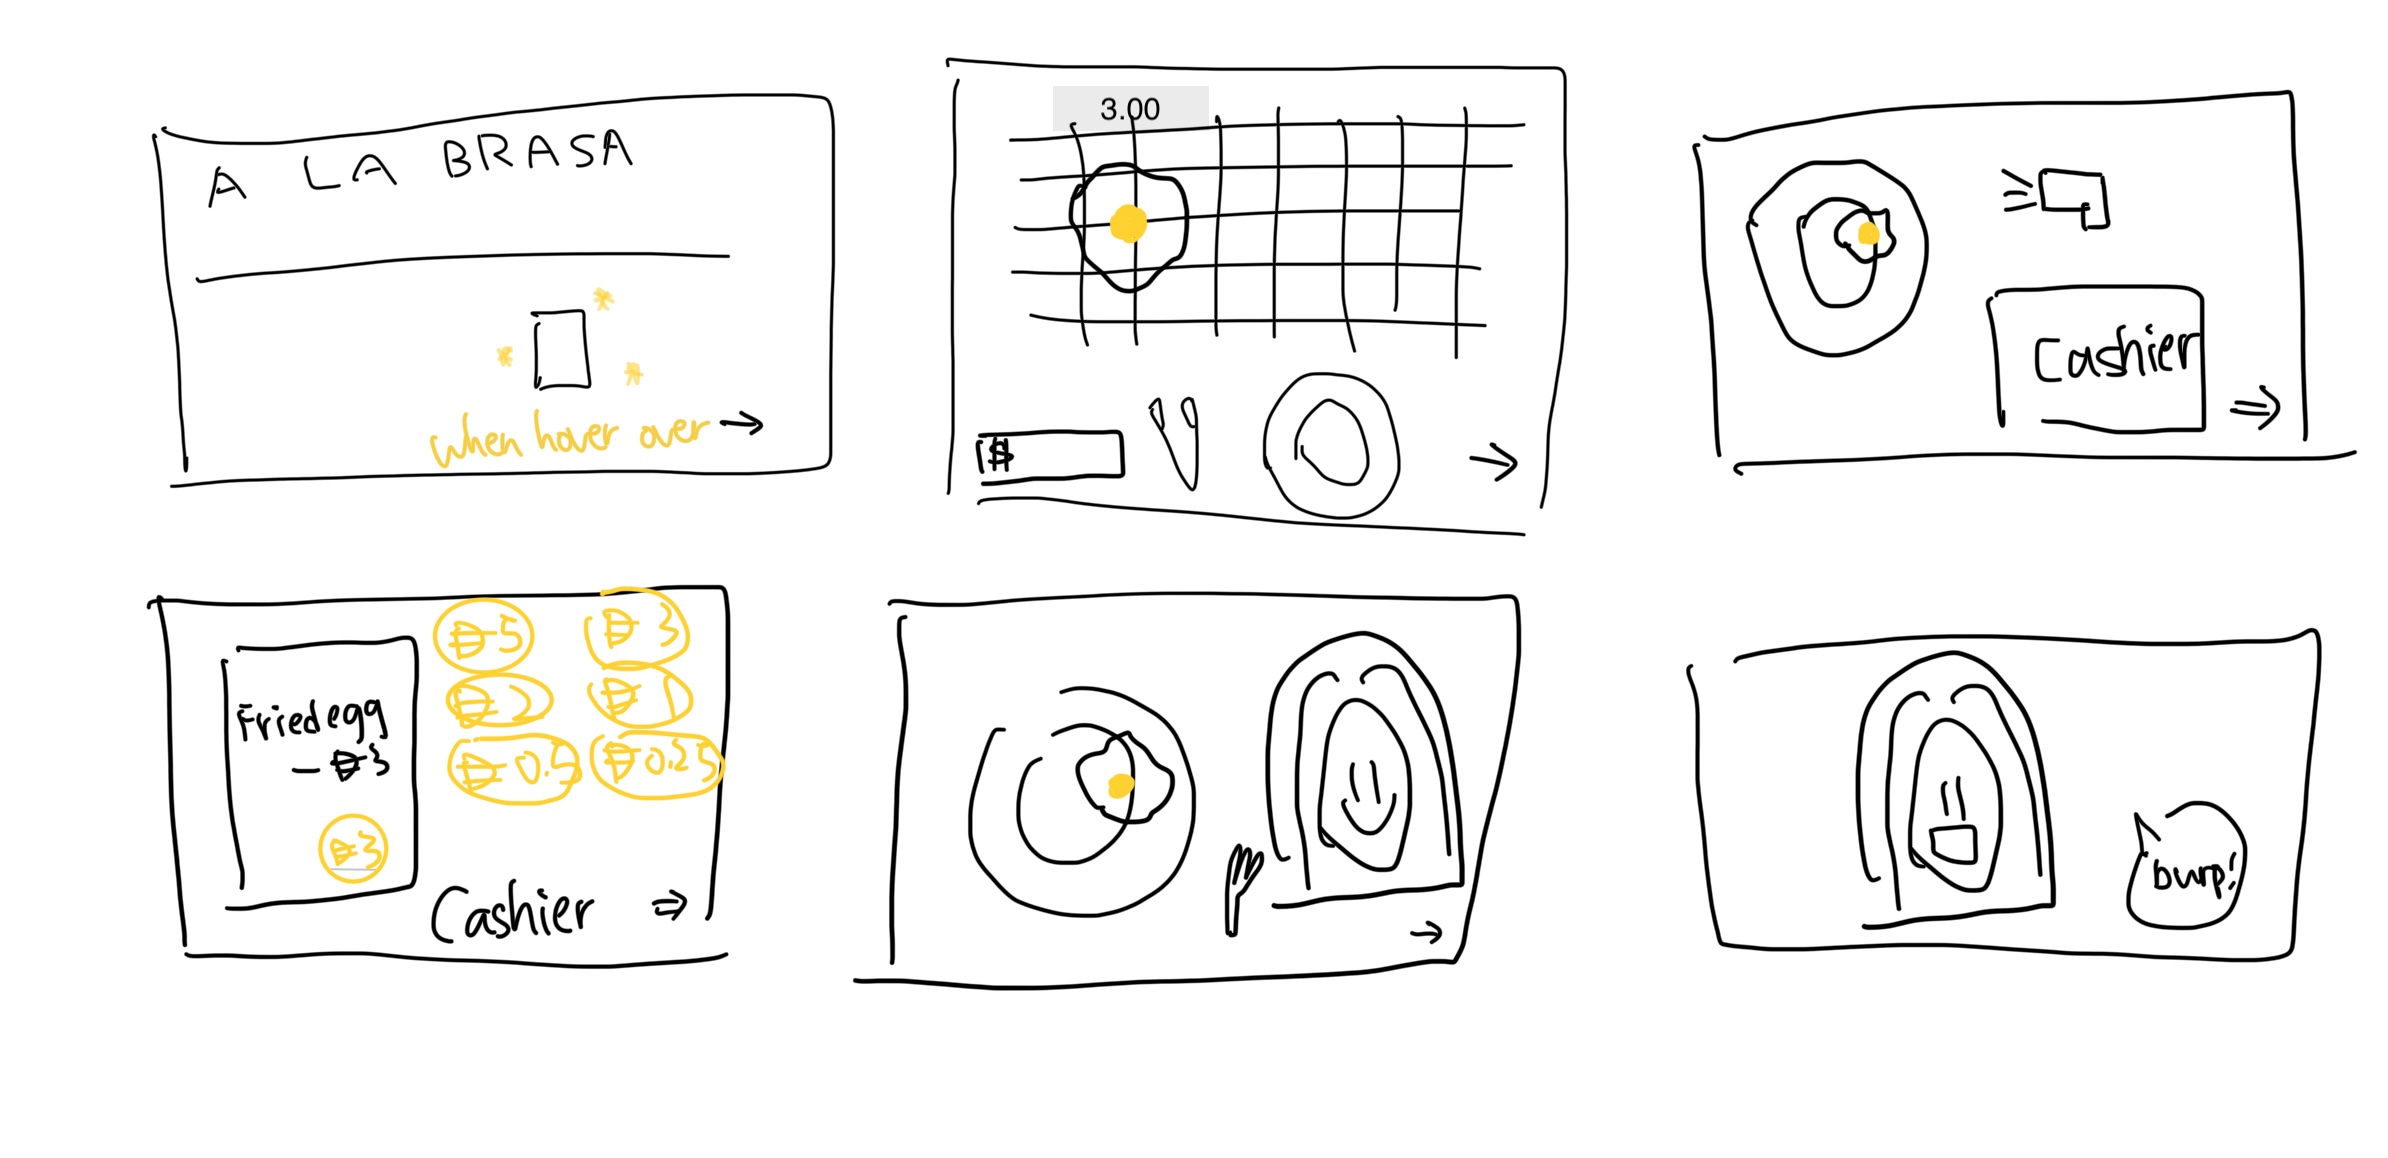
UI Prototype:
UE:
Scene 1:
Start Screen: The player is presented with the All Day Breakfast counter and prompted to “Ready to Order?”. Clicking the triangle button begins the game. The badge board is also displayed here, showing the player’s progress.
Scene 2:
Choose Food: The player is shown a grill with all available food items. They must first click to pick up a pair of tongs, which then attaches to their mouse. They can then click on food items to pick them up and click on the plate to add them to their meal. The total cost is updated in real-time.
Scene 3:
Scan Items: The player takes their plate to the cashier. They must pick up the scanner tool and move it over each food item on the plate. As each item is scanned, a beep sound plays, and the item is added to a virtual receipt.
Scene 4:
Payment: The cashier opens, revealing a coin tray. The player must pay the total amount shown on the receipt by clicking on coins from a palette and dropping them into the tray.
Scene 5:
Eat: The player sits down to eat. They must pick up a fork and use it to pick up food from their plate and bring it to the character(NYUAD Girl)’s mouth to “eat” it, which plays a sound and makes the food disappear.
Scene 6:
End Screen & Badges: After the meal, the game checks if the player’s actions have met the conditions for any new badges. If so, a special animation plays. The player is then given the option to “Dine in AGAIN!”, which resets the game and starts a new session.
Technical Decisions & Game Design I’m Proud of
I am proud of completing a fully functional and well-designed game within the project timeline, especially after iterating on the initial idea. A key technical challenge was to build the entire game to be fully responsive. The core of the responsive design is a set of helper functions (updateLayoutDimensions, scaleRectangle, scaleValue) that calculate scaling factors based on the current window size versus the original 700×500 design grid. This allows every element to reposition and resize dynamically, ensuring the game is playable on any screen.
It’s also helpful to discuss with Professor Mang to improve the interactivity and replayability of the game. We came up the ideas of implementing the stock management system and humorous badge reward that every NYUAD students who went to this dining hall could resonate with(e.g., never being able to spend a whole meal plan; why is 1 meal plan 33.6? Is that 0.1 for service fee?). I design the inventory as the same as how it usually would be in the counter, for instance, there’s always only a few avocado toast and I just never being able to get tofu omelet till now. Overall, this is also very meditating and educational (in some sense) that it reminds people to feed themselves well in dining hall even when you are rushing in classes and encourage user to do a balanced meal with enough amount of fiber everyday.
// =======================================
// SCENE 2: CHOOSE FOOD
// this function calculates the responsive positions for all food items in scene 2
function buildScene2FoodGrid() {
  // clears the array of food objects to ensure a fresh start each time the grid is rebuilt (e.g., window resize)
  scene2FoodObjects = [];

  // constants that define the original pixel dimensions of the background art and the specific rectangular area within it where the food is displayed
  const sourceImageSize = { w: 1536, h: 1024 };
  const sourceFoodArea = { x: 124, y: 138, w: 1284, h: 584 };

  // responsive calculation
  // current on-screen position and size of the food area
  // by finding the scaling ratio between the current canvas and the original background image
  // so the grid always perfectly overlays the correct part of the background art
  const foodGridRect = {
      x: sourceFoodArea.x * (canvasWidth / sourceImageSize.w),
      y: sourceFoodArea.y * (canvasHeight / sourceImageSize.h),
      w: sourceFoodArea.w * (canvasWidth / sourceImageSize.w),
      h: sourceFoodArea.h * (canvasHeight / sourceImageSize.h)
  };

  // the calculated grid area is then divided into cells (8 columns by 2 rows) to position each food item
  const columns = 8;
  const rows = 2;
  const cellWidth = foodGridRect.w / columns;
  const cellHeight = foodGridRect.h / rows;

  // the size of each food item is based on the smaller dimension (width or height) of a grid cell
  // this prevents the food images from looking stretched
  scaled by 70% to add padding
  const itemSize = min(cellWidth, cellHeight) * 0.7;

  // this loop iterates through every food item defined
  for (let i = 0; i < ALL_FOOD_ITEMS.length; i++) {
    // math.floor() and % convert the 1d loop index (i) into a 2d (row, col) grid coordinate
    let row = Math.floor(i / columns);
    let col = i % columns;

    // calculates the final top left (x, y) coordinate for each food item
    // starts at the grid's origin
    // adds the offset for the column/row
    // adds a centering offset
    let itemX = foodGridRect.x + col * cellWidth + (cellWidth - itemSize) / 2;
    let itemY = foodGridRect.y + row * cellHeight + (cellHeight - itemSize) / 2;

    // a new food object is created with its calculated position and size
    // added to the array to be drawn
    scene2FoodObjects.push(new FoodItem(ALL_FOOD_ITEMS[i], itemX, itemY, itemSize));
  }
}
The most complex piece of code, and the one I’m most proud of, is the logic in the buildScene2FoodGrid() function. Unlike other elements that scale relative to the canvas, this grid must scale relative to the background image itself to ensure the food items are perfectly aligned with the artwork.
This logic calculates a scaling ratio based on how the background image has been stretched to fit the screen, and then applies that same ratio to the coordinates of the food grid. It’s a powerful piece of code that makes the experience feel seamless.
Challenges & Improvements
The development process was a valuable relearning game development. I’m surprised by the amount of free assets resources and tutorials for game development online. I’m also inspired by the Coffee Shop Experience example of how to use p5js to manage a game and toggle between scenes.
One of the most surprisingly time-consuming challenges was a simple debugging session that lasted hours, only to discover I had misspelled “diarrhea” as “diarreah” or “diareah” in different location. This taught me the importance of meticulous checking and creating simple debugging tools to isolate issues early.
I also got the opportunities to explore AI created assets through this project. For this huge amount of assets, AI assets might be the best option for me in order to finish on time. However, I still spent at least half of the game development just to get back and forth for “drawing a good card” of images. To be honest, I want to say Nano Banana didn’t worth the hype for image creation. For game assets development, ChatGPT might be the best choice after trying a few different apps like Midjourney or Canva. This is very lightweight and it also supports transparent background with png, so it could be directly use without manually removing the background.
For the future, I have several ideas for improvement:
- Expand to Other Counters: I would like to implement a similar ordering system for the D1 dining hall, which also has a confusing menu.
- UI Enhancements: I plan to add a toggle to hide or show the badge board, giving the player more control over their screen space.
- More Badges: Adding more creative badges would further increase the incentive for players to try different food combinations and spending strategies.
- Scene Refinement: Some scenes are quite dense with assets. In a future version, I might split complex steps into more scenes to make the layout feel cleaner and less cluttered.
- Real Implementation: After Midterm, I will demo this to dining hall manager to see if they want to adopt this ordering system or just using a more intuitive and interactive menu to run the dining hall more efficient.
this is incredible.