Week 9 – Reading Response – Shahram Chaudhry

Physical Computing’s Greatest Hits (and misses)

I think my main takeaway from this reading would be that we could have interactions but what’s more important is for those interactions to be meaningful.I liked how he pointed out that waving your hand over a sensor “has little meaning by itself.” As creative coders, I think that’s such an important reminder. It’s easy to get caught up in cool tech and forget the why behind our interactions. If the action doesn’t hold some significance, it ends up feeling more like a CS demo than an expressive piece (no shade, I’m a CS major myself).

The part about video mirrors also really resonated. I totally agree. They’re super visually engaging (who doesn’t love staring at themselves?), but there’s not much to do. It reminded me of our early class discussions about high vs low interaction. Just because something responds doesn’t mean it creates depth. And also I think mirrors are often more reactive than interactive.

I loved the section about interactive pets, especially since I’m not really into real animals. The idea of a cuddly robot pet that behaves like a dog but doesn’t shed or poop? Count me in.

Making Interactive Art: Set the Stage, Then Shut Up and Listen

I found this reading really refreshing because it reframes the role of the artist in interactive work in a way that feels freeing. The title, Set the Stage, Then Shut Up and Listen, is blunt, but it hits hard. It’s such a shift from the traditional idea of art being about your expression, your vision, and instead saying, “Hey, I’ve built the framework,  now let them do something with it.” That resonated with me and also reminded me of the advice Professor Mang gave us when presenting our mditerm projects, letting our audience interact with our projects, without any additional instructions or explanations. While it can get frustrating if the audience doesn’t interact the way we expected, I think that’s where we actually find room for improvements in our work. Also, if they don’t interact in the way we expected them to, maybe it’s because we didn’t design with them in mind.

I agree with the idea that interactive work is the beginning of a conversation rather than the whole message. It means not trying to force people into a specific reaction, but creating space for them to explore and find their own meaning. That kind of openness can be scary, but it’s also really exciting.

I also really liked the part about using space and affordances thoughtfully. Like, if something has a handle, we naturally want to grab it. That kind of design isn’t just about aesthetics, it’s about instinct and behavior. As someone making interactive things, I think the key takeaway for me is the shift in mindset, moving away from a rigid, outcome-driven approach where I expect the audience to engage in a specific way, and instead embracing curiosity about how they actually interact. It’s less about forcing a response and more about observing what they do, learning from it, and letting that shape the work.

Week 9 – Brain on Break

Brain on Break

Concept & Inspiration

This project started from the chaos of studying late nights and running on caffeine. I wanted to make a circuit that visualizes the mental shift between being focused and completely done,  the moment when my brain decides, without warning, “we’re taking a break now.”

The concept connects light, motion, and emotion. The light sensor represents my surroundings and productivity levels , the brighter the space, the more alert I am. The foil switch stands for that physical collapse when I lean head onto the desk. Together, they create a system that reads like a tiny, glowing version of my attention span.

How It Works

The project combines one analog sensor and one digital sensor, controlling two LEDs in different ways.

  • Light sensor (Analog Input): Reads the brightness of the environment. The green LED glows brighter in bright light, symbolizing focus and clarity.

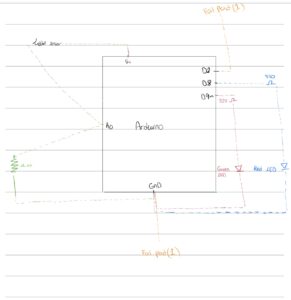
  • Foil Switch (Digital Input): Made of two pieces of aluminum foil connected to D2 and GND. When my elbow or cheek touches them together, it signals “brain on break.”

  • Red LED (Digital Output): Turns on when the foil pads touch — representing mental shutdown.

  • Green LED (Analog Output): Fades according to light level but turns completely off when the foil switch is activated.

This mix of analog and digital behavior mirrors how people work — not everything in us is gradual or logical. Sometimes focus fades; sometimes it just stops.

Circuit Design

When the light changes, the green LED fades smoothly using analogWrite(). When the foils touch, the orange LED turns on and the green one shuts off completely.

Coding:

const int LDR_PIN = A0;        // Analog input from photoresistor
const int SWITCH_PIN = 2;      // Digital input from foil switch
const int GREEN_LED = 9;        // Analog (PWM) output LED
const int RED_LED = 8;      // Digital ON/OFF LED

void setup() {
  pinMode(SWITCH_PIN, INPUT_PULLUP);  
  pinMode(GREEN_LED, OUTPUT);
  pinMode(RED_LED, OUTPUT);
  Serial.begin(9600);
}

void loop() {
  int lightValue = analogRead(LDR_PIN);     // Light level
  int switchState = digitalRead(SWITCH_PIN); // Foil contact: LOW when touched

  
  // Map light value to LED brightness (inverted so bright light = brighter LED)
  int brightness = map(lightValue, 600, 880, 0, 255);
brightness = constrain(brightness, 0, 255);
  analogWrite(GREEN_LED, brightness);

  
  // If foil switch is touched, turn on red LED
  if (switchState == LOW) {
  // Foil pads touching → brain on break
  digitalWrite(RED_LED, HIGH);   // burnout light ON
  analogWrite(GREEN_LED, 0);         // focus light OFF
} else {
  // Normal state → focused
  digitalWrite(RED_LED, LOW);    // burnout light OFF
  analogWrite(GREEN_LED, brightness); // focus light fades with light
}
 //serial monitor
  Serial.print("Light Value: ");
  Serial.print(lightValue);
  Serial.print(" | Brightness: ");
  Serial.print(brightness);
  Serial.print(" | Switch: ");
  Serial.println(switchState == LOW ? "Touched" : "Not touched");

  delay(50);
}

Testing & Results

In bright light, the green LED glows intensely — that’s focus mode. When the room dims, the light softens, mimicking a fading mind. But the real moment comes when I touch the foil pads. This happens when my head touches the desk, indicating that I fell asleep. The red LED flashes alive, and the green one shuts off instantly. It’s like watching my brain say, “enough.”

The light sensor worked better once I narrowed the range (600–880) so the fade became more dramatic. The foil switch needed tighter contact, but once secured, it triggered perfectly. 

Video demo:

8088D1BA-7146-49C3-97C8-CCAB51934422

Challenges

  • Calibrating the light sensor so the fading felt visible but not jumpy.

  • Making sure the foil switch responded to soft touches without staying on permanently.

Future Improvements

If I develop it further, I’d like to:

Include a buzzer or heartbeat sound to show the switch between focus and burnout.

Reflection

This assignment pushed me to merge function with symbolism. The project isn’t just about inputs and outputs — it’s about mood as circuitry. The light patterns represent focus, fatigue, and the strange middle space between both.

It reminded me that even in electronics, balance matters. Circuits need both current and resistance. Brains need both light and rest.

Week 9 – Shahram Chaudhry – The Emotional Snap

You know those days when you’re going about your day, composed, unfazed, maybe a little affected by how things are going,  a compliment here lifts your mood a bit, an awkward text there dims it slightly. Nothing dramatic. That’s me, most of the time. Collected. Measured. But then someone says something, or does something, and boom, something inside flips. And I get  triggered (Only a good squash session can fix that).

That’s the idea behind this project, the emotional snap, that flips from calm to intensity. The potentiometer controls a blue LED, which I chose because blue is often associated with calmness (or at least that’s the association I have). The idea is: when things are calm, you’re still feeling things, but softly. You turn the dial, and the blue LED glows brighter or dimmer depending on how strongly you’re feeling. It’s gradual, and ever-changing, just like most of our emotional states.

But then there’s the toggle switch. 

When flipped UP, it triggers a red LED, one that doesn’t fade in or out. It’s either ON or OFF. That red LED represents those intense moments of anger, panic etc. The contrast here is what makes the circuit special. On one hand, you have the blue LED, whose brightness gently flows with the potentiometer, like your emotional depth shifting over time. On the other, the red LED is binary, triggered by the switch, like someone pushing a very specific emotional button.

So this project is a metaphor for the way we, as humans, respond to the world around us.

The code for it:

int potPin = A0;      
int switchPin = 2;     
int redLED = 9;      
int blueLED = 10;    

void setup() {
  pinMode(redLED, OUTPUT);
  pinMode(blueLED, OUTPUT);
  pinMode(switchPin, INPUT);   
  Serial.begin(9600);
}

void loop() {
  int potValue = analogRead(potPin);
  int brightness = map(potValue, 0, 1023, 0, 255);
  int switchPosition = digitalRead(switchPin);
  if (switchPosition == HIGH) {
    //Red LED ON 
    digitalWrite(redLED, HIGH);
    analogWrite(blueLED, 0);
  } else {
    // Blue LED with analog control
    digitalWrite(redLED, LOW);
    analogWrite(blueLED, brightness);
  }
}

The schematic design:

Video Demo:

IMG_0611


Week 9 – Reading Reflection

For Tigoe’s “Physical Computing” piece, one of the quotes that stood out to me was the idea that pretty much everything physical computing-related has already been done before, and if it hasn’t, many aspects of your idea are inevitably going to be unoriginal, and that is okay. The main message I got from this piece was that there are endless ways of remixing things using the same concepts you see– your specific combination of physical computing-ideas is going to make your idea.

Out of the motifs he listed, I thought the tilty stands/tables were the most amusing to me. The first reason why is because it reminded me of the game Super Monkey Ball, a game I loved as a kid; the second reason is because I’ve been wanting to integrate my old skateboard into our final project since the first class, and a skateboard is basically a “tilty table” you stand on. I hope to learn more physical computing skills to eventually create an interactive experience using my skateboard.

For Tigoe’s second piece, “Set the Stage, Then Shut Up and Listen”, the title immediately reminded me of the mindset I had to approach my midterm presentation with– if my game is good, I have no need to explain anything myself. Sure enough, that was roughly the mentality Tigoe was preaching here.

I’ve heard staying quiet and watching the experience can be very frustrating for many people, but my personal belief is that the frustration is an indicator of poor user experience design. My experience with watching has always been so much fun as I get to confirm my hypothesis with how the user interacts with the game.

For example, I wanted to create a situation where players would communicate “let me handle the red ball and you get the blue ball” in my midterm game’s co-op mode. The game would only start with one ball but a second one would spawn after the ball’s second bounce, which would hopefully prompt the players to coordinate whose responsibility the new ball was. When it came to the first ever playtest in-class, I was overjoyed when Yongje and Khatira said “let me handle the red ball and you get the blue ball” pretty much word-for-word.

However, I also recognize that not every system is foolproof as there are prerequisites I had not considered for understanding the game. Many people struggled to figure out what fingers to use to press WASD or the arrow keys so they would use one finger from each hand to press WASD separately and get really confused why the controls were so clunky. Obviously, WASD is a very gamer-coded instinct so anyone who inherently doesn’t play games would not understand to put their middle finger on “W” and ring and index fingers beside on the “A” and “D” keys respectively. That begs the question of whether explaining finger placement was necessary or whether there was an unforeseen restriction on who could enjoy my project.


Reading Reflection – Week 9

Physical Computing’s Greatest Hits (and misses)

Sometimes I feel like the authors of our readings can read my mind. Usually, my first thought when thinking of a project idea is that I don’t want to do something that’s already done, but the author starts by saying not to think that way. I guess he is right, and that no work is ever truly ‘original’, but always takes inspiration from somewhere or something.

One of the applications of physical computing that really struck me was the Dance Dance Revolution. I realized that I never really thought much about the mechanics of it, but it’s crazy to think that just having a few switches on the floor managed to create this dynamic that took over the world. I also don’t think that I’ve ever encountered the theremin instrument, but it seems very interesting that even though it’s a physical object affected by your actions, you can’t actually think about the actions, but must actually think about the music.

The author’s section on Dolls and Pets also got me thinking about how that concept has evolved compared to the year 2008. The image in the reading shows normal dolls physically connected to a device, but nowadays we have toys with the screens built in, so that the doll/pet seems even more life-like. An example of this is the Eilik Interactive Robot Pet, which went viral on social media a while ago (I actually really want one, but they’re so expensive).

Making Interactive Art: Set the Stage, Then Shut Up and Listen

I agree with everything the author says throughout this reading, however, I do think that it’s easier said than done. He mentions, “Some will be emotionally moved, some will not get it, others won’t care.” This dynamic is why I believe that artists tend to offer interpretation notes about their artwork to their audience. I think it’s quite painful to see people not understand or not care about an interactive work you poured hours of your time into. Therefore, to save themselves from this struggle, artists tend to offer the script beforehand. On a similar note, this is also the approach I took with the first half of this class. Every time I showed someone my work, I would be quick to explain the concept behind it before they even began to explore, making sure that they didn’t do anything “wrong”. But after reading the insightful comparison done by the author between planning interactive artworks and a director working with actors, I think I’ve really understood that an interactive artwork is only completed by the audience’s curiosity. I’m excited to apply this new approach to my own interactive artworks, where the audience is nudged to discover the statement of the artwork by themselves.

Week 8 – Unusual Switch

Concept:

For this week’s assignment, I made a foot-activated switch that turns on an LED when you step on it. It uses two pieces of aluminum foil that touch when pressed together, completing the circuit and lighting the LED.

The idea was to make a basic, hands-free switch that works using pressure from your foot.

Video demonstration:

https://drive.google.com/file/d/1tqjnfQByBRSJJjC8D7xZhDbTFqgD4DTf/view?usp=drive_link

Code Highlight:

const int ledPin = 13;     // LED pin
const int switchPin = A2;  // Foil switch pin

void setup() {
  pinMode(ledPin, OUTPUT);
  pinMode(switchPin, INPUT);
}

void loop() {
  int switchState = digitalRead(switchPin);

  if (switchState == HIGH) {
    digitalWrite(ledPin, HIGH);   // Turn LED on
  } else {
    digitalWrite(ledPin, LOW);    // Turn LED off
  }
}

Github link:

https://github.com/JaydenAkpalu/Intro-to-IM/blob/4dfa5eeecae690e073a9bfd35f4140274d87f5f1/Week8_UnusualSwitchAssignment.ino

Reflections & Future Improvements:

Building the foot-activated switch helped me understand how a basic circuit can turn a simple physical action into an electronic signal. I learned how to use digital inputs on the Arduino and how completing a circuit with something as basic as foil can act as a switch.

If I were to improve it, I’d try to make the foil connection stronger and more reliable, since it doesn’t always press evenly. I’d also like to make the setup look cleaner and maybe add another component, like a buzzer or a second LED, to make it more interactive.

Week 8 – Unusual Switch

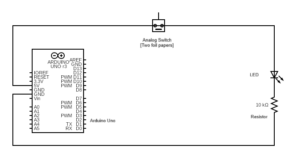
For my project, I created an Arduino switch that activates through physical contact, specifically, a hug. Instead of using hands, I built a simple “hug switch” using two pieces of aluminum foil connected to the Arduino. One piece was taped onto my sleeve, and the other onto a plush toy sitting on my chair. When I hugged the toy, the foil pieces touched and completed the circuit, turning on an LED on the breadboard.

This setup used digitalRead() to detect when the circuit closed, lighting up the LED as a visual indicator. It’s a very basic circuit, just two foil pads, a resistor, and an LED; but it demonstrated how the human body can act as a conductor to trigger digital inputs. I liked how small physical gestures could translate into electronic signals. The process reminded me how interaction design can make technology feel more human, even with something as simple as a hug that lights up a tiny LED.

Schematic Diagram

Week 8 – Unusual Switch

For this recent assignment I decided to build a breath-activated switch.


How It Works

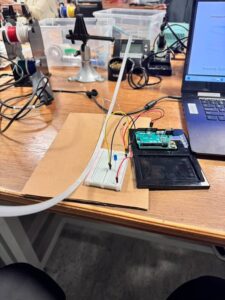
The concept is straightforward. I took a flexible tube and placed a small metal ball inside it. At one end of the tube, I positioned two disconnected wires from my circuit. When I blow into the open end of the tube, the force of my breath pushes the metal ball along the tube until it makes contact with both wires simultaneously.

This contact completes the circuit, and—voila!—a connected blue LED lights up to signal that the switch is “on.” When I stop blowing, the ball rolls back, the circuit breaks, and the light turns off. It’s a hands-free switch that’s both fun and functional.

The Build and Components

As you can see in the photo, the setup is quite simple. Here’s what I used:

  • An Arduino as a power source.

  • A breadboard for easy prototyping.

  • One blue LED.

  • Resistors to protect the LED.

  • Jumper wires to connect everything.

  • A flexible plastic tube.

  • A small metal ball.

The circuit itself is a basic LED setup connected to the development board. The magic is all in the custom-built switch. The tube, the ball, and the carefully placed wires are what make this an “unusual” solution that perfectly met the project’s requirements.

This was a fantastic exercise in creative problem-solving and a great way to apply basic circuit principles in a new and interesting way. It proves that with a little ingenuity, you don’t always need a traditional button or switch to make things work.

Video Demo

IMG_8195

Week 8 – creative switch

For my project, I designed an Arduino switch using open-end wires that respond to the camera’s power state. I taped the wires to a digital camera so that when the camera is turned on, the wires disconnect and the LED light turns off, and when the camera is turned off, the wires reconnect and the light turns on. This created a simple but clever system where the camera itself acts as a physical trigger for the circuit. I really enjoyed experimenting with the setup, testing how small adjustments in the wire placement affected the light’s response. Since I’m passionate about photography, I wanted to combine my interest in cameras with my curiosity about electronics, and this project gave me a fun way to explore both creative and technical sides at the same time.

IMG_8468 (1) The video representation

Week 8 – Creative Switch

For my creative switch project, I decided to use my elbows as the mechanism to turn the lights on and off. I attached copper tape to each elbow, with the ends of the tape connected to the circuit. When my elbows touched, the copper tapes made contact, completing the circuit and turning the light on. Surprisingly, I found that maintaining a steady contact between my elbows was more difficult than I expected. You can actually see in my video that my arms are shaking slightly, as it was challenging to keep them perfectly still while keeping the circuit closed.