Week 11: Final Project Idea

Concept:
My final project is a physically interactive zombie shooting game that uses a laser pointer and photoresistors (light sensors) to detect hits. The player uses a toy gun or pointer that emits a laser beam to “shoot” zombies that appear randomly. On a physical board, multiple photoresistors are positioned with LEDs next to them, each representing a zombie spawn point. When a zombie appears, an LED lights up, and the player must aim the laser pointer at that sensor to “kill” the zombie. The interaction is fast-paced and relies on quick aiming and physical movement, combining real-world action with digital feedback.


Arduino’s Role:
The Arduino is responsible for controlling the game logic on the hardware side. It randomly selects which LED to turn on, simulating a zombie “appearing” in that location. It continuously reads data from the photoresistors to detect when a laser beam hits the correct sensor. When a hit is detected, the Arduino confirms the zombie has been shot, turns off the LED, and sends the information to P5.js (such as which zombie was hit and the reaction time). It can also keep track of hits and misses, and control the timing of zombie spawns to make the game more challenging as it progresses.


P5.js Display:
P5.js will serve as the visual part of the game, showing animated zombies that match the LEDs lighting up on the physical board. When the Arduino tells P5 a zombie has appeared (LED turned on), a zombie image will pop up in the corresponding location on the screen. When the player successfully shoots the sensor with the laser, the zombie will disappear with a simple animation, like falling down or exploding. The game will display the player’s score, reaction time for each shot, and lives or missed zombies. It can also play sound effects for hits and misses, and include a game over screen when the player fails to shoot zombies in time.

Week 11 – Final Project Concept

For my final project, I am creating an interactive audiovisual system called ExpressNotes, which combines sound, visuals, and physical input to encourage real-time artistic expression. The system uses an Arduino with four push buttons and a potentiometer. Each button press plays a different piano note, while the potentiometer adjusts the volume. These physical actions are detected by the Arduino and sent to a P5.js sketch running on a multimedia computer. The P5 environment generates visual effects on screen that correspond to each note, creating a dynamic and evolving piece of generative art based on the user’s input.

This project is designed to facilitate an engaging, expressive loop between the user and the system. The Arduino listens to physical interactions—button presses and volume control—and transmits that information instantly. The P5.js sketch interprets the input by producing synchronized audio and visuals. For example, pressing a specific button might trigger a ripple of blue circles with a soft C note, while another might launch animated triangles with a brighter tone. The visual and auditory elements work in tandem, offering immediate and meaningful feedback that makes the experience immersive and rewarding.

ExpressNotes emphasizes creativity and emotional engagement over precision or performance. The user is both musician and painter, creating a personal composition each time they interact with the system. The careful timing of responses ensures the interaction feels fluid and intuitive, and the unique art generated can be saved or shared. This project demonstrates the power of combining physical sensors with real-time multimedia output to create a space for individual expression that is playful, responsive, and visually compelling.

Final Project Proposal – Code Red

So for my final project, I have decided to create a game called ‘Code Red’, and it’s like a bomb defusal game where players race against time to solver certain challenges before time runs out and each challenge the player successfully completely, one digit of the code is revealed to them. Once they have completed all challenges successfully, they will have to enter the numbers which were revealed to them at the end of each challenge and if they enter the correct code before time runs out, they have defused the bomb.

The Arduino will handle the hardware side:

  • Reading button inputs, knob rotation, etc.
  • Lighting LEDs to indicate bomb status
  • Using a buzzer for alerts, errors, and countdown tension

p5js will handle the visual and game logic:

  • Showing the bomb interface, countdown timer, and progress (how many challenges completed)
  • Giving feedback (success/fail) for each challenge
  • Triggering animations and effects based on player actions

Week 11: Serial Communication

Arduino and p5.js:

Zayed and Zein

Exercise 1: Moving an Ellipse with One Sensor

Arduino Code:

void setup(){
  Serial.begin(9600);
}

void loop(){
  int pot = analogRead(A0);
  // Less responsive: smaller output range
  int xPos = map(pot, 0, 1023, 100, 300); 
  Serial.println(xPos);
  delay(100);  // longer delay = slower updates
}


Challenges:

It was difficult to make the ball move gradually, this was an issue with the p5.js sketch and we added a smoothing factor to make the movement more ideal.

Video:

Exercise 2:

Arduino Code:

// Arduino: LED brightness via Serial input
const int ledPin = 6; 
const unsigned long BAUD = 9600;

void setup() {
  Serial.begin(BAUD);
  while (!Serial) ;        // wait for Serial Monitor
  pinMode(ledPin, OUTPUT);
  Serial.println("LED Brightness Control");
  Serial.println("Send a number 0–255, then <Enter>:");
}

void loop() {
  // only proceed if we have a full line
  if (Serial.available()) {
    String line = Serial.readStringUntil('\n');
    line.trim();           // remove whitespace

    if (line.length() > 0) {
      int b = line.toInt();  
      b = constrain(b, 0, 255);

      analogWrite(ledPin, b);
      Serial.print("▶ Brightness set to ");
      Serial.println(b);
    }
  }
}

// Fade smoothly to a target brightness
void fadeTo(int target, int speed = 5, int delayMs = 10) {
  int curr = 0;
  // read current duty by trial (not perfect, but illustrates the idea)
  for (int i = 0; i < 256; i++) {
    analogWrite(ledPin, i);
    if (i == target) {
      curr = i;
      break;
    }
  }

  while (curr != target) {
    curr += (target > curr) ? speed : -speed;
    curr = constrain(curr, 0, 255);
    analogWrite(ledPin, curr);
    delay(delayMs);
  }
}


Challenges:

For this exercise the challenges were 1: making the gradient slider animation look intuitive for functionality, and we spent a lot of time debating on whether a rainbow slider was cool or not. We decided that it was.


Exercise 3:

For this exercise we decided to build on the example provided and improve the physics of the wind as well as the animation of the ball itself. To keep track of the sensor values and ensure we are receiving consistent results, we included variables to track the potentiometer, bounce (1 results in LED high, 0 results in LED low) and the mass is just an added feature.

Challenges:

The issues we faced were plenty, including making the wind seem more realistic and making the interaction smoother. The first approach to solve this challenge were to implement debounce to discard those operations that would occur too closely during the runtime interval. We also had to be particularly careful about how often the p5.js asks for the potentiometer reading, considering the frequency of the frames displaying the visual text and the frequency of the potentiometer reading.

Arduino Code:

const int LED_PIN = 9;    // LED pin
const int P_PIN = A0;     // Potentiometer pin

void setup() {
  Serial.begin(9600);
  pinMode(LED_PIN, OUTPUT);
  digitalWrite(LED_PIN, LOW); // Initial LED state

  // Handshake: Wait for p5.js to send a start signal
  while (Serial.available() <= 0) {
    Serial.println("INIT"); // Send "INIT" until p5.js responds
    delay(100);             // Avoid flooding
  }
}

void loop() {
  // Check for incoming serial data
  if (Serial.available() > 0) {
    char incoming = Serial.read(); // Read a single character
    if (incoming == 'B') {        // p5.js sends 'B' followed by 0 or 1
      while (Serial.available() <= 0); // Wait for the value
      int bounce = Serial.read() - '0'; // Convert char '0' or '1' to int
      digitalWrite(LED_PIN, bounce);    // Set LED (0 = LOW, 1 = HIGH)
    }
    else if (incoming == 'R') {       // p5.js requests potentiometer reading
      int potValue = analogRead(P_PIN); // Read potentiometer (0-1023)
      Serial.println(potValue);         // Send value
    }
    // Clear any remaining buffer (e.g., newlines)
    while (Serial.available() > 0) {
      Serial.read();
    }
  }
}


ONE VIDEO FOR ALL 3 EXERCISES IN RESPECTIVE ORDER


Assignment 11 – Reading Response (Design Meets Disability)

Reading Design Meets Disability really made me rethink the way we approach assistive devices and design in general. We often talk about design in terms of making things beautiful, sleek, and desirable, but when it comes to tools meant for disabled individuals, the conversation suddenly shifts to pure function. This reading flips that on its head. It challenges the idea that products like hearing aids, prosthetic limbs, and wheelchairs should be discreet or invisible. Instead, it argues that they deserve the same thoughtful, creative attention as a pair of glasses or a smartphone. Why shouldn’t a wheelchair be stylish? Why can’t a prosthetic leg be a bold expression of identity? Nowadays, this sort of mindset has become even more relevant, where people are proud to talk about and display their disabilities; they are no longer a matter of stigma.

What stood out to me most was how this reading doesn’t see disability as something to hide or fix, it sees it as a space full of untapped potential for design. The reading uses real-world examples and poses fascinating questions that got me thinking: what if hearing aids were designed with the same care and flair as high-end earphones? What if voice synthesizers had more emotional range and didn’t all sound like robots? This vision of inclusive design isn’t just about making things accessible; it’s about making them desirable. That’s a big difference. It’s not about helping people fit into a narrow idea of “normal”, but rather it’s about expanding what we think is normal to include a wider range of human experience and expression.

Final Project Proposal: Repeat After Me

For my final project, I’m creating a game called Repeat After Me”, a retro-themed memory and reaction game where the player has to copy a sequence of flashing lights using physical buttons. It’s inspired by classic toys like Hasbro’s Simon Says, which I was obsessed with as a child, but I’m adding my own twist with pixel-style visuals, fun audio feedback, and progressively faster, more challenging rounds.

Video to the original Hasbro Simon Says

I’ve always enjoyed games that involve rhythm, timing, or quick reactions, and I wanted to build something that feels tactile and engaging but also visually playful.

Arduino will handle the hardware side:

  • Lighting up colored LEDs in random sequences

  • Reading button presses from the player

  • Using a buzzer for physical feedback

p5.js will handle the visual and audio feedback:

  • Displaying the current score and level

  • Giving real-time responses to player input with sound and screen effects

  • Showing a title screen, countdown, and game over screen

Overall, I want this project to feel playful, fast-paced, and satisfying to interact with.

Week 11 – Exercises

1: Ellipse

/*
 * Week 11 Production (1)
 *
 * Inputs:
 *   - A1 - 10k potentiometer connected to 5V and GND
 *
 */

int interval = 100;
int lastMessageTime = 0;

int potPin = A1;

void setup() {
  Serial.begin(9600); // initialize serial communications
}
 
void loop() {
  // read the input pin:
  int potentiometer = analogRead(potPin);                  
  // remap the pot value to 0-255:
  int mappedPotValue = map(potentiometer, 0, 1023, 0, 255); 
  // print the value to the serial port.
  Serial.println(mappedPotValue);
  // slight delay to stabilize the ADC:
  delay(1);                                            
  
  delay(100);
}
let port;
let connectBtn;
let baudrate = 9600;
let lastMessage = "";
let currX;

function setup() {
  createCanvas(400, 400);
  background(220);

  port = createSerial();

  let usedPorts = usedSerialPorts();
  if (usedPorts.length > 0) {
    port.open(usedPorts[0], baudrate);
  }

  connectBtn = createButton("Connect to Arduino");
  connectBtn.position(80, height-60);
  connectBtn.mousePressed(connectBtnClick);

  currX = width/2;
}

function draw() {
  background("white");
  fill('grey');
  circle(currX, height/2, 100);
  
  let str = port.readUntil("\n");
  if (str.length > 0) {
    // console.log(str);
    lastMessage = str;
  }
  
  // Display the most recent message
  text("Last message: " + lastMessage, 10, height - 20);

  // change button label based on connection status
  if (!port.opened()) {
    connectBtn.html("Connect to Arduino");
  } else {
    connectBtn.html("Disconnect");
  }
  
  // // Move shape based on received value
  if (!lastMessage) {lastMessage = "127"}
  currX = map(int(lastMessage), 0, 255, 0, width);
  currX = floor(currX);
  // console.log(currX);
}

function connectBtnClick() {
  if (!port.opened()) {
    port.open("Arduino", baudrate);
  } else {
    port.close();
  }
}

2: LED Brightness

/* 
 * Week 11 Production (2)
 * 
 * Outputs:
 * - 5 - LED
 * 
*/

int ledPin = 5;

void setup() {
  Serial.begin(9600);

  pinMode(LED_BUILTIN, OUTPUT);
  pinMode(ledPin, OUTPUT);

  // Blink them so we can check the wiring
  digitalWrite(ledPin, HIGH);
  delay(200);
  digitalWrite(ledPin, LOW);

  // start the handshake
  while (Serial.available() <= 0) {
    digitalWrite(LED_BUILTIN, HIGH); // on/blink while waiting for serial data
    Serial.println("0,0"); // send a starting message
    delay(300);            // wait 1/3 second
    digitalWrite(LED_BUILTIN, LOW);
    delay(50);
  }
}

void loop() {
  // wait for data from p5 before doing something
  while (Serial.available()) {
    digitalWrite(LED_BUILTIN, HIGH); // led on while receiving data

    int brightness = Serial.parseInt();
    if (Serial.read() == '\n') {
      analogWrite(ledPin, brightness);
    }
  }
  digitalWrite(LED_BUILTIN, LOW);
}
let port;
let baudrate = 9600;

// Show button to connect / disconnect
let showConnectButton = false;

function setup() {
  createCanvas(640, 480);
  textSize(20);

  // Create the serial port
  port = createSerial();

  // If the user previously connected, reopen the same port  
  let usedPorts = usedSerialPorts();
  if (usedPorts.length > 0) {
    port.open(usedPorts[0], baudrate);
  }

  // any other ports can be opened via a dialog
  if (showConnectButton) {
    connectBtn = createButton('Connect to Arduino');
    connectBtn.position(80, 350);
    connectBtn.mousePressed(setupSerial);
  }
  
}

// Show serial port connection dialog in response to action
function setupSerial() {
  if (!port.opened()) {
    port.open('Arduino', baudrate);
  } else {
    port.close();
  }
}

function draw() {
  background('white');
  fill('black');
  
  if (showConnectButton) {
    // changes button label based on connection status
    if (!port.opened()) {
      connectBtn.html('Connect to Arduino');
    } else {
      connectBtn.html('Disconnect');
    }
  }

  if (!port.opened()) {
    text("Disconnected - press space to connect", 20, 30);
  } else {
    text("Connected - press space to disconnect", 20, 30);
    
    // // Transmit brightness based on mouse position
    mappedX = floor(map(mouseX, 0, width, 0, 255));
    console.log(mappedX);
    let sendToArduino = mappedX + "\n";
    port.write(sendToArduino);
  }
}

function keyPressed() {
  if (key == " ") {
    setupSerial();
  }
}

3: Wind Gravity

/* 
 * Week 11 Production (3)
 * 
 * Inputs:
 *   - A1 - 10k potentiometer connected to 5V and GND
 * 
 * Outputs:
 * - 5 - LED
 * 
*/

int potPin = A1;
int ledPin = 5;

int interval = 100;
int lastMessageTime = 0;

void setup() {
  Serial.begin(9600);

  pinMode(LED_BUILTIN, OUTPUT);
  pinMode(potPin, INPUT);
  pinMode(ledPin, OUTPUT);

  // Blink them so we can check the wiring
  digitalWrite(ledPin, HIGH);
  delay(200);
  digitalWrite(ledPin, LOW);

  // start the handshake
  while (Serial.available() <= 0) {
    digitalWrite(LED_BUILTIN, HIGH); // on/blink while waiting for serial data
    Serial.println("127"); // send a starting message
    delay(300);            // wait 1/3 second
    digitalWrite(LED_BUILTIN, LOW);
    delay(50);
  }
}

void loop() {
  // wait for data from p5 before doing something
  while (Serial.available()) {
    digitalWrite(LED_BUILTIN, HIGH); // led on while receiving data

    // blink LED based on p5 data
    int status = Serial.parseInt();
    if (Serial.read() == '\n') {
      digitalWrite(ledPin, status);
      delay(10);
      digitalWrite(ledPin, LOW);
    }

    if (lastMessageTime > interval) {
      lastMessageTime = 0;
      // send mapped potentiometer reading to p5
      int potentiometer = analogRead(potPin);                  
      int mappedPotValue = map(potentiometer, 0, 1023, 0, 255); 
      Serial.println(mappedPotValue);
      // slight delay to stabilize the ADC:
      delay(1);
    }
    else {
      lastMessageTime++;
    }

  }
  digitalWrite(LED_BUILTIN, LOW);
}
let velocity;
let gravity;
let position;
let acceleration;
let wind;
let drag = 0.99;
let mass = 50;

// // Arduino
let port;
let connectBtn;
let baudrate = 9600;
let lastMessage = "";
let showConnectButton = false;

function setup() {
  createCanvas(620, 400);
  noFill();
  position = createVector(width/2, 0);
  velocity = createVector(0,0);
  acceleration = createVector(0,0);
  gravity = createVector(0, 0.5*mass);
  wind = createVector(0,0);
  
  // // Arduino
  port = createSerial();
  let usedPorts = usedSerialPorts();
  if (usedPorts.length > 0) {
    port.open(usedPorts[0], baudrate);
  }
  if (showConnectButton) {
    connectBtn = createButton('Connect to Arduino');
    connectBtn.position(80, 300);
    connectBtn.mousePressed(setupSerial);
  }
}

function draw() {
  background(255);
  applyForce(wind);
  applyForce(gravity);
  velocity.add(acceleration);
  velocity.mult(drag);
  position.add(velocity);
  acceleration.mult(0);
  ellipse(position.x,position.y,mass,mass);
  if (position.y > height-mass/2) {
      velocity.y *= -0.9;  // A little dampening when hitting the bottom
      position.y = height-mass/2;
      flashLight();
    }
  
  // // Arduino
  if (showConnectButton) {
    if (!port.opened()) {
      connectBtn.html('Connect to Arduino');
    } else {
      connectBtn.html('Disconnect');
    }
  }
  fill('black');
  if (!port.opened()) {
    text("Disconnected", 20, 30);
  } else {
    text("Connected", 20, 30);
  }
  let str = port.readUntil("\n");
  if (str.length > 0) {
    // console.log(str);
    lastMessage = str;
  }
  
  // Display the most recent message
  text("Last message: " + lastMessage, 10, height - 20);
  
  // // Convert received value to wind.x value
  mappedPot = map(int(lastMessage), 0, 255, -1, 1);
  wind.x = mappedPot;
  let windSpeed = "Wind speed: " + wind.x
  text(windSpeed.substring(0,20), 10, height - 5);
  
  fill('white');
}

function applyForce(force){
  // Newton's 2nd law: F = M * A
  // or A = F / M
  let f = p5.Vector.div(force, mass);
  acceleration.add(f);
}

function keyPressed(){
  if (keyCode==LEFT_ARROW){
    wind.x=-1;
  }
  if (keyCode==RIGHT_ARROW){
    wind.x=1;
  }
  if (key==' '){
    mass=random(15,80);
    position.y=-mass;
    velocity.mult(0);
    port.write("0\n"); // reset light
  }
}

// // Arduino
function setupSerial() {
  if (!port.opened()) {
    port.open('Arduino', baudrate);
  } else {
    port.close();
  }
}

function flashLight() {
  if (port.opened()) {
    port.write("1\n");
    // port.write("0\n");
  }
}


Link to video : https://drive.google.com/file/d/1DTy7Y1JiQVhqhlrblGajL4Inp4co38Vx/view?usp=sharing


Week 11: Serial Communication

Arduino & p5.js

[Nikita and Genesis]

Each exercise focuses on the communication between the Arduino’s physical components and visual output through serial communication.


Exercise 1: Moving an Ellipse with One Sensor

video

Arduino Code:

void setup(){
 Serial.begin(9600);
}
void loop(){
 int pot = analogRead(A0);
 // send mapped X (0–400) to p5
 int xPos = map(pot, 0, 1023, 0, 400);
 Serial.println(xPos);
 delay(30);
}

circuit:

Explanation:

This exercise uses a single analog sensor (potentiometer) connected to Arduino to control the horizontal position of an ellipse in p5.js. The Arduino reads the potentiometer value and sends it over Serial to the p5.js sketch, which updates the x-position of the ellipse accordingly. The communication is one-way:   Arduino → p5.js.


Exercise 2: Controlling LED Brightness from p5.js

video

Arduino Code:

// Arduino: LED brightness via Serial.parseInt()
const int ledPin = 9; // PWM-capable pin


void setup() {
 pinMode(ledPin, OUTPUT);
 Serial.begin(9600); 
}


void loop() {
 if (Serial.available() > 0) {
   int brightness = Serial.parseInt(); // Read integer from serial
   brightness = constrain(brightness, 0, 255); // Clamp
   analogWrite(ledPin, brightness);
 }
}

circuit:

Explanation:

In this exercise, the communication is reversed. The p5.js sketch sends a brightness value (0–255) to Arduino via Serial, which adjusts the brightness of an LED connected to a PWM-capable pin (pin 9). This demonstrates real-time control from software (p5.js) to hardware (Arduino).


Exercise 3: Gravity Wind with LED Bounce Indicator

video

Arduino Code:

/*
* Exercise 3 Arduino:
* - Read pot on A0, send sensorValue to p5.js
* - Listen for 'B' from p5.js → blink LED on pin 9
*/
const int sensorPin = A0;
const int ledPin    = 9;


void setup() {
 Serial.begin(9600);       
 pinMode(ledPin, OUTPUT);
}


void loop() {
 // Read and send sensor
 int sensorValue = analogRead(sensorPin);
 Serial.println(sensorValue);


 // Check for bounce command
 if (Serial.available() > 0) {
   char inChar = Serial.read();
   if (inChar == 'B') {
     digitalWrite(ledPin, HIGH);
     delay(100);
     digitalWrite(ledPin, LOW);
   }
 }


 delay(20);
}

circuit:

Explanation:

This sketch is a modified version of the classic p5.js Gravity + Wind example. An analog sensor (potentiometer) on Arduino controls the wind force in p5.js. Every time the ball hits the bottom (a “bounce”), p5.js sends a command (‘B’) back to Arduino via Serial, which briefly lights up an LED. This showcases a complete two-way communication system between Arduino and p5.js.


week 11-Serial Communication

For this project, I created an interactive system that integrates Arduino with p5.js, using Node.js for serial communication, allowing seamless interaction between the hardware (Arduino) and software (p5.js sketch).

The project consists of three tasks, each demonstrating different ways Arduino sensors and outputs can interact with visual and digital elements in p5.js. Below is a detailed description of each task, including the setup, code, and outcomes.

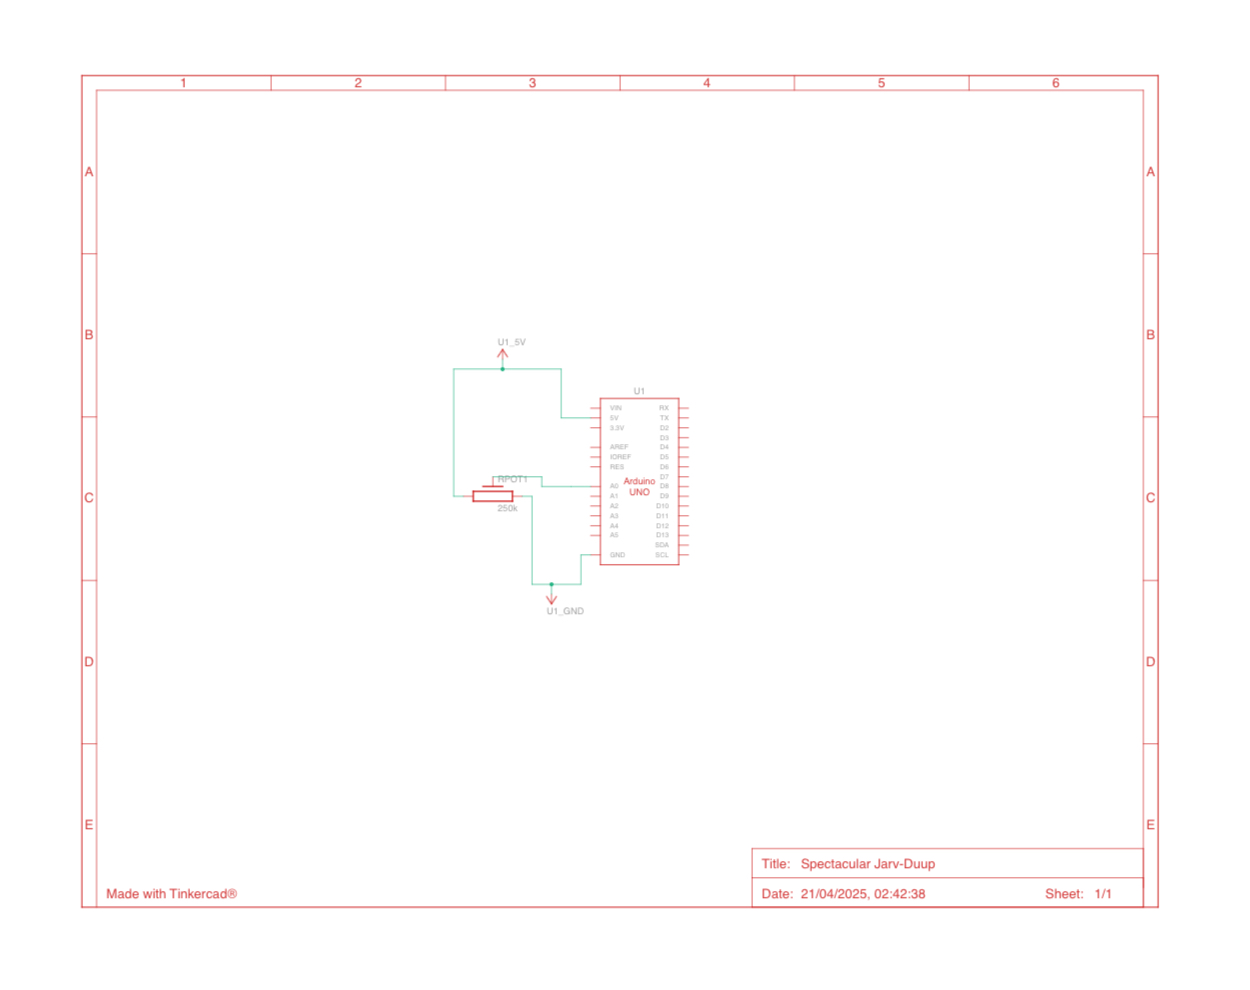
Task 1: Control Ellipse Horizontal Position with Arduino Sensor

Goal: Use a potentiometer connected to Arduino to control the horizontal position of an ellipse in p5.js.

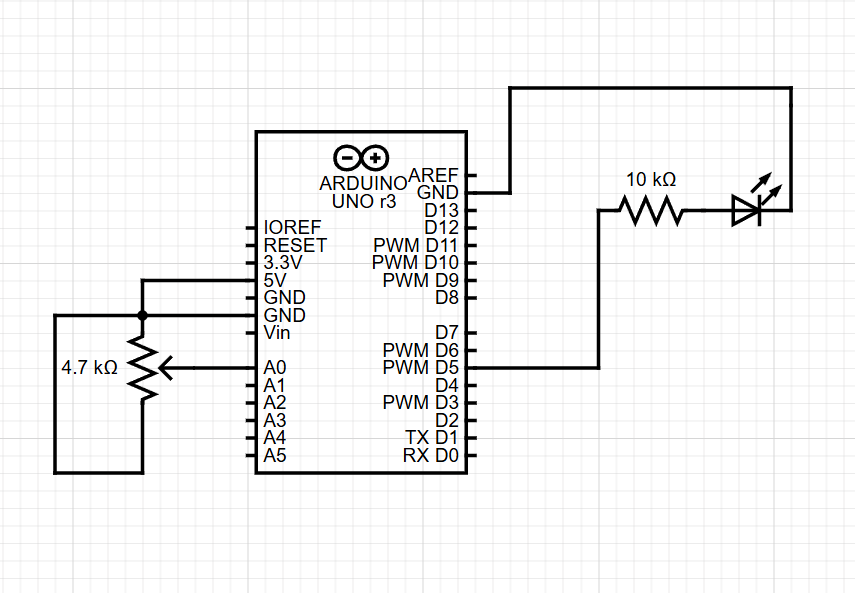
Task 2: Control LED Brightness from p5.js Mouse Position

Goal: Use the mouse cursor in p5.js to control the brightness of an LED connected to Arduino.

Task 3: Gravity-Wind Sketch with LED Bounce Feedback

Goal: Modify the gravity-wind sketch (from Aaron Sherwood’s example) so that:

-A potentiometer controls the wind force.

-Each time the ball bounces, an LED lights up briefly.

systemic diagram:

Conclusion:

This project showcased the flexibility of combining Arduino and p5.js via Node.js, enabling rich interaction between hardware and software. The local setup allowed full control over serial communication, overcoming the browser-based limitations.

Future Improvements:

  • Add sound effects when the ball bounces.

  • Use multiple sensors to control more aspects of the sketch.

  • Expand interaction with other hardware components (motors, buzzers).

p5.js

The codes:

let serial;
let sensorValue = 0;

function setup() {
createCanvas(400, 400);
serial = new p5.SerialPort();

serial.on('list', printList);
serial.on('connected', serverConnected);
serial.on('open', portOpen);
serial.on('data', gotData);
serial.on('error', serialError);
serial.on('close', portClose);

serial.list(); // get list of serial ports
serial.openPort('COM3'); // replace with your actual port
}

function gotData() {
let val = serial.readLine().trim();
if (val !== "") {
sensorValue = int(val);
print(sensorValue);
}
}

function draw() {
background(220);
ellipse(map(sensorValue, 0, 1023, 0, width), height / 2, 50, 50);
}

// Optional helper functions
function printList(portList) {
console.log("List of Serial Ports:");
for (let i = 0; i < portList.length; i++) {
console.log(i + ": " + portList[i]);
}
}

function serverConnected() {
console.log('Connected to server.');
}

function portOpen() {
console.log('Serial port opened.');
}

function serialError(err) {
console.log('Serial port error: ' + err);
}

function portClose() {
console.log('Serial port closed.');
let serial;

function setup() {
createCanvas(400, 400);
serial = new p5.SerialPort();

serial.on('open', () => console.log("Serial port opened"));
serial.openPort('COM3'); // change this if needed
}

function draw() {
background(220);

let brightness = int(map(mouseX, 0, width, 0, 255));
fill(brightness);
ellipse(width / 2, height / 2, 100, 100);

serial.write(brightness + "\n"); // send brightness to Arduino
void setup() {
Serial.begin(9600);
pinMode(9, OUTPUT); // LED on pin 9
}

void loop() {
int sensor = analogRead(A0);
Serial.println(sensor);
delay(10); // short delay

if (Serial.available()) {
char c = Serial.read();
if (c == 'B') {
digitalWrite(9, HIGH);
delay(100);
digitalWrite(9, LOW);
}
}
}
void setup() {
Serial.begin(9600);
pinMode(9, OUTPUT); // LED on pin 9
}

void loop() {
int sensor = analogRead(A0);
Serial.println(sensor);
delay(10); // short delay

if (Serial.available()) {
char c = Serial.read();
if (c == 'B') {
digitalWrite(9, HIGH);
delay(100);
digitalWrite(9, LOW);
}
}
}


let serial;
let sensorValue = 0;
let windForce = 0;
let ball;
let gravity;

function setup() {
createCanvas(400, 400);
serial = new p5.SerialPort();

// Open the correct serial port
serial.openPort('COM3'); // ← Change to your actual Arduino COM port!

// When data comes in from Arduino
serial.on('data', gotData);

gravity = createVector(0, 0.2);
ball = new Ball();
}

function gotData() {
let val = serial.readLine().trim();
if (val !== "") {
sensorValue = int(val);
windForce = map(sensorValue, 0, 1023, -0.2, 0.2);
print("Sensor:", sensorValue, "→ Wind:", windForce);
}
}

function draw() {
background(240);

// Apply wind from sensor and gravity
ball.applyForce(createVector(windForce, 0));
ball.applyForce(gravity);

// Update + show ball
ball.update();
ball.display();

// If ball bounced, tell Arduino to blink LED
if (ball.isBouncing()) {
serial.write('B\n');
}
}

class Ball {
constructor() {
this.position = createVector(width / 2, 0);
this.velocity = createVector();
this.acceleration = createVector();
this.radius = 24;
this.bounced = false;
}

applyForce(force) {
this.acceleration.add(force);
}

update() {
this.velocity.add(this.acceleration);
this.position.add(this.velocity);
this.acceleration.mult(0);

// Bounce off bottom
if (this.position.y >= height - this.radius) {
this.position.y = height - this.radius;
this.velocity.y *= -0.9;
this.bounced = true;
} else {
this.bounced = false;
}
}

isBouncing() {
return this.bounced;
}

display() {
fill(50, 100, 200);
noStroke();
ellipse(this.position.x, this.position.y, this.radius * 2);
}
}

Arduino code:

int sensorPin = A0; // Potentiometer connected to analog pin A0
int sensorValue = 0; // Variable to store the potentiometer value

void setup() {
Serial.begin(9600); // Start serial communication at 9600 baud rate
}

void loop() {
sensorValue = analogRead(sensorPin); // Read the potentiometer value (0-1023)
Serial.println(sensorValue); // Send the value to the computer
delay(10); // Short delay to prevent overloading serial data
}
void setup() {
Serial.begin(9600);
pinMode(9, OUTPUT); // LED connected to pin 9 (PWM)
}

void loop() {
if (Serial.available()) {
int brightness = Serial.parseInt();
brightness = constrain(brightness, 0, 255); // safety check
analogWrite(9, brightness);
}
}
void setup() {
Serial.begin(9600);
pinMode(9, OUTPUT); // LED on pin 9
}

void loop() {
int sensor = analogRead(A0);
Serial.println(sensor);
delay(10); // short delay

if (Serial.available()) {
char c = Serial.read();
if (c == 'B') {
digitalWrite(9, HIGH);
delay(100);
digitalWrite(9, LOW);
}
}
}

The videos:

https://drive.google.com/drive/u/0/folders/1Kk2lkQgoAyybXSYWVmY2Dog9uQVX_DMq


Week 11 – Serial Communication

Group Members: Shamsa Alremeithi and Maliha

Exercise 1

For this exercise, we had connected a potentiometer to the Arduino by connecting the middle pin to analog pin A1, and the other two pins to 5V and GND. we had written a simple Arduino code to read the analog value from the potentiometer and map it to a range of 0 to 400, which was then sent to the computer through the serial port. With p5.js and the p5.webserial library, a circle moves left to right across the screen based on the potentiometer’s position. we also included “Connect” and “Disconnect” buttons to control the serial connection from the browser with ease.


Arduino Code:

void setup() {
  Serial.begin(9600); 
}

void loop() {
  // Read the analog value from pin A1 (0 to 1023)
  int potentiometer = analogRead(A1);                  

  // Map the raw potentiometer value to a new range (0 to 400) for use in p5.js
  int mappedPotValue = map(potentiometer, 0, 1023, 0, 400); 

  Serial.println(mappedPotValue);

  delay(100);                                            
}


p5.js Code:

let port;
let connectBtn;
let disconnectBtn;
let baudrate = 9600;
let isConnected = false;

function setup() {
  createCanvas(400, 400);
  background(220);

  // Create a new Web Serial port instance using p5.webserial
  port = createSerial();

  // If a port was previously used, auto-connect to it
  let usedPorts = usedSerialPorts();
  if (usedPorts.length > 0) {
    port.open(usedPorts[0], baudrate);
    isConnected = true;
  }

  // Create the Connect button and open the port when clicked
  connectBtn = createButton("Connect to Serial");
  connectBtn.position(10, 10);
  connectBtn.mousePressed(() => {
    port.open(baudrate);  // Opens a serial connection using the chosen baud rate
    isConnected = true;
  });

  // Create the Disconnect button to close the serial port
  disconnectBtn = createButton("Disconnect");
  disconnectBtn.position(150, 10);
  disconnectBtn.mousePressed(() => {
    port.close();  // closes the serial connection
    isConnected = false;

    // Clear screen and show "Disconnected" message
    background(255);
    textAlign(CENTER, CENTER);
    textSize(18);
    fill(100);
    text("Disconnected.", width / 2, height / 2);
  });
}

function draw() {
  if (isConnected) {
//"\n", signaling the end of one complete piece of data after sending each number.

    let str = port.readUntil("\n");

    if (str.length > 0) {
      background("white");

      // Convert the received string to an integer (e.g., mapped potentiometer value)
      let x = int(str);

      // Make sure x stays within the canvas width (safety measure)
      x = constrain(x, 0, width);

      ellipse(x, 200, 40, 40);
    }
  }
}

Exercise 2

make something that controls the LED brightness from p5

p5.js interface:

Arduino Code:
int ledPin = 9; // PWM-capable pin to control LED brightness

void setup() {
  Serial.begin(9600);          // Start serial communication at 9600 baud rate
  pinMode(ledPin, OUTPUT);     // Set the LED pin as an output
}

void loop() {
  if (Serial.available()) {    // Check if data is available to read from serial
    int brightness = Serial.parseInt();  // Read the integer value (brightness)
    brightness = constrain(brightness, 0, 255); // Limit the value to the 0-255 range
    analogWrite(ledPin, brightness);   // Write the brightness value to the LED pin
  }
}

This project creates a real-time visual and physical interface to control an LED’s brightness using a slider in a p5.js sketch. The brightness value is sent from the browser to an Arduino board via serial communication. As the user moves the slider, the LED’s intensity changes accordingly, both in the physical circuit and on-screen through a glowing animation and gauge ring. The interface also includes a connect/disconnect button for flexible hardware control.

Exercise 3

In this exercise, we took the gravity and wind example and instead connected it to the Arduino. We replaced the digital wind control with a potentiometer, allowing us to control the wind force by hand. Additionally, we used an LED to light up every time the ball hit the ground and is at rest.

Arduino Code:

const int ledPin = 5;
const int potPin = A0;

void setup() {
  Serial.begin(9600);
  pinMode(ledPin, OUTPUT);
}

void loop() {
  int sensorValue = analogRead(potPin);
  Serial.println(sensorValue);

  if (Serial.available() > 0) {
    char msg = Serial.read();
    
    if (msg == '1') {
      digitalWrite(ledPin, HIGH);
    } 
    else if (msg == '0') {
      digitalWrite(ledPin, LOW);
    }
    
    while (Serial.available() > 0) Serial.read();
  }

  delay(50);
}


p5.js Code:

let port;
let baudrate = 9600;
let position, velocity, acceleration, gravity, wind;
let drag = 0.99;
let mass = 50;
let val = 0;
let str = "";
let hitGround = false;

function setup() {
  createCanvas(640, 360);
  noFill();

  position = createVector(width / 2, 0);
  velocity = createVector(0, 0);
  acceleration = createVector(0, 0);
  gravity = createVector(0, 0.5 * mass);
  wind = createVector(0, 0);

  port = createSerial();

  let connectButton = createButton("Connect");
  connectButton.position(10, 10);
  connectButton.mousePressed(() => {
    if (!port.opened()) port.open(baudrate);
  });

  let disconnectButton = createButton("Disconnect");
  disconnectButton.position(100, 10);
  disconnectButton.mousePressed(() => {
    if (port.opened()) port.close();
  });

  let dropButton = createButton("Drop Ball");
  dropButton.position(220, 10);
  dropButton.mousePressed(dropBall);
}

function draw() {
  background(255);

  applyForce(gravity);
  applyForce(wind);

  velocity.add(acceleration);
  velocity.mult(drag);
  position.add(velocity);
  acceleration.mult(0);

  ellipse(position.x, position.y, mass, mass);

  if (position.y > height - mass / 2) {
    velocity.y *= -0.9;
    position.y = height - mass / 2;

    if (!hitGround) {
      hitGround = true;
      if (port.opened()) {
        port.write("1\n"); // turn LED on
      }
    }
  } else {
    hitGround = false;
    if (port.opened()) {
      port.write("0\n"); // turn LED off
    }
  }

  str = port.readUntil("\n");
  val = int(str.trim());

  if (!isNaN(val)) {
    updateWind(val);
  }
}

function applyForce(force) {
  let f = p5.Vector.div(force, mass);
  acceleration.add(f);
}

function updateWind(val) {
  wind.x = map(val, 0, 1023, -1, 1);
}

function dropBall() {
  // Reset ball to the top
  position.y = 0;
  velocity.set(0, 0);
  acceleration.set(0, 0);
  hitGround = false;

  // Force LED off
  if (port.opened()) {
    port.write("0\n");
  }
}

SchematiC

Video

Link: https://drive.google.com/file/d/1bVrW1jPjtYBfAijWJPNHeHTnERkzNfPb/view?usp=sharing