Week 9 – Physical Computing’s Greatest Hits (and Misses)

“Physical Computing’s Greatest Hits (and Misses)” was like a fun tour through some of the most popular themes in interactive media projects and I appreciated how he didn’t just list the types of projects such as theremin-like instruments, drum gloves, tilty tables, video mirrors, etc. but really dug into why these ideas come up again and again.

What stood out to me most is how familiar many of these projects feel. Even if I haven’t built them myself, I’ve seen a lot of them or even thought about similar concepts. Igoe makes a great point that just because something’s been done before doesn’t mean you shouldn’t try your own take on it. There’s always room for originality in the way we approach or remix old ideas.

His section on LED fetishism was especially relatable and I feel like every beginner, including me, gets a little too excited about blinking lights. But even those simple projects can be meaningful with the right context.

I also liked his honesty about the limitations of certain projects. For example, waving over a sensor or watching yourself in a video mirror might be cool for a few seconds, but the interaction doesn’t always have depth. On the other hand, ideas like drum gloves or tilty controllers succeed because they connect more directly with natural, intuitive gestures.

Overall, Igoe’s piece made me think more critically about interaction design, not just what’s cool or visually interesting, but what’s actually meaningful to the person using it and I’m hoping that’s something I’ll carry into my own work.

Week 9 – Making Interactive Art: Set the Stage, Then Shut Up and Listen

This reading honestly made me rethink how I approach interactive stuff. Igoe’s whole “don’t interpret your own work” thing called me out in the best way. I’m definitely guilty of wanting to explain every little thing, and giving context for everything. But his point is solid, if you tell people exactly how to engage with your piece, you’re not really giving them space to explore or react on their own.

I liked how he described interactive art as starting a conversation, not just delivering a monologue. You build the thing, set the scene, give people some hints, and then let them do their thing. His comparison to directing actors was kind of perfect too. You don’t hand someone a script and say “now cry here and feel sad exactly like this.” You give them room to figure it out. Same goes for interactive art, you’re building the set and handing out props, but the audience gets to decide what it all means.

I think that idea of stepping back and letting go of control is both a little scary and kind of exciting. People might totally misinterpret what you were going for, but they might also surprise you in a good way. So yeah, I’m definitely keeping this in mind as I start making things, give just enough direction to spark curiosity, then let people make it their own.

Week 9 – Reading Response

Reading “Physical Computing’s Greatest Hits (and Misses)” was strangely comforting and inspiring at the same time. It helped me realize that a lot of the ideas I thought were already “done” or cliché—like using sensors to make interactive gloves or LED-based projects—are actually important milestones in learning and creativity. I used to feel discouraged when I saw someone else had already made something similar to what I had in mind, but this piece reframed that completely. It emphasized how each version of a repeated idea can still be fresh and meaningful when approached from a personal or unique angle. I found myself especially drawn to the “Fields of Grass” and “Things You Yell At” themes—they really match how I want people to feel something tactile or emotional when they interact with my work. This gave me permission to play, iterate, and remix existing concepts without feeling like I have to reinvent the wheel just to be valid.

That sense of permission and openness carried over into “Making Interactive Art: Set the Stage, Then Shut Up and Listen,” which really shifted how I think about authorship and control in interactive work. I’ve always felt the need to guide viewers to the “correct” meaning, but Tigoe’s argument for stepping back and letting the audience complete the piece through their own actions hit me hard. It reminded me that the most memorable interactions I’ve had with art happened when I could explore it freely, without being told what to think. The comparison to directing actors—offering intentions instead of rigid instructions—really reframed how I might approach building experiences. I’m beginning to see interactive art less like a fixed statement and more like a space for dialogue, where the audience brings the work to life and creates meaning in real time.

Week 9 – Making Interactive Art: Set the Stage, Then Shut Up and Listen

In the article, Tom Igoe talks about making interactive art and stresses that the artist’s role is to set up the experience and then step back. He explains that once the piece is in front of people, it should speak for itself without the creator needing to guide or explain everything. I thought this was a really powerful idea because it shifts control from the artist to the audience. It made me realize that true interaction happens when people can explore and react in their own way, not when they are being told exactly what to do. Igoe’s comparison of interactive art to setting a stage rather than delivering a message really stuck with me.

One thing that made me think more deeply was when he pointed out how important it is to listen to how people actually use and react to the work. Sometimes what users do might not match what the artist imagined, and that is okay. In fact, it is part of what makes interactive art exciting. It raises an interesting question though: if an audience interacts with a piece in a completely different way than intended, is the art still successful? I liked how the article encouraged flexibility and openness, and it reminded me that in interactive work, letting go of control is not a weakness but a strength.

Week 9 – Physical Computing’s Greatest Hits (and misses)

Tom Igoe’s article about physical computing shows how the field has grown through different projects, with some being very successful and others not working out as well. I found it really interesting how he talks about the importance of human interaction in successful projects, like the “Public Broadcast Cart” and “Topobo.” Igoe suggests that when creators make technology that is too complicated or focused only on being impressive, they lose the human connection that makes physical computing special. This made me think about how easy it is for people to focus on making something flashy instead of creating something meaningful or easy to use.

One thing I was wondering about is how Igoe decides what counts as a failure. He mentions that some projects are too self-centered or confusing for users, but I thought maybe even complicated projects could inspire new ideas for others. I also found it important when he talked about “learning by doing.” It shows that physical computing is not just about building cool devices, but about experimenting, failing, and trying again. It made me realize that failure can be just as helpful as success when creating something new. I liked how the article celebrated creativity but also reminded us that keeping people in mind is the most important part.

Reading Response 6 – Physical Computing & Interactivity (Week 9)

Reading 1: Physical Computing’s Greatest Hits (and misses)
When I read through the list of projects, I felt a mix of excitement and a bit of doubt. I love seeing new ideas for sensors, LEDs, and simple mechanical parts. At the same time, I wondered how many of these projects really make people stop and play. The drum glove idea made me smile, but I also thought: will users want to keep playing after the first try? The remote hug example hit me hard. It showed how a simple sensor could carry emotion across a room. I pictured my own version, maybe using a small motor to squeeze a pillow. That felt more personal than flashing lights. I also liked the “fields of grass” sensors. It made me think about how we touch the world around us. I realized that each project is more than a gadget. It is a way to connect our bodies with code. This reading reminded me to pick one idea, try it out, and see how people react. I don’t need the flashiest tech. I just need to build something that invites a smile or a question. And then I need to watch and learn from their moves.

Reading 2: Making Interactive Art: Set the Stage, Then Shut Up and Listen
When I read this piece, I realized that sometimes I talk too much about my projects. I write long instructions or guides. But here, the author says to set things up and then be quiet. That idea felt strange at first. I’m used to explaining every detail. I worry people will miss the point if I don’t. But I also saw how much freedom it gives to users. They can try things their own way. I thought about a demo I did for my capstone last month. I spent five minutes showing how to use the application I have built. After that, no one tried new ideas. Next time, I will just ask the users to open the app and try it out on their own, no directions. I will step back and watch. I will take notes on what people try first and what they ignore. I will let them find their own path. I feel nervous but also curious. This reading taught me that good design is a conversation, not a lecture. If I can listen, I will learn more than if I just tell. I feel excited to see what I will learn. I think this small change will make my work more alive. I’m ready to try this and see what surprises come up.

Week 9: Analog input & output

Video demo link : https://drive.google.com/file/d/1KHeKfNwfINI-l48dOEf03Td8BbLoIRbe/view?usp=drive_link

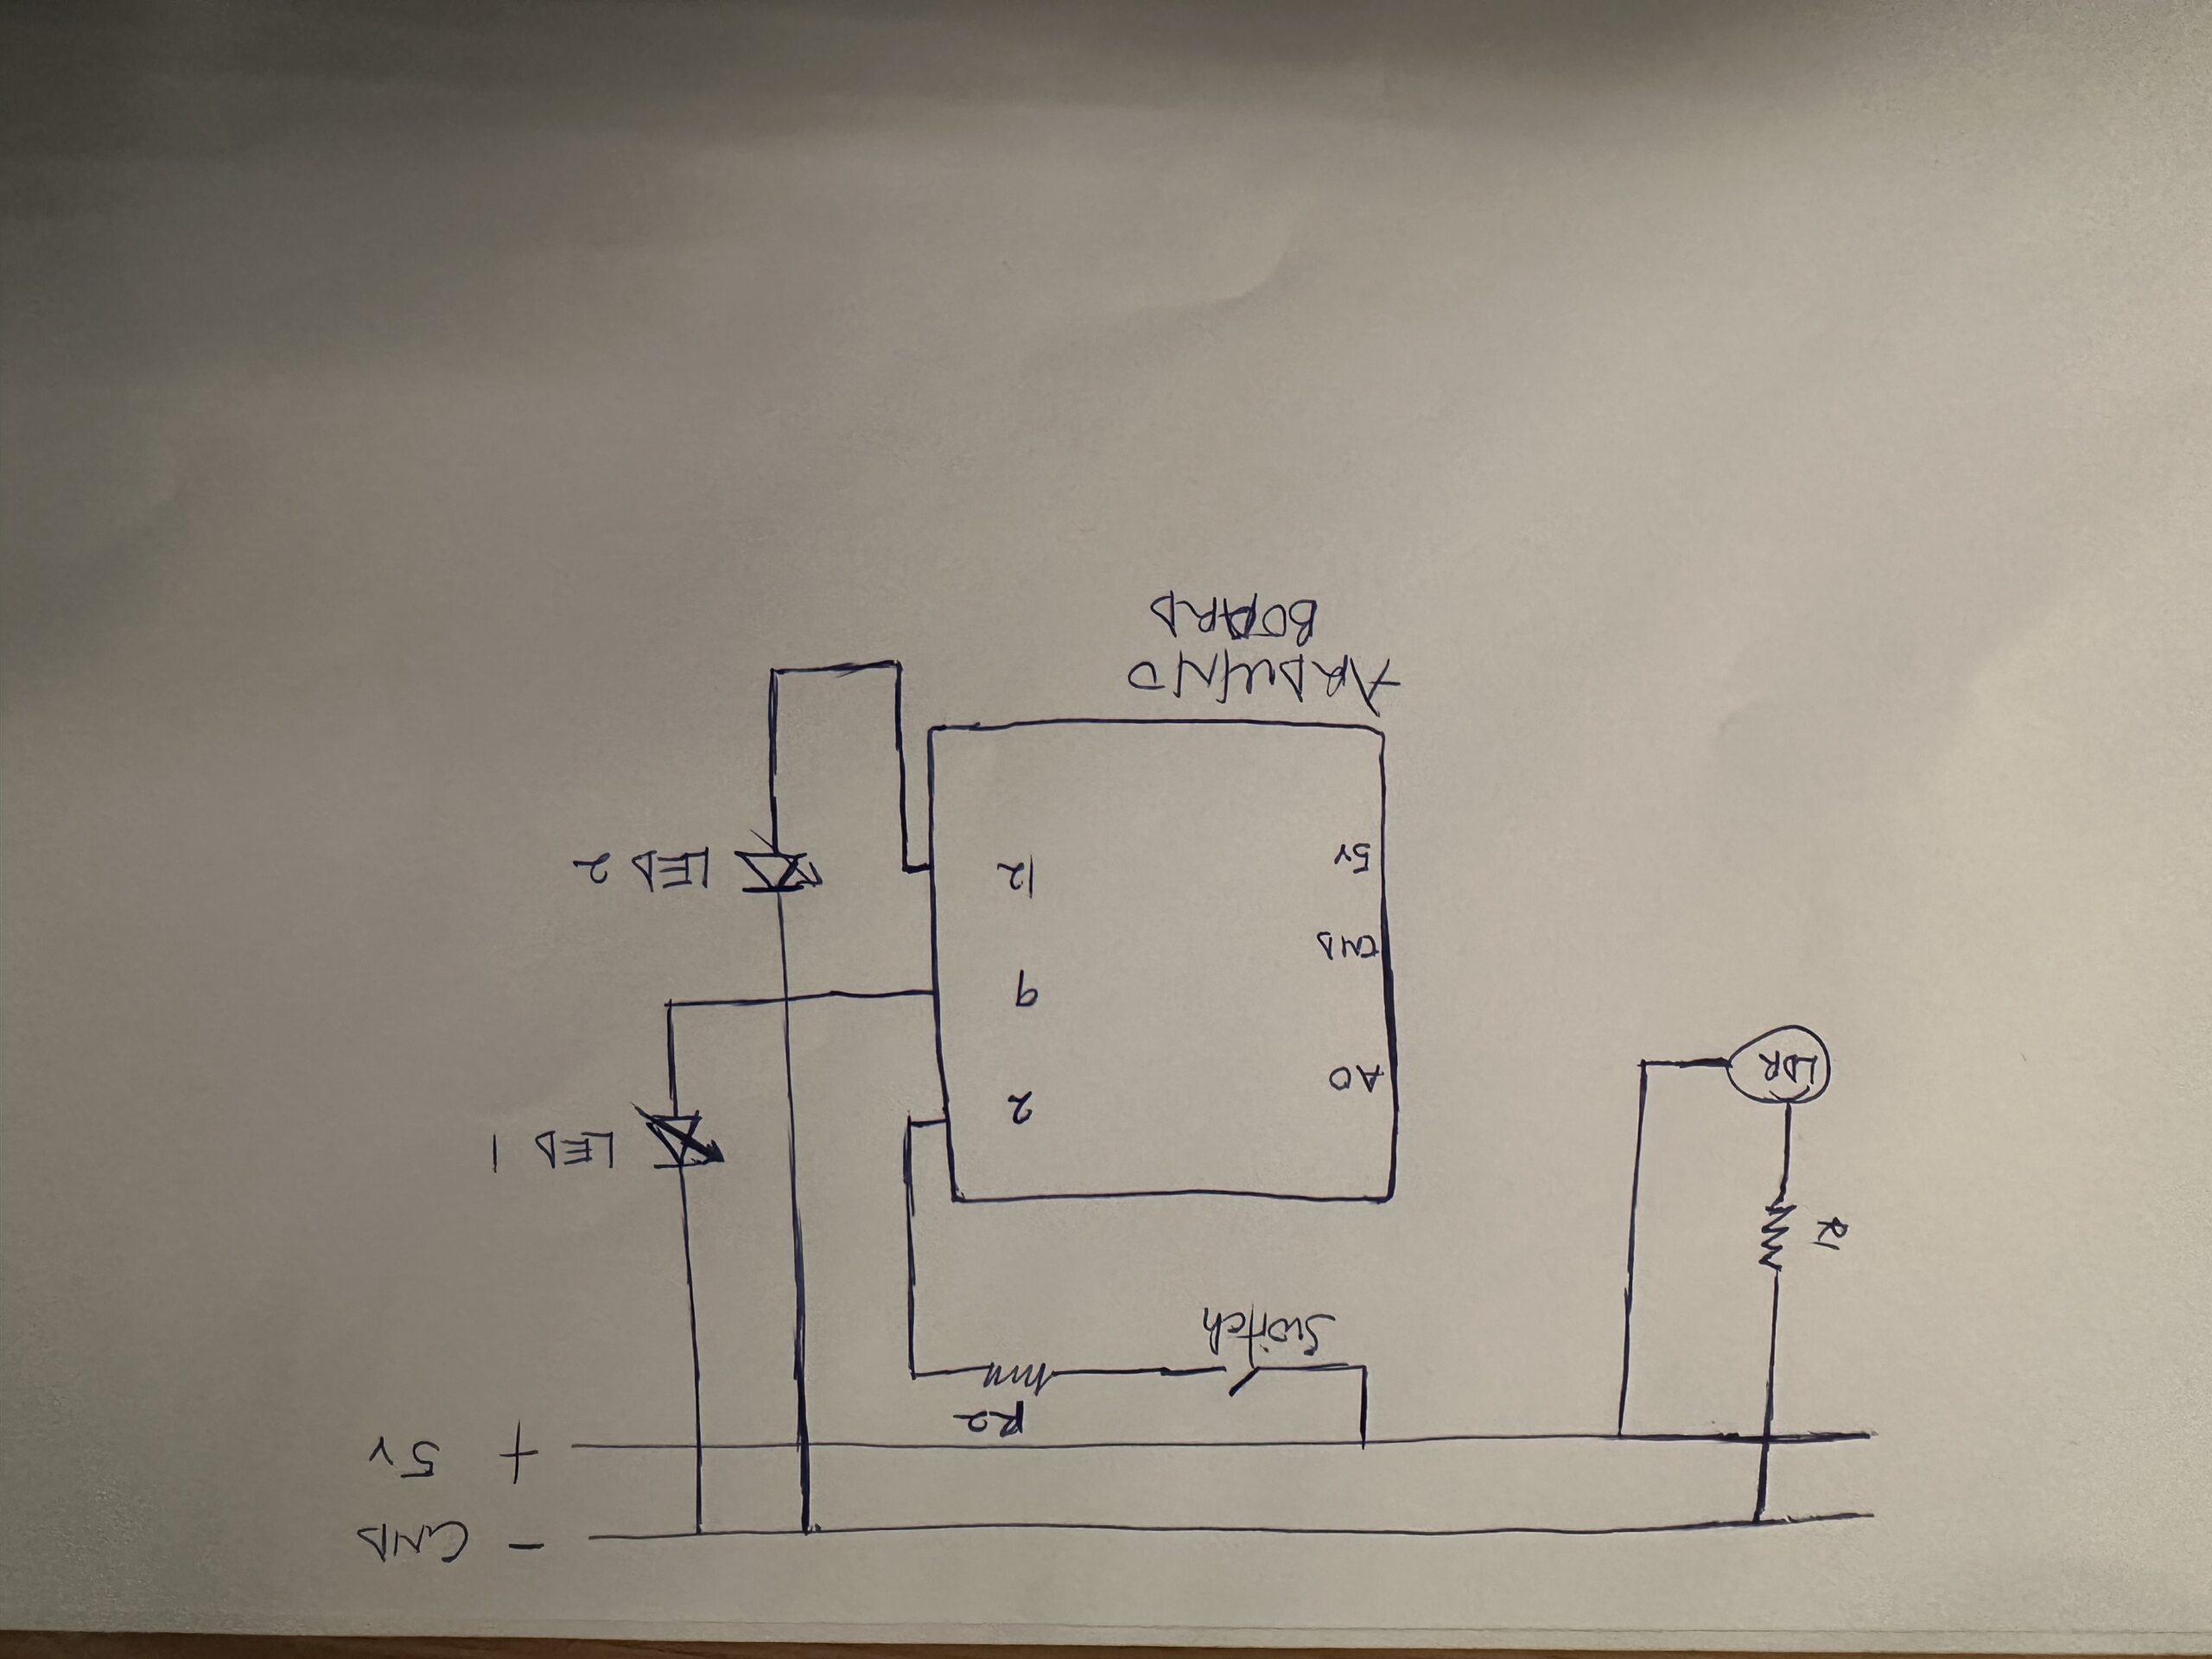
Hand-drawn schematic:

For this assignment, I set out to build a simple system using both a digital and an analog sensor to control two separate LEDs. My chosen components were an LDR (light-dependent resistor) for the analog input and a push button for the digital one. I liked the idea of mixing natural input (like ambient light) with a more deliberate human interaction (pressing a button) to affect two types of light output.

To keep things manageable, I started with just the LDR and one LED. The goal was to make the LED change brightness based on how much light the sensor picked up. I wired the LDR as part of a voltage divider, connected it to an analog input pin, and ran a basic analogRead() loop to see the values coming in. From there, I used the map() function to translate the light readings (from 0 to 1023) into PWM values (0 to 255) for controlling LED brightness. I also inverted the mapping, so the LED would get brighter when it was darker — which just felt more intuitive, like a night light.

Once that was working, I added the digital side of things with a simple push button. Pressing the button would turn a second LED on, and releasing it would turn it off. Simple on/off logic with digitalRead() and digitalWrite() did the trick. It was satisfying to see both LEDs responding to such different kinds of input — one gradual and ambient, the other instant and tactile.

One of the challenges I ran into was just getting reliable readings from the button. At first, it was behaving erratically because I forgot to use a pull-down resistor. Once I added that in, everything stabilized. I also realized pretty quickly that without any sort of filtering or delay, the analog LED could flicker a bit depending on the room lighting, so I added a small delay(100) to smooth things out a little.

const int ldrPin = A0;              // LDR connected to analog pin A0
const int buttonPin = 2;            // Push button connected to digital pin 2
const int ledAnalogPin = 9;         // PWM LED pin
const int ledDigitalPin = 12;       // On/off LED pin

void setup() {
  pinMode(buttonPin, INPUT);
  pinMode(ledAnalogPin, OUTPUT);
  pinMode(ledDigitalPin, OUTPUT);
  Serial.begin(9600);
}

void loop() {
  int ldrValue = analogRead(ldrPin);        
  int brightness = map(ldrValue, 0, 1023, 255, 0);  // Brighter in darkness

  analogWrite(ledAnalogPin, brightness);

  int buttonState = digitalRead(buttonPin);

  if (buttonState == HIGH) {
    digitalWrite(ledDigitalPin, HIGH);
  } else {
    digitalWrite(ledDigitalPin, LOW);
  }

  delay(100);
}

Looking back, the most satisfying part was seeing the analog LED respond in real-time to light changes. Just waving my hand over the sensor and watching the LED slowly brighten gave a cool sense of control — like making a light react to shadows. It reminded me of automatic lights in stairways or hotel lobbies, except mine was sitting on a breadboard.

In the future, I’d like to swap the button for a capacitive touch sensor or maybe even a motion detector, so the LED lights up when someone walks by. Or take the LDR further by combining it with an RGB LED that changes color depending on how dark it is — there’s a lot of room to build from this foundation.

Week 9 – Analog and Digital

Concept

When thinking about this weeks assignment I wanted to make something that is interactive and also fun to use. I was thinking for a while and then I decided to make a game where we play against the Arduino. The game is simple, the Arduino thinks of a random number and we need to try to guess it. But out of all numbers how would we guess which one Arduino thought of. Well by turning the potentiometer left or right we are adjusting the number that is the representation of our guess which we lock in by clicking on the switch. The closer we are to the number Arduino thought of the brighter does the blue LED become and when we think we got the answer we press on the switch and we either get a green or a red light from the LEDs, depending on if our answer is correct or not.

Implementation

The design, as mentioned above uses a potentiometer to change change the value of the choice number the user will select. A pushbutton switch is used to lock in the answer and get feedback from the LEDs. A blue LED is used as an indicator on how close we are getting to the answer and the red and green ones are used to give feedback if the answer is correct or not. The design also uses one 10k ohm resistor for the button and three 330 ohm resistors for the LEDs.

Her is the schematic of the circuit.

Code I am proud of
int potValue = analogRead(potPin);           // 0–1023
int guess = map(potValue, 0, 1023, 0, 100);  // Convert to 0–100 range

int difference = abs(guess - targetNumber);     // Distance from correct
int brightness = map(difference, 100, 0, 0, 255); // Closer = brighter
brightness = constrain(brightness, 0, 255);
analogWrite(blueLEDPin, brightness);

This part of the code took some time to get right. I used the map function we recently used in class to make the LED brighter the closer we got to the correct number.

Challenges and future improvements

I again faced challenge with the cable management. The breadboard sometimes feels too small for all of the cables, sensors and resistors to fit and a lot of time when I would finish plugging a resistor in I would accidently unplug a cable with my hands. This is something I definitely want to work on for future projects. As for this design specifically, I would like to implement a reset button so the whole device doesn’t need to be reset every time a guess is made, also some audio queues would probably be a nice addition to the whole concept. Maybe also including a screen from which the user could see what numbers they are choosing would bring the game to a whole another level. Overall working with Arduinos is very fun and I enjoy it even more with every project we do.

Week 9 – Reading Response

Physical Computing’s Greatest Hits (and misses):

The first category that popped up was a theremin-esque instrument and that’s exactly how I described my week 9 assignment with sound produced based on distance/motion. It’s interesting how motifs get repeated constantly in physical computing. Core functionalities repeat, but how you make it different and your own spin on the functionality makes physical computing worth pursuing. This blog brought up an important point about interactions that have meaning. Rather than simply mimicing a user’s actions or mapping one to one interactions, thinking about why certain interactions are valuable can fuel a physical computing project even more. For example, I really liked the accessibility examples provided like the one where a someone uses their wheelchair as a painting tool as opposed to their limbs.

Making Interactive Art: Set the Stage, Then Shut Up and Listen

Interactive art is a mix of design and art — your piece should invoke the right emotions without having the tell the users how to feel. Just like how a sign doesn’t need to say push or pull on a door — it should be intuitive (design principles). An interactive piece is a conversation, not a one-sided story where the artist tells the user how to feel or approach the piece. The piece can grow and evolve with feedback or reactions the users provide. By listening to their side of the conversion, you can learn a lot about how people behave with your piece and ways to change it. This brings me back to a previous reading response we had about interactivity as not just a response to users’ actions, but a tool for users to create with. By giving users a sense of agency, they’re able to creative the art with you. We as artists might feel inclined to spell out our intentions for audiences and explain how complex our projects are, but if a project is truly complex and thoughtful, it shouldn’t need explanation.

Assignment 9: Digital and Analogue Detection

This is my Analogue and Digital device sensing machine. It uses an Ultrasonic sensor and Push button to change the brightness of LEDs and to toggle them on/off.

Assignment Brief

  • Get information from at least one analogue sensor and at least one digital sensor
  • Use this information to control at least two LEDs, one in a digital fashion and the other in an analog fashion
  • Include a hand-drawn schematic in your documentation

Conceptualisation

The idea for this project was inspired by the desire to create an interactive system that responds to both user input and environmental conditions. I wanted to design a setup where users could actively engage with the system while also observing dynamic feedback. By using an ultrasonic sensor as the analog input, I aimed to create a setup where distance could influence the brightness of an LED, making it visually engaging. Additionally, I incorporated a pushbutton as the digital input to provide manual control over another LED, allowing for a tactile interaction. This combination of sensors and LEDs was chosen to demonstrate how analog and digital inputs can work together in a creative and functional way.

Process

  1. Component Selection: I gathered an Arduino board, an Ultrasonic Sensor (HC-SR04), LEDs, Resistors, Pushbutton Switch, and Jumper Wires

  2. Circuit Assembly: I connected the ultrasonic sensor to the Arduino, ensuring proper wiring for its VCC, GND, TRIG, and ECHO pins. I connected the pushbutton switch to one of the digital pins on the Arduino with an internal pull-up resistor. I wired two LEDs: one LED was connected to a PWM pin for analog brightness control; the other LED was connected to a digital pin for simple on/off functionality.

  3. Code Development: I wrote Arduino code that: Reads distance data from the ultrasonic sensor; maps the distance data to control the brightness of one LED using PWM; reads input from the pushbutton switch to toggle another LED on or off. The code also included debugging statements for monitoring sensor data via the Serial Monitor.

  4. Calibration: I tested and calibrated the ultrasonic sensor by experimenting with different distance thresholds. This involved adjusting the mapping range for brightness control and ensuring accurate detection of distances within 100 cm. For the pushbutton, I verified its functionality by toggling the digital LED on and off during testing.

Challenges

  1. Sensor Accuracy: The ultrasonic sensor occasionally gave inconsistent readings due to interference or non-flat surfaces. To address this, I ensured proper alignment of objects in front of the sensor during testing

  2. False Triggers: Early versions of the code caused unintended behavior due to incorrect wiring and delays in signal processing. I resolved this by carefully re-checking connections and optimizing delay times in the code

  3. Brightness Mapping: Mapping distance values (0–100 cm) to PWM brightness (0–255) required fine-tuning to achieve smooth transitions in LED brightness.

Potential Improvements

  1. Multiple Sensors: Adding more ultrasonic sensors could allow for multi-directional distance sensing, enabling more complex interactions.

  2. Enhanced Visual Feedback: Using RGB LEDs instead of single-color LEDs could provide more dynamic visual responses based on distance or button presses.

  3. Energy Efficiency: Exploring low-power modes and more efficient components could extend battery life for portable applications.

Schematic Diagram

Source Code

// Pin assignments
const int trigPin = 7;       // Trig pin for ultrasonic sensor
const int echoPin = 6;       // Echo pin for ultrasonic sensor
const int buttonPin = 2;     // Digital pin for pushbutton
const int ledAnalogPin = 9;  // PWM pin for analog-controlled LED
const int ledDigitalPin = 13; // Digital pin for on/off LED

void setup() {
  pinMode(trigPin, OUTPUT);
  pinMode(echoPin, INPUT);
  pinMode(buttonPin, INPUT_PULLUP); // Enable internal pull-up resistor
  pinMode(ledDigitalPin, OUTPUT);
  pinMode(ledAnalogPin, OUTPUT);

  Serial.begin(9600); // For debugging
}

void loop() {
  // Measure distance using ultrasonic sensor
  long duration, distance;
  
  digitalWrite(trigPin, LOW);
  delayMicroseconds(2);
  
  digitalWrite(trigPin, HIGH);
  delayMicroseconds(10);
  
  digitalWrite(trigPin, LOW);
  
  duration = pulseIn(echoPin, HIGH);
  
  // Calculate distance in centimeters
  distance = duration * 0.034 / 2;

  // Map distance (0-100 cm) to PWM range (0-255)
  int brightness = map(distance, 0, 100, 0, 255);

  // Control brightness of analog-controlled LED
  analogWrite(ledAnalogPin, brightness);

  // Read pushbutton state
  int buttonState = digitalRead(buttonPin);

  // Toggle digital-controlled LED based on button press
  if (buttonState == LOW) { // Button pressed
    digitalWrite(ledDigitalPin, HIGH);
  } else {
    digitalWrite(ledDigitalPin, LOW);
  }

  // Debugging output
  Serial.print("Distance: ");
  Serial.print(distance);
  Serial.print(" cm | Brightness: ");
  Serial.println(brightness);

  delay(100); // Small delay for stability
}