
Concept
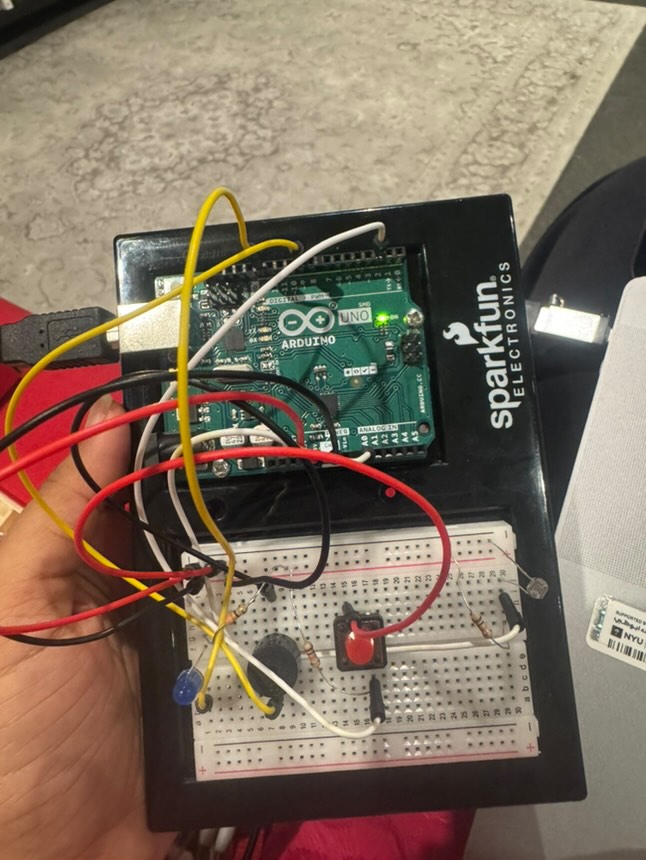
For this assignment, me and Maliha made an interactive light-sensitive sound device using an Arduino Uno, a photoresistor (LDR), a pushbutton, an LED, and a piezo speaker. When the button is pressed, the Arduino reads the surrounding light level using the LDR and maps that value to a specific sound frequency. The speaker then emits a tone depending on the brightness or darkness—darker settings yield higher-pitched tones, and brighter settings yield lower-pitched tones. Meanwhile, the LED lights up to signal that the system is reading and responding actively. This project taught us how sensors, inputs, and outputs are combined to build responsive circuits.

Code Highlights
const int ldrPin = A0;         // LDR connected to analog pin A0
const int buttonPin = 2;       // Button connected to digital pin 2
const int speakerPin = 9;      // Speaker connected to digital pin 9
const int ledPin = 13;         // LED connected to pin 13

// Dramatically different frequencies (non-musical)
int notes[] = {100, 300, 600, 900, 1200, 2000, 3000};

void setup() {
  pinMode(buttonPin, INPUT);         // Button logic: HIGH when pressed
  pinMode(speakerPin, OUTPUT);
  pinMode(ledPin, OUTPUT);
  Serial.begin(9600);
}

void loop() {
  int buttonState = digitalRead(buttonPin); // Read the button

  if (buttonState == HIGH) {
    int lightLevel = analogRead(ldrPin);         // Read LDR
    int noteIndex = map(lightLevel, 0, 1023, 6, 0); // Bright = low note
    noteIndex = constrain(noteIndex, 0, 6);      // Keep within range
    int frequency = notes[noteIndex];            // Pick frequency

    tone(speakerPin, frequency);                 // Play note
    digitalWrite(ledPin, HIGH);                  // LED on

    Serial.print("Light: ");
    Serial.print(lightLevel);
    Serial.print(" | Frequency: ");
    Serial.println(frequency);
  } else {
    noTone(speakerPin);            // No sound
    digitalWrite(ledPin, LOW);     // LED off
  }

  delay(100);
}
Video Demonstration
Challenges
One of the problems we faced was getting accurate light readings from the photoresistor since small changes in lighting at times caused big frequency jumps. We also had trouble keeping the wiring on the breadboard tidy and making sure each device was correctly connected to power and ground. Debugging the circuit and double-checking the connections fixed the issues and taught us about how analog inputs and digital outputs work together.