Concept
It was my birthday recently and while thinking of this week’s assignment, I came up with the idea to create a birthday-themed project. I wanted to specifically capture the moment when the lights are turned off and your loved ones bring a cake to you with candles on it while singing happy birthday.

Implementation
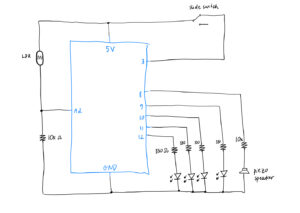
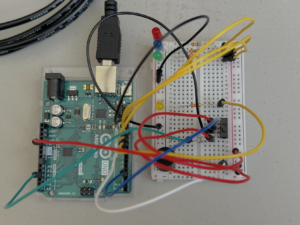
The analog sensor is a photoresistor that controls the on/off state of the 3 LEDs (red, blue and green). When the brightness is below a certain threshold, i.e. the room is dark, the 3 LEDs light up, as if party lights are turned on. The digital sensor (switch) is a slide switch that we perform a digitalRead from. When the switch closes the circuit, the yellow LED in the middle lights up to simulate a birthday candle being lit up and the piezo speaker starts playing the birthday song. The song and the yellow LED can be stopped by sliding the switch to open the circuit.
We didn’t use the slide switch in class and I was a bit confused by the 3 pins, so I referred to this video to complete the analog sensor portion. Another cool resource I found is this GitHub repo that contains Arduino code for a bunch of different songs and melodies. I simply copy pasted the code for the birthday melody from this repo and it worked perfectly!

// ------------ source: https://github.com/robsoncouto/arduino-songs/blob/master/happybirthday/happybirthday.ino
// happy birthday song portion
// change this to make the song slower or faster
int tempo = 140;

// change this to whichever pin you want to use
int buzzer = 8;

// notes of the melody followed by the duration.
// a 4 means a quarter note, 8 an eighteenth , 16 sixteenth, so on
// !!negative numbers are used to represent dotted notes,
// so -4 means a dotted quarter note, that is, a quarter plus an eighteenth!!
int melody[] = {

  // Happy Birthday
  // Score available at https://musescore.com/user/8221/scores/26906

  NOTE_C4,4, NOTE_C4,8,
  NOTE_D4,-4, NOTE_C4,-4, NOTE_F4,-4,
  NOTE_E4,-2, NOTE_C4,4, NOTE_C4,8,
  NOTE_D4,-4, NOTE_C4,-4, NOTE_G4,-4,
  NOTE_F4,-2, NOTE_C4,4, NOTE_C4,8,

  NOTE_C5,-4, NOTE_A4,-4, NOTE_F4,-4,
  NOTE_E4,-4, NOTE_D4,-4, NOTE_AS4,4, NOTE_AS4,8,
  NOTE_A4,-4, NOTE_F4,-4, NOTE_G4,-4,
  NOTE_F4,-2,

};

// sizeof gives the number of bytes, each int value is composed of two bytes (16 bits)
// there are two values per note (pitch and duration), so for each note there are four bytes
int notes = sizeof(melody) / sizeof(melody[0]) / 2;

// this calculates the duration of a whole note in ms
int wholenote = (60000 * 4) / tempo;

int divider = 0, noteDuration = 0;
// ------------

int analogPin = A2;
int switchPin = 3;

void setup() {
  Serial.begin(9600);

  pinMode(12, OUTPUT);
  pinMode(11, OUTPUT);
  pinMode(10, OUTPUT);
  pinMode(9, OUTPUT);
  pinMode(switchPin, INPUT);
}

void loop() {

  int lightValue = analogRead(analogPin);
  int switchState = digitalRead(switchPin);

  // turn on the red, blue, green LEDs
  if (lightValue < 400) {
    digitalWrite(12, HIGH);
    digitalWrite(11, HIGH);
    digitalWrite(10, HIGH);
  } else {
    // turn off the 3 LEDs
    digitalWrite(12, LOW);
    digitalWrite(11, LOW);
    digitalWrite(10, LOW);
  }

  if (switchState == HIGH) {
    // turn on the yellow LED
    digitalWrite(9, HIGH);
    // play happy birthday
    for (int thisNote = 0; thisNote < notes * 2; thisNote = thisNote + 2) {
      // Check switch state during playback
      if (digitalRead(switchPin) == LOW) {
        digitalWrite(9, LOW);   // Turn off the LED
        noTone(buzzer);         // Stop any sound
        break;                  // Exit the loop
      }

      divider = melody[thisNote + 1];
      if (divider > 0) {
        noteDuration = (wholenote) / divider;
      } else if (divider < 0) {
        noteDuration = (wholenote) / abs(divider);
        noteDuration *= 1.5;
      }

      tone(buzzer, melody[thisNote], noteDuration * 0.9);
      delay(noteDuration);
      noTone(buzzer);
    }
  } else {
    // turn off the yellow LED
    digitalWrite(9, LOW);
    // stop playing happy birthday
    noTone(buzzer);
  }

  Serial.println(lightValue);
}
Challenges and Future Improvements
I really liked working on this week’s assignment and I am quite happy with the concept as well as the final result. I did try to make the candle (aka the yellow LED) blow-able, by taking the wind-blowing idea from Mustafa, so that when you make a blow, the LED turns off, but I got stuck on seamlessly closing/opening the circuit with wind without using a very lightweight/airy material like aluminium foil (as I didn’t have any with me ), so I let go of that idea in the end. All in all, I am happy I got to further review and practice working with Arduino, and now I am feeling a lot more comfortable working with it!

