After reading “A Brief Rant on The Future of Interaction Design,” I find myself questioning the direction of future technology. The author’s firsthand experience in designing real prototypes brings credibility to their skepticism towards futuristic interaction concepts portrayed in videos. This makes me wonder about the reliability of visionary ideas depicted in media compared to practical implementation. For instance, the author emphasizes the importance of considering human capabilities in interface design, which resonates with my own experiences of struggling with certain digital interfaces that seem disconnected from natural human interactions.
Moreover the author talks about how current ideas for future technology don’t fully consider what humans are capable of. He mention that the way we interact with devices now, like touching screens, might not be the best way. The author thinks we should pay more attention to how we use our hands and bodies in everyday tasks, like making breakfast or tying shoelaces. This made me think about how we usually use technology and if there might be better ways to do things.
I wonder if the author is biased because they used to work in interaction design, so they might have strong opinions based on their experience. But it also seems like they have good reasons for their opinions, like their knowledge of how real prototypes work. Reading this made me realize that maybe we need to think more creatively about how we design technology. Instead of just sticking to what we know, we should consider what humans are naturally good at and how we can make technology work better with that. This raises questions for me about how we can encourage more innovative thinking in technology design and whether there are already ideas out there that we’re not paying enough attention to.
After reading the responses to the author’s rant on the future of interaction design, I’m struck by the importance of acknowledging problems even without offering immediate solutions. In this reading, I agree with the author because the author makes it clear that identifying issues is the first step towards finding answers through research and innovation. This makes me think about how society often expects instant solutions without recognizing the complexity of the problems we face. It also raises questions about the role of patience and long-term thinking in addressing technological challenges.
One interesting point raised in the reading is the comparison between current technology like the iPad and historical innovations such as the Kodak camera. The author suggests that while these technologies are revolutionary in their own right, there’s still room for improvement and innovation. This made me reflect on the idea that just because something is good now doesn’t mean it can’t be better in the future. It prompts me to consider how we can continue to evolve and refine technology to better serve human needs and capabilities. This analogy also prompts me to consider how today’s revolutionary advancements, like the iPad, might be stepping stones towards even greater developments in the future. However, the warning against complacency and the call for dynamic, tangible interfaces remind me that progress should not stagnate. It also makes me wonder what steps we can take to ensure that future technology continues to evolve in ways that enhance human capabilities rather than limiting them.
Victor urges designers to defy convention and rethink how we engage with technology through his criticism.
Victor’s initial outburst functions as a wake-up call, stressing how crucial quick feedback loops and user-friendly interfaces are to creating meaningful user experiences. He highlights how technology can empower people and foster creativity, and he pushes for a move towards direct manipulation and user-centric design.
There is a wide range of viewpoints from the design world in the replies to Victor’s questions. While some share his views and support his vision for the direction of interface design, others present opposing arguments and voice legitimate doubts about the viability and practicality of his suggestions.
In my opinion, Victor makes strong arguments. I really like how he emphasises user empowerment and the transformative power of interactive technologies. His appeal for creativity is in line with my own conviction that technology has the ability to improve human experiences and encourage meaningful interaction.
I do, however, recognize the difficulties of turning creative concepts into workable solutions. Victor makes some insightful and thought-provoking suggestions, but putting them into practice in real-world settings necessitates giving considerable thought to user requirements, technology limitations, and wider societal ramifications.
Music possesses a remarkable capacity to bridge cultural and linguistic divides and unite individuals from diverse backgrounds. Motivated by the notion of promoting interactive experiences and democratizing music creation, we set out to build a one-of-a-kind musical instrument out of buttons and Arduino. Our intention was to enable people to use sound as a creative medium for self-expression, irrespective of their experience with music. We chose the piano as our main inspiration because we could recreate the chords using buttons.
💡 Process:
Using Arduino Uno we wired up buttons to serve as interactive triggers for different musical notes. Each button was assigned a specific pitch or sound, allowing users to create melodies by pressing combinations of buttons. We leveraged our programming skills to code the logic behind the instrument, ensuring seamless functionality and an intuitive user interface.
🚀 Difficulties:
Although our journey was exciting and innovative, there were certain difficulties. A major challenge we encountered was guaranteeing the reliability and consistency of button pushes. We have to use precise calibration and filtering techniques to get beyond problems like noise interference and debounce.
There were additional difficulties in creating an intuitive user interface. To ensure that users could simply grasp how to interact with the instrument while still having the freedom to explore and experiment with various musical compositions, we had to find a balance between simplicity and utility.
Our arduino illustration:
The code:
onst int speakerPin = 9;  // Speaker connected to pin 9
int buttonPins[] = {2, 3, 4, 5};  // Button pins for C, D, E, F
int notes[] = {262, 294, 330, 349};  // Frequencies for C4, D4, E4, F4

void setup() {
  // Set up each button pin as an input with pull-up resistors
  for (int i = 0; i < 4; i++) {
    pinMode(buttonPins[i], INPUT_PULLUP);
  }
  // Set the speaker pin as an output
  pinMode(speakerPin, OUTPUT);
}

void loop() {
  // Check each button and play the corresponding note
  for (int i = 0; i < 4; i++) {
    if (digitalRead(buttonPins[i]) == LOW) {  // Check if button is pressed
      tone(speakerPin, notes[i]);  // Play the corresponding note
      delay(200);  // A short delay to help debounce the button
      while (digitalRead(buttonPins[i]) == LOW);  // Wait for the button to be released
      noTone(speakerPin);  // Stop playing the note
    }
  }
}
Reading Bret Victor’s “A Brief Rant on the Future of Interaction Design” was a wake-up call. It made me question the direction we’re heading with technology and the limitations we’re placing on ourselves by focusing solely on “Pictures Under Glass.” Victor’s point about our hands resonated deeply with me. We interact with the world through touch, manipulating objects, and receiving feedback through our fingertips. Yet, many of our current devices ignore this fundamental aspect of human capability. They offer a flat, sterile experience that limits our ability to connect with the digital world truly.
The examples he uses, like tying shoelaces or making a sandwich, were eye-opening. These everyday tasks highlight the incredible talent and nuanced control we possess. It seems almost absurd to think that the future of interaction should involve simply sliding our fingers across a screen.
Victor’s call for a more ambitious vision that embraces the full potential of our bodies and our senses is inspiring. I imagine a future where we interact with technology more naturally and intuitively, using gestures, movement, and touch to manipulate digital objects as if they were physical. This reading has challenged me to think differently about interaction design. It’s not just about creating interfaces that look sleek and futuristic; it’s about designing human-centered experiences that leverage our innate capabilities and allow us to interact with the digital world in a natural and empowering way.
I believe the future of interaction lies beyond the screen in a world where technology seamlessly integrates with our physical reality and empowers us to create, explore, and connect in ways we can only begin to imagine.
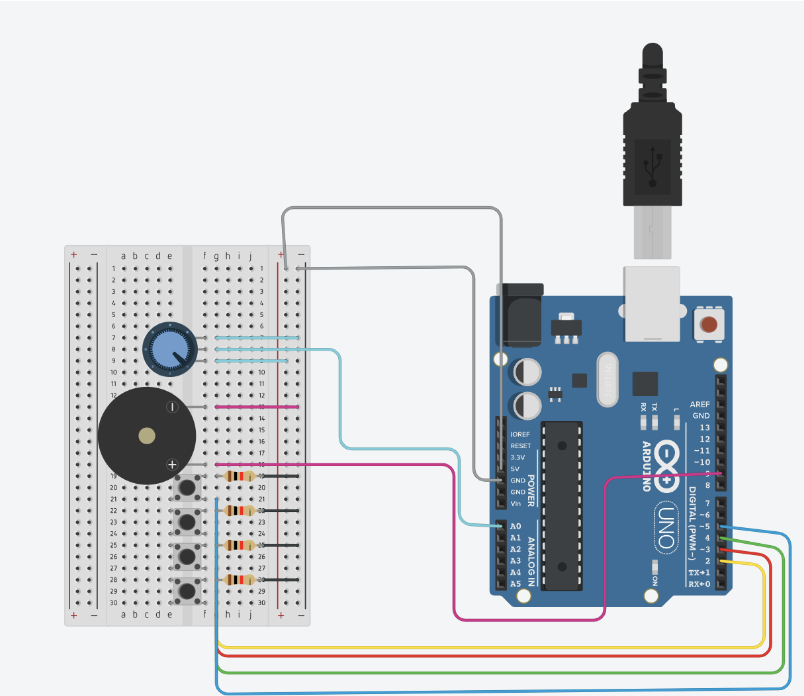
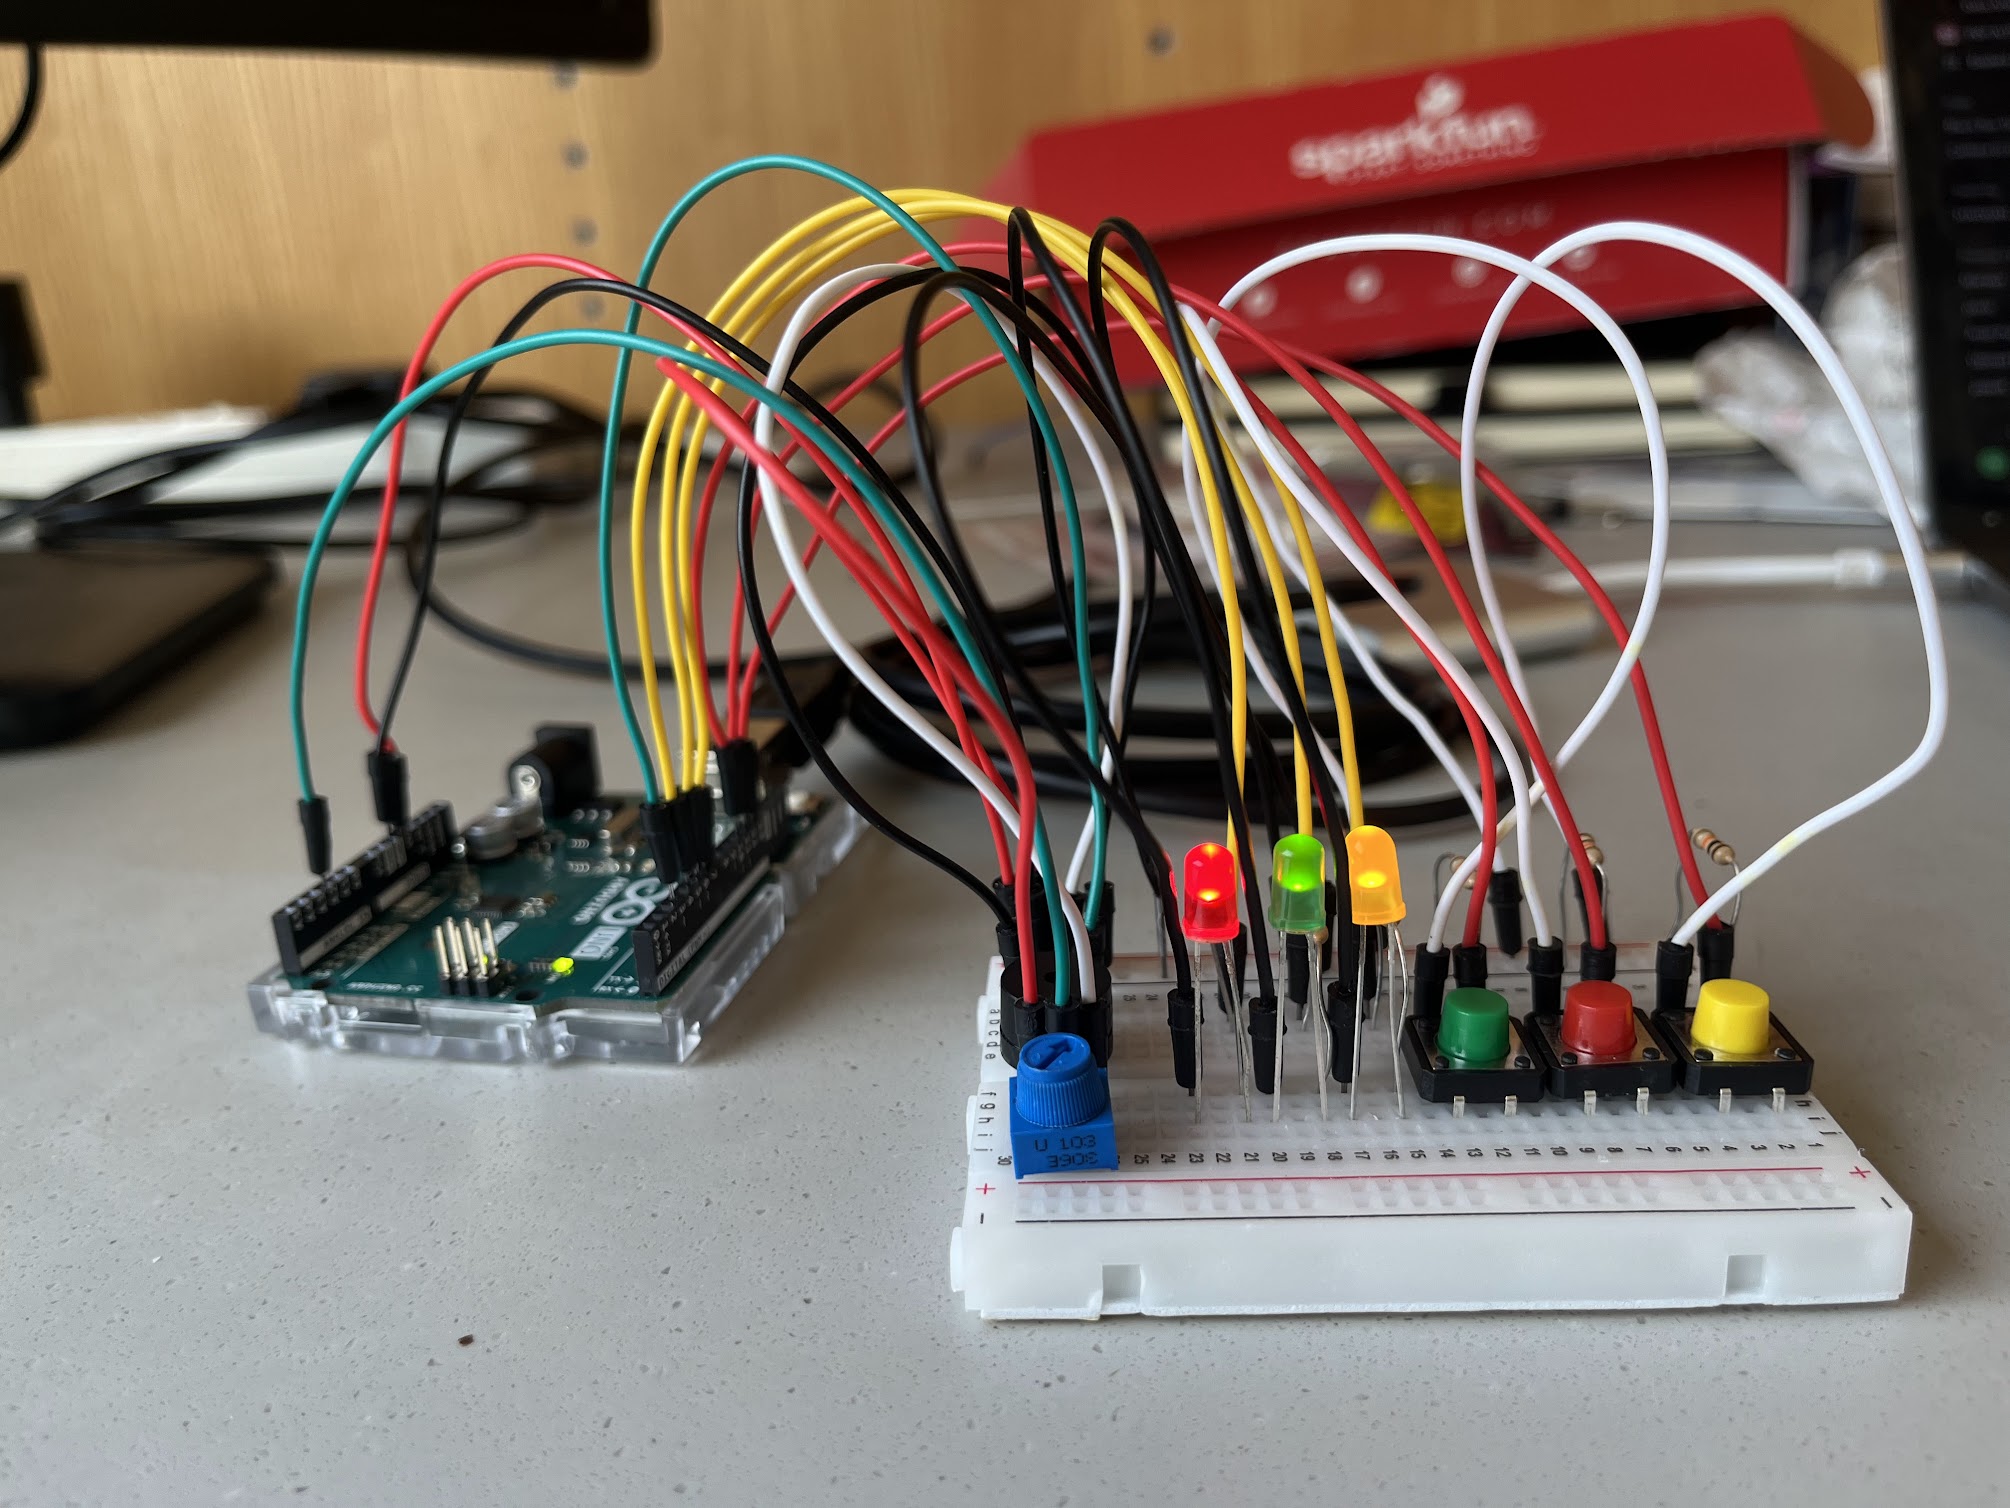
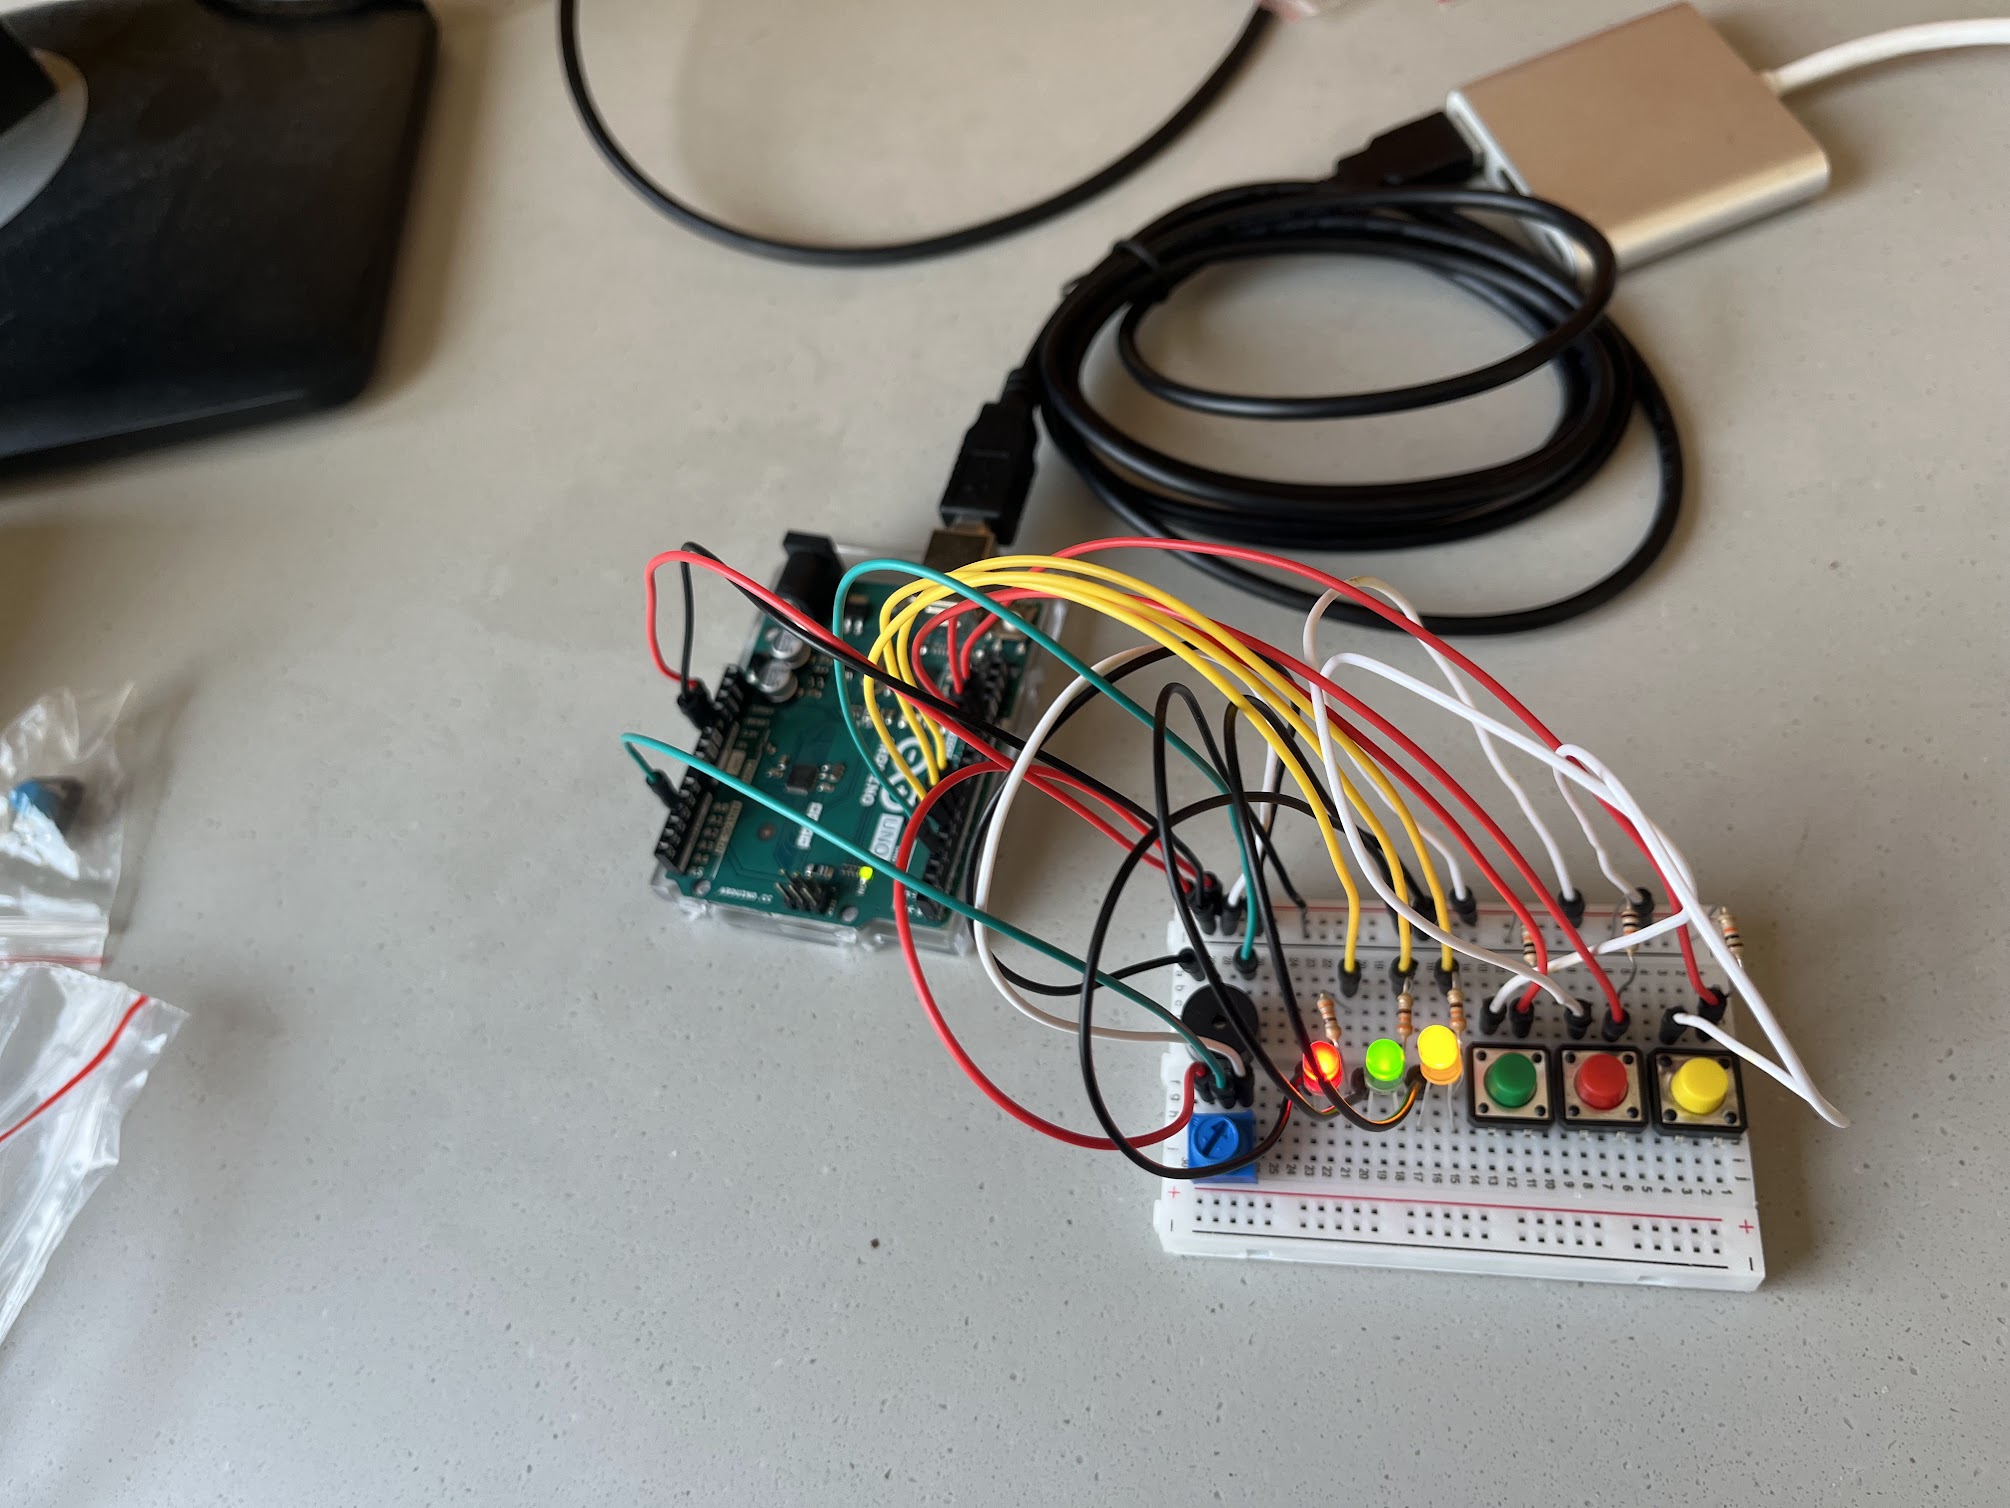
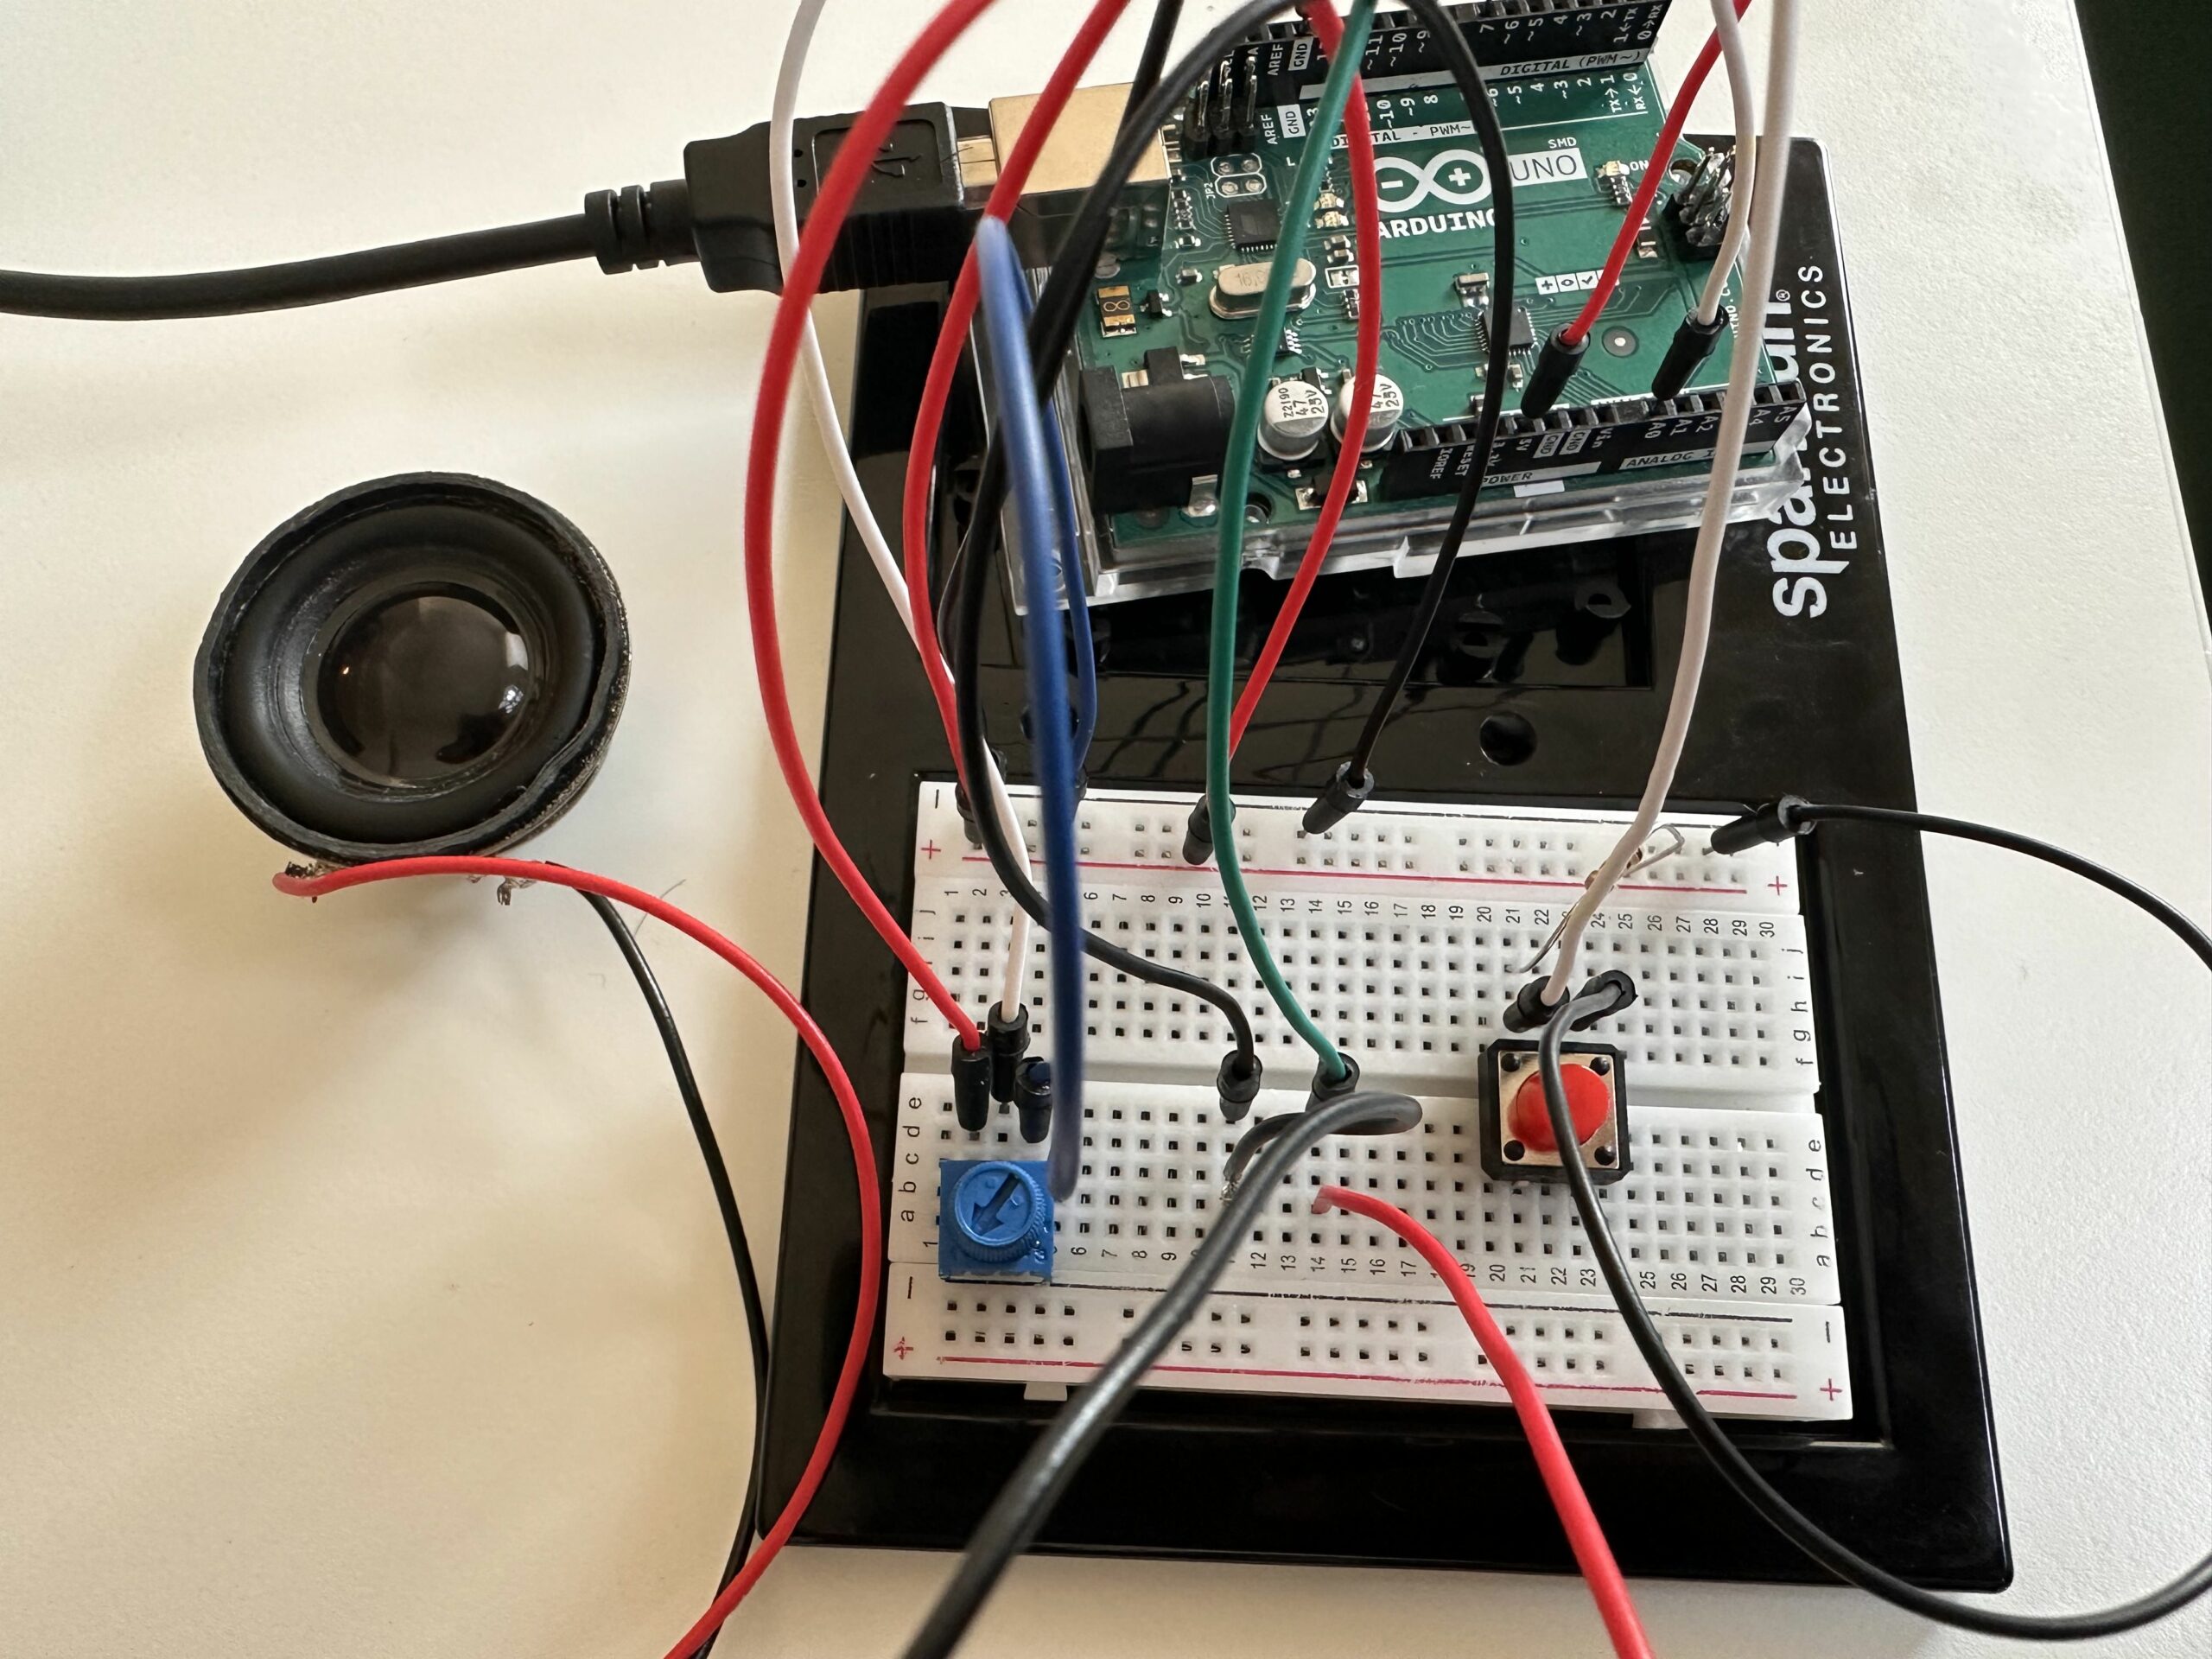
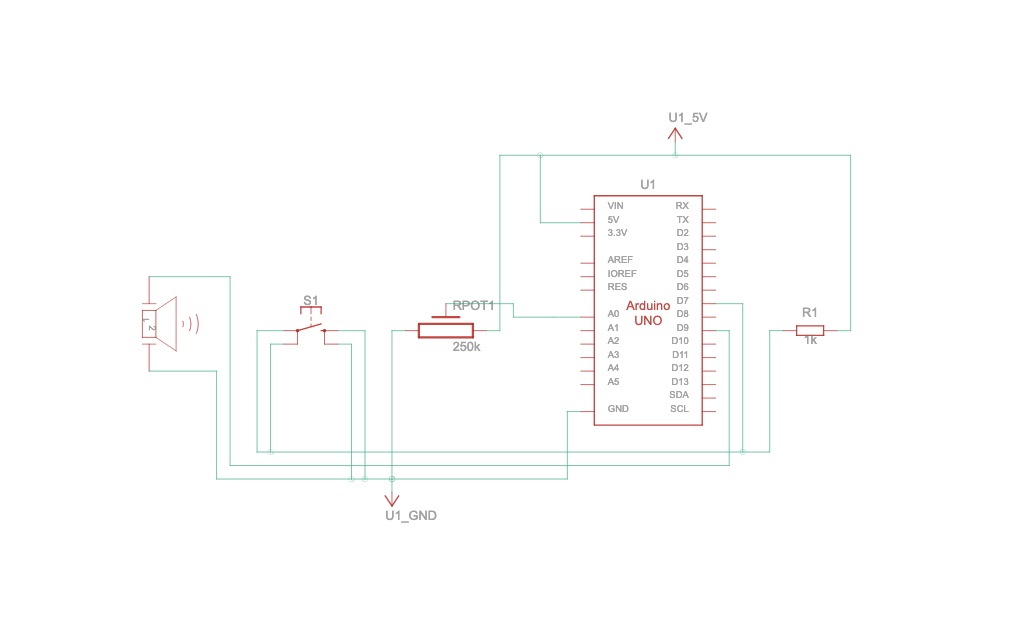
This project explores the interaction between LEDs, buttons, a potentiometer, and a buzzer to create an engaging sensory experience. Let’s break down the idea and reflect on the process.
Components and Functionality
Breadboard
Arduino UNO
LEDs: These provide visual feedback based on button presses.
Buttons: Each button is associated with a specific LED. Pressing a button activates the corresponding LED and triggers a sound.
Potentiometer: controls the pitch of the sound produced by the buzzer.
Buzzer: generates sound based on the button press and the potentiometer’s readings.
330-ohm resistors (3)
10k ohm resistors (3)
Photo
Video
Schematic
Code
const int redLED = 6;
const int greenLED = 5;
const int yellowLED = 7;
const int redButton = 12;
const int greenButton = 11;
const int yellowButton = 13;
const int potPin = A2;
const int buzzerPin = 3;

void setup() {
  pinMode(redLED, OUTPUT);
  pinMode(greenLED, OUTPUT);
  pinMode(yellowLED, OUTPUT);

  pinMode(redButton, INPUT_PULLUP);
  pinMode(greenButton, INPUT_PULLUP);
  pinMode(yellowButton, INPUT_PULLUP);

  // Initialize Serial for debugging
  Serial.begin(9600);
}

void loop() {
  // Read potentiometer value
  int potValue = analogRead(potPin);
  // Map potentiometer value to a frequency range (e.g., 100 Hz to 2000 Hz)
  int frequency = map(potValue, 0, 1023, 100, 2000);

  // Check each button and activate the corresponding LED and buzzer
  if (digitalRead(redButton) == LOW) {
    digitalWrite(redLED, HIGH);
    tone(buzzerPin, frequency);  // Play buzzer at mapped frequency
    delay(100);  // delay
  } else {
    digitalWrite(redLED, LOW);
  }

  if (digitalRead(greenButton) == LOW) {
    digitalWrite(greenLED, HIGH);
    tone(buzzerPin, frequency + 100);  // Slightly higher pitch for green button
    delay(100);  // Debounce delay
  } else {
    digitalWrite(greenLED, LOW);
  }

  if (digitalRead(yellowButton) == LOW) {
    digitalWrite(yellowLED, HIGH);
    tone(buzzerPin, frequency + 200);  // Even higher pitch for yellow button
    delay(100);  // Debounce delay
  } else {
    digitalWrite(yellowLED, LOW);
  }
  delay(10);
}
Reflections
Seeing the LEDs light up and hearing the buzzer’s pitch change in response to my actions was incredibly satisfying. It’s amazing how these simple components, combined with code, can create such an engaging experience.
I particularly enjoyed the challenge of mapping the potentiometer’s value to the buzzer’s frequency. Finding the proper range to create pleasing sounds and ensuring smooth transitions between pitches was a fun puzzle.
Challenges
– Debouncing: Ensuring buttons register single presses can be tricky. The current code uses simple delays, but more robust debouncing techniques could be implemented.
– Sound Complexity: The buzzer produces simple tones. Exploring libraries like Mozzi could enable more complex and engaging soundscapes.
Potential Enhancements
Light patterns: Explore blinking or fading LEDs for more dynamic visuals.
Multiple tones/melodies: Utilize libraries to create richer audio experiences.
Interactive games: Design games based on button presses and timing.
LCD display: Incorporate a display to show instructions or scores.
Music possesses a remarkable capacity to bridge cultural and linguistic divides and unite individuals from diverse backgrounds. Motivated by the notion of promoting interactive experiences and democratizing music creation, we set out to build a one-of-a-kind musical instrument out of buttons and Arduino. Our intention was to enable people to use sound as a creative medium for self-expression, irrespective of their experience with music. We chose the piano as our main inspiration because we could recreate the chords using buttons.
💡 Process:
Using Arduino Uno we wired up buttons to serve as interactive triggers for different musical notes. Each button was assigned a specific pitch or sound, allowing users to create melodies by pressing combinations of buttons. We leveraged our programming skills to code the logic behind the instrument, ensuring seamless functionality and an intuitive user interface.
🚀 Difficulties:
Although our journey was exciting and innovative, there were certain difficulties. A major challenge we encountered was guaranteeing the reliability and consistency of button pushes. We have to use precise calibration and filtering techniques to get beyond problems like noise interference and debounce.
There were additional difficulties in creating an intuitive user interface. To ensure that users could simply grasp how to interact with the instrument while still having the freedom to explore and experiment with various musical compositions, we had to find a balance between simplicity and utility.
Arduino illustration:
The code:
const int speakerPin = 9;  // Speaker connected to pin 9
int buttonPins[] = {2, 3, 4, 5};  // Button pins for C, D, E, F
int notes[] = {262, 294, 330, 349};  // Frequencies for C4, D4, E4, F4
int potPin = A0;  // Potentiometer connected to A0
int volume;
int melody[] = {262, 262, 349, 349, 330, 330, 294};  // Melody for Twinkle Twinkle
int noteDurations[] = {500, 500, 500, 500, 500, 500, 500};  // Duration of each note


void setup() {
 for (int i = 0; i < 4; i++) {
   pinMode(buttonPins[i], INPUT_PULLUP);
 }
 pinMode(speakerPin, OUTPUT);
}


void loop() {
 volume = analogRead(potPin) / 4;  // Read volume level from potentiometer


 if (digitalRead(buttonPins[0]) == LOW) {  // Check if the first button is pressed
   playSong();
 }
 for (int i = 0; i < 4; i++) {
   if (digitalRead(buttonPins[i]) == LOW) {  // Check if any button is pressed
     tone(speakerPin, notes[i], volume);  // Play note with dynamic volume
     delay(200);  // A short delay to help debounce the button
     while (digitalRead(buttonPins[i]) == LOW);  // Wait for button release
     noTone(speakerPin);  // Stop the note
   }
 }
}


void playSong() {
 for (int thisNote = 0; thisNote < 7; thisNote++) {
   int noteDuration = 1000 / noteDurations[thisNote];
   tone(speakerPin, melody[thisNote], noteDuration);
   int pauseBetweenNotes = noteDuration * 1.30;
   delay(pauseBetweenNotes);
   noTone(speakerPin);
 }
Concept : This project is a creative exploration into the realm of music and interactivity. Inspired by the dynamic role of a DJ, we have created a turntable that allows users to listen two globally popular songs: “Despacito” by Luis Fonsi and Daddy Yankee, and the “Mario Theme Song” by Koji Kondo for Nintendo. The project aims to provide a simple yet enjoyable experience, blending Western and Eastern musical influences.
Objective: The primary objective is to design an interactive turntable that allows the user to play and switch between two distinct songs using a digital switch and an analog potentiometer, emulating the experience of a DJ.
Components we used:
Arduino UNO
Potentiometer (Analog Sensor)
Push Button (Digital Sensor)
Miniature Speaker
10k Ohms Resistor
Implemented Code with comments:
#include "pitches.h"

#define BUZZER_PIN 9
#define POTENTIOMETER_PIN A0
#define BUTTON_PIN 7

// Melody for the first song
int melody1[] = {
  NOTE_D4, NOTE_CS4, NOTE_B3, NOTE_FS3, NOTE_FS3, NOTE_FS3, NOTE_FS3, NOTE_FS3,
  NOTE_FS3, NOTE_B3, NOTE_B3, NOTE_B3, NOTE_A3, NOTE_B3, NOTE_G3, NOTE_G3, NOTE_G3, NOTE_G3, NOTE_G3,
  NOTE_G3, NOTE_B3, NOTE_B3, NOTE_B3, NOTE_B3, NOTE_CS4, NOTE_D4, NOTE_A3, NOTE_A3, NOTE_A3, NOTE_A3, NOTE_A3,
  NOTE_A3, NOTE_D4, NOTE_D4, NOTE_D4, NOTE_D4, NOTE_E4, NOTE_E4, NOTE_CS4
};

// Note durations for the first song
int noteDurations1[] = {
  4,4,8,8,16,16,16,16,
  16,16,16,8,16,8,16/3,16,16,16,16,
  16,16,16,16,8,16,8,16/3,16,16,16,16,
  16,16,16,16,8,16,8,16/3
};

// Melody for the second song
int melody2[] = {
  NOTE_E4, NOTE_E4, NOTE_E4, NOTE_C4, NOTE_E4, NOTE_G4, NOTE_G3, NOTE_C4, NOTE_G3, NOTE_E3, NOTE_A3, NOTE_B3, NOTE_AS3, NOTE_A3,NOTE_G3,NOTE_E4,NOTE_G4,NOTE_A4,NOTE_F4,NOTE_G4,NOTE_E4,NOTE_C4,NOTE_D4,NOTE_B3,NOTE_C4
};

// Note durations for the second song
int noteDurations2[] = {
  16,8,8,16,8,4,4,16/3,16/3,16/3,8,8,16,8,32/3,32/3,32/3,8,16,8,8,16,16,16/3,8
};

// Flag to indicate if a song is currently playing
bool songPlaying = false;
// Variable to store the previous state of the button
bool lastButtonState = false;

// Setup function to initialize the pins
void setup() {
  // Set the buzzer pin as output
  pinMode(BUZZER_PIN, OUTPUT);
  // Set the button pin as input with internal pull-up resistor enabled
  pinMode(BUTTON_PIN, INPUT_PULLUP);
}

// Loop function to continuously check for button presses and play melodies
void loop() {
  // Read the current state of the button
  bool buttonState = digitalRead(BUTTON_PIN);

  // Check if the button is pressed and it was not pressed in the previous loop iteration
  if (buttonState == LOW && lastButtonState == HIGH) {
    // Toggle the song playing state
    songPlaying = !songPlaying;

    // Start or stop playing the selected song
    if (songPlaying) {
      // If the potentiometer value is less than 512, play the first melody; otherwise, play the second melody
      if (analogRead(POTENTIOMETER_PIN) < 512) {
        playMelody(melody1, noteDurations1, sizeof(melody1) / sizeof(int));
      } else {
        playMelody(melody2, noteDurations2, sizeof(melody2) / sizeof(int));
      }
    } else {
      // If the song was playing, stop playing it
      noTone(BUZZER_PIN);
    }
  }

  // Update the last button state for the next iteration
  lastButtonState = buttonState;
}

// Function to play a melody
void playMelody(int melody[], int noteDurations[], int size) {
  // Iterate over each note in the melody
  for (int thisNote = 0; thisNote < size; thisNote++) {
    // Calculate the duration of the current note
    int noteDuration = 1000 / noteDurations[thisNote];
    // Play the current note on the buzzer pin
    tone(BUZZER_PIN, melody[thisNote], noteDuration);
    // Wait for the duration of the note
    delay(noteDuration * 2);
    // Stop playing the note
    noTone(BUZZER_PIN);
    // Add a short pause between notes
    delay(noteDuration * 0.1);
  }
}
Code Logic:
The code begins by defining the pin numbers for the buzzer, potentiometer, and button. The buzzer pin is where the speaker is connected, the potentiometer pin is where the potentiometer (for selecting songs) is connected, and the button pin is where the push button (for controlling song playback) is connected.
In the setup() function, the buzzer pin is set as an output, and the button pin is set as an input with an internal pull-up resistor enabled. This configuration ensures that the button pin reads HIGH when the button is not pressed and LOW when it is pressed. Moreover two melodies are defined (melody1 and melody2), each represented as an array of note frequencies. Corresponding to each melody, two arrays (noteDurations1 and noteDurations2) define the duration of each note in the melodies.
In the loop() function, the code continuously checks the state of the button. When the button transitions from HIGH to LOW (indicating a button press), the code toggles the songPlaying variable to start or stop playing the selected song. If songPlaying is true, the code reads the potentiometer value to determine which melody to play. If the potentiometer value is less than 512, it plays melody1; otherwise, it plays melody2. If songPlaying is false, it stops playing the melody by calling noTone() on the buzzer pin.
The playMelody() function is responsible for playing a melody. It takes as input the melody array, note duration array, and the size of the melody. Inside the function, it iterates over each note in the melody, calculates the duration of the note, plays the note using tone(), adds a short delay between notes, and then stops playing the note using noTone().
Video Demonstration:
Images of the circuit:
Schematics Sketch:
Circuit connections from above Schematics diagram.
1) Potentiometer Connections: The potentiometer is crucial for song selection and control. It has three pins: two for power and one for the signal. The outer pins are connected to the 5V and GND (ground) terminals on the Arduino to provide it with power. The middle pin, which is the wiper, is connected to the analog input A0 on the Arduino. As the user turns the knob of the potentiometer, the resistance changes, and the Arduino reads this as an analog value, allowing the user to blend between the two songs.
2) Button Connections: A push button is used to start or stop the song playback. One side of the button is connected to the digital pin 2 on the Arduino. The other side is connected to the GND terminal on the breadboard. A pull-up resistor is not necessary as the Arduino’s internal pull-up resistor is used in the code to avoid floating values when the button is not pressed.
3) Speaker Connections: The speaker, which outputs the sound, has two wires. The positive wire is connected to digital pin 8 on the Arduino. This pin is set up in the code to deliver a pulse-width modulation (PWM) signal that creates the audio tones for the songs. The negative wire from the speaker is connected directly to the GND terminal on the breadboard to complete the circuit.
4) Power Connections: The breadboard’s power rail is used to distribute the 5V and GND connections to the potentiometer and the button. Wires run from the 5V and GND pins on the Arduino to the power rail on the breadboard.
With this setup, the user interacts with the button and potentiometer to control the playback of “Despacito” and the “Mario Theme Song”. The code on the Arduino processes the input signals and triggers the speaker to play the appropriate song based on the state of the button and the value from the potentiometer.
What does the Analog and Digital Sensor do in this circuit? – Schematics:
The code and circuit are structured to respond to the interactions with the potentiometer and the push button:
1) Button Press: Initiates the playback of “Despacito” or stops the current song.
2) Potentiometer Rotation: Facilitates the blending from “Despacito” to the “Mario Theme Song.” and vice versa.
The user must press the button to start playing “Despacito.” They can then rotate the potentiometer to initiate the “Mario Theme Song” by pressing the button again. This interaction can be repeated to switch between the two songs.
Challenges & Reflections:
1) Connecting the buzzer, potentiometer, and push button to the Arduino board together proved to be trickier than anticipated. We encountered issues with loose connections, incorrect wiring, and misplacing the digital pin assignments. Later then, we carefully reviewed the circuit diagram and schematics to double-checked each wiring connection, additionally we also referenced the Arduino documentation and class slides to ensure we understood the purpose and functionality of each sensor working nature.
2) When testing the circuit, we noticed inconsistencies in melody playback. Some notes were not playing correctly, and there were unexpected pauses between notes and some notes are repeating itself. To troubleshoot this issue, we reviewed the code related to melody playback and examined the arrays containing note pitches and durations. We adjusted the timing parameters and experimented with different delay values to ensure smooth transitions between notes.
Future Improvements:
1) To create a vibrant atmosphere that mimics a mini club, we aim to incorporate LEDs that flash in sync with the music notes.
2) To provide a more DJ-like experience, we intend to program more songs and add a crossfade effect, allowing one song to ease into the other as the potentiometer is turned, instead of multiple switches.
Due to the development of technology, people are having less and less contacts with the actual environment. Therefore, we are getting more familiar with the sensory of the plastics and glass screen rather the actual environment. We are more familiar with see images through a glass screen (and nowadays we have VR/AR technologies to replace that). Hence, it seems that we start to forgot how to interact with the actual objects and environment.
Take the hand as the example. The hands in the futuristic environment are used as an intermediate tool to have a visually satisfied results. However, why should the hands have only that limited functionality (only touches)? As mentioned in the reading, the hands can understand the change in patterns, change in weight. It is very sensitive to any changes. Therefore, why don’t make it to be responsible for more interactive things.
I believe that the potential for changing the ways we interact with technology is really significant. Interactivity does not necessary comes from the screen itself. It is how the user interact with it. Therefore, the technology should be the intermediate tool for any actions that will be carried out by the audiences. Physical computing seems to be a possible way to do that. While using the hardware materials as the central technologies, the actions and sensory are experienced by the users.
Finally, this is not to say that all of the current technologies of tablet and laptop are the terrible choices. My point is that those technologies shall not be the main attention of our interaction with any media and technology.
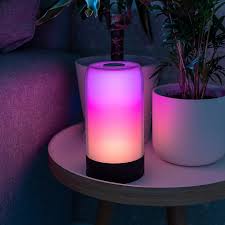
My idea for the final project is the Interactive Mood Lamp, a user-responsive system that combines hardware interaction through Arduino and software interfacing via P5.js to create an emotionally adaptive environment. This system utilizes a webcam to capture the user’s facial expressions, which are then processed through P5.js to analyze and interpret emotions. Following this analysis, the detected emotions are communicated to an Arduino-controlled RGB LED lamp, which changes its colors accordingly. The primary goal of this project is to provide visual feedback based on the user’s emotional state.
Sensing: The project begins with the webcam capturing live video of the user’s face. This video feed is processed by a P5.js application running on a connected computer. The application utilizes a facial recognition algorithm, potentially enhanced by machine learning libraries
Processing: Upon identifying an emotion, the P5.js application assigns a specific color to represent each mood: blue might indicate sadness, green happiness, red anger, and yellow surprise. This color mapping will be based on common psychological associations between colors and emotions
Responding: After processing the emotional data, the P5.js application sends the corresponding color command to the Arduino via a serial communication link. The Arduino then adjusts the RGB LED’s color to match the detected emotional state.
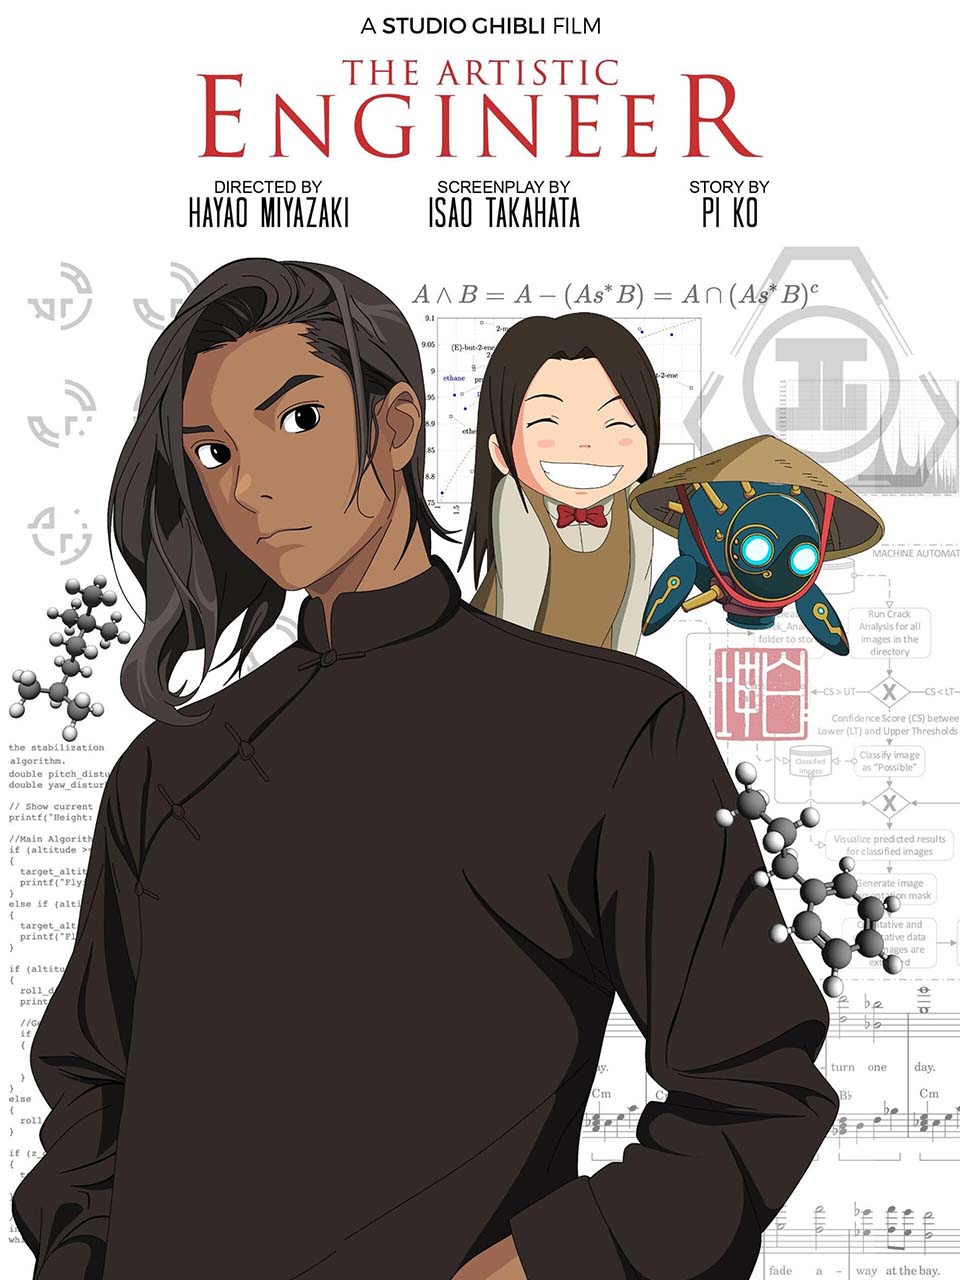
“Pi, you are cursed as the Artistic Engineer. Artists and engineers alone don’t share this burden.
But you, your unconscious artist within dreams the idealistic, fictional, perfect beauty, and the conscious engineer within, uses any methods possible, uncompromisingly, to bring that perfect fiction into reality.
Yet, when reality falls short of your dreams, a piece of your soul dies each time.
~ Pi’s father, after Pi surviving the panic attack
Yes, this is my greatest curse. I dream perfection, and kill my soul little by little. I have put myself into life threatening situations…. People warn me… Pi, Pi, life is not always the wholesome Ghibli films.
I mean… Duh 🤷♂️ ! I have this poster above my bed.
I religiously worship Hayao Miyazaki, and have always been inspired by the the Dutch kinetic sculptor Theo Jansen. Jansen is one of the few people who managed to bring my Ghibli dreams into reality. He developed a planar leg mechanism, which converts rotatory motion into a living creature.
And, Pi heart was hurt very very deeply with great pain. So we have –
Ghibli Movies
Walking Mechanism and
Pi’s heart pain
And smashing them together gives…. wait for it –
Hence, ladies and gents (and everyone in between), I present …
Backstory
In a realm of both steam and green, Pi the artistic engineer lived in a castle on legs of iron and steam. His home, grand and tall, walked on land with ease. Pi, in his chamber of echoes, wove art, spun gears, and melodies spilled like whispers of a stream.
The castle’s pulse, Pi’s own heart encased in a labyrinth of cogs and sparks, pushed it to dance across the valleys and peaks. It moved with the rhythm of his boundless dreams.
One sad day, the heart stopped. The castle stood still, and so did Pi.
Now, you stand before this slumbering giant. To wake it, to heal Pi, you must delve into the heart’s core, where steam circuits lie in wait of knowing hands. Each piece you fit, each puzzle you solve, is a beat returned, a hope rekindled, and will wake up the castle and Pi again.
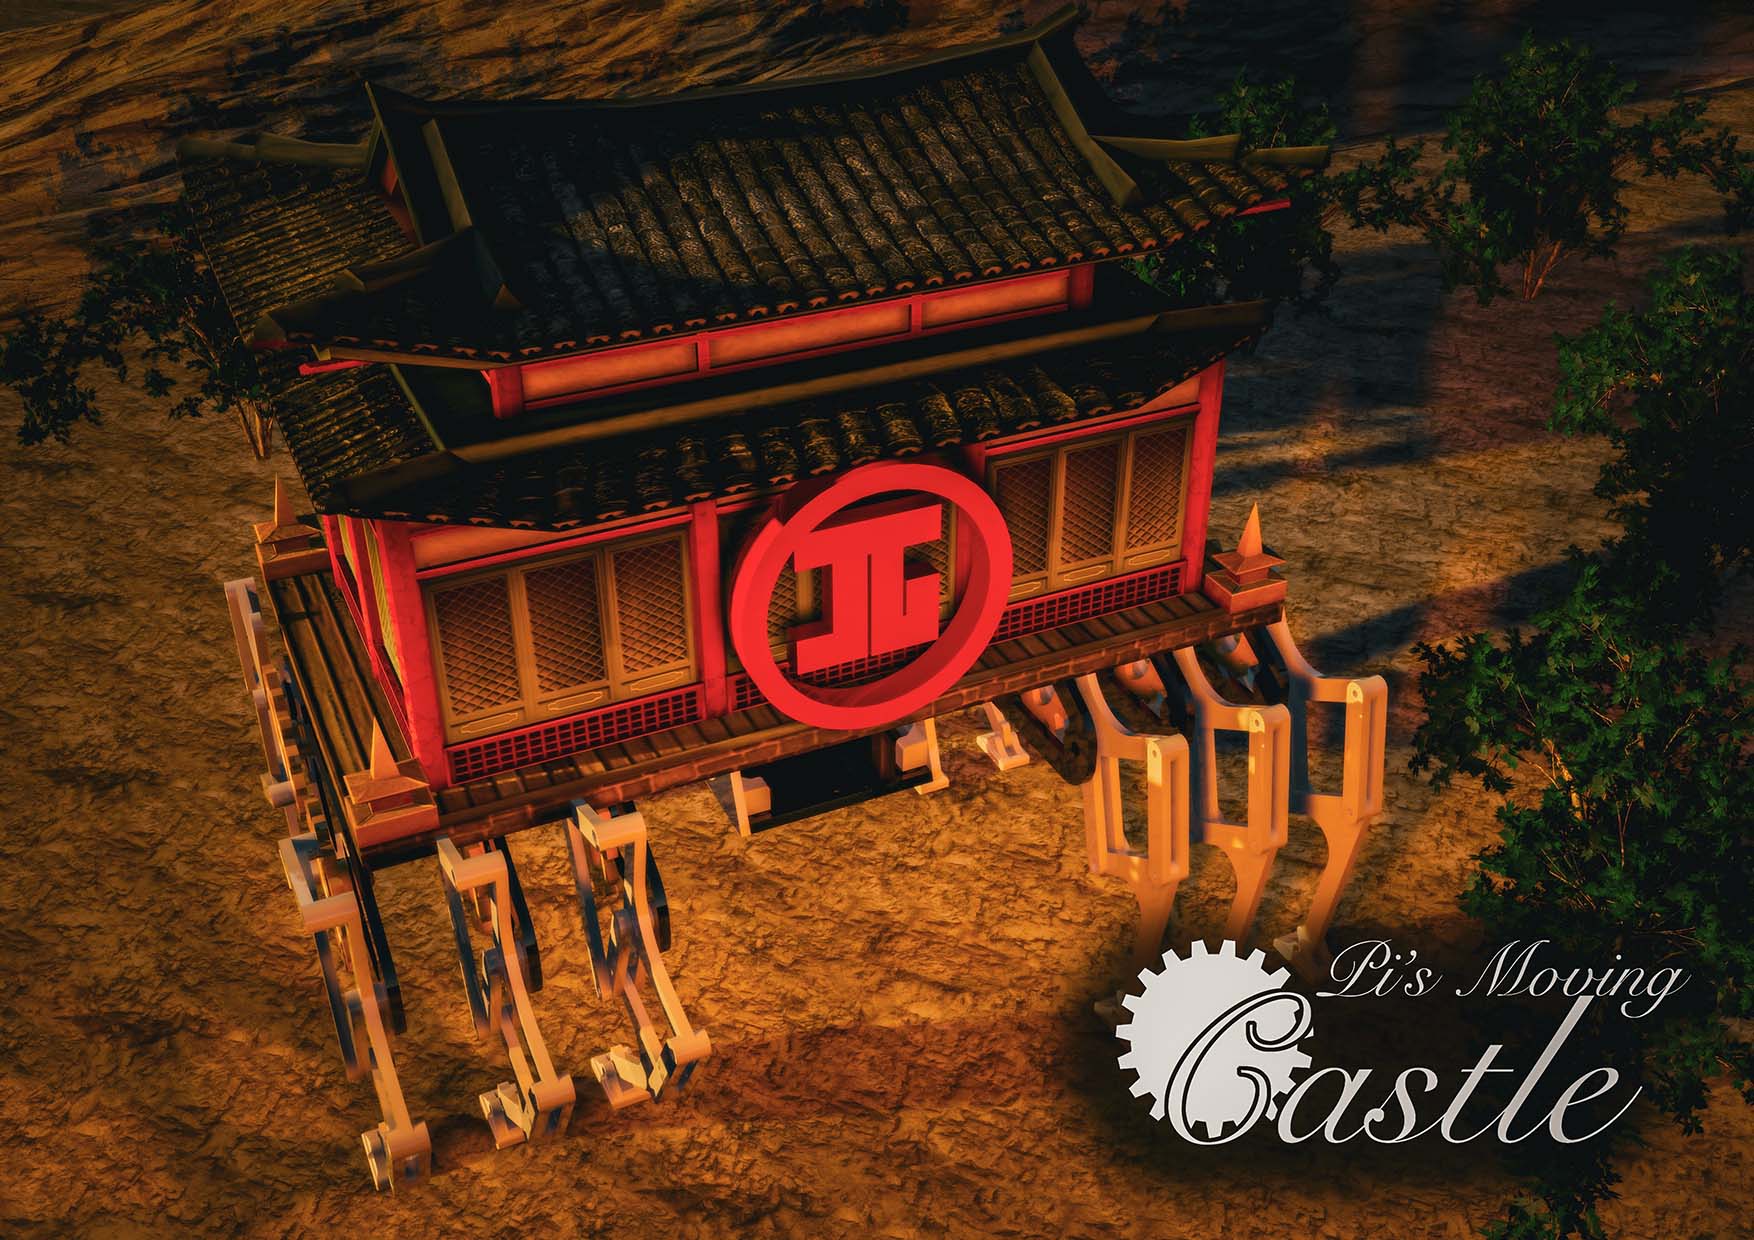
So the idea is super simple. You play a p5js puzzle game on the computer, which is to repair Pi’s mechanical heart. And we will have an actual physical steampunk robot which is not moving. But as the user solves the puzzle through stages, the castle will wake up, and finally be able to walk again. (Once it walks, the user can program the path of the castle 😉 … i.e. like Scratch)
Pi’s moving castle looks like this.
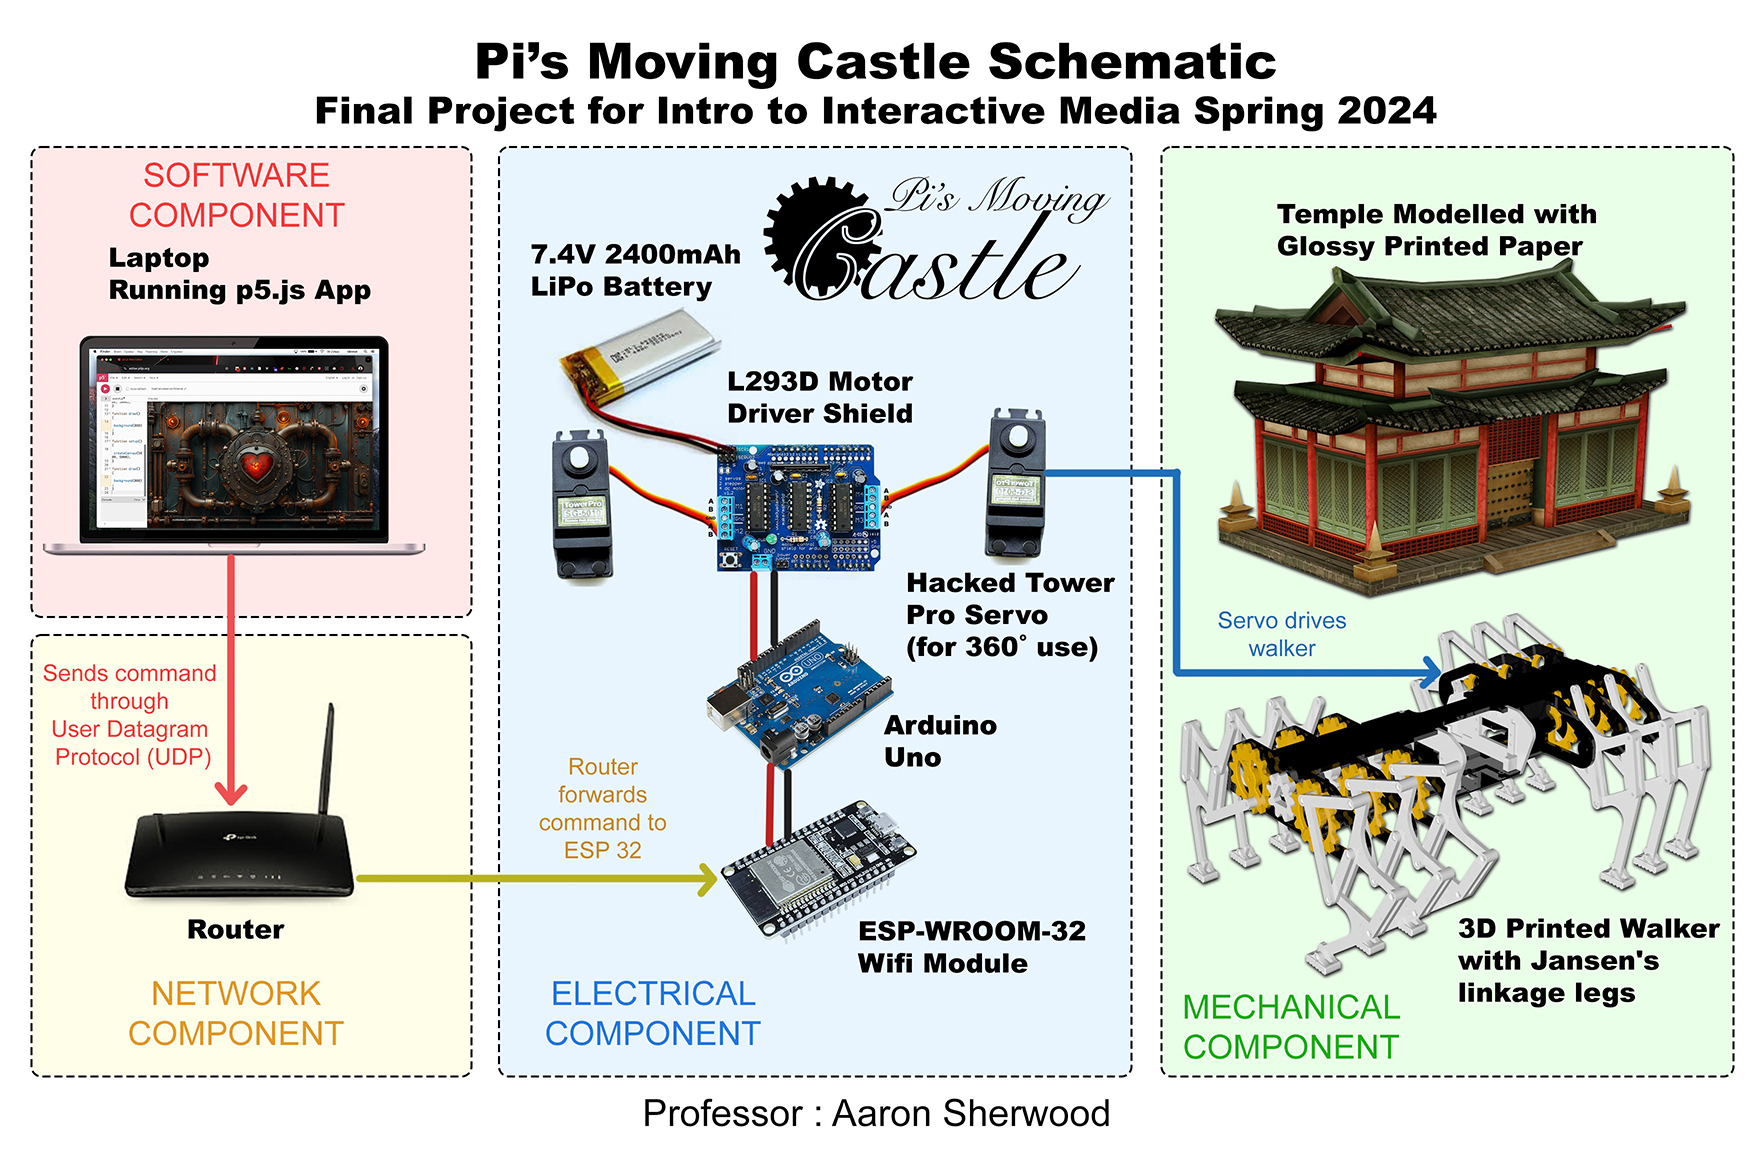
Q: Alright Pi, stop your arty-farty nonsense and tell us how it’s gonna work.
A: Here’s a not so complicated Schematic. The diagram should be self explanatory.
Q: Good. How does it fulfill the … umm..err… the good o’d listening, thinking, and speaking from both parties..?
A: Well, here. The feedback loop is closed.
Q: Cool cool, do you think you can implement it on time and get it working before you graduate?
A: Well, this is a preliminary concept so I am only talking about the non-tangible ideas, planning stuff here. But I will let you sneak peak into the actual tangible stuff below.
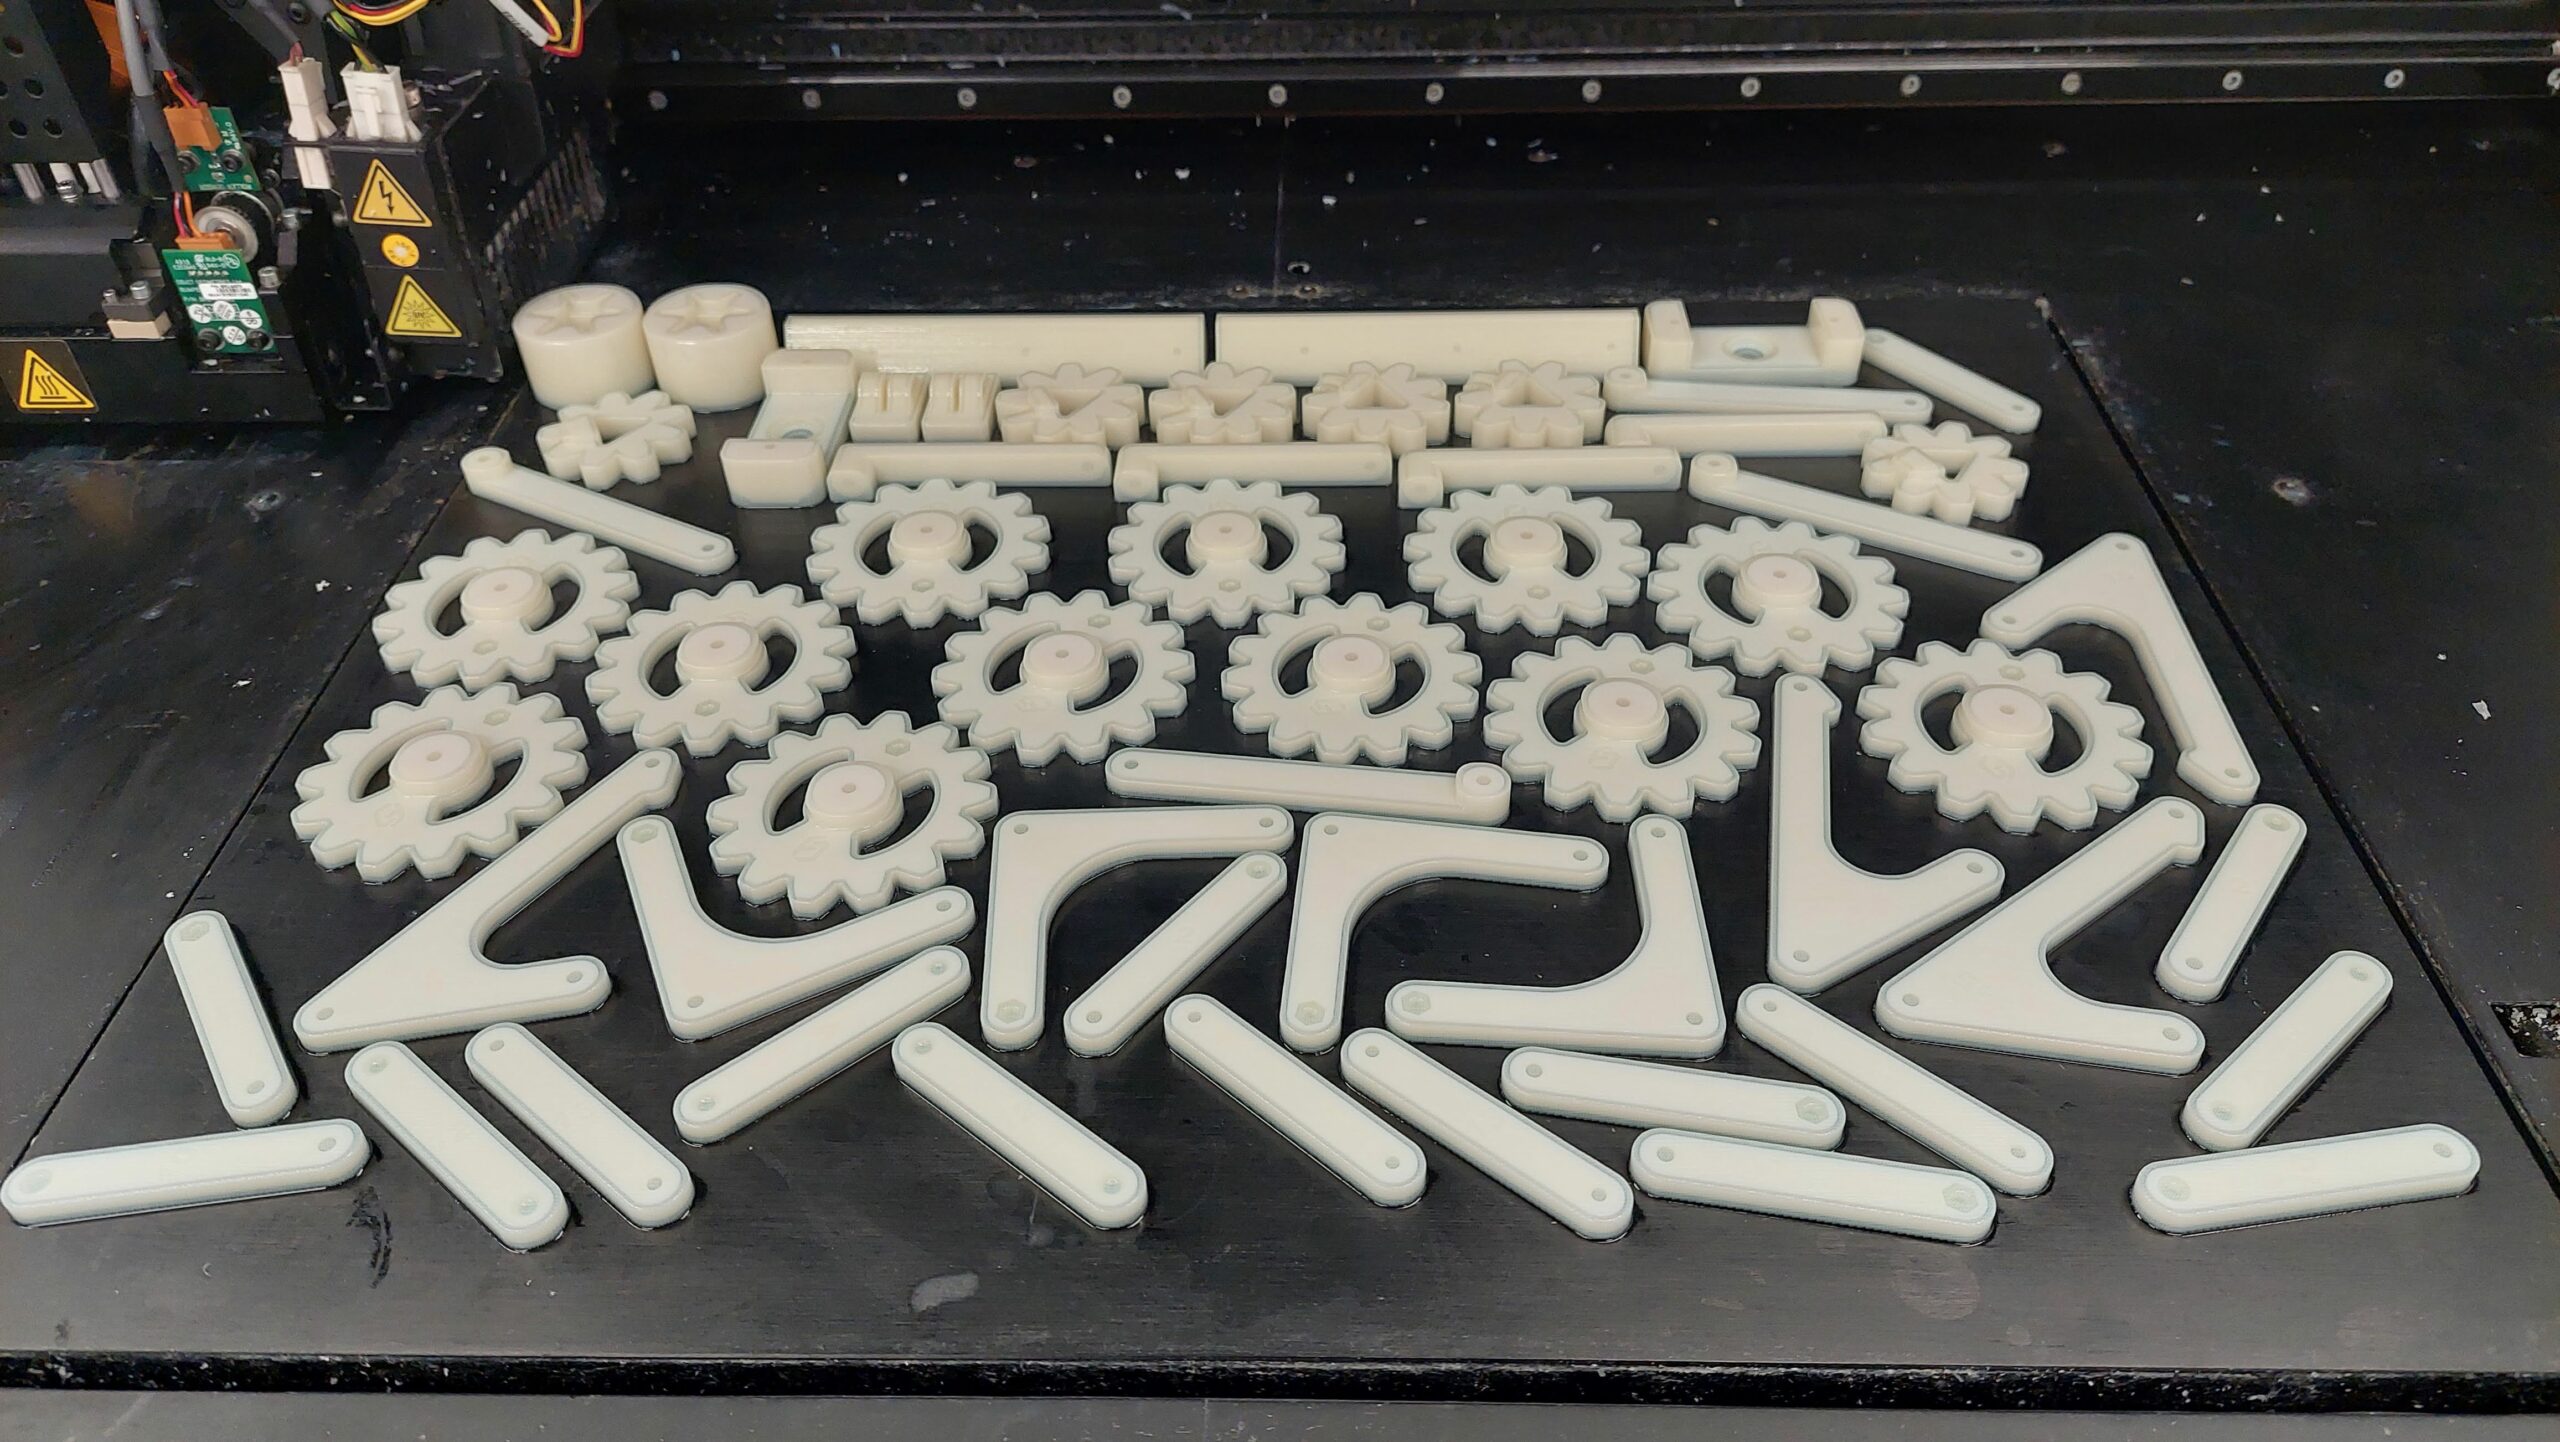
(3D Printed Castle Parts)
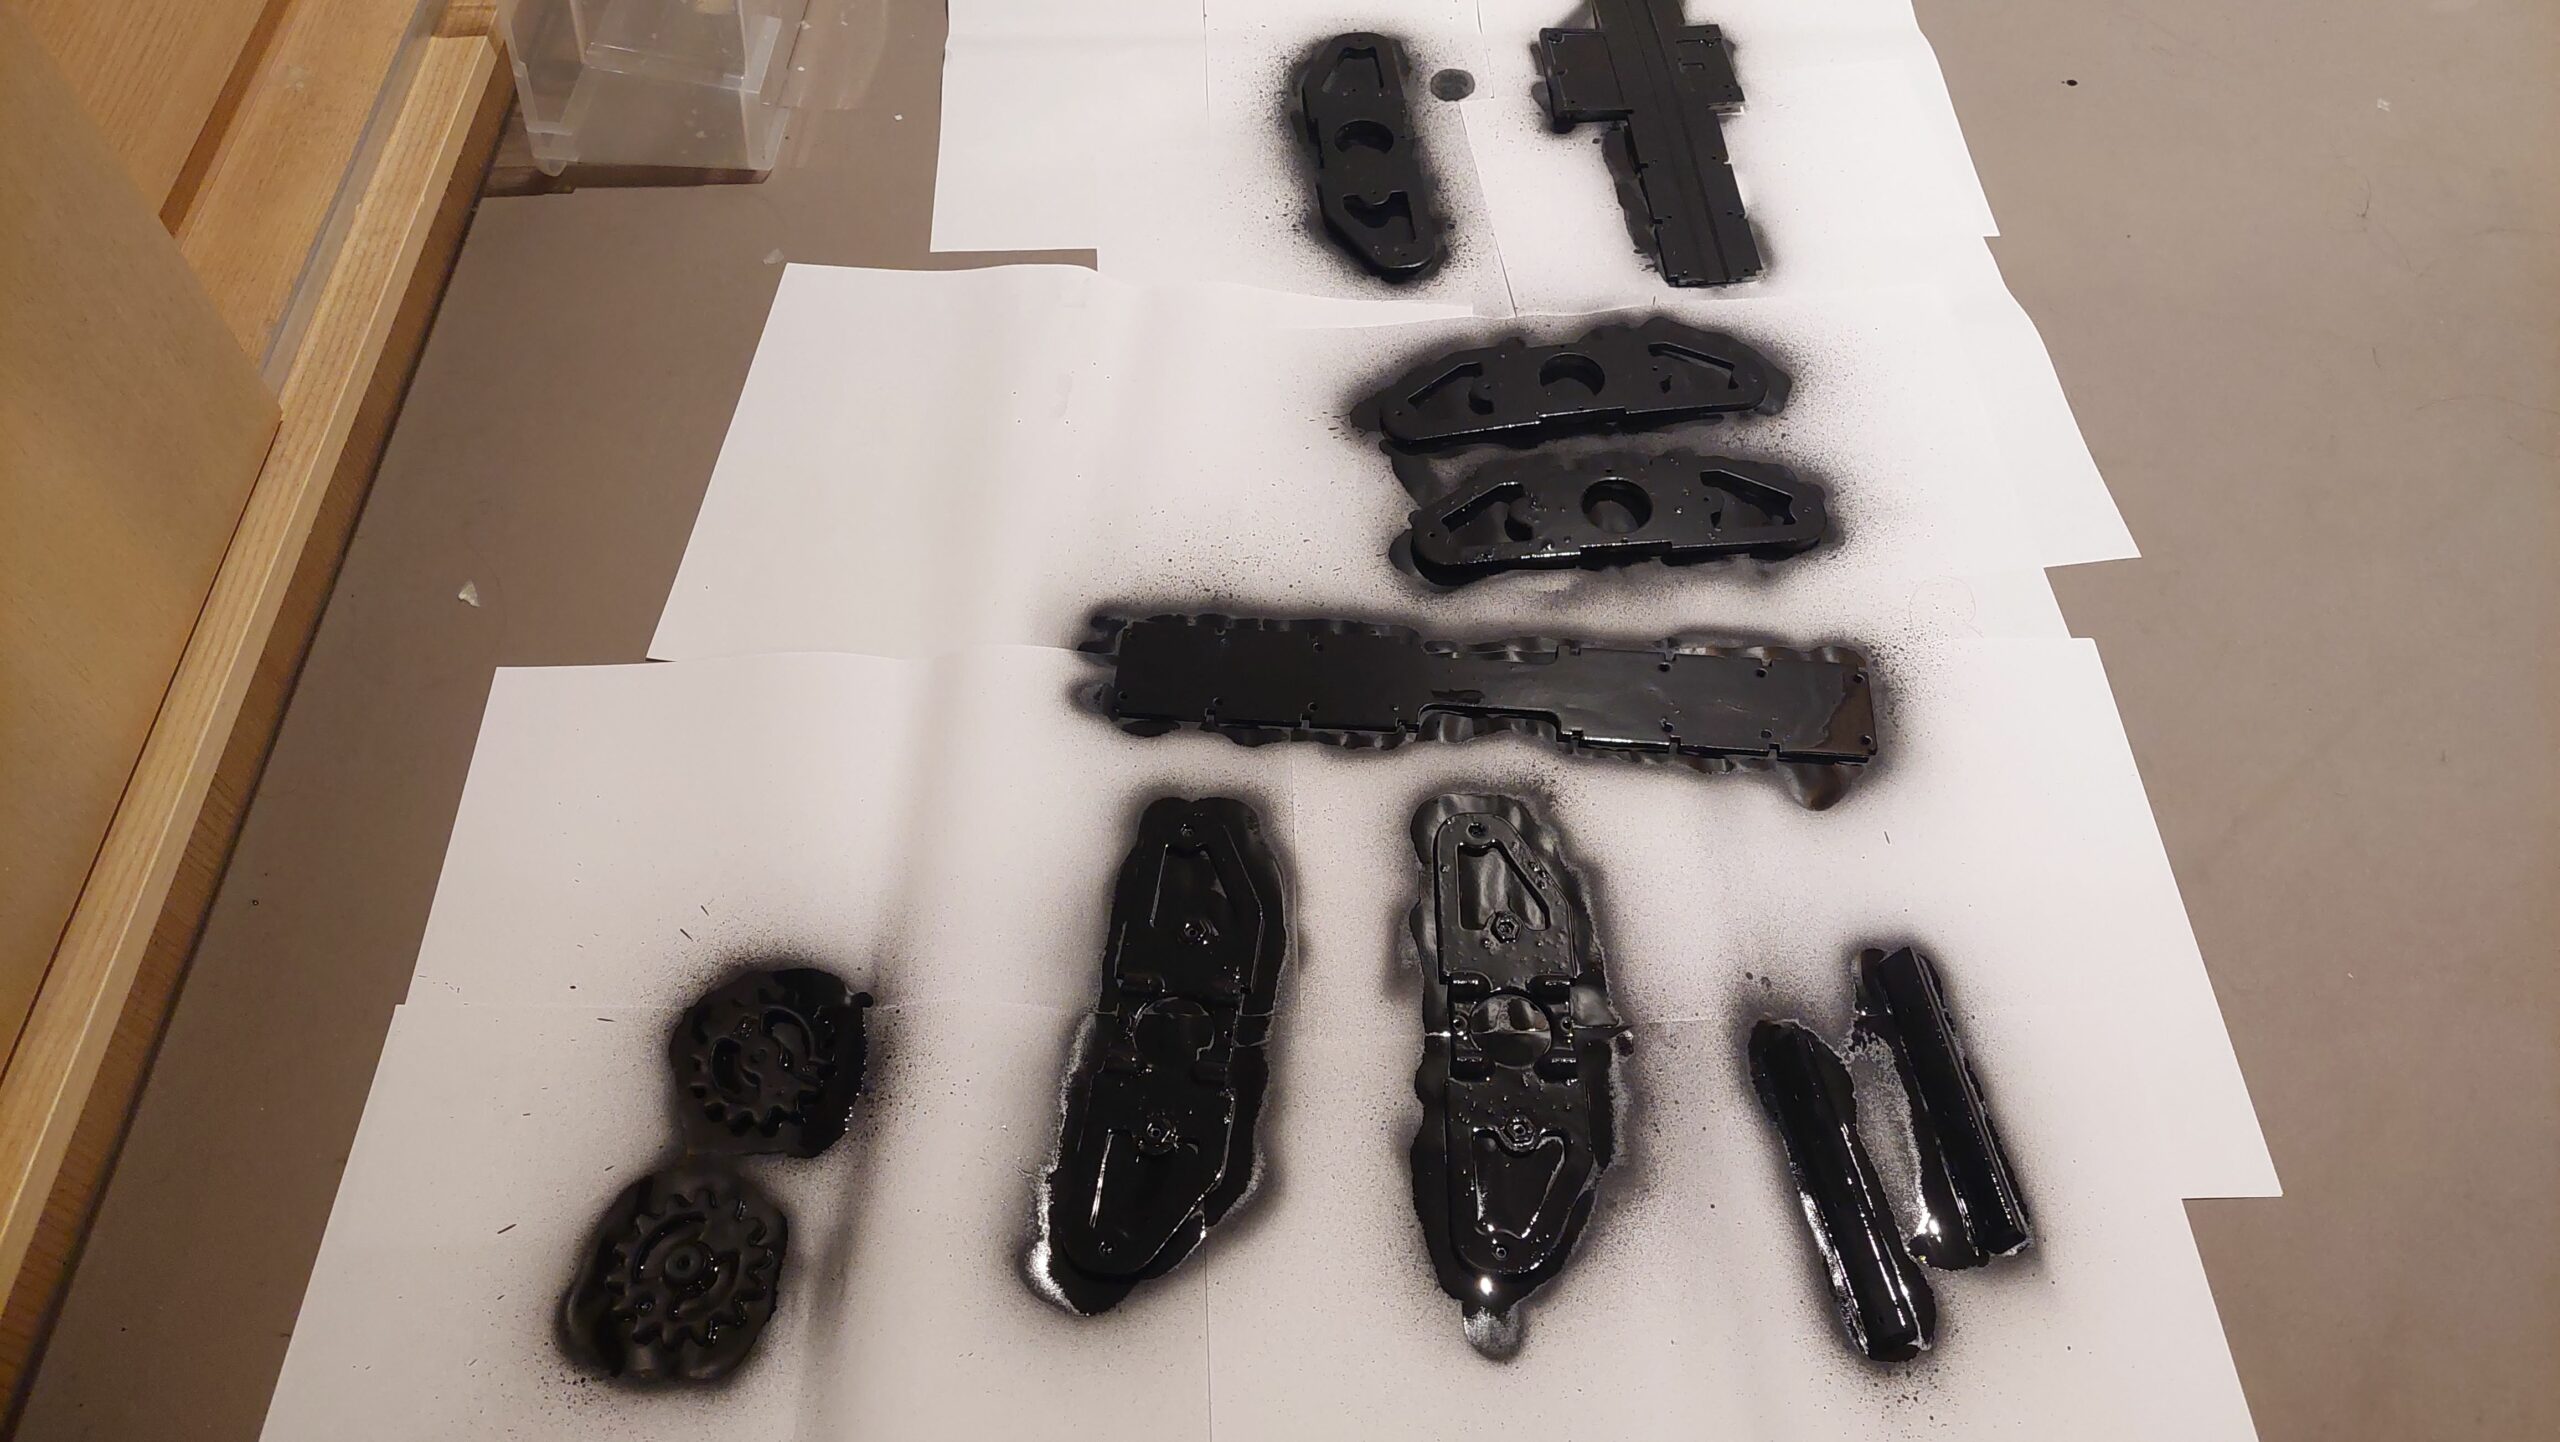
(Black Paint to make it… steam punky)
(Steam Punky 3D Printed Castle Parts)
And below is one of the legs and the linkage working.
Q: Great. What if I do not approve this Final Project?


