Concept & Motivation:
 I drew inspiration for my final project from the concept of sonification within the realm of astronomy, a fascination that emerged during my exploration in an astronomy and cosmology course. Despite deviating from my initial plan to incorporate specific data, the overarching aim of the project was to offer an engaging educational experience, shedding light on the absence of sounds in outer space. Alternatively, one might say it aimed to introduce users to sonification, a process wherein astronomical data is translated into audible sounds, fostering a profound connection with the cosmos. Sonification proves particularly valuable when dealing with extensive datasets that may be challenging to visualize or analyze. Through sound, individuals can more easily perceive alterations in waves, frequencies, and patterns.
How it Works:
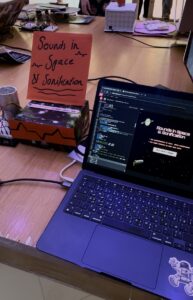
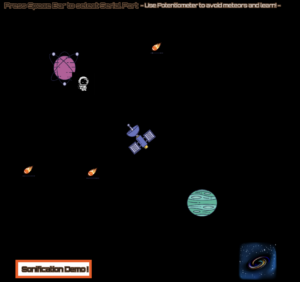
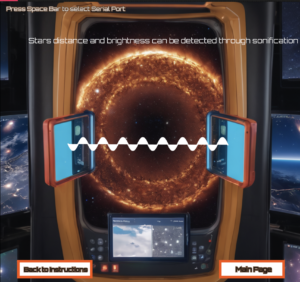
The functionality of this educational game commences on the main page, featuring instructions on utilizing the potentiometer and light sensor. Users initiate the game by clicking the start button. The first page serves as an informational hub, prompting users to employ the potentiometer to maneuver a miniature astronaut towards various celestial objects (planets, satellites, etc.). At each element encountered, informative text is displayed, delving into topics such as sounds in space, how media portrays such sounds, the concept of sonification, and two practical examples of its application. The unique challenge lies in reading this information while navigating the astronaut through the cosmos and avoiding incoming meteors. The subsequent section of the educational game offers a hands-on demonstration of sonification. Users can use the palm of their hands and a flashlight which can be detected by a light sensor. This detection is then translated into piano notes, with low, moderate, and high pitches corresponding to varying levels of brightness. Users can both hear the resulting musical notes and observe a wave visualization representing the light frequency, facilitating a comprehensive understanding of the process.

Communication between Arduino and P5js :
Most of the communication between the hardware and software involved messages from arduino sending to p5js where the output is. These messages are values from the potentiometer and the light sensor, hence the values are splitted by a comma. The serial connection is implemented using the serial port library.
//Arduino Code final IM project

//  Example of bidirectional serial communication

// Inputs:
// - A0 - sensor connected as voltage divider (e.g. potentiometer or light sensor)
// - A1 - sensor connected as voltage divider
//
// Outputs:
// p5js sound


void setup() {
  // Start serial communication so we can send data
  // over the USB connection to our p5js sketch
  Serial.begin(9600);

  // We'll use the builtin LED as a status output.
  // We can't use the serial monitor since the serial connection is
  // used to communicate to p5js and only one application on the computer
  // can use a serial port at once.
  pinMode(LED_BUILTIN, OUTPUT);

  // start the handshake
  while (Serial.available() <= 0) {
    digitalWrite(LED_BUILTIN, HIGH); // on/blink while waiting for serial data
    Serial.println("0,0"); // send a starting message
    delay(300);            // wait 1/3 second
    digitalWrite(LED_BUILTIN, LOW);
    delay(50);
  }
}

void loop() {
  // wait for data from p5 before doing something
  while (Serial.available()) {
    digitalWrite(LED_BUILTIN, HIGH); // led on while receiving data
    int left = Serial.parseInt();
    int right = Serial.parseInt();
    if (Serial.read() == '\n') {
      int sensor = analogRead(A0);
      delay(50);
      int sensor2 = analogRead(A1);
      delay(5);
      Serial.print(sensor);
      Serial.print(',');
      Serial.println(sensor2);
    }
  }
   digitalWrite(LED_BUILTIN, LOW);
}
- P5js Code :
For this assignment, I endeavored to introduce a novel approach for navigating between pages, distinct from the method employed in my midterm project. Within my draw function, I utilized the concept of state to showcase various pages and their respective elements whenever a mouse-click event occurred at specific coordinates. Drawing inspiration from Fausto Fang’s code, I sought to understand and implement this technique. The primary innovations incorporated into my final project revolved around the integration of hardware input and laptop-generated output. Specifically, I harnessed data from a light sensor and a potentiometer, utilizing specific ranges to orchestrate the movement of a miniature astronaut and the production of musical notes as a form of sonification.
- Reflection & improvements:
I addressed neglected or previously inefficiently implemented elements, such as ensuring buttons visually stand out when the mouse hovers over them. Furthermore, I implemented features like displaying a warning when meteors collide with the mini astronaut (controlled by the potentiometer) and triggering the playback of three distinct sounds on each page, including an explosion audio resulting from the meteor clashing with the astronaut. I was particularly proud of the aesthetic and the idea itself. I’m very passionate about science and astronomy, and I’m always looking for ways to integrate it in my technological field, and creating an educational game was one of the best ideas.
There is always room for improvement. First of all, if I had the chance, I would’ve used the panel mount pot potentiometer instead of the trim pot, simply because it would be easier for users to handle it. I would display the directions of the game differently by explaining how the potentiometer works and where to use it exactly because not everyone knows how it works. When it comes to the hardware, I think I should’ve placed more effort into creating the concept of sonification by using a flash light attached to a star structure or something that resembles the concept more. Additionally , it takes it a minute to load everything and I haven’t been able to figure out a way around it.
User Experiences:
When users attempted to play the game, some read the directions and understood where to start and what to expect as results, while others were either confused by the functionality of the potentiometer, and some didn’t know what the controls are and how to make the game work. Although I had some instructions, I think I need to be more precise about what the potentiometer does, how it’s supposed to be rotated, and when exactly they can use the light sensor.
Note: I added some background sound that is originally in the project but it was too loud for it to be heard in the recording.
Overall Experience:
Overall, the experience is good enough and easy to work with. However, I felt the need to explain how to use the potentiometer often and when to use the light sensor. I had to explain why is sonification used in the field of astronomy, so maybe that’s something I could add in the project itself. One can understand how it works through the instructions but they can be improved in terms of how apparent and visible they are to the users and giving more details to how the sensors work along with p5js.
References:
https://mixkit.co/free-sound-effects/
https://eprints.hud.ac.uk/id/eprint/15922/2/

