Week 5: Midterm Progress: Save the Snail

For my midterm project I’m creating a game called ‘Save the Snail’. It’s a very simple, easy-to-play game where the user tries to save a snail from getting eaten by a frog or getting hit by rocks.

Save the Snail:

The game will be extremely easy to play, and will just need a press on the keyboard or a click on the mouse. The frog will be at one end of the screen and the snail will keep getting attracted to the frog and the user’s click on the mouse will move the snail away to the right. At the same time there will be rocks falling randomly from the top of the screen and the user will also have to make sure the rocks don’t hit the snail. The gameplay overall is very simple. If the snail comes in contact with the frog or gets hit by the rocks, the screen shows the score and a game over message.

My Progress:

So far I have figured out how to make the rocks drop down randomly. I accomplished that using a class for the rocks and then a update() method to make them drop down. I also made the ‘snail’, currently it’s just a circle that keeps moving to the left and a built-in p5js function- mouseIsPressed()-  moves the circle ten units to the right.

Here’s a screenshot of the progress. The code is still very scratchy and uncommented for the most part:

Things left to do:

Although the code is somewhat functional, what makes or breaks a game is the interface. I am looking to make the interface a lot more friendly and add graphical elements to it. Also, I’ll maybe try to add difficulty levels but I’m not sure if I can make that happen. For now the game is an arcade style game, a very good way to kill time, haha.

Midterm Progress

Concepts I had throughout:

Working on my midterm, I had multiple ideas for games. I thought of the snake game, and flappy bird, and the bouncing ball game. While the idea for the program for all the games didn’t seem too difficult, I wanted to focus more on the game rather than choose based on difficulty. I thought the snake game was too common and it wouldn’t be unique and wouldn’t really mean anything to anyone. Next, flappy bird was actually pretty cool and I think doing its code would’ve exposed me to different types of functions from the reference in p5js and I liked that. However, I settled on the bouncy ball game, especially because I thought it relates to most of the content we covered throughout the course and I liked that because it helped me review everything we did so far. The bouncing ball was also a concept covered in the video tutorials by TheCodingTrain which was really helpful to me.

Coding Process

I started my program by brainstorming what functions and variables I would need. I figured out which functions I needed for my code and then planned in which order I would code them in, and where exactly I would use each variable. This really helped the whole programming process as it helped me organize everything and figure out where exactly the bugs I ran into are. Moreover, it helped me learn from my mistakes. (I cannot post my code progress because I am doing this after finishing the final product).

[Assignment 8] Water Switch

Concept

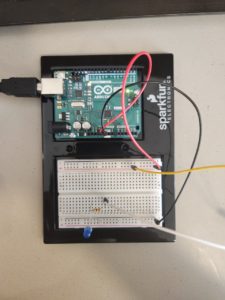
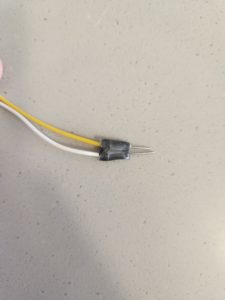
For this assignment, I have created an electrical switch that uses water to switch on and off. Unlike conventional mechanical switches that require us to use our hands, this switch uses water. As shown below, this switch has two wires that are taped to each other.


Without a conductive medium, i.e. water, in between them, electricity will not flow because air has high resistance. Only when both wires touch water, the circuit will be closed and LED will turn on. Shown below is a video of me turning LED on and off using this switch.

Reflection / Future Improvements

One advantage of this switch over other conventional switches is that resistors can be removed from the circuit. Since medium is required for the switch to operate, the medium itself can act as a resistor. By controlling the resistance of the medium (e.g. adding salt to water), user can freely control the brightness of the LED.

One of the many aspects of this switch to improve is finding a way not to make water droplets to remain on the wires even when they are removed from the water. Because water adheres to wires, I realized the LED will be on even when the wires are pulled off from the water. One possible solution to this would be making the gap between the wires larger, so water droplets on the wire cannot close the circuit.

Week 8: Unusual Switch

For my unusual switch, I instantly thought of a guillotine. It appealed to me because the words “hands-free” made me think of how guillotines kind of symbolize hands-free killing – you didn’t kill the person, you just put their head in a place where gravity would deliver a knife to deliver the final blow.

In the same way, my hands don’t actually connect the switch. I just lift the guillotine into a position from which gravity finishes the job.

First, I sketched out my design for the simple guillotine, with a place to insert someone’s “head” at the bottom and a smaller piece of cardboard with copper tape at the bottom to serve as the knife. Instead of someone’s neck, I would place the ends of two wires in the guillotine. When the “knife” hits the bottom, the copper tape conducts electricity and connects the two wires, completing the circuit.

Then, I started crafting. I found some copper tape and started tracing out pieces of cardboard. I decided to connect my pieces by intersecting them at cut slits, which would be cleaner and more stable than hot glue.

No description available.

From there, I cut the pieces out with a box cutter and assembled them.  My intial prototype looked great, but the knife would spin and go everywhere as it fell down. To remedy this, I added hot glue “tracks” to guide the path of the knife, added a cover that would ensure the knife fell in a straight line, and inserted two washers into the cardboard to make it heavier, and therefore fall in a more guillotine-like fashion.

No description available.

Just for fun, I made a little tombstone in front of which the LED lights up, so it kind of looks like a candle in front of a grave (probably of the person who died in the guillotine.) I embellished the guillotine with a little of my extra copper tape, hooked it up to the Arduino, and tweaked it until it worked.

I’m pretty happy with the finished product! The guillotine is sturdy, the “switch” works when the knife goes down, and the if you turn the audio of the video on, the slice of the knife sounds pretty compelling. In a future version, I might try to add a pulley system or a platform so that it’s even more hands-free (right now the video makes it look like it’s still responding to my hands), but for something small, portable, and mobile, I think this is great. I’m excited to do more fun stuff with Arduino!

No description available.

No description available.


Assignment 4: Tarek Nabih

Concept:

I had a project in mind: making sentences pop up on the canvas. So I tried making that But I got stuck in the part where I should formulate the sentence. Hence, I got peer help. Ayazhan Gabitkyzy’s code helped me a lot in figuring out what could be done and how to debug my code. There were even useless blocks of code that I realized after I have gotten Aya’s code help. I changed the word combination to predict more logical sentences. And I was pretty satisfied with the result.


Code:

let VERB1 = 0;
let WORD1 = 1;
let VERB2 = 2;
let WORD2 = 3;
let words = [];
let wordctr = 0;

let strings = [];

function setup() {
  createCanvas(600,600);
  background(153,0,0);
  strings = loadStrings("words.csv");
  
}

let csvRowNumber = 0;

function generatemessages(){
  let rand = int(random(0, 100));
  let rand2 = int(random(0, 100));
  if(rand % 7 == 0){
    if(rand2 % 3 == 0){
      if(rand2 % 2 == 0 && rand % 2 == 0){
          words[wordctr] = new sentences();
          words[wordctr].display();
          wordctr++;
        }
     }
  }
}

function displaymessages(){
  for(let i = 0; i < words.length; i++){
    words[i].display();
    if(words[i].y > height){
      words.splice(i,1);
      wordctr--;
    }
  }
}

function draw() {
//   generatemessages();
//   displaymessages();
  frameRate(3);
  if(wordctr > 30){
    clear();
    background(153,0,0);
    wordctr = 0;
  }
  generate_text();
  
  
}

function generate_text(){
  let singleRow = [];
 
  message = "I want to " ;
  singleRow = split(strings[int (random(strings.length))], ',');
  message += singleRow[VERB1];
  message+=" ";
  singleRow = split(strings[int (random(strings.length))], ',');
  message += singleRow[WORD1];


  message2 = "I don't want to " ;
  singleRow = split(strings[int (random(strings.length))], ',');
  message2 += singleRow[VERB2];
  message2+=" ";
  singleRow = split(strings[int (random(strings.length))], ',');
  message2 += singleRow[WORD2];
  

  fill(245,213,10);
  textSize(20);
  textFont('Georgia');
  
  let randnumber=int(random(1,3));
  if (randnumber==1){
    text(message,random(0,width-60),random(0,height-2));
    // return message;
    // text(this.message,this.x,this.y);
    wordctr++;
  }
  else if(randnumber==2){
    text(message2,random(0,width-60),random(0,height-2));
    wordctr++;
    // return message2;
    // text(this.message,this.x,this.y);
  }


}


class sentences{
  constructor(){
    this.x = 20;
    this.y = -20;
    this.message = generate_text();
  }
  
  display(){
    // this.tempo.remove();
    this.tempo = text(this.message,this.x,this.y);
    this.y+=20;
  }
  
}


Project:

Reflection:

I would love to make add effects to the text in the future like a shadow or make them move on their own.. or add an illustration by which instead of disappearing, the sentences by animation make another sentence.

I was wondering as well if the sentences can be more coherent and more logical. However, I feel like for that to take place there should be a use of AI or machine learning so that the sentences can make sense and will sound like it was written by a human not a machine.

Mid term project- Aayat Azim

Concept

What happens when you are swamped with work and all you can think about is the upcoming deadlines? You code your way out of it of course! For this assignment, I was fueled by the fascination I have always had with shooting games. And the enforced time during my injury allowed me to subtly “elevate” my game. I played with the underlying phenomenon of something that we go through on a daily basis and that is getting work done, be it creative or otherwise. And even though the task came with its fair share of challenges, the end result was a sweet surprise.

Here it is,

Workings of the Game

The game primarily consists of three main characters-the player (worker), the bullets (finished work), and the enemies (deadlines). These at first glance seemed like bland soup (even to me), but they got polished as I played around with my concept and the game progressed.  I started off simply by placing basic shapes on the screen and tweaking their movements. The player was initially an ellipse tracing the cursor and was changed into a loaded gif. Similarly, images were loaded and adjusted in the place of bullets and enemies that were circles and rectangles respectively.

Picking up from there, for each character, I initially coded functions. like this bullet and its draw function.

let bullets = [];

function setup() {
  createCanvas(400, 400);
}

function draw() {
  noCursor();
  background(220);
  rectMode(CENTER);
  let xc = constrain(mouseX, 15, 385);

  //   player position
  let player = { x: constrain(mouseX, 15, 385), y: height - 50 };
  circle(player.x, player.y, 25);

  drawBullet();
}

// function to draw bullets
function drawBullet() {
  for (let bullet of bullets) {
    bullet.y -= 10; // bullet moves up
    circle(bullet.x, bullet.y, 10);
  }
}

function mousePressed() {
  let bullet = {
    x: constrain(mouseX, 15, 385),
    y: 350,
  };
  bullets.push(bullet);
}

But later on, it seemed like a better choice to transform the program into an OOP as it allowed me to have a fixed set of operations on things, and as the code evolved I could add new things and attributes. I also went through a couple of resources to get a gist of how shooting games work wherein Dan Shiffman’s coding challenge on space invaders provided me with a broad idea about the concept that was being implemented in my code. The idea of loading various classes as separate p5js files in the main sketch was something remarkable that I picked up from this video that helped me to efficiently visualize and tidy my code.

Challenges

One of the portions of the code that took me some time to figure out was how to prevent the objects from trailing off of the screen. Finally, I added the constrain function as shown in the code below to fix the movement of my player as well as the bullets.

class Bullet {
  constructor() {
    let xc = constrain(mouseX, 45, 335)
    this.x = xc
    this.y = 350;
  }
class Player {
  constructor () {
    this.x = width/2;
    this.y = height - 50;
  } 
  
  display() {
     imageMode(CENTER);
    image(gif_player, this.x, this.y, 170, 170);
}
 move (){
   let xc = constrain(mouseX, 45, 335)
   this.x = xc
   this.x = xc + 5;
}

}

Secondly, creating a single object within OOP was relatively easy but I had to go back and forth while figuring out how to place an array of objects within OOP. The basic reference list on the main p5js website helped me in implementing it.

Moreover, this bit was among the bigger challenges that I encountered. After I had added the collision between my bullet and the enemy through splice to remove the abovementioned objects from their arrays, the enemies just stopped appearing on the screen. A setInterval function for spawning new enemies had to be added to fix this.

function setup() {
  createCanvas(400, 400);

  //   loop for player
  myPlayer = new Player();

  //  spawning new enemies
  setInterval(() => {
    enemies.push(new Enemy());
  }, random(500, 1000));
} // end of setup function

Lastly, it took me a while to place my entire game within game states. I initially began by assigning the game state as a variable and then added different values so that every time the game is played the game state functions get smoothly called. In a way, the entire game became a combination of functions and OOP wherein different object classes interacted with the game states within the code. And the entire draw function was just primarily coded to call the game states. But as the game ended, the start screen was not becoming visible without refreshing the page. By referring to the p5js code samples provided in the lecture notes I realized that I had to add a separate restart function to make it work.

function restartGame() {
  // Reset character position, lives, etc
  gameState = 0;
  enemies = [];
  bullets = [];
  score = 0;
}

function draw() {
  background(210);

  // game gtates and their functions defined and called
  if (gameState == 0) {
    startGame();
  } else if (gameState == 1) {
    playGame();
  } else if (gameState == 2) {
    finishGame();
  }
} // end of draw function
Reflections

In the future, I would also like to work with sound and loading different backgrounds for each screen. I am also a bit worried that after a certain point the generation of new enemies that are being pushed may become uncontrollable, especially when the program keeps running on the page, and for that, I would have to further think and code in functions such as framerate and millis. Nonetheless, this assignment genuinely gave me a chance to tap into the academic as well as the creative side of interactive media. It feels like a win-win.

germ worm

concept:

The midterm of this course required us to implement everything we had learned, ranging from the simplicity of shapes to the complexity of object-oriented programming. I intended to provide the skills I learned throughout these past seven weeks while also implementing my touch of art and creativity. That being said, this required me to code a playable game and make it aesthetically pleasing in its own art style. I chose to aim towards a retro-pixelated black-and-white art style that would make the user delve into a nostalgic experience when playing the game. I decided to get inspired by the most prominent game in video game history, snake. However, in my game (germ-worm), the player is in a black-and-white world where they control a worm in need of collecting germs to reach the highest possible score while exploring the setting available to play, making it a more complex or more manageable experience.

code:

//                      HAMAD ALSHAMSI
//                GERM WORM: MIDTERM PROJECT


//                           code

//game state variable
var mode = 0;

//set object/player variables
let worm = []; //variables for worm and player
let player;
let germ;

//set game's rules variables
let gameExtent = 20;
let edgeExtent = 1;
let collectibles = 10;
let playState = true;
let direction, frameChange, scoreCount;
let portionValue, collectiblesValue, frameValue;
let portionSlider, lengthSlider, multiplierSlider, speedSlider;

//classify worm portions and
class Portion {
  constructor(x, y) {
    this.x = x;
    this.y = y;
    this.wormLength = gameExtent - edgeExtent * 2;
  }

  //used to test if player is offscreen
  testEdges() {
    return this.x < 0 || this.x > width || this.y < 0 || this.y > height;
  }

  //used to test player self-collision
  testWorm() {
    for (let portio of worm) {
      if (this.x == portio.x && this.y == portio.y && direction) return true;
    }
    return false;
  }

  //used to test player germ-collision
  testGerm() {
    return this.x == germ.x && this.y == germ.y;
  }

  //update position to player's direction input
  update() {
    switch (direction) {
      case "up":
        player.y -= gameExtent;
        break;
      case "right":
        player.x += gameExtent;
        break;
      case "down":
        player.y += gameExtent;
        break;
      case "left":
        player.x -= gameExtent;
        break;
    }

    //test offscreen or self-collision, if so, lose. else test germ-collision
    if (this.testEdges() || this.testWorm()) {
      //implemet pixelated font
      textFont(fontPixel);
      fill(60);
      push();
      translate(width / 2, height / 2);
      textSize(52);
      text("GAME OVER", -150, 0);
      textSize(18);
      text("press ' SPACE ' to restart", -134, 30);
      pop();
      playState = false;
    } else if (this.testGerm()) germ.consume();
  }

  //first worm section drawn using image asset alongside a white background
  create() {
    noStroke();
    fill(255);
    image(wormIMG, this.x, this.y, this.wormLength, this.wormLength);
  }
}

//classify germs
class Germ {
  constructor(x, y) {
    this.x = x;
    this.y = y;
    this.wormLength = gameExtent - edgeExtent * 2;
    this.collectibles = 2;
  }

  //when worm collides with germ, increase length. then pick random spot for new germ
  consume() {
    collectibles += this.collectibles;
    this.x = floor(random(width / gameExtent)) * gameExtent + edgeExtent;
    this.y = floor(random(height / gameExtent)) * gameExtent + edgeExtent;
  }

  //draw germ in new spot using image from asset
  create() {
    image(germIMG, this.x, this.y, this.wormLength, this.wormLength);
  }
}

//load images from asset file
function preload() {
  menuIMG = loadImage("assets/menuImage.png");
  germIMG = loadImage("assets/germImage.png");
  wormIMG = loadImage("assets/wormImage.png");
  fontPixel = loadFont("assets/PixelDigivolve-mOm9.ttf");
}

function setup() {
  //define default game state
  mode = 0;

  //center shapes and images
  rectMode(CENTER);
  imageMode(CENTER);

  //set canvas size
  createCanvas(400, 600);

  //create new germ
  let x = floor(random(width / gameExtent)) * gameExtent + edgeExtent;
  let y = floor(random(height / gameExtent)) * gameExtent + edgeExtent;
  germ = new Germ(x, y);

  //view score counter
  scoreCount = createP(
    "&nbspS &nbspC &nbspO &nbspR &nbspE &nbsp: &nbsp1 &nbsp"
  );
  scoreCount.style("color", "white");
  scoreCount.style("font-size", "15px");
  scoreCount.style("background-color", "#5c5c5c");
  scoreCount.position(5, 560);

  //worm size slider
  portionValue = createP("size: 20");
  portionValue.position(50, 610);
  portionValue.style("font-size", "15px");
  portionValue.style("margin:2px");
  portionValue.style("color", "#5c5c5c");
  portionSlider = createSlider(10, 50, 20, 10);
  portionSlider.position(10, 630);

  //worm length slider
  lengthP = createP("length: 0");
  lengthP.position(50, 660);
  lengthP.style("font-size", "15px");
  lengthP.style("margin:2px");
  lengthP.style("color", "#3c3c3c");
  lengthSlider = createSlider(1, 30, 1, 1);
  lengthSlider.position(10, 680);

  //score per germ slider
  collectiblesValue = createP("multiplier: 1");
  collectiblesValue.position(290, 610);
  lengthP.style("font-size", "15px");
  collectiblesValue.style("margin:2px");
  collectiblesValue.style("color", "#3c3c3c");
  multiplierSlider = createSlider(1, 10, 1, 1);
  multiplierSlider.position(270, 630);

  //frames per second slider
  frameValue = createP("speed: 8");
  frameValue.position(300, 660);
  lengthP.style("font-size", "15px");
  frameValue.style("margin:2px");
  frameValue.style("color", "#3c3c3c");
  speedSlider = createSlider(1, 20, 8, 1);
  speedSlider.position(270, 680);

  //set default framerate
  frameRate(8);

  //prnt rules in console.log
  print(
    "arrow keys   -->    MOVE. \nspace        -->    RESTART. \nclick        -->    START."
  );
}

function keyPressed() {
  //different arrows correspond to different directions
  if (frameChange) {
    switch (key) {
      case "ArrowUp":
        if (direction != "down") direction = "up";
        break;
      case "ArrowRight":
        if (direction != "left") direction = "right";
        break;
      case "ArrowDown":
        if (direction != "up") direction = "down";
        break;
      case "ArrowLeft":
        if (direction != "right") direction = "left";
        break;
      case " ":
        player = new Portion(width / 2 + edgeExtent, height / 2 + edgeExtent);
        germ.x = floor(random(width / gameExtent)) * gameExtent + edgeExtent;
        germ.y = floor(random(height / gameExtent)) * gameExtent + edgeExtent;
        //display score
        scoreCount.html(
          "&nbspS &nbspC &nbspO &nbspR &nbspE &nbsp: &nbsp1 &nbsp"
        );
        direction = undefined;
        worm = [];
        playState = true;
        break;
    }
    frameChange = false;
  }
}

//game state display
function draw() {
  if (mode == 0) {
    menuGame();
  } else if (mode == 1) {
    startGame();
  }
}

//command lines responsible before the game starts
function menuGame() {
  background(255);
  push();
  translate(width / 2, height / 2);
  image(menuIMG, 0, 0);
  pop();
}

//command lines responsible for when the game starts
function startGame() {
  frameChange = true;
  //update information on sliders accordingly
  portionValue.html(
    portionValue.html().split(" ")[0] + " " + portionSlider.value()
  );
  lengthP.html(lengthP.html().split(" ")[0] + " " + lengthSlider.value());
  collectiblesValue.html(
    collectiblesValue.html().split(" ")[0] + " " + multiplierSlider.value()
  );
  frameValue.html(frameValue.html().split(" ")[0] + " " + speedSlider.value());
  if (!direction) {
    //if game not run, update using sliders info
    background(255);
    gameExtent = portionSlider.value();
    edgeExtent = gameExtent / 20;
    collectibles = lengthSlider.value() - 1;
    frameRate(speedSlider.value());
    player = new Portion(
      floor(width / gameExtent / 2) * gameExtent + edgeExtent,
      floor(height / gameExtent / 2) * gameExtent + edgeExtent
    );
    germ.x = floor(random(width / gameExtent)) * gameExtent + edgeExtent;
    germ.y = floor(random(height / gameExtent)) * gameExtent + edgeExtent;
    germ.wormLength = gameExtent - edgeExtent * 2;
    germ.collectibles = multiplierSlider.value();
    player.create();
  } else if (playState) {
    background(255);
    //copies player into a worm array and replaces index to show worm moving motion
    worm.push(new Portion(player.x, player.y));
    //if germ is present, erase it. else kill worm
    if (collectibles) collectibles--;
    else worm.shift();
    //update game scores and display
    player.update();
    player.create();
    germ.create();
    for (let portio of worm) portio.create();
    scoreCount.html(
      "&nbspS &nbspC &nbspO &nbspR &nbspE &nbsp: &nbsp" +
        (worm.length + 1) +
        " &nbsp"
    );
  }
}

//launch game by clicking
function mousePressed() {
  if (mode == 0) {
    launchGame();
  }
}

function launchGame() {
  mode = 1;
}


//                           references

// game rule variables inspired from "GeoCrafter57" on YouTube
// color palette from "https://colorhunt.co/palettes/grey"
// images from "https://www.alamy.com/stock-photo/star-pixel-video-game-play.html"


method:

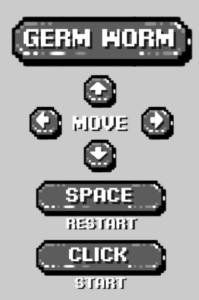
Initially, having an object, a worm, move through the screen in a manner that is up, down, right, and left was an essential aspect of the game. Then, it was necessary to include a collectible germ that would also serve as a point system. These goals were managed by classifying both the ‘worm’ and ‘germ’ and implementing them into arrays and indexes to stylize further the motion presenting an illusion of a worm-like movement. Then, adding a difficulty aspect where the user can freely adjust the difficulty level was an enjoyable feature, as it required sliders, a concept never delved into before. Finally, adding menu and end screens containing instructions would be the icing on the cake. To do that, I fully customized an entire image in Photoshop that compliments the pixelated theme present in the game. These images possessed easy-to-follow instructions such as an icon of arrows with “move,” a space bar with “restart, and a click with “start” phrases next to them.

sketch:

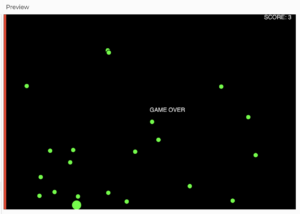
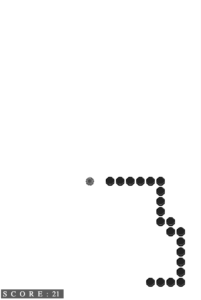
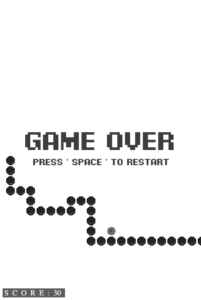
The following pictures preview the menu, game, and end screens of the game. Additionally, images of the gameplay with the various rules are previewed to present the difficulty range offered.


menu screen


gameplay screen

end screen


future improvements:

Presenting a worm-customization aspect allowing the user to customize the shape of the worm would be a fun and interactive feature. Additionally, adding a high-score element to possibly implement a competitive aspect to the game would be extremely fun.

Midterm Assignment: Capitalism Chess

Concept

The idea I had for my game came to me while I was watching a skit by a stand-up comedian on the absurdity of big tech companies. he likened the monopolies that the big tech firms have on our lives to the level of mastery a chess grandmaster has. At the same time, we, normal human beings, are trapped as newbies (“noobs”). this gave me the idea to make a satirical chess game where the capitalist big tech companies have complete, overarching control while providing the player the illusion of choice. Still, whatever happens, the big tech always wins. or you pay. the concept at first was to make a fully-fledged chess game with tweaked rules which allowed an eventual win for the capitalist side. but that was beyond the scope of my project so instead, I modified it to a simpler and more absurd version.


Process

To start, I drew a storyboard kind of thing on my iPad to make sure I had all my plans noted down. I decided to include two different game states; the start screen and the game screen. I went about populating the game screen first, using some maths to make a chessboard. after that, I made the start screen and added buttons and text. then I added the game state conditional statement which allowed the console to load the screen procedurally. the images came next. At first, I was going to make an array and generate the chess pieces by push() and pop() but then a friend suggest I add only queen and king pieces for the capitalist side and give only 3 pieces to the player. For this, I instead chose to make the opposite side into a single png and load in the player pieces separately.


After this, I chose to generate popups with promotional messages. to achieve this, i created a class for all the messages. i also created a class to make the highlighted areas for the chess pieces. the final aspect was to create the death animation for the king. i took inspiration from youtube and tried adding an animation for the king to be sliced in half. but instead i decided on an explosion gif image and an explosion sound for added effect.
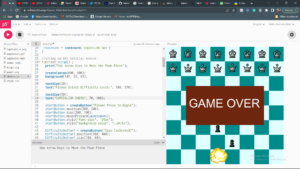
Initially, I wanted to add a separate game state for the ending screen with more cheeky ‘buy our stuff’ remarks from the capitalist side but decided instead for a simple, crude game over. partially because I wanted to reduce the complexity of the code and partially because I appreciated the crude, absurdly low quality aesthetic that it presented juxtaposed with the seemingly shiny image that people have of big tech companies.


let mode = 0;
let startButton;
let imgCapitalist;
let imgPlayerPawn1;
let imgPlayerPawn2;
let HighlightPosX;
let pawn1y = 470;
let KillShotX = 252.5;
let KillShotY = 27.5;
let collision = false;
let explosion;

//loading all the image assets
function preload() {
  imgCapitalistSide = loadImage("CapitalistSide.png");
  imgPlayerPawn1 = loadImage("pawn1.png");
  imgPlayerPawn2 = loadImage("pawn1.png");
  imgPlayerKing = loadImage("king1.png");
  imgExplosion = loadImage("explosion.gif");
 explosion = loadSound('explosion.mp3')
}

//seting up the intitial screen
function setup() {
  print("Use Arrow Keys to Move the Pawn Piece");

  createCanvas(600, 600);
  background(149, 53, 83);

  textSize(20);
  text("Please Select Difficulty Level:", 168, 370);

  textSize(50);
  text("CAPITALISM CHESS", 70, 100);

  startButton = createButton("Please Press to Begin");
  startButton.position(200, 200);
  startButton.size(200, 100);
  startButton.mousePressed(updatemode);
  startButton.style("font-size", "25px");
  startButton.style("background-color", "white");

  DifficultyButton1 = createButton("Easy (selected)");
  DifficultyButton1.position(100, 400);
  DifficultyButton1.size(100, 60);
  DifficultyButton1.mousePressed(eraseMessage);
  DifficultyButton1.style("font-size", "15px");
  DifficultyButton1.style("background-color", "white");

  DifficultyButton2 = createButton("Easy Premium 🔒");
  DifficultyButton2.position(250, 400);
  DifficultyButton2.size(100, 60);
  DifficultyButton2.mousePressed(promoMessage);
  DifficultyButton2.style("font-size", "15px");
  DifficultyButton2.style("background-color", "white");

  DifficultyButton3 = createButton("Easy Premium Plus+ 🔒");
  DifficultyButton3.position(400, 400);
  DifficultyButton3.size(100, 60);
  DifficultyButton3.mousePressed(promoMessage);
  DifficultyButton3.style("font-size", "13px");
  DifficultyButton3.style("background-color", "white");

  highlight = new highlightedarea();
  DisplayMessage = new PromoMessage();
}

//this function will display the message for the locked modes
function promoMessage() {
  DisplayMessage.createMessage2();
}

function eraseMessage() {
  DisplayMessage.eraseMessage();
}

function draw() {
  //this if statement is based on the condition mode = 1, the game mode is start mode

  if (mode == 1) {
    noStroke();
    startButton.hide();
    DifficultyButton1.hide();
    DifficultyButton2.hide();
    DifficultyButton3.hide();

    let SquareSize = width / 8;
    let squareNum = 0;
    for (let columny = 0; columny < height; columny += SquareSize) {
      squareNum++;

      //by adding squarenum+1 here i can add the value for the boxes in the y-axis

      for (let rowx = 0; rowx < width; rowx += SquareSize) {
        squareNum++;

        //by adding squarenum+1 i was able to add the box values in the x-axis

        if (squareNum % 2 == 0) {
          fill(224, 255, 255);
        } else {
          fill(0, 139, 139);
        }
        rect(rowx, columny, SquareSize, SquareSize);
      }
    }
    //here we can add all our sprites and maths because elsewhere doesnt work lol because it is being overwritten by the grid-making function

    image(imgCapitalistSide, 0, 0);
    image(imgPlayerPawn1, 242, pawn1y);
    image(imgPlayerPawn2, 315, 470);
    image(imgPlayerKing, 244, 545);

    if (
      mouseIsPressed == true &&
      mouseX > 225 &&
      mouseX < 300 &&
      mouseY > 75 * 6 &&
      mouseY < 75 * 7
    ) {
      HighlightPosX = 225;
      highlight.create(24);
      // HighlightState= !HighlightState ;
    } else {
      if (
        mouseIsPressed == true &&
        mouseX > 300 &&
        mouseX < 375 &&
        mouseY > 75 * 6 &&
        mouseY < 75 * 7
      ) {
        HighlightPosX = 300;
        highlight.create();
      } else {
        if (mouseIsPressed == true && mouseY > 450) {
          DisplayMessage.createMessage1();
        }
      }
    }

    // these statements deal with teh mechanics of the bomb released at the opponent side

    if (pawn1y < 470) {
      fill(204, 85, 0);
      circle(KillShotX, KillShotY, 20);
      if (collision == false) {
        KillShotX = KillShotX - 5;
        KillShotY = KillShotY + 5;
      }
    }
    if (KillShotX < 0) {
      collision = true;
    }
    if (collision == true) {
      KillShotX = KillShotX + 5;
      KillShotY = KillShotY + 5;
    }
    if (KillShotX > 252 && KillShotY > 552) {
      image(imgExplosion, 165, 450);
      fill(110, 38, 14);
      rect(100, 200, 400, 200);
      fill(250, 250, 250);
      textSize(60);
      text("GAME OVER", 115, 310);
      explosion.play()
    }
  }
}

//making classes for the messages in the pop up windows/rectangles
class PromoMessage {
  constructor() {
    this.a = mouseX;
    this.b = mouseY;
  }
  createMessage1() {
    fill(0, 0, 0);
    rect(mouseX, mouseY, 350, 60);
    fill(300, 300, 300);
    textSize(20);
    text("Join Chess Premium for More Pieces", mouseX + 7, mouseY + 40);
  }
  createMessage2() {
    fill(0, 0, 0);
    rect(45, 480, 510, 100);
    fill(300, 300, 300);
    textSize(23);
    text("You Are Not Subscribed to our Premium Plan", 70, 510);
    textSize(24);
    text("Join Now to Get 2% Off for the Next 2 Months", 55, 550);
  }
  eraseMessage() {
    noStroke();
    fill(150);
    rect(44, 479, 515, 105);
  }
}

//class was made for the highlights that pop up to show legal moves available
class highlightedarea {
  constructor(HighlightPosX) {
    this.x = HighlightPosX;
  }

  create() {
    fill(0, 139, 250);
    rect(HighlightPosX, 300, 75, 150);
  }
}

//function added to make the pawn move to intended position via arrow keys. it can go forward and backwards
function keyPressed() {
  if (keyCode == UP_ARROW) {
    pawn1y = pawn1y - 75;
  } else {
    if (keyCode == DOWN_ARROW) pawn1y = 470;
  }
}

//this function updates the game mode from the intro screen to game screen
function updatemode() {
  mode++;
}

Problems

As expected I ran into many problems while working on this project. so many that I would probably end up running out of space if I tried listing them here:,(

but here are the three main ones:

  1. the first problem I ran into was with the initialization of the board itself. I could not manage to make the boxes render in a grid pattern, instead, they were rendering in columns which weren’t ideal. I realized it was because I had been not accounting for the fact that after every row, the values were resetting and the same values were being put again into the loop causing it to render the same pattern over and over again. to work around this I simply added a digit to the value of the subsequent row to offset the answer by 1. it caused the whole pattern to shift by one to the left and made a checkered pattern that I was looking for
  2. the second problem I ran into was that the highlights for the possible moves for the player were not showing up. I tried creating it by rendering a rectangle with a mouse click after the game started but that would reset the background. to combat this I decided to create a class for the highlight as it was not only easier to assign it to different positions but also allowed me to render it on top of the checkered background
  3. another problem I faced was that the kill shot element in the last portion of the game would not bounce but stick instead to the wall and fall to -y infinity. the problem was caused by the if statement I used which stated if x was less than 0 (the edge of the canvas) it would start adding 5 to the x variable instead of subtracting it. what I did not realize was that it sent the loop into an endless repetition since by adding 5 it ended the loop and subtracted 5 again and entered the loop again. to combat this I added a conditional statement that split the event into two states (one in which the condition was false and once when it was true). this allowed the loop to run separately and exhibit bouncing behavior

Reflection:

despite it being a tedious game to make, I really enjoyed creating a little narrative piece with absurdist elements. the coding aspect allowed me to explore way outside of what we had covered in class and forced me to think out of the box to solve problems that I had not experienced before. for this assignment, I forced myself to take as little coding input as I could from outside sources (as in using other people’s solutions) and create my workaround. it caused me to take much more time and made it harder but gave me the freedom to experiment on my own. in the future I would like to make a similar game, with a similar theme, but more streamlined and with more functionality. I feel more confident in my ability to make such projects thanks to the experience I gained from this exercise. 

Midterm Project – Sky Bounce Game

https://editor.p5js.org/merna.rakkad/full/kFdTOWJAb

Concept:

The concept of this game was to bring back a game I used to play as a child. I lost this game when I was young and couldn’t find it ever again, even after going to many lengths to find it. While the game I created isn’t exactly the same, it still reminds me of my childhood and brings back many childhood memories. Once I realized I could create a game on my own, this was the first thing I thought of and I was elated to start working on it.

As I grew up, I realized the specific game I played was probably deleted, and this made me want to attempt to recreate it to bring it back to other kids, and remind other young adults of our near childhood. The outcome did not exactly fully represent the game, but it is close enough and still brings me the same enjoyment I got as a child.

How it works:

The way this game works is basically a ball that bounces off a platform. If you miss the platform, you lose. As the game progresses, the speed of the ball increases and the platform gets smaller, making it harder and harder to win. The winning score is 12, since after 12, it becomes impossible to win as the platform will simply cease to exist.

I am proud of the OOP I used in this project because it is one of the things I struggle with the most.

Problems I ran into:

I ran into many bugs in this project, some that I even could not fix. For example, the sound I inputted into the game would not input, and the restart button would disappear based on whether the sound works or not. Moreover, sometimes the ball would not bounce or it would move in a straight line. These are bugs that happened randomly and are not consistent.

Midterm

Concept

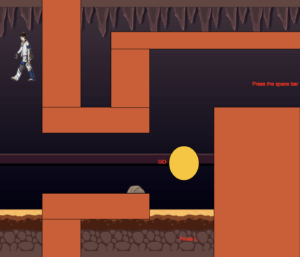
So, my game did not turn out exactly like I wanted it to be which I think is OK. the concept was to have a much more complicated game with different levels, but I don’t think I was able to achieve that. However, I was able to produce a game that I was really proud of I had a maze where the character had to walk through it and I was able to create a character which was able to walk and give the animation of it walking right to left and back and forward which is something I didn’t think was possible prior to this class. I was also able to have a game that is based on luck which was my initial idea the coin is what decides whether you wins or loses and the whole game depends on it so there is no skill involved which was something that I wanted to do with the game since the project was announced.

Inspiration

My inspiration came from the idea of randomness that we talked about during our first couple of classes. being a social science student, my background is in legal studies and in the law everything is relatively a fact so you have to prove the events and you have to make the assumption that nothing is really random. computer languages however depend a lot on randomness especially in the field of I.M. we see a lot of interesting artworks that have created been created from randomness and they all look beautiful in their own sense. And my game I wanted to create the idea of winning being incorporated with such randomness.

code

var Mazeb;
var x1 = 0;
var x2;
var scrollSpeed = 2;

let gameState = "start";
let spritesheet;
let sprites = [];
let direction = 1; // 0 up
let step = 0;
let x;
let y;
let speedx = 3;
let spritesheetintialx = 20;
let spritesheetintialy = 70;

function preload() {
  soundFormats("mp3", "ogg");
  spritesheet = loadImage("walking.png");
  Mazeb = loadImage("Mazebackground.png");
  castle= loadImage("castle.jpeg");
  Flip = loadSound("Coin flip.mp3");
}

function setup() {
  //fullscreen(true);
  // print(Mazeb.width, Mazeb.height);
  createCanvas(700, 600);
  restartGame();
  x2 = width;
  // 12 images across, 4 down, in the spritesheet

  let w = int(spritesheet.width / 12);
  let h = int(spritesheet.height / 4);

  for (let y = 0; y < 4; y++) {
    sprites[y] = [];
    for (let x = 0; x < 12; x++) {
      sprites[y][x] = spritesheet.get(x * w, y * h, w, h);
    } // iterate over rows
  } // iterate over columns

  x = 20;
  y = 70;

  imageMode(CENTER);

  // Display first sprite
  image(sprites[direction][step], x, y);

  //Flip.play()
}

function restartGame() {
  print("Welcome to the dungon");
  print("help me escape");
  y = spritesheetintialy;
  x = spritesheetintialx;
  wonGame = false;
  gameState = "start";
  
}

function draw() {
  if (gameState == "start") {
    drawInstructions();
  } else if (gameState == "playing") {
    drawGame();
  } else if (gameState == "end") {
    drawEndScreen();

  }
  //print(mouseX, mouseY);
}
function drawInstructions() {
  //print('drawing instructions');
  background('#95a8b0');
  // white
  text("Welcome to my dugon", 300, 300);
  text("you have to escape", 300, 320);
  text("Press any key to start", 300, 340);
}

// nothing to do here because all the action
// happens in the keyPressed() callback
//coin
var Coinx = 430;
var Coiny = 380;
var Coinwidth = 70;
var Coinheight = 80;
// rectangle 1
var rect1x = 100;
var rect1y = 0;
var rect1width = 90;
var rect1height = 250;
// rectangle 2
var rect2x = 100;
var rect2y = 250;
var rect2width = 250;
var rect2height = 60;

function drawGame() {
  fill(255,0,0)
 text("Press the space bar",589,200);
  
  text("GO",370,381)
  text("Press L", 420,560 )
  noFill()


  fill("#d8572a");
  // Maze
  rect(rect1x, rect1y, rect1width, rect1height);
  rect(rect2x, rect2y, rect2width, rect2height);
  rect(100, 450, 90, 600);
  rect(100, 450, 250, 60);
  rect(500, 250, 200, 600);
  rect(260, 115, 90, 136);
  rect(260, 75, 600, 40);
  noFill();
  
  
text("GO",430,380)
  // coin
  fill("#fdc500");
  ellipse(Coinx, Coiny, Coinwidth, Coinheight);
  noFill();
  
   if (y > height) {
    // Lost the game!
    wonGame = false;
    // Change to end game state
    gameState = "end";
  }
}
function drawEndScreen() {
  if (wonGame) {
    background("#4cc9f0");
    fill('#ffd60a')
    text("You have escaped", 300, 300);
    text("Press any key to restart", 300, 320);
    noFill()
  } 
  if (lostGame){
    background("#d90429");
    fill('#000814')
    text("You have not made it out.", 300, 300);
    text("Press any key to restart", 300, 320);
    noFill()
  }
}

function mouseClicked() {
  if (
    mouseX > Coinx &&
    mouseX < Coinx + Coinwidth &&
    mouseY > Coiny &&
    mouseY < Coiny + Coinheight
  ) {
    Flip.play();
  }
 if (random() < 0.5){
    print("up");
  } else {
    print("down");
  }
}

//function frameDifference(){
//  capture.loadPixels(255);
//}

function keyPressed() {
  imageMode(CORNER);
  image(Mazeb, x1, 0, width, height);
  image(Mazeb, x2, 0, width, height);

  x1 -= scrollSpeed;
  x2 -= scrollSpeed;

  if (x1 < -width) {
    x1 = width;
  }
  if (x2 < -width) {
    x2 = width;
  }

  // look at sprite sheet to determine
  // which direction is which row
  // if (
  //   mouseX > Coinx &&
  //   mouseX < Coinx + Coinwidth &&
  //   mouseY > Coiny &&
  //   mouseY < Coiny + Coinheight
  // ) {
  //   Flip.play();
  // }
  if (keyCode === DOWN_ARROW) {
    direction = 0;
    y += speedx;
  }

  if (keyCode === LEFT_ARROW) {
    direction = 1;
    x -= speedx;
  }

  if (keyCode === RIGHT_ARROW) {
    direction = 2;
    x += speedx;
    // if(x=>100){
    //   x=45
    // }
    // if(y=rect1height){
    //   x+= speedx
    // }
  }

  if (keyCode === UP_ARROW) {
    direction = 3;
    y -= speedx;
  }

  // Every so often
  // advance to the next sprite
  if (frameCount % speedx == 0) {
    step = (step + 1) % 12;
  }

  // Finally draw paint the sprite

  image(sprites[direction][step], x, y);

  if (gameState == 'start') {
    // Start the game
    gameState = 'playing';
    
  } else if (gameState == 'playing') {
    
    if (key == ' ') {
      // Won game!
      wonGame = true;
      gameState = 'end';
    }
    
  } if (key == 'l') {
      // lost game!
      lostGame = true;
      gameState = 'end';
  }
  return false;
}

At least one shape.  

I created multiple shapes through the rectangles that create the maze and the coin that I made by using an ellipse.

At least one image

I use this sprite sheet with the different images to create The Walking character that goes through the maze. And I create the background with an image of a dungeon that moves along with the advancement of the game

At least one sound

I create a sound that you hear once you click on the coin to simulate the coin flip that decides on random whether you should go up or down

At least one on-screen text

I had many on screen text that had the instructions and the winning and ending commands while I also had the commands that tell you what actions to make once you win or lose

Object Oriented Programming

I created this game to simulate the maze with his story where you should escape from the dungeon


Problems 

Why writing my code I run into many problems that I had to adapt with throughout the way. I wasn’t able to make the borders set so that the character would bump into them and not be able to go through them I try to use either color dedicated blocking, but I wasn’t able to figure out how that worked 100% and I was able to block the character at a certain point but it would go through the whole X axis. anyway, I also had issues with creating the instructions page that I later found out solutions to once I kept rereading my code over 20 times. we just I would have liked the character to either win or lose once they go through either screen instead of having a press command check but I came up with that idea later when I in my project and I didn’t have enough time to write about and implement the code.