
Inspiration
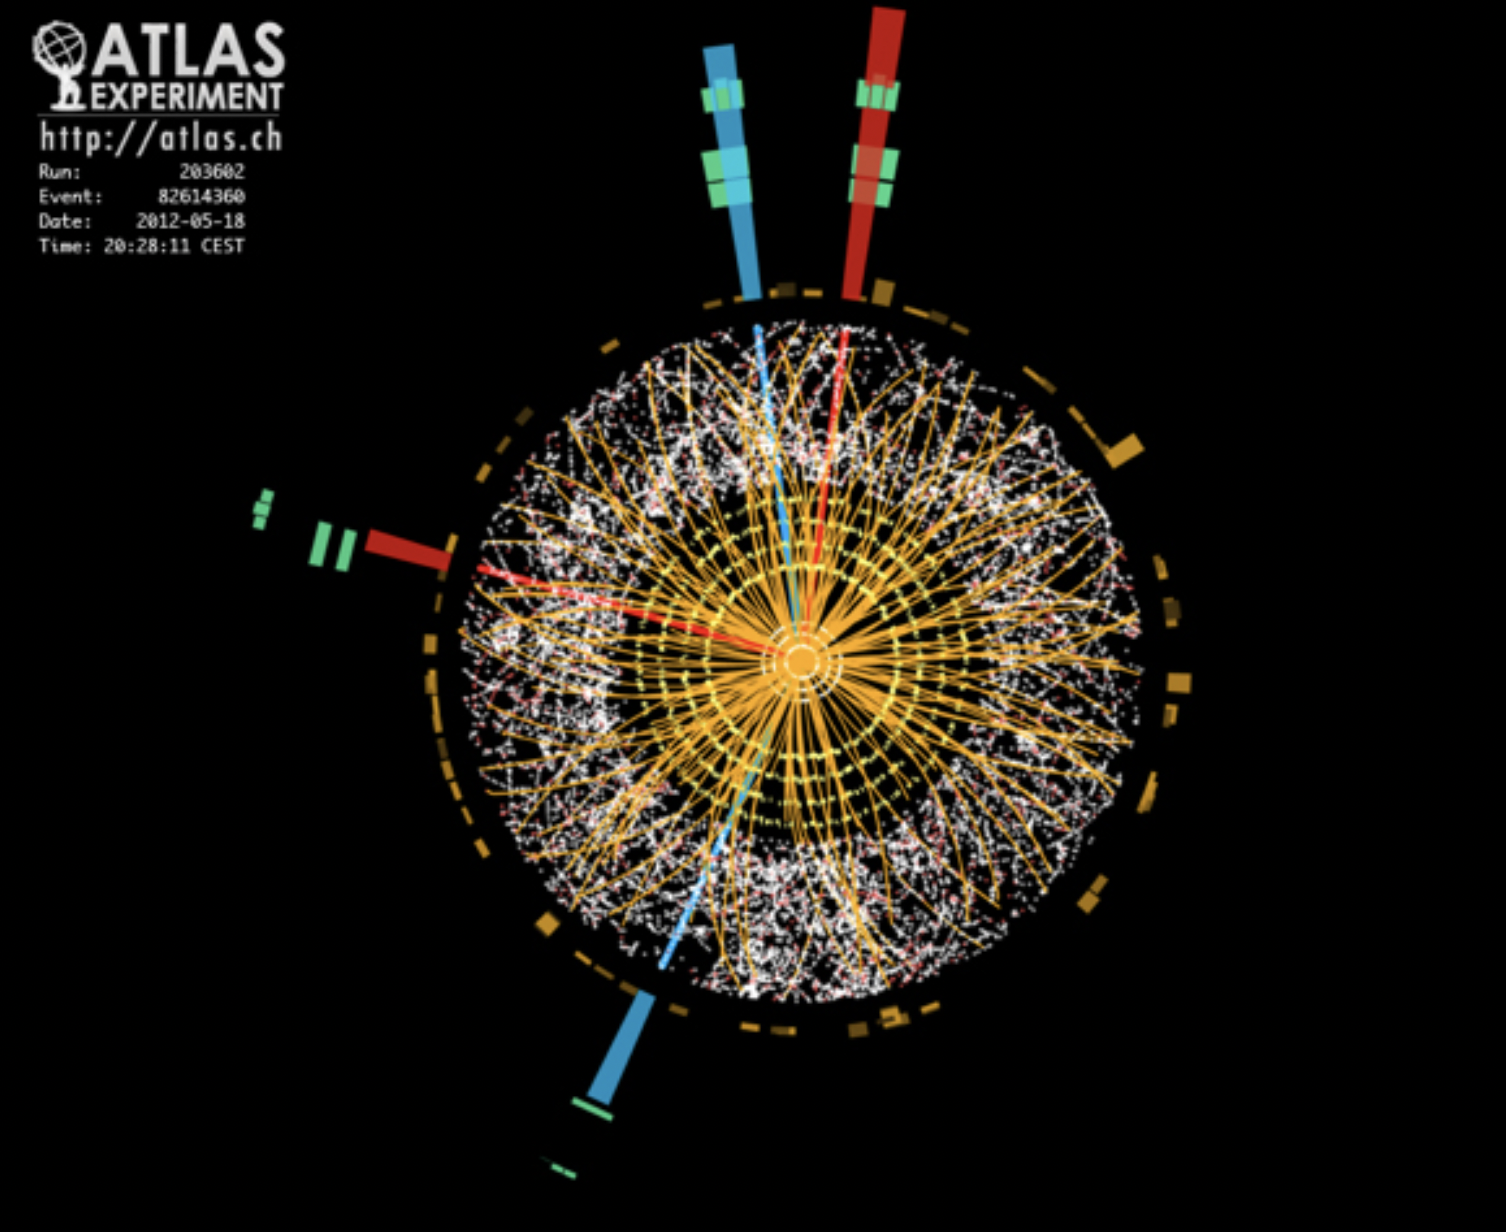
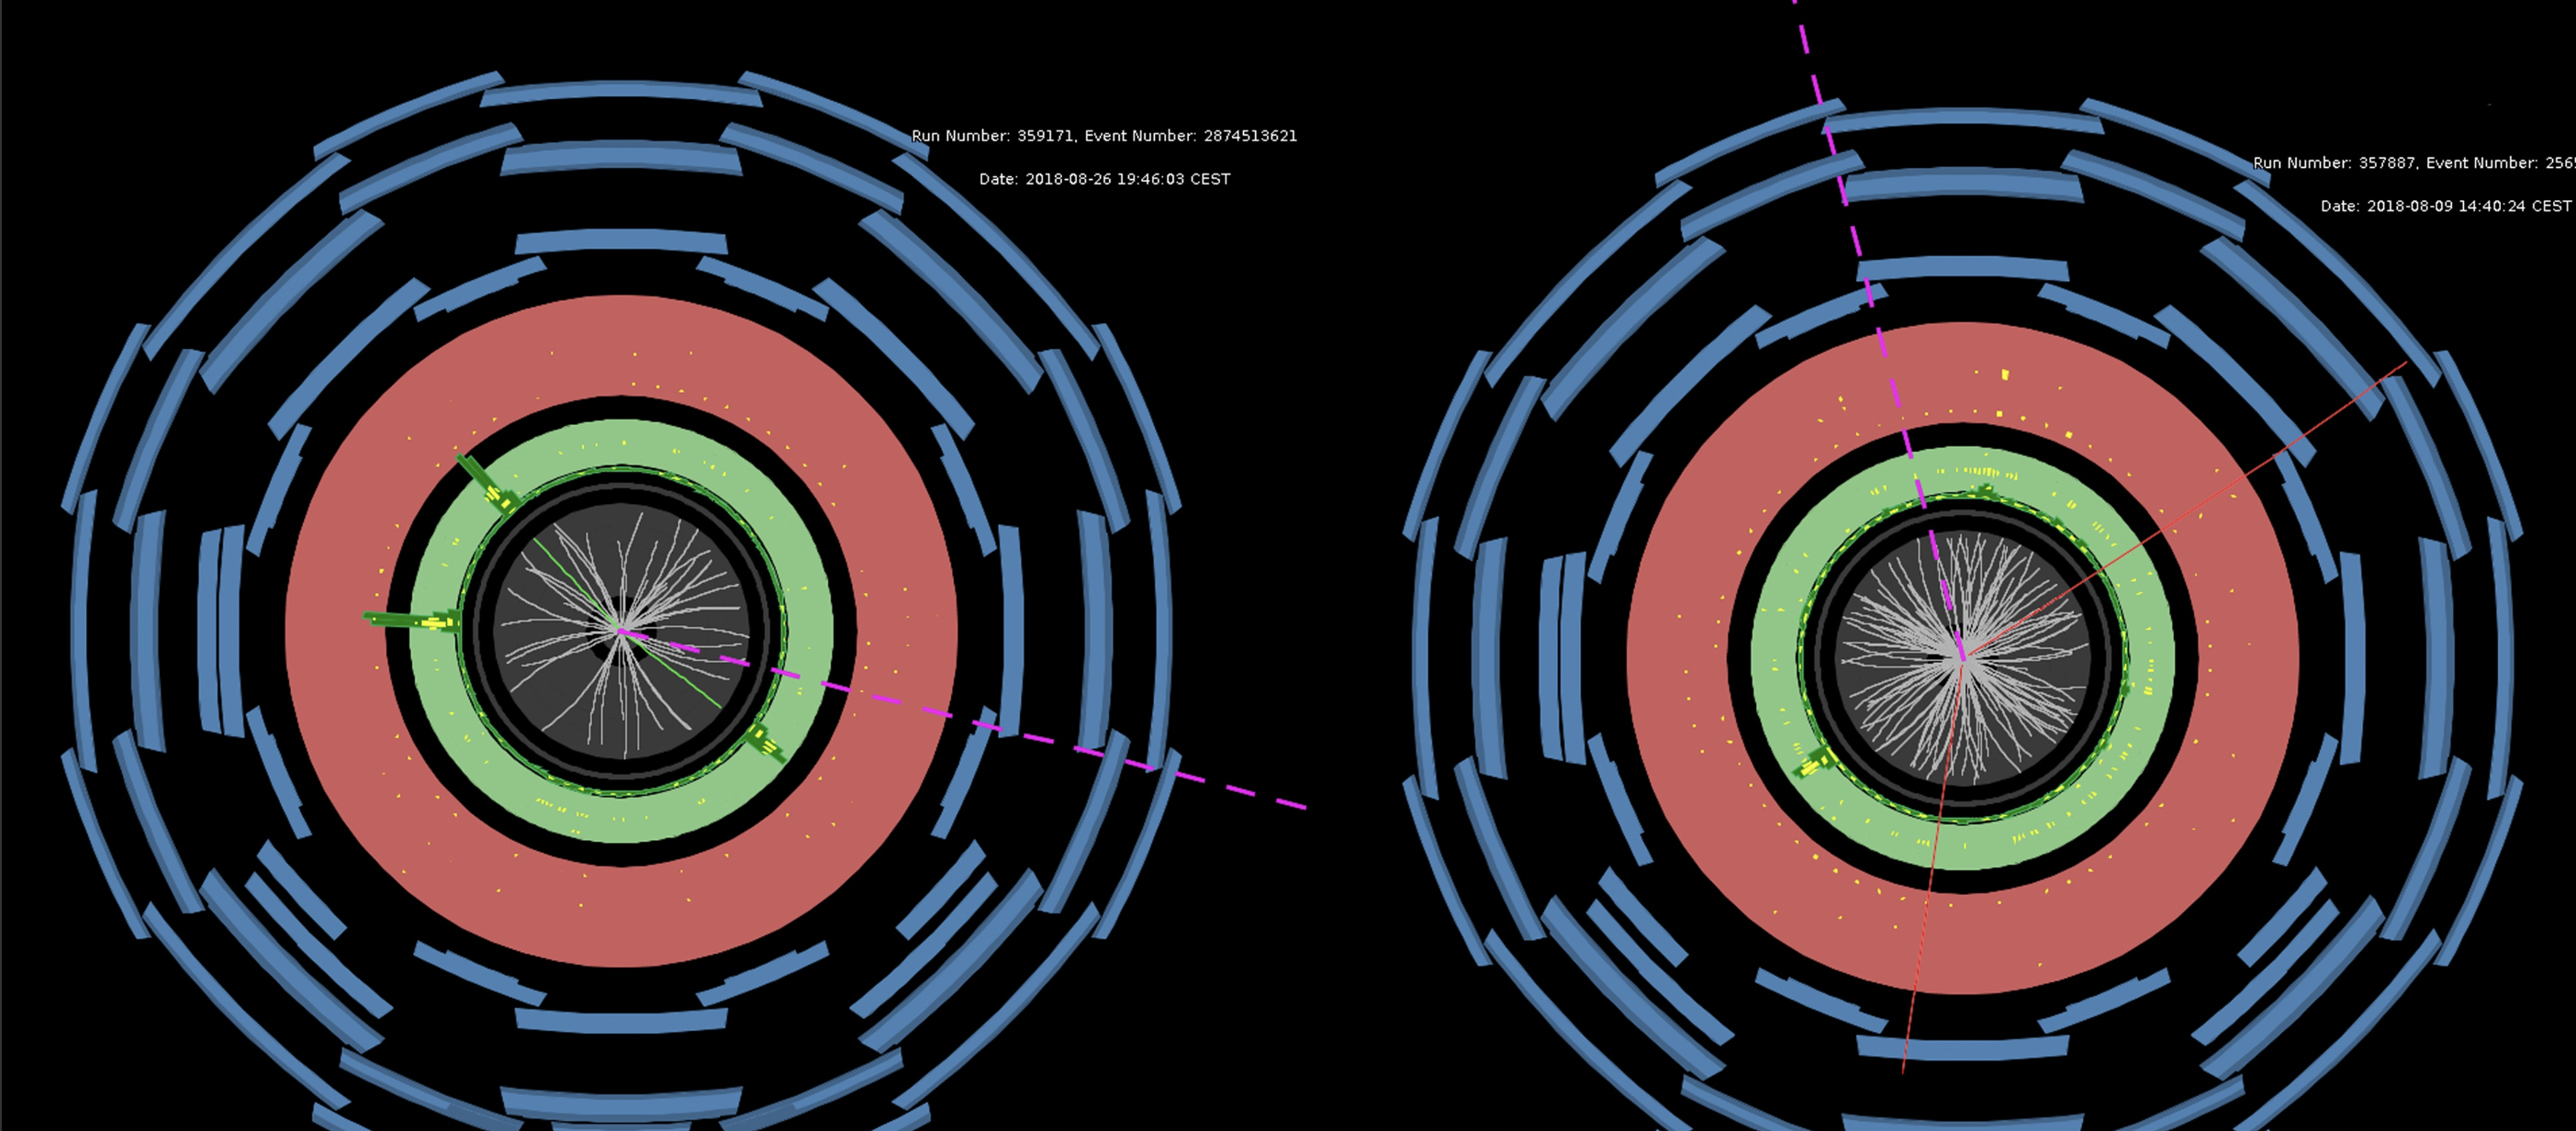
For this assignment, I have replicated the renowned particle physics experiment called ATLAS, the largest general-purpose particle physics experiment at the Large Hadron Collider (LHC) (at CERN in Switzerland). The scientists at LHC use the Higgs boson (an unstable particle that decays into stable particles) to search for dark photons. The image below (Image 1) is related to an experiment completed on May 18, 2012, where the ATLAS detector records a Higgs boson decay; the second image (Image 2) is also related to a similar experiment. Thus, in this project, I have created an animated simulation of the experiments mentioned above — it is an amalgamation of two images shown.
Code
In addition to p5.js’ two default functions (draw() and setup()), the project comprises of one additional function and four classes.
- OuterShell class
- Circle class
- Particle class
- Pattern class
- Draw_beam function
OuterShell Class
I began writing code for the project by completing OuterShell class at first. It is a class that represents the outer rectangular-shaped structure of the lateral cross-section of the collider shown above. The class depends on five attributes and one display method that draws rectangle(s) using the information fed into its attributes. The display method makes use of two transformations — translation and rotation — in order to make the rectangles rotate around a fixed point (here, it is the center of the canvas). Thus, when objects are instantiated, stored and displayed using this class, it appears that a set of inclined rectangles are revolving around the core of the detector.
// Reset the canvas using push() and pop()

push();
translate(canvas_w / 2, canvas_h / 2);                // Move the origin to the middle of canvas
rotate(ANGLE);                                        // Angle of rotation
fill(random_r_val, random_g_val, random_b_val);       // Fill the shape
noStroke();
rect(this.x, this.y, this.length_, this.width_, this.roundness);         // The fifth parameter determines the roundness of edges
pop();

ANGLE += 3;
Circle Class
The Circle class is relatively a simple implementation, as it consists of three attributes and one display method. The primary challenge here was to implement fill() function on each circle individually. Even though I used multiple fill() functions, only the final color would cover the largest circle on the canvas, and since I planned on using different fill colors for different circles, the use of if-conditionals to manually specify RGB values helped me solve this problem. Here, I used radial measurement to determine which RGB values go with which circle.
Later, four concentric circles are instantiated in the setup function. In doing so, a list of radii is stored in a list and looped through using another for-loop to create and store circles in their corresponding list. Finally, in the draw function, using another for-loop, the display() method is called on each circle in the list and is displayed on the canvas.
Particle Class
This class is similar to the OuterClass class in terms of its display() method, yet a lengthy one. It depends on three attributes and two methods. The first method, titled display(), is used to create a set of red particles (ellipses) that revolve around the core, which has been done using a similar algorithm used in the OuterShell class, whereas the second method, titled disperse(), is related to free-flowing particles (ellipses) on the entire canvas. The idea for the disperse() method is such that there are particles around the detector, in reality, thus I implemented this method to represent the existence of different kinds of particles in and around the detector. Here, I update the x and y coordinates of free-flowing particles inside the disperse() method, which provided mobility to individual particles.
// METHOD 2

disperse()
{
  stroke("white");
  ellipse(this.x, this.y, random(0, 0.5), random(0, 0.5));

  // Update x and y values simultaneously
  this.x += this.speed;
  this.y += this.speed;
}
Pattern Class
This is by far the most interesting and tedious section of the project. Initially, I was planning to draw either spiral or arc-related designs, but I went with a new pattern to differentiate this project from previous assignments.
The class depends on three attributes and consists of a single display() method. Here, I used one of the attributes (count) to determine the number of lines drawn. And, using a combination of for-loop and line() function, with some basic trigonometric calculations to determine two points of a line, a number of linear segments are drawn inside a circle of radius 80 (modifiable). Since its objects are instantiated and displayed inside the draw() function, which is called a certain number of times in a second, it appears as if the lines are mobile in nature.
display()
  {
    let radius = 80;                              // Radius whichin which lines creation is confined

    push();
    translate(canvas_w / 2, canvas_h / 2);       // Move the origin to the middle of canvas

    // Loop execution determined by this.count attribute
    for (let i = 0; i < this.count; i++) {
      let ANGLE1 = random(0, 2 * PI);            // Angle value that determines x and y coordinate of Point 1
      let point_1_x = sin(ANGLE1) * radius;      // x-cordinate of Point 1
      let point_1_y = cos(ANGLE1) * radius;      // y-cordinate of Point 1

      let ANGLE2 = random(0, 2 * PI);            // Angle value that determines x and y coordinate of Point 1
      let point_2_x = sin(ANGLE2) * radius;      // x-cordinate of Point 2
      let point_2_y = cos(ANGLE2) * radius;      // y-cordinate of Point 2

      strokeWeight(0.4);
      stroke(234, 148, 14);

      // Drawing line from point 1 to point 2
      line(point_1_x, point_1_y, point_2_x, point_2_y);
    }

    pop();
  }
Draw_beam function
Finally, to add to the final effect and incorporate user interaction, this function is implemented so that a random number of lines (in a range of 3 to 7 inclusive) that lead to the core of the detector are drawn. These lines imitate the actual beam of light that is radiated inside a reactor when particles collide with each other. Thus, when the user clicks on the canvas, different colored lines are generated and displayed on the screen. The function makes use of if-conditional statements to pick a certain color for each line.
Here, the frameRate() function’s argument can be modified to control the speed of the canvas element. If a lower frameRate is used, the output may seem laggy. However, for this assignment, frameRate is set to be “5”.
Reflection
Overall, I am satisfied with the final output. I was prepared to start working on this project on Friday, but the brainstorming phase got an unforeseen amount of extension. Thus, I believe, I invested a good portion of time in planning. Also, since the project is divided into fixed classes and dependencies are handled separately, I am happy with the project.
- If I get to improve or re-work this particular project, I will focus on the following ideas and technicalities to further improve the final output:
When the user clicks on the canvas, lines are drawn from random particles to the center of the core. However, with a little bit of work, it can be modified so that when the user clicks on a particular particle, a line will be drawn connecting it and the core of the reactor. - Similarly, using 3D libraries, an extra dimension can be added as a result when the mouse is clicked, the canvas spans 360 degrees to give a thorough animation of the simulation.
Looks good! The motion could be smoother.