Week 11: Amina & Susanne Updated

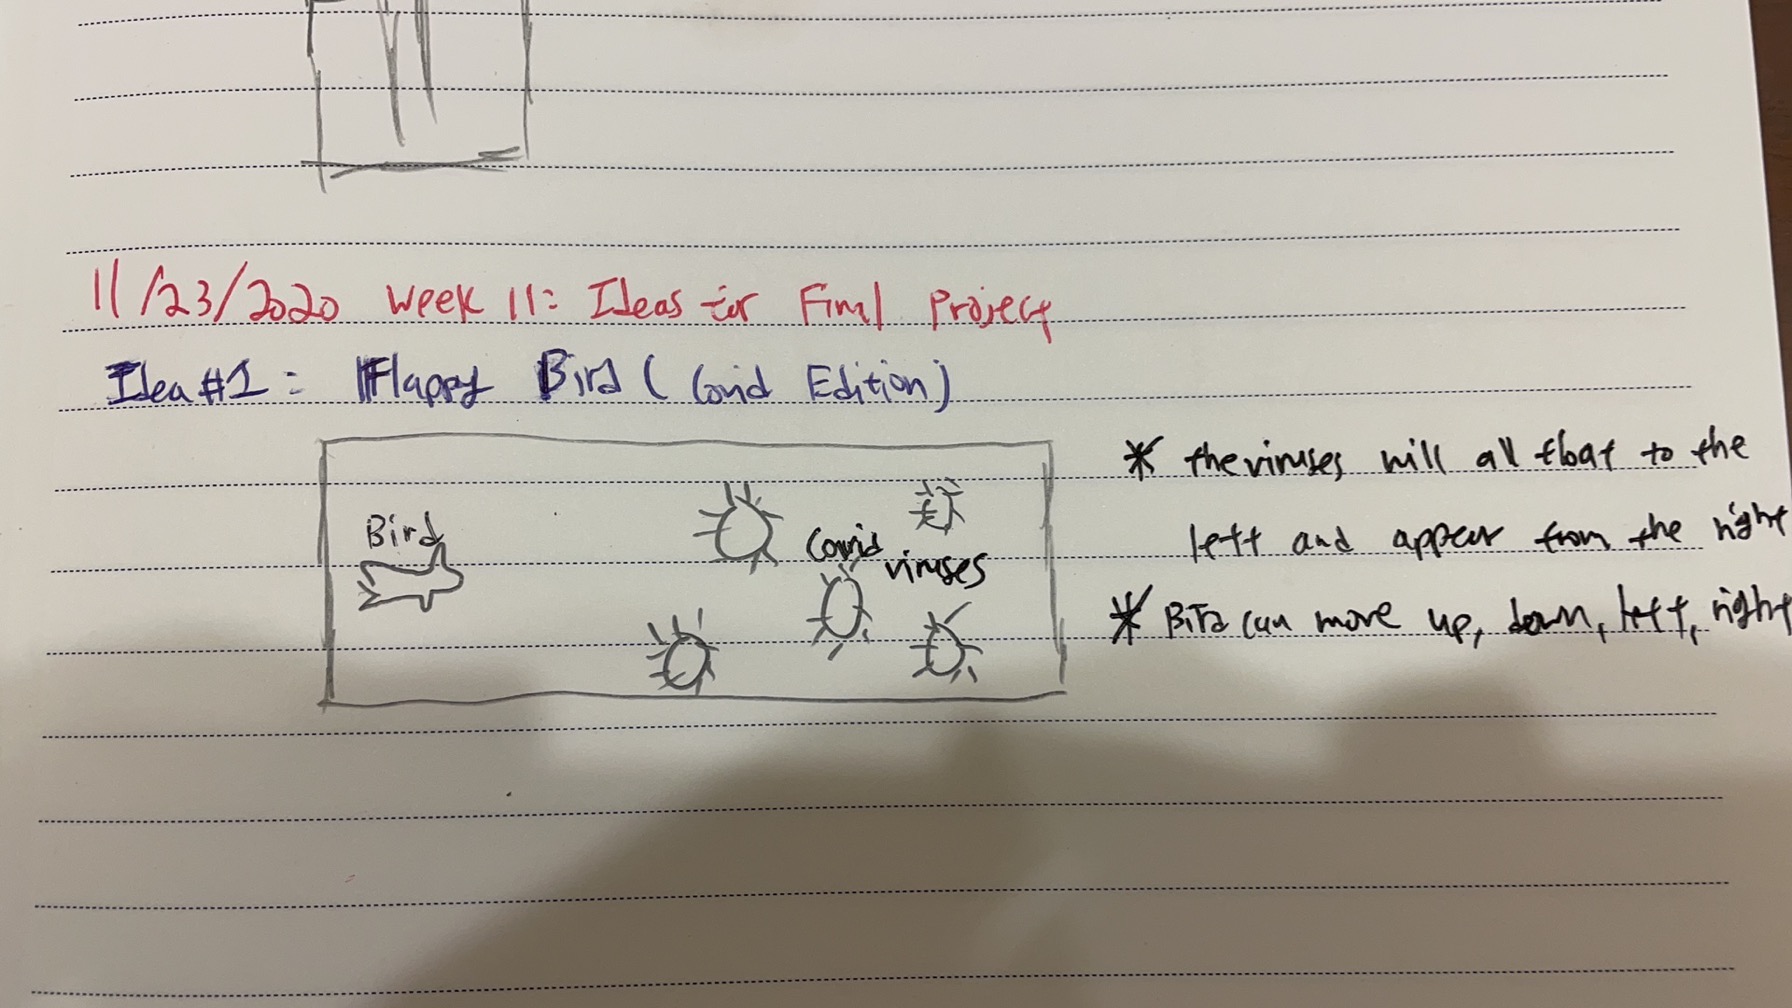
Feedback during our class discussion and wire framing helped us finalize a clear plan for our Zoom game in which the player has to repeat a specific LED and sound pattern through button input in order to join the Zoom meeting in which prerecorded version of Amina and Susanne will be waiting.


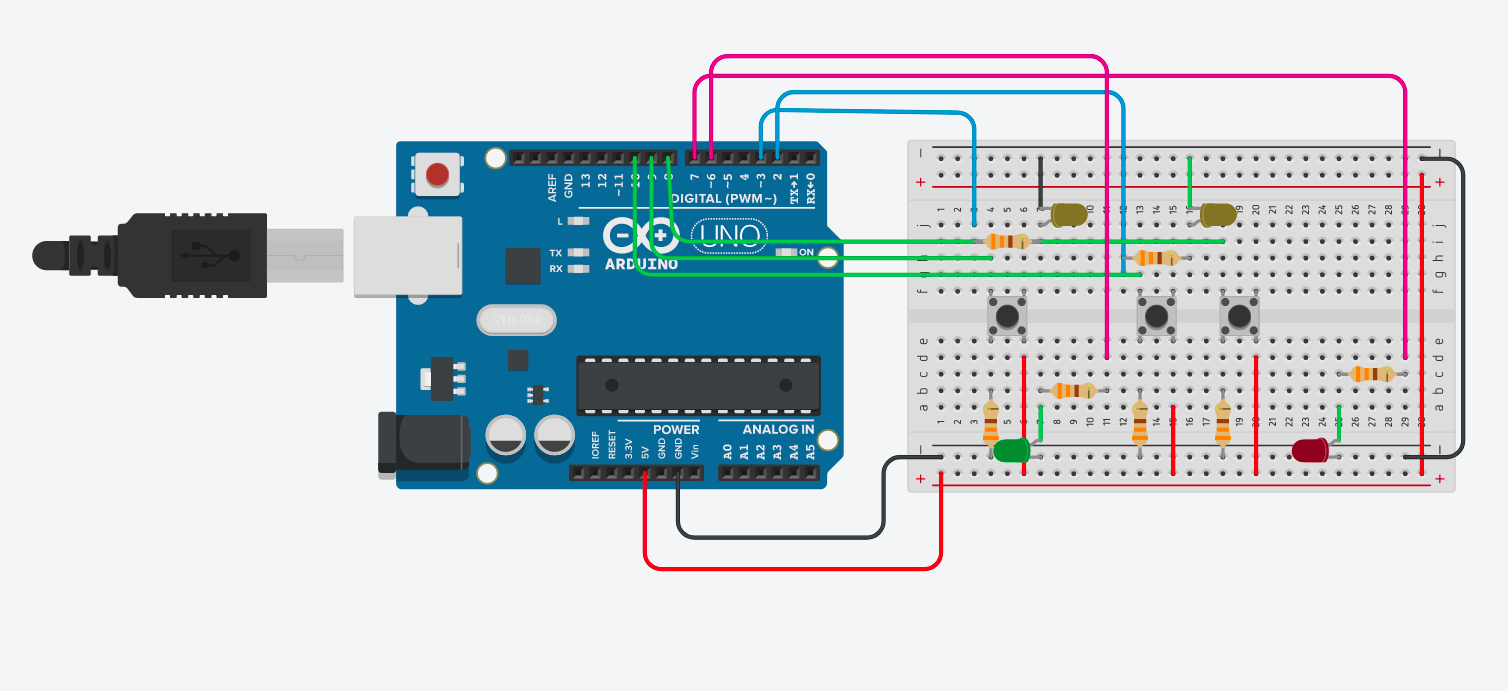
+++Communication between Arduino & Processing🔄💻🔈🎶+++

STEP 1

Processing: Start with the “Main Menu” / “Log Into Zoom” screen. Send a message to Arduino if the game has started.

Arduino: Turn on if there is a specific message from Processing received. Play a specific tone once and blink with green LED to indicate the start of the game.

STEP 2

Processing: Player clicks game start button, sound effect for click. Then redirect to the window saying “The password pattern is playing. The meeting host wants to test your memory. You can enter the meeting after you repeat the pattern.

Arduino: Play the right combination with tone() and corresponding LED colors. After this, send a message to Processing indicating the end of the password.

STEP 3

Processing: After receiving the end signal from arduino, redirect to the “input” window and prompt the user to enter the password using the buttons on Arduino.

Arduino: Start to take input from the user and send the combinations to Processing. Provide immediate feedback to the user by playing corresponding button sounds and turning the corresponding light color. Send input if the “enter” button was pressed.

STEP 4

Processing: Keep checking for input from Arduino until the right combination is entered. If the input is wrong, keep asking for it. If the input is right, redirect to the “Zoom Meeting”.

Arduino: If the wrong combination is entered, play a specific sound and turn the LED to red light. If the right combination is entered, play congratulating sound and turn the green light to indicate the end of the game.


+++Wire frames💻📐🎨+++
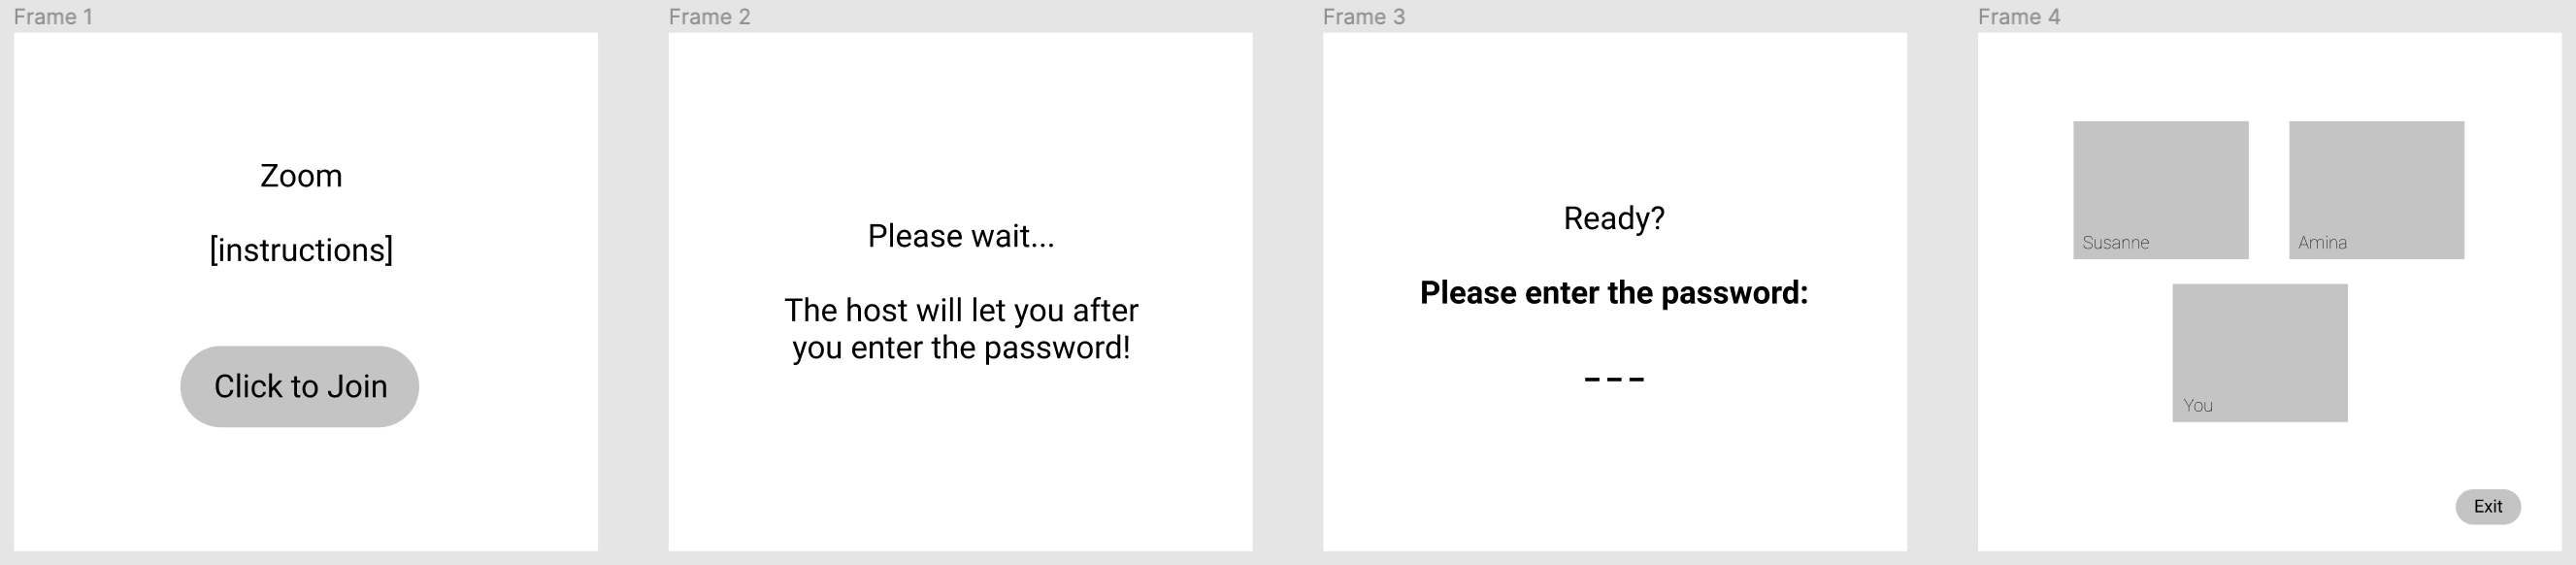
 

+++Next steps📝+++

    • We want to explore the option of bringing in real time camera input to have the players video appear in Frame 4 alongside our prerecorded videos. Daniel Shiffman seems to have a good tutorial on that topic.
    • Amina will start with Arduino, specifically exploring the format in which button input is read and sent when the player repeats the pattern password.
    • Susanne will start with Processing and design the different scenes of the game.

Final Project Brainstorming

So as usual, being the indecisive person I am, I have no clue what I will be doing for the final project. I have some random ideas as to what I can do so far:

Idea 1:

Building some kind of trivia for a TV show like How I Met Your Mother, where questions pop up and you answer using the buttons and a yellow bulb signifies waiting for response, a blue one blinks when you answer, and at the end a green one. According to your answers, the screen tells you which character you are most similar to.

Idea 2:

Building some kind of spike ball representing COVID-19 where each spike when clicked would bring an output of sound, picture, or data of a country/ worldwide.

Idea 3:

Connect 4 game on screen played by 4 buttons representing each position.

Idea 4:

Obstacle course game on screen where you move using buttons and collect power-ups to overcome challenges. Could be a multiplayer race between 2 players.

Nathan – New Final Project Idea

General Idea

For my final project, I plan to do a “ghost busting” device. The device would include an Arduino layout and a laptop. When there’s a “ghost” caught, the laptop would display the type of ghost caught, its nature (malicious/neutral/friendly), and instructions on how to dispose of it. The way the player would dispose of the ghost would include a certain set of actions on the arduino.

Inspiration

For this idea, I was inspired by watching BuzzFeed unsolved 😅. The hosts Ryan and Shane use this device called a spirit box. When they turn the box on, it makes a screeching noise produced by switching channels (radio channels I think?) at a rapid pace. It’s believed that this way, the ghosts would be able to “communicate” through the white noise. Something like this:

Since I need to have some form of communication between the Arduino and processing for this project, I thought I might make an “upgraded” spirit box that consisted of a laptop as well.

Specifics

Arduino components:

  1. Sensing department
    1. Photoresistor
      1. The lower the brightness of the room, the likelier for there to be a ghost
    2. Ultrasonic distance sensor
      1. The closer the player is to a wall or corner, the likelier for there to be a ghost
    3. Piezo disk
      1. The sound changes based on the situation. No ghost is a sound, each type of ghost has a sound. (malicious has a more scary sound, friendly is more meme sound)
  2. Hands-on department
    1. Buttons and knob
      1. For the players to interact with after encountering a ghost.

Arduino-Processing Communication:

  • The photoresistor and the ultrasonic sensor will send two data values to processing, and processing will have a function that interprets the data. The chance of a ghost popping up will correlate with these data values.
  • For the piezo disk, the Arduino will have four sounds coded in. (No ghost, three other types). According to the situation, processing sends a message to Arduino to play which sound.
  • For the hands-on department, three sets of instructions will have been coded into the Arduino. According to the situation, Processing sends a message to Arduino for which set of actions is required.

[Updated] My final project idea 💡

I am still torn between a few ideas in my mind… But the idea I am leaning towards the most at the moment is the following:

Idea:

An arcade game. The setting of the game is in the space amidst a space war. ‘You will have to defeat the alien spaceships by using the laser beams on your vessel to protect the earth.’

Arduino-side:

The player will be able to maneuver the player using 2~3 push buttons (for items and miscellaneous skills) and a potentiometer.

Processing-side:

The visual of the game will contain a working sprite of a spaceship, background image of the space, images of the bullets, alien spaceships, items, etc. The game will contain different levels. The screen won’t convert on different levels, but rather there will be a display of level numbers and the difficulty of the game will increase. Might include a level consisting a different theme for fun.

I will update this post if my idea/plan changes overtime.

-*-*-*-*-*-*-*-*-*-*-*-*-*-*-*-*-*-*-*-*-*-*-*-*-*-*-*-*-

After Monday’s class and having listened to other friends’ ideas, I thought to myself, ‘I do not necessarily need to make a game do I…?’.

So I decided to switch to a different topic. I am still not 100% sure about the idea so I expect to have my final project idea more tailored by the end of today’s class.

New idea: A radar turret. I would like to make a rotating turret using arduino, with an ultrasonic sensor attached to a servo, in order to create a scouting(?) surveillance sensor. I would like to use processing to display any objects that are recognized by the sensor to alert the user monitoring the environment.

Arduino + Processing

I was probably most clueless for this week’s assignment when I started planning for it. I initially tried making numerous different games including, aligning moving objects, shooting game, and so on. I resorted to this game because it is the most neatly operating game in my opinion. I am not a huge gamer myself, but I sometimes get fascinated (or close to getting addicted to) by smartphone app games that are very simple yet clear on their objectives.

The objective of this game is to align the circles. To be more specific, for each round there will be a circle randomly generated by variating radius. The circle will be centered in the middle of the scree, but its size will differ every round. You, as a player, have to align your circle by resizing it and adjusting it to the generated circle. The resizing will be carried out by moving the potentiometer. So, when you move the potentiometer to the right, the circle gets bigger, and when you move the potentiometer to the left, the circle gets smaller. You will repeat this until you have successfully overlapped 3 circles in total. You will be timed each round on your performance and the completion time will be posted on the scoreboard.

To talk a bit about the design and the location of different elements, you will see a scoreboard on your left that is updated after every 3 circles, and you will also be able to see how many circles you have aligned so far on the right-hand side. On the top segment, you will see the time. Most importantly, you will see the two circles in the center.  Without further ado, enjoy!

How this works:

Arduino code:

void setup() {
  Serial.begin(9600);
  Serial.println('0');
  pinMode(2, OUTPUT);
}

void loop() {
  if(Serial.available()>0){
    char inByte=Serial.read();
    int sensor = analogRead(A0);
    delay(1);
    Serial.println(sensor);
    digitalWrite(2, inByte);
  }
}

Processing code:

PFont easyfont;
int now_time = 0;
import processing.serial.*;
Serial myPort;
int radius=10;
float initial_rad = 30;
float time = 0;
boolean game_start = false;
int c = 0;
int count = 0;
float[] scoreboard = new float[10];
String[] timestamp = new String[10];

void setup(){
  size(600,400);
  easyfont = createFont("arial", 50);
  now_time = millis();
  smooth();
  //printArray(Serial.list());
  String portname=Serial.list()[4];
  //println(portname);
  myPort = new Serial(this,portname,9600);
  myPort.clear();
  myPort.bufferUntil('\n');
}

void draw(){
  background(255);
  fill(#00cc33);
  textSize(24);
  text("Overlap 3 circles as fast as you can...", width/2, height-20);
  textAlign(CENTER,CENTER);
  textFont(easyfont);
  textSize(24);
  text(nf(time,0,2)+" sec", width/2, 25);
  noFill();
  strokeWeight(10);
  circle(width/2,height/2,radius);
  
  textSize(10);
  fill(0);
  text("Number of circles so far: " + c, width-70, 25);
  
  if(abs(initial_rad - radius) < 3){
    fill(#FFC300);
    textSize(48);

    game_start = false;
    initial_rad = random(1,height);
    c += 1;
    if(c == 3){
      c = 0;
      println(nf(time,0,2));
      now_time = millis();
      scoreboard[count] = time;
      timestamp[count] = str(hour())+":"+str(minute())+":"+str(second());
      printArray(timestamp);
      count += 1;
    }
  }
  else{
    time = (millis()-now_time)/1000f;
  }
  game_start = true;
  noFill();
  circle(width/2, height/2, initial_rad);
  
  for(int i=0; i<10; i++){
    textSize(20);
    text("SCOREBOARD", 80, 25);
    textSize(18);
    text(timestamp[i] + "  " + scoreboard[i], 70, 60+i*20);
  }
}

void serialEvent(Serial myPort){
  String s=myPort.readStringUntil('\n');
  s=trim(s);
  if (s!=null){
    radius=(int)map(int(s),0,1023,0, height);
  }
  myPort.write('0');
}


Don’t let it explode – Week 10

introduction

For this week’s assignment, the first thing I started thinking about was which elements to use from Arduino. I wanted Arduino to offer some sort of functionality that Processing couldn’t.
So, I decided to use a potentiometer that would allow you to rotate a line within a circle, by converting the potentiometer values into angles.
Yes, this can be done with just Processing, but I think that physically twisting a button and having the line rotate as you twist, is something you can’t replicate with the keyboard or mouse.

idea

The point of the game is to try and deactivate a bomb before it explodes.
A red arc shows up randomly on the screen of the bomb and you have to move the potentiometer to get the line inside that arc before a specific amount of time passes.
When you first run the game, you get around 5 seconds to deactivate the first arc. This is because it was taking some time at first to load everything. But after that, you have 2 seconds for each arc.
You would win/deactivate the bomb if you are able to deactivate 20 arcs. And, you would lose if 2 seconds go by before you are able to reach one of the arcs.
You can restart the game by clicking the mouse anywhere on the screen.


Here, you can see how the potentiometer controls the line:

Circuit

The wiring is really basic. All I used was a potentiometer.

code

This the Arduino Code:

//get value of potentiometer at where you want degree 180 to be
float at180=862; 
//get value of potentiometer at where you want degree 0 to be
float at0=144;

void setup() {
  // put your setup code here, to run once:
  Serial.begin(9600);
  Serial.println('0'); //sending an ASCII version
  //println sends a string of ascii values
}

void loop() {
    
  if(Serial.available()>0)
  {
    float toAngle = ((at180-at0)/180);
    char inByte=Serial.read();
    //read the poteniometer value
    int sensor = analogRead(A0);
    //convert it to an angle
    float angle = (sensor - at0) / toAngle;
    delay(1);
    //send the angle value to processing
    Serial.println(String(angle)); 
  }
}

And this is the Processing code:

import processing.serial.*;
Serial myPort;
float pAngle;
PImage bomb;
int x =0;
int y =0;
int r = 170;
float angle, dist;
boolean done, lost, won;
color c;
int score;
int timer, timeleft, timestart,seconds;
int coolingTime;
float lineX, lineY;

void setup()
{
  size(420,750);
  //connection with arudino
  printArray(Serial.list());
  String portname=Serial.list()[1];
  println(portname);
  myPort = new Serial(this,portname,9600);
  myPort.clear();
  myPort.bufferUntil('\n');
  //variable initialization
  bomb = loadImage("b.png");
  lost = false;
  won = false;
  done = false;
  angle = random (-8*PI/7,PI/6); //radnom angle 
  dist = angle + PI/8; //another angle distant from the first one by PI/8 to make up the arc
  c = color(255,0,0);
  pAngle = radians(36); 
  score=0;
  timer = timeleft = 5500; // set timer for about 5 seconds the first time
  //because it takes some time to load the potentiometer
  //but then you get only 2 seconds
  timestart = millis();
  coolingTime =0; //variable used to pause a bit before switching to another random angle value
}

void draw(){
  //display once you lose
  if (lost) 
  {
    background(0);
    fill(255,0,0);
    textSize(30);
    textAlign(CENTER);
    text("YOU LOST!!", width/2,height/3 - 50);
    text("Bomb was not deactivated!!", width/2,height/3);
    textSize(20);
    fill(255);
    text("Remaining moves until deactivation: "+ str(20-score), width/2,height/2);
    textSize(20);
    text("Click anywhere to start again.", width/2,3*height/4);
    textSize(13);
    text("Make sure to reset your potentiometer at lowest angle", width/2,4*height/5);
    text("(which is at the far right) before restarting.", width/2,5*height/6);
  }
  //display once you won
  else if (won)
  {
    background(100);
    fill(0,255,0);
    textSize(50);
    textAlign(CENTER);
    text("BOMB", width/2,height/3);
    text("DEACTIVATED", width/2,height/3 + 60);
    fill(255);
    textSize(20);
    text("Click anywhere to start again.", width/2,3*height/4);
    textSize(13);
    text("Make sure to reset your potentiometer at lowest angle", width/2,4*height/5);
    text("(which is at the far right) before restarting.", width/2,5*height/6);
  }
  //display during the game
  else if (!won && !lost)
  {
    background(50);
    image(bomb,-2,4);
    translate(width/2,height/2);
    timeleft =  timer - (millis() - timestart);
    seconds = (timeleft/1000) % 60;
    //println(seconds);
    fill (255,190);
    rect(-200,-370,250,65);
    fill(0);
    textSize(20);
    textAlign(LEFT);
    text("Timer: "+ seconds, -185, -345);
    text("Moves to deativate: "+ str(20-score), -185, -320); 
    
    //drawing a circle and the arc
    strokeWeight(3);
    fill(255);
    ellipse(0,0,r,r);
    fill(c);
    arc(x, y, r, r, angle, dist);
    //drawing the line controlled by the potentiometer angle value
    lineX = cos(pAngle)*(r/2);
    lineY = sin(pAngle)*(r/2);
    line(0,0,lineX,lineY);
    //losing condition : you run out of time before reaching an arc
    if (seconds <= 0)
    {
      lost = true;
    }
    //winning condition : you manage to reach 20 arcs
    if (score == 20)
    {
      won = true;
    }
    //if you touch an arc before timer runs out
    if ((pAngle>angle)&&(pAngle<dist) && seconds>0){
      done = true;
      c= color(0,255,0); //change color to green
      coolingTime ++; //start incrementing coolingTime
      timer = timeleft = 2500; //restart the timer
      timestart = millis();
    }
    //this statement is used so that cooling time will still increment if you touch the arc
    //and then move away from it
    else if ( !((pAngle>angle)&&(pAngle<dist)) && coolingTime >= 1) {coolingTime++;}
    //println(coolingTime);
    //once the coolingTime is over
    if(coolingTime> 15)
    {
      score++; //increment score
      //get new random arc
      angle = random (-8*PI/7,PI/6); 
      dist = angle + PI/8;
      done = false;
      c= color(255,0,0); //change color of arc back to red
      coolingTime = 0; //reset coolingTime to 0
    }
  }
}
//restart the game and resee all the needed variables when mouse is clicked at one of the end screens
void mouseClicked()
{
  if (lost || won)
  {
    won = false;
    lost = false;
    timer = timeleft = 5500;
    timestart = millis();
    score=0;
    coolingTime = 0;
    done = false;
    angle = random (-8*PI/7,PI/6);
    dist = angle + PI/8;
    c = color(255,0,0);
  }
}

//getting the value from arduino
void serialEvent(Serial myPort){
  String s=myPort.readStringUntil('\n'); //to know where it ends
  s=trim(s);
  if (s!=null){
    pAngle= int(s);
    pAngle = - radians(pAngle);
  }
  //println(pAngle);
  myPort.write("0"); //send something back to arduino to ask for next value
}

final outcome

If I had more time, I would have liked to add a buzzer, as well as a button on Arduino to restart the game instead of doing that with the mouse. I would have also liked to add a start-screen.
Something else I would like to fix is when generating a random arc, it shouldn’t be where the previous one was.

Anyway, this is the final outcome.

Final Project Idea

For my Final Project, I have managed to narrow it down to a single idea as explained below.

MAIN IDEA #1

For this, I wanted to recreate the Flappy Bird game but make it a Covid 19 edition, where the user will be able to control the bird’s up & down movement with a photoresistor or distance sensor and to control its left & right movement with a switch or potentiometer.

another possible idea…if i have enough time of course…

I wanted to also introduce another type of input instead of using the photoresistor only, which would be a microphone. So, instead of being able to control the up and down movement with only your hand, it would move the bird’s location base on the user’s amplitude value within the volume, or how loud they scream.

Objective of the Game

The goal of the game would be to avoid the incoming Covid viruses that will be constantly appearing from the right side of the screen and disappearing off the left side of the screen. If the user touches any of the Covid viruses, he or she loses.

Another idea…

I also wanted to introduce more elements such as live counts, where the player will have a total of 3 total lives or something. Another idea would also probably involve different levels??

Mini Sketch


Learning Morse Code Through A Quiz

For this week project I took inspiration from my one of my previous weekly assignments where I made a device where a user could record a Morse code message and could play it back.

One issue with that project is that a user must know Morse code first. I personally don’t know Morse code but I find the idea to be pretty cool.

For my assignment this week I made a setup where you could interact with processing via the buttons on the breadboard to input a dashes and dot and you could press enter to check if your input was correct.

The user would press the blue button to input a dot and the yellow button to input a dash. The corresponding would be displayed on the processing window. Once the user is satisfied with the input they can press the red button to check if the input is correct. If the input is correct a green light would flash on the breadboard, if not a red light would flash. Once the enter button is pressed a new letter is displayed and the input is cleared.


Circuit Diagram


import processing.serial.*;

Serial port;

int[][] morseCode = {
  {1, 2}, //a
  {2, 1, 1, 1}, //b
  {2, 1, 2, 1}, //c
  {2, 1, 1}, //d
  {1}, //e
  {1, 1, 2, 1}, //f
  {2, 2, 1}, //g
  {1, 1, 1, 1}, //h
  {1, 1}, //i
  {1, 2, 2, 2}, //j
  {2, 1, 2}, //k
  {1, 2, 1, 1}, //l
  {2, 2}, //m
  {2, 1}, //n
  {2, 2, 2}, //o
  {1, 2, 2, 1}, //p
  {2, 2, 1, 2}, //q
  {1, 2, 1}, //r
  {1, 1, 1}, //s
  {2}, //t
  {1, 1, 2}, //u
  {1, 1, 1, 2}, //v
  {1, 2, 2}, //w
  {2, 1, 1, 2}, //x
  {2, 1, 2, 2}, //y
  {2, 2, 1, 1} //z
};


int currentAlphabet;
ArrayList<Integer> input = new ArrayList<Integer>();
int recInput = -1;
String inputStr = "";
/*
the ascii for uppercase alphahets range from 65[A] to 90[Z]
 */

void setup() {
  size(600, 600);
  //println(morseCode.length);
  generateNewLetter();
  //printArray(Serial.list());
  String portname = Serial.list()[0];
  port = new Serial(this, portname, 9600);
  println(portname);
}

void draw() {
  background(167);
  displayLetter();
  displayInput();
}

void generateNewLetter() {
  currentAlphabet = floor(random(26));
}

void displayLetter() {
  // (char)(currentAlphabet+65) -> this will give the letter based on current alphabet index
  pushStyle();
  fill(0);
  textAlign(CENTER);
  textSize(200);
  text((char)(currentAlphabet+65), width/2, height/2);
  popStyle();
}

void displayInput() {
  pushStyle();
  fill(0);
  textAlign(CENTER);
  textSize(72);
  text(inputStr, width/2, height/2+200);
  popStyle();
}

void serialEvent(Serial port) {
  recInput = port.read();
  if (recInput == 1) {
    input.add(recInput);
    inputStr+=" *";
  } else if (recInput==2) {
    input.add(recInput);
    inputStr+=" -";
  } else if (recInput == 3)
  {
    if (checkCorrect()) {
      port.write(101);
    } else if (!checkCorrect()) {
      port.write(100);
    }
    inputStr = "";
    input.clear();
    generateNewLetter();
    println("enter was pressed");
  }
}

boolean checkCorrect() {
  boolean correct = true;
  if (morseCode[currentAlphabet].length == input.size()) {
    for (int i=0; i<morseCode[currentAlphabet].length; i++) {
      if (morseCode[currentAlphabet][i] != input.get(i)) {
        correct = false;
        break;
      }
    }
  } else {
    correct = false;
  }
  println(correct);
  return correct;
}
int led1 = 3;
int led2 = 2;
int enter = 8;
int dot = 9;
int dash = 10;
int buttonDelay = 400;
int wrong = 7;
int correct = 6;

void setup() {
  // put your setup code here, to run once:
  Serial.begin(9600);
  pinMode(led1,OUTPUT);
  pinMode(led2,OUTPUT);
  pinMode(enter,INPUT);
  pinMode(dot,INPUT);
  pinMode(dash,INPUT);
  pinMode(wrong,OUTPUT);
  pinMode(correct,OUTPUT);
}

void loop() {
  // put your main code here, to run repeatedly:
  if (digitalRead(dot)==1){
    // send a 1 to processing
    Serial.write(1);
    digitalWrite(led1,HIGH);
    delay(buttonDelay);
    digitalWrite(led1,LOW);
  }
  
  else if(digitalRead(dash)==1){
    // send a 2 to processing
    Serial.write(2);
    digitalWrite(led1,HIGH);
    digitalWrite(led2,HIGH);
    delay(buttonDelay);
    digitalWrite(led1,LOW);
    digitalWrite(led2,LOW);
  }
  
  else if(digitalRead(enter)==1){
    Serial.write(3);
    delay(buttonDelay);
  }

  if (Serial.available()>0){
    int data = Serial.read();
    if (data == 100){
      digitalWrite(wrong,HIGH);
      delay(100);
      digitalWrite(wrong,LOW);
    } else if(data == 101){
      digitalWrite(correct,HIGH);
      delay(100);
      digitalWrite(correct,LOW);
    }
  }
}

/* 
 *  1 for dot 
 *  2 for dash
 *  3 for enter
 */

Final Project Proposal – Sound Visualizer


I’m taking inspiration from the interactive music piece, LINES, but using different sensors/analog and digital input to control the frequency of the sounds and introduce new sounds. The input from the sensors can add visual effects that move according to the frequency of sound. In addition the user can change the color hues, the amplitude and add different effects to create a sound and image piece via sensors and inputs.

Due to the number of effects and sound components, I will likely purchase more components for my Arduino kit.

Inputs:

  • Buttons.
  • Light sensors.
  • Potentiometers.
  • Distance sensor

Update from feedback session:

Add a UI card to guide the user in how to manipulate the visuals and sound coming from processing.


Final Project Proposal – Ons & Sarah

For the final project, Ons and I will be working together to build an interactive travel experience that brings together Arduino and Processing.

Idea

We’re thinking of doing a virtual trip around the world. The Arduino would be used to navigate “around the world” and the visuals would be through processing. The analog elements that we’re considering are:

  • A potentiometer: to control a servo motor.  (A small globe will be stuck onto the servo so that the user will be able to spin it using the potentiometer.)

NOTE: The location will probably be determined by the angle of the servo, but for the purpose of “visual clarity” and successful cognitive mapping we will have something pointing to the globe to indicate the current location.

  • A distance sensor: using it as a zoom tool so the user zooms in and out of the visuals on processing
  • Button: This could add an extra element to the idea, for example, if someone presses the button it would trigger some sort of activity that relates to the location such as generating art specific to the location (we’re still thinking this through)

Questions/Concerns 

  • The Scope: we’re not sure how far we should go with the features, is an interactive “exploration” experience enough, or should we add more (such as the suggestion of the button) 
    • Another element we’re confused about in the scope is should it be a “world tour” or should it be to a specific region 
  • Servo: how could we navigate the globe vertically? In this would a 2D map be better?