Cross Hatching

For my self-portrait project, I wanted to make a machine that in a way replicated the shading tool cross-hatching to create new shades and dimension into images. I coded lines that crossed together at various lengths and amounts, then turned these into 4 main drawing tools. You access the erasing shade by pressing ‘c’, the small white shading tool with ‘b’, and the dark cross hatching with ‘v’. Finally, if you press and hold the mouse, you activate the large ‘X’ tool for some interesting shades and patterns. With these four drawing tools, I played around to make the side of a face with new values and seeing how the overlap of these tools combined created new dimension.


Self_Portait

void setup(){
 size(1000,1000);
 background(225);
}
void draw(){
float x = mouseX;
float y = mouseY;
if (keyPressed){
  if(key =='v' || key == 'V'){
  stroke(0);
  line(x,y,x+30,y-30);
  line(x+10,y,x+40,y-30);
  line(x+20,y,x+50,y-30);
  line(x+30,y,x+60,y-30);
  line(x+5,y-15,x+35,y+5);
  line(x+5,y-25,x+40,y);
  line(x+15,y-25,x+45,y-5);
  line(x+25,y-25,x+50,y-10);
  line(x+35,y-25,x+55,y-15);
  }
}
if(mousePressed == true){
  stroke(0);
  line(x,y,x+60,y-60);
  line(x,y-60,x+60,y);
  }

if(keyPressed){
  if(key == 'b' || key == 'B'){
  stroke(255);
  line(x,y,x+5,y-5);
  line(x,y-5,x+5,y);
  }
}

if(keyPressed){
  if(key == 'c' || key == 'C'){
  stroke(225);
  line(x,y,x+30,y-30);
  line(x+10,y,x+40,y-30);
  line(x+20,y,x+50,y-30);
  line(x+30,y,x+60,y-30);
  line(x+5,y-15,x+35,y+5);
  line(x+5,y-25,x+40,y);
  line(x+15,y-25,x+45,y-5);
  line(x+25,y-25,x+50,y-10);
  line(x+35,y-25,x+55,y-15);
  }
}
}


Icarus

I initially wanted to imitate the graceful movement of a bird’s wings flapping to a certain pattern. However due to my materials and construction efforts, instead I made an extremely aggressive bird, which is fitting as October 31st is approaching anyway.

The setup with the coding is very basic; I simply wrote two loops for two servo motors to move up and down at progressing speeds. It’s slightly slower as the servos move upwards in an attempt to replicate the pattern of bird wings flapping. Then, I attached the cardboard wings and tried creating a stable structure to support these motors. The construction is definitely lacking; tape is far too weak to hold up against the consistently moving motors, which proved rather heavy for the support. If anything, the construction was the most challenging. However, for getting the idea across for the movement, the project was relatively successful. I would like to continue working with servo motors in the future to make more graceful structures; so this will definitely be something I revisit.


#include <Servo.h>

Servo servo;
Servo servo2;
int position = 0;

void setup() {
  // put your setup code here, to run once:
servo.attach(9);
servo2.attach(10);
}

void loop() {
  // put your main code here, to run repeatedly:
for (position = 0; position <=180; position +=1){
   servo2.write(position);
  delay(2);
}

for(position = 180; position>=0; position -=1){
  servo2.write(position);
  delay(1);
}
 
for (position = 0; position <=180; position +=1){
   servo.write(position);
  delay(2);
}

for(position = 180; position>=0; position -=1){
  servo.write(position);
  delay(1);
}

}


Sweeping

For this week’s procect we were supposed to imitate some movement of a human or animal. First, I was considering creating a cyclist but even though I had a clear idea how to make its legs move, I realized it would be rather hard to  hide the servo and I was also unable to come up with an idea for the part where the legs join the body (the legs would have had to be bendable and movable). Then, I touhgt of creating a walking person. Although this would have fixed my problem with the leg joints, I had to drop the idea as syncing the movement of the legs proved to be too difficult. So I ended up creating a person that is sweeping. Continue reading “Sweeping”

Completely Bodiless Nick

For my stupid pet trick, I was planning on creating a head that “lives” in a box, which can be opened in multiple ways, to arrive at different questions the head would ask each time. However, using servos for even the rotating display of the question proved to be difficult (due to the weight of the component), thus I changed my project and turned it into an interactive and friendly head, Completely Bodiless Nick. Different inputs, for instance a “high five”, make him react in different ways. Continue reading “Completely Bodiless Nick”

High five machine

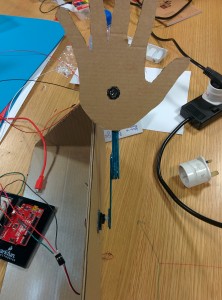
First off, I haven’t been able to get my project to work. The sonar distance sensor isn’t working as I expected, and the servomotor I’m using isn’t powerful enough to reliably throw around some popsicle sticks and cardboard. Regardless, my project was to work as follows. A user is presented with a cardboard cutout of a hand. If she were to pass her hand in front of it, the cardboard hand would rotate forward to give her a high five. Ultimately, this is pretty simple; just a servomotor and a sonar distance sensor. The way I have this setup is such that the sonar sensor is embedded in the cardboard hand. I think (and I could be wrong) that the sonar sensor readings are getting thrown off by the jittering of the servomotor. Even when it’s not being activated, the servo buzzes at a high frequency, which I think messes up the readings from the sonar sensor. Perhaps this was a good opportunity to use an infrared sensor. The end of my post has a few pictures of current (failed) setup.

I think I could make this work by taking some of the following steps. Instead of using a servo motor, I could get my act together and use a step motor with an external power supply. I think that this would prove to be the most difficult solution from a hardware and software perspective, but I think that it would probably result in the best end product. Alternatively, I could slap in a bigger servomotor such that the machine would reliable rotate the hand forward.

IMG_20151013_221532IMG_20151013_221544


Annoying wood/can/glasspeckers

For this assignment I decided to try out the solenoids to produce linear motion. Inspired by woodpeckers (thanks, Shunya), I set out to create a device that would produce ringing noises by hitting objects with the solenoids.

First I had to get acquainted with the solenoids. To use them, I had to hook them up to a transistor in order to not fry my RedBoard. Transistors are annoyingly not labled and their wiring changes between models, so I had to look that up. The TIP120 transistors we have in the lab have, seen from the front and from left to right, the base (signal in), the collector (voltage in) and then the emitter (to ground). That way, I could use the RedBoard’s output to control the transistors, which in turn control the solenoids.

Continue reading “Annoying wood/can/glasspeckers”

The Panda That Wanted To Be A Polar Bear

Allen has a polar and he loves it. He’s been sleeping with the polar bear since forever and his obsession with it is becoming unhealthy. For my stupid pet trick I wanted to find a way for Allen to move on from the polar bear but I couldn’t. I didn’t have the courage to steal the polar bear and transform it into a horrific thing and then give it back to Allen. I just couldn’t do that him. The last time he cried he was three months old and didn’t want to break his little heart.

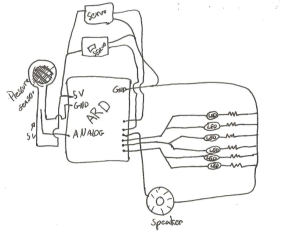
So I stole a panda bear from one of my friends, opened its back, and inserted an Arduino, LEDs, two servos, a speaker, and a pressure sensor.   The idea was to make a panda bear that would always make noise. The user, thinking that it would quiet down by hugging it would hug the bear making its eyes move, turn red, and making the noise even more annoying. With the amount of movement, sound, and light depending on the pressure of the hug.

Screen Shot 2015-10-12 at 2.17.39 PM

Continue reading “The Panda That Wanted To Be A Polar Bear”

heat machine or love-o-meter

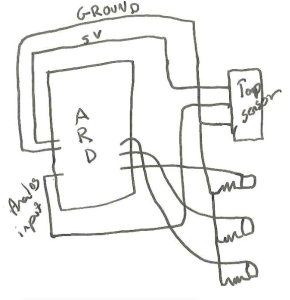
So we had to make a love machine or something similar. I decided to take the traditional path and work on a love-o-meter using a temperature sensor. The sensor, connected to an analog input, gave me numbers that I couldn’t read, so I used arbitrary numbers after playing around and exposing it to several temperatures. Depending on the values received a different number of LEDs would turn on. The hotter the more LEDs turned on.

Here’s how it looked:

Screen Shot 2015-10-12 at 1.48.16 PM


Continue reading “heat machine or love-o-meter”

Spaceship Water Dispenser

I always carry my water bottle around and filling it up with water is super boring, so I decided to add some LEDs to the water dispenser in the IM Lab. Everything is still there, except for the Arduino, so if you want to see it working or make it stay there forever download the code below to an Arduino and fill up your bottle.


The idea:

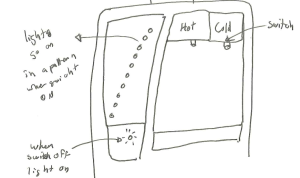
I wanted to have a line of LEDs replicate the idea of water flowing by creating a pattern of LEDs turning on and off. Then I thought of having and LED that would be on whenever the switch was opened.


Screen Shot 2015-10-12 at 1.29.16 PM

Continue reading “Spaceship Water Dispenser”