Long ago the three great nations, Rock, Paper and Scissors lived harmoniously with one another. But their prosperity came to a sudden end when a false messiah had risen and taken power. For nearly a century now, large scale conflict has consumed all beings, only leaving behind sliced paper, shattered rocks and bent scissors. You are our last hope. The Avatar, the chosen one. Having been bestowed all three elements, you are now tasked with defeating the this messiah the most challenging of duels, ‘rock, paper, scissors’.
I had a lot of fun making this assignment. I always been passionate about computer vision, and am glad with this being my first project using it.
You can primarily move around the game just using hand gestures. A thumbs-up signals the code to move forward, while the rock, paper, scissors gestures are used in the 3 round game.
Image Classification Model
I used teachable machine to create and train a model that classifies my different hand gestures. This model was made only using my hand for the samples, and so may be less accurate in classifying other hands in different environments. But this can be easily remedied by creating a new model with varying hands and environments and pasting its link into the p5jscode under the preload function.
Arduino Component
The arduino lights up a green LED when the user wins a round and lights up a red RED when the user loses a round. It also uses a servo to open a box, revealing candy for the user if he/she wins, as a rewards for saving the kingdoms.
Challenges
It was difficult figuring out the timings of the countdown in the code. I spent a lot of time trying to slow down the code, and make it follow strict timely guidelines to simulate a normal game of rock, paper, scissors. Also, I had trouble connecting the arduino to my p5js code, but I managed to do it in the end.
#include <Servo.h>

Servo servo;
int servoPos = 100;

void setup() {
  Serial.begin(9600);
  servo.attach(4);
  pinMode(2, OUTPUT);
  pinMode(5, OUTPUT);
  // start the handshake
  while (Serial.available() <= 0) {
    Serial.println("0,0"); // send a starting message
    delay(300);            // wait 1/3 second
  }
}

void loop() {
  // wait for data from p5 before doing something
  while (Serial.available()) {
    int left = Serial.parseInt();
    int right = Serial.parseInt();
    int victory = Serial.parseInt();
    if (Serial.read() == '\n') {
      digitalWrite(2, left);
      digitalWrite(5, right);
      if (victory == 1){
        servoPos = 20;
        servo.write(servoPos);
         }
      servoPos = 100;
      servo.write(servoPos);


    }
  }
}
The idea was to create my own version of Geometry Dash, which is described as a rhythm-based action platformer. I added my own twist by making it have an Arcane theme as it is my favourite TV show. In my game, you play as Vi in the city of Piltover and need to pass the level to escape to Zaun.
IMPLEMENTATION
I first started with creating all the custom art for the game using Adobe Illustrator. I took inspiration from the city of Piltover in Arcane and made my own art. Then, I was able to get started on working on the P5.js code. It took me the longest time to figure out the gravity and jump in P5.js but once I was able to get it working, then the rest of my time was spent creating a custom level to my liking using my art. I tried to make it challenging and match the beat of the song just like Geometry Dash. Then I added details such as sound, particle effects and text. After the level was finished, I did some user testing to make sure that the difficulty was at a good level. I was then able to move on to the Arduino aspect of my game. Unfortunately, there were no more pressure sensors available so I had to use a piezo disk as a replacement for the controls. I then created the Hextech crystal which the piezo disk would be placed in to suit the Arcane theme. Afterwards, I did final touches such as fixing the end and start screen.
USER TESTING
I did my user testing after I finished creating my level. I allowed students in the IM lab to try it out to see if they were able to beat it and change things accordingly if I saw too many people were not able to make a certain jump. I also let my friends try my game once the Arduino control was working, I saw that the disk can be unreliable and unresponsive at times so I tried my best to make it so that the disk can input their touch correctly by tweaking the codes.
RESULTS
Arduino Code:
void setup() {
  Serial.begin(9600);
  // start the handshake
  while (Serial.available() > 0) {
    Serial.println("0,0"); // send a starting message
    delay(300);            // wait 1/3 second
  }
}

void loop() {
  int sensorValue = analogRead(A1);
  Serial.println(sensorValue);
  // wait for data from p5 before doing something
  while (Serial.available() > 0) {
    // read the incoming byte:
   int inByte = Serial.read();
    Serial.println(sensorValue);
  }
}
P5.js Code:
Full Level Completed
Arduino Controller:
FINAL THOUGHTS
I am very happy with the result of my game, I love the art and gameplay and it reminds me of the fun I had playing geometry dash. It is very addictive as you feel the urge to keep retrying until you pass the level as well. Feel free to try it out and let me know if you manage to beat it!
In the future, I would change the sensor I used to the pressure sensor or perhaps just a regular button would have been fine. I might change the disk to a button in my own time to help with the issues I was facing with the piezo disk. In terms of the actual game, I would add a character select button as I designed many of the characters from the show and it would be a fun personalized experience for the user.
My Project is to create a generative art piece controlled by sensors. I had a hard time figuring out a proper art. My idea was to create a firework-like design pop-up using sensors and change their features. I instead have 3 modes, first two modes include 2 brushes (an idea from my friend!) and generative art.
Implementation
Note: modes have to be changed manually in p5js Brush 1-Line stroke of ellipses Mode 0
Basically, this brush stroke has a few ellipses lined up and it can be used to draw/paint across the screen. I used two potentiometers to control the x and y position of the brush on the screen. Here’s how it looked upon moving: I was inspired to make this brush stroke from this youtube video: https://www.youtube.com/watch?v=YhGoi5MNyvM
Brush-2 Blurry-Trace Brush Mode 1
There is a round brush on procreate that I absolutely love and it is also its signature brush (the ads use it often!) that I kinda re-created. I used a rectangle shape and rounded the corners and used vertical-gradient function code from the happy-coding website. Using the vertical gradient gave it a transparent blurry feel.
Here’s what it looks like: Vertical-Gradient function: https://happycoding.io/examples/p5js/for-loops/vertical-gradient
Generative Art
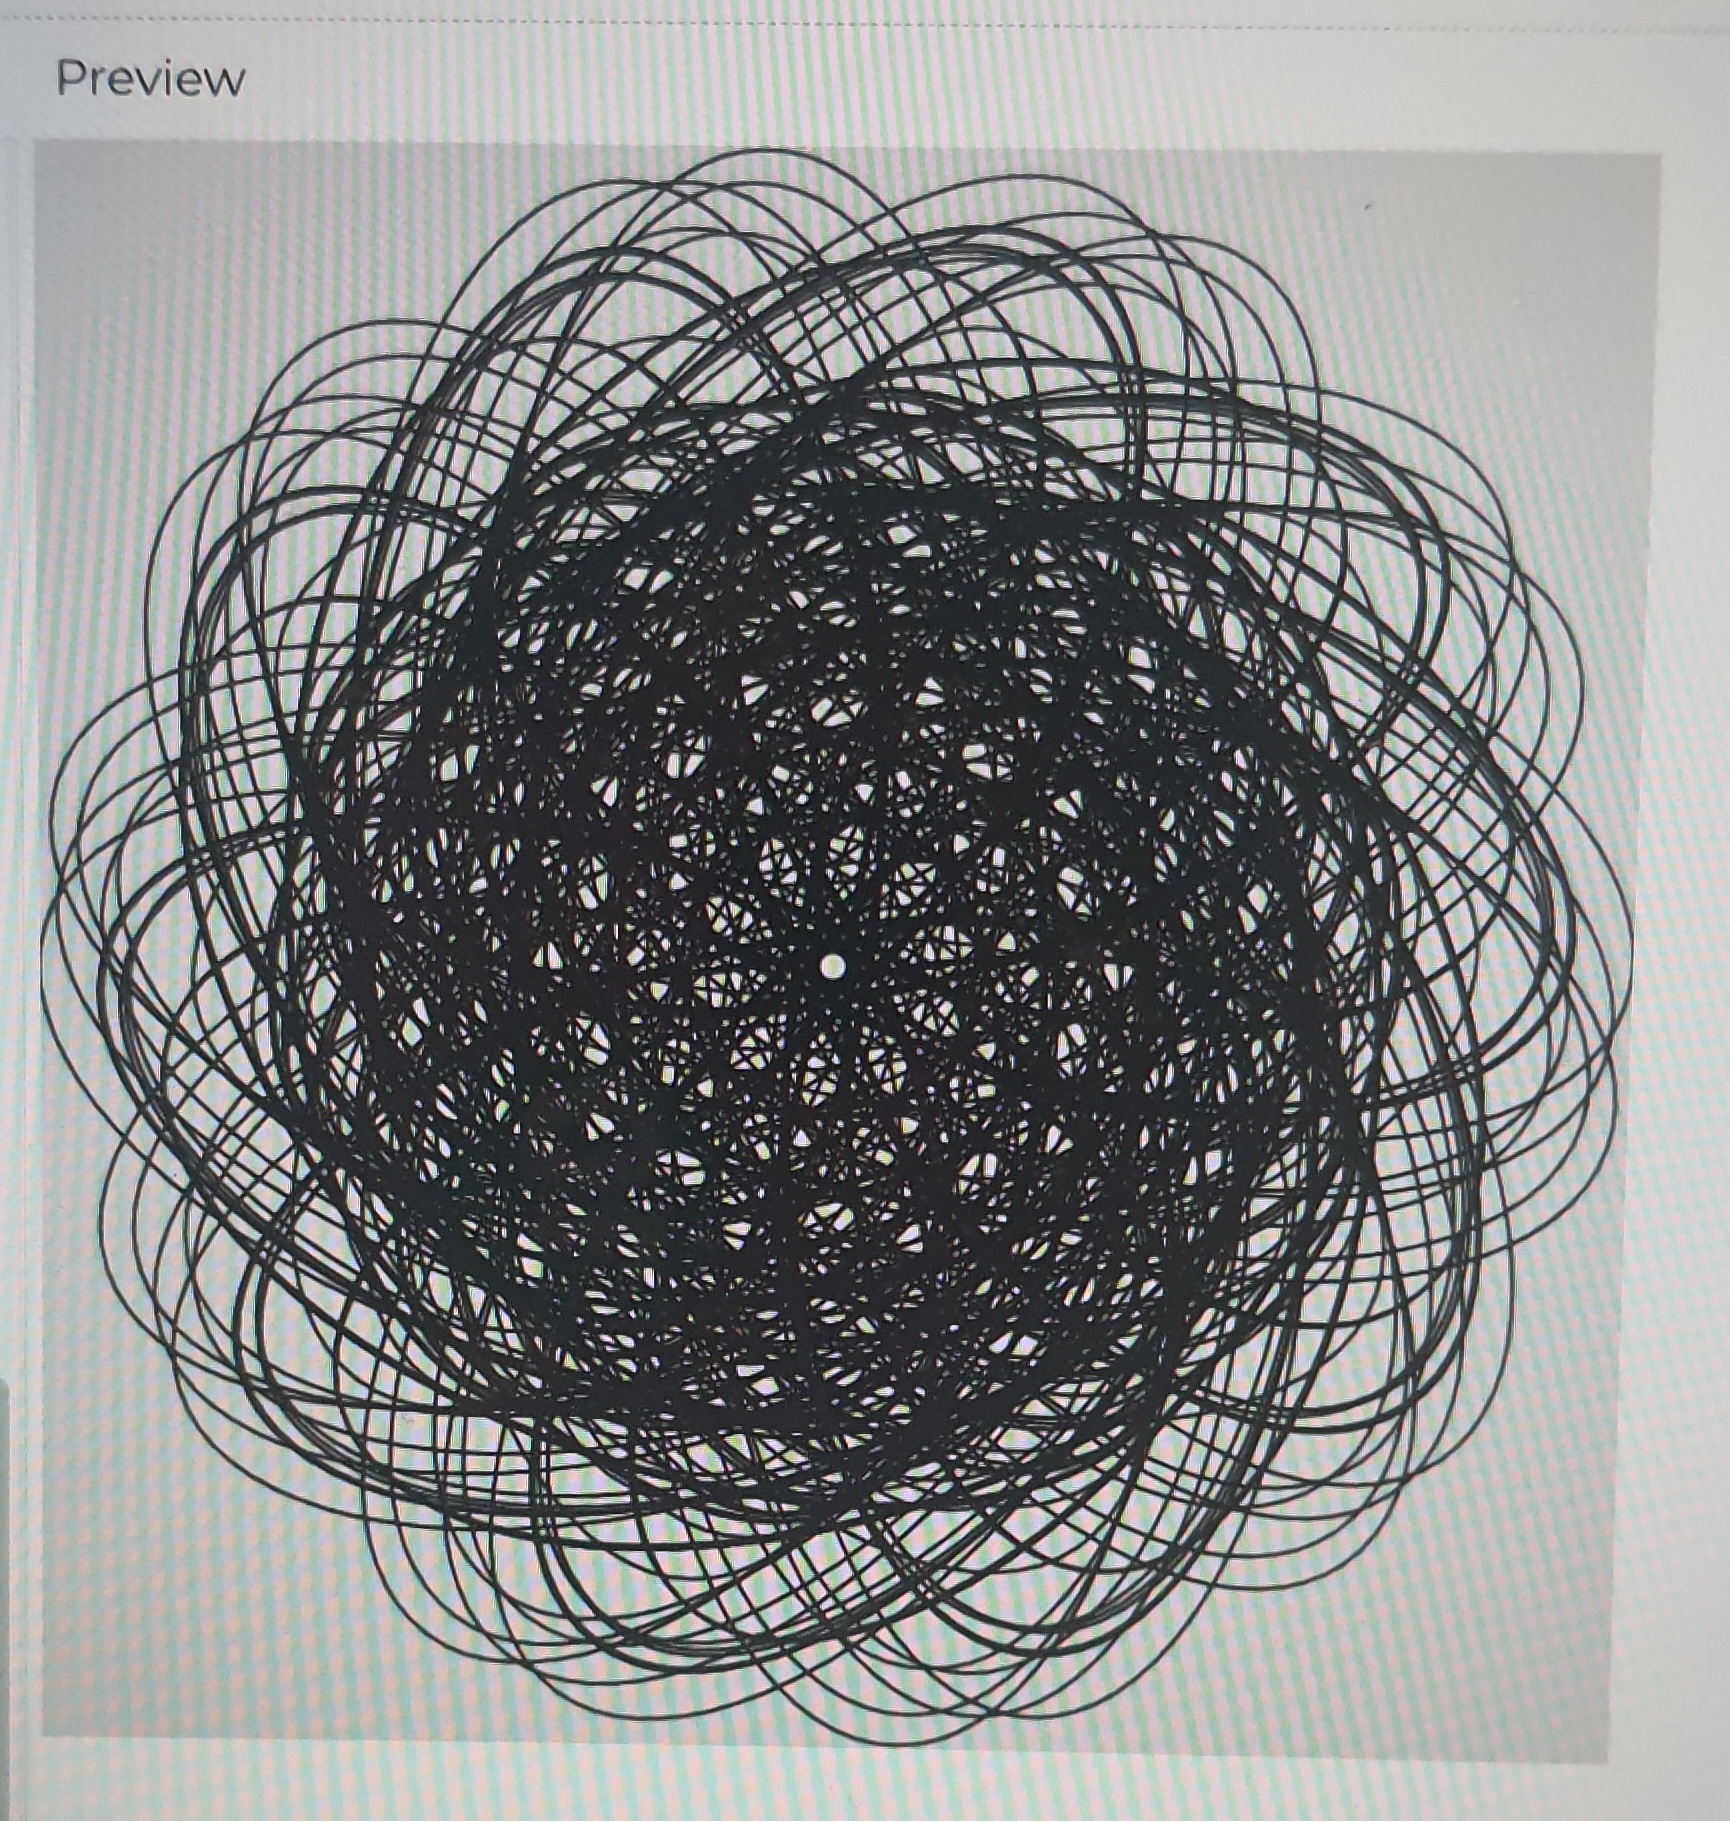
As mentioned in my previous posts, I wanted to have an ellipse positioned as a flower moving and increasing in size. So, I used them and kinda played around creating a camera shutter art. There was some space left in the middle and I spent a lot of time thinking about what to have here I tried having flow fields, bubbles, and noise objects. Finally, ended up with spiral movements and it looked cool. The X and Y position of ellipses was fixed and height and width were being controlled by the two potentiometers.
Here how it looks like:
What I made earlier; was generated by p5js and not controlled by Arduino:
Code
p5js
To test, simply edit the code by replacing xpos, ypos values with mouseX, mouseY. Works similarly!
Arduino
void setup() {
 Serial.begin(9600); // initialize serial communications
}

void loop() {
 int p1 = analogRead(A0);
 int m = map(p1, 0, 1023, 0, 255);
 Serial.print(m);
 Serial.print(",");
 int p = analogRead(A5);
 int m2 = map(p, 0, 1023, 0, 255);
 Serial.print(m2);
 Serial.println();

}
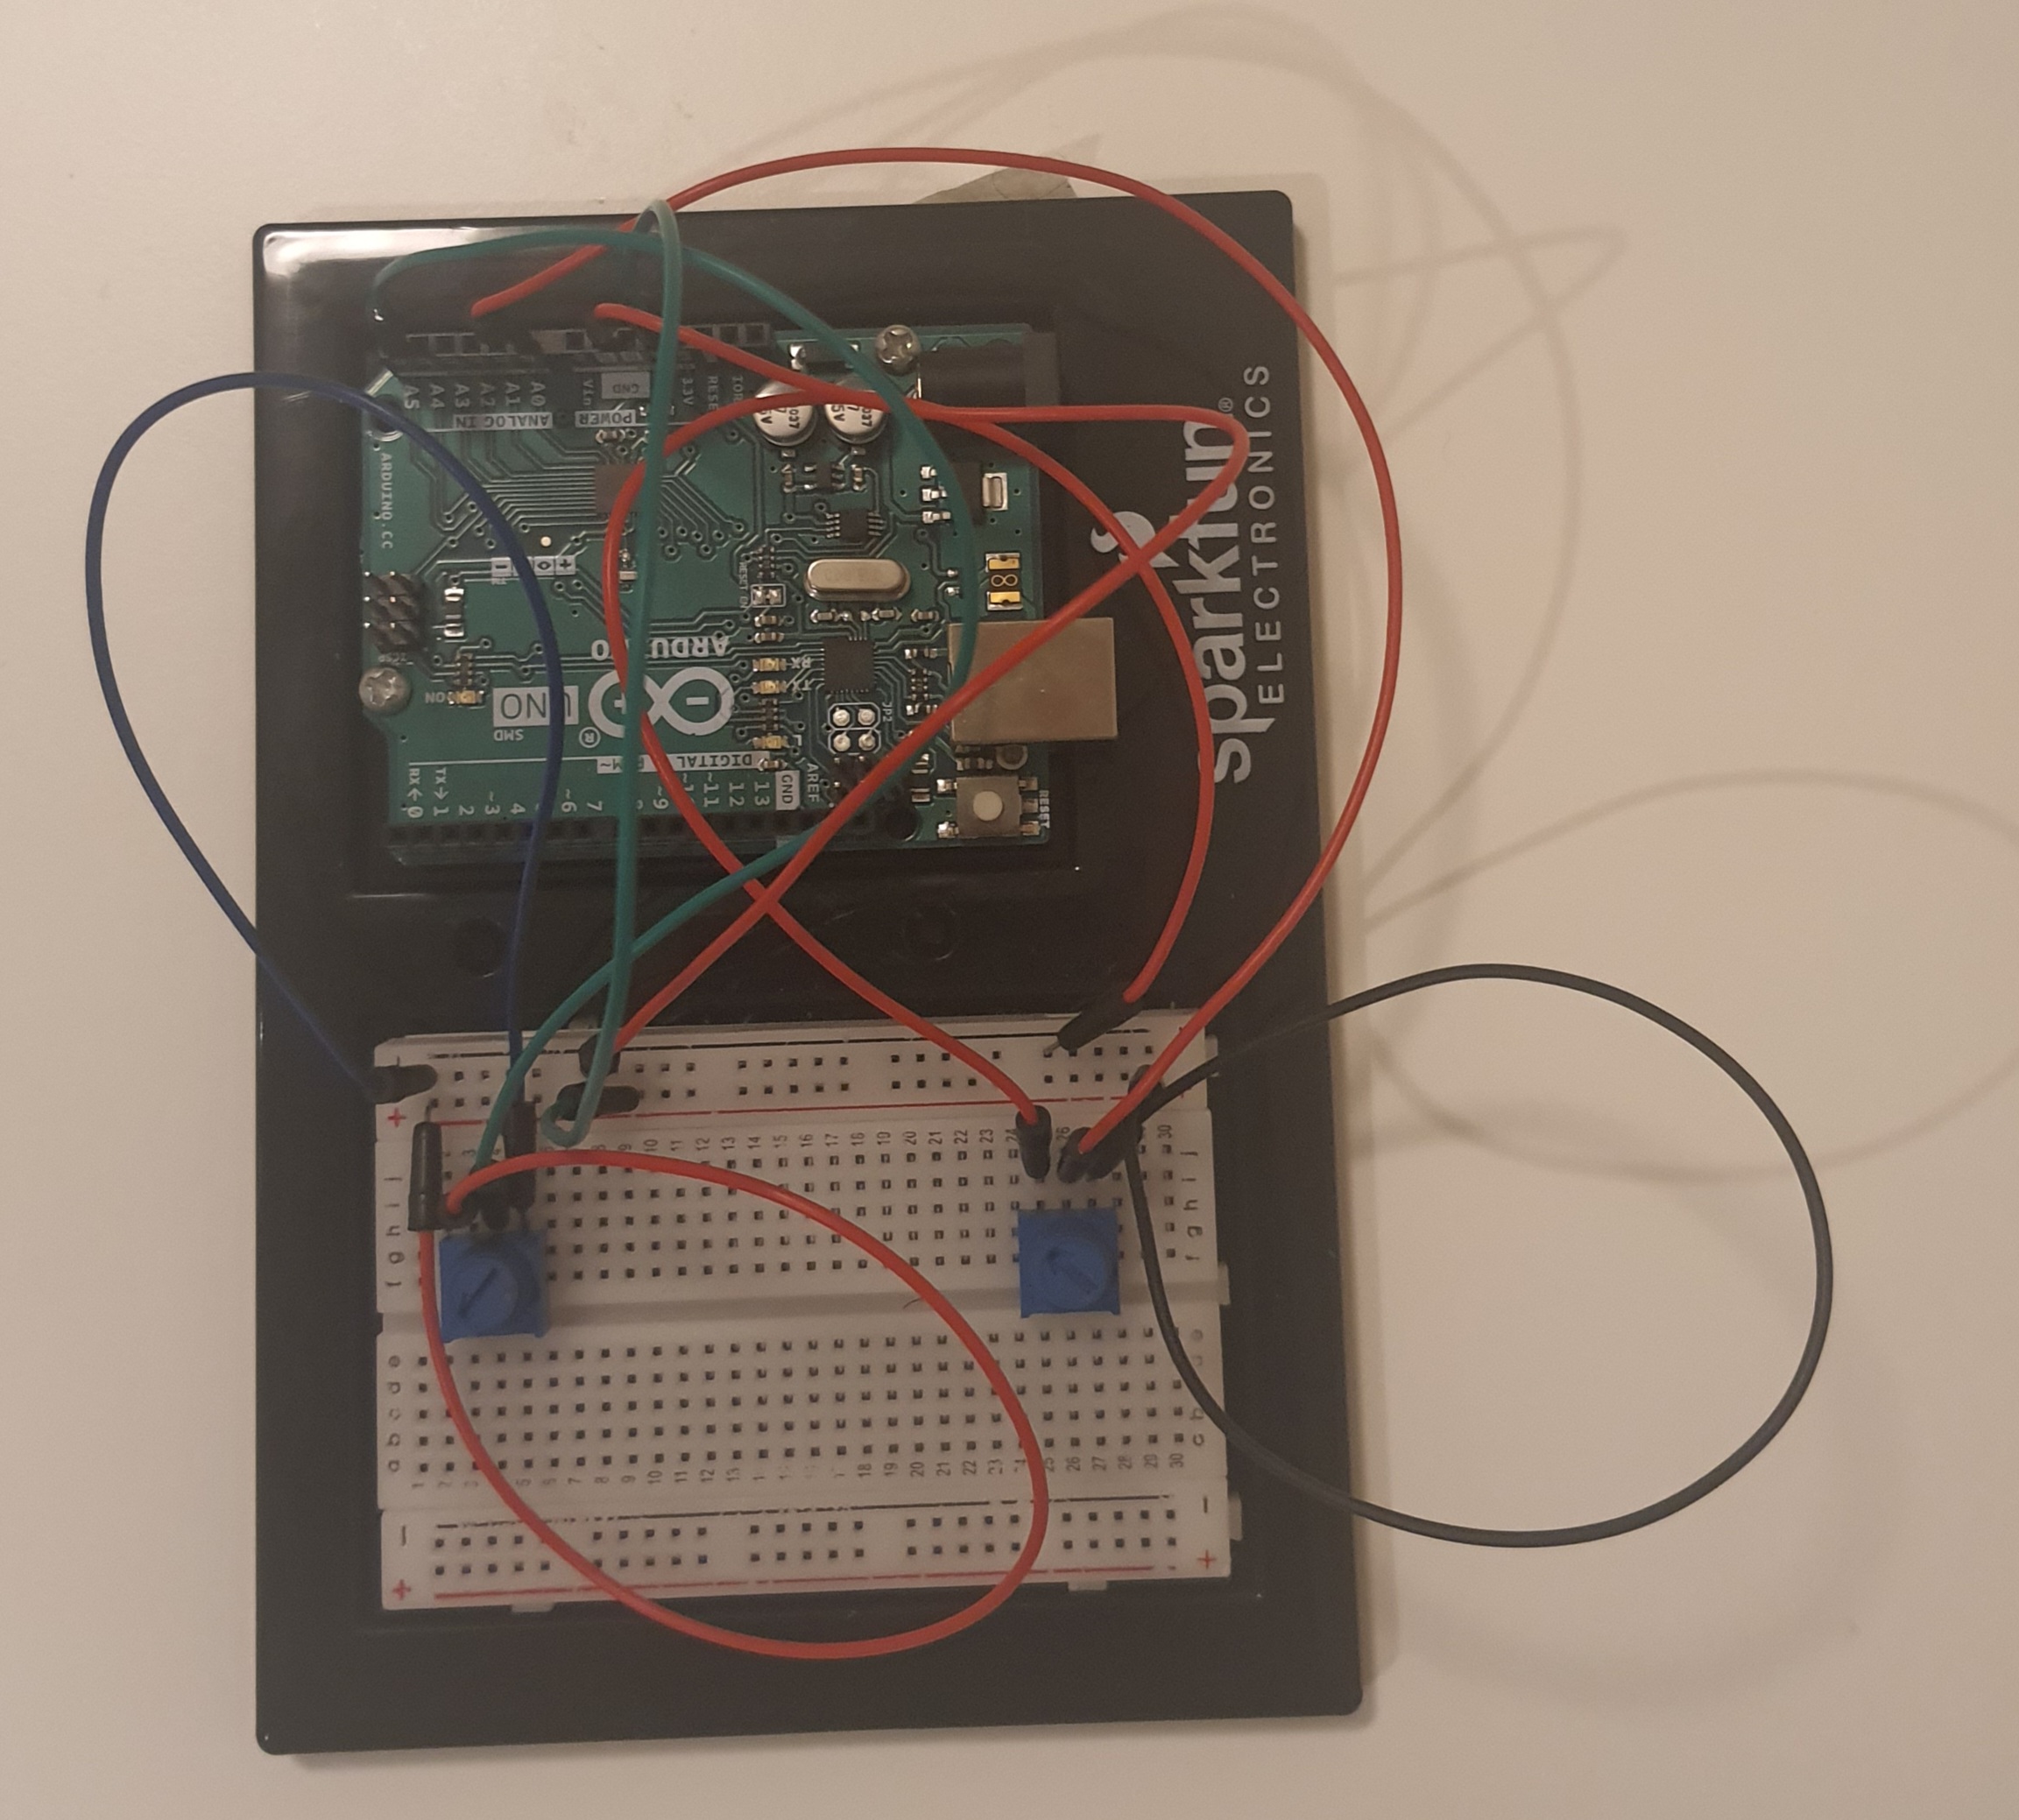
Arduino Board
A0 pin potentiometer: X values
A1 pin potentiometer: Y values
Challenges and Reflection
I had some hardware issues (i think? StackOverflow and Arduino forums mentioned some of them) initially and my serial communicator wasn’t reading the second potentiometer’s values at all. It wasn’t even accepting any second input. I used a comma to separate the value and upon reading I realized that even the comma wasn’t read (I mean Serial.print). I looked at multiple websites and then came to the Arduino/p5js related website by NYU ITP. And, then I would say a miracle, somehow my Arduino started accepting the second potentiometer and comma!!? So, I used split to split the string and access the printed data. Then I had some issues with the button that I wanted to use to switch the modes and then I gave up on it because I didn’t have time. One dumb thing I did was to make the p5js code and then connect Arduino at the very end. Should have worked simultaneously.
It was a fun project to do. While I had a hard time coming up with the idea, I really enjoyed experimenting with art! Realized well that art doesn’t have to be defined and constrained!!!
This was a great course! I took it because I wanted to minor in IM but I am considering a major now. This has really got me into the design.
We originally wanted our final project to do some sort of generative artwork, but somehow we ended up doing a project completely unrelated. Our goal with this project is to raise awareness of issues happening around the world that aren’t covered enough in the media. Although there are certainly many issues that should be highlighted we chose to focus on six issues happening in six different countries. We also wanted to include ways to learn more about these issues as becoming aware, and learning more is the first step toward change.
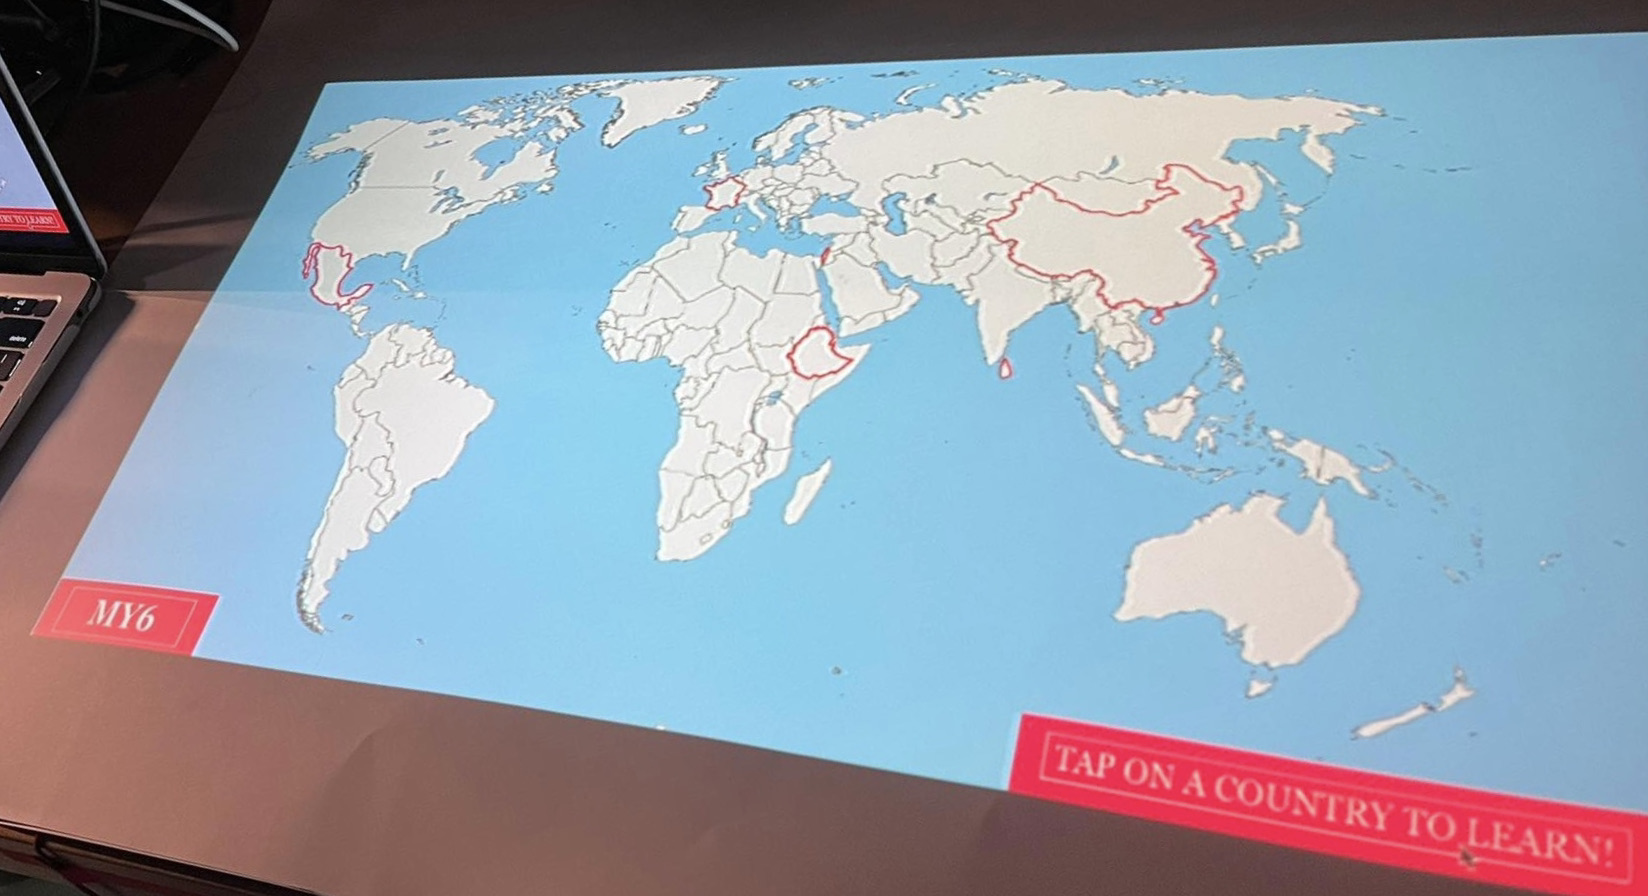
CNN has daily news coverage on issues happening around the world, they do this in a 10-minute video that is intended to be short and easily accessible. Taking inspiration from this we titled our project MY6 (Mariam + Yesenia, 6 issues) and aimed to showcase 6 issues through videos that give insight into the issues in short 2-minute videos. Although we went through many ideas on how to execute this project, including puzzles and floor tiles, in thinking about the experience of the user we landed on this:
Implementation:
To bring this idea to life, we used a project to project a world map onto a surface that outlined the six different countries. By touching one of the six countries, a force sensor would trigger a video to play that again, summarizes the issues, after which we compiled a list of ways to learn more. With each of these videos, we wanted the people who are affected by these issues to be at the forefront of the presentation of these issues. By doing this, we hope that the lives of those affected by these issues are humanized as opposed to being numbers reported, or people affected by another issue happening in the world.
To do this we used p5js to display the videos, and Arduino to trigger the videos. For the videos we used the setup function to hide the videos unless they are triggers, and if statements in the draw function to play the videos when they are triggered, as well as statements to hide the other videos and not play them unless all other videos also aren’t playing. We also used the play function along with an else statement to stop the video after it played once to stop it from looping.
For the map that the user will interact with we used force sensors and positioned them in the same place the map would be projected, we taped them down onto a surface and then laid a sheet of white paper over it to create somewhat of a touch screen. The user can replay a video after it has been played, and also click on any video, in any order to learn about a different country.
P5JS Code
const pts = []
var size = 0.6;
let alpha = 255;
let left = 0;
let right = 0;

let rVal0 = 0;
let rVal1 = 0;
let rVal2 = 0;
let rVal3 = 0;
let rVal4 = 0;
let rVal5 = 0;

let img1;
let vid0;
let vid1;
let vid2;
let vid3;
let vid4;
let vid5;

let playVid0 = false;
let playVid1 = false;
let playVid2 = false;
let playVid3 = false;
let playVid4 = false;
let playVid5 = false;

function preload () {
  imgA = loadImage("outline map.png");
  vid0 = createVideo("china.mp4");
  vid1 = createVideo("sri lanka.mp4");
  vid2 = createVideo("ethiopia.mp4");
  vid3 = createVideo("palestine.mp4");
  vid4 = createVideo("france.mp4");
  vid5 = createVideo("mexico.mp4");
}

function setup() {
  createCanvas(innerWidth, innerHeight);
  pixelDensity(5);
  textSize(18);
  setUpSerial();

  vid0.hide();
  vid0._onended = ()=> {
    playVid0 = false
}
    vid1.hide();
  vid1._onended = ()=> {
    playVid1 = false
}
  vid2.hide();
  vid2._onended = ()=> {
    playVid2 = false
}
  vid3.hide();
  vid3._onended = ()=> {
    playVid3 = false
}
  vid4.hide();
  vid4._onended = ()=> {
    playVid4 = false
}
  vid5.hide();
  vid5._onended = ()=> {
    playVid5 = false
}
}
function keyPressed() {

  if (key == " ") {
    // important to have in order to start the serial connection!!
    setUpSerial(SELECT_PORT);
  }
}
function draw() {
  image(imgA, 0, 0, innerWidth, innerHeight);

  fill(100);
  stroke(255);
  strokeWeight(1);

if (!serialActive) {
    text("Press Space Bar to select Serial Port", 20, 30);
} else {
    text("Connected", 20, 30);
}

if (rVal0 == 1 && playVid0 == false && playVid1 == false && playVid2 == false && playVid3 == false && playVid4 == false && playVid5 == false) {
    print("video0");
    vid0.play();
    playVid0 = true;
}
if ( playVid0 ){
    image(vid0, 300, 120, 560, 316);

} else {
  playVid0 = false;
}

if (rVal1 == 1 && playVid1 == false && playVid0 == false && playVid2 == false && playVid3 == false && playVid4 == false && playVid5 == false) {
  print("video1");
  vid1.play();
  playVid1 = true;

}
if ( playVid1 ){
  image(vid1, 330, 250, 560, 316);

} else {
  playVid1 = false;
}
if (rVal2 == 1 && playVid2 == false && playVid0 == false && playVid1 == false && playVid3 == false && playVid4 == false && playVid5 == false) {
  print("video2");
  vid2.play();
  playVid2 = true;
}
if ( playVid2 ){
  image(vid2, 150, 300, 560, 316);

} else {
  playVid2 = false;
}
if (rVal3 == 1 && playVid3 == false && playVid0 == false && playVid1 == false && playVid2 == false && playVid4 == false && playVid5 == false) {
  print("video3");
  vid3.play();
  playVid3 = true;
}
if ( playVid3 ){
  image(vid3, 200, 330, 560, 316);

}
  else{
    playVid3 = false;
}

if (rVal4 == 1 && playVid4 == false && playVid0 == false && playVid1 == false && playVid2 == false && playVid3 == false && playVid5 == false) {
  print("video4");
  vid4.play();
  playVid4 = true;
}
if ( playVid4 ){
  image(vid4, 200, 250, 560, 316);

} else {
  playVid4 = false;
}

if (rVal5 == 1 && playVid5 == false && playVid0 == false && playVid1 == false && playVid2 == false && playVid3 == false && playVid4 == false) {
  print("video5");
  vid5.play();
  playVid5 = true;
}
if ( playVid5 ){
  image(vid5, 220,200 , 560, 316);

} else {
  playVid5 = false;
}

}

function readSerial(data) {
  ////////////////////////////////////
  //READ FROM ARDUINO HERE
  ////////////////////////////////////

  if (data != null) {
    // make sure there is actually a message
    // split the message
    let fromArduino = split(trim(data), ",");
    // if the right length, then proceed
    if (fromArduino.length == 6) {
      // only store values here
      // do everything with those values in the main draw loop
      rVal0 = fromArduino[0];

      rVal1 = fromArduino[1];

      rVal2 = fromArduino[2];

      rVal3 = fromArduino[3];

      rVal4 = fromArduino[4];

      rVal5 = fromArduino[5];

      print(fromArduino[0]+ " "+fromArduino[1]+ " "+fromArduino[2]+ " "+fromArduino[3]+ " "+fromArduino[4]+ " "+fromArduino[5]);

    }

    //////////////////////////////////
    //SEND TO ARDUINO HERE (handshake)
    //////////////////////////////////
    let sendToArduino = "\n";
    writeSerial(sendToArduino);
  }
}
Arduino Code
//Arudino Code

int pForce0 = 0;
int pForce1 = 0;
int pForce2 = 0;
int pForce3 = 0;
int pForce4 = 0;
int pForce5 = 0;

void setup() {
  Serial.begin(9600);

  // start the handshake
  while (Serial.available() <= 0) {
    Serial.println("0,0,0,0,0,0"); // send a starting message
    delay(300);                   // wait 1/3 second
  }
}

void loop() {


  // wait for data from p5 before doing something
  while (Serial.available()) {
    if (Serial.read() == '\n') {

      int force0 = analogRead(A0);
      delay(2);
      int sensor0 = 0;
      if (force0 > 200 && pForce0 < 100) {
        sensor0 = 1;

      }
      pForce0 = force0;

      int force1 = analogRead(A1);
      delay(2);
      int sensor1 = 0;
      if (force1 > 200 && pForce1 < 100) {
        sensor1 = 1;

      }
      pForce1 = force1;

      int force2 = analogRead(A2);
      delay(2);
      int sensor2 = 0;

      if (force2 > 200 && pForce2 < 100) {
        sensor2 = 1;

      }
      pForce2 = force2;

      int force3 = analogRead(A3);
      delay(2);
      int sensor3 = 0;
      if (force3 > 200 && pForce3 < 100) {
        sensor3 = 1;

      }
      pForce3 = force3;

      int force4 = analogRead(A4);
      delay(2);
      int sensor4 = 0;
      if (force4 > 200 && pForce4 < 100) {
        sensor4 = 1;

      }
      pForce4 = force4;

      int force5 = analogRead(A5);
      delay(2);
      int sensor5 = 0;
      if (force5 > 200 && pForce5 < 100) {
        sensor5 = 1;

      }
      pForce5 = force5;


      Serial.print(sensor0);
      Serial.print(",");

      Serial.print(sensor1);
      Serial.print(",");

      Serial.print(sensor2);
      Serial.print(",");

      Serial.print(sensor3);
      Serial.print(",");

      Serial.print(sensor4);
      Serial.print(",");

      Serial.println(sensor5);

    }
  }
}
Challenges:
One of the first issues we encountered was getting the videos to play over the map as it was playing under the map as a separate screen. To solve this issue we had to add a position to the video as well as hide the video before and after playing. Once we fixed this issue we then made each video work individually, which was quite simple, but when trying to make all of them work, none of the videos would play. For this, we realized there was an issue within Arduino that wasn’t sending the value of the force sensor separately so that p5js could read each value separately and use it for the appropriate video. Once we fixed this issue, we then had to make it so that each video would play only one at a time, and only play once the video playing was over, for this to the if statements that required the video to not be playing to start we added that other videos had to also be not playing.
Overall, the issue we encountered the most was consistency as the videos would play and then not play, even when we changed nothing but reopened the tab. What we realized was that there was an issue with the serial communication, and only when we closed the tabs properly, would the p5js and Arduino be able to communicate properly.
Reflection:
In the end, we not only learn new concepts in implementing our idea but were able to apply a lot of what we learned this semester. Although our project was not as creative as we originally each individually wanted, it is something that we both this is important and truly care about. Moving forward we would add more countries, or even do all the countries, although that would not be as engaging for the user, however, they could pick a few countries they are interested in. We also realized how limited information for some of these issues is as we spent quite a bit of time trying to find resources and compile ways to learn more. Although this is only one small thing, it is a step towards raising awareness for issues in a way that engages the views, gives them information, and is a way to learn more. If nothing else, we hope everyone is able to learn something new and want to learn more through our project!
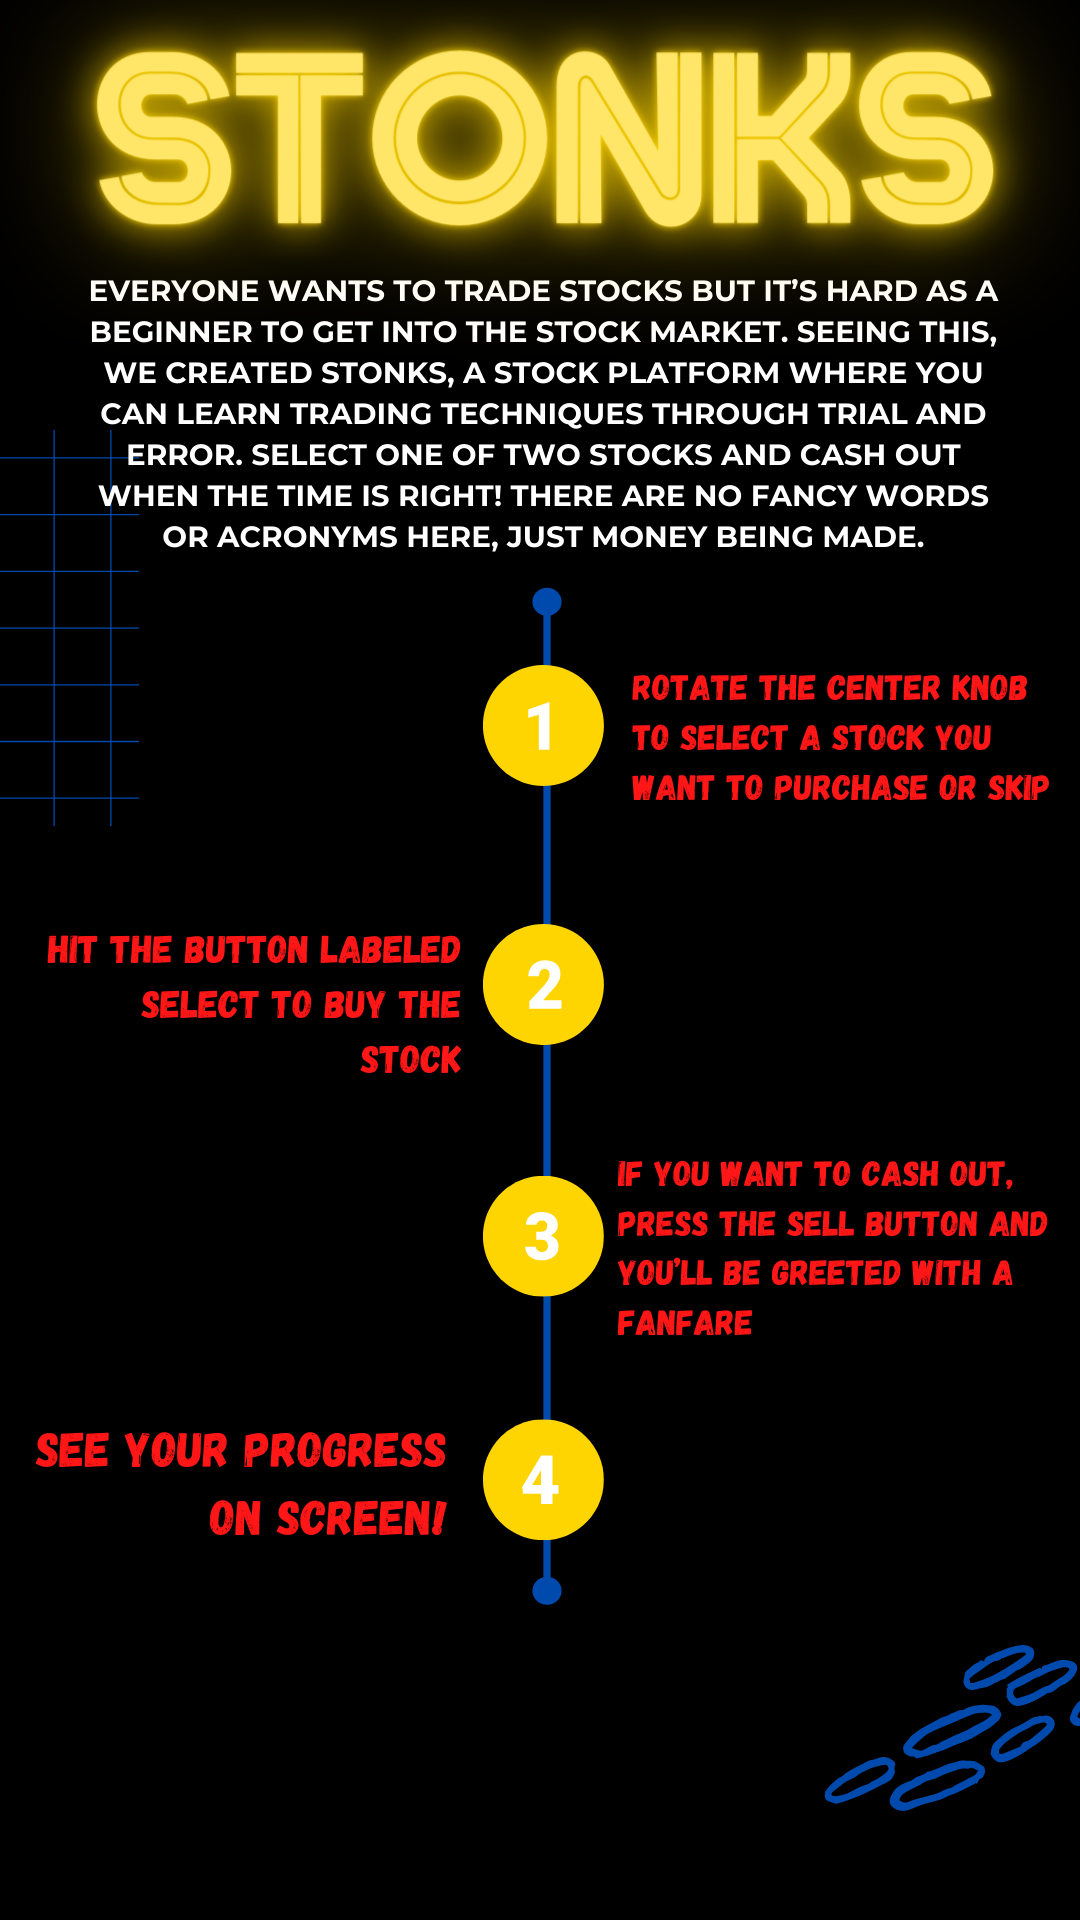
Why is it so hard to get into the stock market? There are so many acronyms and complex words that make it difficult to get into the legal gambling sphere that is trading stocks. Seeing this, we decided to create an installation that simplified the whole process of buying and selling stocks.
Implementation
The implementation of this project had 3 sides: the backend where buy and sell orders were created by interacting with the trading API, the display in p5JS where choices were presented to the user, and the Arduino-based controls where the user can manipulate purchase and sales.
The backend
Using Nodejs and the Alpaca Trading API, we were able to create multiple endpoints that allowed us to send and receive data.
Endpoints
POST /buy_orders -> make a buy order for a stock
Arguments
ticker (string) -> the ticker of the stock to make a purchase of
Returns
order (Alpaca Order Object) -> an object representing the order made
POST /sell_all -> liquidate all stocks and close all open positions
Arguments – None
Returns – Status 200 if successful
GET /timeline -> current equity trends, percent loss and gain
Arguments – None
Returns
equity (Number[]) -> list of numbers of equity through the past 24 hours
profit_loss (number) -> gain or loss in USD
profit_loss_pct (number) -> gain or loss in percentage
start_val (number) -> value of initial equity value, used to measure profit loss
GET /rand_tickers -> get two random tickers to choose from (NYSE)
Arguments – None
Returns
tickers (string[2]) -> list of 2 different tickers
We used p5js for our display, where the user is shown 3 options (2 stocks and 1 skip), as well as their current stock trend. The rotation at the bottom shows the user which option they are hovering over, in addition to the flickering of the background.
To display the equity at the top, we got the data from the API and displayed it on the screen using a p5js shape
To handle the orders, we had to connect with the arduino, so in the mean time we implemented the code structure that enabled us to receive data and update the states in the program as necessary.
The idea being that a potentiometer value from arduino would dictate the highlighted choice, and a button would lock the choice in to make a purchase. A user would also be able to close all open positions through a button press, and that would send a positive value to the arduino serial.
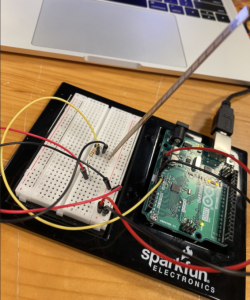
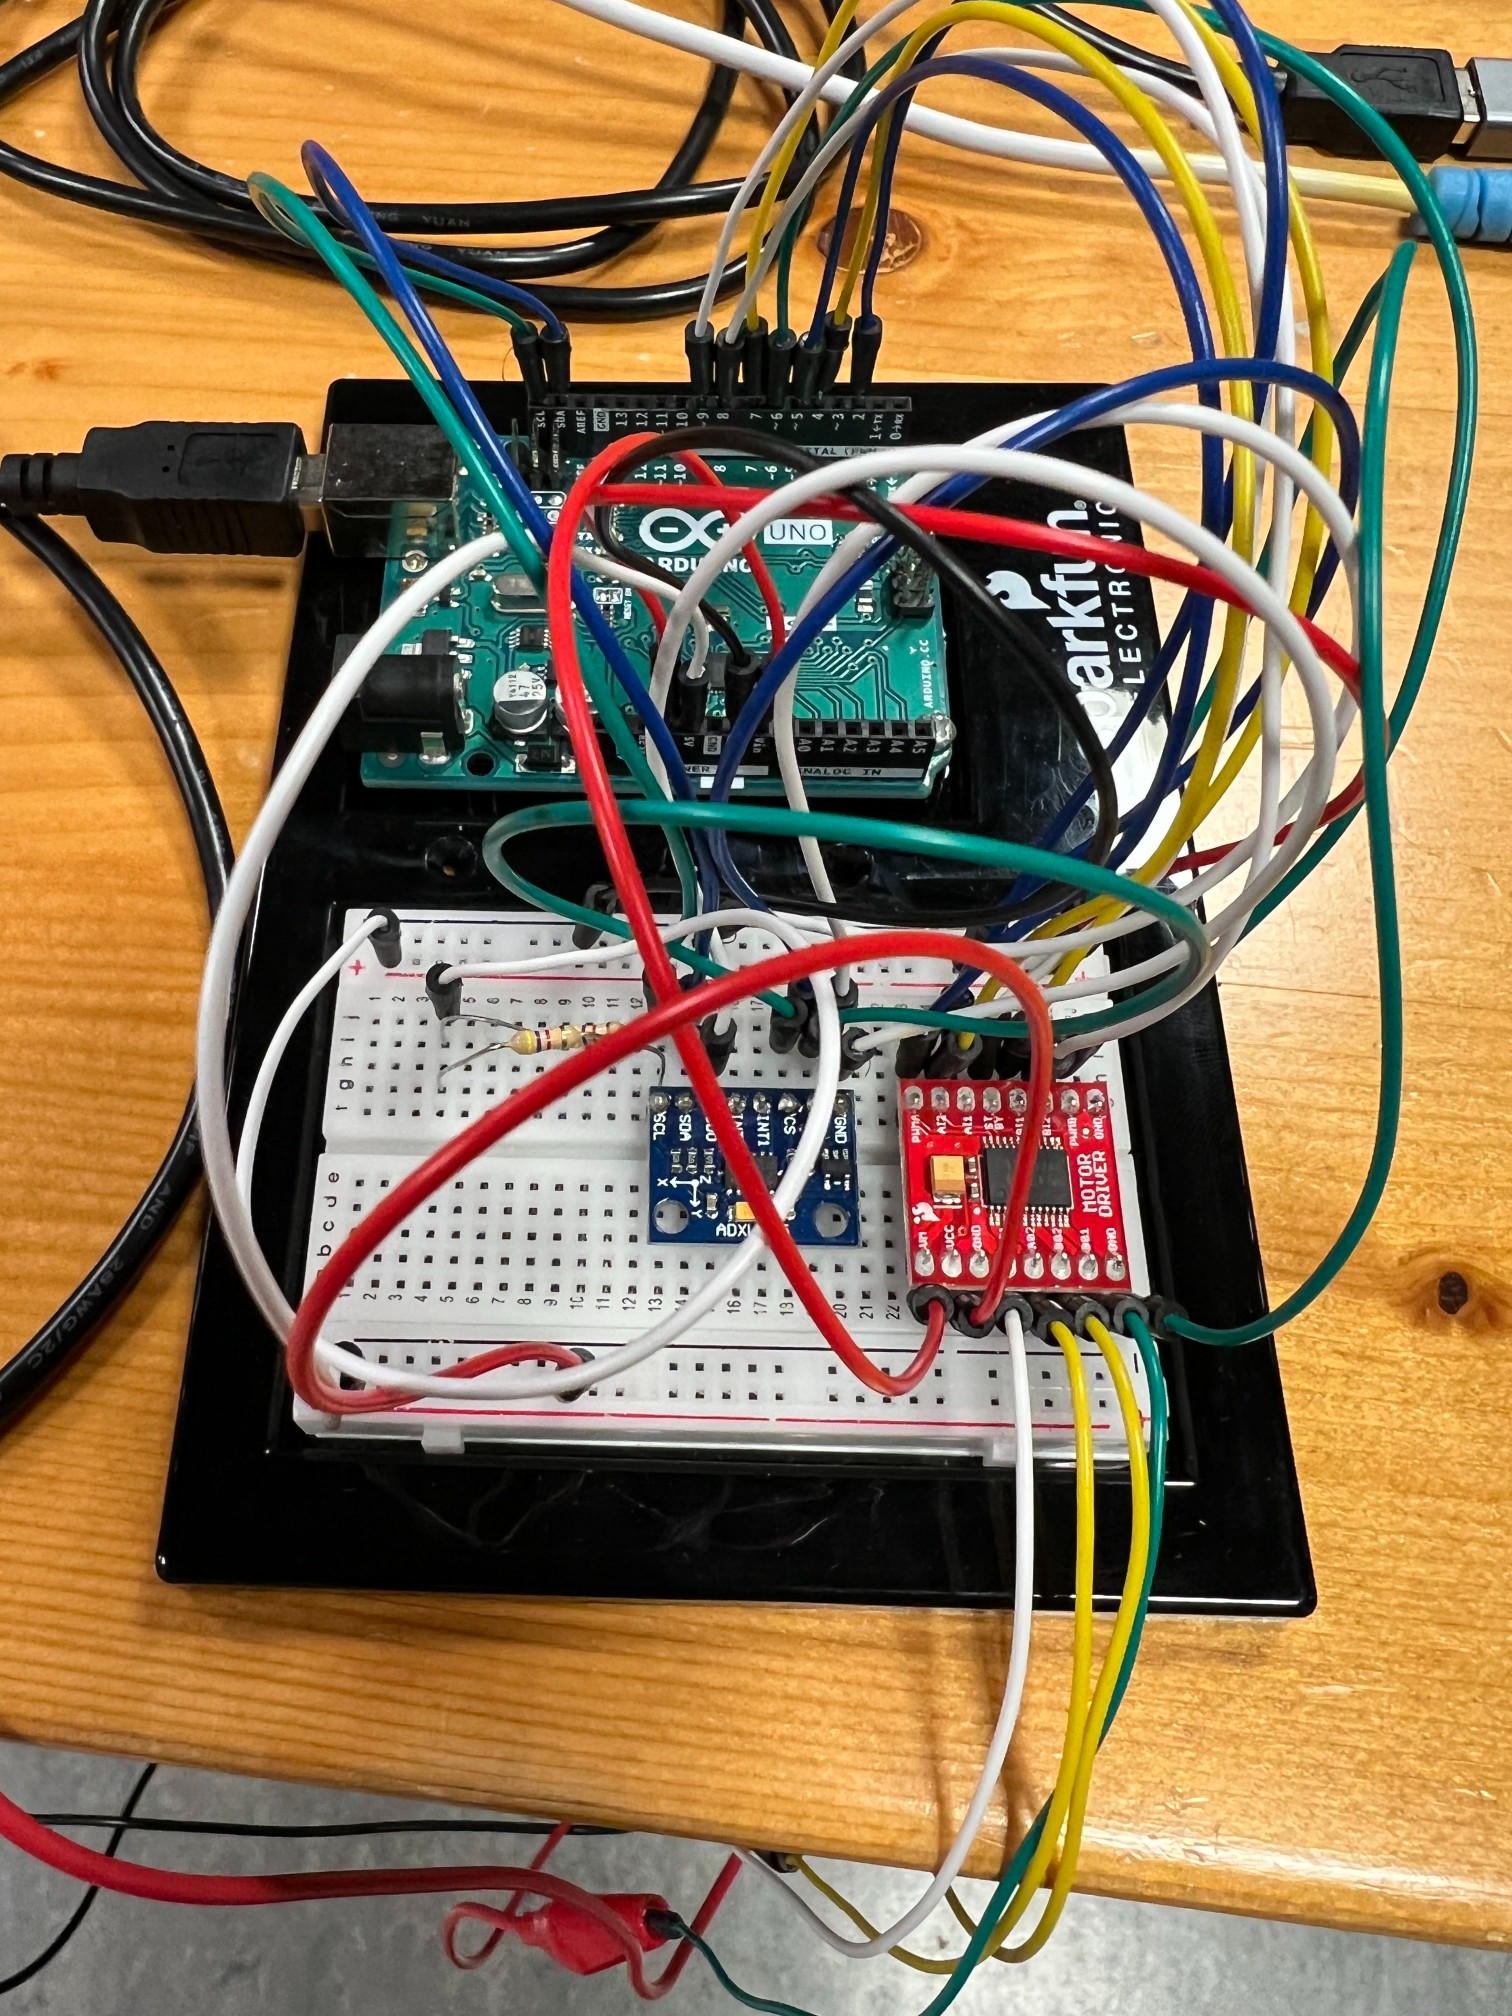
Arduino Implementation
As mentioned previously, we needed a potentiometer and two buttons, but we also wanted to add sound and lights for feedback. We loaded two sounds onto a microSD card onto the arduino, one for a sale and one for a purchase, and loaded them as follows along with the LEDs.
We then parsed the p5js output and sent back the button and potentiometer values.
int SELLPIN = 2;
int BUYPIN = 7;
int POTPIN = A0;
void loop() {
if (Serial.available()) {
  int sellBTN = digitalRead(SELLPIN);
  int buyBTN = digitalRead(BUYPIN);
  int sensorValue = analogRead(POTPIN);
  Serial.print(sellBTN);
  Serial.print(',');
  Serial.print(buyBTN);
  Serial.print(',');
  Serial.print(sensorValue);
  Serial.println("");
    if(buyBTN){
musicPlayer.playFullFile("/track001.mp3");
}
if(sellBTN){
musicPlayer.playFullFile("/track002.mp3");
}
    byte c = Serial.read();
    if(c=='1'){
        digitalWrite(1, 1);
        digitalWrite(5, 1);
        digitalWrite(6, 1);
        digitalWrite(4, 1);
        digitalWrite(3, 1);
    }else{
        digitalWrite(1, 0);
        digitalWrite(5, 0);
        digitalWrite(6, 0);
        digitalWrite(4, 0);
        digitalWrite(3, 0);
    }
}
}
This way, we were able to get the p5js input and send out our own values using the handshake procedure.
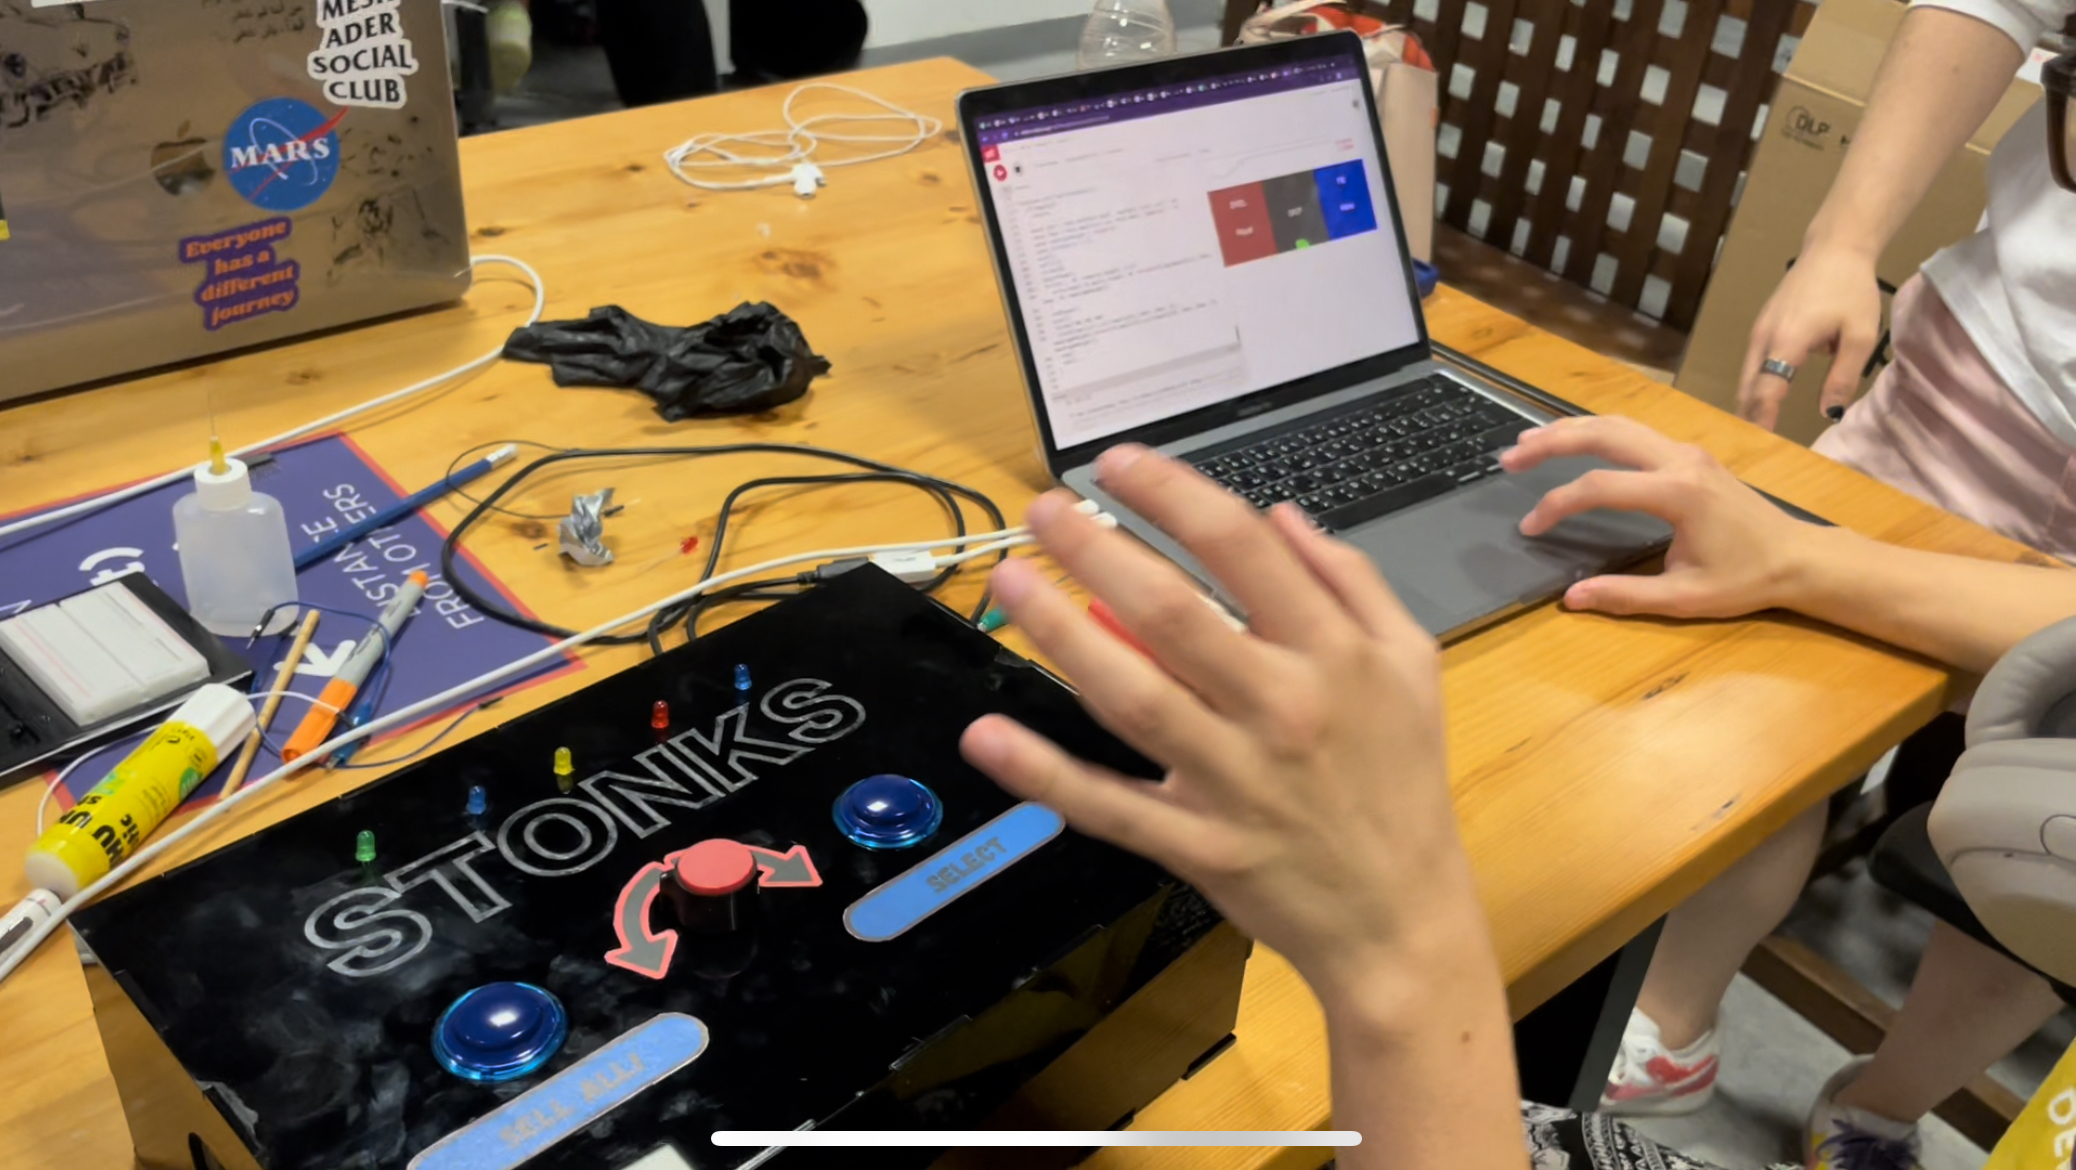
The image shows the complete implementation.
Reflections
Overall, the implementation worked well and made for an intuitive program that enabled people to experiment with the stock market. One of the main limitations of our system is that it only functions between 17:30-00:00 GST due to the stock market being open only for those hours. Other than that however, we found that it provided an interactive experience for the user.
We initially wanted to use an airhorn for the selling sound, but we had hardware restrictions, so decided to go for a speaker instead. We had a couple software slip ups too, as out of nowhere during one of our work sessions, my Google Chrome quit and couldn’t be reopened. In addition, some of the ports on the arduino we used were not working, so we had to test out many different ports before the system worked at full capacity.
We’re happy with the project we made in the class, and hope that the users as less afraid of investing. The repository for the backend can be found here. The .env file is not provided, so the user must provide their own API keys.
For our user testing we waited to include the box piece we had built to test out its functionality. We focused on the intuitiveness of the buttons and a turn pot to select choices. To help in clarity we labelled the buttons, but from our first user test, we realized that it would be even better to include an instruction sheet to summarize the main point of our stock trading program. We limited our instructions to only 4 main points that cover every feature included on the box, and we made sure that the language used was very clear and concise.
To match the clarity of the instruction sheet, we made sure to separate our main buttons with the selection knob in the center to highlight the difference of the buttons and separate their function from each other.
Finally, our user discussed that the sounds felt very interactive and reacted well with the buttons being pressed i.e cashier sound when sell all button is pressed.
By placing the speakers on the side of the box, the user also had an element of surprise as they were not typically expecting a sound to accompany their button press, making the interaction much more enthralling.
Below are some elements of our project, as well as a link to the videos of our user testing process.
As planned, I wanted to incorporate my continuous butterfly theme. I had initially planned to make a butterfly catcher game however changed my concept/idea to butterfly generative art.
Process
p5.js
I began the process by working on the p5js code. I started with working on the butterfly using PI and then added in delta angle in order to add points and noise on the butterfly shape. I also added perlin noise to randomly generate smooth gradients and randomize the shape of the butterfly. I was able to animate the shape and make it look like the wings were flapping using sin and cos (I had to do some research and use online sources to help with this). Once this was sorted, I then played around with background, fill and stroke weight. I was able to remove the background, allowing the moving butterfly to leave behind an imprint which formed the design of a peony (the generate art aspect). I then played around with colors – I wanted to use a flex sensor to control changing colors of the art. Once all the p5js code and animating was sorted, which took the longest to do, I moved onto working on Arduino. Then I came back to the p5js code to insert code that allowed the color to change when the flex sensor was engaged.
p5js code
// Z's 🦋

//handshake
let rVal = 0;
let alpha = 255;
let left = 0;
let right = 0;

//adding a dimension
let yoff = 0;

function setup() {
  createCanvas(600, 600);
  createCanvas(windowWidth, windowHeight);
}

function draw() {
  translate(width / 2, height / 2);
    //rotate(PI / 2);

    stroke(255);
    fill(rVal, 162, 245);
    strokeWeight(1);

  //delta angle - each side of butterfly is PI
  //points
    let da = PI / 150;
  //noise value
    let dx = 0.04;

  //perlin noise
    let xoff = 0;

  //butterfly wings
    beginShape();
    for (let a = 0; a <= TWO_PI; a += da) {

      //using perlin noise to randomize the shape of butterfly
        let n = noise(xoff, yoff);
        let r = sin(2 * a) * map(n, 0, 1, 50, 300);

      //make it look like the wings are flapping
        let x = sin (frameCount*0.01) * r * cos (a);
        let y = r * sin(a);
        if (a < PI) {
            xoff += dx;
        } else {
            xoff -= dx;
        }
      //continous shape
        vertex(x, y);


    }
    endShape();

  //animating the butterfly
    yoff += 0.01;

  // if (!serialActive) {
  //   text("Press Space Bar to select Serial Port", 20, 30);
  // } else {
  //   text("Connected", 20, 30);
  // }

  print(rVal);
}

  function keyPressed() {
  if (key == " ") {
    // important to have in order to start the serial connection!!
    setUpSerial();
  }
}

function mousePressed() {
  if (mouseX > 0 && mouseX < windowWidth && mouseY > 0 && mouseY < windowHeight) {
    let fs = fullscreen();
    fullscreen(!fs);
  }
}

function windowResized() {
  resizeCanvas(windowWidth, windowHeight);
}

  function readSerial(data) {
  //READ FROM ARDUINO HERE

  if (data != null) {
    // make sure there is actually a message
    // split the message
    let fromArduino = split(trim(data), ",");
    // if the right length, then proceed
    if (fromArduino.length == 1) {
      // only store values here
      // do everything with those values in the main draw loop
      rVal = fromArduino[0];
      //alpha = fromArduino[1];
    }

    //SEND TO ARDUINO HERE (handshake)
    //////////////////////////////////
   // let sendToArduino = left + "," + right + "\n";
    writeSerial("\n");
  }
}
Arduino
I started off wanting to use the ZX gesture sensor however was facing difficulty as it would often print random numbers, even when the wiring was done correctly. Then I tried using the distance sensor however the beam for that was limited, therefore I moved onto use a flex sensor. Once I settled on using a flex sensor, I wired up the board and had to test out the sensor to make sure it was printing values out well. I then soldered the flex sensors to wires so that they could be put into a glove. My idea was that when the hand would move (when glove is worn), the colors of the art (butterfly and peony design) would change according to the movement of the sensor. I taped the flex sensor to a glove and then put another glove on top to make it look more seamless and aesthetically appealing.
Arduino code
//Constants:
const int flexPin = A0; //pin A0 to read analog input

//Variables:
int value; //save analog value

void setup(){
  Serial.begin(9600);   //Begin serial communication
}

void loop(){
  value = analogRead(A0);         //Read and save analog value from potentiometer
  value = map(value, 180, 520, 0, 255);  //Map value 0-1023 to 0-255 (PWM)
  value = constrain(value, 0, 255);
  Serial.println(value);               //Print value

  // wait for data from p5 before doing something
  while (Serial.available()) {
    if (Serial.read() == '\n') {

    }
  }
}
Handshake
Then I had to put together both p5js and Arduino through handshake and to start serial connection. I struggled with this part for a bit and realized how essential it is to have all the key part of the handshake code.
Final Result
Overall I am happy with my final project. I am proud of how far I’ve come with coding, I started off the semester with no experience and am ending it having learnt a lot! I love how the project incorporates what I love – butterflies, flowers (peonies in particular) and uses my favorite colors (blue, purple and pink). In the future, I’d love to make more projects related to butterflies and potentially display them on a larger scale.
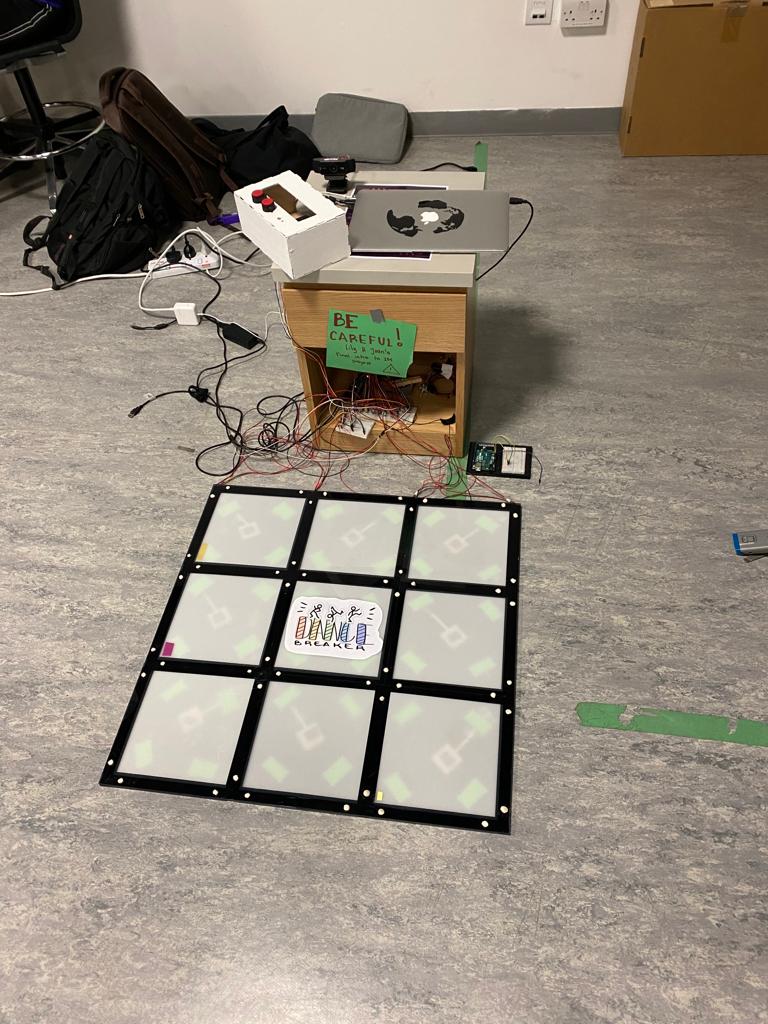
We have all played Just Dance and spent most of the time fixating on figuring out which specific movements on the controller give a higher score. We have all played Dance, Dance revolution and forgotten that it was a dancing game while we are too focused on getting the arrows right. This is because these games are focused on earning a high score rather than enjoying your movements to the sound of music. Thus, Lily and I decided to build a game, Dance Breaker, that focuses on dancing. How you move, how you groove to the melody and how you show the world your emotions with your movement. With a dancing mat, the game will push you out of your comfort zone by pausing the music randomly and telling you to assume a break dance pose. There is no score, no losing, no winning, but a set of instructions and a dynamic game that will motivate you to give it all out. Our game is a fun space to take a break and dance, but of course, it is only as fun as you make it.
The final product is composed of two physical pieces and a P5.Js sketch.
Dancing Mat: a grid of panels built with acrylic sheets. It contains 8 pressure sensors and the logo of the game in the middle.
Control Box: a Box with two potentiometers and a button used to control parameters of the music and choose the song.
P5.js: Contains the instructions for the game, as well as the screens for all the different songs. It is the source of user feedback to interaction, and displays a computer vision sketch to visualize the movements.
After many late nights of hard work, we are very satisfied and proud of how Dance Breaker looks. It is a comprehensive, clean-looking game that has given me, and everyone else who has helped us with user testing a fun and engaging time. It accomplished our purpose (established in previous documentation) of exploring multiple mediums, tools and opportunities that are presented to us as IM students, and building something that resembles a real life product in the market.
Final Product 👣🚨:
Sketch and Code:
** Make sure to see the sketch on full screen.
#include <Servo.h>


Servo myservo;

void setup() {
   myservo.attach(9);
  Serial.begin(9600);
  pinMode(3, INPUT);


   while (Serial.available() <= 0) {
    Serial.println("0,0"); // send a starting message
    delay(300);            // wait 1/3 second
  }

}
void loop() {

  delay(15);

  while (Serial.available()) {
    int left = Serial.parseInt();
    int right = Serial.parseInt();
    int reward = Serial.parseInt();

  int zeroValue = analogRead(A0);

  int oneValue = analogRead(A1);

  int twoValue = analogRead(A2);

  int threeValue = analogRead(A3);

  int fourValue = analogRead(A4);

  int fiveValue = analogRead(A5);

  int sixValue = analogRead(A6);

  int sevenValue = analogRead(A7);

  int eightValue = analogRead(A8);

  int nineValue = analogRead(A9);

// RELEVANT FOR BUTTON
  int tenValue = digitalRead(3);


    int sensorValue = zeroValue;
    Serial.print(sensorValue);
    Serial.print(",");
    sensorValue = oneValue;
    Serial.print(sensorValue);
    Serial.print(",");
    sensorValue = twoValue;
    Serial.print(sensorValue);
    Serial.print(",");
    sensorValue = threeValue;
    Serial.print(sensorValue);
    Serial.print(",");
    sensorValue = fourValue;
    Serial.print(sensorValue);
     Serial.print(",");
    sensorValue = fiveValue;
    Serial.print(sensorValue);
    Serial.print(",");
    sensorValue = sixValue;
    Serial.print(sensorValue);
    Serial.print(",");
    sensorValue = sevenValue;
    Serial.print(sensorValue);
    Serial.print(",");
    sensorValue = eightValue;
    Serial.print(sensorValue);
    Serial.print(",");
    sensorValue = nineValue;
    Serial.print(sensorValue);
    Serial.print(",");
    // RELEVANT FOR BUTTON
    sensorValue = tenValue;
    Serial.print(sensorValue);
    Serial.println();
  //  delay(1);

  if (reward == true){
    myservo.write(0);
  } else {
     myservo.write(90);
    }
}


  }
Despite being very proud of Dance Breaker, there are some elements that we would like to improve if we had more time and experience:
We would like to make the transitions between pages smoother.
We would like to add different elements to the computer vision for each song. This, however, was a massive and time consuming task that would not add significantly to the experience. We were also uncertain in how to do this without slowing the frame rate even more.
We would like to introduce more songs, and a way for users to record the computer vision of themselves.
We would like to work on the frame rate and optimization of the code. As seen during the class presentation, if the frame rate slows down, the screen triggering the dancing mat takes too long to appear.
Some small signifiers and dynamic were planned (stickers for every panel, a mark on the floor indicating the place to dance, images in the instructions) that would make the game more comprehensible.
Process 🦾:
After an initial phase of user testing, we still had a long way to go. By the end of last week, Lily and I met to assemble the board and wire it all together. We realized that we needed a bigger Arduino for the 10 analog inputs that we intended to have, and asked a few friends to test the mat. From this we realized that:
Our initial spring mechanism did not work well, as the material we were using was very brittle. We replaced it with double sided tape which worked wonders, and provided a smoother experience.
We figured out which tool we needed to cut the bolts and smooth the mat.
We did not need a third potentiometer and decided to replace it with a button.
During the weekend, we focused on the mechanics of the game in P5.js. We adjusted everything to the new wires, located all the sensors, and made some important changes. With a basic game mechanic and the physical component ready, we began to test the game. Simultaneously, we worked hard on building the computer vision and making the user experience better. Multiple instances of user testing happened throughout the process. The game, in its different stages, was tested by:
Valentin Josan (again)
Joe Mrad
Nour Mrad
Nicholas Raffone
From their testing we adjusted the timings of the random pauses and the composition of the computer vision. This was done through frame difference, and we mostly altered threshold and RGB colors from class examples. We, however, had one big mistake which led to some challenges in the class presentation.
Class Presentation 😶🌫️: Challenges & Solutions
The presentation of our project did not go as planned. This is because, while plugged to the projector, the frame rate of the sketch significantly decreased. We user tested the mat extensively and the set up with the projector, but it was not until the final set up that we realized this would happen. Thus, we were not able to successfully showcase our project. As it can be seen in the video below the game runs smoothly when played on the computer screen. We also reduced the pixel density in the computer vision sketches to make the code run smoother. Here is how the project looked in the end, after correcting these details. It can be seen played by one and two people, and overall proves to be a fun and engaging experience.
The inspiration for the game is Escape Room, where participants have to solve several puzzles in order to escape from the room.
Content:
A player is stuck in a room where you need to solve 3 puzzles to escape through the exit. In order to find all clues, the player has to interact with the miniature of the room. The game requires both in-game actions, and real-life actions to clear.
Main Algorithms of game mechanics:
Object Interactions: Each game object has a specific area where the message and the clue show up. The message shows up automatically, and the clue opens after the interaction with the object (change in the amount of light)
Character Movement: The character sprite has 4 direction movements, each of them played when corresponding direction keys are pressed. The program remembers the last direction moved and stays looking in the same direction when there is no movement.
UI: Its UI is made as simple as possible, but the timer does not stop when the game is paused to prevent CHEATERS.
Why Photosensors?
There are two reasons why I used photosensors for all of the interactions of the objects in the game. First, the size of the photosensor is very small that it is very easy to hide its location and to place it inside small miniature objects. Second, the photosensor is the most appropriate sensor that goes along with the concept of the game, escaping from a dark room with limited light sources.
Goals that I failed to accomplish:
The collision between the player and the objects
Miniature’s roof and sidewalls that have LED to change the brightness of the room according to the location of the player in the game
Game (Playable through interaction by SpaceBar instead of interacting with the miniature) :
P5js (Alert! Very Very Long)
let serial; // variable to hold an instance of the serialport library
let portName = "COM7"; // fill in your serial port name here

let Character = [];
let playerObj;

let lastkey;

let start = true;
let pause = false;
let fail = false;
let gameclear = false;

let quiz1clear = false;
let quiz2clear = false;
let quiz3clear = false;

let clueOn = true;
let hintOn = false;
let clueUI;

let answercheck = false;
let getinput = false;

let swipeCount = 0;

let roomObjects = [];

let solveNum = 0;
let timer = 300;

let exitdoor;
let userinput = "";

let carpetinput;
let bedinput;
let tableinput;
let glassinput;
let shelfinput;
let drawerinput;

function preload() {
  charSprite = loadImage("character.png");
  bg = loadImage("floor.jpg");
  table = loadImage("table.png");
  darkness = loadImage("darkness.png");
  bed = loadImage("bed.png");
  shelf = loadImage("shelf.png");
  exit = loadImage("exit.png");
  candle = loadImage("candle.png");
  desk = loadImage("desk.png");
  carpet = loadImage("carpet.png");
  wall1 = loadImage("wall1.jpg");
  pauseIcon = loadImage("pause.png");
  textbg = loadImage("textbox.png");
  x = loadImage("x.png");
  quiz1 = loadImage("quiz1.jpg");
  quiz2 = loadImage("quiz2.jpg");
  quiz3 = loadImage("quiz3.jpg");
  quiz2ans = loadImage("quiz2ans.jpg");
  quiz3ans = loadImage("quiz3ans.jpg");

  keypic = loadImage("key.jpg");
  quiz1hint = loadImage("quiz1hint.jpg");
  water = loadImage("water.jpg");

  lock = loadImage("lock.jpg");
  paper = loadImage("paper.jpg");
}

function setup() {
  createCanvas(500, 400);
  frameRate(60);

  //arduino serial
  serial = new p5.SerialPort(); // make a new instance of the serialport library
  serial.on("list", printList); // set a callback function for the serialport list event
  serial.on("connected", serverConnected); // callback for connecting to the server
  serial.on("open", portOpen); // callback for the port opening
  serial.on("data", serialEvent); // callback for when new data arrives
  serial.on("error", serialError); // callback for errors
  serial.on("close", portClose); // callback for the port closing

  serial.list(); // list the serial ports
  serial.open(portName); // open a serial port

  // create character
  let charw = charSprite.width/12;
  let charh = charSprite.height/8;
  for (let i = 0; i < 3; i++) {
    for (let j = 0; j<4; j++) {
      Character[i+3*j] = charSprite.get((i+6)*charw, j*charh, charw, charh);
    }
  }

  //construct playerObj
  playerObj = new player(Character, darkness);

  // setup room objects
  roomObjects[0] = new roomObj (table, 180, 150, 0, 0);
  roomObjects[1] = new roomObj (bed, 0, 0, 0, 0);
  roomObjects[2] = new roomObj (shelf, 330, 0, 0, 0);
  roomObjects[3] = new roomObj (exit, 450, 200, 0, 0);
  roomObjects[4] = new roomObj (candle, 0, 100, 0, 0);
  roomObjects[5] = new roomObj (desk, 100, 0, 0, 0);
  roomObjects[6] = new roomObj (carpet, 100, 320, 0, 0);
  roomObjects[7] = new roomObj (wall1, 0, 240, 0, 0);
  roomObjects[8] = new roomObj (wall1, 225, -55, 0, 0);

  // setup scripts for each objects with clues
  tableUI = new scriptUI("There is a note on the table but it is very dusty... \n(Clean the table to show the hint.)", quiz1,175, 290, 130, 210);
  deskUI = new scriptUI("The drawer opened with the key! There is a note inside the drawer. \n(Pull the drawer to show the hint.)", quiz2,150, 180, 40, 60);
  shelfUI = new scriptUI("As I pour down the water, letters appeared on the paper!!!\n(Place the cup in front of the bookshelf to show the hint.)", quiz3,330, 380, 60, 85);

  // keys to obtain clues
  bedUI = new scriptUI("I see something below my bed... What is it? \n(Check under the bed with a flashlight to show what's there.)", keypic,0, 30, 0, 50);
  carpetUI  = new scriptUI("Found a letter on the carpet... \n(Lift the carpet to show the hint.)", quiz1hint, 120, 170, 300, 335);
  glassUI = new scriptUI("There is a glass of water. Where do I use it? \n(Take the cup to obtain the water.)", water, 0, 25, 90, 180);

  // UI when you don't have item to see the clue
  lockUI = new scriptUI("There is a cabinet that is hard locked. Maybe there is a key nearby to open it. \n(Press SPACE BAR to show/hide the image)", lock, 150, 180, 40, 60);
  paperUI = new scriptUI("There is a paper between books, but nothing is written on it! Maybe I can pour something to make it show? \n(Press SPACE BAR to hide/show the paper)", paper, 330, 380, 60, 85);
  // no hint but just there
  shelf2UI = new scriptUI("There are so many books on the bookshelf. I wander how many there are...", "empty", 420, 450, 75, 92);

  emptyUI = new scriptUI("","empty",0,0,0,0);

  // construct the exitdoor
  exitdoor = new exitdoorUI();
}

let count = 0;

// mouseClick interact with UI
function mousePressed(){
  // Start UI interaction
  if (start == true){
    if (mouseX >= 180 && mouseX <= 330) {
      if (mouseY >= 265 && mouseY <=305){
        start = false;
      }
    }
  }
  // Pause UI interaction
  else{
    if (mouseX>=480 && mouseY <=20){
      pause = !pause;
    }
  }
  // unpause
  if (pause == true){
    if (mouseX >= 165 && mouseX <= 345) {
      if (mouseY >= 185 && mouseY <=225){
        pause = !pause;
      }
    }
    if (mouseX >= 165 && mouseX <= 345) {
      if (mouseY >= 265 && mouseY <=305){
        fail = true;
        pause = false;
      }
    }
  }
  // restart
  if (gameclear == true || fail == true){
    // rect(145, 250, 210, 50);
    if (mouseX >= 145 && mouseX <= 355){
      if (mouseY >= 250 && mouseY <= 300){
        quiz1clear = false;
        quiz2clear = false;
        quiz3clear = false;
        gameclear = false;
        fail = false;
        timer = 300;
        playerObj.posX = width/2+50;
        playerObj.posY = height/2+80;
        playerObj.lastkey = "Front";
        start = true;
        tableUI.isopen = false;
        deskUI.isopen = false;
        shelfUI.isopen = false;
        bedUI.isopen = false;
        glassUI.isopen = false;
        carpetUI.isopen = false;
        shelf2UI.isopen = false;
        lockUI.isopen = false;
        paperUI.isopen = false;
        userinput = "";
        swipeCount = 0;
        solveNum = 0;
      }
    }
  }
}

// gain input from keyboard and send it to the PlayerObj.
function keyPressed(){
  if (keyCode === 32){
    hintOn = !hintOn;
  }
  else if (keyCode === ENTER){
    answercheck = !answercheck;
  }
  else if (keyCode === BACKSPACE){
    userinput="";
  }
  // else if (clueOn == false){
  else{
  if (keyCode === LEFT_ARROW) {
    playerObj.direction = "Left";
    lastkey = "Left";
  }
  else if (keyCode === RIGHT_ARROW) {
    playerObj.direction = "Right";
    lastkey = "Right";
  }
  else if (keyCode === UP_ARROW) {
    playerObj.direction = "Back";
    lastkey = "Back";
  }
  else if (keyCode === DOWN_ARROW) {
    playerObj.direction = "Front";
    lastkey = "Front";
  }
  }
}

function keyTyped() {
  if (getinput){
    let letter = key;
    if (letter.length == 1){
      userinput += letter;
    }
  }

}

function draw(){
  background(220);
  image(bg, 0, 0, width, height, 700, 1200, 1000, 800);

  // print(carpetinput, " ", bedinput," ", tableinput);

  if (keyIsPressed == false){
    playerObj.direction = "Idle";
    playerObj.lastkey = lastkey;
  }
  // display room objects
  for (i=0; i<roomObjects.length; i++){
    roomObjects[i].display();
  }

  // display player object
  playerObj.move();
  playerObj.display();

  // if (frameCount%10 == 0){
  //   print(playerObj.posX+" "+playerObj.posY);
  // }
  clueUI = emptyUI;
  // player on the Object with clue => match clueUI Object's clue
  // table
  if (playerObj.posX >= 175 && playerObj.posX <= 290){
    if (playerObj.posY >= 130 && playerObj.posY <= 210){
      clueUI = tableUI;
      if (frameCount%10 == 0 && tableinput < 140){
        swipeCount++;
        // print(swipeCount);
      }
      if (swipeCount > 10) hintOn = true;
    }
  }
  //desk
  if(playerObj.posX >= 150 && playerObj.posX <= 180){
    if (playerObj.posY >= 40 && playerObj.posY <= 60){
      if (bedUI.isopen == false){
        clueUI = lockUI;
        if (frameCount%10 == 0 && deskinput > 250){
          hintOn = true;
        }
      }
      else clueUI = deskUI;
    }

  }
  //shelf
  if(playerObj.posX >= 330 && playerObj.posX <= 380){
    if (playerObj.posY >= 60 && playerObj.posY <= 85){
      if (glassUI.isopen == false){
        clueUI = paperUI;
        if (frameCount%10 == 0 && shelfinput < 150){
          hintOn = true;
        }
      }
      else clueUI = shelfUI;
    }
  }
  //bed
  if(playerObj.posX >= 0 && playerObj.posX <= 30){
    if (playerObj.posY >= 0 && playerObj.posY <= 50){
      clueUI = bedUI;
      if (frameCount%10 == 0 && bedinput > 250){
          hintOn = true;
        }
    }
  }
  //carpet
  if(playerObj.posX >= 120 && playerObj.posX <= 170){
    if (playerObj.posY >= 300 && playerObj.posY <= 335){
      clueUI = carpetUI;
      if (frameCount%10 == 0 && carpetinput > 170){
          hintOn = true;
        }
    }
  }
  //glass
  if(playerObj.posX >= 0 && playerObj.posX <= 25){
    if (playerObj.posY >= 90 && playerObj.posY <= 180){
      clueUI = glassUI;
      if (frameCount%10 == 0 && glassinput > 130){
          hintOn = true;
        }
    }
  }
  //shelf2
  if(playerObj.posX >= 420 && playerObj.posX <= 450){
    if (playerObj.posY >= 75 && playerObj.posY <= 92){
      clueUI = shelf2UI;
    }
  }
  //exit
  if(playerObj.posX >= 440 && playerObj.posX <= 451){
    if (playerObj.posY >= 176 && playerObj.posY <= 230){
      getinput = true;
    }
    else getinput = false;
  }else getinput = false;

  if(clueUI.inside == false) hintOn = false;

  if (tableUI.isopen && shelfUI.isopen){
    if (deskUI.isopen){
      if (!quiz1clear) exitdoor.quiz1();
      else if (!quiz2clear) {solveNum = 1; exitdoor.quiz2();}
      else if (!quiz3clear) {sdolveNum = 2; exitdoor.quiz3();}
      else gameclear = true;
    }
  }
  else exitdoor.notopen();

  // print(userinput);

  // clue UI display algorithm
  if (clueOn == true){
    clueUI.display();
    if (hintOn == true){
      clueUI.showclue();
    }
  }

  //UI font
  fill("white");
  textFont("Courier New", 50);

  // start UI
  if (start == true){
    image(bg, 0, 0, width, height, 700, 1200, 1000, 800);
    // rect(180, 175, 150, 50);
    if (mouseX >= 180 && mouseX <= 330) {
      if (mouseY >= 265 && mouseY <=305){
        fill("rgb(35,35,167)")
      }
      else fill("white")
    }
    text("Start",180, 300);
    fill("white");
  }

  // pause UI
  if (pause == true){
    image(bg, 0, 0, width, height, 700, 1200, 1000, 800);
    // rect(165, 185, 180, 40);
    if (mouseX >= 165 && mouseX <= 345) {
      if (mouseY >= 185 && mouseY <=225){
        fill("rgb(38,38,160)");
      }
    }
    text("Resume",165, 220);
    fill("white");
    if (mouseX >= 165 && mouseX <= 345) {
      if (mouseY >= 265 && mouseY <=305){
        fill("rgb(38,38,160)");
      }
    }
    text("Restart",165, 300);
    fill("white");
  }
  image(pauseIcon,480,0);

  // fail UI
  if (fail){
    image(bg, 0, 0, width, height, 700, 1200, 1000, 800);
    text("Time Over!!", 90, 150);
    textFont("Courier New", 25);
    text("You found "+solveNum+" out of 3 clues!", 45, 210);
    textFont("Courier New", 50);
    if (mouseX >= 145 && mouseX <= 355){
      if (mouseY >= 250 && mouseY <= 300){
        fill("rgb(38,38,160)");
      }
    }
    text("Restart", 145, 290);
    fill("white");
    // rect(145, 250, 210, 50);
  }

  // Game clear UI
  if (gameclear){
    image(bg, 0, 0, width, height, 700, 1200, 1000, 800);
    text("Game Clear!!", 80, 130);
    textFont("Times New Roman", 28);
    textAlign(CENTER);
    text("You got all 3 Questions correct!! \nCongratulations!", 30, 170, 455, 300);
    textFont("Courier New", 50);
    textAlign(LEFT);
    if (mouseX >= 145 && mouseX <= 355){
      if (mouseY >= 250 && mouseY <= 300){
        fill("rgb(38,38,160)");
      }
    }
    text("Restart", 145, 290);
    fill("white");
  }
  // Timer UI
  if (timer%60 < 10){
    text(int(timer/60)+":0"+(timer%60), 200, 55);
  }
  else {
    text(int(timer/60)+":"+(timer%60), 200, 55);
  }
  if (frameCount%75 == 0){
    if (!start && !gameclear){
      if (!fail) timer--;
    }
  }
  if (timer == 0){
    fail = true;
    timer = 300;
  }
}


//serial functions

// get the list of ports:
function printList(portList) {
  // portList is an array of serial port names
  for (let i = 0; i < portList.length; i++) {
    // Display the list the console:
    print(i + " " + portList[i]);
  }
}

function serverConnected() {
  print("connected to server.");
}

function portOpen() {
  print("the serial port opened.");
}

function serialEvent() {
  // read a string from the serial port
  // until you get carriage return and newline:
  let inString = serial.readLine();
  if (inString.length > 0) {
    let inputVals = split(inString, ","); // split the string on the commas
    if (inputVals.length == 6) {
      // if there are 6 elements
      carpetinput =  inputVals[0];
      bedinput =     inputVals[1];
      tableinput =   inputVals[2];
      glassinput =   inputVals[3];
      shelfinput =   inputVals[4];
      drawerinput =  inputVals[5];
      // print(carpetinput, bedinput, tableinput, glassinput, shelfinput, drawerinput);
    }
  }
  serial.write("0");
}

function serialError(err) {
  print("Something went wrong with the serial port. " + err);
}

function portClose() {
  print("The serial port closed.");
}

class player{
  constructor(Character, darkness){
    this.sprite = Character;
    this.darkness = darkness;
    this.posX = width/2+50;
    this.posY = height/2+80;
    this.direction = "Idle";
    this.lastkey = "Front";
    this.speed = 2;
    this.frame = 1;
  }

  display(){
    image(this.sprite[this.frame], this.posX, this.posY);
    image(darkness, 0, 0, width, height, 475-this.posX, 380-this.posY, 500, 400);
  }

  // Controlls Player's Movement according to the keyboard input
  move(){
    if (this.direction == "Idle"){
      if (this.lastkey == "Front"){
        this.frame = 1;
      }
      else if (this.lastkey == "Left"){
        this.frame = 4
      }
      else if (this.lastkey == "Right"){
        this.frame = 7
      }
      else if (this.lastkey == "Back"){
        this.frame = 10
      }
    }
    else if (this.direction == "Left"){
      if (frameCount % 9 == 0){
      if (this.frame < 3 || this.frame > 4){
        this.frame = 3;
      }
      else {
        this.frame++;
      }
    }
    if (this.posX > 10){
      this.posX -= this.speed;
    }
    }
    else if (this.direction == "Right"){
      if (frameCount % 9 == 0){
      if (this.frame < 6 || this.frame > 7){
        this.frame = 6;
      }
      else {
        this.frame++;
      }

      }
      if (this.posX < 450){
        this.posX += this.speed;
      }
    }
    else if (this.direction == "Front"){
      if (frameCount % 9 == 0){
      if (this.frame > 1){
        this.frame = 0;
      }
      else {
        this.frame++;
      }

    }
      if (this.posY < 350){
        this.posY += this.speed;
      }
    }
    else if (this.direction == "Back"){
      if (frameCount % 9 == 0){
      if (this.frame < 9 || this.frame > 10){
        this.frame = 9;
      }
      else {
        this.frame++;
      }
    }
      if (this.posY > 10){
        this.posY -= this.speed;
      }
    }

    this.xbox = this.posX + this.sprite[0].width;
    this.ybox = this.posY + this.sprite[0].height;
  }

  // collide() {
  //   if (this.lastkey == "Front"){
  //     this.frame = 1;
  //   }
  //   else if (this.lastkey == "Left"){
  //     this.frame = 4
  //   }
  //   else if (this.lastkey == "Right"){
  //     this.frame = 7
  //   }
  //   else if (this.lastkey == "Back"){
  //     this.frame = 10
  //   }
  // }
  // more functions to be added
}

// class of room Objects
class roomObj {
  constructor(image, xPos, yPos, actionX, actionY){
    this.image = image;
    this.xPos = xPos;
    this.yPos = yPos;
    // action Area for objects with specific interaction
    this.actionX = xPos + actionX;
    this.actionY = yPos + actionY;
  }

  display() {
    image (this.image, this.xPos, this.yPos);
  }
}

class scriptUI {
  constructor(scriptText, clueimg, x1, x2, y1, y2){
    this.scriptText = scriptText;
    this.clueimg = clueimg;
    this.isopen = false;
    this.inside = false;
    this.x1 = x1;
    this.x2 = x2;
    this.y1 = y1;
    this.y2 = y2;
  }

  display() {
    if (playerObj.posX >= this.x1 && playerObj.posX <= this.x2){
      if (playerObj.posY >= this.y1 && playerObj.posY <= this.y2){
        this.inside = true;
        image(textbg, 25, 250);
        textFont("Courier New", 18);
        text(this.scriptText, 35, 260, 445, 360);
      }
      else this.inside = false;
    }
  }

  showclue() {
    if (playerObj.posX >= this.x1 && playerObj.posX <= this.x2){
      if (playerObj.posY >= this.y1 && playerObj.posY <= this.y2){
    if (this.clueimg != "empty"){
      image(this.clueimg, 25, 60);
      this.isopen = true;
    }
  }}}
}

class exitdoorUI{
  constructor(){
    this.quizNum = 1;
    this.answer1 = 151;
    this.answer2 = 102;
    this.answer3 = 6511;
  }

  notopen(){
    if (playerObj.posX >= 440 && playerObj.posX <= 451){
      if (playerObj.posY >= 176 && playerObj.posY <= 230){
        image(textbg, 25, 250);
        textFont("Courier New", 20);
        text("You are locked inside the room until you solve all the problems. There are 3 clues... (Search the room for the clues!!)", 35, 260, 455, 360);
      }
    }
  }

  quiz1(){
    textFont("Courier New", 20);
    if (playerObj.posX >= 440 && playerObj.posX <= 451){
      if (playerObj.posY >= 176 && playerObj.posY <= 230){
        if (!answercheck){
          image(textbg, 25, 250);
          textFont("Courier New", 20);
          text("Q1: The answer is : " + userinput, 35, 280);
          image(quiz1, 25, 100);
        }
        else if (userinput != this.answer1){
          image(textbg, 25, 250);
          text("Hmm... Why don't you try again. \nPress Enter to Continue...", 35, 260, 455, 360);
          userinput = "";
        }
        else if (userinput == this.answer1){
          // image(textbg, 25, 250);
          // text("Your answer to Question 1 is correct! \nPress Enter to Continue...", 35, 260, 455, 360);
          quiz1clear = true;
          userinput = "";
          answercheck = false;
        }
      }
    }
  }
  quiz2(){
    textFont("Courier New", 20);
    if (playerObj.posX >= 440 && playerObj.posX <= 451){
      if (playerObj.posY >= 176 && playerObj.posY <= 230){
        if (!answercheck){
          image(textbg, 25, 250);
          textFont("Courier New", 20);
          text("Your answer to Question 1 is correct! \nQ2: The answer is : " + userinput, 35, 260, 455, 360);
          image(quiz2ans, 25, 100);
        }
        else if (userinput != this.answer2){
          image(textbg, 25, 250);
          text("Hmm... Why don't you try again. \nPress Enter to Continue...", 35, 260, 455, 360);
          userinput = "";
        }
        else if (userinput == this.answer2){
        //   image(textbg, 25, 250);
        //   text("Your answer to Question 2 is correct! \nPress Enter to Continue...", 35, 260, 455, 360);
          quiz2clear = true;
          userinput = "";
          answercheck = false;
        }
      }
    }
  }
  quiz3(){
    textFont("Courier New", 20);
    if (playerObj.posX >= 440 && playerObj.posX <= 451){
      if (playerObj.posY >= 176 && playerObj.posY <= 230){
        if (!answercheck){
          image(textbg, 25, 250);
          textFont("Courier New", 20);
          text("Your answer to Question 2 is correct! \nQ3: The answer is : " + userinput, 35, 260, 455, 360);
          image(quiz3ans, 25, 100);
        }
        else if (userinput != this.answer3){
          image(textbg, 25, 250);
          text("Hmm... Why don't you try again. \nPress Enter to Continue...", 35, 260, 455, 360);
          userinput = "";
        }
        else if (userinput == this.answer3){
          // image(textbg, 25, 250);
          // text("Your answer to Question 3 is correct! \nPress Enter to Continue...", 35, 260, 455, 360);
          quiz3clear = true;
          answercheck = false;
        }
      }
    }
  }
}
My final project involved incorporating something that I love with p5js and Arduino. I took skating, one of my hobbies, and transformed it into a game. But not just any skating game, with this game, your controller is the skateboard itself!
Game
The game is straightforward. You have a player on a skateboard with the ability to move left and right. You have to dodge incoming fences by moving left and right. If you get hit more than 3 times, you lose the game and your score is recorded. The highest score is also shown at the end. You have the ability to play the game again or return to the home screen.
For the sprites in this game, I used resources from itch.io mostly.
The trees can be found here; the music can be found here ; the heart icons can be here; the fence image is from google; the tileset can be found here; the player sprites were made by me in Photoshop using original reference pictures that I took.
Arduino
My Arduino setup is mounted underneath my skateboard using velcro and consists of an accelerometer/gyroscope, a motor driver and 2 motors. I 3D printed wheel stoppers so that the skateboard does not move around when the player stands on it.
The accelerometer detects the tilt of the skateboard and moves the player accordingly. The motor driver vibrates when the player hits a fence or the sides of the road. The vibration is caused by some hot glue that I have applied to the gear of the motor.
The Arduino uses serial communication to talk to p5js in a chrome browser.
Code
All of the code is on Github. The final_project.ino file is for Arduino, and the rest is for p5js.
Video
Here are some videos of my final project in action.