Week 9 – Ultrasonic sensor

Concept
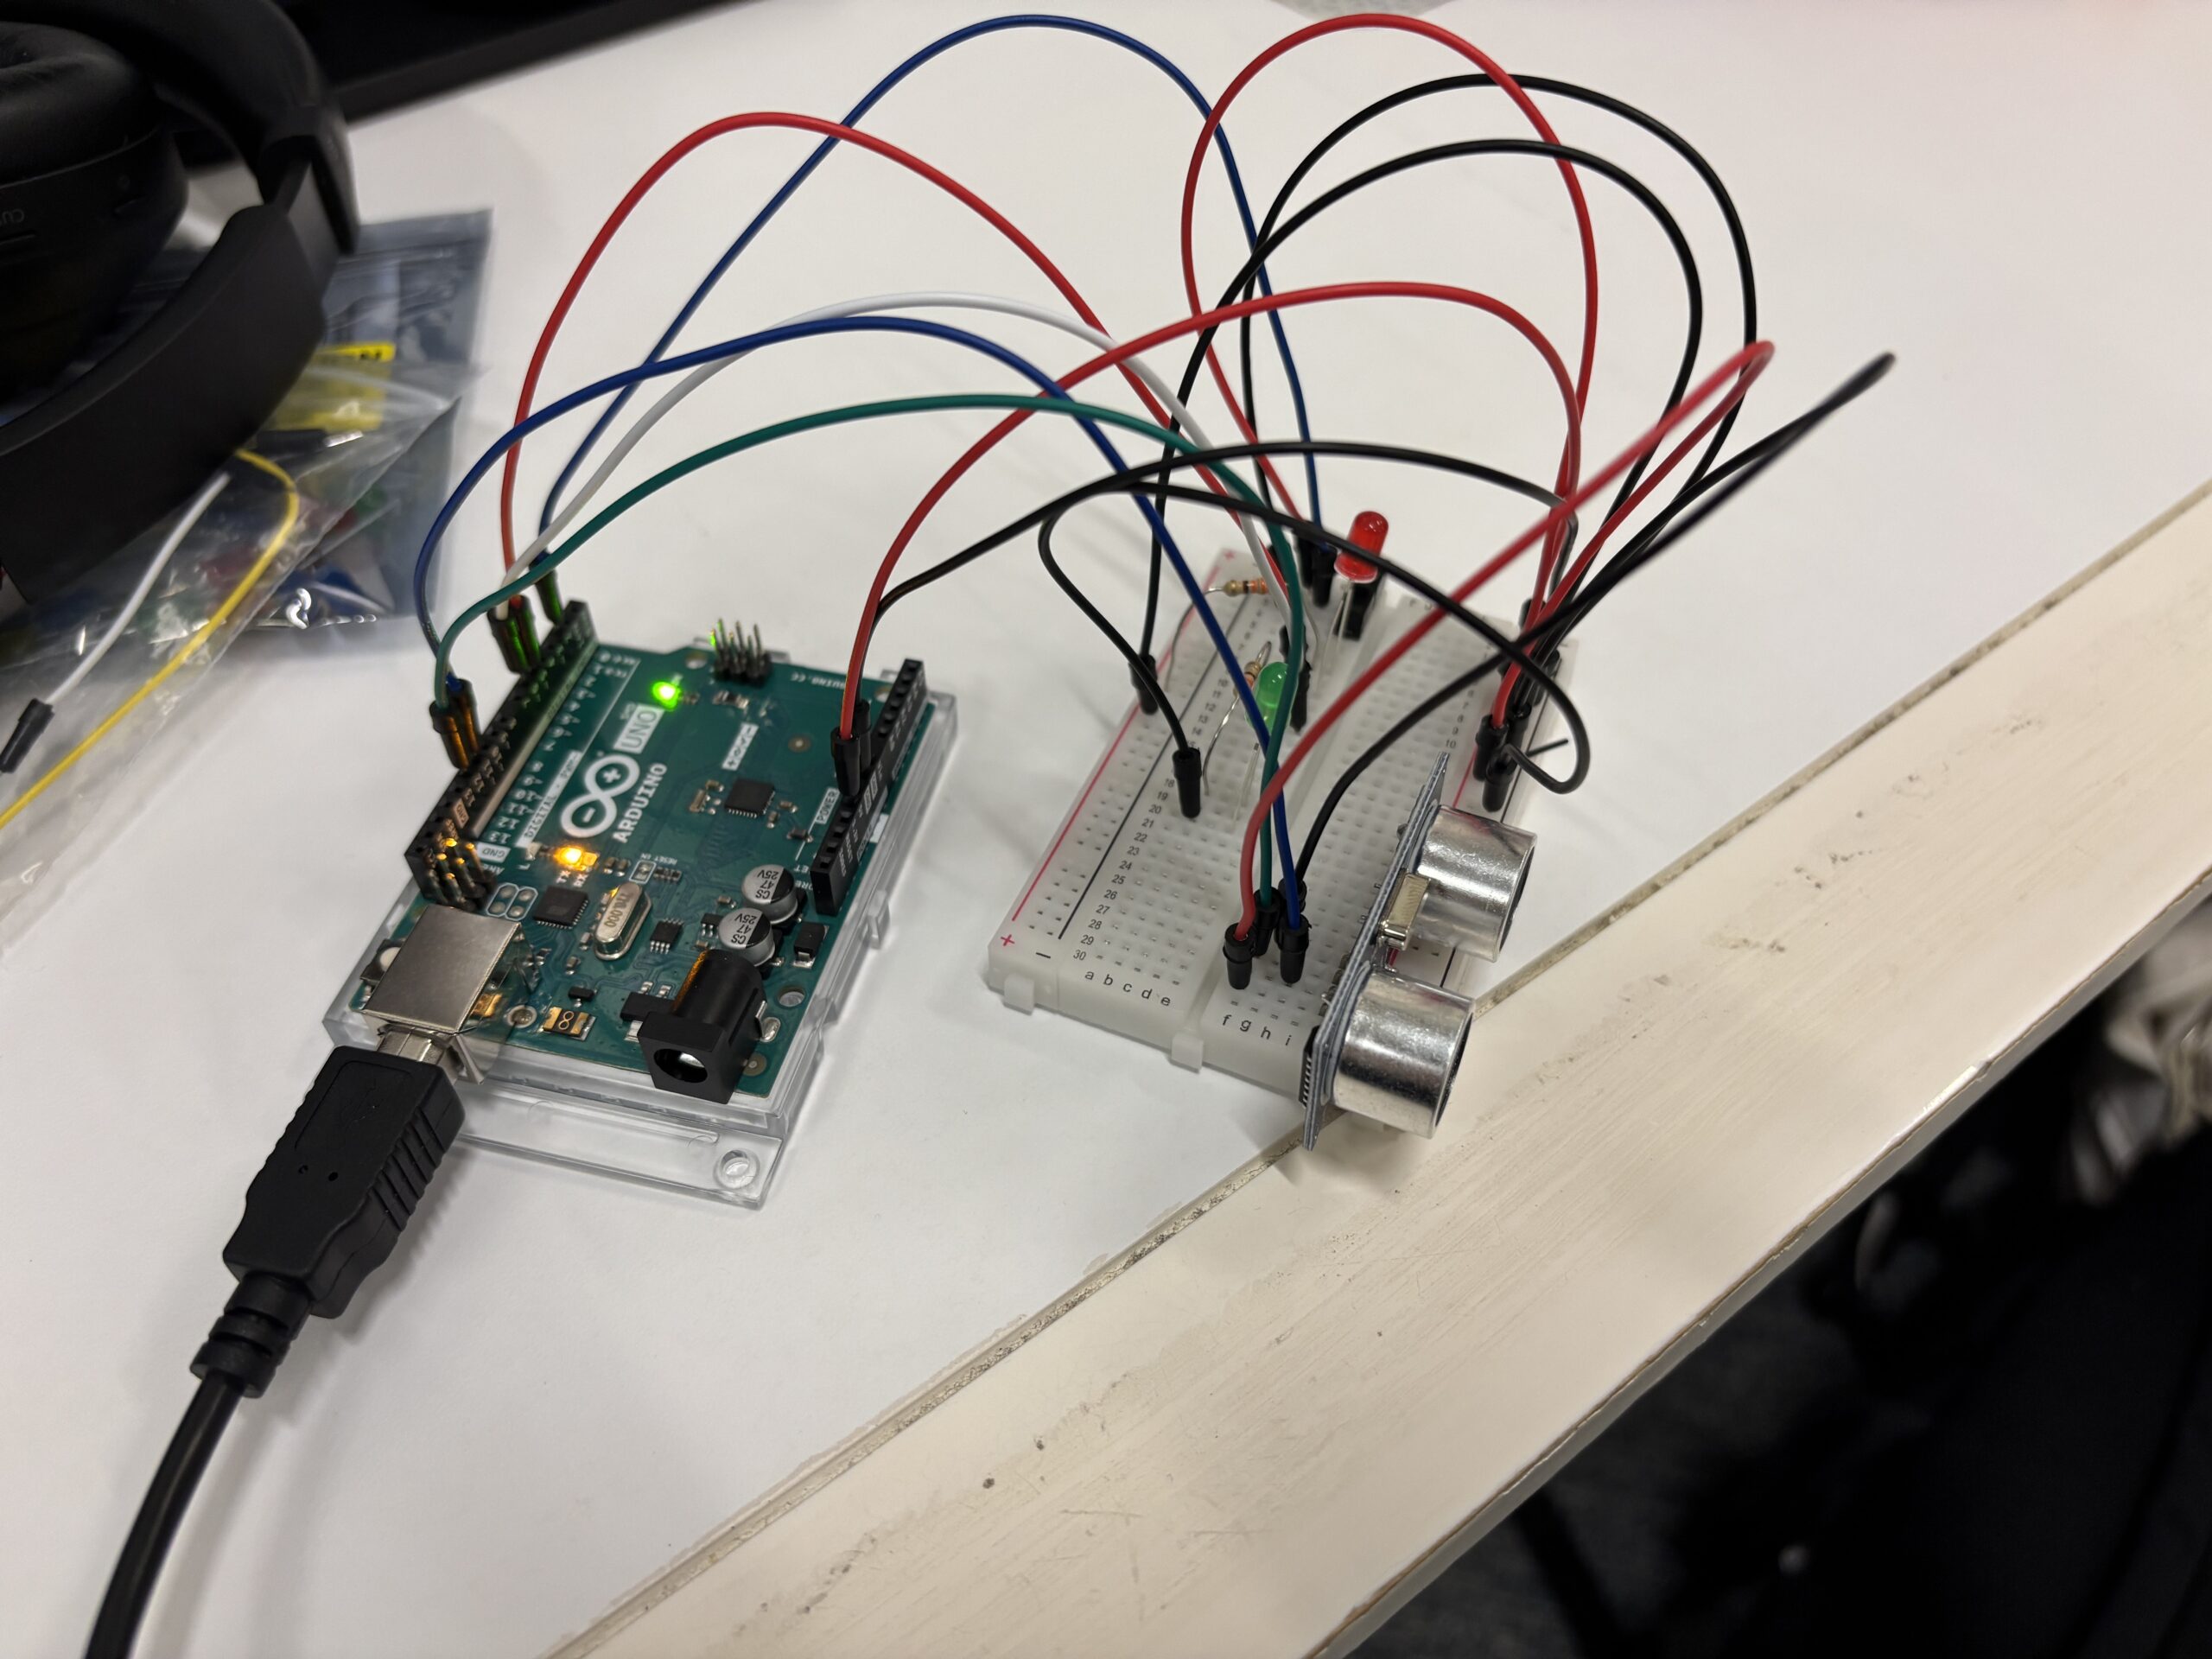
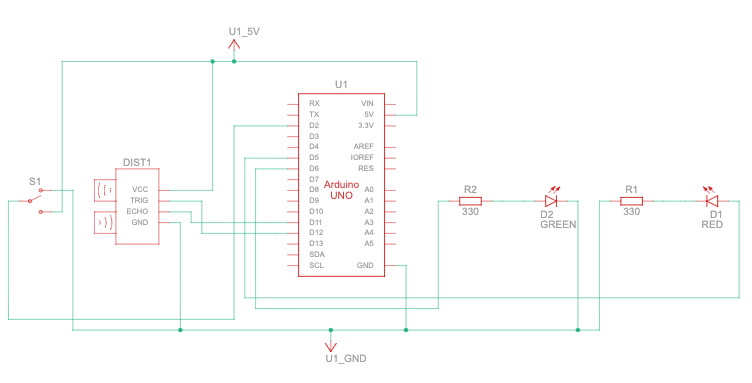
I wanted to combine things we learned in class with a new sensor. This time, it was an ultrasonic distance sensor and an LED. I think I just wanted to experiment with the brightness of the LED, to see how dim or how bright it would be depending on the distance information from the ultrasonic sensor. I watched a couple of YouTube videos to learn how to use and code for the HC-SR04, and it took me some time. Then I utilized code for sending a signal through the TRIG pin and receiving it back through the ECHO pin, calculating the microseconds, and converting it to centimeters using a specific function.

Demo
Video

Highlight of the code

int ECHO_PIN = 12;       //input, collects data from waves
int TRIG_PIN = 11;       //output, sends out the waves
int SWITCH_PIN = 2;
int SWITCH_STATE;
int RED_LED = 5;         // red to light up when objects close
int GREEN_LED = 6;      // yellow to fade if object getting further
float distance = -1.0;            // variable to store distance

void setup() {
  Serial.begin (9600);         // set up a serial connection with the computer

  pinMode(ECHO_PIN, INPUT);    // echo pin measure the duration of pulses coming back from the distance sensor
  pinMode(TRIG_PIN, OUTPUT);   // trigger pin output pulses of electricity
  pinMode(RED_LED, OUTPUT);
  pinMode(GREEN_LED, OUTPUT);
  pinMode(SWITCH_PIN, INPUT);

  digitalWrite(TRIG_PIN, LOW);
}

void loop() {
  long duration = getEchoDuration();
  if (duration == 0){
    distance = -1.0;
  }
  else{
    distance = microsecondsToCentimeters(duration);
  }

  int SWITCH_STATE = digitalRead(SWITCH_PIN);
  if (SWITCH_STATE == HIGH){
    digitalWrite(RED_LED, HIGH);
  }
  else{
    digitalWrite(RED_LED, LOW);
  }

// if conditional to control LED's depending on distance.
  int brightness = 0;
  if (5 <= distance && distance <= 30) {
    brightness = map(int(distance), 5, 30, 255, 0);
    brightness = constrain(brightness, 0, 255);
  } else if (distance > 0 && distance < 5) {
    brightness = 255;
  } else {
    brightness = 0;
  }
  
  analogWrite(GREEN_LED, brightness);

  Serial.println("Distance: ");
  if (distance < 0){
    Serial.println("Out of range");
  } 
  else {
    Serial.print(distance);
    Serial.print("cm");
  }

  Serial.println("");
  Serial.println("Brightness: ");
  Serial.println(brightness);

    delay(500);
}

long getEchoDuration() {
  digitalWrite(TRIG_PIN, LOW);
  delayMicroseconds(2);
  digitalWrite(TRIG_PIN, HIGH);
  delayMicroseconds(10);
  digitalWrite(TRIG_PIN, LOW);
  long duration = pulseIn(ECHO_PIN, HIGH, 30000);
  return duration;
}
  
float microsecondsToCentimeters(long microseconds) {
  return microseconds / 58.0;
  }

I think the if statement that detects if the distance is between 5 and 30 centimeters, and the else if statements, were quite important after I sent the signal through TRIG, received it through ECHO, and transformed the data into centimeters. So, basically, if the distance is more than 30cm, it will show “out of range” on the serial monitor and the green LED will be off. And if it is between 0cm and 5cm, then the brightness is at its peak, 255, and the green LED is fully bright. Also, the red LED works independently based on the sliding switch that we learned during class.

Sketch
Reflection
It took a long time to learn how the distance sensor works. From what I understood, it is similar to a Ping sensor which has 3 pins, but then I had to modify the code I got from the built-in example for TRIG and ECHO pins separately. For future improvements, I want to incorporate the red LED somehow inside the circuit, like if it is out of range or too close, I want the red light to light up. I know it is just a one-line fix, but then I also want it to work independently as well. Maybe when it is turned on, it will do what I said, but when it is off, then it is not going to do those things.

Week 9 – Reading Reflection

These readings made me think about how much pressure I put on myself to be “original.” Tom Igoe’s point that most interactive ideas have already been done was strangely comforting. It made me realize that creativity isn’t about inventing something entirely new , it’s about doing something familiar in a way that feels personal. My projects don’t have to be revolutionary; they just have to feel like mine.

What stood out most to me was his idea of stepping back and letting the audience take over. I tend to over-explain my work, wanting people to understand what I meant. But maybe it’s more powerful to just let them interact and form their own meaning. Igoe’s “set the stage, then shut up and listen” line hit hard , it’s something I need to apply not only to my projects but to how I share them.

These readings reminded me that physical computing is not just about sensors or LEDs. It’s about trust , trusting that the user will understand, trusting the materials to behave, and trusting myself to stop editing and just let the work breathe.

Reading Reflection – Week 9

Physical Computing’s Greatest Hits (and misses)
Just simply scrolling through the list of “greatest hits,” I was struck by how it those simple concepts were utilized nowadays and how universal physical computing actually is. I think seeing these categories laid out so clearly is incredibly useful. For example, those floor dance arcade games, sensory gloves, and multi-touch sensors used in modern interactive museums are using those concepts developed in physical computing. This definitely shows how many systems nowadays are just an extension of physical computing projects. It reminds me that innovation doesn’t always mean inventing something completely new, but can also be about putting a personal or novel twist on a classic concept. I believe the real value here is as a starting point. Instead of staring at a blank slate, I can look at this list and think, “How could I reinterpret a ‘mechanical pin display’ or a ‘glove controller’ in a way that is unique to me?” in my future projects.

Making Interactive Art: Set the Stage, Then Shut Up and Listen
This article fundamentally challenges the way I thought about my role as a creator of interactive things. The instruction to “set the stage, then shut up and listen” is a powerful and difficult one. I think my instinct, like many, is to over-explain, to guide the user to the “correct” experience so they don’t miss my intended point. But this piece reminds me that the magic of interaction happens in the unscripted moments. I believe the author is right. The meaning is not something I embed and the user extracts, but something that is created in the dialogue between the person and the work. It makes me want to create pieces that are more like questions than statements, and to have the confidence to let the audience find their own answers.

W9: Reading Reflections

Physical Computing’s Greatest Hits (and misses)

While reading this piece, I found myself fascinated by how imagination can stretch beyond the limits of what we typically perceive as possible. The example of the waves of leaves particularly resonated with me. It was such a beautiful and unexpected way to translate nature into sound and movement. I would have never imagined something like that, yet it reminded me that creativity often begins with seeing the ordinary through a new lens. This concept really reflects what this course encourages us to do: to move beyond traditional boundaries and explore how abstract ideas can become tangible experiences. It even made me think about how we could merge this with technology, perhaps building something like a domino-inspired instrument that creates a tune from a movement.

Another concept that stood out to me was Dance Dance Revolution. I’ve always loved dancing and even enjoyed playing the this type of game in fun zones, where timing and coordination create a sense of both challenge and joy. Reading about it made me think of how such ideas could evolve into more interactive art experiences. We can probably utilise this concept to build a “twister” game such that everytime someone is out it creates a buzz noise.

Overall, this reading reminded me that creativity is not confined to art or technology alone, it’s in how we connect both. The examples encouraged me to think more experimentally and to consider how imagination can be designed into playful, sensory experiences that engage both mind and body.

Making Interactive Art: Set the Stage, Then Shut Up and Listen

I completely agree with what the author is saying in this reading. If you are creating an immersive, interactive experience, you need to let the audience truly be part of it: to explore, engage, and form their own interpretations. That process of interaction is what reveals how deeply people are willing to think about your project and how many different meanings it can evoke. Each person’s response becomes part of the artwork itself, showing you perspectives you may never have considered.

An immersive experience, in a way, is like an open-ended question. There can be multiple interpretations, each valid in its own context. You can build theories around what you intend to express, but you should always leave your audience curious about what the ground truth really is. That curiosity is what keeps the experience alive even after the interaction ends. As a creator, you can guide emotions subtly through design and environment, but once you begin instructing the audience, it stops being interactive and becomes prescriptive. True interactivity lies in that delicate balance between guidance and freedom where the audience feels both engaged and uncertain.

Week 9 – Brain on Break

Brain on Break

Concept & Inspiration

This project started from the chaos of studying late nights and running on caffeine. I wanted to make a circuit that visualizes the mental shift between being focused and completely done,  the moment when my brain decides, without warning, “we’re taking a break now.”

The concept connects light, motion, and emotion. The light sensor represents my surroundings and productivity levels , the brighter the space, the more alert I am. The foil switch stands for that physical collapse when I lean head onto the desk. Together, they create a system that reads like a tiny, glowing version of my attention span.

How It Works

The project combines one analog sensor and one digital sensor, controlling two LEDs in different ways.

  • Light sensor (Analog Input): Reads the brightness of the environment. The green LED glows brighter in bright light, symbolizing focus and clarity.

  • Foil Switch (Digital Input): Made of two pieces of aluminum foil connected to D2 and GND. When my elbow or cheek touches them together, it signals “brain on break.”

  • Red LED (Digital Output): Turns on when the foil pads touch — representing mental shutdown.

  • Green LED (Analog Output): Fades according to light level but turns completely off when the foil switch is activated.

This mix of analog and digital behavior mirrors how people work — not everything in us is gradual or logical. Sometimes focus fades; sometimes it just stops.

Circuit Design

When the light changes, the green LED fades smoothly using analogWrite(). When the foils touch, the orange LED turns on and the green one shuts off completely.

Coding:

const int LDR_PIN = A0;        // Analog input from photoresistor
const int SWITCH_PIN = 2;      // Digital input from foil switch
const int GREEN_LED = 9;        // Analog (PWM) output LED
const int RED_LED = 8;      // Digital ON/OFF LED

void setup() {
  pinMode(SWITCH_PIN, INPUT_PULLUP);  
  pinMode(GREEN_LED, OUTPUT);
  pinMode(RED_LED, OUTPUT);
  Serial.begin(9600);
}

void loop() {
  int lightValue = analogRead(LDR_PIN);     // Light level
  int switchState = digitalRead(SWITCH_PIN); // Foil contact: LOW when touched

  
  // Map light value to LED brightness (inverted so bright light = brighter LED)
  int brightness = map(lightValue, 600, 880, 0, 255);
brightness = constrain(brightness, 0, 255);
  analogWrite(GREEN_LED, brightness);

  
  // If foil switch is touched, turn on red LED
  if (switchState == LOW) {
  // Foil pads touching → brain on break
  digitalWrite(RED_LED, HIGH);   // burnout light ON
  analogWrite(GREEN_LED, 0);         // focus light OFF
} else {
  // Normal state → focused
  digitalWrite(RED_LED, LOW);    // burnout light OFF
  analogWrite(GREEN_LED, brightness); // focus light fades with light
}
 //serial monitor
  Serial.print("Light Value: ");
  Serial.print(lightValue);
  Serial.print(" | Brightness: ");
  Serial.print(brightness);
  Serial.print(" | Switch: ");
  Serial.println(switchState == LOW ? "Touched" : "Not touched");

  delay(50);
}

Testing & Results

In bright light, the green LED glows intensely — that’s focus mode. When the room dims, the light softens, mimicking a fading mind. But the real moment comes when I touch the foil pads. This happens when my head touches the desk, indicating that I fell asleep. The red LED flashes alive, and the green one shuts off instantly. It’s like watching my brain say, “enough.”

The light sensor worked better once I narrowed the range (600–880) so the fade became more dramatic. The foil switch needed tighter contact, but once secured, it triggered perfectly. 

Video demo:

8088D1BA-7146-49C3-97C8-CCAB51934422

Challenges

  • Calibrating the light sensor so the fading felt visible but not jumpy.

  • Making sure the foil switch responded to soft touches without staying on permanently.

Future Improvements

If I develop it further, I’d like to:

Include a buzzer or heartbeat sound to show the switch between focus and burnout.

Reflection

This assignment pushed me to merge function with symbolism. The project isn’t just about inputs and outputs — it’s about mood as circuitry. The light patterns represent focus, fatigue, and the strange middle space between both.

It reminded me that even in electronics, balance matters. Circuits need both current and resistance. Brains need both light and rest.

Week 8 – Unusual Switch

Concept:

For this week’s assignment, I made a foot-activated switch that turns on an LED when you step on it. It uses two pieces of aluminum foil that touch when pressed together, completing the circuit and lighting the LED.

The idea was to make a basic, hands-free switch that works using pressure from your foot.

Video demonstration:

https://drive.google.com/file/d/1tqjnfQByBRSJJjC8D7xZhDbTFqgD4DTf/view?usp=drive_link

Code Highlight:

const int ledPin = 13;     // LED pin
const int switchPin = A2;  // Foil switch pin

void setup() {
  pinMode(ledPin, OUTPUT);
  pinMode(switchPin, INPUT);
}

void loop() {
  int switchState = digitalRead(switchPin);

  if (switchState == HIGH) {
    digitalWrite(ledPin, HIGH);   // Turn LED on
  } else {
    digitalWrite(ledPin, LOW);    // Turn LED off
  }
}

Github link:

https://github.com/JaydenAkpalu/Intro-to-IM/blob/4dfa5eeecae690e073a9bfd35f4140274d87f5f1/Week8_UnusualSwitchAssignment.ino

Reflections & Future Improvements:

Building the foot-activated switch helped me understand how a basic circuit can turn a simple physical action into an electronic signal. I learned how to use digital inputs on the Arduino and how completing a circuit with something as basic as foil can act as a switch.

If I were to improve it, I’d try to make the foil connection stronger and more reliable, since it doesn’t always press evenly. I’d also like to make the setup look cleaner and maybe add another component, like a buzzer or a second LED, to make it more interactive.

Week 8: Unusual Switch

Concept

The creation of an unusual switch was an interesting task, considering I have created simple LED circuits before, though never with anything beyond what is given in our kit. I decided to use a piano key as a switch to create an interesting switch to add an element of sound that adds dimension to the switch and work. Through this I wanted to create an engaging yet simple work that helps me ground my understanding. To add another layer I wrote code for the light to blink when the key is pressed, which adds a visual to the current auditory element.

Video Demonstration

IMG_7568

Code Snippet

void loop() {
  //Read the state of the switch
  int switchState = digitalRead(A2);

  //Loop to blink if switch is ON
  if (switchState == HIGH) { 
    digitalWrite(13, HIGH); //Turn the LED ON
    delay(250);  // Wait 250 ms
    digitalWrite(13, LOW);   //Turn the LED OFF
    delay(250);  // Wait 250 ms         
  } else {
    digitalWrite(13, LOW); //Keep the LED OFF
  }

}

During this assignment I wanted to integrate two different things we learnt in class to add a little more interactivity to the switch so I decided to use the blinking mechanism during the time where the switch is connected. After prototyping with the regular switch, I added the part of the code where the blinking is handled and noticed a difference on how engaging the switch became which could be useful in creating game interactions or bringing a viewer’s attention to a specific part of a work of interactive art.

Complete Code

Github link

Reflection

This assignment was a great starting point for learning arduino, though a simple task, it helped me make sure that I am well acquainted with the basics of it and I am now excited to learn more. I’d say there is a lot that could be done to improve and develop this work, including adding more LEDs, switches or even more complex visual display when the switch is turned on through a more complex use of digitalRead. Further, this taught me the potential of both hardware and software interacting and what type of work could come out of using such tools together, which inspired me and got me thinking about future projects and how I could make use of this dynamic or how I could have used it in my previous projects.

Reading Response

Attractive Things Work Better

It was really interesting for me to learn how human cognition and emotion are intertwined and how that relationship can determine which design is the best. I personally agree with the author’s idea that more aesthetic and pleasing designs can enhance people’s creativity and allow them to accept even small mistakes or glitches. However, I think that even if a design is aesthetic, if it is too complicated and difficult to use, it will still make me feel frustrated. 

Thus, I believe it’s all about finding the perfect balance between usability, aesthetics, and the emotional impact we gain from the design. In terms of the emotional impact, it is very hard to determine which design works best for people in both pleasant and stressful situations. However, I think it’s always important to make designs both aesthetic and simple at the same time. For instance, Notion is a very simple yet visually pleasing website, and I think that was the key to its success. I know where the templates are, so I can easily choose which template I want to use for my daily diaries and so on. As a software engineer, it is always hard for me to find the right balance between simplicity and aesthetics. However, getting as much user feedback as possible makes it easier for me to find any improvements and add features that make people’s lives easier.


Her Code Got Humans On The Moon

As someone who wants to become a software engineer after graduation, I totally agree that the way Hamilton approached designing software that handles crucial tasks and resolves real-time errors is very important, especially in today’s society. Nowadays, anyone can build almost anything from scratch due to technological advancements without actually knowing how to code at all. However, the real challenge that we, as software engineers, need to tackle is handling critical errors when something goes wrong. If we do not understand the fundamental principles of how software interacts with other components, such as databases, everything in this world will start to malfunction. 

After reading this article, I realized that I want to become a software engineer like Hamilton who can prioritize customers’ needs in  the first place and handle errors in real time. I believe these two skills are fundamental parts of a software engineer’s job in today’s world.

Week 8 – Unusual Switch

Concept

I’ve been thinking a lot about how we usually interact with electronics. It’s almost always with our hands; pressing buttons, turning knobs, typing. So I’m glad we got to try something different. My idea for this project is to have a foot-activated Arduino switch made with nothing more than aluminum foil, tape, socks, and (curiosity).

The idea is simple. When your feet touch, they complete a circuit, and when they move apart, the circuit opens again. Your body becomes the bridge that carries a tiny signal. I wrapped strips of foil around my feet (over socks), taped them so they wouldn’t slip, and connected one to pin 2 on the Arduino and the other to ground. When the two foils touch, the Arduino reads a HIGH signal, meaning the circuit is complete.

Demonstration

IMG_5452

Code

int footSwitchPin = 2;   
int ledPin = 13;         

void setup() {
  pinMode(footSwitchPin, INPUT);
  pinMode(ledPin, OUTPUT);
}

void loop() {
  int footState = digitalRead(footSwitchPin);  //check if feet are touching

  if (footState == HIGH) {
    digitalWrite(ledPin, HIGH);   //feet together = LED ON
  } else {
    digitalWrite(ledPin, LOW);    //feet apart = LED OFF
  }
}

Challenges and Improvements 

The biggest challenge was stability. The foil sometimes slipped or wrinkled, breaking contact even when my feet were touching. The tape would loosen after a few tries, so I had to adjust it constantly.  On the creative side, it would be fun to connect it to a sound or visual program on a computer. For example, every time your feet meet, a sound plays or a color changes on screen. That could turn this tiny experiment into a music or art performance piece.

Week 8 Reading Reflection – Attractive Things Work Better

I didn’t expect to agree so much with Don Norman when I first read Attractive Things Work Better. The title itself almost sounds like clickbait; it feels like he’s just saying “make things pretty.” But as I went through the reading, I realized he wasn’t talking about surface-level beauty at all. He was talking about how our emotions actually change the way we think and interact with design. One thing that really stuck with me was his story about the three teapots. He describes one that’s intentionally unusable (the “coffeepot for masochists”), another that’s kind of ugly but works well, and a third that’s beautifully designed and practical at the same time. It sounds funny at first, but it captures something real about how we connect with the things we use.

Norman also connects emotion and cognition in a way that made a lot of sense. He explains how positive affect (basically being in a good mood) helps people think more creatively and handle problems better, while negative affect makes us focus and think more carefully but also more rigidly. I liked his point that when people are relaxed or happy, they become more flexible, patient, and open-minded; they’re even more forgiving of little design flaws. That feels true in life too. When I’m in a good mood, I don’t mind if my phone glitches or my m1 macbook gets loud; but, as you can imagine, when I’m stressed, every small thing feels like a disaster. When something looks and feels good to use, it changes our attitude toward it; we engage more willingly and think more clearly. I liked how Norman ended by saying that good design balances beauty and usability. A product shouldn’t be just functional or just nice to look at; it should feel right to use.