Final Project Final Update

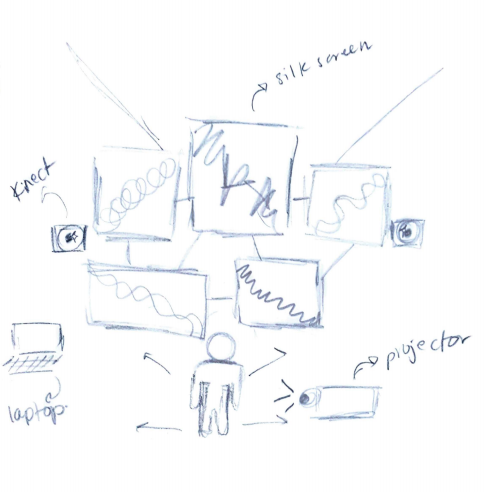
Exhibiting my work in the IM Showcase, as well as interacting with everybody’s projects was such an enjoyable experience for me. I did face some issues with the quality of the projector and the lighting after I noticed that the webcam wasn’t picking up a lot of movements because of the dim lighting. But I managed to solve at least on of those issues through setting up my phone’s flashlight next to the webcam, which increased the response of the graphics to the user’s movements. It was very rewarding to see people enjoy interacting with the project, and provide feedback about the experience. I also loved hearing Nick say that he feels like an “airbender” when interacting with the graphics, and my friends running away from the screen screaming “IT’S CHASING ME”.

At first, I had intended to lower the brightness on the laptop display, so that the user can try to figure out how to interact with the project. But unfortunately the colors displayed by the projector were a bit faded, so the graphics weren’t showing in the opacity that I originally intended to display. You can also notice the flashlight placed on the pedestal as well, which drastically improved the speed of the interaction, since it allowed the Webcam to detect figures more easily. I enjoyed observing how people tried out a range of movements with the bodies and limbs, in order to try to see the extent of the effect their movements have on the motion graphics. I’ve had people run, jump up and down and flail their arms around to see if the projection will follow their movements, so that was fun to watch.

Graphics Code:

import java.util.Calendar;
import ch.bildspur.postfx.builder.*;
import ch.bildspur.postfx.pass.*;
import ch.bildspur.postfx.*;
import oscP5.*;
import netP5.*;

PostFX fx;
//PVector center;
Particles particles;

float centerX, centerY;
float oscX, oscY;
 
OscP5 oscP5;
NetAddress myRemoteLocation;

void setup(){
  //size(displayWidth, displayHeight, P3D);
  fullScreen(P3D);
  smooth(8);
  background(0);
  
  // init form
  centerX = width/2; 
  centerY = height/2;
  
  //center = new PVector(width/2, height/2);
  fx = new PostFX(this);
  particles = new Particles(centerX, centerY);
  background(0);
  
  oscP5 = new OscP5(this,12000);
  myRemoteLocation = new NetAddress("127.0.0.1",1234);
}
 

void draw(){
  // floating towards mouse position
  
  particles.run(oscX*50, oscY*50);

  float ratio = 0.5;
  float intensity = 10;
 
//diffuse
  fx.render()
    .blur(
    round(map(ratio, 0, 1, 0, intensity)), 
    map(ratio, 1, 0, 0, intensity))
    .compose();

  //decay
  noStroke();
  fill(0, 15);
  rect(0, 0, width, height);
}
// timestamp
String timestamp() {
  Calendar now = Calendar.getInstance();
  return String.format("%1$ty%1$tm%1$td_%1$tH%1$tM%1$tS", now);
}

/* incoming osc message are forwarded to the oscEvent method. */
void oscEvent(OscMessage theOscMessage) {
  /* print the address pattern and the typetag of the received OscMessage */
  print("### received an osc message.");
  print(" addrpattern: "+theOscMessage.addrPattern());
  print(" message 1: "+theOscMessage.get(0).floatValue());
  print(" message 2: "+theOscMessage.get(1).floatValue());
  println(" typetag: "+theOscMessage.typetag());
  oscX = theOscMessage.get(0).floatValue();
  oscY = theOscMessage.get(1).floatValue();

}

Particle class:

class Particle {

  PVector pos, startPos;
  float heading = random(TWO_PI);
  float startHeading = heading;
  float step = random(1.0, 5.5);
  float stepNext = step;
  float lifespan;

  color col;

  Particle() {
    this.pos = new PVector(random(width), random(height));
    this.build();
    lifespan = 255.0;
  }

  Particle(PVector pos, float heading) {
    this.pos = pos.copy();
    this.startPos = pos.copy();
    this.heading = heading;
    this.startHeading = heading;

    if (pos.x > width/2) { //change color per segment
      if (pos.y > height/2) {
        col = color(178,153,255);
      } else {
        col = color(156, 0, 128);
      }
    } else {
      if (pos.y > height/2) {
        col = color(183, 0, 183);
      } else {
        col = color(255, 132, 178);
      }
    }
  }

  Particle(PVector pos, float heading, color col) {
    this.pos = pos.copy();
    this.startPos = pos.copy();
    this.heading = heading;
    this.startHeading = heading;
    this.col = col;
  }

  void build() {
  }

  void update(float newCenterX, float newCenterY) {
    
    pos.add(newCenterX, newCenterY);
    pos.add(new PVector(cos(heading), sin(heading)).mult(stepNext));

    if (this.outOfBound()) {
      pos = startPos.copy();
      heading = startHeading;
    }
    lifespan -= 1.0;
  }

  void render() {
    //deposit
    stroke(col);
    vertex(pos.x, pos.y);
  }

  boolean outOfBound() {
    return (
    pos.x < 0 ||
    pos.x > width ||
    pos.y < 0 ||
    pos.y > height
    );
  }
  boolean isDead(){
    if (lifespan < 0.0){
      return true;
    } else {
      return false;
    } 
  }
}

Particles (mother) class:

class Particles {

  ArrayList<Particle> particles;

  Particles(float _xCenter, float _yCenter) {
    this.build(_xCenter, _yCenter);
  }

  void build(float centerX, float centerY) {
    particles = new ArrayList<Particle>();

    int steps = 30000;
    float step = TWO_PI/steps;
    float rad = 300;
    float amp = PI/8;

    for (float i = 0; i <+ steps; i++) { //add new particle at random position
      float a = step * i;
      particles.add(new Particle(
        new PVector(cos(a), sin(a)).mult(rad).add(centerX, centerY).add(PVector.random2D().mult(20)), 
        a + PI/2 + PI/8 + random(amp, amp))); //random pos amp
    }
  }

  void update(float changeX, float changeY) {
    for (Particle p : particles) {
      p.update(changeX, changeY);
      //int c = get(2, 3);
      //int r = c >> 16 & 0xFF;
      //int g = c >> 8 & 0xFF;
      //int b = c & 0xFF;
    }
  }

  void render() { //render each particle
    beginShape(POINTS);
    stroke(255);
    strokeWeight(1.0);
    for (Particle p : particles) {
      p.render();
    }
    endShape();
  }

  void run(float newX, float newY) {
    this.update(newX, newY);
    this.render();
  }
}

Webcam code Aaron helped me with:

import gab.opencv.*;
import processing.video.*;
import oscP5.*;
import netP5.*;

OscP5 oscP5;
NetAddress dest;

OpenCV opencv;
Capture video;

PVector smoothedFlow;

void setup() {
  size(320, 240);
  video = new Capture(this, 320, 240);
  opencv = new OpenCV(this, 320, 240);
  video.start(); 
  smoothedFlow = new PVector(0, 0);
  /* start oscP5, listening for incoming messages at port 12000 */
  oscP5 = new OscP5(this, 1234);
  dest = new NetAddress("127.0.0.1", 12000);
}

void draw() {
  background(0);
  if (video.available() == true) {
    video.read();
  }
  opencv.loadImage(video);
  opencv.flip(opencv.HORIZONTAL);
  opencv.calculateOpticalFlow();

  pushMatrix();
  scale(-1.0, 1.0);
  image(video, -video.width, 0);
  popMatrix();

  stroke(255, 0, 0);

  PVector aveFlow = opencv.getAverageFlow();
  PVector diff = PVector.sub(aveFlow, smoothedFlow);
  smoothedFlow.add( diff.mult(.1));

  stroke(255);
  strokeWeight(2);
  translate(width/2, height/2);
  line(0, 0, 50*smoothedFlow.x, 50*smoothedFlow.y);
  sendOsc();
}

void sendOsc() {
  OscMessage msg = new OscMessage("/opticalFlow");
  msg.add((float)smoothedFlow.x); 
  msg.add((float)smoothedFlow.y);
  oscP5.send(msg, dest);
}

It was a great semester!

Final Project User Test

I’ve probably said this on numerous occasions, but my main interest in interactive media lies in finding the intersection between art and technology. I wanted to find a way to combine everything we’ve learned in class about coding and using processing as a creative platform, with my passion for creating art and aesthetically appealing interactive installations. For this project, I wanted the user to be able to use their bodies as a medium or as a brush of some sorts, to paint on a canvas, through interacting with installation. I used a particle system, where I created an array of A LOT of objects or particles which are added in random positions along the radius of a circle revolving in the center of the screen. The interactive aspect of it, is that the webcam detects any movement on an x, y, z axis and creates movement in the graphics that mimic the user’s moves. This happens through adding a new center or circle in every place the user moves, and this circle has an intensity of blur that makes it appear to be moving smoothly with the user.

My friends having too much fun:

Despite the users enjoying the overall interaction, I noticed several aspects I could improve and build upon:

  1. The purpose of the project wasn’t clear at first, and some of the users were confused. This could be improved through using a large projection of the screen so that passersby can easily observe the effect of their movements on the graphics.
  2. Some users said that I should work on increasing the blur or changing the movement of the main circle, since they could see the trail of circles being added as they move.
  3. Adding more movement specific effects, in the sense that a smaller movement (moving an arm) would produce a different effect than moving the entire body.


Final Project Update

I am ashamed to admit that I only barely completed one and a half of the 3 challenges I had set out for myself last week – who knew learning was so difficult? Most of my accomplishments over the weekend consisted of referencing geometric code we created in class and finding a cool replacement for the blur effect, which is the wonderful library – Postfx, which is great for creating graphics. As for the second challenge concerning the Kinect, I watched most of the Daniel Shiffman’s videos on the thing and I intend to start hooking it up today. My last challenge involves connecting the Kinect to the pattern generated by the code, and making it possible for the user’s movements to control the movements of the pattern. I also intend to create a wayyyy cooler color palette.

A lil code:

import ch.bildspur.postfx.builder.*;
import ch.bildspur.postfx.pass.*;
import ch.bildspur.postfx.*;

PostFX fx;

PVector center;
Agents agents;

void setup() {
  size(1280, 720, P3D);
  frameRate(60);
  smooth(8);
  background(0);

  center = new PVector(width/2, height/2);
  fx = new PostFX(this);

  agents = new Agents();

  background(0);
}

void draw() {
  agents.run();

  float ratio = 0.5;
  float intensity = 10;

  
  fx.render()
    .blur(
    round(map(ratio, 0, 1, 0, intensity)), 
    map(ratio, 1, 0, 0, intensity)
    )
    .compose();

  
  noStroke();
  fill(0, 15);
  rect(0, 0, width, height);
}
class Agent {

  PVector pos, startPos;
  float heading = random(TWO_PI);
  float startHeading = heading;
  float step = random(1.0, 2.5);
  float stepNext = step;

  color col;

  Agent() {
    this.pos = new PVector(random(width), random(height));
    this.build();
  }

  Agent(PVector pos, float heading) {
    this.pos = pos.copy();
    this.startPos = pos.copy();
    this.heading = heading;
    this.startHeading = heading;

    if ( pos.x > width / 2 ) {
      if ( pos.y > height / 2 ) {
        col = color(255);
      } else {
        col = color(0, 255, 0);
      }
    } else {
      if ( pos.y > height / 2 ) {
        col = color(255, 0, 0);
      } else {
        col = color(255, 0, 255);
      }
    }
  }

  Agent(PVector pos, float heading, color col) {
    this.pos = pos.copy();
    this.startPos = pos.copy();
    this.heading = heading;
    this.startHeading = heading;
    this.col = col;
  }

  void build() {
  }

  void update() {
    //callSensors(this);
    pos.add(new PVector(cos(heading), sin(heading)).mult(stepNext));


    if ( this.outOfBound() ) {
      pos = startPos.copy();
      heading = startHeading;
    }
  }

  void render() {
    stroke(col);
    vertex(pos.x, pos.y);
  }

  boolean outOfBound() {
    return (
      pos.x < 0 ||
      pos.x > width ||
      pos.y < 0 ||
      pos.y > height
      );
  }
}

creds to this github account for having great examples for working with postFX: https://github.com/cansik/processing-postfx/blob/master/examples/SimpleEffect/SimpleEffect.pde

Computer Vision for Artists and Designers

This detailed article embodies most of what I enjoy and love about interactive media. I enjoyed forming a deeper understanding of how computers are programmed to “see”, and the article provided a history lesson of some sorts as it detailed the origins of computer vision, and all the fascinating projects which nurtured this concept into the wonderful world of interactive media that we know and continue to develop today.

The first project that showcased the use of computer vision in interactive art was Myron Krueger’s Videoplace, and despite being first conceived in the early 1970s it seems to hold a lot in common with several modern digital art installations that I enjoy and am inspired by. I kept making mental references to the works of American immersive artist, Chris Milk, who creates large interactive installations that require the audience’s interactions. I found it fascinating how I could identify elements of elementary computer vision techniques in Milk’s and other artist’s work. This made me realize that despite the conception of certain computer vision techniques decades ago, much of them pertain and apply to interactive art in modern times. I also considered how there could be endless applications for this kind of creative technology, which could generate revolutionary changes in the fields of education, architecture, media, art, etc.

Furthermore, I noticed how prior to reading this article I was starting to consider how to operate elements of motion and presence detection for my project, since I intended to use a Kinect to detect body movements and mimic them through colors and patterns.

Chris Milk:


Class Exercise: Pixels

Using code and some of the new/old functions we learned on Processing, I fiddled around with the values to change the pixels and their movement in a certain image.

PImage img;
int cellSize=2;
int columns, rows;
void setup() {
  size(512, 512, P3D);
  img = loadImage("Elizabeth Taylor.jpeg");
  img.resize(width,height);
  noStroke();
  columns=width/cellSize;
  rows=height/cellSize;
}

void draw() {
  background(255);
  img.loadPixels();
  for (int i=0; i<columns; i++) {
    for (int j=0; j<rows; j++) {
      int x= i*cellSize+cellSize/4;
      int y= j*cellSize+cellSize/2;
      int loc = x+(y*height);
      color pix=img.pixels[loc];
      float z=map(brightness(pix), 10, 255, 0, mouseX);
      float t=map(brightness(pix),255,0,255,mouseY);
      pushMatrix();
      translate(x,y,z);
      fill(pix);
      rectMode(CENTER);
      ellipse(10,0,cellSize,cellSize);
      popMatrix();
    }
  }
  img.updatePixels();
}


Final Project Update

I made small changes to my final project idea conceptually, and in terms of certain technicalities. So in plain terms, I aim to design a piece of interactive and performative art installation, where the audience shape/silhouette and movements are translated into different complex patterns and colors onto different transparent surfaces. I will still be using a Kinect in order to detect the movement of the audience, and program a Processing sketch that will analyze the data from the Kinect and translate that into patterns and colors. Conceptually, my project aims to explore issues of surveillance in our modern world, where people place a lot of trust in technology and a lot of our personal data is present and recorded on clouds. Through choosing to interact with the installation, the audience are giving information about their movements, which will be recorded by the Kinect. This doesn’t necessarily imply that sharing our data is in inherently good or bad, but rather to make the audience think about the larger implications of that prospect.

I believe some of the complicated or challenging aspects of the project will be:

  1. Separating the data from the Kincet into three sections, since I want each section to present a change of patters as the user moves along the width of the screens.
  2. Programming the Kinect into detecting more than one body at a time rather than solid surfaces
  3. Assigning specific colors to each section and each pattern

Brainstorming for Final Project

As an initial idea for my final project, I wanted to create an interactive art installation that would act as a parallel universe to the audience’s body. Conceptually speaking, I am intrigued by the prospect of combining technology and computing with visual arts and performance. The project also acts as an exploration regarding certain dynamics – relationship between colors, space, and the audience to each other. This could also be done through a change in graphics and patterns when to people experience the installation together. The main dynamic of the project would be the camera detecting the movement of the user and then generating colorful geometric patterns to follow the movement of the body. Each section of the projection should display a different color if the user stands in front of that specific section.

I’ll need:

  • 1 or 2 Kinects
  • 1 projector
  • 5 silk screens

Physical Controller for my OOP Game

I decided to create a physical controller for my simple version of Flappy Bird, that I coded for the OOP assignment. I tried to code a button which will control the movement of the object in the game, and with some help from Rick, I was able FINALLY figure it out! I set up a button state and used it in the draw function, since I have three states for the game – pressing the button will change the button state from 0 to 1 then change the state of the game also from 0 to 1.

Arduino Code:

int buttonPin = 2;
int button;

void setup() {
  Serial.begin(9600);
  Serial.println('0');
  pinMode(buttonPin, INPUT);
}
 
void loop() {
    char inByte=Serial.read();
    button = digitalRead(buttonPin);
    delay(0);
    Serial.println(button);
}

Processing Code:

import processing.serial.*;
Serial myPort;
int state = 0; 
int score=0;
boolean currentState = false;
boolean prevState = false;
int arduinoButton = 0;
bird b = new bird();
pillar[] p = new pillar[3];


void setup(){
 size(500,700);
 
 printArray(Serial.list());
  String portname=Serial.list()[7];
  println(portname);
  myPort = new Serial(this,portname,9600);
  myPort.clear();
  myPort.bufferUntil('\n');
  
 int i; 
 for (i = 0; i < 3; i++){
   p[i]=new pillar(i);
 };
}

void draw(){
  background(0);
  if (arduinoButton == 1 && prevState == false) {
    currentState = true;
    prevState = true;
    state = 1;
  }
  
  if (arduinoButton == 1) {
    b.jump();
  }
  
  if (state==0){
    // intro state
    text("Click to Play",155,240);
    b.move(p);
  }
  
  else if (state==1){
    // start state 
    b.move(p);
    b.drag();
    b.checkCollisions();
    rect(20,20,100,50);
    fill(255);
    text(score,30,58);
  }
  
  else {
    // end state 
    rect(150,100,200,50);
    rect(150,200,200,50);
    fill(255);
    text("game over",170,140);
    text("score",180,240);
    text(score,280,240);
  }
  
  b.drawBird();
  
  for(int i = 0;i<3;i++){
    p[i].drawPillar();
    p[i].checkPosition();
  }
  
  stroke(255);
  textSize(32);
}
void mousePressed(){
  state = 1;
} 

void serialEvent(Serial myPort){
  String s=myPort.readStringUntil('\n');
  s=trim(s);
  if (s!=null){
    arduinoButton = int(s);
  }
  println(arduinoButton);
}


Finding Meaning in Computing

I’ve always been fascinated with the prospect of utilizing computing or coding as a medium to generate art, and discover intersections between the visual and the tangible. So I felt that Interactive Media would be ideal in helping me explore and combine art and technology, and when we started delving deeper into using Processing, it made me realize that I might be a little closer to visualizing some of my projects. Having no prior experience in coding, it was kind of a challenging process to execute a lot of the concepts I had in mind, and I would end up being frustrated most of the time. However, I came to understand that this is a new world of possibilities that only recently opened up to me, and I know more now than when I started out. It’s also already a huge milestone that I can look up functions online and more or less understand how to employ them in Processing to achieve certain effects. It’s also quite interesting how we’re now learning about the ability to combine Arduino and Processing, which really enabled me to think about all the possible intersections between different programs and coding languages.

I’m hoping that the projects I created in this class so far, are only the beginning of my computing journey and the belief that I still have a lot to learn is a little comforting at the moment. As the deadline for the final project looms near, I was really hoping to surprise myself with some badass coding skills I  have stored in my subconscious, but I think it’s important for me (and all of us really) to be ambitious but within the limits of our current knowledge.

An Explosion of Generative Text

For this week’s assignment, I decided to go for the generative text but with a playful twist in relation to misheard lyrics from famous songs. The process was very challenging at first, since I wasn’t able to get a more organic transition from the text to the pixels. But after discovering several in-built functions in Processing, such as get() and set() it was easier to manipulate the pixels. get() was particularly useful and interesting to use, since it allowed me to extract the non-black pixels within set parameters. I also struggled a lot with the values being returned by my functions as they were doing almost the opposite of what I intended, until I used the function abs() – which returns positive values no matter what, and ultimately allowed me to scroll the text in the correct orientation.

I feel like at this point there are so many functions built in Processing that can help make my life easier and more interesting, and I’m making it my life’s mission to uncover these functions one by one.

Sweet dreams are indeed made of cheese!

Code:

ArrayList p;
PFont font; 

void setup() {
  int i, x, y;
  color c;
  size (640, 480);
  frameRate(60);

  p = new ArrayList();
  createText();
  
  //set font
  font = createFont("Arial", 100); 

  background(0);
  stroke(255);
  fill(244, 154, 194);
  rect(0, 0, 240, 480);
}

void createText() {
  PGraphics pg;
  int x, y;
  color c;

  pg = createGraphics(5000, 500);
  pg.beginDraw();
  pg.background(0);
  pg.fill(255);
  pg.stroke(255);
  pg.textSize(200);
  pg.textAlign(LEFT, CENTER);
  pg.text("Sweet dreams are made of cheese", 0, 200);
  pg.endDraw();

  // Extract all non-black pixels
  for (x=0; x<5000; x++) {
    for (y=0; y<480; y++) {
      if ((c=pg.get(x, y))!=color(0)) {
        p.add(new pxl(x+1000, int(y+100*sin(x/(PI*80))), -80000*5, 0, c, color(0)));
      }
    }
  }
}
void draw () {
  int i;
  pxl a;

  fill(154, 194, 244);
  triangle(0, 0, 240, 240, 0, 480);
  for (i=0; i<p.size(); i=i+1) {
    a = (pxl) p.get(i);
    a.moveSpecial();
  }
}

Pixel Class:

class pxl {
  // Position and speed is x>>16 
  int x, y, xorg, yorg;
  int xspeed, yspeed;
  color c;              // pixel color
  color b;              // background color
  color c_temp;
  int gravity = 00;
  int resistance = 20;

  pxl(int _x, int _y, int _xspeed, int _yspeed, color _c, color _b) {
    x = xorg = _x<<16;
    y = yorg = _y<<16;
    xspeed = _xspeed;
    yspeed = _yspeed;
    c = _c;
    b = _b;
  }
  void display() {
    c_temp = get(x>>16, y>>16);
    set(x>>16, y>>16, c);
  }
  void hide() {
    set(x>>16, y>>16, b);
  }
  void updateSpeed() {
    long t = xspeed;
    xspeed = xspeed - ((int) (t * resistance)>>16);
    t = yspeed;
    yspeed = yspeed - ((int) (t * resistance)>>16);
    yspeed = yspeed + gravity;
    if (abs(xspeed)<100 && abs(yspeed)<100) {
      xspeed = int(random(-500000, 500000));
      yspeed = int(random(-500000, 500000));
    }
  }
  void moveSpecial() {
    int yt;
    hide();
    x = x + xspeed;
    y = y + yspeed;
    if ((x>>16)<=(240-abs(((y>>16)-240)))) {
      x = x - xspeed;
      y = y - yspeed;
      // change speeds 
      xspeed = int(random(1<<16, 10<<16));
      yt=int(-240+(y>>16))/48;

      yspeed = int(random((yt-5)<<16, (yt+5)<<16)) ;
      c = color(random(255), random(255), random(255));
    }
    display();
    updateSpeed();
  }
}