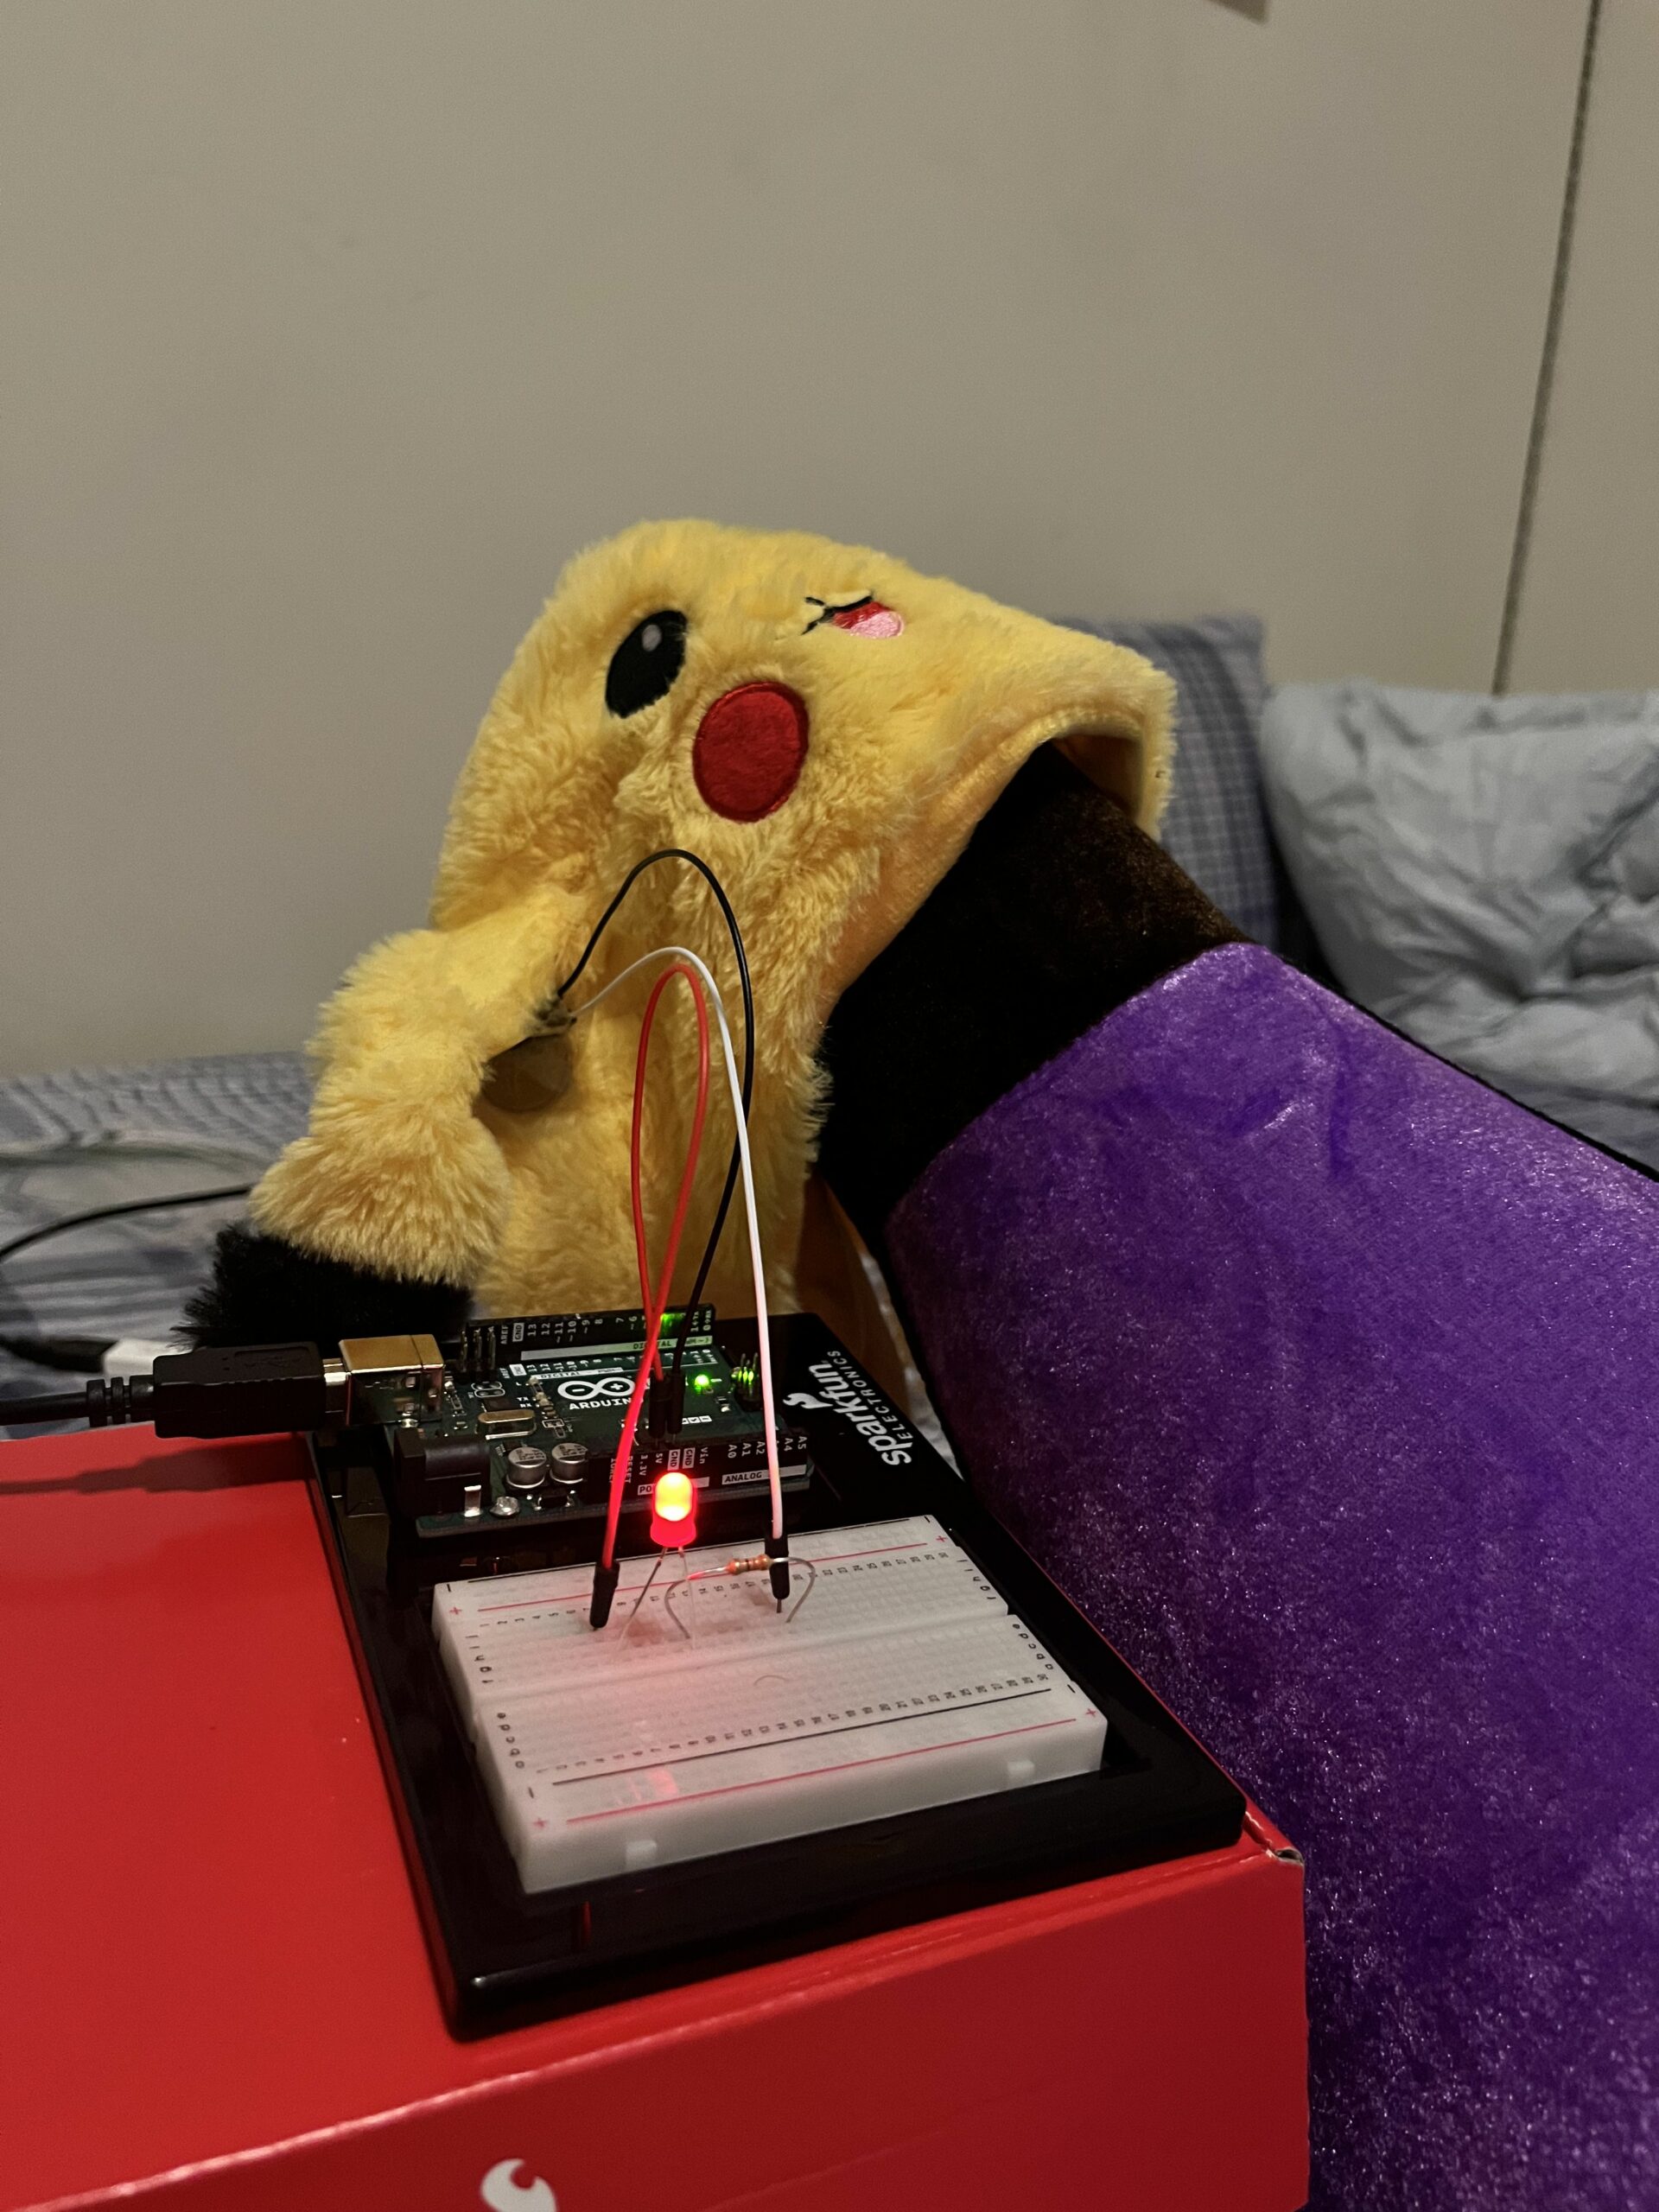
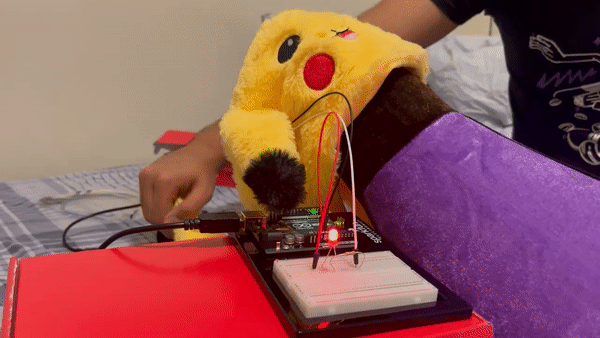
Concept and Design:
For my final project, I created a table piano using the ultra sonic sensor and connected it to the P5js interface. The start screen allows users to choose between three modes: free mode, game mode, and record mode.
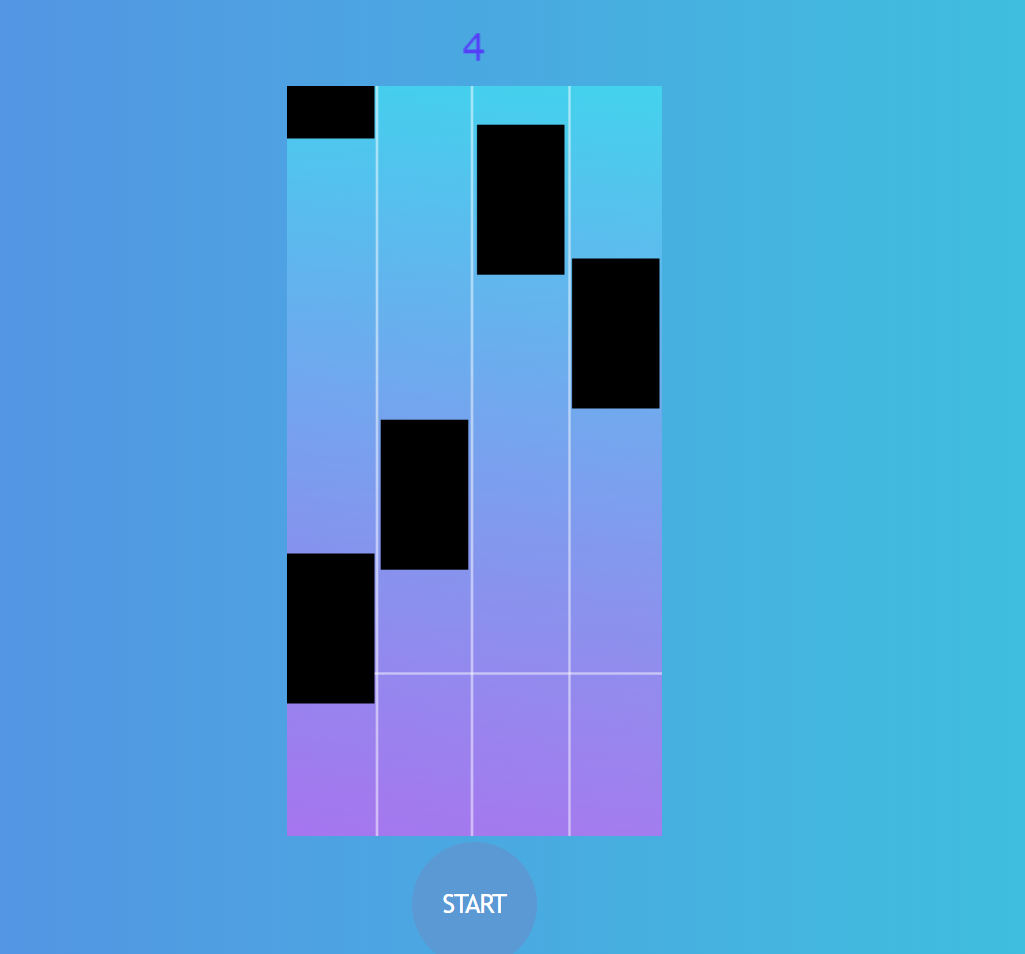
In free mode, users can play the piano for as long as they want and try to figure out a tune on their own. Every time a note is pressed on the piano, the P5js interface shows a different picture for each note so that the experience is more immersive. The free mode allows the user to practice their skills and be as creative as they want to be.
Record mode as the name suggests records and store each key played by the user and the concatenation of these notes then can be played back in the form of a tune. This allows the user to listen back to what they play and make amends to what needs to be changed in the future. This proves to be a good tool for those who like to be precise and perfect.
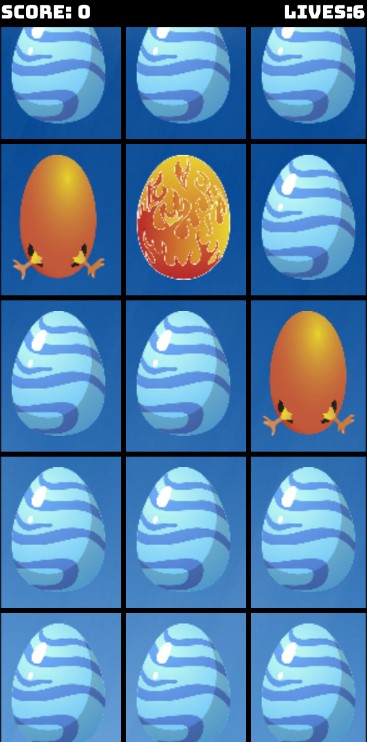
In game mode, numbers fall from the sky, and the user would have to press the appropriate number on the table piano. The game eventually keeps getting harder as the score increases. The game gets harder in the form of game speed and the spacing between the numbers. Every un-pressed note/number will result in losing a life and after a certain number of lives lost, the game ends. The current score of the user and the high score of the user is also displayed at the same time encouraging the users to get more competitive in a healthy way. The game mode is basically created to add some fun to piano playing and also to build muscle memory of where what keys are and strong reflexes. This would in turn help the user with reading off of music sheets while playing actual pianos.
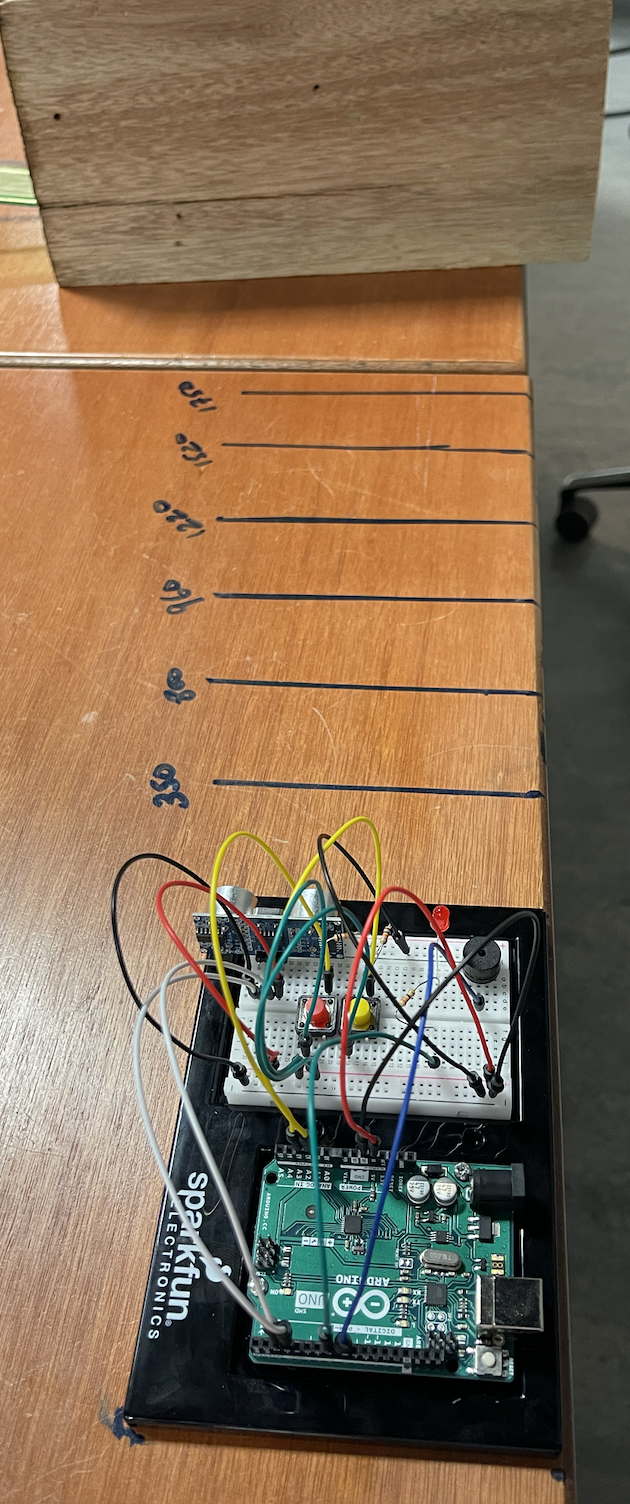
Final Product
Interaction Design:
The project is designed in a way that makes it much more interactive as compared to my previous projects in the class. From the hardware connected to Arduino to the software element in P5js, everything is interactive. The main theme of the project is a table piano and users have to use their hands to play keys and notes. This allows the user to get a different feel of the project as compared to simple buttons on a keyboard or keys on a touch screen phone. When it comes to the P5js user interface, it is designed in a way, that gives full control to the user. There are buttons that change color when you hover over it, suggesting that it is a button. There are instruction screens in all three modes and all the screens have back buttons as well that allow the user to go back to the home screen. Furthermore, before recording, stopping while recording, or playing the recorded tone, the user can use interactive buttons provided to control all of these functions. The user can also see their score going up and lives decreasing while playing the game. In the end, the game has an option of being restarted as well.
Description of P5js code:
The P5js code is developed using Object Oriented Programming to keep the work flow easier, manageable, more efficient. Two classes have been created: the noteDrop class and the Game class. The noteDrop class handles the movements and functionality of a single falling note. On the other hand, the game class is where all the game logic is implemented. The objects of the noteDrop class are stored in an array and then the array is used in various ways depending on the game state.
To keep track of the different game states, variables and boolean values have been used. These variables are updated based on user input and the game logic. Additionally, messages are sent to and received from Arduino to synchronize the game state. This allows for better user experience where the hardware and software work in perfect harmony.
To ensure a smooth flow of the game, I have also implemented a preload function that loads all the necessary assets before the game begins. This helps to prevent any issues with lag or delays during gameplay.
In order to make the code more manageable and easier to understand, the game has been divided into functions and different game states. This also allows for easier editing and maintenance of the codebase. Here is the code:
new p5(); //to counter the issue with random function

//declare global variables
let highscore = -1;
let globalGameSpeed = 1.5;
let gameObject;
let menuBackgroundPicture1;
let menuBackgroundPicture2;
let menuBackgroundPicture3;
let menuBackgroundPicture4;
let endBackgroundPicture;
let recordScreen1;
let recordScreen2;
let recordScreen3;
let recordScreen4;
let recordScreen5;
let freeScreen0;
let freeScreen1;
let freeScreen2;
let freeScreen3;
let freeScreen4;
let freeScreen5;
let freeScreen6;
let freeScreen7;
let freeScreen8;
let freeScreen9;
let freeScreen10;
let freeScreen11;
let freeScreen12;
let freeScreen13;
let freeScreen14;
let freeScreen15;
let freeScreen16;
let gameScreenBG;
let gameInstructions;
let num1;
let num2;
let num3;
let num4;
let num5;
let num6;
let num7;
let num8;
let num9;
let num10;
let num11;
let num12;
let num13;
let num14;
let num15;
let num16;

let playfair_font; //declare the font named playfair
let background_music;

function preload() //preload all the assets
{
  menuBackgroundPicture1 = loadImage("menu_background1.png");
  menuBackgroundPicture2 = loadImage("menu_background2.png");
  menuBackgroundPicture3 = loadImage("menu_background3.png");
  menuBackgroundPicture4 = loadImage("menu_background4.png");
  endBackgroundPicture = loadImage("end_game.png");
  playfair_font = loadFont("playfairDisplay_font.ttf");
  recordScreen1 = loadImage("record_instruction1.png");
  recordScreen2 = loadImage("record_instruction2.png");
  recordScreen3 = loadImage("record_instruction3.png");
  recordScreen4 = loadImage("record_instruction4.png");
  recordScreen5 = loadImage("record_instruction5.png");

  freeScreen0 = loadImage("free01.png");
  freeScreen1 = loadImage("free1.png");
  freeScreen2 = loadImage("free2.png");
  freeScreen3 = loadImage("free3.png");
  freeScreen4 = loadImage("free4.png");
  freeScreen5 = loadImage("free5.png");
  freeScreen6 = loadImage("free6.png");
  freeScreen7 = loadImage("free7.png");
  freeScreen8 = loadImage("free8.png");
  freeScreen9 = loadImage("free9.png");
  freeScreen10 = loadImage("free10.png");
  freeScreen11 = loadImage("free11.png");
  freeScreen12 = loadImage("free12.png");
  freeScreen13 = loadImage("free13.png");
  freeScreen14 = loadImage("free14.png");
  freeScreen15 = loadImage("free15.png");
  freeScreen16 = loadImage("free16.png");

  gameScreenBG = loadImage("gameModeBG.png");
  gameInstructions = loadImage("gameModeinstructions.png");

  num1 = loadImage("num1-removebg-preview.png");
  num2 = loadImage("num2-removebg-preview.png");
  num3 = loadImage("num3-removebg-preview.png");
  num4 = loadImage("num4-removebg-preview.png");
  num5 = loadImage("num5-removebg-preview.png");
  num6 = loadImage("num6-removebg-preview.png");
  num7 = loadImage("num7-removebg-preview.png");
  num8 = loadImage("num8-removebg-preview.png");
  num9 = loadImage("num9-removebg-preview.png");
  num10 = loadImage("num_a-removebg-preview.png");
  num11 = loadImage("num_b-removebg-preview.png");
  num12 = loadImage("num_c-removebg-preview.png");
  num13 = loadImage("num_d-removebg-preview.png");
  num14 = loadImage("num_e-removebg-preview.png");
  num15 = loadImage("num_f-removebg-preview.png");
  num16 = loadImage("num_g-removebg-preview.png");

  background_music = loadSound("music2.mp3");
}


class NoteDrop //noteDrop class that commands the movement of each note
{
  constructor(x, y, noteWidth, noteHeight, noteNumber, canvasWidth, canvasHeight) //constructor initializes everything
  {
    this.note_x = x;
    this.note_y = y;
    this.note_height = noteHeight;
    this.note_width = noteWidth;
    this.canvas_width = canvasWidth;
    this.canvas_height = canvasHeight;
    this.visible = false;
    this.note_number = noteNumber;
  }

  movement() //movement of the note from top to bottom of the canvas
  {
    this.note_y = this.note_y + globalGameSpeed; //
    if ((this.note_y + this.note_height >= 0) && (this.note_y + this.note_height <= 20)) //as soon as the bottom of the note enters the canvas
    {
      this.visible = true; //make it visible and this allows for catching it
    }
  }

  display() //displays the note
  {
    this.movement();
    if (this.visible == true) //only display the note if it is visible
    {
      if (this.note_number == 1) //for each note
      {
        image(num1, this.note_x, this.note_y); //display its appropriate picture
      }
      else if (this.note_number == 2)
      {
        image(num2, this.note_x, this.note_y);
      }
      else if (this.note_number == 3)
      {
        image(num3, this.note_x, this.note_y);
      }
      else if (this.note_number == 4)
      {
        image(num4, this.note_x, this.note_y);
      }
      else if (this.note_number == 5)
      {
        image(num5, this.note_x, this.note_y);
      }
      else if (this.note_number == 6)
      {
        image(num6, this.note_x, this.note_y);
      }
      else if (this.note_number == 7)
      {
        image(num7, this.note_x, this.note_y);
      }
      else if (this.note_number == 8)
      {
        image(num8, this.note_x, this.note_y);
      }
      else if (this.note_number == 9)
      {
        image(num9, this.note_x, this.note_y);
      }
      else if (this.note_number == 10)
      {
        image(num10, this.note_x, this.note_y);
      }
      else if (this.note_number == 11)
      {
        image(num11, this.note_x, this.note_y);
      }
      else if (this.note_number == 12)
      {
        image(num12, this.note_x, this.note_y);
      }
      else if (this.note_number == 13)
      {
        image(num13, this.note_x, this.note_y);
      }
      else if (this.note_number == 14)
      {
        image(num14, this.note_x, this.note_y);
      }
      else if (this.note_number == 15)
      {
        image(num15, this.note_x, this.note_y);
      }
      else if (this.note_number == 16)
      {
        image(num16, this.note_x, this.note_y);
      }
    }
  }
}

class Game //game class contains all the functionality and game attributes
{
  constructor()
  {
    //defines canvas dimensions
    this.canvasWidth = 800;
    this.canvasHeight = 600;

    //defines note dimensions
    this.noteWidth = 75;
    this.noteHeight = 75;

    this.gameHealth = 10;
    this.gameScore = 0;

    //these arrays contain various note numbers. They are two different arrays in order to avoid overlap of notes
    this.notes1 = [1, 2, 3, 4, 5, 6, 7, 8];
    this.notes2 = [9, 10, 11, 12, 13, 14, 15, 16];

    this.noteArray = []; //contains the arrays that are displayed
    this.recordArray = []; //contains the array that is recorded (not used since array now recorded in arduino)

    //boolean variables to control the game
    this.recordBool = false;
    this.playBool = false;
    this.playingScreen = false;
    this.instructionsBool = true;
    this.backgroundNumber = 0;

    this.arrayCounter = 0;
    this.notesInAnArray = 8;
    this.clickCount = 0;

    //dimensions of various buttons
    this.menuButtonWidth = 282
    this.menuButtonHeight = 56;
    this.menuButtonX = 38;
    this.menuButton1Y = 357;
    this.menuButton2Y = 445;
    this.menuButton3Y = 533;

    this.recordButtonX = 212;
    this.recordButtonY = 369;
    this.recordButtonWidth = 393;
    this.recordButtonHeight = 80;

    this.homeButtonX = 22;
    this.homeButtonY = 33;
    this.instructionButtonX = 690;
    this.instructionButtonY = 33;
    this.homeButtonWidth = 95;
    this.homeButtonHeight = 40;

    //used to increase game speed
    this.difficultyParameter = 20;

    this.gameState = "menuScreen";

    this.noteSpacing = 2.5; //this is the random spacing between notes in order to increase difficulty

    for (let i = 0; i < this.notesInAnArray; i++) //constructs and initializes note objects
    {
      this.noteArray[i] = new NoteDrop(random(0, this.canvasWidth - this.noteWidth), (i + 1)*(-this.noteHeight * this.noteSpacing), this.noteWidth, this.noteHeight, this.notes1[i], this.canvasWidth, this.canvasHeight);
    }
  }

  rainMovement() //rain like movement of notes from the top of canvas to the bottom
  {
    for (let i = 0; i < this.notesInAnArray; i++)
    {
      this.noteArray[i].display();
      fill(0,0,0);

      if (this.noteArray[i].note_y > this.canvasHeight && this.noteArray[i].visible == true) //if the note is not caught and goes below canvas
      {
        this.gameHealth = this.gameHealth - 1; //you lose a life
        if (this.gameHealth == 0) //if the lives go to zero
        {
          this.gameState = "endScreen"; //the game ends
        }
        this.noteArray[i].visible = false; //the note also becomes invisible
      }

      if (this.noteArray[i].note_y > this.canvasHeight) //as soon as the note goes below the canvas
      {
        this.arraySwitch(i); //switch its number and it should re-emerge at the top of the canvas
      }
    }
  }

  arraySwitch(indexOfArray) //this function changes the note numbers in order to make them random and avoid overlap
  {
    if (this.arrayCounter % 2 == 0) //arrayCounter keeps track of what array of notes is being used
    {
      //if array counter is even that means first array is being used and so
      this.noteArray[indexOfArray].note_number = this.notes2[indexOfArray]; //you change the array note numbers and get them from notes2 array
      this.noteArray[indexOfArray].note_y = this.noteArray[this.notesInAnArray -1].note_y - ((indexOfArray + 1) * (this.noteHeight * this.noteSpacing)); //change the y value and ensure all of them are almost equidistant and there is no overlap
      this.noteArray[indexOfArray].note_x = random(0, this.canvasWidth - this.noteWidth); //the x coordinates are random
      this.noteArray[indexOfArray].visible = false; //ensure that the visibility is off
    }
    else
    {
      //same thing here but the notes are taken from the first array instead of the second one
      this.noteArray[indexOfArray].note_number = this.notes1[indexOfArray];
      this.noteArray[indexOfArray].note_y = this.noteArray[this.notesInAnArray -1].note_y - ((indexOfArray + 1) * (this.noteHeight * this.noteSpacing));
      this.noteArray[indexOfArray].note_x = random(0, this.canvasWidth - this.noteWidth);
      this.noteArray[indexOfArray].visible = true;
    }

    if (indexOfArray == this.notesInAnArray - 1) //when all the 8 notes in an array have gone beneath the canvas,
    {
      shuffle(this.notes1, true); //shuffle both arrays and
      shuffle(this.notes2, true);
      this.arrayCounter = this.arrayCounter + 1; //increment the counter to now go for the other array
    }
  }

  recordNotes(valueOfNote) //records the value of notes and appends them to the array (not used)
  {
    append(this.recordArray, valueOfNote);
  }

  playRecordedNotes() //plays all the notes that are recorded
  {
    let noteString = "102\n"; //sends a message to arduino and allows arduino to know when to play the notes
    writeSerial(noteString);

    this.playBool = true; //the game is now in playing mode
    this.recordBool = false; //and not in recording mode
  }

  display() //display function of the whole game
  {
    if (this.gameState == "menuScreen") //if the game is in menu mode
    {
      image(menuBackgroundPicture1, 0, 0); //display the menu picture
      //and if the mouse hovers over a button, change the color of the button
      if (mouseX >= this.menuButtonX && mouseX <= this.menuButtonX + this.menuButtonWidth && mouseY >= this.menuButton1Y && mouseY <= this.menuButton1Y + this.menuButtonHeight)
      {
        image(menuBackgroundPicture2, 0, 0);
      }
      else if (mouseX >= this.menuButtonX && mouseX <= this.menuButtonX + this.menuButtonWidth && mouseY >= this.menuButton2Y && mouseY <= this.menuButton2Y + this.menuButtonHeight)
        {
          image(menuBackgroundPicture3, 0, 0);
        }
      else if (mouseX >= this.menuButtonX && mouseX <= this.menuButtonX + this.menuButtonWidth && mouseY >= this.menuButton3Y && mouseY <= this.menuButton3Y + this.menuButtonHeight)
        {
          image(menuBackgroundPicture4, 0, 0);
        }
    }
    else if (this.gameState == "gameScreen") //if game mode is on
    {
      if (this.instructionsBool == true) //see if the instructions page is up
      {
        image(gameInstructions, 0, 0); //provide instructions to the user
      }
      else //else it would be game mode
      {
        image(gameScreenBG, 0, 0); //add the background to the game
        this.rainMovement(); //make sure the notes keep falling
        textSize(15);
        fill(255,255, 255);
        text("SCORE: ", 10, 20); //display score
        text(this.gameScore, 75, 20);
        text("LIVES: ", this.canvasWidth - 87, 20); //display lives
        text(this.gameHealth, this.canvasWidth - 30, 20);
      }
    }
    else if (this.gameState == "freeScreen") //if the game is in free mode
    {
      this.freeModeBackgrounds(); //display different backgrounds for different notes played
    }
    else if (this.gameState == "recordScreen") //if the game is in record mode
    {
      if (this.recordBool == false && this.playBool == false) //see if its the first page
      {
        image(recordScreen1, 0, 0); //then display the "start recording" image
        if (mouseX >= this.recordButtonX && mouseX <= this.recordButtonX + this.recordButtonWidth && mouseY >= this.recordButtonY && mouseY <= this.recordButtonY + this.recordButtonHeight)
        {
          image(recordScreen2, 0, 0); //hovering over the button would change the button color
        }
      }
      else if (this.recordBool == true && this.playBool == false) //if the button is pressed, then start recording
      {
        let valueOfState = "98\n"; //tell arduino that the game is now in recording mode so that it changes state as well
        writeSerial(valueOfState);
        image(recordScreen3, 0, 0); //show image that says stop recording and play
        if (mouseX >= this.recordButtonX && mouseX <= this.recordButtonX + this.recordButtonWidth && mouseY >= this.recordButtonY && mouseY <= this.recordButtonY + this.recordButtonHeight)
        {
          image(recordScreen4, 0, 0); //hovering over the button changes the button color
        }
      }
      else if (this.recordBool == false && this.playBool == true) //when the button is pressed that says stop recording
      {
        image(recordScreen5, 0, 0); //image is display that says playing
        this.playRecordedNotes(); //recorded notes are then played
      }
    }
    else if (this.gameState == "endScreen") //when the lives are lost and game ends
    {
      let stateOfArduino = "103\n"; //tell the arduino that game has ended (sets arduino back to the start position)
      writeSerial(stateOfArduino);
      image(endBackgroundPicture, 0, 0); //show game end image
      if (this.gameScore > highscore) //calculate if you have a highscore
      {
        highscore = this.gameScore; //if yes then change the highscore value to your current score
      }
      fill(255, 255, 255);
      textSize(23);
      text("HIGH SCORE: ", 295, 365); //display high score
      text(highscore, 460, 365);
      text("YOUR SCORE: ", 295, 475); //display your score
      text(this.gameScore, 460, 475);
    }
    else
    {
      background(255, 0, 0);
    }
  }

  backgroundVariableChange(keyValue) //changes the background variable based on the data received
  {
    this.backgroundNumber = keyValue;
  }

  freeModeBackgrounds() //the background variable is used to display appropriate pictures for each note
  {
    if (this.backgroundNumber == 0) //every note has a different picture associated with it
    {
      image(freeScreen0, 0, 0);
    }
    else if (this.backgroundNumber == 1)
    {
      image(freeScreen1, 0, 0);
    }
    else if (this.backgroundNumber == 2)
    {
      image(freeScreen2, 0, 0);
    }
    else if (this.backgroundNumber == 3)
    {
      image(freeScreen3, 0, 0);
    }
    else if (this.backgroundNumber == 4)
    {
      image(freeScreen4, 0, 0);
    }
    else if (this.backgroundNumber == 5)
    {
      image(freeScreen5, 0, 0);
    }
    else if (this.backgroundNumber == 6)
    {
      image(freeScreen6, 0, 0);
    }
    else if (this.backgroundNumber == 7)
    {
      image(freeScreen7, 0, 0);
    }
    else if (this.backgroundNumber == 8)
    {
      image(freeScreen8, 0, 0);
    }
    else if (this.backgroundNumber == 9)
    {
      image(freeScreen9,0, 0);
    }
    else if (this.backgroundNumber == 10)
    {
      image(freeScreen10, 0, 0);
    }
    else if (this.backgroundNumber == 11)
    {
      image(freeScreen11, 0, 0);
    }
    else if (this.backgroundNumber == 12)
    {
      image(freeScreen12, 0, 0);
    }
    else if (this.backgroundNumber == 13)
    {
      image(freeScreen13, 0, 0);
    }
    else if (this.backgroundNumber == 14)
    {
      image(freeScreen14, 0, 0);
    }
    else if (this.backgroundNumber == 15)
    {
      image(freeScreen15, 0, 0);
    }
    else if (this.backgroundNumber == 16)
    {
      image(freeScreen16, 0, 0);
    }
  }


  notePressed(keyValue) //this is used in game Mode - keyValue is the key pressed on the table piano sent by arduino to p5js
  {
    for (let i = 0; i < this.notesInAnArray; i++) //in all the arrays
    {
      if (this.noteArray[i].visible == true) //if the note is visible (on screen)
      {
        if (keyValue == this.noteArray[i].note_number) //check if the key pressed matches a note
        {
          this.gameScore = this.gameScore + 1; //increase the game score
          this.noteArray[i].visible = false; //make the visibility false
          if (this.gameScore % this.difficultyParameter == 0 && this.noteSpacing > 1.5) //make the game harder but not very hard
          {
            this.noteSpacing = this.noteSpacing - 0.3; //decrease the distance between the notes
            globalGameSpeed = globalGameSpeed + 0.5; //increase game speed
          }
          break; //avoid checking other keys because already one has been found
        }
      }
    }
  }
}

//setup function
function setup() {
  createCanvas(800, 600); //creates canvas of desired size
  textFont(playfair_font); //use the playfair font to keep everything consistent
}

gameObject = new Game(); //create object of the game class

function draw() {
  background(220); //arbitary background for debugging
  // if (gameObject.gameState == "menuScreen") //only play the music when the user is in the menu
  // {
    if (!background_music.isPlaying()) //ensure the music keeps looping forever
    {
      background_music.play(); //but also ensures that it doesnt start from the start every time
    }
  // }
  // else //if the game is in any other state
  // {
  //   if (background_music.isPlaying()) //check if the music is playing
  //   {
  //     background_music.stop(); //if yes then stop the music
  //   }
 // }
  gameObject.display(); //displays all the screens
}

function keyTyped() //key typed built in function
{

  if (gameObject.gameState == "endScreen") //when the game has ended
  {
      if (key === 'h' || key === 'H') //you can press h to return to home/restart game
      {
        gameObject = new Game(); //a new object is assigned to the variables and the constructor initializes everything
      }
  }

  if (gameObject.gameState == "menuScreen") //if the game is in menu screen
  {
    if (keyCode == ENTER) //use enter to
    {
      setUpSerial(); //set up serial
    }
  }
  return false;
}

function readSerial(data) //callback function for read serial
{
  if (data != null) //if the data is good
  {
      if (gameObject.gameState == "gameScreen") //if game mode is on
      {
        if (data >= 1 && data <= 16) //and the data is between the range we want (the keys)
        {
          gameObject.notePressed(data); //tell the game that a note has been pressed and which one
        }
      }

      if (gameObject.gameState == "recordScreen" && gameObject.recordBool == true) //if the game is in record mode and is recording
      {
        if (data >= 1 && data <= 16) //if any note is pressed
        {
          gameObject.recordNotes(data); //record the notes (not used)
        }
      }

    if (gameObject.gameState == "freeScreen") //if the game is in free mode
    {
      if (data >= 1 && data <= 16) //and the data is what we want
      {
        gameObject.backgroundVariableChange(data); //we know a note has been played and so change the backgrounds
      }
    }
  }
}

function mouseClicked() //mouseclicked function
{
  if (gameObject.gameState == "menuScreen") //if the game is in menu screen
    {
      //whatever button is pressed, change the gameState to that specific state
      if (mouseX >= gameObject.menuButtonX && mouseX <= gameObject.menuButtonX + gameObject.menuButtonWidth && mouseY >= gameObject.menuButton1Y && mouseY <= gameObject.menuButton1Y + gameObject.menuButtonHeight)
      {
        gameObject.gameState = "freeScreen";
        let screenState2 = "97\n"; //tell arduino that we are in free mode now
        writeSerial(screenState2);
      }
      else if (mouseX >= gameObject.menuButtonX && mouseX <= gameObject.menuButtonX + gameObject.menuButtonWidth && mouseY >= gameObject.menuButton2Y && mouseY <= gameObject.menuButton2Y + gameObject.menuButtonHeight)
      {
        gameObject.gameState = "gameScreen";
        gameObject.instructionsBool = true;
      }
      else if (mouseX >= gameObject.menuButtonX && mouseX <= gameObject.menuButtonX + gameObject.menuButtonWidth && mouseY >= gameObject.menuButton3Y && mouseY <= gameObject.menuButton3Y + gameObject.menuButtonHeight)
      {
        gameObject.gameState = "recordScreen"; //change the mode to record mode
      }
    }

  if (gameObject.gameState == "recordScreen") //if the game is in record mode
  {
    //check to see if the button is pressed or not and then change boolean variables accordingly
    if (mouseX >= gameObject.recordButtonX && mouseX <= gameObject.recordButtonX + gameObject.recordButtonWidth && mouseY >= gameObject.recordButtonY && mouseY <= gameObject.recordButtonY + gameObject.recordButtonHeight && gameObject.recordBool == false && gameObject.playBool == false)
    {
      gameObject.recordBool = true;
      gameObject.clickCount = 0; //this is so that button is not accidentally double clicked
    }
    else if (mouseX >= gameObject.recordButtonX && mouseX <= gameObject.recordButtonX + gameObject.recordButtonWidth && mouseY >= gameObject.recordButtonY && mouseY <= gameObject.recordButtonY + gameObject.recordButtonHeight && gameObject.recordBool == true && gameObject.playBool == false)
    {
      gameObject.clickCount++;
      if (gameObject.clickCount >= 3)
      {
        gameObject.recordBool = false;
        gameObject.playBool = true;
        gameObject.playingScreen = true;
      }
    }

    if (mouseX >= gameObject.homeButtonX && mouseX <= gameObject.homeButtonX + gameObject.homeButtonWidth && mouseY >= gameObject.homeButtonY && mouseY <= gameObject.homeButtonY + gameObject.homeButtonHeight && gameObject.playingScreen == true)
    {
      gameObject.playingScreen = false;
      gameObject.gameState = "menuScreen"; //go to the menu state if the home button is pressed
    }
  }

  if (gameObject.gameState == "freeScreen") //if the game is in free mode
  {
    if (mouseX >= gameObject.homeButtonX && mouseX <= gameObject.homeButtonX + gameObject.homeButtonWidth && mouseY >= gameObject.homeButtonY && mouseY <= gameObject.homeButtonY + gameObject.homeButtonHeight)
    {
      //if the home button is pressed
      gameObject.backgroundNumber = 0; //reinitalize variable so that instruction screen pops up again
      gameObject.gameState = "menuScreen"; //go back to menu state
      let screenState3 = "104\n"; //tell arduino that we are going back to menu screen
      writeSerial(screenState3);
    }
  }

  if (gameObject.gameState == "gameScreen") //if the game is in game mode
  {
    if (gameObject.instructionsBool == true && mouseX >= gameObject.instructionButtonX && mouseX <= gameObject.instructionButtonX + gameObject.homeButtonWidth && mouseY >= gameObject.instructionButtonY && mouseY <= gameObject.instructionButtonY + gameObject.homeButtonHeight)
    {
      //if the instructions button is pressed
      gameObject.instructionsBool = false; //set the boolean to false
      let gameScreenState = "99\n"; //tell arduino that we are in game mode now
      writeSerial(gameScreenState);
    }

    if (gameObject.instructionsBool == true && mouseX >= gameObject.homeButtonX && mouseX <= gameObject.homeButtonX + gameObject.homeButtonWidth && mouseY >= gameObject.homeButtonY && mouseY <= gameObject.homeButtonY + gameObject.homeButtonHeight)
    {
      //if the home button is pressed
      gameObject.instructionsBool = true; //ensure the next time instruction page pops up
      gameObject.gameState = "menuScreen"; //go back to menu screen mode
      let stateOfArduino2 = "103\n"; //tell arduino as well that you have gone back to menu screen mode
      writeSerial(stateOfArduino2);
    }
  }
}

remove();
Description of Arduino Code:
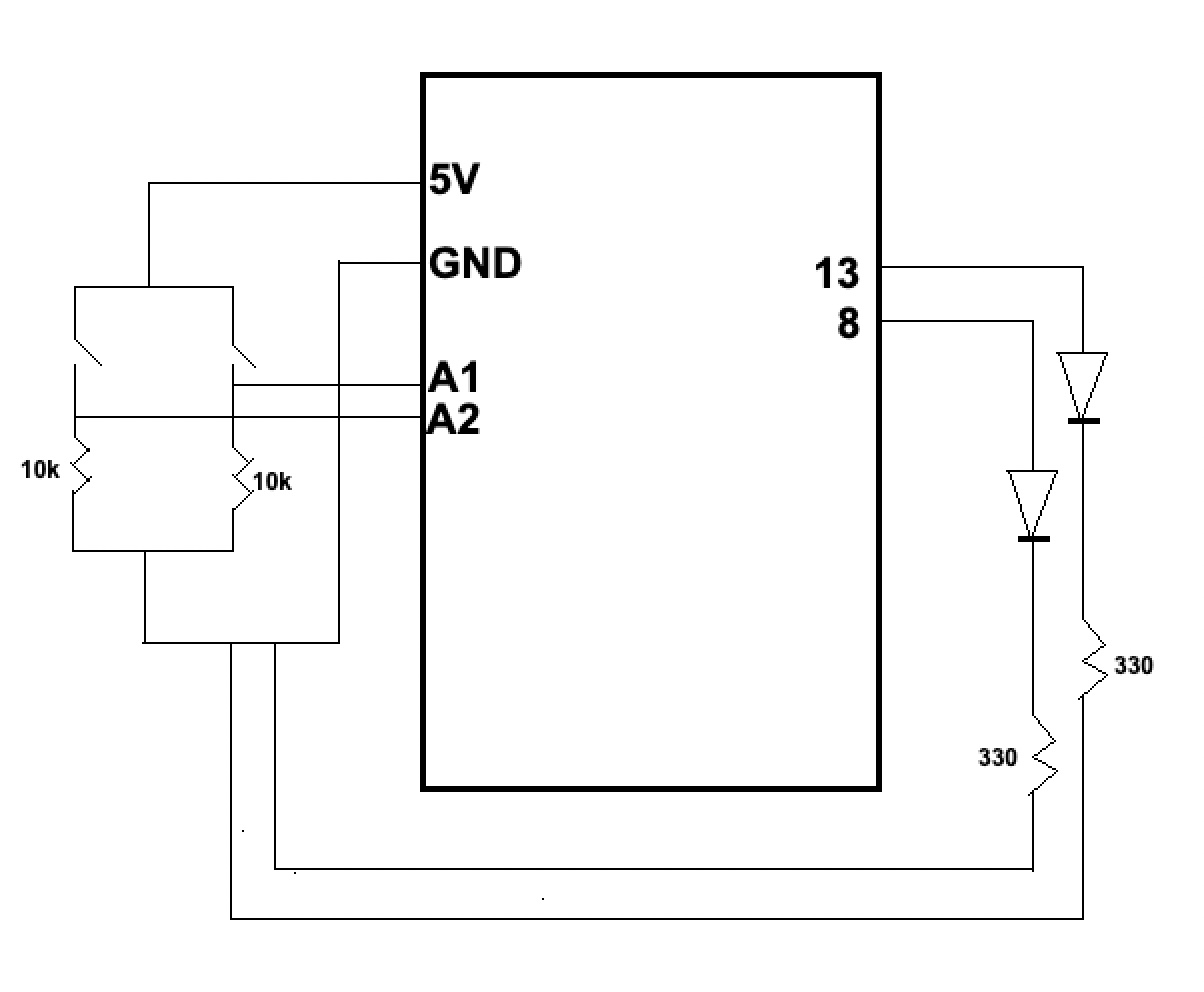
The program reads data from an ultrasonic sensor and responds by generating tones through a buzzer and turning on an LED. The program has four different states, menu mode, game mode, record mode, and free mode, which are determined by input from the P5js interface.
In the beginning, the code defines the pins for the ultrasonic sensor, buzzer, buttons, and LED, and initializes several variables used in the program, including pressed, distance, arduinoState, recordCounter, and recordArray.
The first state is menu mode, indicated by arduinoState == 100. In this mode, the program waits for input from the connected P5js program. If it receives the value 99, it changes the state to game mode, if it receives 98, it changes the state to record mode, and if it receives 97, it changes the state to free mode.
In game mode, the program turns on the LED to indicate that the ultrasonic sensor is working, reads sensor data, and generates tones based on the distance measured. It also checks for input from the P5js program and leaves the state if it receives the value 103.
In record mode, the program reads data from the ultrasonic sensor, turns on the LED, and waits for input from the P5js program. If it receives the value 102, it plays back the recorded notes stored in recordArray, resets the state to menu mode, and sets recordCounter to 0.
In free mode, the program reads data from the ultrasonic sensor, turns on the LED, and checks for input from the P5js program. It leaves the state if it receives the value 104.
Finally, the playRecordedNote() function is called in the loop() function to generate tones based on the notes stored in recordArray. The function maps the values in the array to specific frequencies and durations using the tone() function.
All over the place, the Serial.read() function is used to skip over irrelevant data that may be present in the serial. Also the break feature is used excessively to break out of the serial.available() loop once the required value is read. Here is the code:
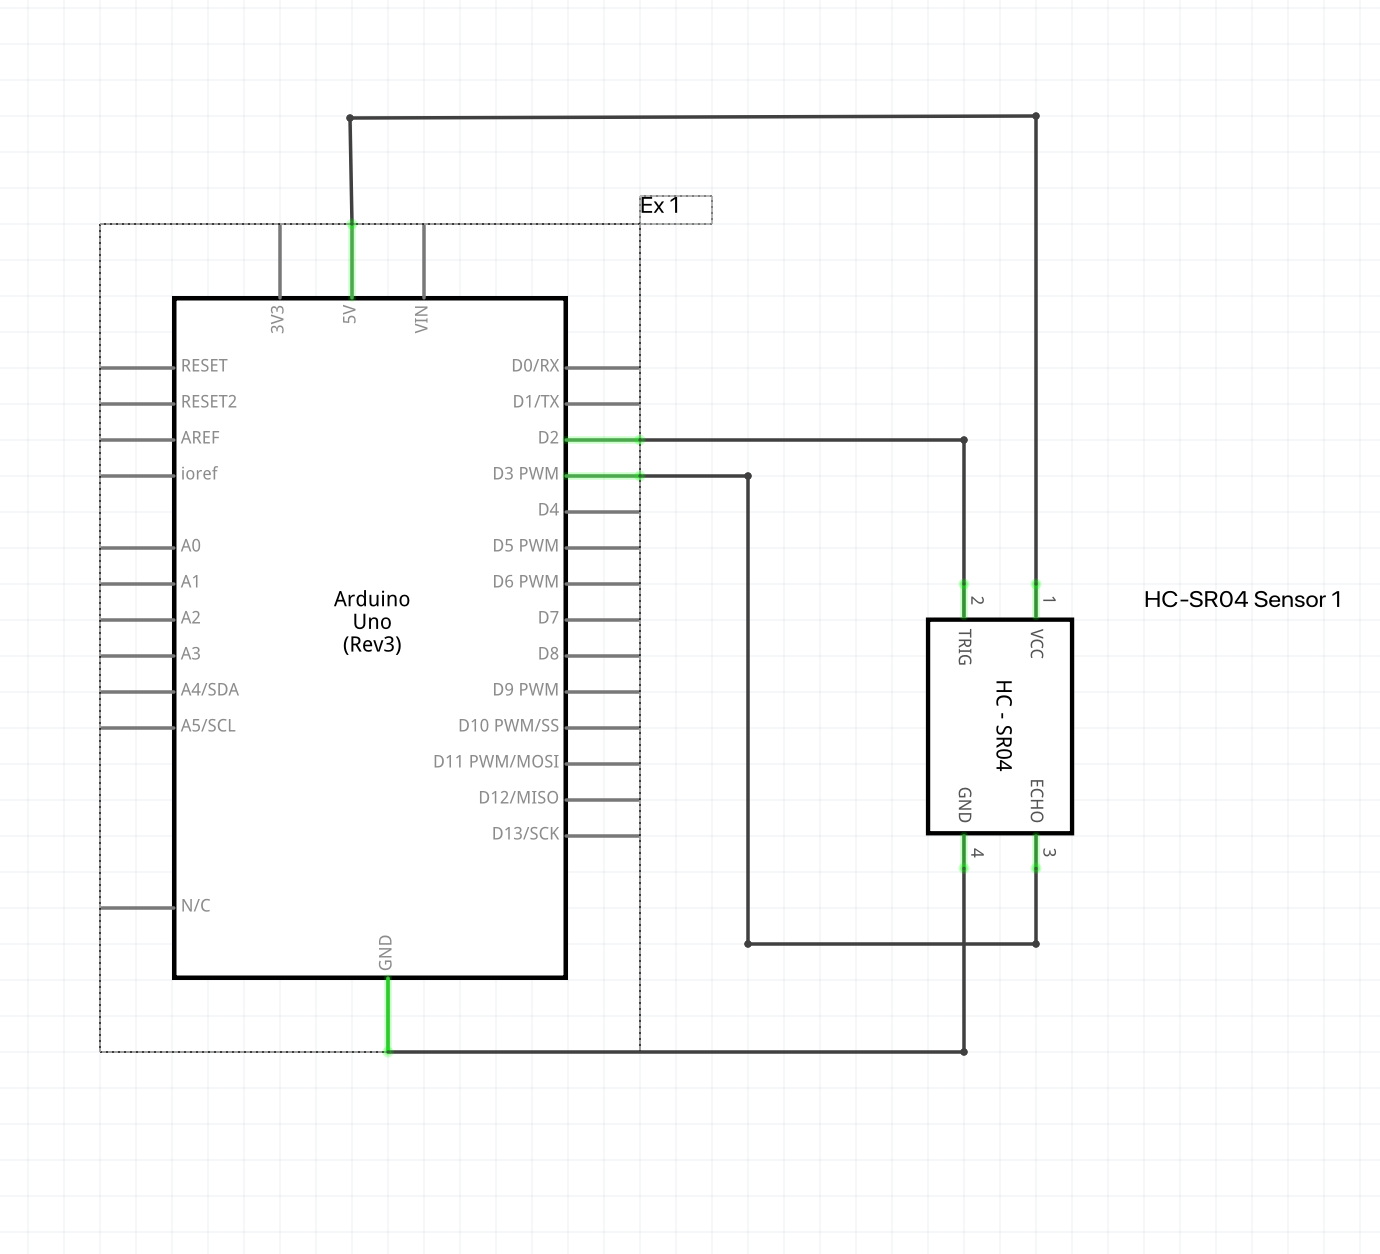
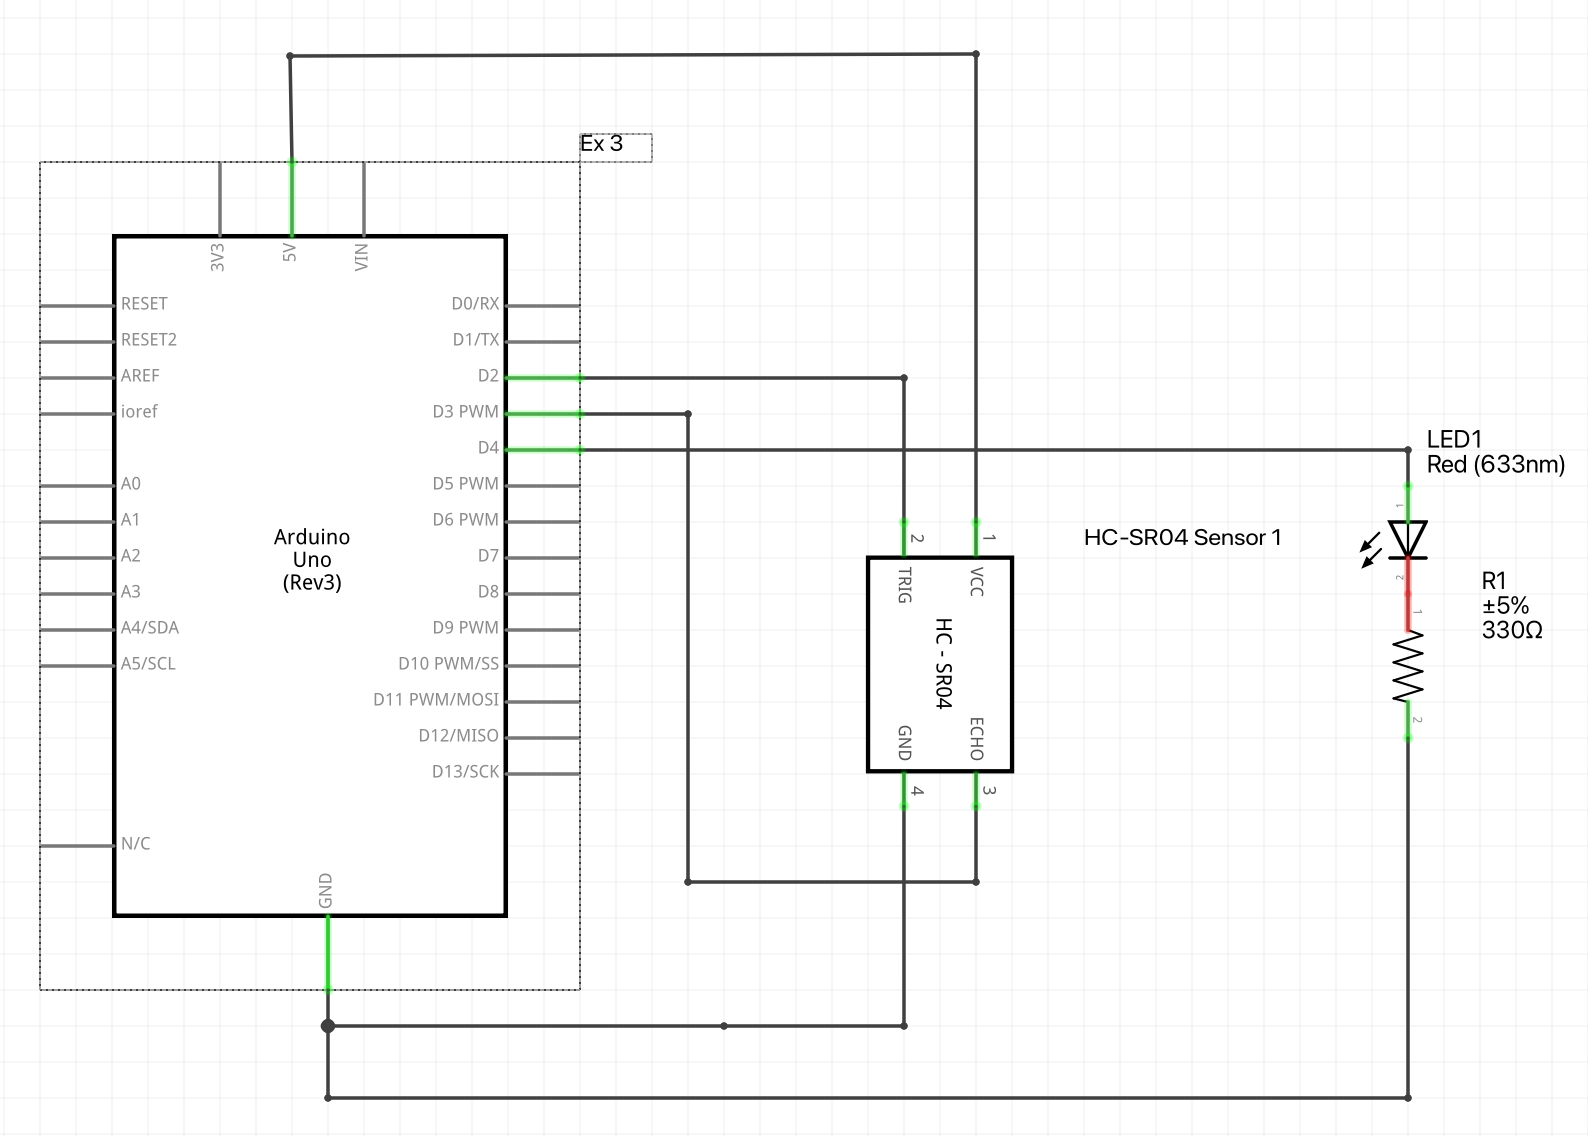
//Define the pins used for the ultrasonic sensor, buzzer, buttons, and LED
const int pingPin = 2; //Trigger Pin of Ultrasonic Sensor
const int echoPin = 3; //Echo Pin of Ultrasonic Sensor
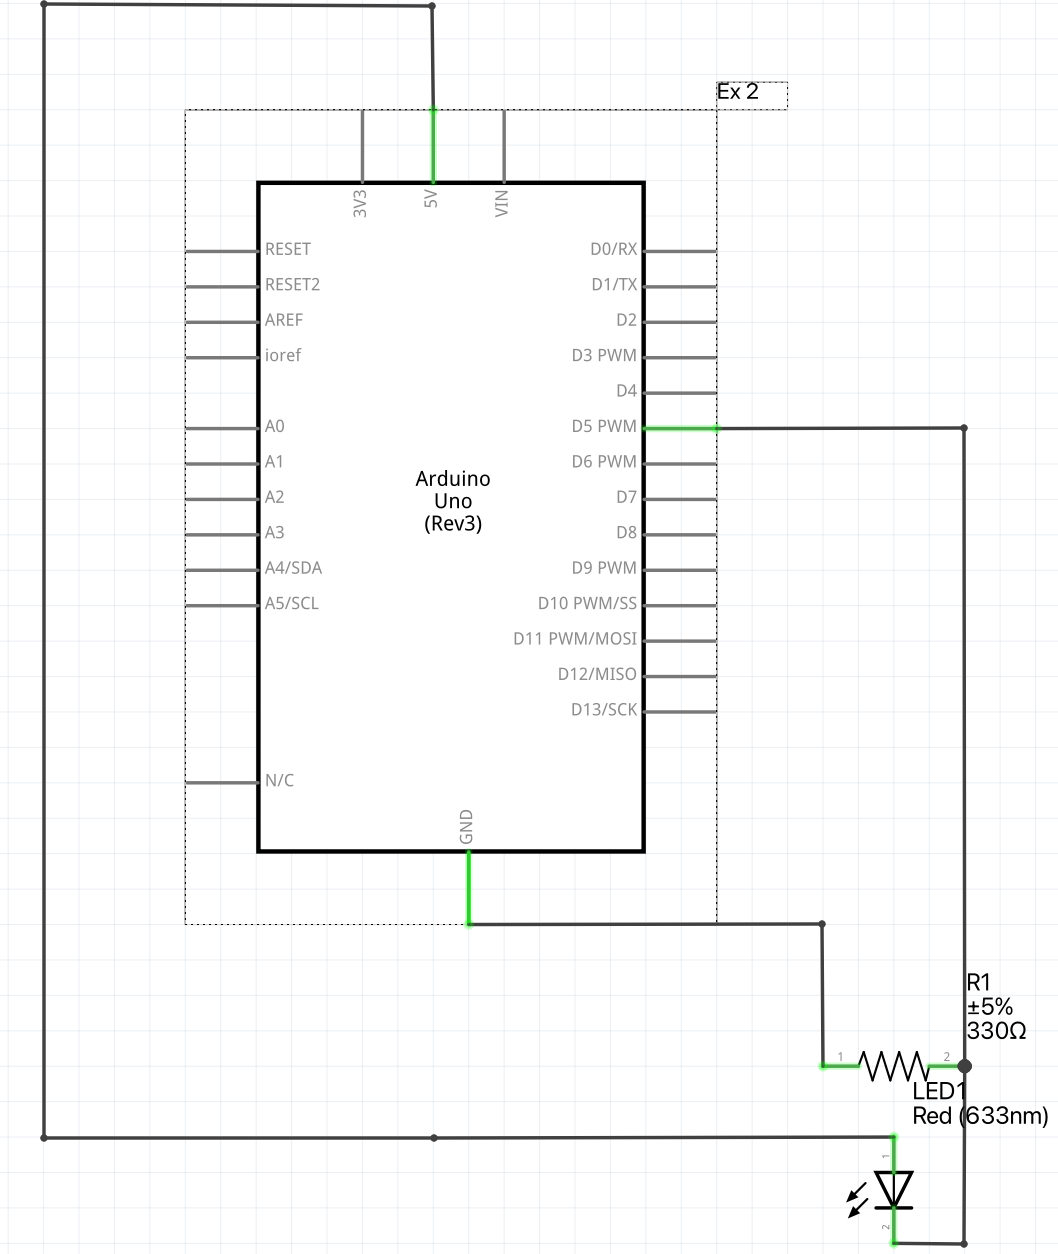
const int buzzerPin = 8;
const int LEDbutton = 7;
//Initialize variables used in the program
int pressed = 0;
long distance = 0;
int arduinoState = 100;
int recordCounter = 0;
int recordArray[100];
int stateValue = 0; //helps change the state of Arduino (sent by p5js)
//Include the pitches library for generating tones
#include "pitches.h"
void setup()
{
//Start serial communication at 9600 baud
Serial.begin(9600);
//Set the ultrasonic sensor pins as output and input respectively
pinMode(pingPin, OUTPUT);
pinMode(echoPin, INPUT);
//Set the LED pin as an output
pinMode(LEDbutton, OUTPUT);
//Turn off the LED initially
digitalWrite(LEDbutton, LOW);
}
void loop()
{
if (arduinoState == 100) //menu mode
{
digitalWrite(LEDbutton, LOW); //this means that the sensor is not working
while (Serial.available()) //if serial is available
{
stateValue = Serial.parseInt(); //then parseInt and see what p5js has sent us
if (stateValue == 99) //game mode
{
arduinoState = 99; //set arduino state to 99 as well which is game mode
digitalWrite(LEDbutton, LOW);
break; //we have the state so we can now go to that state
}
else if (stateValue == 98) //record mode
{
arduinoState = 98; //set arduino to record mode as well
digitalWrite(LEDbutton, LOW);
break; //we have the state so we can leave
}
else if (stateValue == 97) //free mode
{
arduinoState = 97; //set arduino state to free mode
digitalWrite(LEDbutton, LOW);
break; //we have the state so we can leave
}
}
}
else if (arduinoState == 99) //game Mode
{
sensorReading(); //start the sensor
digitalWrite(LEDbutton, HIGH); //turn on LED to indicate the sensor is on
while (Serial.available()) //if serial is available
{
int changeOfState = Serial.parseInt(); //use the parseInt functiion
if (changeOfState == 103) //if the value is 103, this means that the p5js program has left the game Mode
{
arduinoState = 100; //so arduino can also leave the game mode state
break;
}
Serial.read(); //keep reading and ignoring the serial values until 103 is reached
}
}
else if (arduinoState == 98)
{
digitalWrite(LEDbutton, HIGH); //turn on LED to indicate the sensor is on
sensorReading(); // start the sensor
int dataNote;
while (Serial.available()) //see if serial is available
{
int playSound = Serial.parseInt(); //parse the serial for integer
if (playSound == 102) //if it is 102, we know that p5js wants us to play the recorded sound
{
for (int i = 0; i < recordCounter; i++) //go through the array that has recorded notes
{
playRecordedNote(recordArray[i]); //play each note
recordArray[i] = 0; //then empty that location for the next time
}
arduinoState = 100; //go back to state 100 which is menu state
recordCounter = 0; //initialize the record counter to 0 as well for the next time
break; //break the loop
}
Serial.read();
}
}
else if (arduinoState == 97) //if you are in free mode
{
sensorReading(); // start the sensor
digitalWrite(LEDbutton, HIGH); //turn on LED to indicate the sensor is on
while (Serial.available()) //check if serial is available
{
int stateChange = Serial.parseInt(); //parse the serial for integers
if (stateChange == 104) //if it is 104
{
arduinoState = 100; //p5js has left free mode and is in menu mode so arduino does the same
break;
}
Serial.read(); //keep reading serial to ignore irrelevant information
}
}
}
void playRecordedNote(int valueOfNote) //play recorded notes
{
if (valueOfNote == 1)
{
tone(buzzerPin, NOTE_C4, 400); //for 400ms
}
else if (valueOfNote == 2)
{
tone(buzzerPin, NOTE_E4, 400);
}
else if (valueOfNote == 3)
{
tone(buzzerPin, NOTE_G4, 400);
}
else if (valueOfNote == 4)
{
tone(buzzerPin, NOTE_A4, 400);
}
else if (valueOfNote == 5)
{
tone(buzzerPin, NOTE_C5, 400);
}
else if (valueOfNote == 6)
{
tone(buzzerPin, NOTE_D5, 400);
}
else if (valueOfNote == 7)
{
tone(buzzerPin, NOTE_E5, 400);
}
else if (valueOfNote == 8)
{
tone(buzzerPin, NOTE_G5, 400);
}
else if (valueOfNote == 9)
{
tone(buzzerPin, NOTE_A5, 400);
}
else if (valueOfNote == 10)
{
tone(buzzerPin, NOTE_B5, 400);
}
else if (valueOfNote == 11)
{
tone(buzzerPin, NOTE_D6, 400);
}
else if (valueOfNote == 12)
{
tone(buzzerPin, NOTE_E6, 400);
}
else if (valueOfNote == 13)
{
tone(buzzerPin, NOTE_G6, 400);
}
else if (valueOfNote == 14)
{
tone(buzzerPin, NOTE_A5, 400);
}
else if (valueOfNote == 15)
{
tone(buzzerPin, NOTE_B5, 400);
}
else if (valueOfNote == 16)
{
tone(buzzerPin, NOTE_C5, 400);
}
else
{
tone(buzzerPin, NOTE_C5, 400);
}
delay(408); // a small delay so it sounds nice
}
//Function to read the ultrasonic sensor and play a tone based on the distance measured
void sensorReading()
{
//Send a short low pulse
digitalWrite(pingPin, LOW);
delay(2); //delay to avoid complications
digitalWrite(pingPin, HIGH); //sends a high pulse for 10 microseconds
delay(10);
digitalWrite(pingPin, LOW);
distance = pulseIn(echoPin, HIGH); //Measure the duration of the ultrasonic pulse and calculate the distance
distanceNotes(distance); //play the notes based on the distance
delay(100);
}
void distanceNotes(long distance)
{
if (distance >= 2920) //if the distance is greater than 2920
{
noTone(8); //then dont play anything
Serial.println(0); //send 0 to serial to indicate nothing is being played
pressed = 0; //reinitialize the key pressed variable to 0 so other keys can be pressed
}
else if (distance >= 2800 && pressed == 0) //for each distance, there is a specific note
{
tone(buzzerPin, NOTE_C5, 400);
if (arduinoState == 98) //f the arduino is in record mode
{
recordArray[recordCounter] = 16; //record the note number in the array
recordCounter++; //increment counter for the future
}
Serial.println(16); //print the serial and send to p5js for it to be dealt with appropriately
pressed = 1; //do this to avoid the same note being played repeatedly
}
else if (distance >= 2600 && pressed == 0)
{
tone(buzzerPin, NOTE_B5, 400);
Serial.println(15);
pressed = 1;
if (arduinoState == 98)
{
recordArray[recordCounter] = 15;
recordCounter++;
}
}
else if (distance >= 2420 && pressed == 0)
{
tone(buzzerPin, NOTE_A5, 400);
Serial.println(14);
pressed = 1;
if (arduinoState == 98)
{
recordArray[recordCounter] = 14;
recordCounter++;
}
}
else if (distance >= 2260 && pressed == 0)
{
tone(buzzerPin, NOTE_G6, 400);
Serial.println(13);
pressed = 1;
if (arduinoState == 98)
{
recordArray[recordCounter] = 13;
recordCounter++;
}
}
else if (distance >= 2060 && pressed == 0)
{
tone(buzzerPin, NOTE_E6, 400);
Serial.println(12);
pressed = 1;
if (arduinoState == 98)
{
recordArray[recordCounter] = 12;
recordCounter++;
}
}
else if (distance >= 1960 && pressed == 0)
{
tone(buzzerPin, NOTE_D6, 400);
Serial.println(11);
pressed = 1;
if (arduinoState == 98)
{
recordArray[recordCounter] = 11;
recordCounter++;
}
}
else if (distance >= 1690 && pressed == 0)
{
tone(buzzerPin, NOTE_B5, 400);
Serial.println(10);
pressed = 1;
if (arduinoState == 98)
{
recordArray[recordCounter] = 10;
recordCounter++;
}
}
else if (distance >= 1515 && pressed == 0)
{
tone(buzzerPin, NOTE_A5, 400);
Serial.println(9);
pressed = 1;
if (arduinoState == 98)
{
recordArray[recordCounter] = 9;
recordCounter++;
}
}
else if (distance >= 1345 && pressed == 0)
{
tone(buzzerPin, NOTE_G5, 400);
Serial.println(8);
pressed = 1;
if (arduinoState == 98)
{
recordArray[recordCounter] = 8;
recordCounter++;
}
}
else if (distance >= 1180 && pressed == 0)
{
tone(buzzerPin, NOTE_E5, 400);
Serial.println(7);
pressed = 1;
if (arduinoState == 98)
{
recordArray[recordCounter] = 7;
recordCounter++;
}
}
else if (distance >= 1005 && pressed == 0)
{
tone(buzzerPin, NOTE_D5, 400);
Serial.println(6);
pressed = 1;
if (arduinoState == 98)
{
recordArray[recordCounter] = 6;
recordCounter++;
}
}
else if (distance >= 825 && pressed == 0)
{
tone(buzzerPin, NOTE_C5, 400);
Serial.println(5);
pressed = 1;
if (arduinoState == 98)
{
recordArray[recordCounter] = 5;
recordCounter++;
}
}
else if (distance >= 660 && pressed == 0)
{
tone(buzzerPin, NOTE_A4, 400);
Serial.println(4);
pressed = 1;
if (arduinoState == 98)
{
recordArray[recordCounter] = 4;
recordCounter++;
}
}
else if (distance >= 530 && pressed == 0)
{
tone(buzzerPin, NOTE_G4, 400);
Serial.println(3);
pressed = 1;
if (arduinoState == 98)
{
recordArray[recordCounter] = 3;
recordCounter++;
}
}
else if (distance > 310 && pressed == 0)
{
tone(buzzerPin, NOTE_E4, 400);
Serial.println(2);
pressed = 1;
if (arduinoState == 98)
{
recordArray[recordCounter] = 2;
recordCounter++;
}
}
else if (distance <= 310 && pressed == 0)
{
tone(buzzerPin, NOTE_C4, 400);
Serial.println(1);
pressed = 1;
if (arduinoState == 98)
{
recordArray[recordCounter] = 1;
recordCounter++;
}
}
}
Communication Between Arduino and P5js:
P5js and Arduino are fully connected in this implementation. They communicate with each other to ensure that the program runs smoothly and there is harmony between the software and hardware components of the project. The project has various modes that allows for a greater user experience and so the program is divided in a way that breaks down different modes in game states. This goes for both P5js and Arduino. P5js sends data to Arduino that allows for mode changes in the Arduino program. Without P5js communicating the state it is on, Arduino would have never been able to sync with the program. P5js also tells Arduino when to start recording, stop recording, and then when to play the recorded tune. It also sends data to Arduino in order to communicate when to turn the sensor on or off. Arduino, on the other hand, in the game mode calculates the distance using its ultrasonic sensor and then evaluates what note each distance corresponds to and then finally sends it to P5js interface. The interface then uses the data to either play the game and “catch the notes.” Furthermore, in the free mode as well, Arduino filters out the bad data and then sends only the right notes to P5js in order to be displayed using various images.
Reflection and Improvement
I’m particularly proud of the user interface that I have designed for the project. I put a lot of thought and effort into making it user-friendly and intuitive, while also allowing for complete freedom and interactivity. The buttons and other interactive features really make the interface come alive, and I think users will find it enjoyable to use.
In addition to the user interface, I am also really proud of how I tackled the game states in the project. Initially, I was worried that I wouldn’t be able to get everything done in time, but through lots of user testing and feedback, I was able to create a code that I’m actually really proud of. The game states add a level of complexity and depth to the project, and I think users will appreciate the extra challenge.
Finally, I’m really happy with the arraySwitch function that I developed for the project. It was a difficult task to create two different arrays with different types of notes and then switch between them every time one array was exhausted. But in the end, it was definitely worth it because it ensures that the same note won’t come up twice in a row, which makes the game more interesting and challenging.
I am very proud of the end result of my project, but there are still areas that I can improve on. For instance, I expected the ultrasonic sensor to be more accurate, but I was disappointed with the level of precision it provided. In addition, using the ultrasonic sensor made it difficult for users to play notes quickly, as the hand gestures required were awkward and unlike those used for a normal piano. In the future, I will need to explore alternative sensor options to improve user experience.
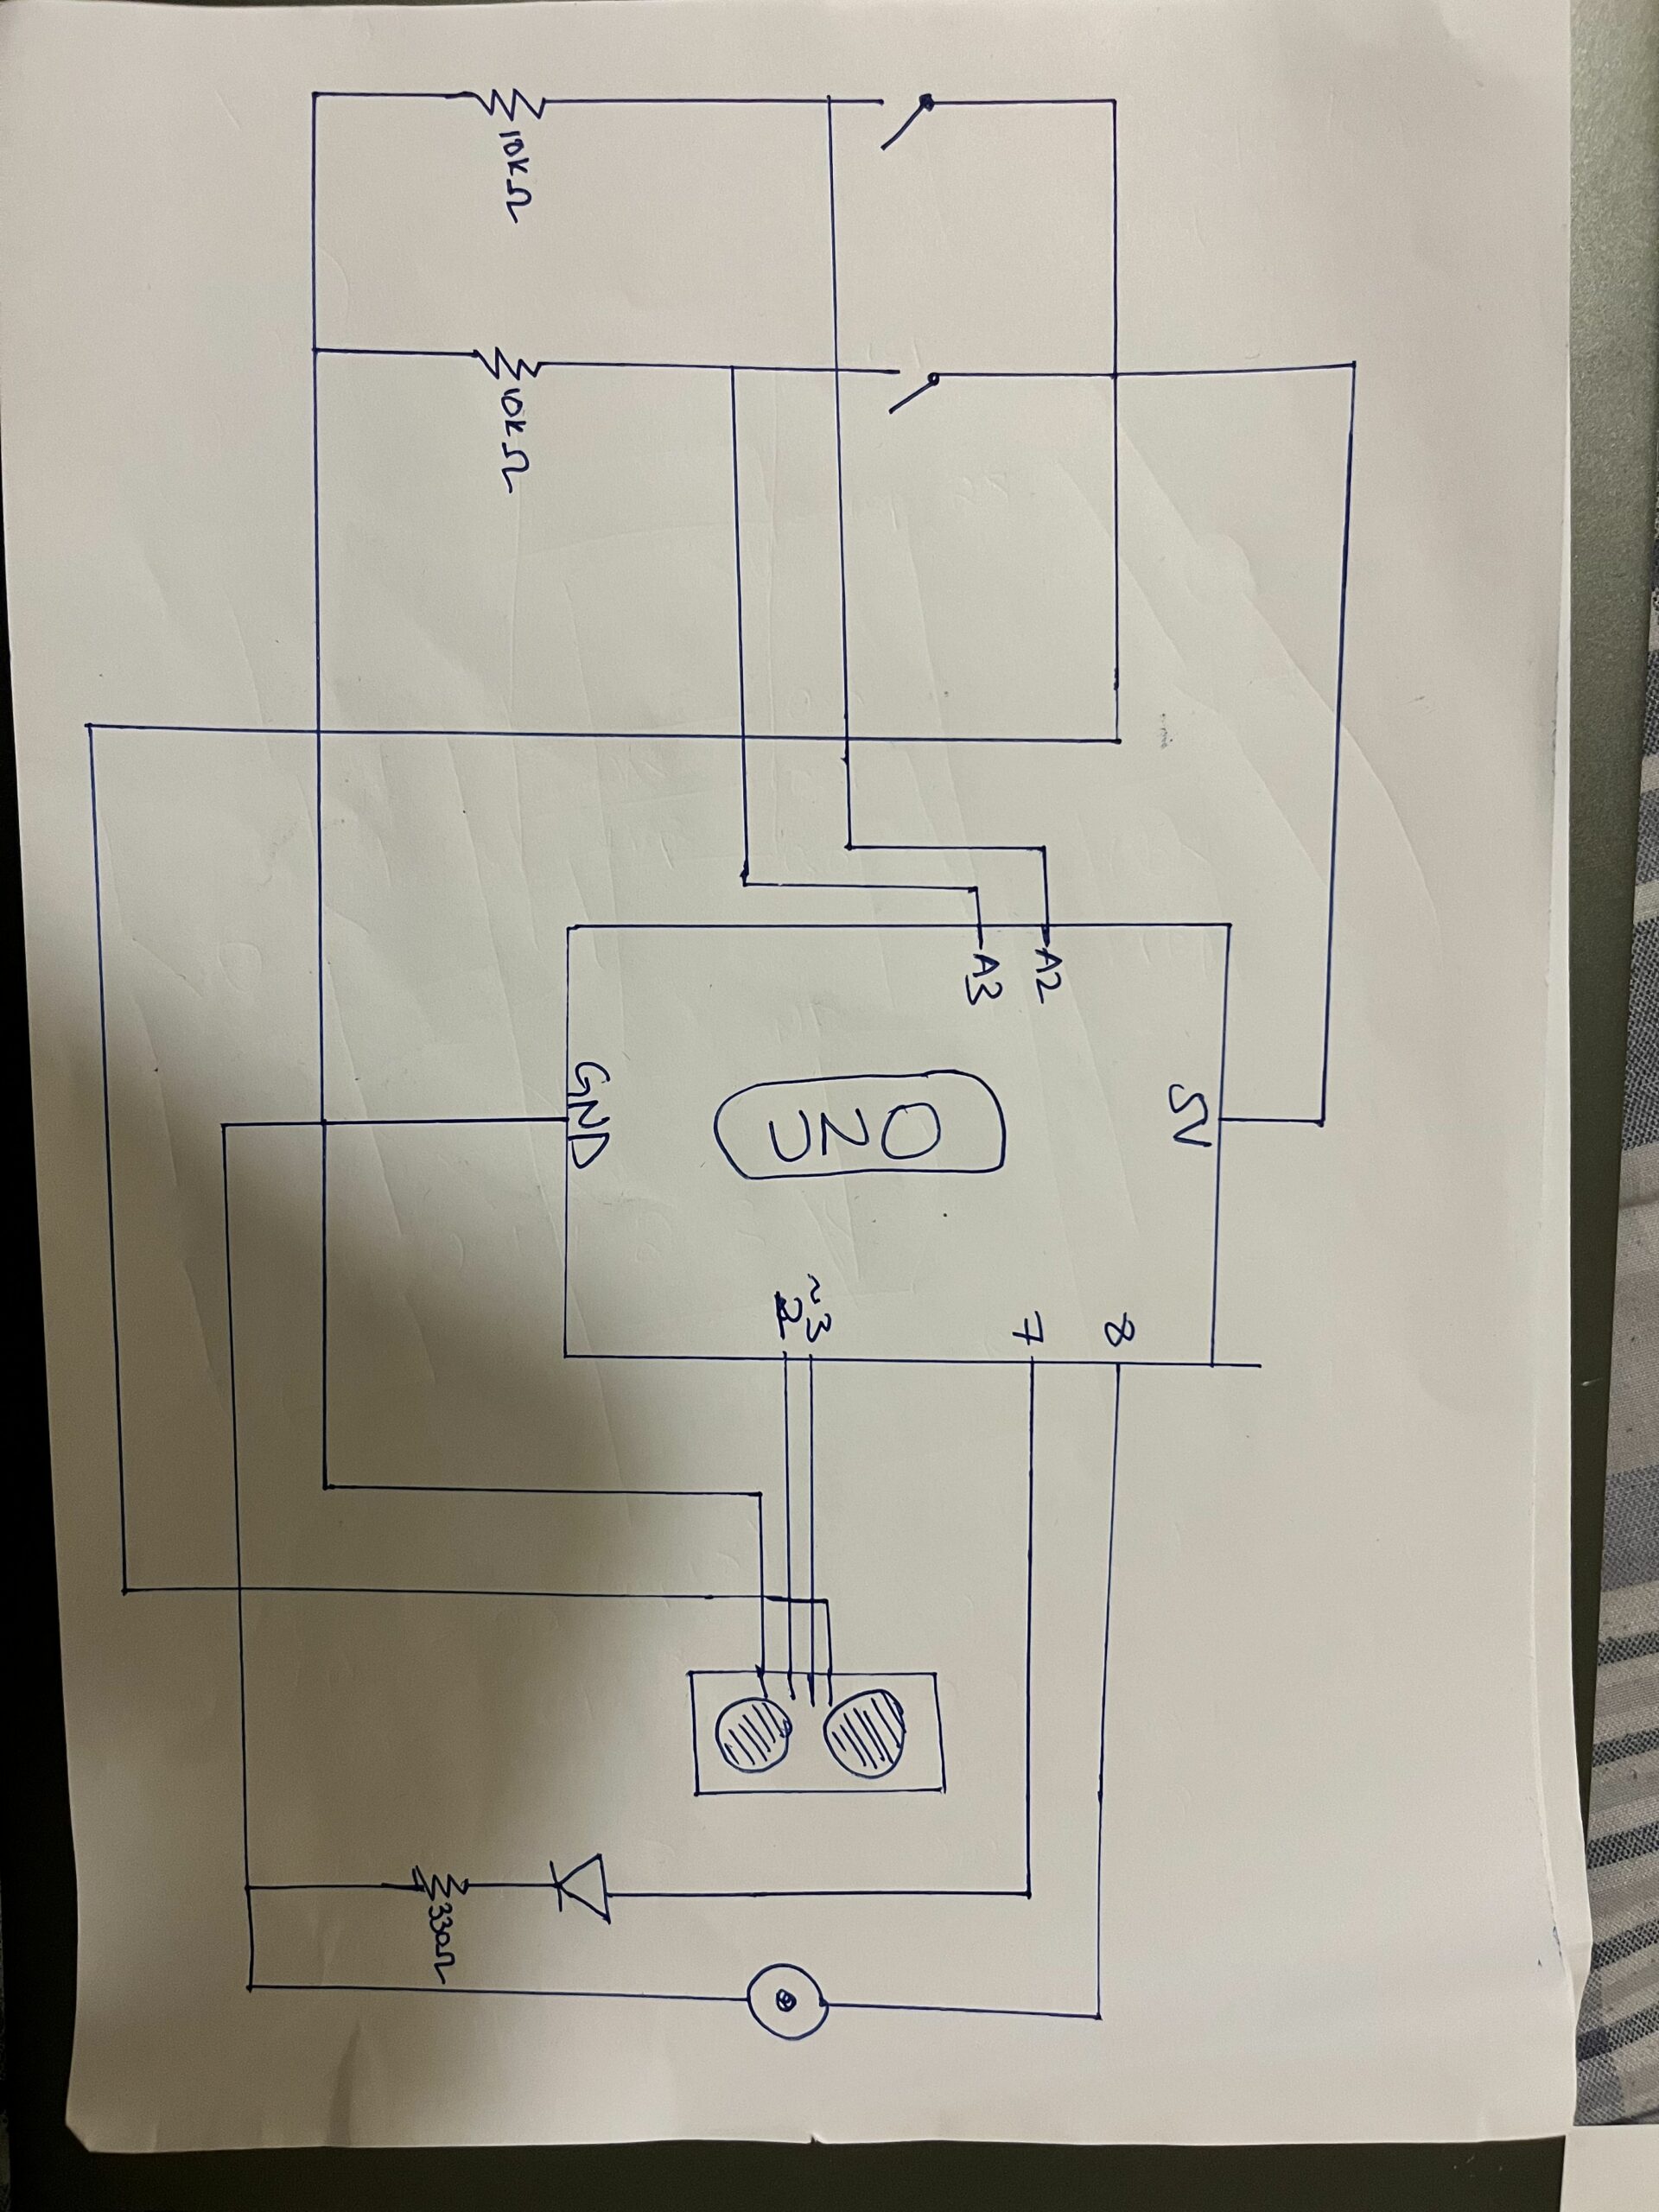
Another area for improvement would be to incorporate more buttons or LEDs on the Arduino side of the project to make it more interactive. This would enhance the overall experience for users and make it more engaging. Finally, time management was a significant challenge for me during this project, and as a result, I was unable to 3D print or craft a box for the Arduino. As a result, the aesthetics of the final product (hardware) were what I had in mind. In the future, I will need to better manage my time to ensure that I have enough time to complete all aspects of the project, including the aesthetics.
User Testing
According to my friend’s testing of my project, they had some initial confusion with the user interface, as there were no back buttons and some buttons didn’t respond when hovered over. Additionally, they had trouble understanding when to start playing the notes and what each mode was meant for. However, through incorporating their feedback, I was able to make improvements to the instructions screen and provide clearer information on the interface, which ultimately led to a more interactive and controllable experience. My friend found the P5js portion of the program to be smooth and bug-free, which is working well.
On the other hand, my friend had issues with the sensor as it registered a note even while their hand was still moving in front of it. I had to explain to them that only one finger/hand should be used, and it needed to move out of the way of the sensor for the next note to be played. To make this clearer to future users, I could include instructions on the interface or have a printed paper with the instructions. However, the best solution would be to use a different sensor altogether to avoid these issues in the future.