3 Point Shootout – Final Project

Game Idea

I really wanted to make something related to basketball, since I am a big fan of the sport. So I decided to make a mini basketball shooting game, similar to the ones seen in arcades. My game consists of a small boxy frame in which there is a hoop I made. The player basically has to shoot the ball into the hoop from a fair distance. Each time the ball goes through the hoop, it hits the flex sensor and changes its values. Each time a change in the flex sensor values is detected, the player is awarded 3 points. There are no point deductions for misses. There is also a timer of 60 seconds after which a buzzer sounds and the game ends. Then the player can see their score, the high score, and has the option to play again.

Game Box Frame

I made a boxy frame (see game demo below) to hold up the hoop and also have a ramp so that the ball would roll back towards the player which makes it more convenient. Ideally, the box should have been bigger to allow more space for the ball to fall on the ramp so that most misses would still fall within the box and the ball would roll back to the user. However, I did not think of this when designing the box. I wanted to use my monitor to display the p5js sketch behind the box frame just so that the score would be directly behind the target and the player would not have to look to the side each time they want to see the score or the time left.

I made the hoop using a plastic tube as the pole holding it up, a piece of cardboard as the backboard, and a transparent plastic cup as the rim. The ball is just a ping pong ball that I had in my room. To assemble the carboard pieces together, I used a glue gun and I drilled a hole into the ramp to insert the plastic tube into. The hole I drilled was smaller than the diameter of the tube so I forced the tube into the hole. This was to make sure the tube fits perfectly and is tightly held up. The two holes on the side only exist to make it easier for me to carry it.

P5JS Implementation

I started my project by making the game class, with different game states so I can transition between the menu screen and game screen easily, and to make it easier to restart the game when necessary. Doing this also lets me do different things whenever the mouse is pressed at different stages of the game. I then added all the necessary variables for all the images, sounds, the sprite sheet, arrays and other necessary variables.

Then I made the game full screen when the user clicks the starting screen, by resizing the canvas and using fullscreen(). While this worked fine on my laptop screen, it just would not fill up my entire monitor screen (see game demo below), even when I tried hard coding the canvas size values with the monitor resolution.

I used a sprite sheet of a bouncing basketball I found online on the menu screen to make the menu screen more dynamic and not just a boring old background.

Also, I had an array of sounds from audio clips of a famous NBA commentator, Mike Breen who has iconic lines. Each time a shot is made, a rando sound from the array is played to provide feedback to the user. When the game ends, there is a buzzer sound played to let the user know the game is over.

Here is the p5sj code:

let alpha = 255;
let game;
let backgroundMusic;
let spritesheet;
let bballSprite = [];
let step = 0;
let x = 0;
let w;
let h;
let startTime = 0;
let cd = 1;
let gameTime = 5;
let fade = 0;
let prevVal = 0;
let newVal = 0;
let time = 0;
let sounds = [];
let crowdSound;
let music;

function preload() {
  // backgroundMusic = loadSound("assets/background.mp3");
  spritesheet = loadImage("assets/sprite.png");
  crowd = loadImage("assets/background2.jpg");
  menu = loadImage("assets/menu.jpg");
  font = loadFont("assets/font.ttf");
  buzzer = loadSound("assets/buzzer.wav");
  for (let i = 1; i < 7; i++){
    sounds[i-1] = loadSound("assets/" + i + ".wav");
  }
  crowdSound = loadSound("assets/crowdSound.wav");
  music = loadSound("assets/music.wav");
}

function setup() {
  createCanvas(600, 600);
  textSize(18);
  setUpSerial();
  game = new Game();
  textAlign(CENTER);
  rectMode(CENTER);
  spritesheet.resize(spritesheet.width / 2, spritesheet.height / 2);
  w = spritesheet.width / 6;
  h = spritesheet.height;
  for (let i = 0; i < 6; i++) {
    bballSprite[i] = spritesheet.get(i * w, 0, w, h);
  }
  textFont(font);
}

function draw() {
  if (!serialActive) {
    fill(255);
    text("Press Space Bar to select Serial Port", 20, 30);
  } else {
    //backgroundMusic.play();
    background(255);
    if (game.state == 0) {
      game.click();
    } else if (game.state == 1) {
      game.menu();
    } else if (game.state == 2) {
      game.countdown();
    } else if (game.state == 3) {
      game.game();
    } else if (game.state == 4) {
      game.endScreen();
    }
  }
}

function mousePressed() {
  if (game.state == 0) {
    music.setVolume(0.5);
    music.loop();
    let fs = fullscreen();
    fullscreen(!fs);
    resizeCanvas(displayWidth, displayHeight);
    game.state++;
  } else if (
    game.state == 1 &&
    mouseX < width / 4 + width / 8 &&
    mouseX > width / 4 - width / 8 &&
    mouseY < (5 * height) / 9 + height / 14 &&
    mouseY > (5 * height) / 9 - height / 14
  ) {
    music.stop();
    game.state++;
    startTime = frameCount;
  } else if (
    game.state == 4 &&
    mouseX < width / 2 + width / 4 &&
    mouseX > width / 2 - width / 4 &&
    mouseY < (7 * height) / 9 + height / 5 &&
    mouseY > (7 * height) / 9 - height / 5
  ) {
    game.state = 2;
    game.score = 0;
    cd = 3;
    gameTime = 60;
  }
}

function keyPressed() {
  if (key == " ") {
    setUpSerial(SELECT_PORT);
  }
}

function readSerial(data) {
  if (data != null) {
    let fromArduino = split(trim(data), ",");
    if (newVal!=prevVal){
        prevVal = newVal;
    }
    if (fromArduino.length == 1) {
      newVal = fromArduino[0];
      //print (newVal);
    }
    writeSerial(0);
  }
}

class Game {
  constructor() {
    this.state = 0;
    this.score = 0;
    this.highScore = 0;
    this.time = 60;
    this.highScore = 0;
  }

  click() {
    push();
    background(0);
    fill(255);
    textSize(width / 10);
    text("Click to start", width / 2, height / 2);
    pop();
  }

  menu() {
    if (frameCount % 5 == 0) {
      step++;
      if (step == 6) {
        x += w;
        step = 0;
      }
      if (x >= width) {
        x = 0;
      }
    }
    push();
    imageMode(CORNER);
    image(menu, 0, 0, width, height);
    //backgroundMusic.play();
    pop();
    push();
    image(bballSprite[step], x, (2 * height) / 3);
    if (fade < 255) {
      fade += 2;
    }
    fill(0, 150);
    rect(width / 4, (5 * height) / 9, width / 4, height / 7, 20);
    rect(width / 2, height / 7, 5*width / 6, height / 6, 20);
    fill(255, fade);
    textSize(width / 10);
    textFont(font);
    text("3 POINT SHOOTOUT", width/2, height/5);
    text("Start", width / 4, (3 * height) / 5);
    pop();
  }

  countdown() {
    push();
    background(0);
    fill(255);
    textSize(width / 12);
    text(cd, width / 4, height / 2);
    if ((frameCount - startTime) % 60 == 0) {
      cd--;
    }
    if (cd == 0) {
      crowdSound.setVolume(0.5);
      crowdSound.loop();
      this.state++;
      startTime = frameCount;
    }
    pop();
  }

  game() {
    push();
    imageMode(CORNER);
    image(crowd, 0, 0, width, height);
    pop();
    push();
    textSize(width / 15);
    if ((frameCount - startTime) % 60 == 0) {
      gameTime--;
    }
    text("Time left: " + gameTime, width / 4, height / 8);
    text("Score: " + this.score, width / 4, (10 * height) / 11);
    if (newVal < prevVal - 7 && time < frameCount - 30){
      let rand = int(random(6));
      sounds[rand].play();
      this.score+=3;
      time = frameCount;
    }
    if (gameTime == 0) {
      buzzer.play();
      this.state++;
      if (this.score > this.highScore) {
        this.highScore = this.score;
      }
    }
    pop();
  }
  endScreen() {
    push();
    imageMode(CORNER);
    image(crowd, 0, 0, width, height);
    pop();
    push();
    fill(255);
    textSize(width / 12);
    text("Game Over", width / 2, height / 2);
    text("Score: " + this.score, (1.5 * width) / 7, height / 4);
    text("High Score: " + this.highScore, (5 * width) / 7, height / 4);
    fill(255);
    text("Play Again", width / 2, (7 * height) / 9);
    pop();
  }
}

Here is the p5js sketch (the embedded version does not seem to work well and I can’t figure out why):

Arduino Implementation

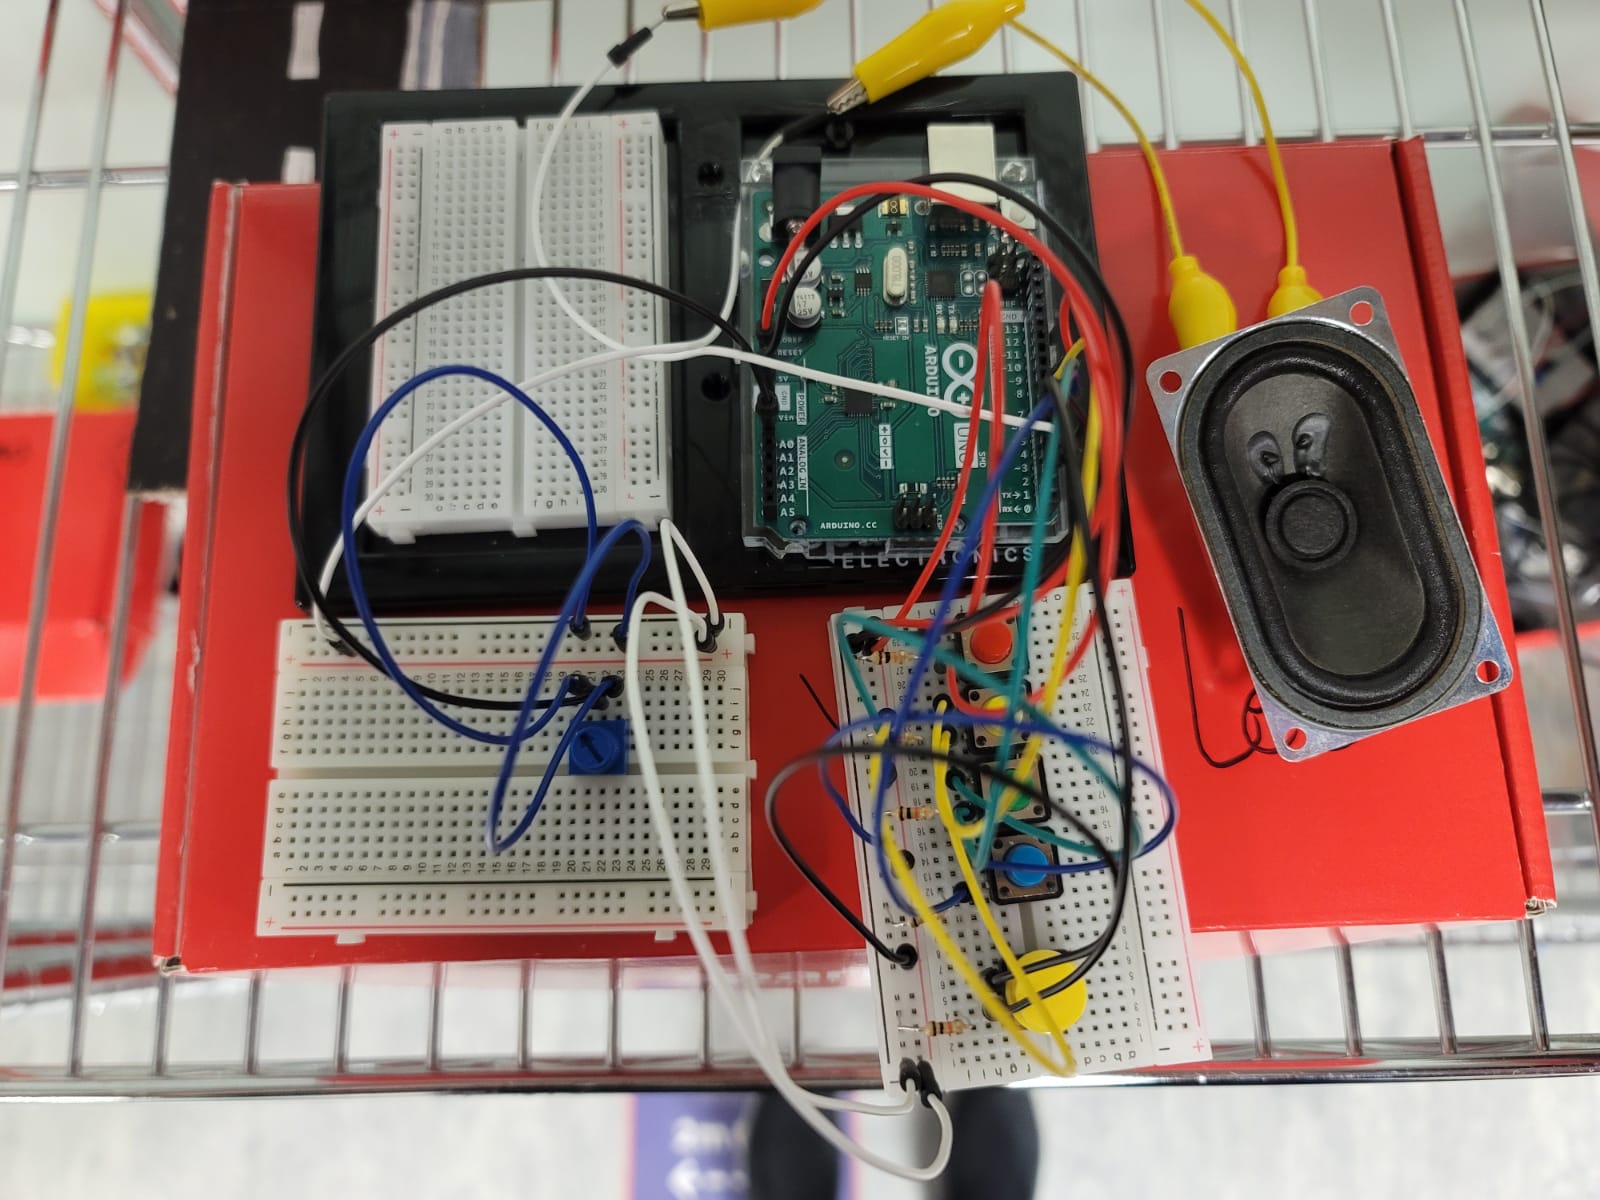
My project only used one flex sensor so my circuit and code were fairly simple. The circuit only consisted of the flex sensor and a resistor. The flex sensor is connected to analog input. The Arduino code was basically just receiving the flex sensor value and sending it to p5js.

Here is the Arduino code:

void setup() {
  Serial.begin(9600);
  while (Serial.available() <= 0) {
    Serial.println("0,0");
    delay(300);
  }
}

void loop() {
  int sensorValue = analogRead(A0);
  Serial.println(sensorValue);

Finally, here is the game demo (I shortened the game time to 20 seconds so as to not make the video too long):

Final Project User Testing and Progress

Since my last post, I have worked on the circuit, the cardboard frame, and the hoop. I managed to put everything together and finish the main part of the game hardware. I pasted two cardboard planks with holes in them for me to carry the setup around, to a ramp which exists to let the ball roll down back to the user after it goes in the hoop.

Below is the video of me testing out if the flex sensor works correctly. It may be hard to see in the video, but each time the ball goes in the hoop, the value of the flex sensor changes by about 50, so I plan to detect a change of around 20-30 in my code to sense when the ball goes in and add the score accordingly and trigger the corresponding sounds. I can’t rely on detecting any change in the flex sensor values, because the hoop is a bit shaky and this makes the values fluctuate by 1 or 2 when nothing is happening.

Things left for me to do
  • Add the necessary sounds when the user scores
  • Add music for the game
  • Make sure the game setup is durable and won’t eventually break or come apart
  • Figure out if and how I will use a monitor behind the hoop

Final Project Progress

Before starting the Arduino side of things, I wanted to finish the p5js side of my project. So far, I’ve finished all the main parts of the game like the transitions and different buttons. I’ve managed to make the game go full screen when the user clicks the starting screen.

All that is left for me to add in the p5js code is the part that is related to Arduino and small parts like the sounds and other small visual effects which I haven’t decided on yet.

Sounds

I will add the following sounds:

  • Background music for the entire duration of the game including menu and score screen
  • Crowd sounds to play during the main part of the game
  • Excited crowd sounds when the user scores

P5js sketch

Arduino

As for the Arduino side of my project, I have decided that I will use an infrared emitter and receiver under the hoop on either side so that when the ball falls through the hoop, it will disrupt the signal.

I will also build a boxy frame in which I will have my hoop on a slanted surface so that the ball rolls down to the user after they shoot it.

Serial Communication Exercise- Yunho and Kashyapa

Exercise 1

N/A

Exercise 2
let serial; // variable to hold an instance of the serialport library
let portName = "COM3"; // fill in your serial port name here
let xPos=0;
let yPos=240;
let onOff=0;
let val;

function setup() {
  createCanvas(640, 480);
  serial = new p5.SerialPort(); // make a new instance of the serialport library
  serial.on("list", printList); // set a callback function for the serialport list event
  serial.on("connected", serverConnected); // callback for connecting to the server
  serial.on("open", portOpen); // callback for the port opening
  serial.on("data", serialEvent); // callback for when new data arrives
  serial.on("error", serialError); // callback for errors
  serial.on("close", portClose); // callback for the port closing

  serial.list(); // list the serial ports
  serial.open(portName); // open a serial port
}

function draw() {
  background(255);
  val = map(mouseX, 0, width, 0, 255);
}

// get the list of ports:
function printList(portList) {
  // portList is an array of serial port names
  for (let i = 0; i < portList.length; i++) {
    // Display the list the console:
    print(i + " " + portList[i]);
  }
}

function serverConnected() {
  print("connected to server.");
}

function portOpen() {
  print("the serial port opened.");
}

function serialEvent() {
  // read a string from the serial port
  // until you get carriage return and newline:
  let inString = serial.readLine();
  serial.write(val);
}

function serialError(err) {
  print("Something went wrong with the serial port. " + err);
}

function portClose() {
  print("The serial port closed.");
}

/*
Arduino code
void setup() {
  Serial.begin(9600);
  pinMode(2, OUTPUT);
  pinMode(5, OUTPUT);
  while (Serial.available() <= 0) {
    Serial.println("0,0"); // send a starting message
    delay(300);              // wait 1/3 second
  }
}
void loop() {
  while (Serial.available() > 0) {
    // read the incoming byte:
    int inByte = Serial.read();
    analogWrite(5,inByte);
    Serial.println();
  }
}
*/
Exercise 3
let serial; // variable to hold an instance of the serialport library
let portName = "COM7"; // fill in your serial port name here

let velocity;
let gravity;
let position;
let acceleration;
let wind;
let drag = 0.99;
let mass = 50;
let windVal;

function setup() {
  createCanvas(640, 360);
  noFill();
  position = createVector(width/2, 0);
  velocity = createVector(0,0);
  acceleration = createVector(0,0);
  gravity = createVector(0, 0.5*mass);
  wind = createVector(0,0);
  
  serial = new p5.SerialPort(); // make a new instance of the serialport library
  serial.on("list", printList); // set a callback function for the serialport list event
  serial.on("connected", serverConnected); // callback for connecting to the server
  serial.on("open", portOpen); // callback for the port opening
  serial.on("data", serialEvent); // callback for when new data arrives
  serial.on("error", serialError); // callback for errors
  serial.on("close", portClose); // callback for the port closing

  serial.list(); // list the serial ports
  serial.open(portName); // open a serial port
}

// get the list of ports:
function printList(portList) {
  // portList is an array of serial port names
  for (let i = 0; i < portList.length; i++) {
    // Display the list the console:
    print(i + " " + portList[i]);
  }
}

function serverConnected() {
  print("connected to server.");
}

function portOpen() {
  print("the serial port opened.");
}

function serialEvent() {
  // read a string from the serial port
  // until you get carriage return and newline:
  let inString = serial.readLine();
  print(inString);
  if (inString.length > 0){
    windVal = map(inString, 0, 1023, -3, 3);
  }
}

function serialError(err) {
  print("Something went wrong with the serial port. " + err);
}

function portClose() {
  print("The serial port closed.");
}

function draw() {
  background(255);
  
  wind.x = windVal;
  
  applyForce(wind);
  applyForce(gravity);
  velocity.add(acceleration);
  velocity.mult(drag);
  position.add(velocity);
  acceleration.mult(0);
  ellipse(position.x,position.y,mass,mass);
  
  if (position.y > height-mass/2 - 25){
    serial.write(255);
  }
  else serial.write(0);
  
  if (position.y > height-mass/2) {
      velocity.y *= -0.9;  // A little dampening when hitting the bottom
      position.y = height-mass/2;
    }
}

function applyForce(force){
  // Newton's 2nd law: F = M * A
  // or A = F / M
  let f = p5.Vector.div(force, mass);
  acceleration.add(f);
}

function keyPressed(){
  if (keyCode==LEFT_ARROW){
    wind.x=-1;
  } 
  if (keyCode==RIGHT_ARROW){
    wind.x=1;
  }
  if (key==' '){
    mass=random(15,80);
    position.x=width/2;
    position.y=-mass;
    velocity.mult(0);
  }
}

/*
Arduino code
void setup() {
  Serial.begin(9600);
  pinMode(2, OUTPUT);
  while (Serial.available() <= 0) {
    Serial.println("0"); // send a starting message
    delay(300);              // wait 1/3 second
  }
}
void loop() {
  while (Serial.available() > 0) {
    // read the incoming byte:
    int inByte = Serial.read();
    analogWrite(2, inByte);
    int WindPower = analogRead(A0);
    Serial.println(WindPower);
    
  }
}
*/

Final Project Idea

For my final project, I was thinking about a way of making an interactive basketball shooting game in which the user would control the direction and power using sensors.

The game would have a basketball spawn at different distances and angles from the hoop and there would be an arrow in front of the ball controlled by a potentiometer to allow the user to aim at the hoop correctly. The more shots the user makes the more difficult the shots will be.

There would also be a power meter on the screen which could be controlled by a flex sensor so that the user can bend it until the right power required is reached. The basketball will start moving when the flex sensor is released by the user, to simulate a flick.

The game would have a timer that runs and the user would have to score as much as possible within this time.


Yunho and Kashyapa – Toy Electric Guitar

Concept

We made a very simple toy electric guitar that anyone can use and make music with just by pressing the buttons in the right order. The tempo of the notes can also be changed using the potentiometer, which challenges the user by seeing how quick they can play the guitar.

Initially, we wanted to use the potentiometer to change the volume of the speakers and we managed to use the potentiometer as a variable resistor almost to change how much current went into the speaker, but the speakers only got soft in the middle range of the potentiometer and got louder at the two extremes, which is unsuitable to use as a switch. Because of this we decided to use it to change the tempo of the notes instead.

Below is an image of the circuit.

Here is the code and video:

#include "sound.h"

int counter = 0;
int group = 0;
int playMode = 0;

byte But1, PBut1, But2, PBut2, But3, PBut3, But4, PBut4, But5, PBut5;

bool lastnote = false;

int But1Note [] = {NOTE_A2, NOTE_B2, NOTE_C3, NOTE_D3, NOTE_E3, NOTE_F3, NOTE_A3, NOTE_B3, NOTE_C4};
int But2Note [] = {NOTE_B2, NOTE_C3, NOTE_D3, NOTE_E3, NOTE_F3, NOTE_G3, NOTE_D4, NOTE_C4, NOTE_B3};
int But3Note [] = {NOTE_C3, NOTE_D3, NOTE_E3, NOTE_F3, NOTE_G3, NOTE_A3};

int ending [] = {NOTE_A5, NOTE_G5, NOTE_F5, NOTE_E5, NOTE_D5, NOTE_C5, NOTE_B4, NOTE_A4, NOTE_G4, NOTE_E5, NOTE_D5, NOTE_C5, NOTE_B4, NOTE_A4, NOTE_G4, NOTE_F4, NOTE_E4, NOTE_D4, NOTE_C4, NOTE_B3, NOTE_A3};

int play[3];

int octave = 0;

int toneNum;
unsigned long timer = 0;
unsigned long timer2 = 0;

void setup() {
  pinMode(2, INPUT);
  pinMode(3, OUTPUT);
  pinMode(4, INPUT);
  pinMode(5, INPUT);
  pinMode(6, INPUT);
  pinMode(7, INPUT);

  Serial.begin(9600);
}

void loop() {

  if (millis() > timer2) {
    // 3 Buttons that plays 3 notes of the guitar solo
    But1 = digitalRead(7);
    if (But1 == HIGH && PBut1 == LOW) {
      counter = 0;
      for (int i=0; i<3; i++){
        play[i] = But1Note[i+3*group];
      }
    }
    PBut1 = But1;
  
    But2 = digitalRead(6);
    if (But2 == HIGH && PBut2 == LOW) {
      counter = 0;
      for (int i=0; i<3; i++){
        play[i] = But2Note[i+3*group];
      }
    }
    PBut2 = But2;
  
    But3 = digitalRead(5);
    if (But3 == HIGH && PBut3 == LOW) {
      if (group == 2) {}
      else{
        counter = 0;
        for (int i=0; i<3; i++){
        play[i] = But3Note[i+3*group];
        }  
      }
    }
    PBut3 = But3;
  
    // this button switches the notes to the next group of the solo
    But4 = digitalRead(4);
    if (But4 == HIGH && PBut4 == LOW) {
      if (group<2){
        group++;
      }
      else group = 0;
    }
    PBut4 = But4;
  
    // this button switches to the next octave
    But5 = digitalRead(2);
    if (But5 == HIGH && PBut5 == LOW) {
        group = 0;
      if (octave<2){
        octave++;
      }
      else if (octave == 2) {octave++; counter =300;}
      else {octave = 0;}
    }
    PBut5 = But5;
    
    timer2 = millis() + 10;
  }
  
  // input from Pot.
  long potVal = analogRead(A0);
  long mapVal = map(potVal, 0, 1023, 100, 350);

  // sound player
  if (millis() > timer) {
    
    if (counter > 2 && octave !=3) {noTone(3);}
    else if (octave == 3 && counter<21) {tone(3, ending[counter], mapVal+50);}
    else if (octave == 3 && counter>=21) {noTone(3);}
    else{
      tone(3, play[counter]*pow(2,octave), mapVal+50);
    }
    
    counter++;
    timer = millis() + mapVal;
  }
}


RGB Light

I really wanted to make a cycling RGB light for this week’s homework so I did some research on the RGB LED in the kit and how to use it, and I ended up making a circuit in which the switch lets the user switch between control of the two LEDs, one RGB and the other just blue and a potentiometer to control the color of the RGB and the brightness of the other LED. To learn how to use the RGB LED, I went through other projects that used it online and learned that it sort of acts as 3 separate LEDs one red, one green and one blue. Using analogWrite() with each pin allows you to generate different colors the same way we used color() in p5js.

I wanted to make the light cycle through colors as seen in some gaming keyboards, for example. To achieve this, I mapped the value from the potentiometer to 0-767 (256×3), and I found that keeping one of the 3 colors at 0 and changing the other two colors according to the mapped value would achieve a nice cycling effect. I was inspired by this project to come up with this.

When the switch is pressed, the RGB LED would turn off, the blue LED would turn on and the potentiometer would then be used to control the brightness of the LED.

Here is my code and video:

bool pressed = false;
unsigned long timer = 0;
int prevButtonState = 0;
void setup() {
  Serial.begin(9600);
  pinMode(2, OUTPUT); //bluepin
  pinMode(3, OUTPUT); //redpin
  pinMode(5, OUTPUT); //greenpin
  pinMode(10, OUTPUT); //ledpin
  pinMode(9, OUTPUT); //switch
}
void loop() {
  int potValue = analogRead(A0);
  int buttonState  = digitalRead(9);
  if (buttonState == 1 && prevButtonState == 0){
    pressed = !pressed;
  }
  prevButtonState = buttonState;
  int mappedValue;
  int r;
  int g;
  int b;
  if (pressed){
    digitalWrite(2, LOW);
    mappedValue = map(potValue, 0, 1023, 0, 767);
    int color = mappedValue;
    color = constrain(color, 0, 767);
    if (color <= 255){
      r = 255 - color;
      g = color;
      b = 0;
    }
    else if (color <= 511){
      r = 0;
      g = 511 - color;
      b = color - 256;
    }
    else{
    r = color - 512;
    g = 0;
    b = 767 - color;
    }
    analogWrite(6, r);
    analogWrite(5, g);
    analogWrite(3, b);
  } else {
    analogWrite(6, 0);
    analogWrite(5, 0);
    analogWrite(3, 0);
    mappedValue = map(potValue, 0, 1023, 0, 255);
    analogWrite(10, mappedValue);
  }
}

Hands Free Switch

Coming up with an idea for this was slightly challenging. I was inspired by ankle exercises I’ve been doing recently in which I would move my ankle around in different directions which gave me a few possible ideas.

Initially, I wanted to do a heel click with aluminum foil on my shoes with foil on the side of my shoes but when I connected the foil on each shoe to the wires, the LED would light up and produce a very faint light without the shoes touching each other. I then decided to wrap the foil around my shoe and step on the wire with it to make the switch.

I had one cable going into the foil inside my shoe and one cable under the shoe where I would step on it with the foil part of the shoe which would close the circuit.

Midterm – Reflex Shot

Game Idea

Reflex Shot is a 2D arcade shooting game in which enemies pop up on the screen at random locations and the user has to click them as fast as possible to score points. There is a crosshair on screen at all times and each time a shot is fired a gun fire sound is played. Each game lasts 60 seconds and at the end, the final score, high score, accuracy, number of targets hit, number of targets missed and average time taken to hit a target will be displayed on the screen. The game begins with a starting page which gives the player the option to start of change crosshair size. When the start button is clicked, the game instructions are then displayed on the screen and the user has to click the screen again for the game to start. Once the game ends, the statistics will be shown and the user will have the option to play again.

Implementation

In my code, I had 3 classes: a Game class, Crosshair class, and an Enemy class.

In the game class, I controlled what would be shown on the screen depending on the current stage of the game using functions. In the draw function, I had many else ifs with a variable that dictated which stage was currently to be displayed to decide which function within the class was to be called. Also, the Game class had variables that counted all the statistics to be shown at the end of the game. The screen backgrounds were also loaded within the class.  There were also a few functions to update the score and high score when required.

The crosshair class had two attributes, length and gap size. Each time the change crosshair size button is pressed, these two values are incremented by a fixed amount, but when a certain size is reached, the values are reset back to their original values.  Other than this, there was just the drawCrosshair function which drew the four lines required for the crosshair.

The enemy class had two attributes x and y to determine the position of the enemy on the screen, a function to move the enemy when it is shot by the user and a function to draw the enemy. The moveEnemy function is used to make it seem like a new enemy spawns when one is shot, but in reality the current enemy just moves to a different location on the canvas.

Outside these 3 classes, my mousePressed function was very important since my game uses the mouse as its only input device. I had a switch case for the game.state variable in which each case called a function to decide what each mouse click would do. Inside these functions, I used if statements when I had buttons to detect if mouse clicks were inside the buttons. Similarly, to detect if mouse clicks were on enemies, I used the mouseX and mouseY values to see if the clicks were inside an invisible rectangle around the image of the enemy. This did lead to some inaccuracies in the clicks, though, as some clicks were registered as hits even if they were in the empty space under the enemy’s arm and above the leg.

In terms of sounds, I added a gun draw sound that plays when the game starts. I had a gun fire sound that plays whenever the user shoots, and a body hit sound that doesn’t sound too pleasant but is used to indicate when an enemy is hit. When an enemy is clicked on, both the hit marker sound and the gun fire sound play at the same time therefore the gun fire sound can’t be heard when an enemy is hit. When the user misses, however, it is clearly heard and it is clear to the user that the shot didn’t hit an enemy.

Overall, I’m pretty satisfied with my work and I think it is a fun game to play. Hope you have fun playing it!

Midterm Progress

Game Idea

My game is going to be a 2D arcade shooting game in which random enemies pop up on the screen and the user has to click them as fast as possible to score points. There will be a crosshair on screen at all times and each time a shot is fired a gun fire sound will be played and there will also be some background music. Each game will last 60 seconds and at the end the final score, high score and average time taken to hit a target will be displayed on the screen. The game will begin with a starting page in which the name of the game (which I haven’t decided yet) will be displayed and the user will have the option to start the game, change the crosshair size. When the start button is clicked, the game instructions are then displayed on the screen and the user has to click the screen again for the actual game to start. Once the game ends, the statistics will be shown and the user will have the option to play again.

Implementation

I started by creating a class for the Game in which I would store an integer variable to indicate the current state of the game (state = 0 means menu page, state = 1 means the actual game starts, and so on). This would make it easier to transition from one game state to another and would make it easier to be able to restart the game once it ends without having to re-run the code. I also added a high score variable to store the highest score in the current session. I also made a crosshair class so the user can change the size of the crosshair in game and created a draw function inside the class to draw the crosshair at all times during the game wherever the mouse pointer is.

After this I downloaded an image from this link
https://steamcommunity.com/sharedfiles/filedetails/?id=766712125
to use as a background for my menu screen. The image had a resolution of 1920×1080 so I changed my canvas to a size with the same aspect ratio to make the image not seem stretched or compressed.

I then started working on the buttons for my menu screen and used rect, text and a lot of if statements to do this. Then I worked on my mousePressed function, which would have several parts to it depending on the current state of the game. I also created separate functions to be called within the mousePressed function so that not all my if statements will be in my mousePressed function.

In mousePressed the first thing I did was store the mouseX and mouseY variables in two separate variables just to make the mouse clicks slightly more accurate, because mouseX and mouseY will be changing very fast in the game. I then pass these two variables into the relevant functions as required.

I am using an array of size 3 so that there will only be 3 enemies on the screen at any given moment. As for the enemy hitboxes, I am using a hypothetical rectangle around the png of the enemy to detect if the user clicks on the enemy successfully.

So far I’ve finished the starting screen, the instructions screen and most of the actual game.
Enemies are generated at random locations on the screen and if the mouse is clicked inside any of the enemy hitboxes and the score is adjusted accordingly. Now I have to add all the sounds and make them play on each mouse click and each time an enemy is successfully hit to add feedback and create the game over screen. I also have to add backgrounds to the different game states.