Final Project

Concept

I started this project with the purpose of encapturing the essence of this semester, a type of memorabilia. In order to figure out how to do that, I have to go through many types of interaction and setting to land on a viable idea that would require a more simplistic interaction with a scope for storytelling. Finally I decided to use a circular structure which a person can complete 1 by 1 each segment. The purpose would be to finish the whole circle (journey). As I have started to conceptualized the activity to be like a journey, I felt that the literary framework of “Hero’s Journey” would be a great fit. In order to reflect the “Hero’s Journey,” I divided the framework onto 5 segments accordingly: acquiring knowledge/advice, enjoying lively goods, getting distracted from work, working hard to reach goals, and reflection/atonement. Hence, each segment carries these themes respectively from 1 to 5.  I included activities and artists that make frequent visits to my day to day life, as by doing this I was able to commentary on our daily lifestyles of growth and change, our hero’s journeys. Something interesting I added is the option of staying on a tile and experiencing it or just skipping by stepping on the next tile. In some cases, skipping a tile is show of no effort, and in others it is a show of determination. Finally, the final page upon completing the tile 5 explains the metaphor on hero’s journey as each of ours journey, and reminds that we are all going through our own journeys next to each other or even together.

Implementation

There is a circuit implementation as well as the software implementation.

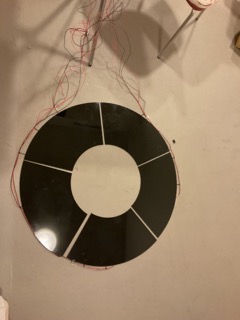
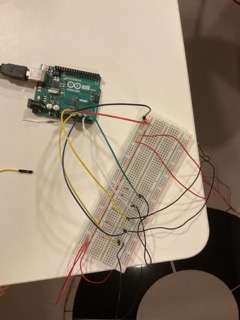
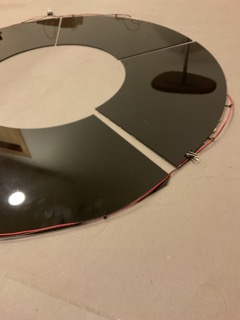
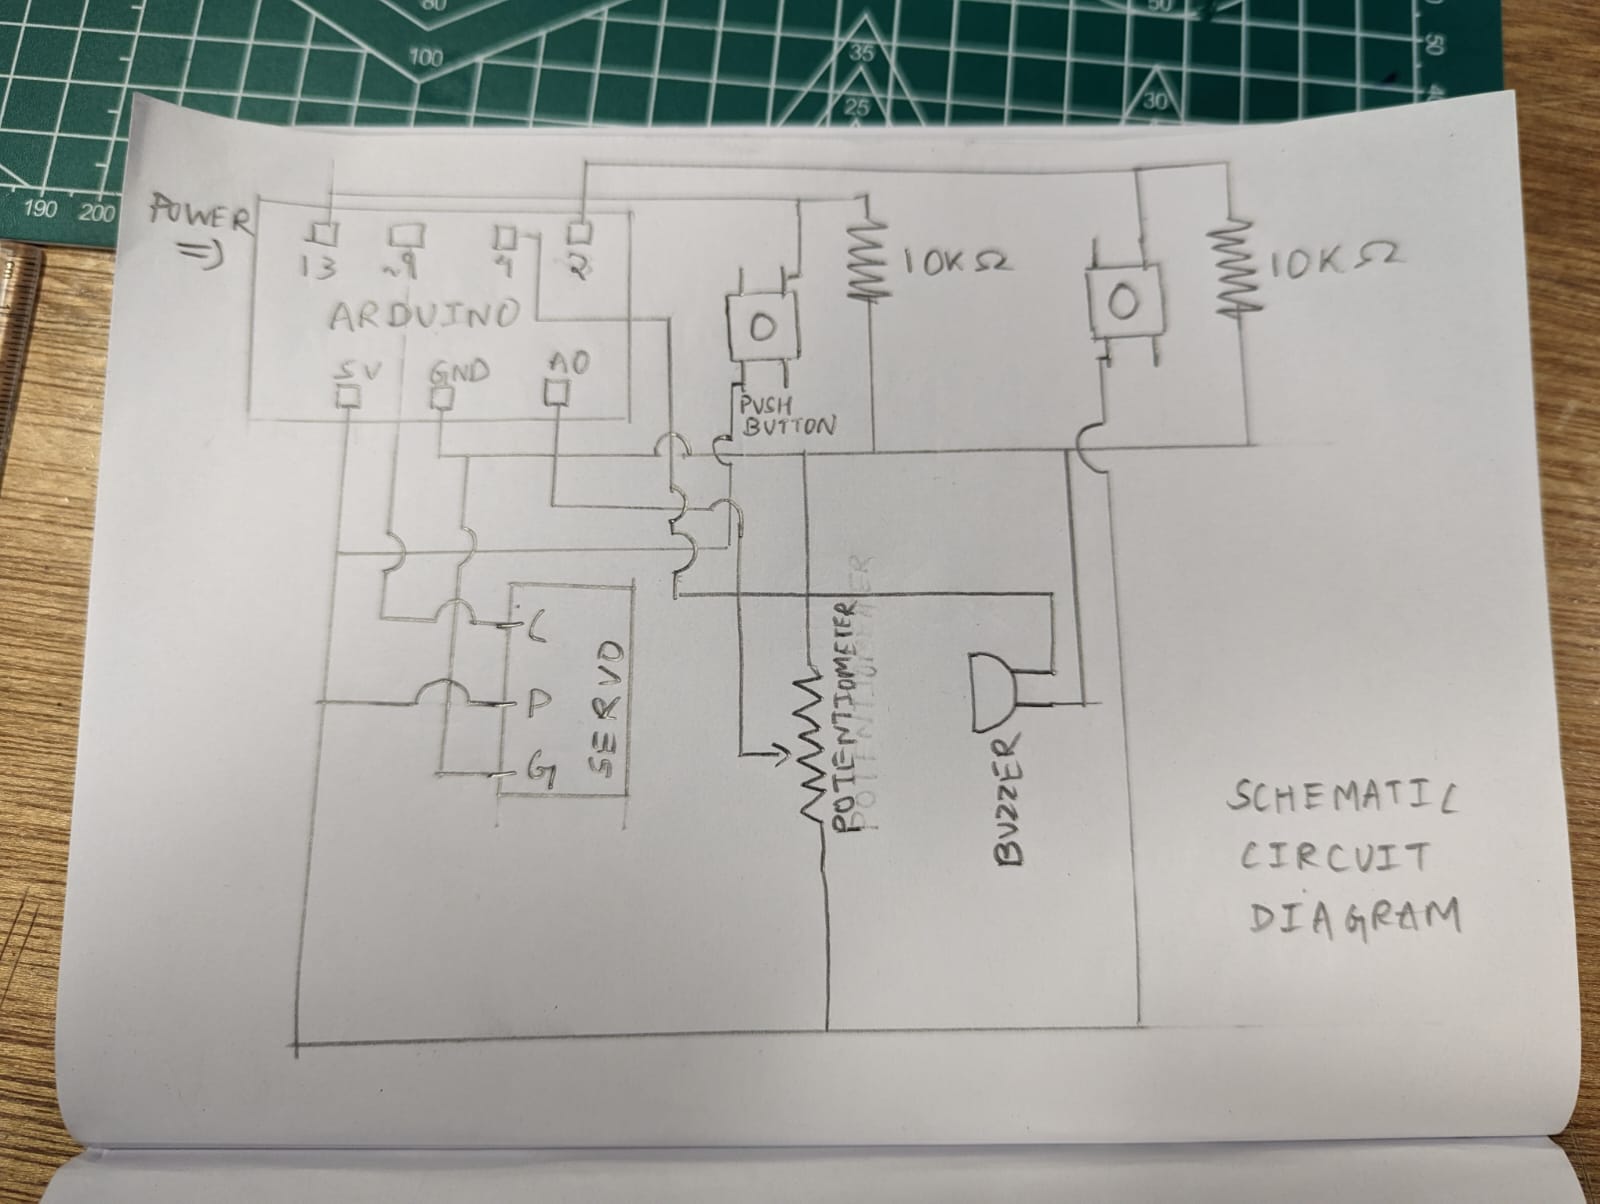
For the circuitry, I have had to do some soldering. For the setup of the circle, I have designed a circle with an inner radius of 20 cm and outer radius of 45 cm. The circle is divided into 5 segments which are laser cut to acrylic plates. Under each segment there is an FSR (force sensing resistor), which all are parallel to each other and are in series with 10k Ohm resistor. The values are read analog.

In terms of software, I have had to commit day and nights as there were to many areas to cover which I quickly realized was too much for my plate. For each tile I have utilized different approach. The first tile encompasses a simple representation of knowledge by an image of a quote on an old paper in a library. The second tile has a song playing on a Spotify interface with respective lyrics that touches upon life, youth and joy. The third tile uses the screen recording that I have taken of my own reels feed in instagram. I wanted to incorporate ‘scrolling’ as it is one of the biggest escape/distarction methods I use in my daily life, and as I have recently lost my phone I have been especially realizing how refreshing it is to not have these distractions. In the third tile there is a video that pops up that mentions you have to jump to reach stars which is shadowing. The user has to make the choice of continuing to the next tile themselves, as this is a conscious decision I made. If there is no decision to leave, you are stuck in the loop of social media forever. In the fourth tile, there is a starry night, with a girl sitting on a moon. When the use jumps on the tile the star gets closer and closer to the girl. When the girl reaches the star or user just moves onto the next tile without trying to reach the star, the 5th tile starts. In the 5th tile, there is cycles by Mac Miller playing, with a relaxing image of a midnight beach. This room is designed to be contemplative where the user should just reflect and absorb. When the sequence finishes the final page is prompted. The final page clarifies the concept of the “hero’s journey” and talks about the overarching theme of each tile, and makes a note on how we are all on our own journeys in the company of each other.


The start page. The icon lights up when the mouse is hovered above.

In the implementation side, I had to experiment with different fonts, images, video representation, concept markers and general design. Managing sound and video was especially challenging.

The user only has to take steps as they seem to fit. Similarly they should jump on the 4th tile if that’s something they wish for. They will be having headphones on as well as a tablet in their hands which they can receive all the inputs.

Hero’s Journey – Final Sketch

The link for my sketch.

Arduino Code

My Arduino code is very simple which 5 analog readings are received and passed together at each loop to the serial connection p5.js as follows:

void setup() {
  Serial.begin(9600);
}

void loop() {
  //receives information from the analog pins accordingly and assigns them 
      int tile1 = analogRead(A0);
      int tile2 = analogRead(A1);
      int tile3 = analogRead(A2);
      int tile4 = analogRead(A3);
      int tile5 = analogRead(A4);
  //passes the readings seperated by comma from the pins directly to p5js  
      Serial.print(tile1);
      Serial.print(',');
      Serial.print(tile2);
      Serial.print(',');
      Serial.print(tile3);
      Serial.print(',');
      Serial.print(tile4);
      Serial.print(',');
      Serial.println(tile5);
  //marks the end of 1 run of data by continuing to a new line
}


p5.js Code

In p5.js code is quite long for this code and therefore please follow the following link to reach the editor that hosts my p5.js code.

I have described the general progress of the experience in terms of p5js in the previous section. One thing interesting about my code is that since creating canvas and creating a video element at the same time is not allowed, instead I displayed the videos by passing them as images and displaying them quite fast. This allowed me to switch videos and come back to any, play around with displays, and music.  There is also more freedom in terms of the placement of the video displayed. Basically, the video becomes that is comparatively way easier to manipulate in p5js. However, there needs to be considerations for the frame rate of the sketch. The following is tile 3 code, one of the parts in which I implemented this method:

let organizerCount = 0;

let changeVideo = 0;
let duration = 0;

//the main setter for the videos has to be called once
function organizer() {
  short.size(350, 1.78 * 350);
  short.loop();
  short.hide();
  reel.size(350, 1.78 * 350);
  reel.loop();
  reel.hide();
}

//function checks whether there is pressure on the next tile
//to prompt up the next tile event
function tile3Function() {
  if(dataTile4 > 100){
    //the videos are stopped and the selector value is changed
    reel.stop();
    short.stop();
    selector = 4;
  }
  
  if (!organizerCount) {
    //the organizer function is called only once
    organizer();
    //escape from if condition
    organizerCount++;
  } 
  //setup the main reel video with the 'jump for stars' video 
  //popping up randomly
  else {
    background(255);
    frameRate(60);
    //put out video image by image in order to have a canvas to 
    //manipulate
    let img = short.get();
    let mg = reel.get();
    //formatting
    strokeWeight(0);
    stroke(0);
    fill(0);
    //the bacground of the phone is black
    rect((width - img.width) / 2, 20, 350, 1.95 * 350);
    //randomly prompt up the 'jump for stars' part
    if (changeVideo == 2) {
      //stop the main reel video
      short.pause();
      image(mg, (width - mg.width) / 2, (height - mg.height) / 2);
      changeVideo = 2;
      duration++;
      //run the jump for the stars video for a set time
      if (duration == 60) {
        changeVideo = 0;
        //switch back to the main reel
        short.play();
        duration = 0;
      }
    } 
    //the random value generaor prompt the 'jump for stars' video
    //and runner for the main reel video
    else {
      changeVideo = int(random(1, 900));
      image(img, (width - img.width) / 2, (height - img.height) / 2);
    }
    //phone image on the videos that are played
    phone.resize(img.width * 2.55, img.height * 1.35);
    image(phone, width/10.2, -80);
  }
}

Communication between Arduino and p5.js

I have used the exemplary communication that was given to us in the class. Hence, there is the following snippet in my p5js sketch to receive serial data from Arduino, as well as the needed library and html edit for this communication. Reading for the p5js from Arduino checksfor 5 data points and stores them into 5 variables to be used in other parts of the code.

function readSerial(data) {

  if (data != null) {
    // when there is an actual message, receive and split the message
    let fromArduino = split(trim(data), ",");
    // if the right length, then proceed and assign one by one to variables
    if (fromArduino.length == 5) {
     
      dataTile1 = fromArduino[0];
      dataTile2 = fromArduino[1];
      dataTile3 = fromArduino[2];
      dataTile4 = fromArduino[3];
      dataTile5 = fromArduino[4];
      print(
        dataTile1 +
          " " +
          dataTile2 +
          " " +
          dataTile3 +
          " " +
          dataTile4 +
          " " +
          dataTile5 +
          "\n"
      );
    }
}

There is also another function that prompts up when space bar is pressed to establish the serial communication between Arduino and the p5js editor.

function keyPressed() {
  if (keyCode == 32) {
    // important to have in order to start the serial connection!!
    setUpSerial();
  }
}

Challenges

The whole project was quite stressful for me as I felt early on that there were some loopholes in the logic and storytelling aspect of it. Despite figuring out the physical interaction of it to be simple and clean, I realized that even after giving days to plan out the storytelling did not change how complicated it turned out to be in the end. I was trying to sketch out each tile and transitions between tiles as well as the general storytelling framework I was going to use for so long, that I experienced a little withdrawal in my capability figure this out. So I just simply sat down and drafted what I had on my mind till now.

In terms of Arduino, the most challenging part was to figure out how to evaluate data to detect jumping, as 1 jump would give consecutive no pressure values to p5js, which disrupted the work on my tile 4. Hence, I decided to counter this by setting the frame rate a set value, so that irrespective of the speed that Ardino delivers to the computer the receiver of the data would be ordered and easy to analyze and deal with. After doing that, I was able to see trends in how the force reading changes during a jump and make the necessary adjustments to register jumps one by one.

The p5js section is definitely more complicated part of my code, and without doubt at every tile (out of 5) there was a long design process as I tried out styles. I incorporated videos and sounds heavily as my experience with this semester was completely defined by videos and sounds as well. In doing that, for example, in the distraction (scrolling in Social Media) video I had to find a way to have the video on but also a canvas so that I can have a phone silhouette on as well as switch between 2 video entities randomly. Figuring out this part was very challenging and had to do a lot of research in terms of how to run videos in p5js. I had a similar struggle in controlling sound files as well, which required a similar amount of commitment in its logic.

While doing the p5js, the rest of the methods I used were not completely new but still challenging. An issue I have had problems till now is the completeness and digestibility of the total experience. Despite putting more time into the design and storytelling sketch this time, I felt that there was still aspects that just did not feel complete. For example, I spent such a long time on tile 2 (which a song is listened in the topic of jot of living), I changed the construction of the page at least 10 times, because I was not able to figure out what kind of delivery worked best out of each option in the grand scheme of the project. Looking at the user reactions, I think the project needs a pamphlet prior to being used, that will allow the users to get into the mindset of the project.

Successes

The experience finally running from the start to finish was what I felt the most proud about, as I have been working on it piece by piece for so long. I’m especially the most proud about the simple experiences like in the last tile just watching the night sea roll to sound of Circles playing. Similarly, reaching the stars tile is so simple yet feels so important and beautiful to me. I was happy to be able to put a concept that I felt to be true and constantly felt around me into a project. I always felt that we were all so consumed with our struggles, successes, distractions, reflections all the time, which always circled back to start. Slump would appear every other week. We would overwork ourselves for a couple weeks every now and then. We would become especially introspective every now and then. I just wanted to concretely draw this process out, personalized with the tokens that I believed marked this journey. My main goal all along the project was to have the scene after tile 5, where many circles appear, intersecting each other. This is what I felt thankful for the most throughout the whole semester. We all had to go through our journeys but it felt even more worthy because we got to have each other’s company: intersecting circles/journeys with our intersecting lives.

Future Improvement

For future improvement, I would want to make this project even more immersive. I feel that every moment of it works to establish a feeling or understanding in the user, which requires the full attention of the user. Hence, I was thinking a fully immersive experience that would limit the user’s ability to look away would definitely align with my project. This would also help to emphasize that our power is on how we respond to what comes our way. We get to look away (step away), but we don’t get to just not see. I think that in terms of this project, this was the overarching dynamic that was created and there are many ways this could be implemented by changing the experience’s location from computer screen, to projected screen on 4 walls inside a small chamber created with projection fabric.

User Testing

User testing was done but I cannot paste the specific video/photos due to privacy reasons. However admittedly there was haste in terms of rushing through the steps similar to my previous project in midterm. It seems that I will have to think more about how to handle this issue by changing the interface or giving a booklet of directions to read before users try out the the journey.

Additional User Testing:

User Input Highlights:

The user did not mention hardships in terms of the instructions of the experience.

There were interesting insights and take about the individual perception of the journey.

The linked circle outro was especially a favorite, as according to the user it emphasized how people come by to our lives and even if they have to leave, there is a possibility they will be back as there are two points of intersection between each circles.

The user made interesting comments about the distraction tile, and how it was constant battle between looking at the reels and looking at the “reach the star” reel.

The user mentioned that it did not feel as if it was a circle but was more of a path as they were not the same person  at the end of the journey. After talking about my inspirations of hero’s journey concept and how I made parallels between the literary device and the experience, they found it very intriguing. They think that the other users should be redirected to receive more information on hero’s journey upon going through the project as well.

The user felt that instructions were generally clear. They did not know what to do after being trapped in the reflection  room, but as this was my intention as a part of the project I though it was exactly how it should be when I saw the user just switching between tiles to try to get out of reflection room. The user thought it was a good example of the things we could not run away from/just leave.

Final Project Progress 1

Concept

For my final project I want to utilize force sensors that are placed under placards to create a walking path. The path will be circular and walking a full circle will be enough to complete the experience. Basically, the person will be holding a tablet with headphones on while walking the path. The person will get to choose one of the 2 option from the computer in the middle: escape or commit. According to that what they will see image/video sequence will be decided and what is displayed on the screen will gain mess or clarity according to how much of the circular path the user finishes.

Goal

There are messages that will be displayed when the person returns to where they have started. For the person who chose to escape, the image and the song that they will be watching will be so strong and attention seeking that it will be truly interruption when the final screen comes by at the end, asking “Look around you, how did we end up here?”

Similarly, for the person who chose the commit sequence, there will be an ending message saying “Different stories but same circles. Where do you wanna go from here?”

Method

I will use nearly 5 force sensors, Arduino, p5js, a headphone, laptop and a tablet to make this experience.

HW 8: 3 in-class exercises

Group mates: Swostik Pati and Aibar Talip
The Arduino circuit is kept the same as it was directed in the Lecture Notes.

Exercise 1 – Code & Video

The Arduino Code and the P5.Js code were directly used as given in the lecture notes, except for the draw function of p5.js. We amended the code so that turning the potentiometer would change the horizontal location of the ellipse. On the other hand, the LDR input would amend the vertical location of the ellipse. We also omitted the background and fill functions in order to not have multiple responses from the p5js visually for the actions observed on the potentiometer and the LDR.

The new draw function used in the p5.js code is shown below:

function draw() {
  background(0);
  fill(255);
  
  ellipse(map(alpha, 0, 1023, 0, width),map(rVal, 0, 1023, 0, height),40,60);
 
  // one value from Arduino controls the background's red color
  //background(map(rVal, 0, 1023, 0, 255), 255, 255);

  // the other value controls the text's transparency value
  //fill(255, 0, 255, map(alpha, 0, 1023, 0, 255));

  if (!serialActive) {
    text("Press Space Bar to select Serial Port", 20, 30);
  } else {
    text("Connected", 20, 30);
    // Print the current values
    text('rVal = ' + str(rVal), 20, 50);
    text('alpha = ' + str(alpha), 20, 70);
  }
}

Exercise 2 – Code & Video

For this exercise we amended the Arduino code a little as well as the p5.js code. In order to control the LED brightness, we used the keyboard, Up and Down arrows, as the input for the p5.js code that was running and then send this changing value to the LED that was connected in PMW pin 5. We analog wrote to this pin, by the incrementing/decrementing value of the LED, which resets 0 if it passes 255, and vice versa.

The new draw function and the keyPressed() function is as follows:

function draw() {
  background(255, 255, upVal,upVal);

  if(upVal==255) upVal =0;
  if(upVal==0) upVal=255;

  if (!serialActive) {
    text("Press Space Bar to select Serial Port", 20, 30);
  } else {
    text("Connected", 20, 30);
  }
}


function keyPressed() {
  if (keyCode == UP_ARROW) {
    upVal += 10;
  }
  if (keyCode == DOWN_ARROW) {
    upVal -= 10;
  }
  if (key == " ") {
    // important to have in order to start the serial connection!!
    setUpSerial();
  }
}


The following change is made to the p5.js code in the definition of the values that are sent to the Arduino, as the information for the LED at pin 5 is not digital but analog now, while the pin 2 LED is set to 0 indefinitely.

//////////////////////////////////
      //SEND TO ARDUINO HERE (handshake)
      //////////////////////////////////
      let sendToArduino = upVal + "," + 0 + "\n";
      writeSerial(sendToArduino);

Amendments to the Arduino code are as follows, in the section where the LED values are set:

// inside loop function of arduino
void loop{
.....
    int right = Serial.parseInt();
    int left = Serial.parseInt();
    if (Serial.read() == '\n') {
      digitalWrite(leftLedPin, left);
      analogWrite(rightLedPin, right);
...}


Exercise 3 – Code & Video

Only the p5.js code from the lecture notes is amended for the exercise after being combined with the gravity wind example given while the original Arduino code from the lecture notes is used. The range of the potentiometer is divided into 3 intervals, which accordingly sets the wind vector as -1, 0, and 1, as these are the acceptable values for the wind according to its direction. A flag for checking a collision has happened is put in place, in which ever case it is true the LED on pin 2 is turned on, and everytime it is “not collided” the LED is turned down.

The final version of the p5.js code used is as follows:

let bFlag = true;
let velocity;
let gravity;
let position;
let acceleration;
let wind;
let drag = 0.99;
let mass = 50;

let rVal = 0;
let upVal = 0;
let alpha = 255;
let left = 0;
let right = 0;

function setup() {
  createCanvas(640, 360);
  noFill();
  position = createVector(width / 2, 0);
  velocity = createVector(0, 0);
  acceleration = createVector(0, 0);
  gravity = createVector(0, 0.5 * mass);
  wind = createVector(0, 0);
}

function draw() {
  background(255);
  applyForce(wind);
  applyForce(gravity);
  velocity.add(acceleration);
  velocity.mult(drag);
  position.add(velocity);
  acceleration.mult(0);
  ellipse(position.x, position.y, mass, mass);
  if (position.y > height - mass / 2) {
    velocity.y *= -0.9; // A little dampening when hitting the bottom
    position.y = height - mass / 2;
    if(bFlag){
      print("collided");
      bFlag=false;
      left = 1;
    }
    else
      left=0;
  }
  else{
    bFlag=true;
    left=0;
  }

  // one value from Arduino controls the background's red color
  //background(map(rVal, 0, 1023, 0, 255), 255, 255);

  // the other value controls the text's transparency value
  //fill(255, 0, 255, map(alpha, 0, 1023, 0, 255));

  if (!serialActive) {
    text("Press Space Bar to select Serial Port", 20, 30);
  } else {
    text("Connected", 20, 30);

    // Print the current values
    //text("rVal = " + str(rVal), 20, 50);
    //text("alpha = " + str(alpha), 20, 70);
  }
//wind.x = map(alpha, 0, 1023, 0, 255);
  if(alpha>670)
    wind.x=1;
  else if(alpha>320)
    wind.x=0;
  else
    wind.x=-1;
  print(wind.x);
 
  // click on one side of the screen, one LED will light up
  // click on the other side, the other LED will light up
}
function keyPressed() {
  if (key == " ") {
    // important to have in order to start the serial connection!!
    setUpSerial();
  }
  if(keyCode==UP_ARROW){
    position = createVector(width / 2, 0);
  }
  if (key == " ") {
    mass = random(15, 80);
    position.y = -mass;
    velocity.mult(0);
  }
}

// This function will be called by the web-serial library
// with each new *line* of data. The serial library reads
// the data until the newline and then gives it to us through
// this callback function
function readSerial(data) {
  ////////////////////////////////////
  //READ FROM ARDUINO HERE
  ////////////////////////////////////

  if (data != null) {
    // make sure there is actually a message
    // split the message
    let fromArduino = split(trim(data), ",");
    // if the right length, then proceed
    if (fromArduino.length == 2) {
      // only store values here
      // do everything with those values in the main draw loop
      rVal = fromArduino[0];
      alpha = fromArduino[1];
    }

    //////////////////////////////////
    //SEND TO ARDUINO HERE (handshake)
    //////////////////////////////////
    let sendToArduino = left + "," + right + "\n";
    writeSerial(sendToArduino);
  }
}

function applyForce(force) {
  // Newton's 2nd law: F = M * A
  // or A = F / M
  let f = p5.Vector.div(force, mass);
  acceleration.add(f);
}

Reflections

These exercises were very enjoyable and definitely interesting to try as they allowed us to grasp the communication between the p5.js and Arduino way better. We were able to get exercises in for this complex relationship before devising our plan for the final project.

HW 7: Musical Instrument – Irem Naz Celen & Swostik Pati

If you have ever wondered how it would be to a starting DJ, this design is for you!

Alternative link to the video:https://drive.google.com/file/d/1kGo-VwdNhDPFH2HRHXRKaNn54ME_v5gZ/view?usp=sharing

Inspiration

The inspiration for this project comes from a DJ controller. We wanted to design a physical interface that would allow a range of motions by the DJ. Our focus was on an easy and intuitive design that would mimic a basic DJ controller. The 2 requirements that had to be fulfilled were a beat-making mechanism as well as a musical mechanism in which the frequency can be controlled.

Concept

In order to make our inspiration become a reality, we have decided to produce the musical notes in different frequencies of 7 tones through the buzzer while making a beat maker using the servo. A push button connected to the servo slams the handle on the wooden surface imitating the beat sound. On the other side, another button is used to switch between 7 different notes that are played in the buzzer. Potentiometer that feeds back to the buzzer allows the frequency of the tone that the buzzer is playing to go higher when it is twisted right, and lower when twisted left.

Implementation

In the implementation of the project an Arduino Uno, a servo, 2 push buttons, a buzzer, and a potentiometer are used. Servo’s rotating wing is taped to plastic handled screwdriver while the servo itself is fixed on a wooden plate.

The first push-button retains information on the occasions where it is pressed. A push that is recorded prompts the screwdriver that is connected to the rotating wing of the servo to switch from a levitating position to slam on the wooden fixation plate. The sound produced is similar to a beat sound that can be achieved from an electronic device. On the other side of the board, the push button and potentiometer both record information that changes the state of the buzzer. The buzzer is constantly creating sound. The range of sound is modeled from a piano’s octaves, and therefore there are 7 keys in 7 different octaves that can be produced from this buzzer according to the code. The frequencies of these notes are numerically written into the notes double array.  The push button for the buzzer (stationed towards the right side of the breadboard) switches between the 7 notes in the order of B, C,D,E,F,G, and A. Potentiometer on the other hand, switches into higher pitch/frequency of the same note, visually can be thought of as higher octave of the same note on the piano, when turned towards the right. There are again 7 octaves possible, in which the most left position of the potentiometer is the lowest frequency the note exists in while the most right position is the highest frequency of the note.

This is the code for the said implementation.

//Include Servo Library
#include <Servo.h>

//servo
int servoPin = 9;
int pos1 = 40;
int pos2 = 110;
int dt = 100;
Servo myServo;


//pushButton for servo
int pbPin = 13;
bool pbFlag = true;

//pushButton for note change
int notePin = 2;
bool nbFlag = true;
int currNoteI = 0;
int mappedValue;

//potentiometer
int potPin = A0;

//notes array
int tones[7][7] = {{31, 62, 123, 494, 988, 1976, 3951}, {33, 65, 131, 262, 523, 1047, 2093}, {37, 73, 147, 294, 587, 1175, 2349}, {41, 82, 165, 330, 659, 1319, 2637},
  {44, 87, 175, 349, 698, 1397, 2794}, {49, 98, 196, 392, 784, 1568, 3136}, {55, 110, 220, 440, 880, 1760, 3520}
};

//buzzer
int tonePin = 4;

void moveServo() {
  delay(dt);
  myServo.write(pos1);
  delay(dt);
  myServo.write(pos2);
  delay(dt);
}

void setup() {
  // put your setup code here, to run once:
  Serial.begin(9600);

  //  setting up servos
  myServo.attach(servoPin);
  myServo.write(pos2);

  //  setting up pushbutton
  pinMode(pbPin, INPUT);

  //  setting up buzzer
  pinMode(tonePin, OUTPUT);


}

void loop() {
  // put your main code here, to run repeatedly:
  //pushbutton and servo implementation
  int pbVal = digitalRead(pbPin);
  if (pbVal == 1 && pbFlag) {
    //high
    moveServo();
    pbFlag = false;
  }
  else if (pbVal == 0) {
    pbFlag = true;
  }

  //potentiometer implementation
  int potValue = analogRead(potPin);
  mappedValue = map(potValue, 0, 1023, 6, -1);
  //  Serial.println(mappedValue);
  //  Serial.println(potValue);

  //  pushbutton and note change implementation
  int nbVal = digitalRead(notePin);
  if (nbVal == 1 && nbFlag) {
    //high
    if (currNoteI < 6) {
      currNoteI++;
    }
    else {
      currNoteI = 0;
    }
    Serial.print("The current note is: ");
    Serial.println(currNoteI);
    nbFlag = false;
  }
  else if (nbVal == 0) {
    nbFlag = true;
  }

  //buzzer
  tone(tonePin, tones[currNoteI][mappedValue]);

}


Schematic Diagram

Challenges

The main challenge that we have come across was making the location of the push buttons and the potentiometer user-friendly while taking wires into consideration. We had to play around with different versions of the breadboard construction multiple times to make sure the musical instrument was approachable and easy to use.

Moreover, we also considered multiple circuit designs for the buzzer in order to control the volume by adding resistors. Upon multiple trials, we have decided not to add a resistor for maximum volume and clarity.

For servo attachment, we looked around for a considerable time to find the most suitable extension to make the optimum beat sound. Before deciding on attaching the screwdriver to the rotational component of the servo, we considered using plastic and wooden extensions. For gaining the right sound of a beat, we realized we needed more weight for the attached piece, hence the final screwdriver extension was chosen. Putting a wooden plate below enhanced the experience, after our trial and error.

Another consideration was given to the response time of the servo, by adjusting the delay time in the moveServo() function. The final adjusted value of the delay was given according to what sounded natural according to the frequency at which the push button of the servo was pushed.

Reflections

Making this project together as a group was very enjoyable, which made the design process more exciting and fun. A part to improve on in the next projects would be in terms of having more power in choosing which tone to play on the buzzer rather than having to follow the set order that is programmed in the current version of the code. On a more general note, we would love to improve our ability to follow up what is happening in the circuit as it gets more complex, and making the schematic together definitely allowed us to work on that.

Assignment 6: Handshake-meter

Concept

The concept of this project comes purely from my desire to use a analog sensor that we have not used before. For this reason I wanted utilize the temperature sensor we have. For the ways which I could integrate the sensor first i though about a mechanism like alarm clock which would stop ringing if you placed your hand over it (due to immediate temperature difference) however since we had to use one digital sensor and 2LED s still, I had to choose another sensor. So I decided to switch that can be used to switch from an LED to another one.


Implementation

For this project, I first connected the temperature sensor. Since it takes time for the sensor to relay information on the temperature change I decided to put delay information. For the conversion of the read value from the sensor to the intelligible temperature value, this link can be used. When the jump level for the temperature is achieved, the red LED is turned on. On the other hand, when the switch is pushed the green LED is on until there is a significant drop on the temperature sensor again.

int tempPin = A0; //the temperature pin
int gLed = 3;
int rLed = 4;
int buttonPin = 8;
int ctr = 0;
int data1;
float temperature1;

void setup() {
  // Init serial at 9600 baud
  Serial.begin(9600);
}

void loop() {
  if (ctr == 0) {
    //initial temperature is recorded only once at the start and stored for use
    data1 = analogRead(tempPin);
    temperature1 =  100 * ((data1 * 5.0 / 1024.0) - 0.5);
    //the temperature recorded can be seen at the monitor
    Serial.print("Temperature: ");
    Serial.print(temperature1);
    Serial.println(" *C");
    ctr++;
  }

  //reads pure temp sensor data
  int data2 = analogRead(tempPin);
  // conversion to temperature from the data
  float temperature2 = 100 * ((data2 * 5.0 / 1024.0) - 0.5);;

  //the difference is recorded
  float difference = temperature2 - temperature1;

  //difference from the current to the initial temperature is mapped for the green LED
  analogWrite(gLed, map(difference, 0, 3, 0, 255));

  //red LEDis lit up according to the button pressed
  int buttonState = digitalRead(buttonPin);
  digitalWrite(rLed, buttonState);

  //difference pattern observed in the monitor
  Serial.print("Difference: ");
  Serial.print(difference);
  Serial.println(" *C");
  delay(800); // wait a second between readings
}

Schematic Diagram

Challenges

It was quite hard to do trial and error on the temperature data, as it was quite experimental. I had to watch through the relayed data some time to figure out which data cutoffs to use, as well as delay. It is still open to changes and the whole effect of the project would change according to these values that are arbitrarily determined. The project had similar challenges to plans that were not brought into reality before. Its in soul similar to Simone Giertz’s projects.

On the other hand, the mechanism of having it on my hand, and making sure that it didn’t move and was still usable was also very hard. I experimented with a couple of materials to make sure that the cables did not slip away, or the temperature sensor didn’t give faul values.

Reflections

This was a completely experimental project and even its purpose is questionable. I wanted to make a commentary on the social construct of what is a required amount to handshake and how we view it as weird if it is too long etc. I made the LEDs work in reverse, as red when you are waiting for it, and green if you handshake for too long (measured in temperature). It was quite fun and frankly purposeless and I feel like that’s why I enjoyed building this project.

Assignment 5: Creative Switch of Buddhas

Inspiration

For this creative switch example, I was inspired by these small Buddha statues I bought long ago. I like that there is a specific way for these Buddhas to be lined up, in relation to the Japanese sanbiki no saru. So I have decided to make a creative switch that relates to this initial idea.

Concept

In order to be true to my inspiration, I decided that I wanted the LED to light up when the statues are lined up or at least in close contact with each other, depending on the understanding of the user. This would signify the saying or the concept itself. Therefore, in order to make this concept come true, I had to find an inductive material that I can attach to them, as the statues themselves are from ceramics.

Implementation

I decided to start by figuring out what kind of circuitry I had to build that would light up the LED when the statues are put together. I put tapes under the statues and then connected them to large coins. On the bottom of the coin, for I didn’t see and I don’t know statue, I connected positive and ground wires respectively, while the I didn’t hear statue was only taped above the coin and there was no wire passing true. When it comes to making the circuit work, which is powered by pin 13 of the Arduino automatically when plugged in without any code running, statues have to be put together so that their base coins touch each other, preferably in the proper line-up but would work in any circumstance. The concept of these statues is also a saying in my country which I enjoy using quite a lot. Hence, as a source of wisdom, I like seeing them together, especially in the context of Buddha, and I feel like it gives a similar commentary to enlightenment when they are lined up.

Challenge

It was quite hard to figure out the conductivity and make sure that wires were secured properly to the coins as well as the statues to the coins. Hence, I had to spend time playing around with the wires to make sure that switch would work at all times. It was also challenging to find inspiration as well, but I quite enjoyed settling on the philosophical enlightenment, Buddha, and 3 wise monkeys analogy.

Reflection

This project was quite fun to implement, and I really enjoyed bringing something from my daily life to the project. It was a great start for the future. I’m looking forward to the future motions of playing around with Arduino and projects.

Midterm – 3 Rooms

You can visit my project titled “3 rooms” by clicking this link: https://editor.p5js.org/iremnaz/full/aFq48HNIB

or


Project Background:

This project is a visual, auditory, and interactive experience that hopes to include the user through interactivity allowed only in limited ways. The level of involvement and “the representation” of the user slowly recedes, only to be established somewhat at the end. The experience hopes to be enjoyable, surprising, disorienting, and thought-provoking.

Each room is chosen and designed after many trials and errors, as there is no set way of looking and behaving for each room, except for the feelings it should be awakening.

The Workings Of It:

Prior to each room, the instructions of what you can do is explicitly given.

For room 1 you can use the arrow keys.

For room 2 you can use the mouse to Click only on the decided sections of the screen.

For room 3 you can only press the ENTER key.

The user is able to proceed using the W key between information pages, but can never go back or exit the experience. These were conscious choices.

Things That Work and Do Not Work:

Room 1 definitely turned out well, as I especially love the colors, movements, and songs inside it.

Room 2 feels like there is room for improvements, purely by using self-created and themed artwork instead of outsourcing from royalty-free pieces. I have the feeling that experience in room 2 has more room for improvement.

Room 3 was especially meaningful for me. I feel like I did all of this project to actually be able to make room 3. It also, as a theme, holds a lot of meaning for me, and I totally enjoyed making it.

Code Snippets:

The code for the sketch runner is as follows:

Codes for rooms are not given here as there are nearly 800+ code lines. Please check them out in the p5.js sketch.

let roomChoice = 0;
let tintB=255;

//preloading the necessary images and sounds
function preload() {
  sound1 = loadSound("myMusic.mp3");
  imgT = loadImage("myTrees.png");
  ph2 = loadImage("mount.png");
  ph3 = loadImage("cliff.png");
  img1 = loadImage("1.jpg");
  img2 = loadImage("2.jpg");
  img3 = loadImage("3.jpg");
  img4 = loadImage("4.jpg");
  img5 = loadImage("5.jpg");
  img6 = loadImage("6.jpg");
  sound = createAudio("chatter.mp3");
}

//setting up with the canvas size
function setup() {
  createCanvas(400, 400);
  setRoom2();
  img = img1;
}

//the room selection menu is follows in draw
function draw() {
  switch (roomChoice) {
    case 0:
      main();
      break;
    case 1:
      preRoom1();
      break;
    case 2:
      ready1();
      break;
    case 3:
      situation1 = runRoom1();
      if (situation1 == true) {
        roomChoice = 4;
      }
      break;
    case 4:
      preRoom2();
      break;
    case 5:
      ready2();
      break;
    case 6:
      situation3 = runRoom2();
      if (situation3 == true) {
        roomChoice = 7;
      }
      break;
    case 7:
      preRoom3();
      break;
    case 8:
      ready3();
      break;
    case 9:
      runRoom3();
      break;
  }
}

//this is the main room (intro room)
//setsup the initial aura 
function main() {
  stroke(255);
  strokeWeight(1);
  background(0);
  fill(255);
  textFont("Georgia", 15);
  text("Welcome to the experience!", 5, height / 10);
  text("This is you:", 5, (2 * height) / 10);
  hello = new user1(width / 2, height / 2);
  hello.draw();
  text("You will be experiencing 3 rooms.", 5, (8 * height) / 10);
  text("Press W to proceed.", 5, (9 * height) / 10);
  boundary1();
  if(tintB>0){
  background(0,tintB);
  tintB-=1;}
}

//just before the room 1 opens this is the last time 
//to take breather, press 2 to proceed
function ready1() {
  stroke(255);
  strokeWeight(1);
  background(0);
  fill(255);
  textFont("Georgia", 15);
  text("Are you ready?", width / 2 - 50, (1.5 * height) / 10);
  text("Press W to proceed.", width / 2 - 65, (9 * height) / 10);
  hello = new user1(width / 2, height / 2);
  hello.draw();
  boundary1();
}

//are you ready page before room 2 resumes
function ready2() {
  stroke(255);
  strokeWeight(1);
  background(0);
  fill(255);
  textFont("Georgia", 15);
  text("Are you ready?", width / 2 - 50, (1.5 * height) / 10);
  text("Press W to proceed.", width / 2 - 65, (9 * height) / 10);
  hello = new user1(width / 2, height / 2);
  hello.draw();
}

//are you ready page before room 3 resumes
function ready3() {
  stroke(255);
  strokeWeight(1);
  background(0);
  fill(255);
  textFont("Georgia", 15);
  text("Are you ready?", width / 2 - 50, (1.5 * height) / 10);
  text("Press W to proceed.", width / 2 - 65, (9 * height) / 10); 
}

//this is the page where instructions for room 1 is given
function preRoom1() {
  stroke(255);
  strokeWeight(1);
  background(0);
  fill(255);
  textFont("Georgia", 50);
  text("Room 1", 5, height / 10);
  textFont("Georgia", 15);
  text("Yellow line is your boundary.", 150, (3 * height) / 10);
  text("You exist, within it.", 7, (4.5 * height) / 10);
  text(
    "Experience room 1 by using the 4 arrow keys to move.",
    10,
    (6 * height) / 10
  );
  text(
    "Don't forget to dance, even if you don't want to.",
    30,
    (7.5 * height) / 10
  );
  text("even if you are lonely.", (2.5 * width) / 4, (8 * height) / 10);
  textFont("Georgia", 20);
  text("We are all happy here.", (1.2 * width) / 4, (8.8 * height) / 10);
  textFont("Georgia", 15);
  text("Press W to proceed to room 1.", 60, (9.5 * height) / 10);
}

//this is where instructions for room 2 is given
function preRoom2() {
  stroke(255);
  strokeWeight(1);
  background(0);
  fill(255);
  textFont("Georgia", 50);
  text("Room 2", 5, height / 10);
  textFont("Georgia", 15);
  text("You ONLY exist inside the yellow boundary.", 100, (3 * height) / 10);
  text(
    "When you click while you exist, you give life to the plant.",
    5,
    (4.5 * height) / 10
  );
  text("Experience room 2 by giving life to the plant.", 80, (6 * height) / 10);
  text(
    "When you click, you give love. You show effort.",
    5,
    (6.8 * height) / 10
  );
   text(
    "You have to show effort until you can move on.",
    70,
    (7.5 * height) / 10
  );
  textFont("Georgia", 20);
  text(
    "Is your love enough to grow the plant?",
    (0.4 * width) / 4,
    (8.5 * height) / 10
  );
  textFont("Georgia", 15);
  text("Press W to proceed to room 2.", (2 * width) / 4, (9.5 * height) / 10);
}

//this is where instructions for room 3 are given
function preRoom3() {
  stroke(255);
  strokeWeight(1);
  background(0);
  fill(255);
  textFont("Georgia", 50);
  text("Room 3", 5, height / 10);
  textFont("Georgia", 15);
  text("You DON'T exist.", 150, (2.5 * height) / 10);
  text("Until you are welcome here.", 7, (4 * height) / 10);
  textFont("Georgia", 20);
  text("Until you feel welcome here.", (1.5 * width) / 4, (5 * height) / 10);
  textFont("Georgia", 15);
  text("When you don't, everything looks foreign.", 30, (6 * height) / 10);
  text("Gather your courage and talk.", (2 * width) / 4, (7 * height) / 10);
  text("You talk when you PRESS on it. When you are ready.", 30, (7.8 * height) / 10);
  text(
    "Experience room 3 by pressing the ENTER key.",
    (0.2 * width) / 4,
    (8.8 * height) / 10
  );
  text("Press W to proceed to room 3.", (2 * width) / 4, (9.5 * height) / 10);
}

//this takes the keyboardinformation to change between 
//loading pages as well as the in-room movements
function keyPressed() {
  if (keyCode == ENTER) {
    counter = 0;
  }
  if (keyCode == 87 && roomChoice!=3 && roomChoice!=6) {
    roomChoice++;
    if (roomChoice == 3) setRoom1();
    if (roomChoice == 9) setRoom3();
    if (roomChoice == 10){tintB=255; roomChoice=0;}
  }
}

Reflections:

This midterm project really pushed me out of my comfort zone as I was confronted by artistic and built issues at the same time.

Per artistic issues, I feel that the way I have designed the introductory pages, the theme of the user icon with a ring around, as well as the themes in each room were kind of struggling to come through the other users. This was something I have realized both in my friends as well as classmates. In order to solve this, I did try to reorganize my introductory pages, and have the “Are you ready” pages stay until the user wishes to continue. These pages were where the difference in the user icon was explicitly shown different, and these pages were previously timed so that there were not enough time to grasp differences. However, I can see that even after making changes, the same issues persist to some degree. I think that by changing the design and flow of these intermediary stages between rooms, the experience can be improved. This is something that I definitely should focus on.

Per coding issues, I feel that each room was a struggle to make it work. Especially room 1, it was hard to figure out the pattern changes, their succession, and the user icon interaction with its environment. As there were many loops that are ongoing at the first part, we can see the icon motions lagging. Moreover, it was a lot of trial and error to have a feel for when to have the patterns change according to the song. Similarly, for room 2 sprites were quite the issue as they were not made in equal gaps, so I had to manually try and crop them. There was also a lot of trial and error in their placement in the sketch and the way they are cropped. In room 2, choosing any of the images was quite hard due to their processing but more importantly how they looked together. Room 3 was quite simple and straight forward in terms of the coding part, but figuring out the lines to be printed on the scene was quite hard.

I believe when I look at my journey overall, figuring out the storyline in each room, and the overall cohesion has been quite hard. Even after finishing the project, I can see that there is room for growth. I think an approach to figuring out this issue would be writing down the storyline on paper and seeing how it feels, instead of running the project over and over again.

Overall, I enjoyed making this project very much. However, it was definitely time-consuming as it pushed my creative and coding boundaries during the each stage. I feel excited to come back to this project and let it grow in the future.

Midterm Proposal – Naz

For my midterm project, I was inspired by “Everything is Temporary” by Joe Pease. You can find the link to the work he has done here:

In order to capture the same feeling that the video gave me, the temporariness of the surroundings, combined with the life going on in its own chaotic and messy way, even if we engage, if we don’t, and even if we try to. This temporary feeling is everpresent, when the weird realization hits us at a party, in a room of friends, and on the shore sitting at the edge of Saadiyat or being in the view of a beautiful mountain.

Therefore, I will be creating an interactive artwork where there will 3 rooms (as of now) with the following compositions. There will be available actions to the user which they will be briefed on before being put inside the room. The idea is to allow the user to have a set of actions, while the output of those actions not being what they wanted or tried to achieve at all, hence achieving the temporary feeling by highlighting our powerlessness in the outcomes of our choices.

Room 1: The rave

(room created through pattern making in p5js)

I basically want a room that is loud and chaotic with the sensory overload of voices and visuals in this room. The visuals will be produced by p5js using shapes and color contrast with respect to a black background, with the sound being outsourced from the internet. The user will be allowed to use right, left, up, and down arrows to go to any area of the screen. Depending on the area the user moves to on the screen the visual and sound will get amplified or toned down but never disappear.

Room 2: The home

(room created by a background of a picture)

I want to capture the chaos of home, where at one point the self seems to be disintegrating and lose its meaning in the face of the community. For this room, I will be using a picture that is dear to me (not the one provided here) in which all my friends are hanging out in my room in a chaotic manner. The user will be given the option to be able to “speak” (printing words on screen) however the voice of chattering will be exponentially rising as more attempts to speak are made, in which the users “seem” to be drowning.

Room 3: The nature

(room created by drawing a mountain using p5js)

I want to capture the serenity and calm of nature. My initial idea is to create a simplistic drawing of nature using p5js which looks mountainous and pristine. There is a small snowfall, and the user is given a specific set of input keys to make a fire. After the fire is set by the user, the snowfall seems to get faster and faster, covering every part of the “vision”, hence the screen.

Assignment 4 – Oh! Annabel Lee

In this assignment, I knew that I wanted to combine the process of creating a poem and going through a huge data chunk. Moreover, I was repeating Edgar Allan Poe’s poem Annabel Lee, for some time before making this poem. That’s why I decided to make a alt version of the original poem. In order to find what kind of data to incorporate into the data, I have went through data sites, and found a data set for a range of colors (1500+) with their rgb values. Thus I have decided to choose 2 colors from this set randomly and put it inside the first and third line of the 4 lines I chose from the main poem.

However for me it was important to have a type of data visualization in, so I wanted to do that by mapping the two colors of each poem on the screen like a gradient where the bottom of the screen would have one of the colors and slowly as it went up the screen it would transition to the other color. I achieved this by using lerpcolor and mapping the height of the y position in comparison to the bottom color, and drawing that color on screen line by line.

It was fun to try out different ways of having the colors on the screen, with huge bands, with gradient, in response to the speed of the mouse in the y-direction.

I feel that the main challenge was having also the poem written on the screen. I got the feeling that commanding the text, in terms of font, and coloring and filling, was hard to navigate and hard to preserve in response to the mouse’s position. I feel that understanding the dynamics of text function in relation to rest of the drawing functions that are available in p5js will be my challenge.

Link to p5js:

https://editor.p5js.org/iremnaz/sketches/xrBpShmUv

Assignment 3 – the sun and her flowers

For this piece which had to incorporate arrays and objects, I was inspired by the poetry book called “the sun and her flowers” by rupi kaur. While I was looking around at my desk, in order to get inspired on what to work on, my eyes got fixated on the cover and at that moment I decided that I wanted to do something that incorporated the book into my code, as my life has been entangled with the book up to that point.

Hence I first started by designing the sunflower class. The hardest part for me in this was making small circles that would form a silhouette of a circle altogether in the middle of the sunflower. The math to figure out to make sure that the final shape was also a circle took some time as well as trial and error, as even when I incorporated the right math, sometimes my results would be different due to misusing other commands (such as int()). After being able to make the middle of the sunflower, the petals were similar to drawing as it was an iteration of the ellipses in an angle around the middle of the flower. For an artistic choice, I decided to make them a range of yellow with also a range of transparency, so that it would give a feeling for the range of differences between flowers, hence adding to each one of the flowers’ uniqueness.

After finishing up the flower object, I worked on the sun and moon which share the same class, and this was pretty straightforward to make by making the constructor pass on the starting location of the sun and moon as well as their color, the rest of qualities for the two were common.

One thing I decided later on was making the flowers move downwards as the sun went out of the frame and the moon came, while the background darkened. This was particularly hard, as the making of the petals, center, and stem for each flower was unique, and while going down they should not be changing in each frame. Trying to figure out the mechanics of this, defining its most central variables in the constructor while the actual drawing happening was in the draw function of the sunflower took some time to perfect, but in the end, I was able to print each flower going down while keeping the same composition for petals and stem, while the middle would be dynamic, giving in a way more life to the flowers.

Link to p5js:

https://editor.p5js.org/iremnaz/sketches/YpKfMJJaH