Final Project: Across Kazakhstan 🐎

Yay, I could put my final idea into reality! 🏄‍♀️

Idea 🙆‍♀️

As you may have noticed, I had some difficulties in coming up with a project idea for so long, it took me 2 weeks… I had even started creating my first idea, which was about creating a 3D controller for a game. Honestly, I found this idea on the internet and just wanted to create my own snake game to use this controller. Yet the idea was really “half-baked” and I was not really excited about creating it, I thought that having a particular idea is enough to implement it. Yet, apparently not for me. Having a lot of struggles with the project idea, I talked to Professor Aaron, who emphasized that there should be a part of me in the project. Being lost for a couple of weeks, I got eventually inspired by the song of the Kazakh artists (https://www.youtube.com/watch?v=iHh_DoqE2fY). The song made me think about the nature of our country and suddenly I started to have ideas about creating an interactive experience. Then, I decided to discuss the idea with Professor Aaron, who helped me to have a more refined view of the project. I got really excited about implementing my final idea for the project

Process 👩‍💻

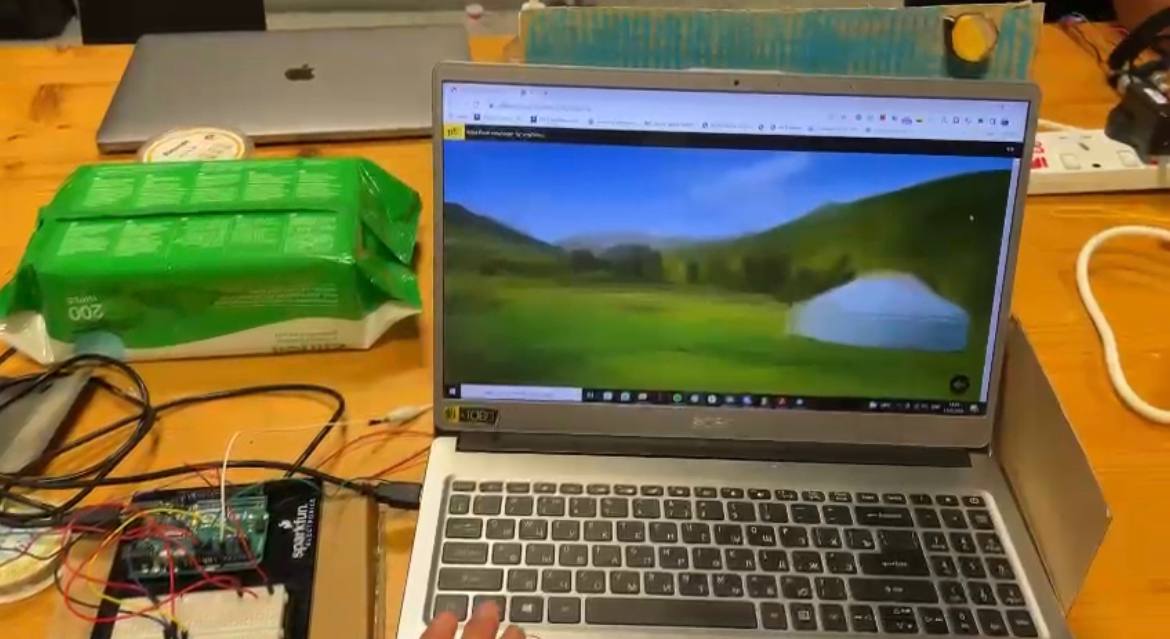
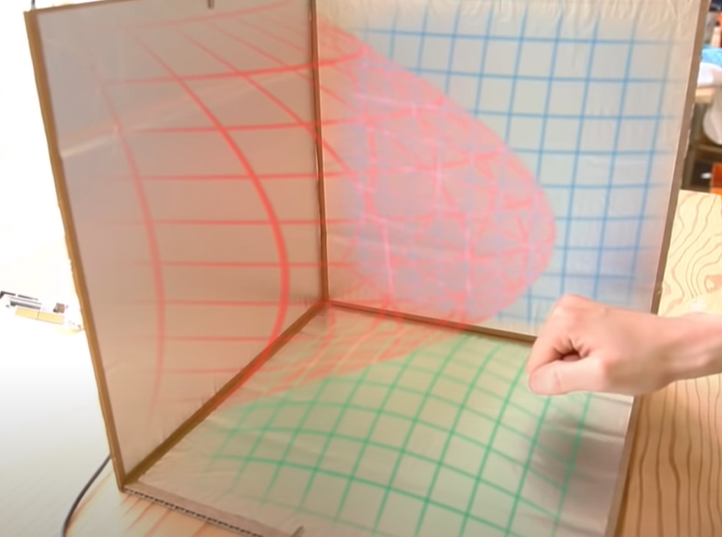
I booked iPad from the lab to create some visuals (that was my first time using it and I really enjoyed using its possibilities for creative purposes). I found some photos of our nature on the internet and smudged the colours to create a painting effect. 

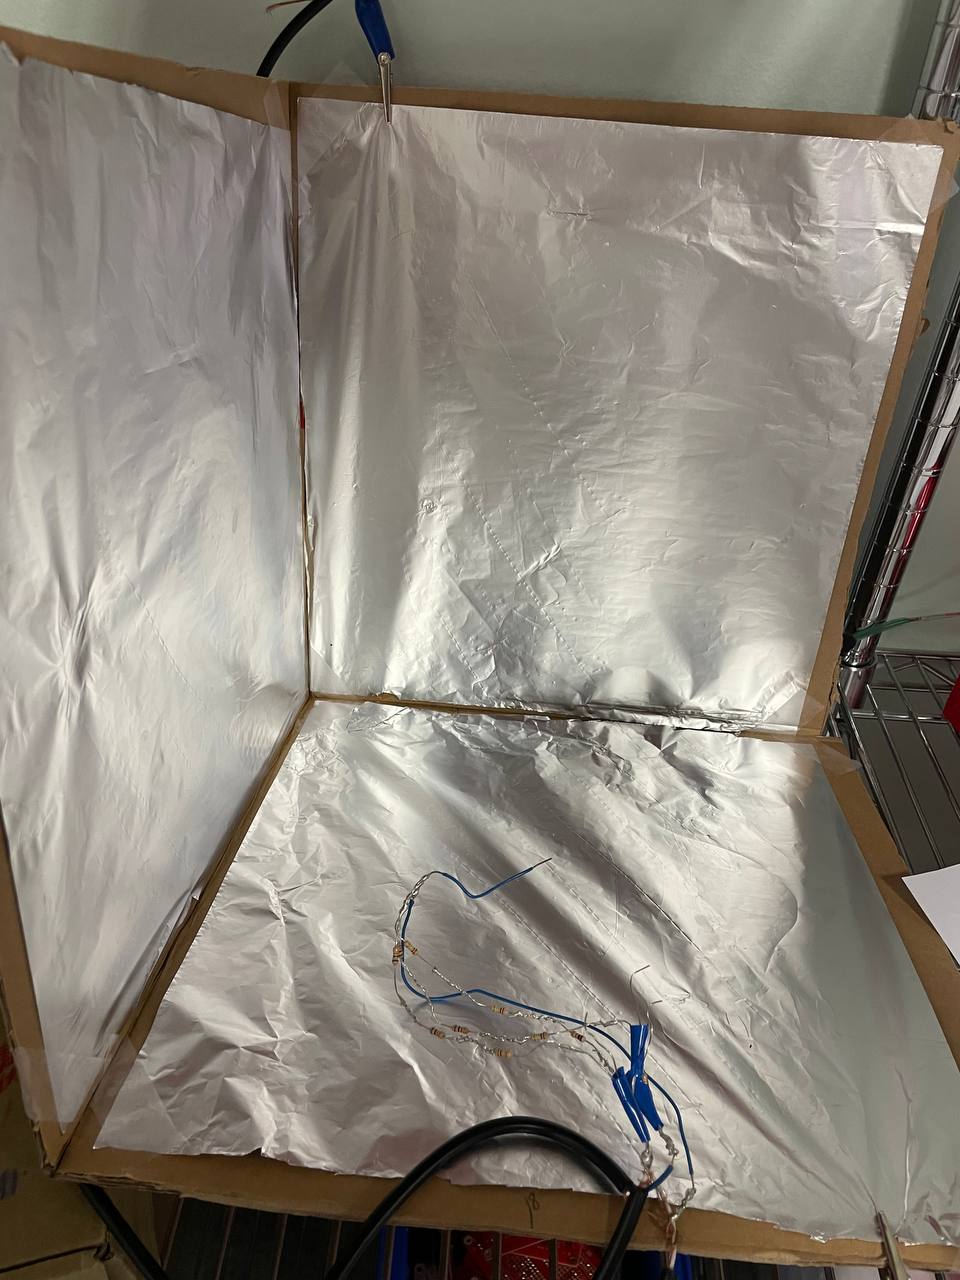
Also special thanks to Jack for expanding my idea of creating physical interaction with the 3D printed grass. He kindly guided me through the process of using the 3D printer for the first time.

I had some struggles in controlling the ZX detection sensor, which should work when a user waves a hand over the grass to turn on the led strip and initiate the horse’s running. First of all, I used coordinates to be able to control hand detection. However, the sensor could give some random values sometimes and the horse would demonstrate to me its audacity to run on its own and not “obey” the movements of my hand. Therefore, instead of using the library example with coordinates, together with the Professor’s help, we discovered the gesture example. As opposed to the previous library example, it could be easily controlled due to any gesture the sensor could be exposed to. 

Also, I have a potentiometer, which is hidden by the sun and moon pictures. I am using it to change the background of the program so that there is a transition from day to night. Compared to the sensor, the potentiometer was less “capricious” :))

Result 🤸‍♀️

I am really glad about the final result! Thank you to the whole IM Lab team and Professor Aaron for helping me throughout this process! I learned a lot of interesting and practically useful things this semester. I had several hardships, but it was a rewarding experience 🙂

#include <Wire.h>
#include <ZX_Sensor.h>
#include <FastLED.h>
#define LED_PIN     5
#define NUM_LEDS    25
#define BRIGHTNESS  64
#define LED_TYPE    WS2811
#define COLOR_ORDER GRB
CRGB leds[NUM_LEDS];
int currentVal = 0;

const int ZX_ADDR = 0x10;  // ZX Sensor I2C address

// Global Variables
ZX_Sensor zx_sensor = ZX_Sensor(ZX_ADDR);
uint8_t x_pos;
uint8_t z_pos;

CRGBPalette16 currentPalette;

GestureType gesture;

void setup() {
  delay( 3000 ); // power-up safety delay
  FastLED.addLeds<LED_TYPE, LED_PIN, COLOR_ORDER>(leds, NUM_LEDS).setCorrection( TypicalLEDStrip );
  FastLED.setBrightness(  BRIGHTNESS );

  // Initialize Serial port
  Serial.begin(9600);

  zx_sensor.init();

  while (Serial.available() <= 0) {
    Serial.println("0,0");
    delay(300);
  }
}


void loop()
{

  FastLED.show();

  if ( zx_sensor.gestureAvailable() ) {
    gesture = zx_sensor.readGesture();
    switch ( gesture ) {
      case RIGHT_SWIPE:
        currentPalette[0] =  CRGB(255, 255, 0);
        x_pos = 0;
        break;
      case LEFT_SWIPE:
        x_pos = 1;
        currentPalette[0] =  CRGB(0, 255, 0);
        break;
      default:
        break;
    }
  }

  for (int i = 0; i < NUM_LEDS ; i++) {
    // let's set an led value
    leds[i] = currentPalette[0];//CHSV(hue++, 255, 255);

  }

  while (Serial.available()) {
    byte inComing = Serial.read();
    if (inComing == '\n') {

      int sensor = analogRead(A0);
      delay(1);

      Serial.print(x_pos);
      Serial.print(',');
      Serial.println(sensor);
    }
  }
}


user testing

First of all, I changed my topic again. Now, it is about creating an “immersive” experience of the nature of my country, Kazakhstan. I just miss home and got inspired after listening to some Kazakh songs. For this project, I am using a potentiometer to change the backgrounds and a ZX detection sensor to move a horse on the screen and change the colour of led lights from green to yellow, so that there could be an interactive experience with the environment.

Generally, I could finish the main functionality part of the program, and establish the communication between p5js and Arduino. However, I keep having struggles with the working of the led strip. I tried to solder it many times, but it keeps falling off (and the strip is becoming shorter and shorter). I asked for help, but although it seemed that the connection was good, it still remains unresponsive to the code. During the weekends, I worked with a soldered led strip, which is much shorter, sorry but one of the wires fell off just yesterday……So, now it does not work either, although I created a code based on it. A ZX detection sensor is another story. Theoretically, it is a really fun and useful sensor with endless possibilities… but it keeps giving me random values, which makes it complicated to control.

I asked my friend to test the program so that I could have a clear view of some new additions and changes to the program. Firstly, I need to add instructions. The second thing is to adjust my sensor. Also, she asked me if I could add more interaction with the sensor, I will think about it when it starts to normally work without creating a messy picture 😀 Yet she loved the design and the music in the background.

final project progress: not 90%

So, according to the ambitions that I had in the previous post, I wanted to create a 3d interface controller to play a snake game in 3d format. I built a box, it worked, when I placed a hand inside of it. Also, apparently, the project, which I wanted to implement in my project, was created 10 years ago and it is not relevant anymore (oops). At least, I learned soldering and could do a 220k resistor, so if you need one, I have it…

However, the given values were inaccurate and I could not check if the p5js/or any 3d processing code would work with it. Had some trouble planning the project accordingly.

After talking to Professor Aaron, he suggested using a ZX distance and gesture sensor instead. I might use two sensors to provide a 3d effect, but it does not work anyways. So I hope that even one sensor could work for now.

In my p5js code, I just re-created a simple snake game, which is controlled by the keys for now.

Sorry, my project has not progressed much, since my idea was changing the whole week.

Exercises

Exercise 1

Arduino:

void setup() {
  Serial.begin(9600);
  while (Serial.available() <= 0) {
    Serial.println("0"); // send a starting message
    delay(300);              // wait 1/3 second
  }
}
void loop() {
  while (Serial.available() > 0) {
    // read the incoming byte:
   int inByte = Serial.read();
    }
    int sensorValue = analogRead(A0);
    Serial.print(sensorValue);
    Serial.println();
  }

P5js:

Exercise 2:

void setup() {
  Serial.begin(9600);
  while (Serial.available() <= 0) {
    Serial.println("0"); // send a starting message
    delay(300);              // wait 1/3 second
  }
}
void loop() {
  while (Serial.available() > 0) {
    // read the incoming byte
    int inByte = Serial.read();
     // brightness = map(inByte, 0, 1023, 0, 255);
    analogWrite(5, inByte);
    Serial.println(inByte);
  }
}


p5js:

Exercise 3:

void setup() {
  Serial.begin(9600);
  pinMode(5, OUTPUT);
  while (Serial.available() <= 0) {
    Serial.println("0,0"); // send a starting message
    delay(300);              // wait 1/3 second
  }
}
void loop() {
  while (Serial.available() > 0) {
    // read the incoming byte:
   int onoff = Serial.read();
   analogWrite(5, onoff);
    int sensorValue = analogRead(A0);
    Serial.print(sensorValue);
    Serial.println();
  }
}

p5js:


Final Project idea – 3D controller

For my final project, I am planning to create a sort of interactive game with the use of Arduino and p5js. The idea is to create a 3D controller, which would allow the user to play a game. 

I got inspiration from watching this video → https://www.youtube.com/watch?v=ikD_3Vemkf0&feature=emb_title. In the video, the guy uses cardboard and foil, which can track the position of his hand. As he moves his hand, he can see the direction of the hand movement on the screen. So, I thought that I could connect Arduino to the cardboard with foil and make an interactive box, which sort of looks like this:

Turning to the screen, I thought to create a hidden object game. So there will be a picture presented on the screen with many objects and a gamer would need to find a red ball (for example) while moving their hand inside a cardboard box with a foil.

This idea also reminds me of a claw machine, so in any case, I have been thinking that I might use a joystick to find an object among many on the screen. 

I know that the idea still seems “half-baked”, so I am looking forward to discussing how to improve it and implement it with the use of appropriate components.

Week 10: A Drum with electronic sounds 🤖 [Aliya & Gautham]

For this week’s assignment, we have created a drum with an electronic sound. The idea is that you can control drum sticks (pencils) by tapping the press sensors. To move the drum sticks, we attached them to servo controllers and taped them to the box.

We also have added the button as a digital read, so that a user can change the producing sound. There are four modes of playing the instrument. You can play it by producing sound yourself or by adding extra notes to your play. 

To provide a louder sound, we used a speaker instead of a buzzer. After finishing with the functioning part of the work, we decided to add led lights, which would light up whenever the drum sticks touch the box.

#include <Servo.h>
#include "pitches.h"

Servo drum1;
Servo drum2;

int drum1Pin = 5;
int drum2Pin = 3;
int ledPin1 = 8;
int ledPin2 = 2;
int switchPin = 7;
int speaker = 6;

int prevButton;

// play sound or not
bool buzzer = false;


int interval = 250;
unsigned long timer1 = 0;
unsigned long timer2 = 0;

// play different notes with drum beat
int index = -1;
int notes[] = {NOTE_D5, NOTE_F4, NOTE_C4};

void setup() {
  drum1.attach(drum1Pin);
  drum2.attach(drum2Pin);
  pinMode(ledPin1, OUTPUT);
  pinMode(ledPin2, OUTPUT);
  pinMode(switchPin, INPUT);
  pinMode(speaker, OUTPUT);
  pinMode(speaker2, OUTPUT);
}

void loop() {
  int force1 = analogRead(A0);
  int force2 = analogRead(A1);

  int button = digitalRead(switchPin);

  if(button == 1 && prevButton == 0){
    if (index == -1){
      buzzer = true;
      index++;
    }
    else if (index == 2){
      buzzer = false;
      index = -1;
    }
    else{
      index++;
    }
  }

  prevButton = button;

  if(force1 > 800){
    // move the servo
    drum1.write(0);
    digitalWrite(ledPin1, HIGH);
    if(buzzer){
      if (index >= 0){
        // play sound as well
        tone(speaker, notes[index], interval*0.25);
      }
    }
  }
  else{
    // timer to allow the servo to return 
    if(millis() > timer1){
        drum1.write(40);
        digitalWrite(ledPin1, LOW);
        timer1 = millis() + interval;
    }
  }

  // for the second servo
  if(force2 > 800){
    drum2.write(0);
      digitalWrite(ledPin2, HIGH);
      if(buzzer){
      tone(speaker, notes[index], interval*0.25);
    }
  }
  else{
    if(millis() > timer2){
        drum2.write(50);
          digitalWrite(ledPin2, LOW);
        timer2 = millis() + interval;
    }
  }
}


Class Discussion – Aliya and Kashyapa

Hello everyone, here are some questions for tomorrow’s reading discussion:

  1.  Before reading this article what were your thoughts on the future of interaction design? 
  2. Are you satisfied with current technology like iPhones or iPads for example and you don’t think it really needs to improve much?
  3. we were wondering if you had any ideas as to how hands could be integrated into interaction design in a feasible way?
  4. Do you actually use voice interactions like voice assistants on their phones for example? Do you think voice will play a big role in future interaction design?
  5. Would you disagree and think that brain interfaces could be good? What other problems do you think brain interfaces could lead to?
  6. Do you have any ideas as to how something like haptic gloves could be integrated into our daily lives and replace some of our current technology?
  7. As a final thought, do you agree or disagree with the author’s perspective on the future of interaction design?

Week 9 – object detector (kind of)

Idea

Thinking about the use of LEDs in a more practical and engineering way, I came up with the idea of creating an object detection sensor, which is widely used in tesla cars, home security systems, etc.

Implementation

As an object detector, I used an ultrasonic sensor (digital input). I also used a photosensor as a sort of solar power, which enables the work of the whole system (analog input). 

There are three modes to detect an object depending on its distance from the ultrasonic sensor. You can identify if the object is close or far away by looking at which LED light is turned on and which sound is produced. If an object is close, the red LED will be turned on. If an object is at a medium distance, the yellow LED light turns on, which serves as a warning. And if an object is at a normal distance, the green LED is turned on all the time. 

Code

int sensorPin = A0; // select the input pin for the potentiometer
int powerPin = 7;
int ledPin1 = 11; //  red LED
int ledPin2 = 10; // yellow LED
int ledPin3 = 9; // green LED
int buzzPin = 4;
const int trigPin = 12;
const int echoPin = 13;

long duration;
int distance;

bool gameStarted = false;

int sensorValue = 0; // variable to store the value coming from the sensor

void playSound(int hz) {
  tone(buzzPin, hz);
  delay(hz);
  noTone(buzzPin);
}

void setup() {
  // declare the ledPins as an OUTPUT:
  pinMode(ledPin1, OUTPUT);
  pinMode(ledPin2, OUTPUT);
  pinMode(ledPin3, OUTPUT);
  pinMode(buzzPin, OUTPUT);
  pinMode(sensorPin, INPUT);
  pinMode(powerPin, OUTPUT);
  pinMode(trigPin, OUTPUT);
  pinMode(echoPin, INPUT);

  Serial.begin(9600);
}

void loop() {
  digitalWrite(trigPin, LOW);
  delayMicroseconds(2);
  digitalWrite(trigPin, HIGH);
  delayMicroseconds(10);
  digitalWrite(trigPin, LOW);

  duration = pulseIn(echoPin, HIGH);
  distance = duration * 0.034 / 2;

  digitalWrite(powerPin, HIGH);

  sensorValue = analogRead(sensorPin);
  Serial.println(sensorValue);

  //to turn on the object detection by photo sensor (solar power)
  if (sensorValue <= 30) {
    gameStarted = false;
    delay(2000);
  }

  //if there is no light, the system does not work
  else if (sensorValue > 30) {
    gameStarted = true;
  }
  
  if (gameStarted) { //to measure a distance
    if (distance <= 5) { //red led turns on at the lowest distance

      // turn the ledPin on
      digitalWrite(ledPin1, HIGH);
      digitalWrite(ledPin2, LOW);
      digitalWrite(ledPin3, LOW);
      playSound(200);

      delay(100);
      // turn the ledPin off:
      digitalWrite(ledPin1, LOW);
      digitalWrite(ledPin2, LOW);
      digitalWrite(ledPin3, LOW);
      delay(100);
    }
    else if (distance > 5 && distance <= 10) { //yellow led turns on at the medium distance
      digitalWrite(ledPin1, LOW);
      digitalWrite(ledPin2, HIGH);
      digitalWrite(ledPin3, LOW);
      playSound(1000);

      delay(100);
      digitalWrite(ledPin1, LOW);
      digitalWrite(ledPin2, LOW);
      digitalWrite(ledPin3, LOW);
      delay(100);
    }

    else if (distance > 10) { //to turn on the green led

      digitalWrite(ledPin1, LOW);
      digitalWrite(ledPin2, LOW);
      digitalWrite(ledPin3, HIGH);

      delay(100);

      digitalWrite(ledPin1, LOW);
      digitalWrite(ledPin2, LOW);
      digitalWrite(ledPin3, LOW);

      delay(100);
    }
  }
}

Week 8 – Hands free switch

Mostly my ideas involved the use of hands, therefore, my “creativity” led me to use my foot. 

First of all, I made a circuit to turn on the LED light. Then, I connected two strips of copper tape to two wires. Copper tapes, which serve as conductors,  were stuck on a bin and on a trash lid.

As a result, when a trash bin is closed, the light turns on because two conductors touch each other. 

Generally, that was fun doing it and I learned some basics in working with basic circuits.

Midterm Assignment


Idea

First of all, I got inspired by the old game (https://kbhgames.com/game/throw-paper), where a player needed to throw a paper into a trash bin. Then, I decided to modify it, thinking about making a waste sorting game. Honestly, when I see trash bins with different labels, I can get confused about how to do waste sorting. Therefore, my idea developed into a sort of educational game. I made some research and stumbled upon plenty of valuable resources from our university about sustainability and effective recycling. https://www.thegazelle.org/issue/148/features/recycling-rundown?fbclid=IwAR29lGNj9u9fJKsSh04SI1rM-9KAqOV92OBGTBX-ObOIKGupfIssHzaCB2A. https://docs.google.com/presentation/d/1pbGNdAsGjuJ5EpqZOm0oOVZWK7rg-g04gpsV4Wo7e0E/edit#slide=id.p.
Implementation
While thinking about the ways of implementing the game, I came up with the idea of re-creating a Tetris based functioning. Ultimately, I wanted a player to be able to use arrow keys in order to place the trash into the correct bin. First of all, I started with creating bins and trash items as two separate classes. I have included attributes inside each class that help to display and move items due to pressing arrow keys. The items are randomly selected from the trash array and generated at the top of the screen

Challenges

The foremost challenge was how to implement the logic of the game into coding. As it could be seen in my previous post, I struggled with the basic functionality of the game. I spent a lot of time on this while rewinding everything that we learned in the class and going to the Professor’s office hours. After dealing with that, it became easier to add multiple, but small details for the program’s proper functionality and design. The items are supposed to fall into the correct bin. To achieve this, I have created checkTrash() function, which considers the coordinates of the bin to place trash. After finishing working with the game functionality, I added scores and a timer. Every time a player places trash into a correct bin, the score is increased by 100 points, otherwise, he might lose 100 points. Then, I created the menu for the game with two buttons: Play (to start the game) and Instructions (to get acquainted with the game rules). There is a sound when you click on each button. Also, I added background music as well as a cheering sound whenever a player correctly sorts out the trash.


Reflection

The beginning of the midterm project was chaotic and challenging, but, eventually, I am satisfied with the final version of it. Through this assignment, I could consolidate the material that we learned during the first half of the semester. Generally, that was a fun experience.