Final project documentation:Jump Pinkie!

  • Concept

The concept of my game is based on the Chrome running dinosaur game, which I adapted for my midterm project. I wanted to learn to work with sprites, so I decided that the pony will be the main theme. For the final, I adapted it more, and when the player jumps physically, the pony will jump on the screen, too.

    • Implementation 
        • Description of interaction design

      The game starts when the player clicks on the mouse and they have to connect the port by pressing the space bar. After that, the player has to jump over the little dragon and earn points by collecting a pink magic box, they have 3 lives.  The score and remaining lives are displayed at the top of the screen.

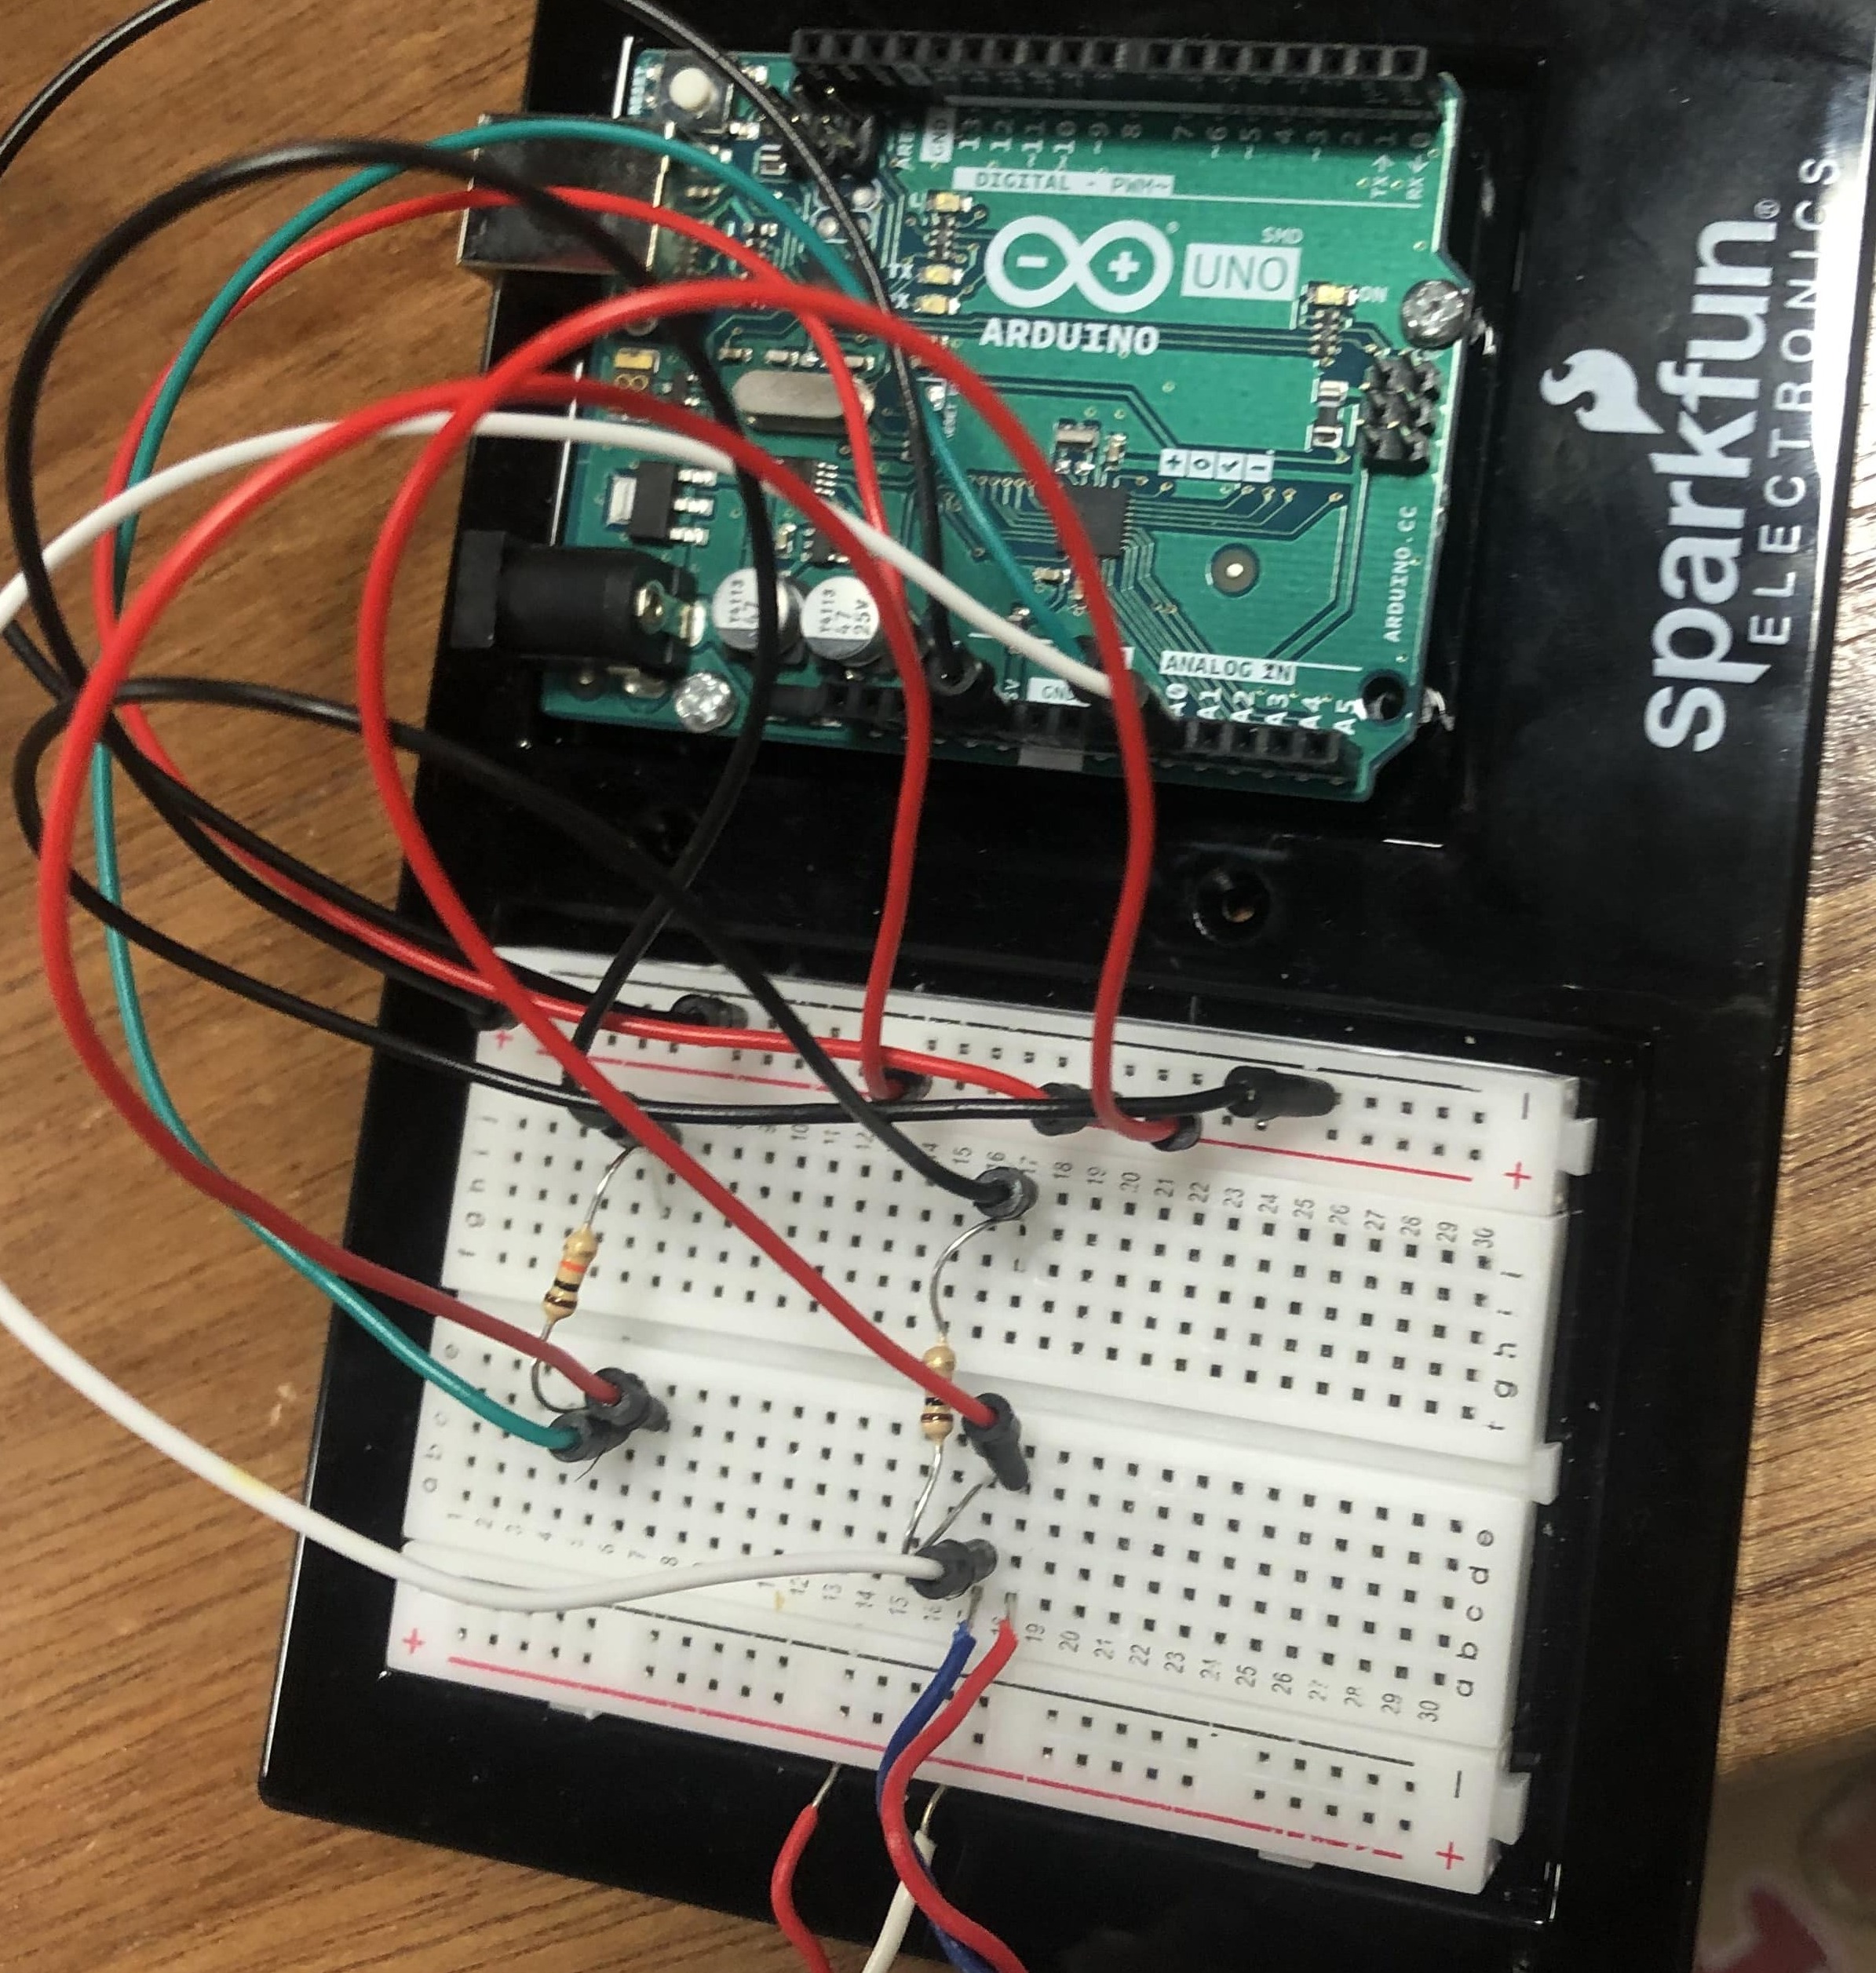
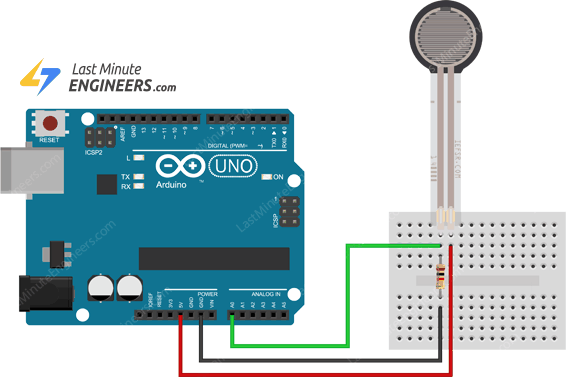
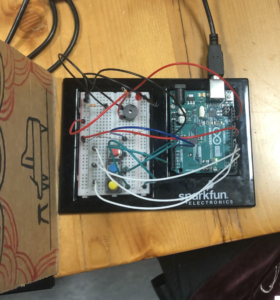
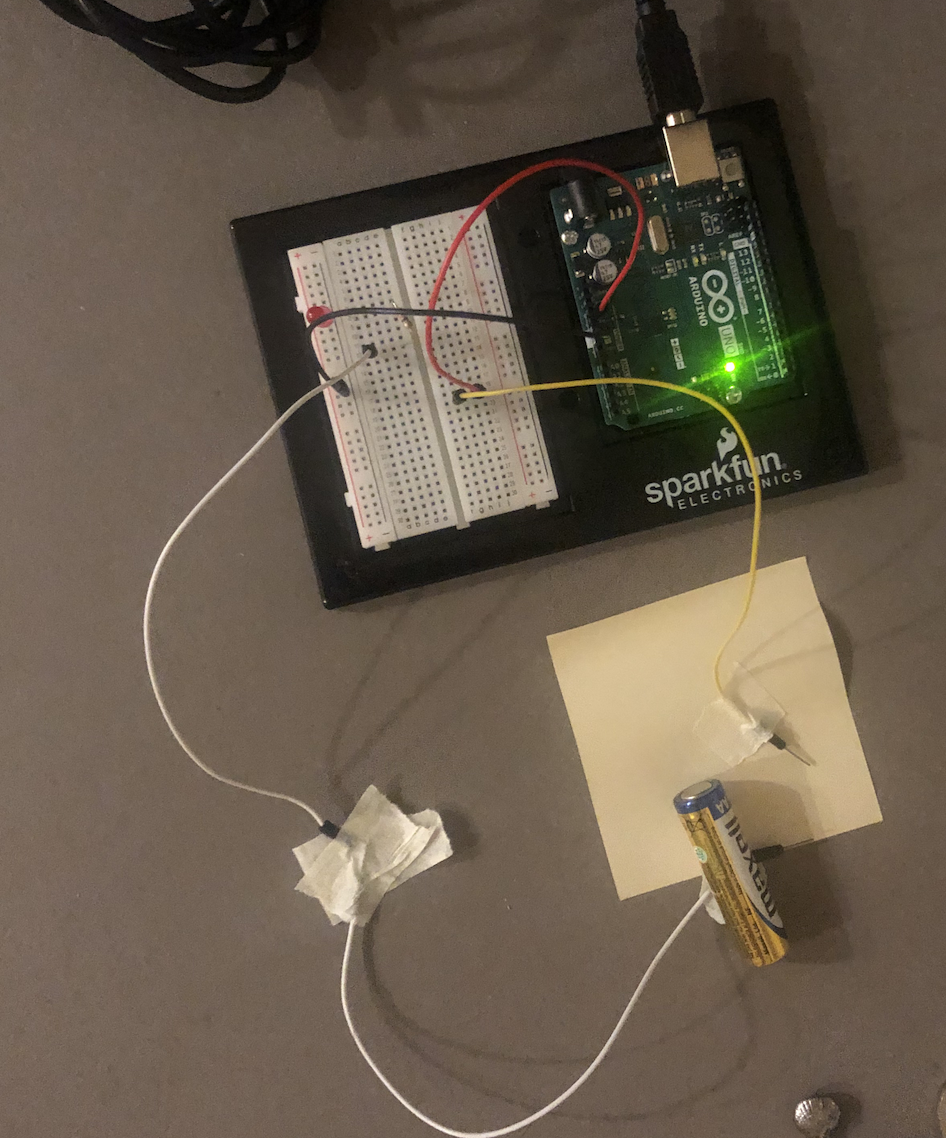
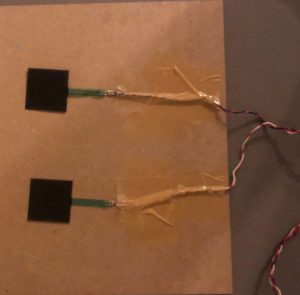
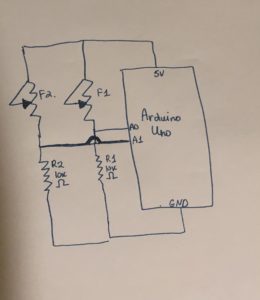
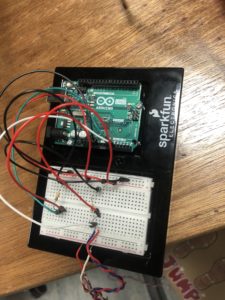
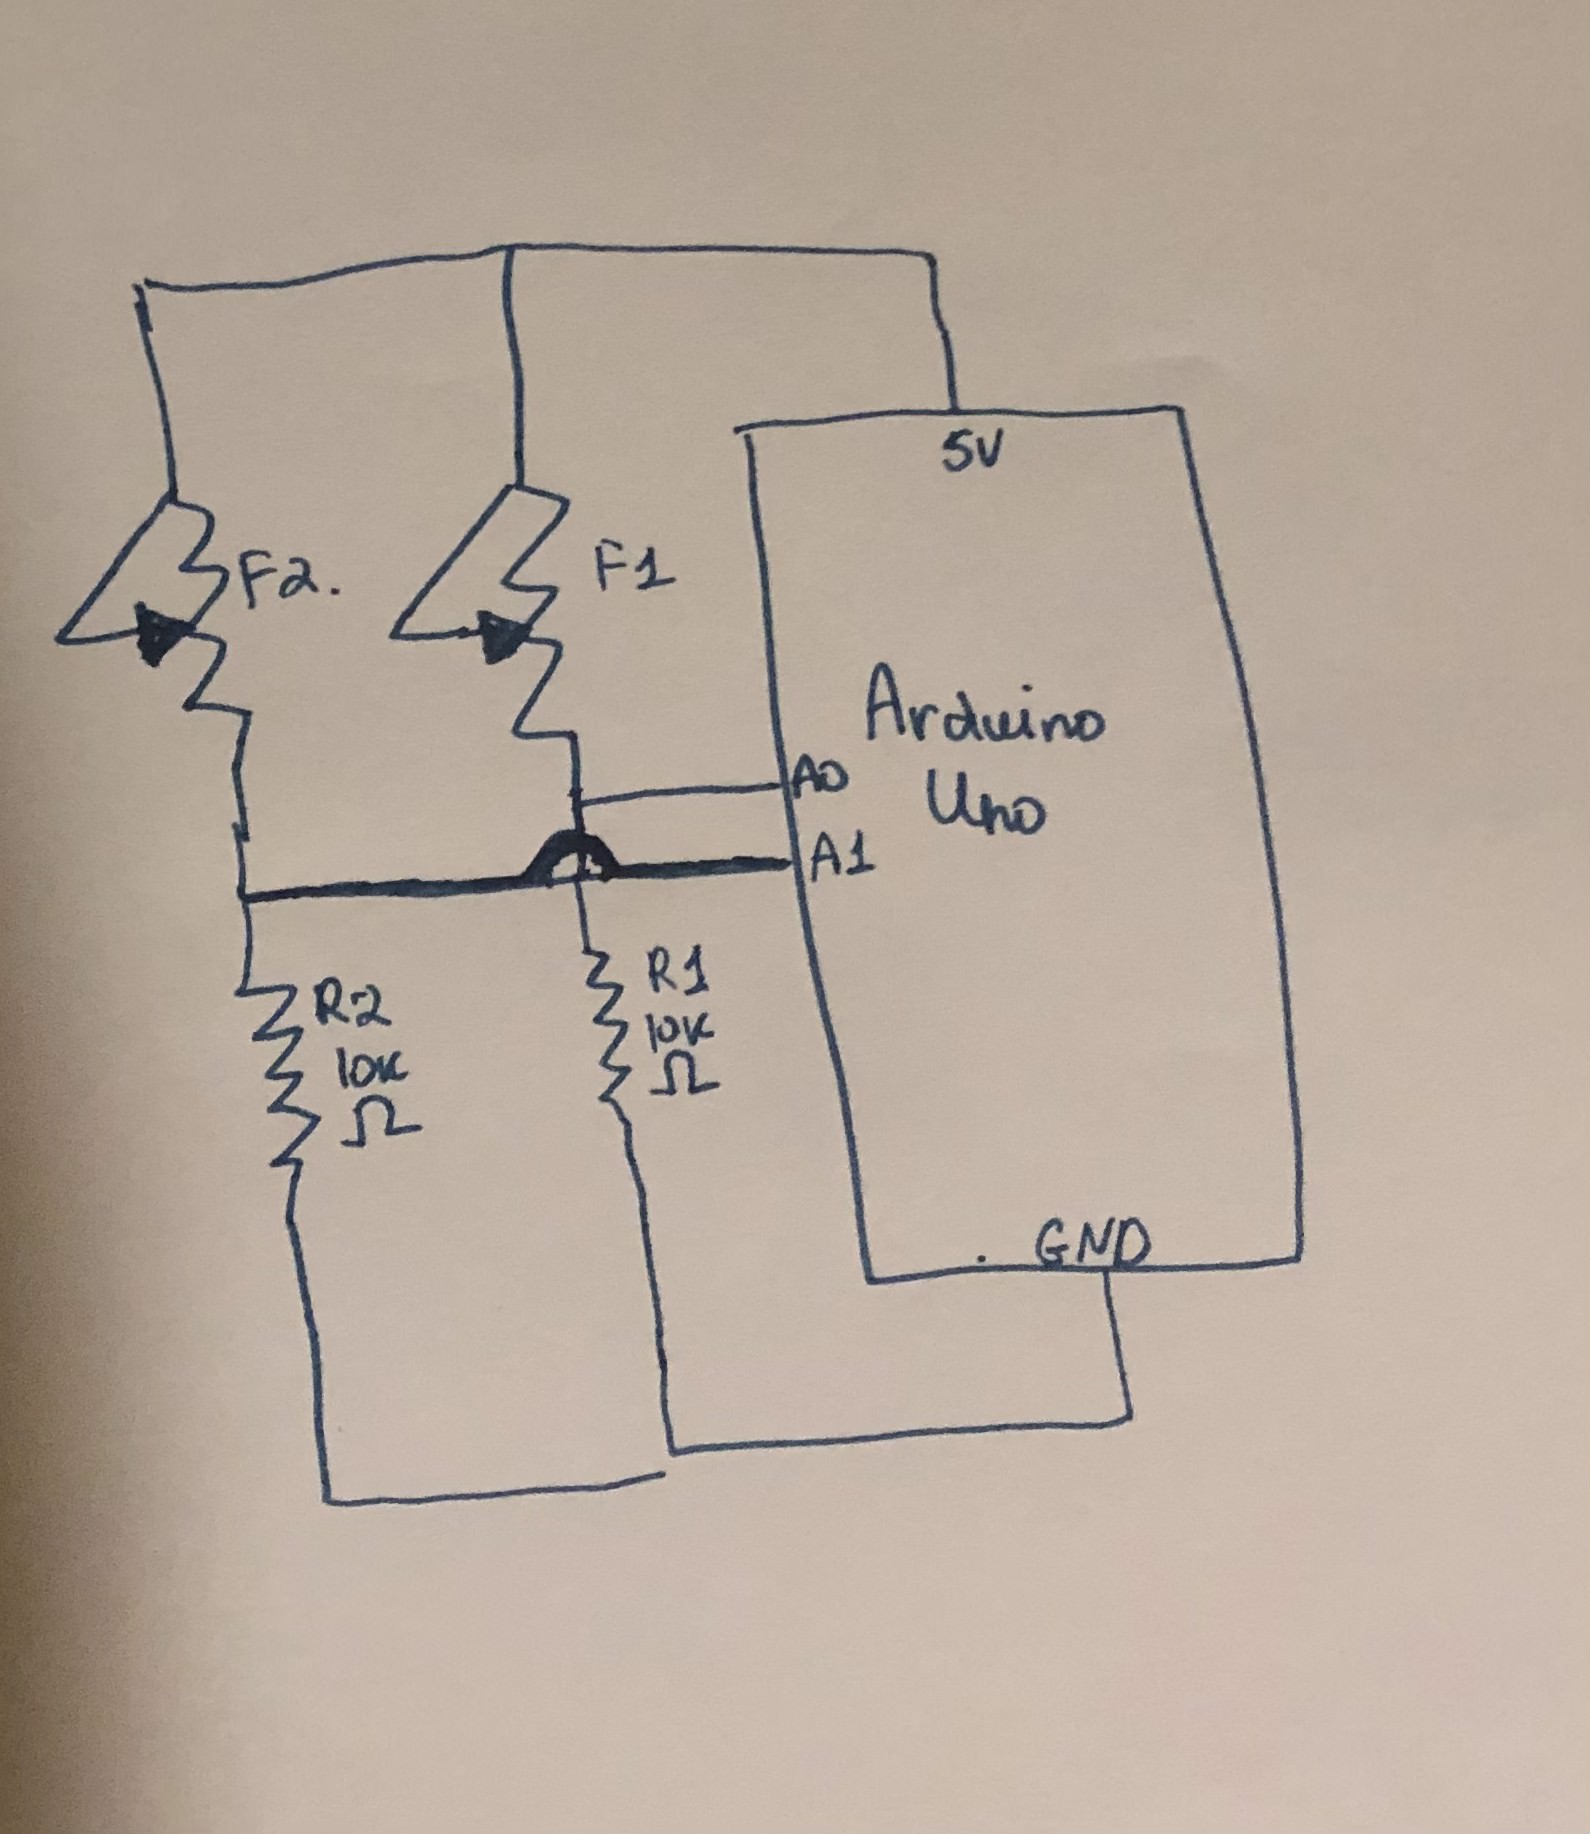
For the physical part, I connected two force resistors to Arduino, by soldering really long wire to the sensor and sticking them onto the board.

    • Description of Arduino code
      void setup(void) {
        Serial.begin(9600);   
      }
       
      void loop(void) {
        int sensor1 = analogRead(A0);
        delay(5);
        int sensor2 = analogRead(A1);
        delay(5);
        Serial.print(sensor1); 
        Serial.print(','); 
        Serial.println(sensor2); 
       
        
      }

      Arduino code is pretty simple, I just get the sensor values and send them to p5 by also adding a coma.

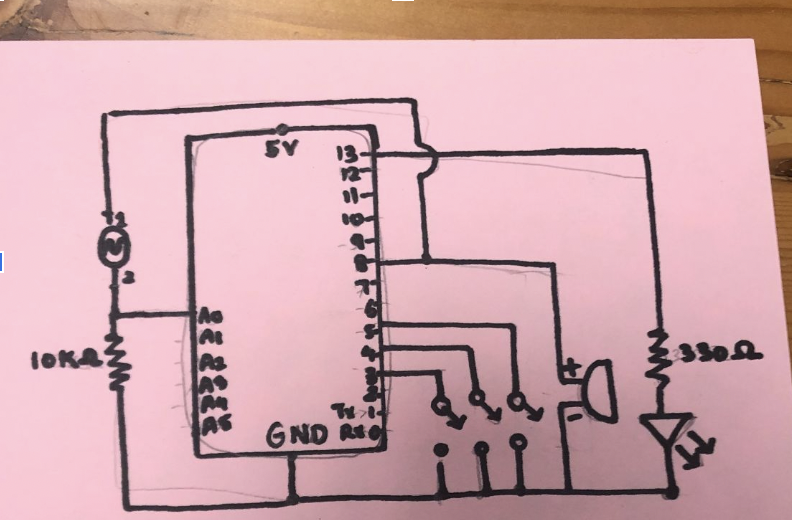
    • Schematic and circuit
    • Description of p5.js code
            • Because I implemented a collision library, it calculates to what extent the pony collides with a Draco, which is why depending on where/when they collide, lives change non-linearly. For example, if it doesn’t jump at all it is -1 point, but if the pony touches the Draco slightly around half a point is deducted. This gives the players grace jump, as the collision area is not too precise and bigger. And the game ends when there are no lives left.
          //creates dracos
            if (millis() >= lastFrame + frameDelay) {
              dracos.push(new Draco());
              frameDelay = random(0.6, 1) * 2500;
              lastFrame = millis();
              score++;
              
            }
          
            //draw dracos and check for collision
            for(let d of dracos){
              d.move();
              d.display();
              if(pinkiePie.hits(d)){
                lives=(lives-1/17);
                lives1=round(lives);
             
                sound1.playMode('restart');
                sound1.play();
                
              }
              else{
                sound1.playMode('sustain');
              }
           
            }
            if(lives1<=0){
                gameState='lose';
                console.log("game over");
                //gameLost=true;
                loseSound.play();
              }

          I had trouble restarting the game and realized that my lives were not updated whenever I want to restart. That is why I created a restart function that resets all the variables.

      //to restart the game and scores
      const restartGame = () => {
        gameLost=false;
        score=0;
        lives=3;
        lives1=3;
        lastFrame=0;
        frameDelay=500;
        lastFrame1=0;
        frameDelay1=200;
        dracos = [];
        stars=[];
        pinkiePie= new PinkiePie(walk);
        new Draco();
        new Star();
        loop();
      }


    • Description of communication between Arduino and p5.js
function readSerial(data) {
  ////////////////////////////////////
  //READ FROM ARDUINO HERE
  ////////////////////////////////////
  //console.log("data"+data);
  if (data != null) {
    
    //for button
    //if(data==0)

    let fromArduino = split(trim(data), ",");
    
    // if the right length, then proceed
    if (fromArduino.length == 2) {
      
      sensor1= fromArduino[0];
      sensor2 = fromArduino[1];
      console.log("s1 "+sensor1);
      console.log("s2 "+sensor2);
      
      
      if((sensor1 <= 1) && (sensor2<=1)){
        pinkiePie.jump();
      }
    }
   
  }
  
}

Here, I get the data and split it on comma, and store the two values in an array, assign them to two sensor variables. When a player stands on the board, there is some amount of pressure, when they jump->almost no pressure, and when they land on the board there is a force again. That is why, I made an if statement when there is no force, Pinkie Pie will jump.

    • What are some aspects of the project that you’re particularly proud of?

Overall, I am really proud of how the project turned out and the experience players have when the game is dependent on their physical activity. I am also happy that I learned how to work with another type of sensor, which means that I can work with more sensors and hardware features in the future thanks to the knowledge I got from the class. I love how sound also adds interactive experience, as well as lives implementation.

    • What are some areas for future improvement?

There is a problem with the sensitivity of the game, as players should practice and get used to the pace of the game.  This could be improved by adding more sensors or maybe trying to implement other sensors, too. I also think the game could be improved by adding more levels or speeding up the pace when players play longer.

Final project:user testing

Progress

As I was testing the game, I understood that one sensor is not enough as data gets into the game randomly depending on where is the user. That is why I decided to connect two sensors as well as get a board for jumping. I had a lot of stress getting data from two sensors as it was getting lost somewhere or as far as I understood, there was just an extra line.😭

Schematic

Circuit

User testing video

Results:

It seems like shoes can be a little obstacle on how legs are pressed on the board, as it might be difficult to center the pressure of the legs with shoes. If the legs are pressed correctly every time a person jumps, the game is pretty responsive.

Final project progress update

Process

I finally connected Arduino to my game and before setting up the jumping board, I tried checking whether the force resistor works and if so, how it works.  I searched on the internet how to connect the force resistor sensor to Arduino and get the data.

Schematic

I followed this schematic to hook up the resistor:

wiring fsr to arduino

Arduino code:

int fsrPin = 0;     // the FSR and 10K pulldown are connected to a0
int fsrReading;     // the analog reading from the FSR resistor divider
 
void setup(void) {
  Serial.begin(9600);   
}
 
void loop(void) {
  fsrReading = analogRead(fsrPin);  
 
  Serial.print("Analog reading = ");
  Serial.print(fsrReading); 
}

Next steps:

  • Work on the jumpability of the game
  • Set up the jumping area->work on the sensitivity of the sensors
  • Fix the bugs with lives

Serial Communication exercise

Control ellipse using potentiometer values:

This code is controlled by potentiometer values from Arduino, and these values are set to be X coordinate, which allows the ellipse to move whenever the potentiometer is changing its direction. The only drawback was the slow response of the program and the reading of the sensors.

Code:

// variable to hold an instance of the p5.webserial library:
const serial = new p5.WebSerial();
 
// HTML button object:
let portButton;
let inData;                   // for incoming serial data
let outByte = 0;              // for outgoing data
 
function setup() {
  createCanvas(400, 300);          // make the canvas
  // check to see if serial is available:
  if (!navigator.serial) {
    alert("WebSerial is not supported in this browser. Try Chrome or MS Edge.");
  }
  // if serial is available, add connect/disconnect listeners:
  navigator.serial.addEventListener("connect", portConnect);
  navigator.serial.addEventListener("disconnect", portDisconnect);
  // check for any ports that are available:
  serial.getPorts();
  // if there's no port chosen, choose one:
  serial.on("noport", makePortButton);
  // open whatever port is available:
  serial.on("portavailable", openPort);
  // handle serial errors:
  serial.on("requesterror", portError);
  // handle any incoming serial data:
  serial.on("data", serialEvent);
  serial.on("close", makePortButton);
}
 
function draw() {
  
   background(0);
   fill(255);
   //show the values
   text("sensor value: " + inData, 30, 50);
  
   //draw ellipse using those values
   ellipse(inData, height/2, 50,70);
 
}

// if there's no port selected, 
// make a port select button appear:
function makePortButton() {
  // create and position a port chooser button:
  portButton = createButton("choose port");
  portButton.position(10, 10);
  // give the port button a mousepressed handler:
  portButton.mousePressed(choosePort);
}
 
// make the port selector window appear:
function choosePort() {
  if (portButton) portButton.show();
  serial.requestPort();
}
 
// open the selected port, and make the port 
// button invisible:
function openPort() {
  // wait for the serial.open promise to return,
  // then call the initiateSerial function
  serial.open().then(initiateSerial);
 
  // once the port opens, let the user know:
  function initiateSerial() {
    console.log("port open");
  }
  // hide the port button once a port is chosen:
  if (portButton) portButton.hide();
}
 
// pop up an alert if there's a port error:
function portError(err) {
  alert("Serial port error: " + err);
}
// read any incoming data as a string
// (assumes a newline at the end of it):
function serialEvent() {
  inData = Number(serial.read());
  console.log(inData);
}
 
// try to connect if a new serial port 
// gets added (i.e. plugged in via USB):
function portConnect() {
  console.log("port connected");
  serial.getPorts();
}
 
// if a port is disconnected:
function portDisconnect() {
  serial.close();
  console.log("port disconnected");
}
 
function closePort() {
  serial.close();
}


Final Project Concept

Concept

For my final project, I would like to continue working on my jumping pony game concept by adding more features using Arduino.

The basic and simple idea and integration:

Use Arduino buttons to control the pony’s action->interaction from Arduino to p5js

When the pony jumps successfully turn the LED light on. Also, when the game ends, send an audio losing sound through the piezo buzzer->signal from p5js to Arduino.

The next step and more complex integration will be adding sensors to control the pony game. I am thinking of using a sound detection sensor, so when the user jumps, Arduino will detect the sound, and pony will jump together with the user.

The only challenge I am afraid of is the sensibility of the sensors, so it has to be really precise and there should not any delay in sending the sound signal to the game. As the game is fast-pacing, any delay will make the user experience dissatisfying.

If everything is gonna be successful, I believe this game can resemble the Xbox console concept and can be a fun cardio exercise 😆

Seven Xbox 360 Kinect Playing Tips and Tricks from the Number One #1 Kinect  Player in the World | BoZack's Blog

Assignment 10: Musical intstrument

Concept 

For this assignment, we decided to remake a piano, but add some adjustments to its stage presence. We all know that there are a lot of stage lights mechanisms when a pianist performs, but what happens when there is no light or lights are directed at people? Our piano changes its tunes and how it sounds. The main technology behind this piano is the usage of the photoresistor which sends different sensor values and with the changing frequency of the sensor, the note fluctuates.

Materials used

LED

3 Switches (digital)

Photoresistor (analog)

Wires 

Resistors – 10 K ohm and 330 ohm

Schematic

Code

Code starts off with the assignment of a variable to each component of the circuit 

The tone() function is used to generate a square wave of a certain frequency on three pins that are attached to their respective switches.  

int piezoPin = 8;
 
int LED = 13;
 
int button1 = 5; //Set up the input pins connected to the buttons.
int button2 = 4;
int button3 = 3;
 
int frequency = 0;
 
int sensor = 0;
int value = 0;
 
const int delayTime = 500; 
void setup() {
pinMode(button1, INPUT_PULLUP);
pinMode(button2, INPUT_PULLUP);
pinMode(button3, INPUT_PULLUP);
pinMode(LED, OUTPUT);
}

void loop() {
 value = analogRead(sensor);
 //Map the different values of the photoresist to a set of frequencies for each of the three buttons.
 if (digitalRead(button1) == LOW) {
 frequency = map(value, 0, 1023, 400, 499);
 digitalWrite(LED,HIGH);
 }
 else if (digitalRead(button2) == LOW) {
   frequency = map(value, 0, 1023, 300, 599);
   digitalWrite(LED,HIGH); 
 }
 else if (digitalRead(button3) == LOW) {
   frequency = map(value, 0, 1023, 500, 599);
   digitalWrite(LED,HIGH); 
 }
 else {
   frequency = 0;
   digitalWrite(LED,LOW);
 }
 tone(piezoPin, frequency, delayTime); //plays a tone() functions mapped frequencies.
}


An LED also lights up when a note is played

The photoresistor also causes the fluctuation in the tone i.e. the frequency when the sensor value is mapped.

Reflections

Happy with the playfulness of the output but would like to experiment with other notes. We had some difficulties with creating more hearable differences when the light setting changed. Perhaps, it was due to the little difference photoresistor could detect, or we could play around changing the value, but it didn’t really work out as it was making the noise bad. Moreover, the LED just switches on and off when the switch is pressed perhaps its brightness could also be changed when a new note is played.

Week 9: Traffic light controller

Concept

For this assignment, I decided to make a traffic light that can be controlled by the enemy and get broken. It gets broken by using the potentiometer, which turns it off or turns all the lights on at the same time which can create a huge traffic jam. However, policemen can make it work by clicking the button, which lets the lights turn on one by one.

Code

int potpin = 2;  // analog pin used to connect the potentiometer
int val; 
void setup() {
  pinMode(7, OUTPUT);
  pinMode(2, OUTPUT);
  pinMode(4, OUTPUT);
  pinMode(A2, INPUT);
}

void loop() {

  int switchPosition = digitalRead(A2);
  val = analogRead(potpin);            // reads the value of the potentiometer (value between 0 and 1023)
  val = map(val, 0, 1023, 0, 360); 
  if (switchPosition == LOW) {
    digitalWrite(4, val);   
    digitalWrite(2, val);
    digitalWrite(7, val);


  } else  {

    digitalWrite(7, HIGH);    // turn the  red LED on
    digitalWrite(4, LOW);
    digitalWrite(2, LOW);
    delay(500);
    digitalWrite(7, LOW);    // turn the yellow LED on
    digitalWrite(4, HIGH);
    digitalWrite(2, LOW);
    delay(500);
    digitalWrite(7, LOW);    // turn the green LED on
    digitalWrite(4, LOW);
    digitalWrite(2, HIGH);
    delay(500);
    digitalWrite(4, HIGH);   // turn all the lights on
    digitalWrite(2, HIGH);
    digitalWrite(7, HIGH);
  }
}

Reflection

Connecting several lights and making them light one by one was a really fun exercise. However, adding a potentiometer broke down my switch at some point, which made it difficult for me to control the LED light using it. For future improvements, I would like to be able to have different outputs when changing the potentiometer values when the switch is on and off, so the game mode can get difficult, so I can learn more about the potentiometer’s advanced features.

Hands-free switch:Mini-football

Concept:

When the task stated that we can’t use hands, I immediately though about legs and thought it would fun to recreate the soccer game. The led-light goes on when the person strikes a goal(battery) with a small ball. Then the battery falls and  connects two cables, which turns on the switch. This kinda resembles the football game where you have to kick the ball on the field.

Process:

First, I made a basic circuit to turn on my led-light with a resistor 0hm 330. Then, I prolonged the circuit and added more cables and taped two cables to allow myself broader area to work. I spent a lot of time figuring out how to make the switch stay on, not light it once when the ball and cable have a collision, because ball bounces back. That’s why I added a battery as a target, which will fall and stay in the same place, so the two cables could be connected and stay on.

Reflection

It was really fun and super brain-stormin process to figure out how to make the switch on without hands, as connecting cables with hands seemed so easy and most efficient. I wish I had flat surface like domino cards, because I had a lot of trouble of the battery’s round surface, as it would roll around and won’t stay on the cables. However, this also added difficulty level to my soccer game, as scoring a goal is never easy in the real life too.

Midterm project: Final game-Jump Pinkie!

Inspiration:

I came up with the theme of my game when I was looking for different sprite sheets, as I really wanted to learn how to animate sprites during the development of my game. I came across “My Little Pony” sprite sheets, and thought it would be fun and colorful to work with ponies. Initially, I wanted to create a platform jumping game, but due to some challenges(listed below), I changed the concept of my game to a jumping pony game resembling the Chrome Dino Game.

Game Phase:

PinkiePie one of the characters in the cartoon is running away from the small dragon, that’s why she has to jump over it. Each successful jump adds one point. Also, when Pinkie Pie collects the star, she also gets one more point. Some funny phrases from the actual cartoon play, when she collects a star. When she hits Draco, the game is over and a funny cartoon phrase plays.

Challenges:

Unfortunately, while I was trying to create platform classes, place them randomly, jump over them and check for collisions, my program did not work, and I could not figure out the solution. That’s why I decided to stick to the game without platforms. It led to the alterations of the whole project and the assets of the game.

Also, one of the biggest challenges was the animation of the sprite, therefore I am really happy with the result that my pony is running. However, I couldn’t do two consecutive animations. For example, when a pony is jumping do jumping animation, and then change to running animation immediately.

Code:

Parallax motion:

image(back1, x1, 0, width, height);
image(back1, x2, 0, width, height);

x1 -= scrollSpeed;
x2 -= scrollSpeed;

if (x1 < -width){
  x1 = width;
}
if (x2 < -width){
  x2 = width;
}

Create dracos and check for collisions, if yes the game is lost(same for the stars):

//creates dracos
if (millis() >= lastFrame + frameDelay) {
  dracos.push(new Draco());
  frameDelay = random(0.6, 1) * 2000;
  lastFrame = millis();
  score++;
}
//draw dracos and check for collision
for(let d of dracos){
  d.move();
  d.display();
  if(pinkiePie.hits(d)){
    gameState='lose';
    console.log("game over");
    gameLost=true;
    //noLoop();
  }
}

Class Pinkie Pie:

class PinkiePie{
  constructor(animation){
    this.size=80;
    this.x=40;
    this.y=300;
    this.vy=0;
    this.gravity=3;
    this.animation = animation;
    this.w = this.animation[0].width;
    this.len = this.animation.length;
    this.speed = 0.2;
    this.index = 0;
    
  }
  
  display(){
    let index = floor(this.index) % this.len;
    image(this.animation[index], this.x, this.y, this.size,this.size);
    
  }
  jump(){
    if (this.y==height-100){
      this.vy=-35;
    }
    
  }
  hits(elem){
    return collideCircleCircle (this.x,this.y,this.size,elem.x,elem.y,elem.size);
  }
  run(){
    this.index += this.speed;
    this.y+=this.vy;
    this.vy+=this.gravity;
    this.y=constrain(this.y, 0, height-100);
  }
}

Class Dracos/stars-aka obstacles:

class Draco{
  constructor(){
    this.size=40;
    this.x=width;
    this.y=height-70;

  }
  
  move(){
    this.x-=6;

  }
  display(){
    image(draco, this.x, this.y, this.size,this.size);
  }
}

Reflection:

Even though I had a lot of challenges when I was making the game and my initial concept was changed, I am really happy with my result.  I learned a lot during this process of mistakes. Also, I learned that breaking the problem into small problems is really great way of development. I started the code with primitive shapes and then started adding my assets and animation, point system and etc. I was checking the animation code separately and added it only when it was finally moving.

Midterm Progress

Concept

For my midterm project, I really wanted to learn to work with sprites and add movement to my characters. An idea for the game came to my mind when I looked at different sprite sheets on the internet and found pony characters. I chose them because their movements include flying,jumping as well as walking, which seemed really interesting to work with. You can see an example of the sprite below:

pony sprite | Pony, Sprite, Mlp wingsMy Little Gauntlet — Yet another update. All the manes and tails...

That’s why my game concept will be around the theme of the cartoon “My little pony” 😁 I am planning to make a game similar to vertical jumping games, where my rainbow pony(character of Rainbow dash) will fly in the sky, and maintain the weather and clear the skies. The player earns bonus points for every cloud cleared and loses points when the character hits a bolt of lightning.

Process

As the first step into my game, I started working on backgrounds and an algorithm that changes the background and indicates a change of level. So I created a dummy variable that increases with time and that leads to a change. I also added background music to my sketch.

Next steps

1. Create classes for clouds and lightning and locate them into my canvas

2. Make my pony move

3. Work on the point counting system which will then lead to the change of levels(background)