Week 10 Reading Response

Whilst reading a Brief Rant on The Future of Interactive Design I thought of the essential framework as controversial. Firstly the assumption that humans require tactile feedback and attributing the cause of high numbers of nerve endings in fingertips only reinforces concepts of evolutionary outcomes. Yes, by evolution we do have the most nerve endings in the tips of our fingers, that does not contradict the future of interactive design removing the necessity for human touch. Unlike Humans 5000 years ago, we will not need more tactile feedback in modern society. I prefer completely removing human touch when needed. We should not have to turn a light switch on, that should be automated. We should not have to turn the AC on through an outdated retro interface as well. Several things are way better without human touch. If we take the framework further, then we should rethink even current technology and not just future technology.

Whilst Reading Responses: A Brief Rant on the Future of Interaction Design, I realized that the author completely dismissed the reasoning behind the framework under the guise that it is just a rant. Perhaps the examples of solutions such as haptic holography and nanobot assemblies is conceptually useful, but not without a further explanation of the framework. Overall I disliked this reading for the above reasons but I found the response to provide some helpful

Week 10 Project

Initally, I wanted to something with potentiometers as they reminded me very much of the knobs we see on MIDI keyboards. I decided to use Max MSP, a digital music coding inteface to see what I could do with analog outputs coming from my two potentiometers. I had two projects.

The first one was using analog outputs from 0 to 1023 to modulate the pitch of a synthesizer. To do this, I mapped the values 0 to 1023 to output as the frequency of a combined sine and saw wave. The result was that the pitch of the wave could be changed by the first potentiometer. Next, the second potentiometer was mapped to volume that way I could control the volume of my synth. Lastly, I used the button as an octave changer. I programmed it so that holding the button down multiplied my frequency of the wave by 2, turning it up an octave.

The other creation was a DJ mixer. I programmed the first capcitor’s output to 1. map to the volume of the first piece of music you inserted, 2. inverse itself and map that to the volume of the second piece of music. This creater a simple fader I could swtich between the two tracks. The second potentiometer remained a volume control. The button allowed you to start/stop both tracks at once so you could play them in sync, and crossfade between them.

One of the issues that came up was the connections breaking. Sometimes I would not notice and the potentiometer would just stop working. To work around this, I made sure everything was on the table, and none of the wires were in tension. Another issue was that I ony had one 5V power supply. While I could link up both potentiometers in parallel, I found this made the analog outputs shaky. To fix this I actually instead connect one of the two potentiometers to the 1.5V power, then changed to scaling of inputs from 0 to 1023 to 0 to 666, allowing for the same range of volume control.


In the future I could defnitely add more knobs to modulate more aspects of my sound. And as for the DJ mixer, because we do no precieve sound linearly, when the crossfader was between the two songs, the msuic became way too quiet, a non-linear form of mapping for volume could probably fix this. Another thing to improve is to defnitely create some sort of housing, permanently connecting the electornics to create a box-like apparatus as a DJ crossfader.


IMG_8326 IMG_8329


Week 10 Reading

The part of this article that stuck out to me the most was when the word “tool” was defined. I had never thought of a tool as something that was supposed to amplify human capabiity, yet when he explained his reasoning, using the example with the hammer, it all clicked for me. This meant that when he then goes on to explain the lack to tactile richness in modern day tools as a problem, it makes far more sense for me to see it as a problem.

He then points out that touchscreens should be only a transitionary technology. This really points out the possibilities that I have nver considered due to our complacency in screen usage. I think that being able to control something with our fingers, by dragging something along on a touchscreen is inherently somewhat unnnatrual in terms of what the human mind and body are used to; it is simply an unnatrual way to manipulate ‘objects.’ Yet I believe that in terms of how far away that takes us from perfect design with tactile responses, I would not overlook the human mind’s capacity to ‘fill in the blanks’ and ascertain all that we need to know from the object on the screen. So I personally do not think it is as much of an issue as the article says.

Week 10 Instrument (Z Z)

Concept:

We decided to use two digital switches (push switches) to play two different notes, with the LDR effectively acting as an analogue volume adjustment mechanism. The video demonstrates how this feedback from the LDR changes the volume, and if you focus when the light intensity pointed towards the LDR is decreased, there is a very small noise.

Demo (Circuit):

Demo (Video):

Arduino Code:

// Define pins for the buttons and the speaker
int btnOnePin = 2;
int btnTwoPin = 3;
int speakerPin = 10;

void setup() {
// Initialize both button pins as inputs with built-in pull-up resistors
pinMode(btnOnePin, INPUT_PULLUP);
pinMode(btnTwoPin, INPUT_PULLUP);

// Configure the speaker pin as an output
pinMode(speakerPin, OUTPUT);
}

void loop() {
// Check if the first button is pressed
if (digitalRead(btnOnePin) == LOW) {
tone(speakerPin, 262); // Play a tone at 262 Hz
}
// Check if the second button is pressed
else if (digitalRead(btnTwoPin) == LOW) {
tone(speakerPin, 530); // Play a tone at 530 Hz
}
// No button is pressed
else {
noTone(speakerPin); // Turn off the speaker
}
}

Challenges:

The initial concept started out with a Light Dependent Resistor and the Piezo speaker/buzzer. We faced issues as the readings from the LDR did not behave as expected, there was an issue with the  sound produced, and the change in music produced was not adequate.

We also faced challenges with the programming, as the noise production was inconsistent. We fixed this by adjusting the mapping of the notes to produce more distinct frequencies for each independent push button (red vs yellow). for 262 and 540 Hz respectively.

Done by: Zayed Alsuwaidi (za2256) and Zein Mukhanov (zm2199)

Assignment 10 – Reading Response (A Brief Rant On the Future Of Interaction Design, and it’s Follow-up)

Reading this response made me think about how much and how little has changed since 2011. At the time, touchscreens were really starting to take over. The iPhone was still kind of shiny and new, and starting to set a trend, and the iPad had just started making its way into homes, schools, and workplaces. It was exciting. And yet, looking back from 2025, it’s almost prophetic how spot-on this rant was about where things might go. We did, in many ways, double down on the flat, glassy rectangles.

What really struck me was how much of this still applies today. In fact, it’s even more relevant now. Since 2011, we’ve added smart speakers, VR headsets, and now AI tools like ChatGPT and image generators like DALL·E. The author says Monet couldn’t have painted by saying “Give me some water lilies,” but with generative AI, that’s suddenly a real thing, and has become increasingly more relevant in debates on human participation; it’s both exciting and a little unsettling. It made me wonder: are we making creativity more accessible, or are we distancing ourselves from the hands-on, exploratory process that gives creative work its depth and meaning?

The rant also touched on something deeper, the idea that our tools shape how we think, learn, and grow. When we limit interaction to just tapping a screen or giving voice commands, we risk becoming passive users instead of active thinkers. Especially now, when so much of daily life is mediated by screens and digital assistants, it’s easy to forget how valuable physical engagement really is. In the end, this wasn’t just a rant about interface design; it was a call to imagine more ambitious, embodied futures for how we use technology. It made me reflect on my own habits and what kind of tech I want to see (and use) going forward.

Week 10: Musical Instrument

Link to video demo : https://drive.google.com/file/d/1KGj_M7xq6IdsS2Qwq-zbjjspCPPgcaj4/view?usp=sharing

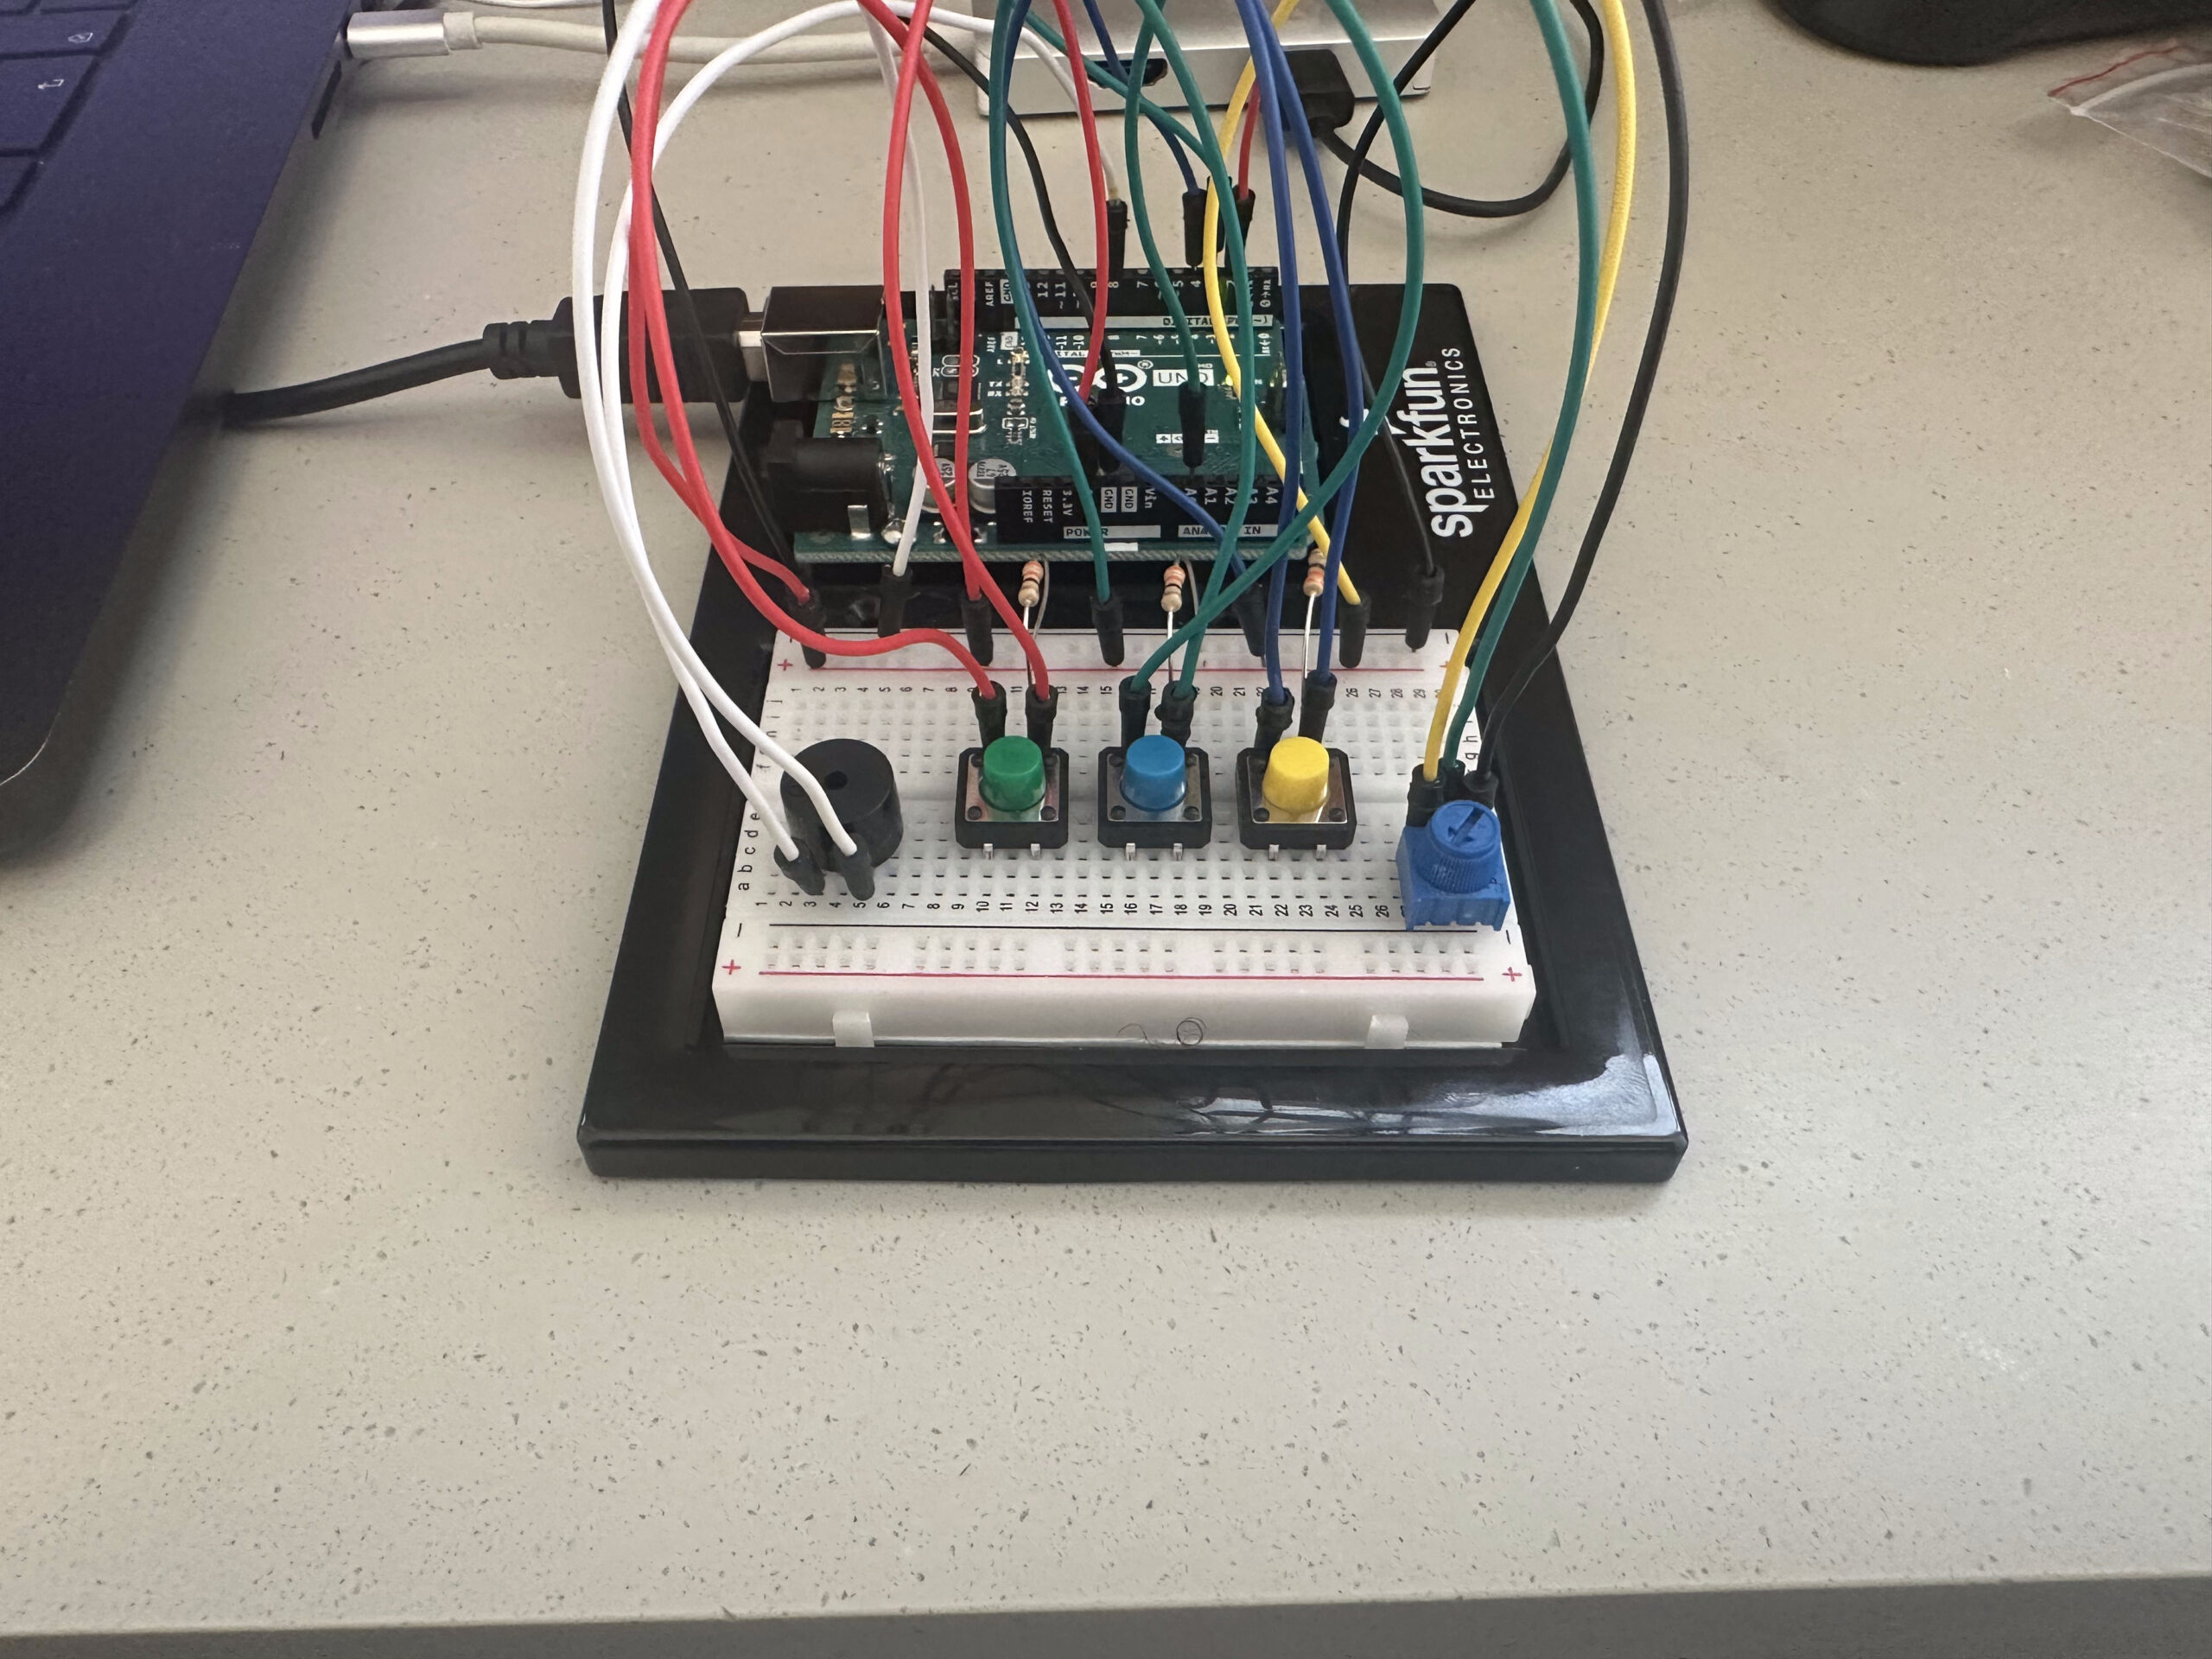
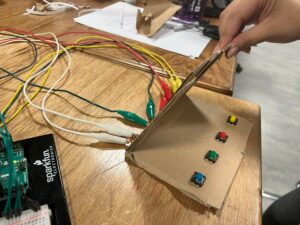
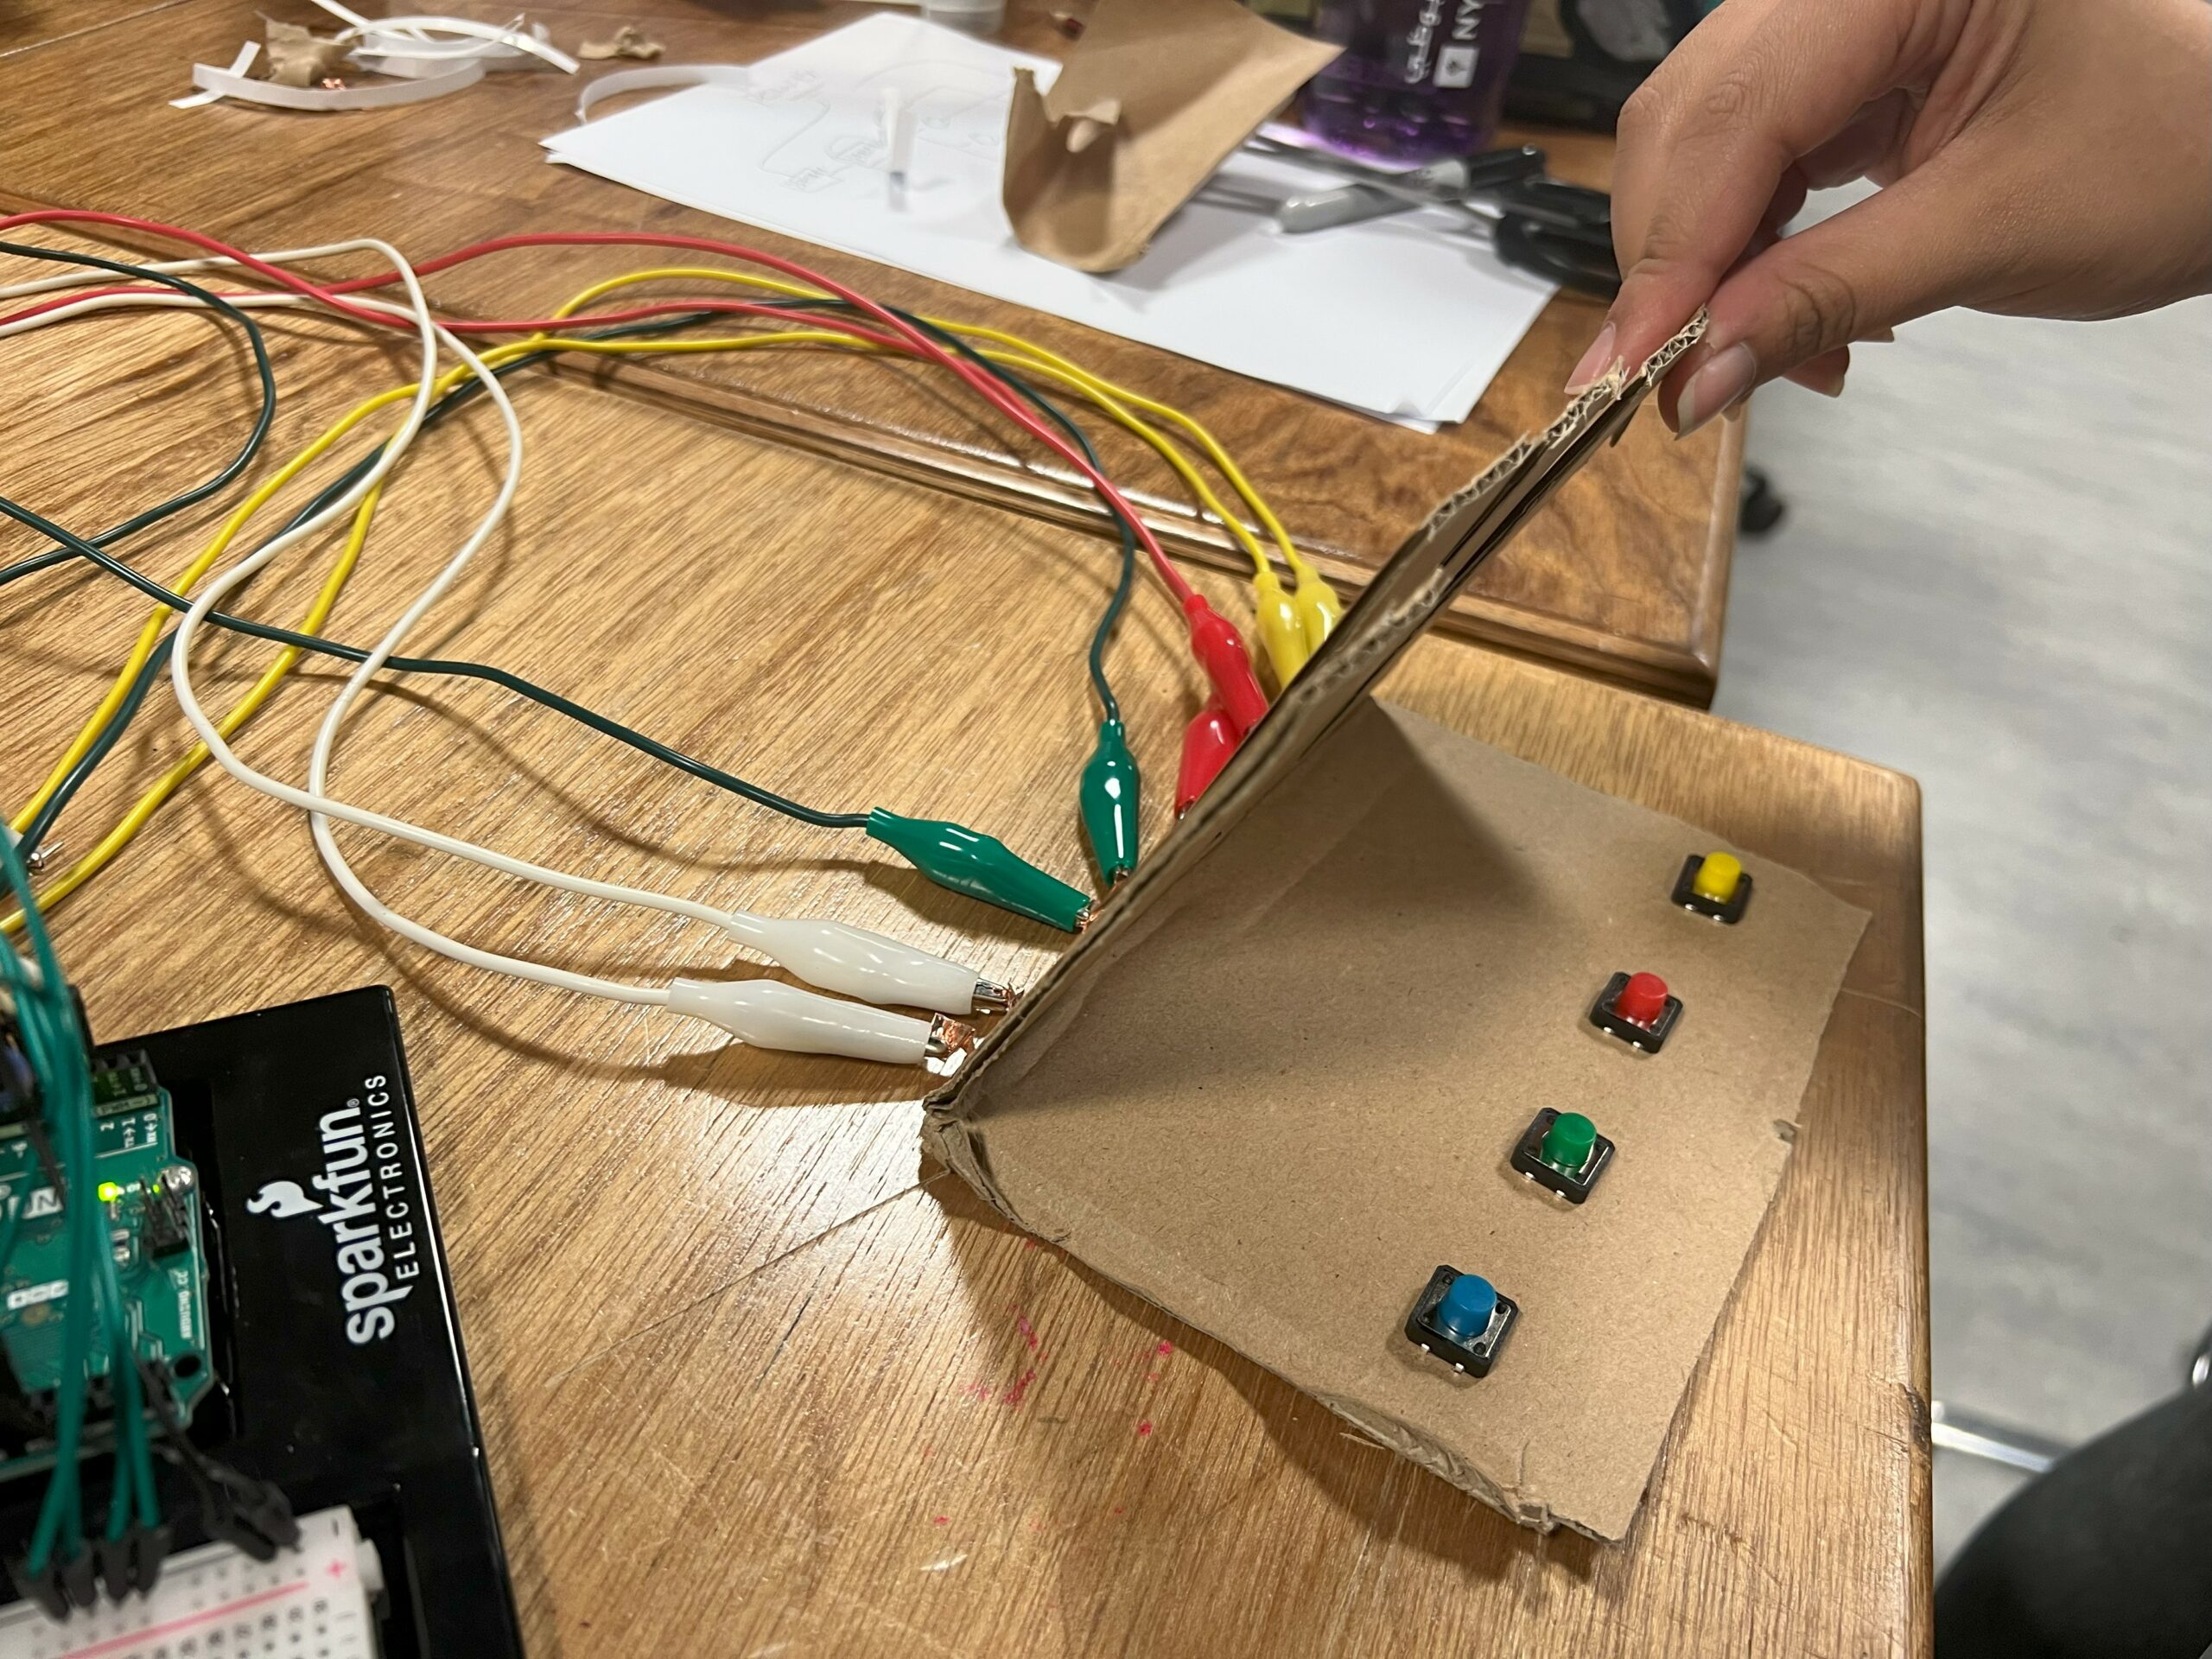
For this assignment, I decided to build a digital trumpet using an Arduino Uno, three push buttons, a potentiometer, and a speaker. My goal was to simulate the behavior of a real trumpet in a fun and creative way, even though I knew the sound would be more electronic than acoustic. It was a great opportunity for me to explore how hardware and code can come together to create music, and I ended up learning a lot about sound generation and analog input in the process.

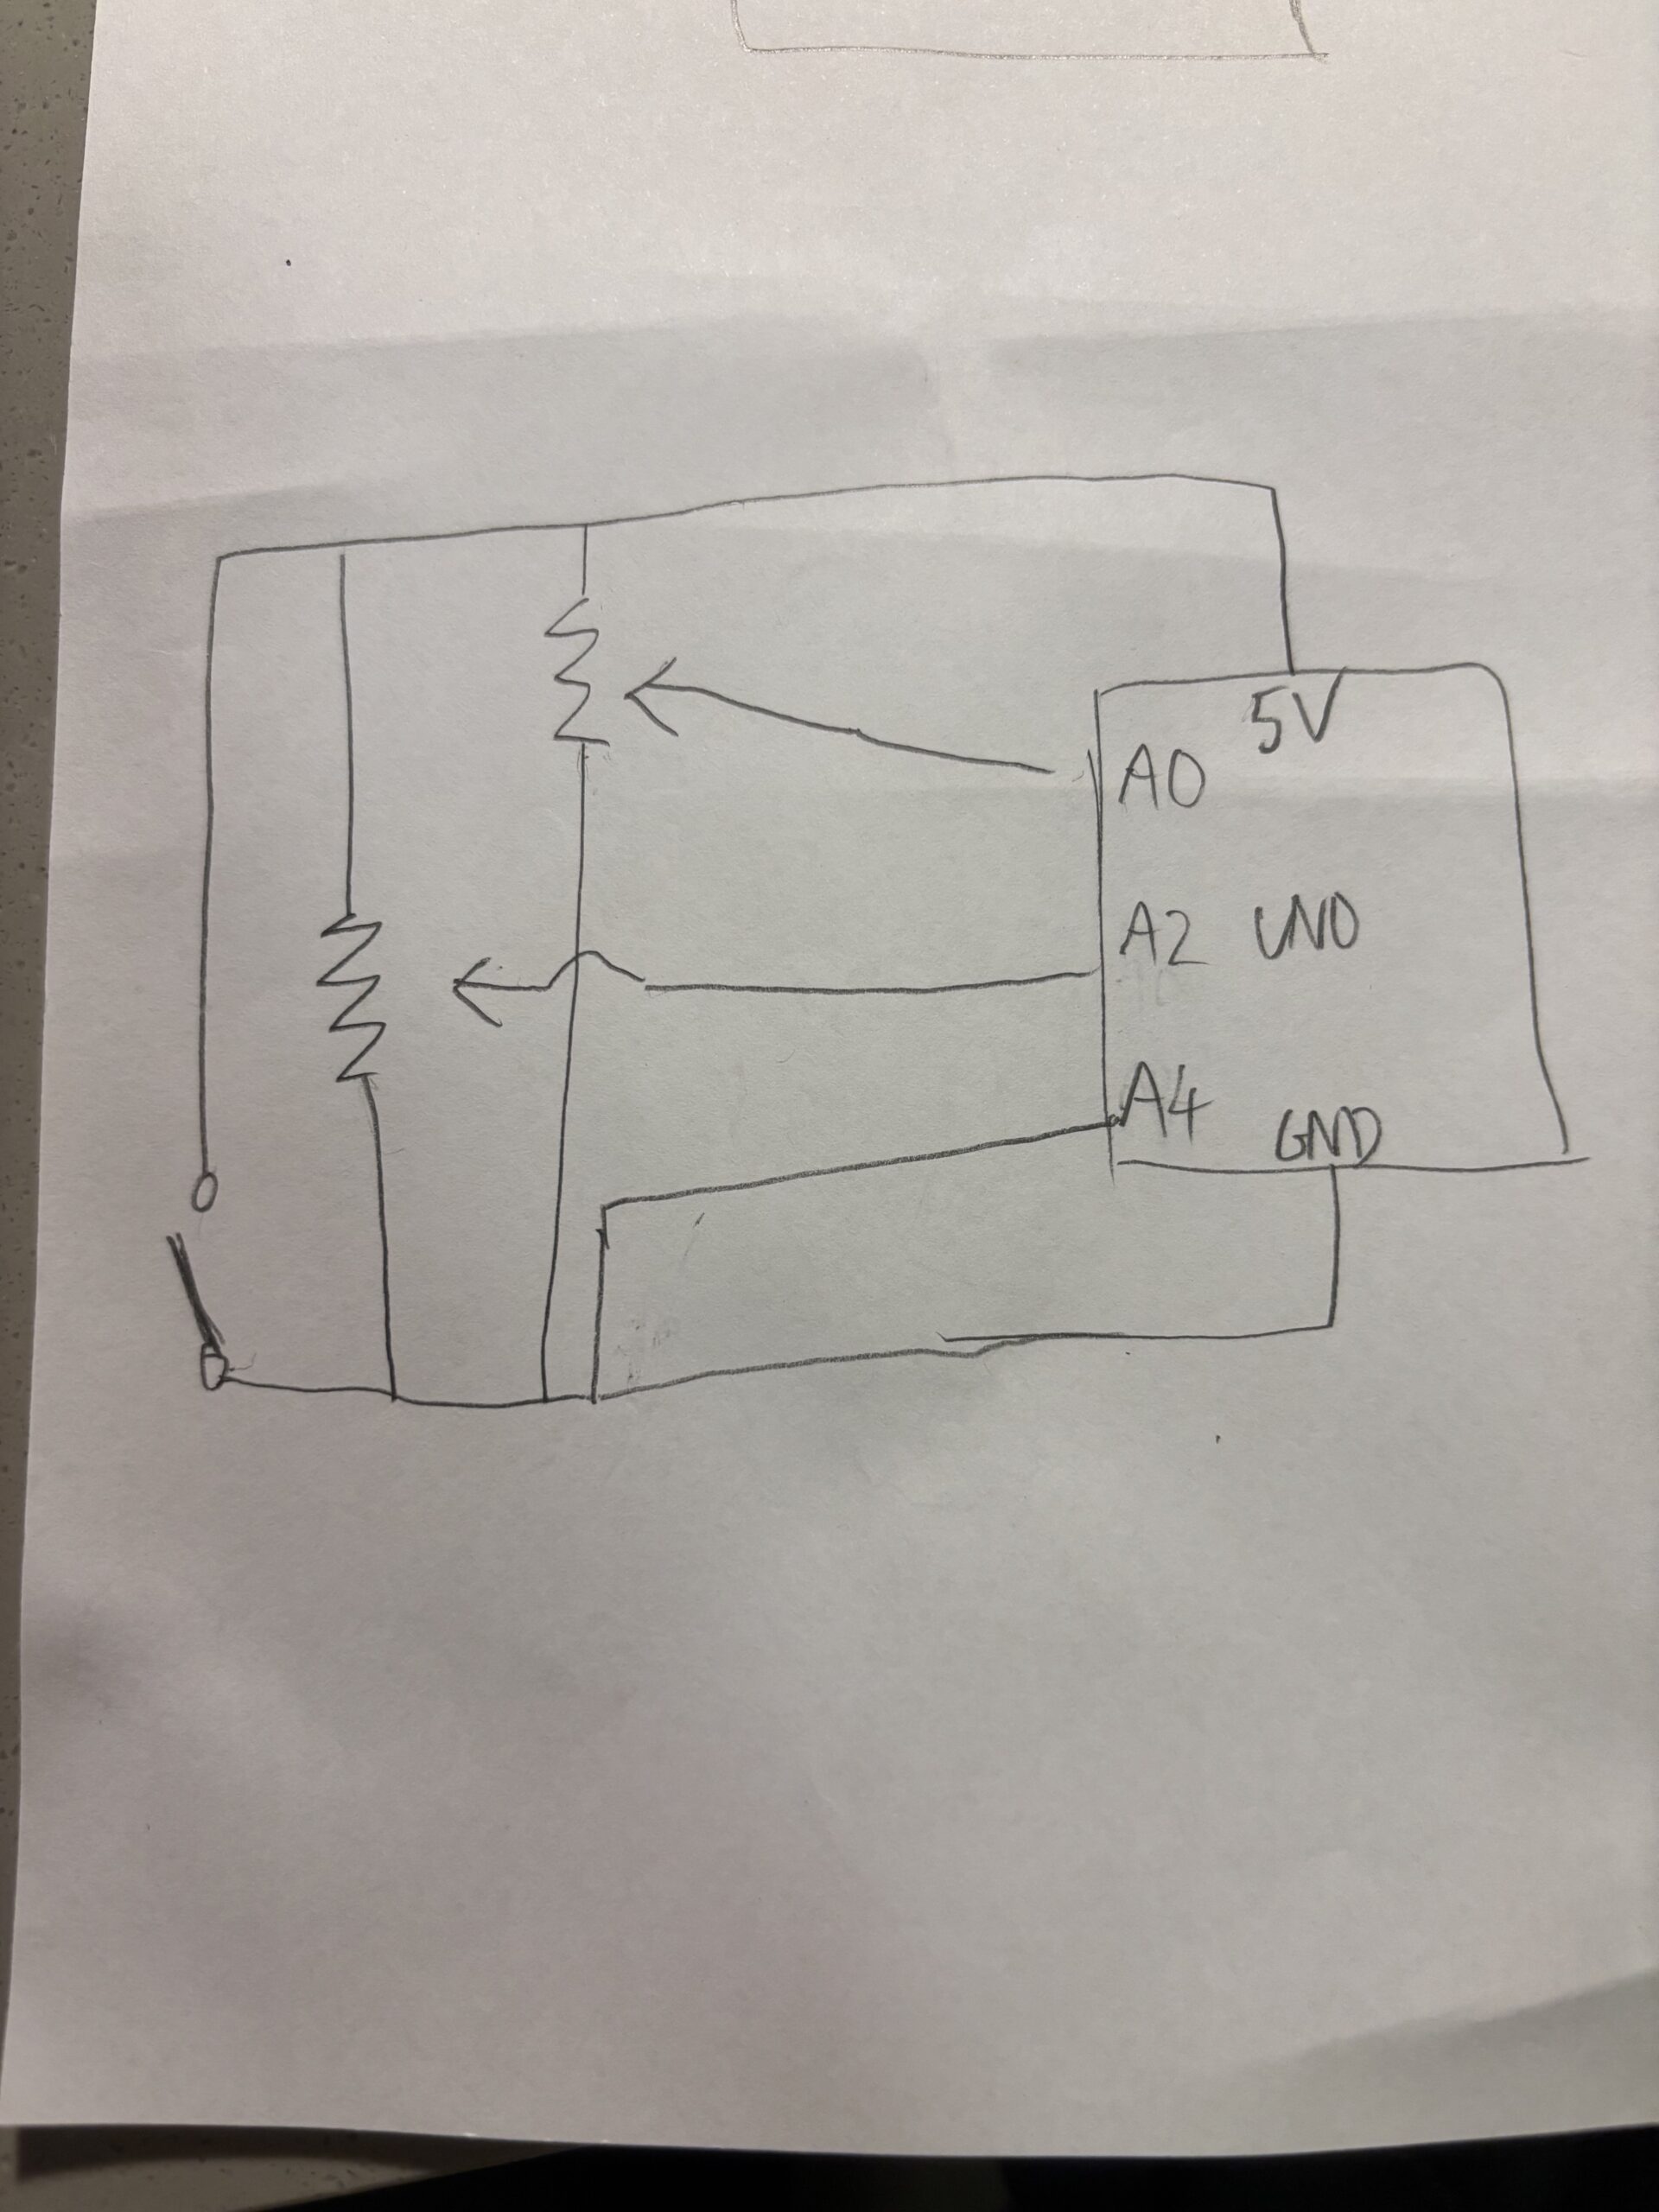
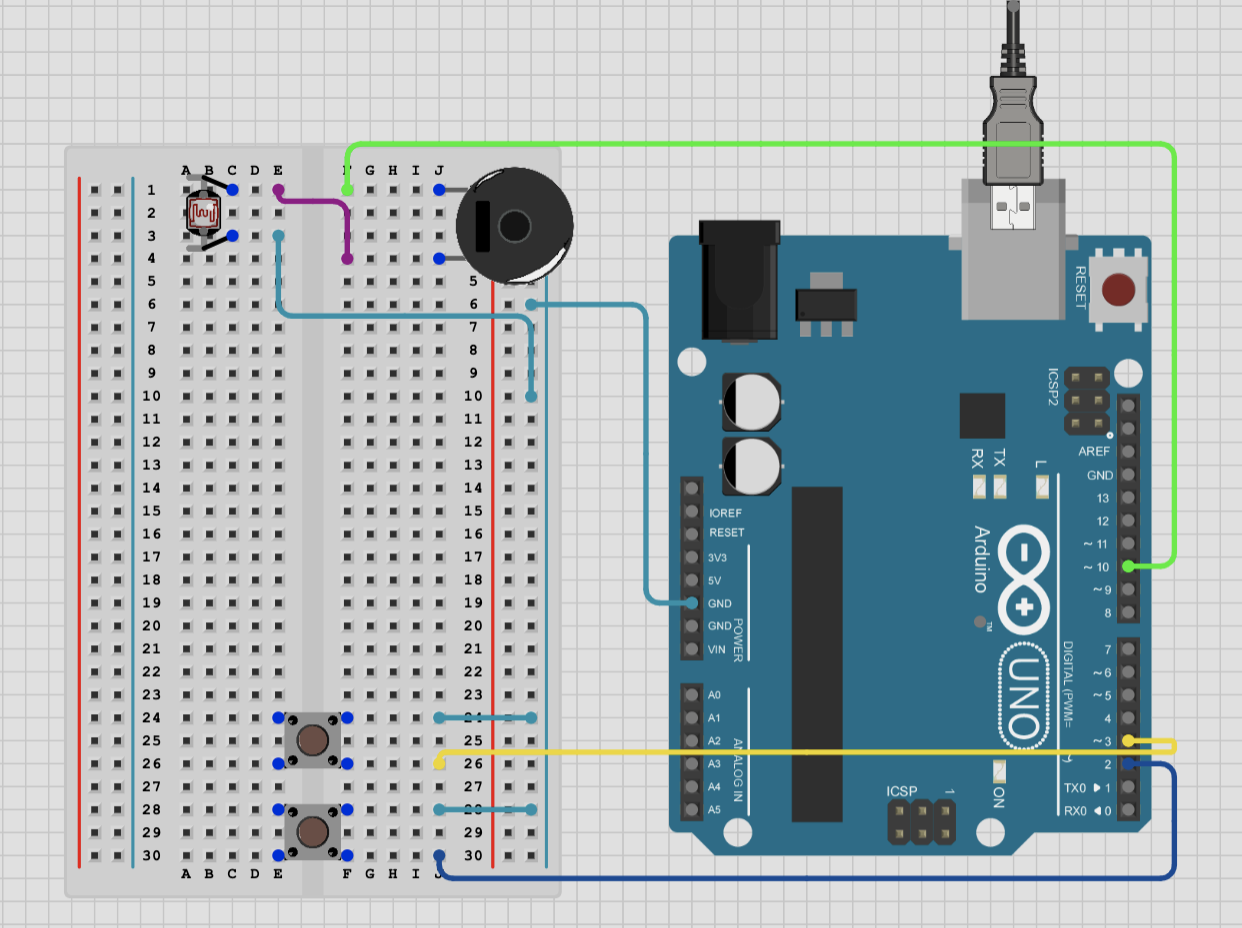
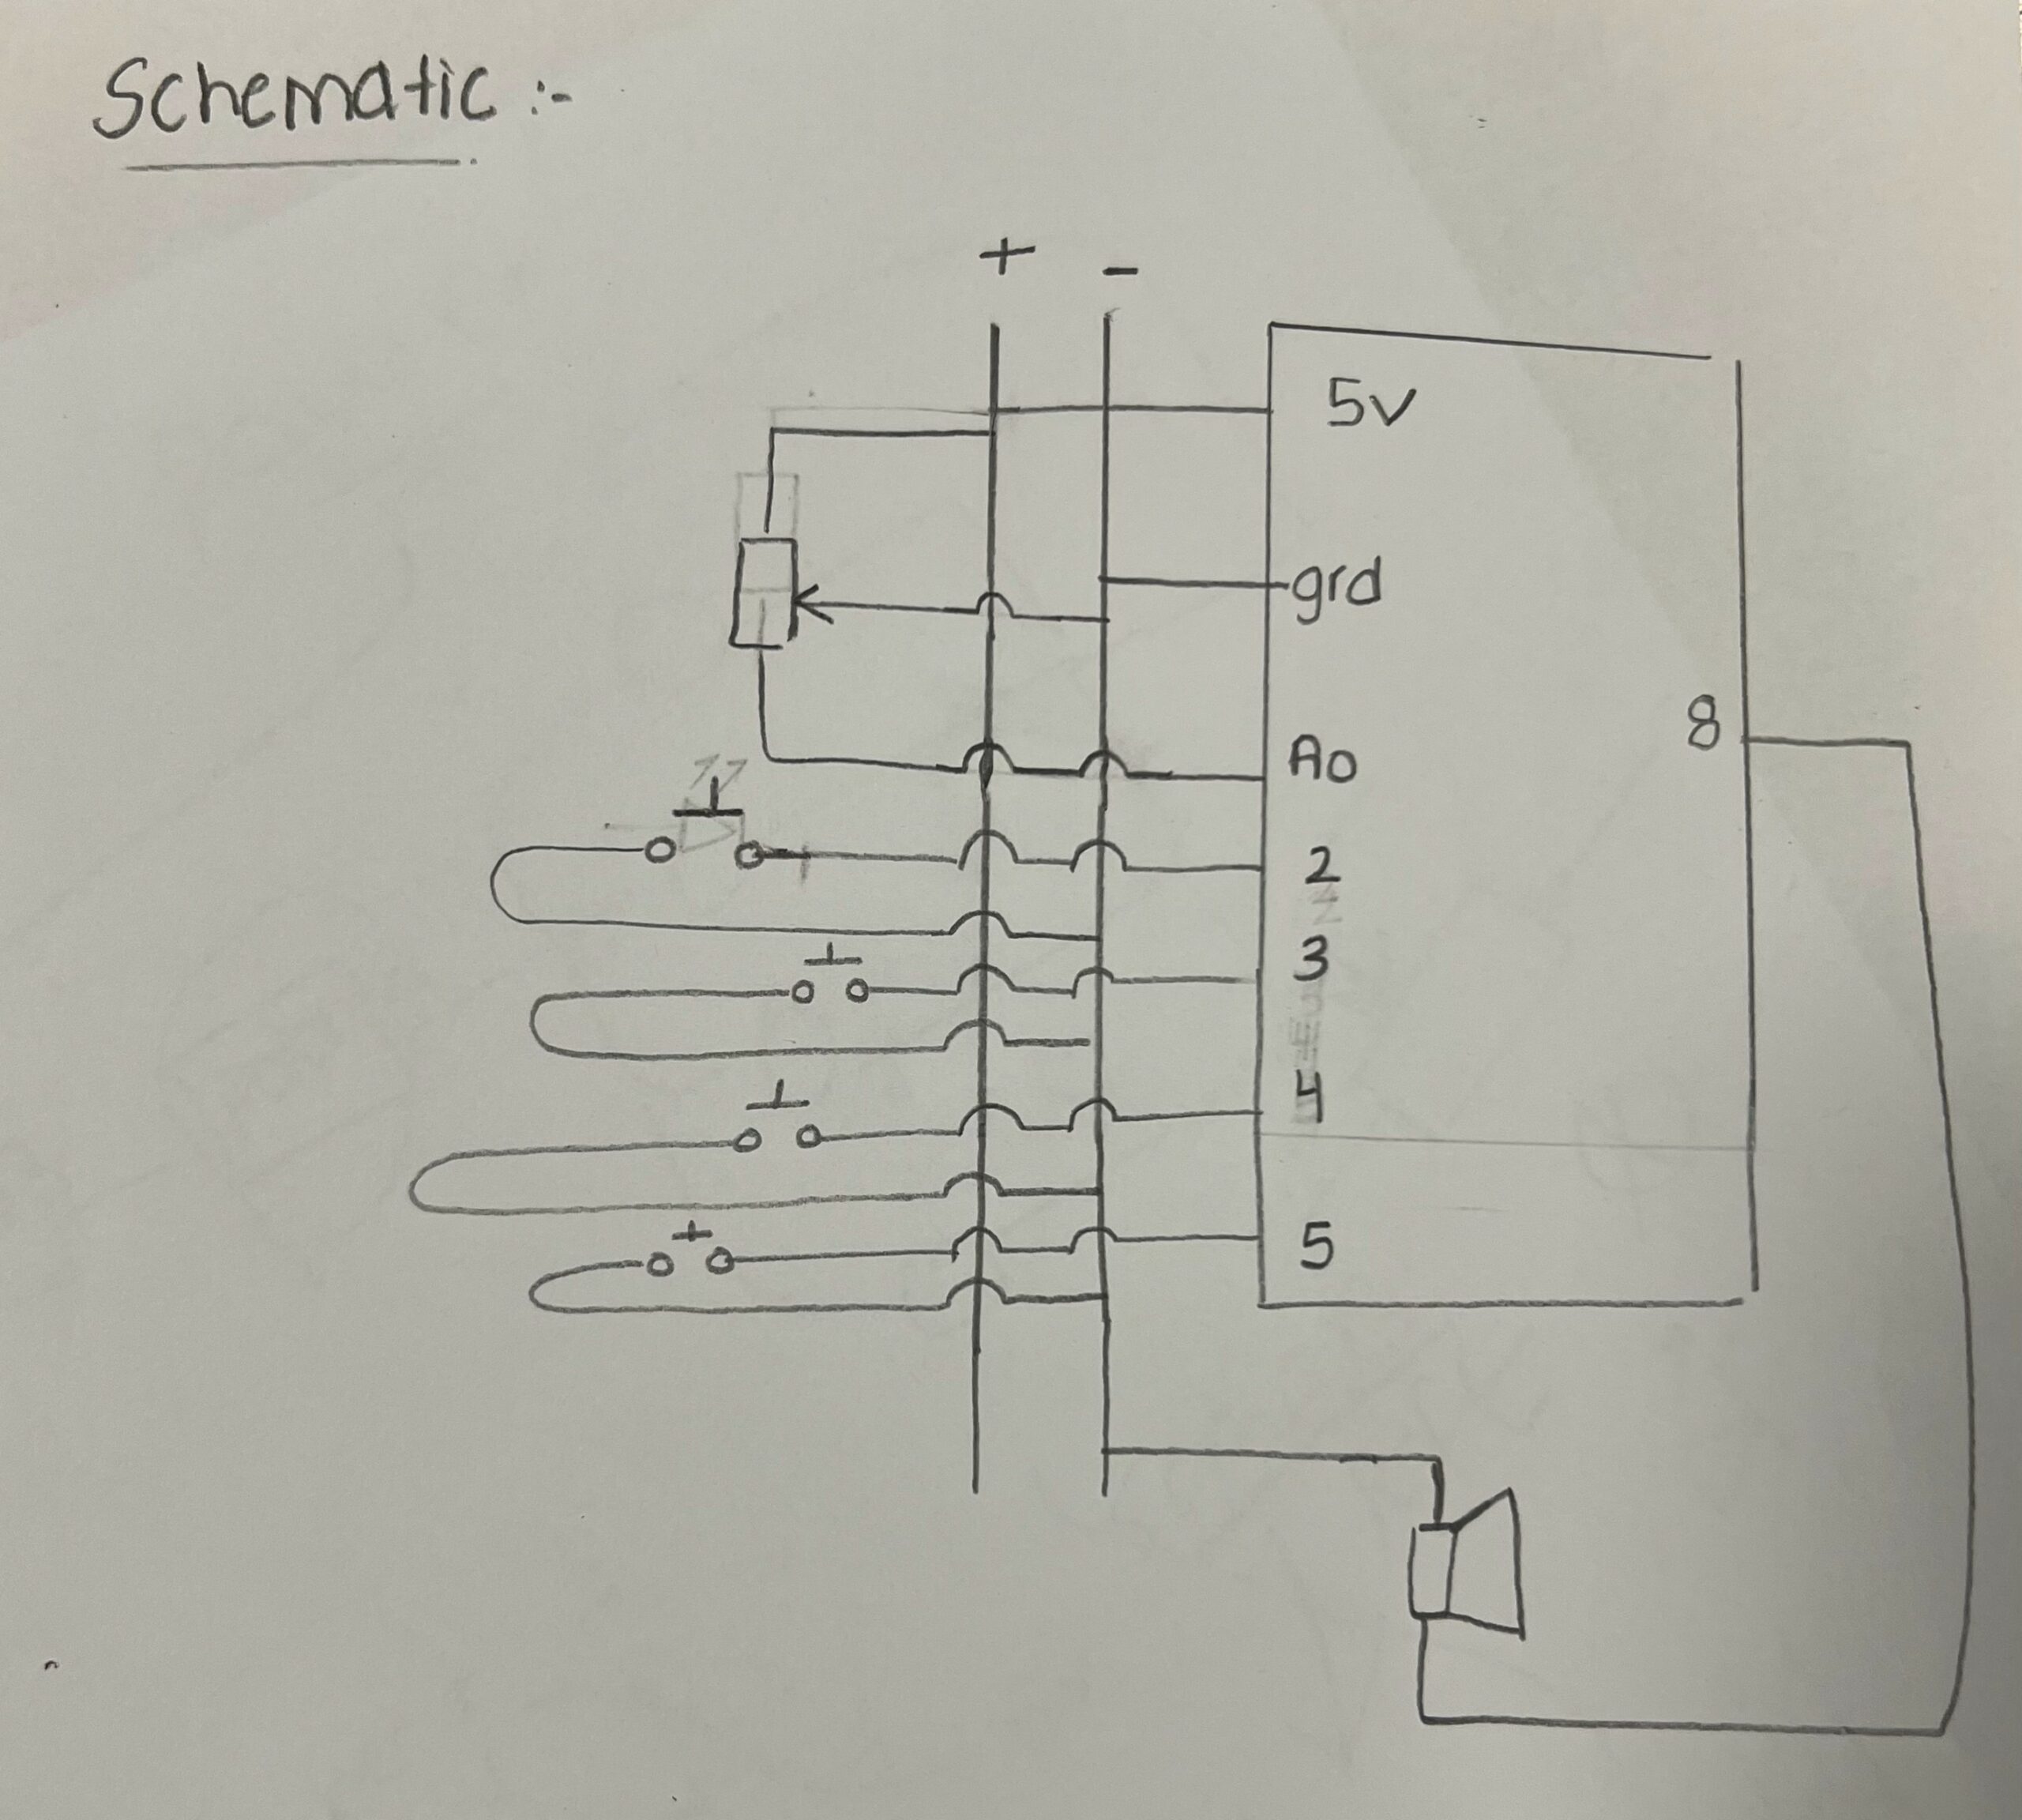
The concept was simple: each of the three buttons acts like a trumpet valve, and each one triggers a different note — specifically G4, A4, and B4. These are represented in the code as fixed frequencies (392 Hz, 440 Hz, and 494 Hz). When I press one of the buttons, the Arduino sends a signal to the speaker to play the corresponding note. The potentiometer is connected to analog pin A0 and is used to control the volume. This was a really cool addition because it gave the instrument a bit of expressive control — just like how a real musician might vary their breath to change the loudness of a note.

To make the sound a bit more interesting and less robotic, I added a little “vibrato” effect by randomly adjusting the pitch slightly while the note is playing. This gives the tone a subtle wobble that sounds more natural — kind of like the way a real trumpet player might shape a note with their lips. It’s still a square wave, and it’s definitely digital-sounding, but it gives it more character than just playing a flat, unchanging frequency.

If I were to continue developing this project, I have a few ideas for improvements. One would be to add more buttons or allow combinations of the three to create more notes — like a real trumpet with multiple valve positions. I’d also love to add some kind of envelope shaping, so the notes could have a smoother fade-in or fade-out instead of sounding flat and abrupt. It might also be fun to hook the project up to MIDI so it could control a software synthesizer and produce higher quality trumpet sounds. And for an extra visual touch, I could add LEDs that light up in sync with the music.
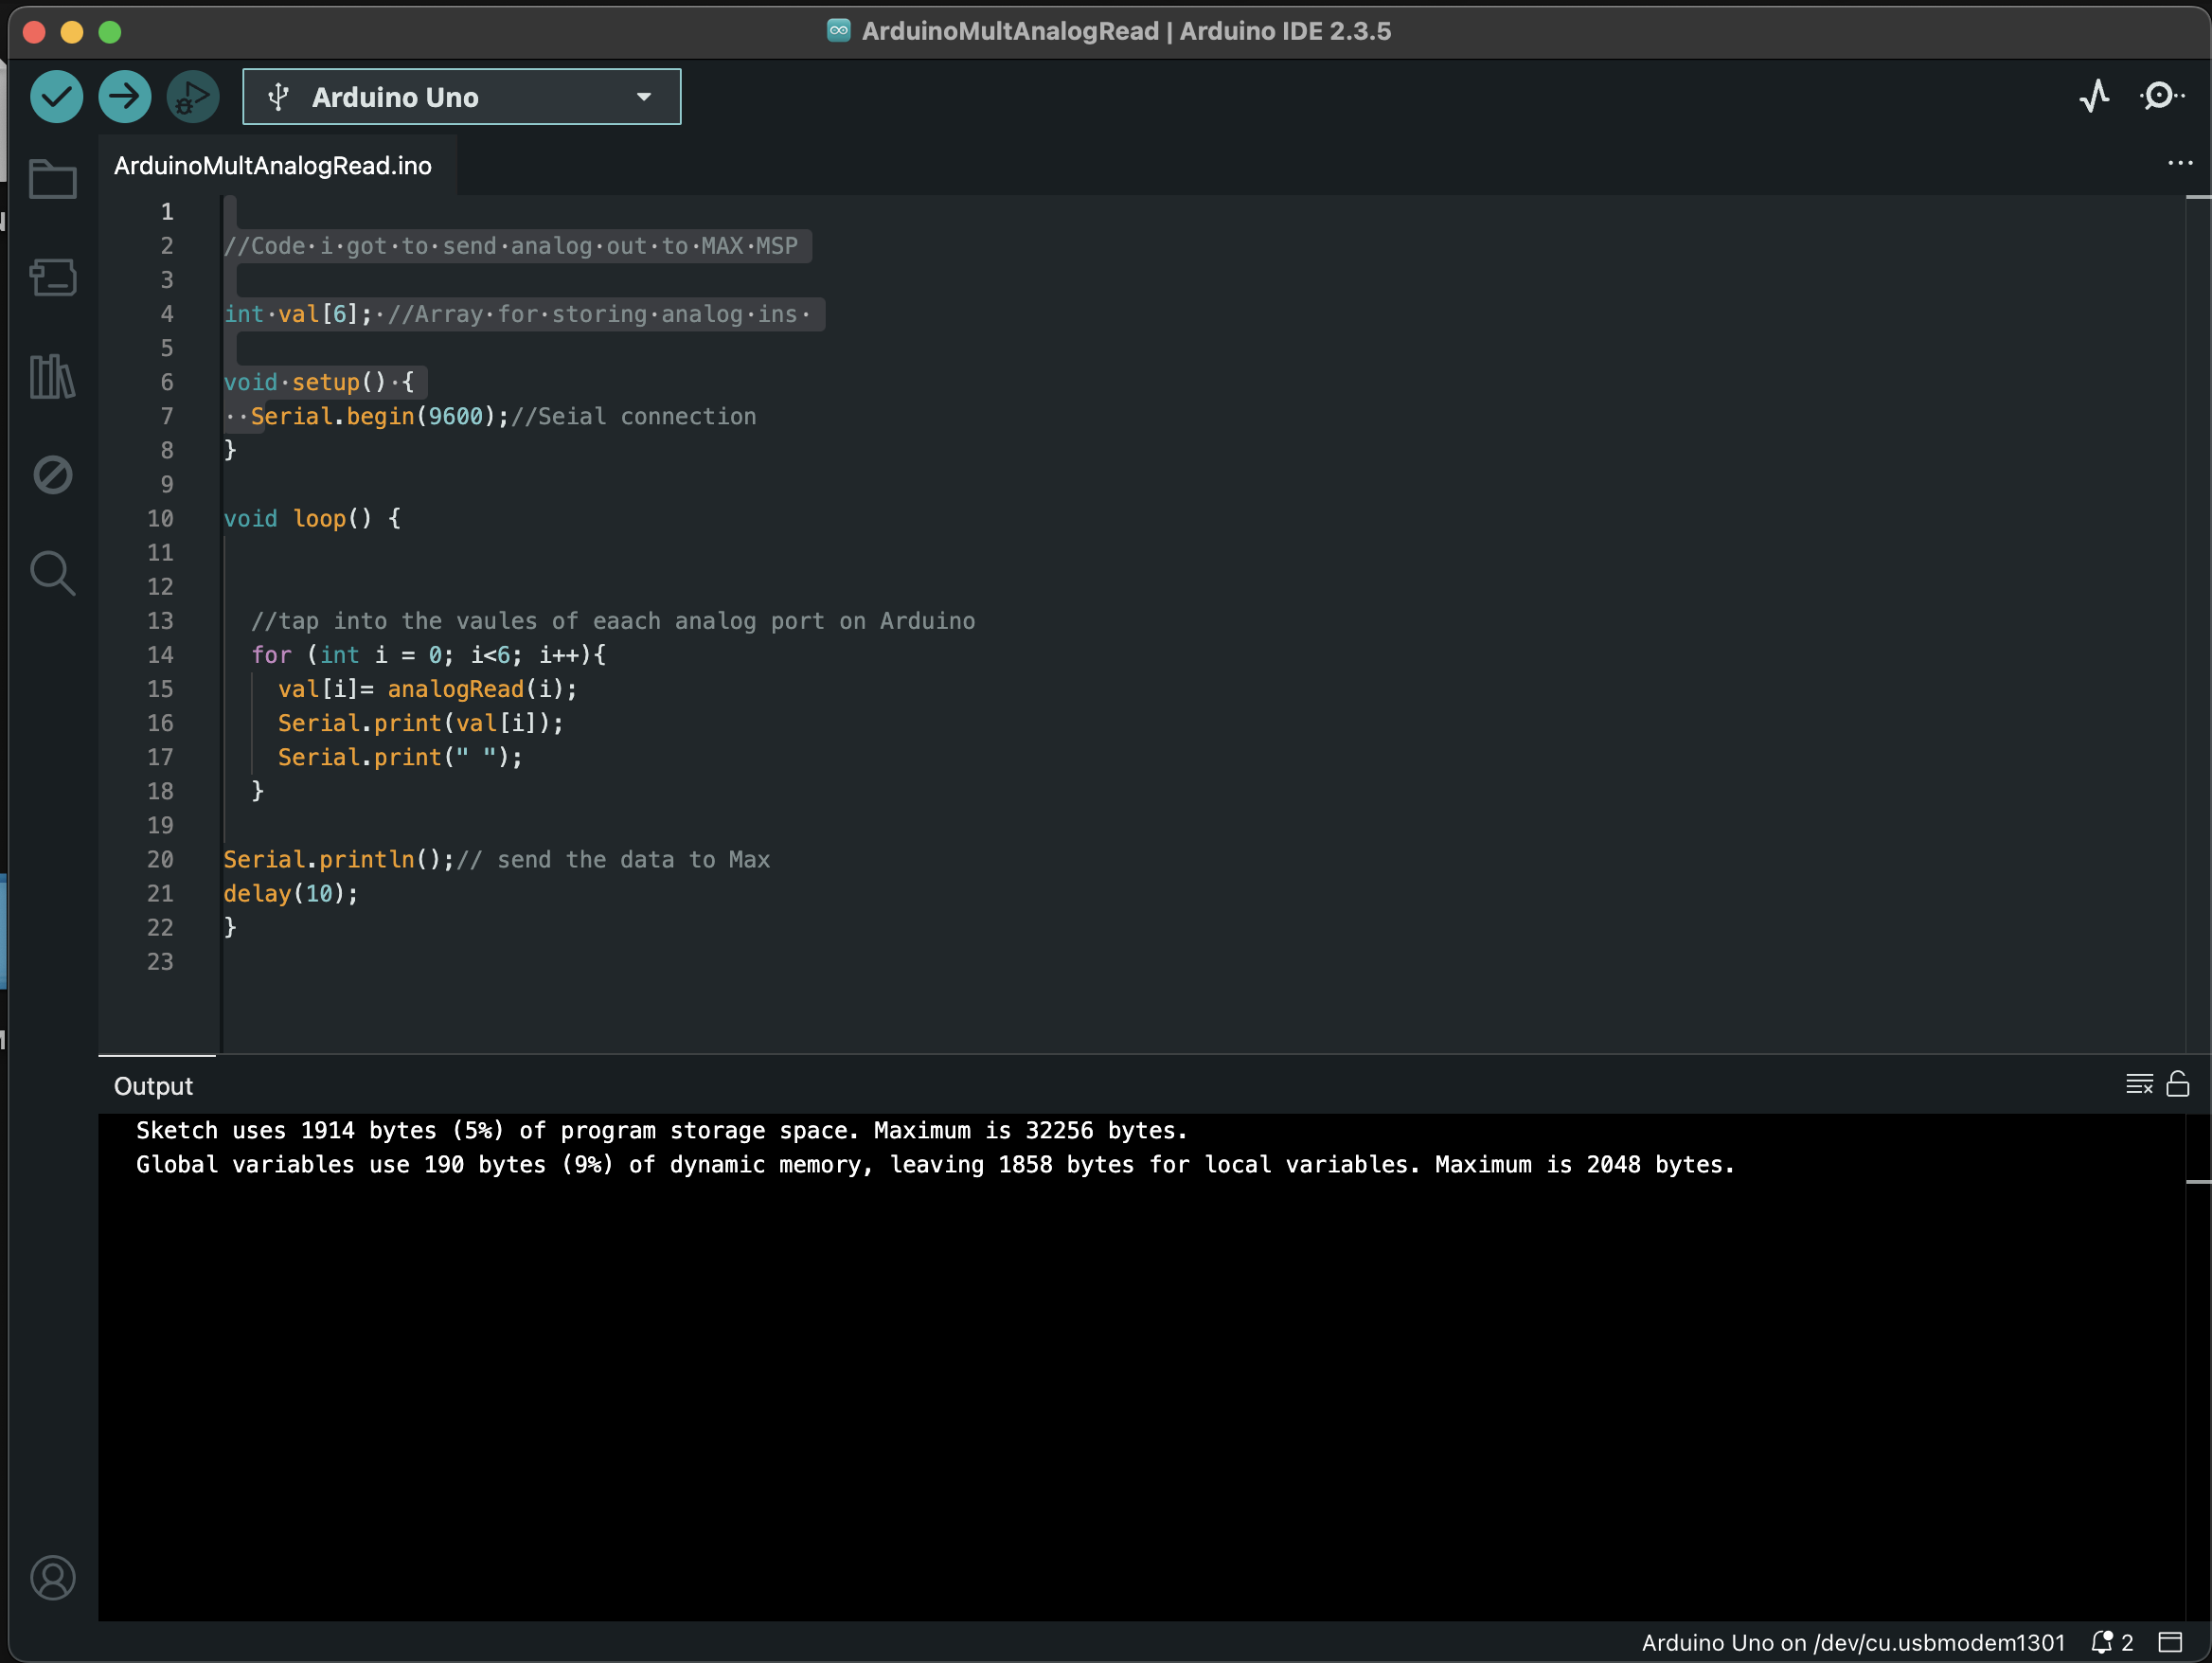
CODE :

const int potPin = A0;          // Potentiometer for volume
const int speakerPin = 8;       // Speaker on PWM pin
const int buttonPins[] = {2, 3, 4}; // 3 buttons = 3 different notes

// Trumpet-like frequencies (roughly G4, A4, B4)
const int trumpetNotes[] = {392, 440, 494}; 

void setup() {
  for (int i = 0; i < 3; i++) {
    pinMode(buttonPins[i], INPUT); // External pull-down resistors
  }
  pinMode(speakerPin, OUTPUT);
}

void loop() {
  int volume = analogRead(potPin) / 4;

  for (int i = 0; i < 3; i++) {
    if (digitalRead(buttonPins[i]) == HIGH) {
      playTrumpetNote(trumpetNotes[i], volume);
    }
  }

  delay(10); 
}

void playTrumpetNote(int baseFreq, int volume) {
  unsigned long duration = 10000; // microseconds per cycle
  unsigned long startTime = micros();

  while (micros() - startTime < duration) {
    // Slight pitch wobble
    int vibrato = random(-3, 3);
    int currentFreq = baseFreq + vibrato;
    int halfPeriod = 1000000 / currentFreq / 2;

    analogWrite(speakerPin, volume);
    delayMicroseconds(halfPeriod);
    analogWrite(speakerPin, 0);
    delayMicroseconds(halfPeriod);
  }
}


Week 10: Musical Instrument

For this assignment, Izza and I worked together to come up with the idea of using the push buttons from our kit as keys for a piano. We used cardboard to create the piano keys and poked the push buttons through the bottom layer. We then used copper tape to cover the push button’s pins and give the alligator clips something to attach to in order to connect the buttons with wires that went into the breadboard. For our analog sensor, we used a potentiometer to control the length of the sound made once a key was pressed. The result can be seen here:

https://drive.google.com/file/d/187WqUyYvRZ6KFFVMn0NtSO0ycqEzKyXq/view?usp=sharing


Our circuit diagram can also be seen here:

We’re really proud of the fact that we were able to complete the circuit using a variety of tools like the copper tape and alligator pins and were able to have a creative and working result. We are also really proud of the code that was inspired by the toneMelody exercise we did in class for the pitches. The code can be seen below:

#include "pitches.h"

const int speakerPin = 8;
const int potPin = A0;

const int buttonPins[] = {2, 3, 4, 5};
const int numButtons = 4;

// Define the notes for each button
int notes[] = {NOTE_C4, NOTE_D4, NOTE_E4, NOTE_F4};

void setup() {
  for (int i = 0; i < numButtons; i++) {
    pinMode(buttonPins[i], INPUT_PULLUP);  // Internal pull-up resistor
  }
  pinMode(speakerPin, OUTPUT);
}

void loop() {
  int potValue = analogRead(potPin);  // 0–1023
  int noteDuration = map(potValue, 0, 1023, 100, 1000);  // Adjusts the lengths of the notes

  for (int i = 0; i < numButtons; i++) {
    if (digitalRead(buttonPins[i]) == LOW) {  // Button is pressed
      tone(speakerPin, notes[i], noteDuration);
      delay(noteDuration * 1.3);  // Pause between tones
      noTone(speakerPin);
    }
  }
}

We had some difficulty getting the buttons to connect with the alligator clips using the copper tape since it kept poking through the tape and was very fragile to move around. Even with a double reinforcement, the pins would still stick through. If we were to recreate it, we may seek another alternative that is thicker. We also encountered an unknown issue with some ghost keys where sounds would appear even if no key was pressed. This could be due to the copper tape issue as well.

Overall though, we are proud of the fact that the piano keys worked when pressed and the potentiometer properly adjusted the length of the notes as seen in the video.

Week 10 – Reading Response

Reading A Brief Rant on the Future of Interaction Design felt less like a critique of current technology and more like a reminder of how disconnected we’ve become from our own bodies when interacting with digital tools. What stood out to me wasn’t just the fixation on touch or screens, but the larger idea that we’ve built a digital world that doesn’t physically involve us much at all. We sit, swipe, and speak to our devices, but rarely do we engage with them in a way that feels natural or satisfying. That idea made me reflect on how strange it is that we’ve accepted this passive interaction style as normal, even though it barely scratches the surface of what our senses and motor skills are capable of. The rant made me question whether convenience has quietly replaced depth in our relationship with technology.

What also struck me was the underlying urgency — not just to change what we build, but to change how we think about building. It challenged the assumption that progress is purely about making things smaller, faster, or more responsive. Instead, it asked: what if we measured progress by how much it involves us — our movement, our perception, our ability to explore ideas physically, not just conceptually? It reminded me that interaction design isn’t only about the interface; it’s about the experience and how deeply it aligns with our human nature. This reading didn’t just shift my thinking about interfaces — it made me realize that future design needs to be less about controlling machines and more about collaborating with them through a fuller range of expression. That’s a future I’d like to be part of.

Week 10: Reading Assignments

Reading 1: A Brief Rant on the Future of Interaction Design

This article challenged me not just to think about technology differently, but to think about my own body in a way I hadn’t before. I’ve never really considered how much my hands do until I read this, and how trained they are to respond to tactile stimuli. The jar had never even occurred to me until I read this piece. The idea that we’ve somehow accepted a future where our main way of interacting is through a single flat surface feels, honestly, a little absurd now. Victor’s relation of tying shoes with numb fingers to the uncomfortable, clumsy feeling of using a touchscreen was also very interesting. It’s like we’ve trained ourselves to tolerate the flat, lifeless interaction because it’s become such an integral part of our daily lives. That realization made me question how many other “innovations” we’ve accepted without thinking critically about what they’re replacing.

Victor’s point that “technology doesn’t just happen” was also really impactful. The future isn’t just something that will occur with no warning but rather something that we have a say and control over. We are not and should not be just passive consumers of technology and we can and should demand more human-centered, embodied interaction. The piece didn’t just critique existing technology, it kind of made me mourn what tactile feelings are being lost in this rush for sleek minimalism.

Reading 2: Follow-Up

I like that the author did not try to fake any sweetness in his responses and was extremely straight up in his replies. Still, he reframes the rant not as a complaint, but as a call to arms for future innovation. Rather than proposing a specific fix, he emphasized the importance of recognizing what’s missing in current interaction design which, as mentioned before, is the lack of physical, tactile, and dynamic engagement with technology nowadays. His point isn’t that iPads or voice commands are inherently bad, but that they represent a limited vision if they become the final stop in interface development because of the lack of tactility. Through analogies to historical tech like early cameras and color film, Victor highlights how true change begins with noticing a gap and daring to explore it.


Week 10: Musical Instrument Group Assignment [Izza and Hoor]

For this assignment, Hoor and I worked together to come up with the idea of using the push buttons from our kit as keys for a piano. We used cardboard to create the piano keys and poked the push buttons through the bottom layer. We then used copper tape to cover the push button’s pins and give the alligator clips something to attach to in order to connect the buttons with wires that went into the breadboard. For our analog sensor, we used a potentiometer to control the length of the sound made once a key was pressed. The result can be seen here:

https://drive.google.com/file/d/187WqUyYvRZ6KFFVMn0NtSO0ycqEzKyXq/view?usp=sharing

Our circuit diagram can also be seen here:

We’re really proud of the fact that we were able to complete the circuit using a variety of tools like the copper tape and alligator pins and were able to have a creative and working result. We are also really proud of the code that was inspired by the toneMelody exercise we did in class for the pitches. The code can be seen below:

#include "pitches.h"

const int speakerPin = 8;
const int potPin = A0;

const int buttonPins[] = {2, 3, 4, 5};
const int numButtons = 4;

// Define the notes for each button
int notes[] = {NOTE_C4, NOTE_D4, NOTE_E4, NOTE_F4};

void setup() {
  for (int i = 0; i < numButtons; i++) {
    pinMode(buttonPins[i], INPUT_PULLUP);  // Internal pull-up resistor
  }
  pinMode(speakerPin, OUTPUT);
}

void loop() {
  int potValue = analogRead(potPin);  // 0–1023
  int noteDuration = map(potValue, 0, 1023, 100, 1000);  // Adjusts the lengths of the notes

  for (int i = 0; i < numButtons; i++) {
    if (digitalRead(buttonPins[i]) == LOW) {  // Button is pressed
      tone(speakerPin, notes[i], noteDuration);
      delay(noteDuration * 1.3);  // Pause between tones
      noTone(speakerPin);
    }
  }
}

We had some difficulty getting the buttons to connect with the alligator clips using the copper tape since it kept poking through the tape and was very fragile to move around. Even with a double reinforcement, the pins would still stick through. If we were to recreate it, we may seek another alternative that is thicker. We also encountered an unknown issue with some ghost keys where sounds would appear even if no key was pressed. This could be due to the copper tape issue as well.

Overall though, we are proud of the fact that the piano keys worked when pressed and the potentiometer properly adjusted the length of the notes as seen in the video.