Reading Reflection – Week 11

Design Meets Disability

This reading was probably my favorite out of all the pieces we’ve read so far. It shifted how I thought about design and its relationship to disability; before this, I had mostly seen assistive devices as purely functional tools but Pullin’s writing made me realize that it’s really not the case. He reframes assistive devices – i.e. hearing aid, prosthetic hand/leg, wheelchair – as opportunities for self-expression and avenues for celebrating individuality, the same way how eyeglasses have evolved into fashion statements. So much of design for disability has been shaped by a desire to hide and minimize differences and prioritized functionality over aesthetics. It has also often been suboptimally fulfilled through universal design where a product is overburdened with mediocre at best features that attempts to accommodate everyone’s needs, a concept which is perfectly summarized by the expression “flying submarine” in the piece. To bridge this disconnect between design and disability, the author argues that disabled people should participate in the design process as collaborators alongside engineers, designers and medical practitioners to actualize a true inclusive design for assistive devices that balance function with aesthetics, and embrace individuality over invisibility. The idea that inclusion is not just about access and compliance, but also deeply involves choice and self-expression, is one that I will remember and apply in the things I do now moving forward.

Week 10 – Reading Response

A Brief Rant on the Future of Interaction Design

I feel like this piece hit hard, not because it presented this radical concept I’d never considered, but because it made me realize how “numb” we’ve become to bad interaction design. The author’s rant about Pictures Under Glass being a transitional technology really stuck with me, as I really hadn’t consciously thought about how much feedback we’re missing when we interact with screens, but now I can’t unsee it. It’s like we’ve accepted a more flattened version of reality just because it looks sleek and futuristic. The author’s praise for the hands also reminded me of how intuitive and rich real world interactions are, so like the simple example of turning the pages of a book or making a sandwich made it feel so obvious. Our fingers do a million things, completely automatically, and we’ve built an entire tech world that barely acknowledges that. The ending made me feel slightly  hopeful, though, I love the idea that the future is a choice, and that inspired people, like us students can try to help push interaction design in new directions.

As for the second reading which was a response to this first reading, what I took away is that if we don’t push for more sensory-rich interaction design, we might risk narrowing our creative and cognitive possibilities. I feel there was a subtle warning which tells designers and everyone else to not let convenience trap us in shallow interaction as we deserve better tools that can really challenge and extend the full capabilities of our bodies and minds.

Week 10 – Reading Response

Through the reading “A Brief Rant of the Future of Interaction Design,” I was convinced that the Future of Interaction should not be a single finger and should have good feedback, and I think big innovations needs to raise the usefulness of current things. It is problematic that most Future Interaction Concepts completely ignore parts of the body we rely on. If Pictures Under Glass were an invention when the ipad or touch-screen phones were not yet made, then perhaps it would be considered a good advancement (that still needs further improvement on interaction). Pictures Under Glass looks similar to the current phone or ipad, and I think I was visioning a different way of seeing andinteracting with things you find in the phone or ipad in the future – like content you can swipe and change up in the air (is this a good thing or not?). While watching the video “Microsoft – Productivity Future Vision”, I felt I was looking for something useful, something more. For example, I think the translation using what you see with your glasses looks very useful. If you can make your recipes while reading what you need up in the air, this could be useful because you just need to look up from the food. If things look futuristic simply for the sake of looking futuristic, is that really progress or moving backward?

However, I do disagree with one definition used for a tool (“A tool addresses human needs by amplifying human capabilities”) as I think a tool can address human needs in another way, such as by helping open up a new possibility for humans rather than amplify existing human capabilities. Another definition of a ‘tool’ strikes me well: “That is, a tool converts what we can do into what we want to do. A great tool is designed to fit both sides.” I have never thought of it that way and I sure do agree with this one.

As for the second reading, I was reminded of my experience with virtual reality, when I tried to touch objects I see in the air but not feel feedback. I was still amazed by what I experienced, but imagine if two people were learning fencing in a virtual world without feeling the weight of the weapon and its impact on the opponent’s weapon – I really think that’s not going to work… Also, while virtual reality is cool, like the author, I also have a problem with a future where people can and will spend their lives completely immobile, if they spend all their time on computers that are not part of the physical environment. That is unhealthy, and the inventions should be used to help people and encourage them in taking good actions.

Assignment 10: Make a musical instrument

This is my Melodic Button Machine. It uses three push buttons (digital sensors) and a potentiometer (analog sensor) to create a simple, playful musical instrument. Each button plays a different musical note, while the potentiometer allows the player to bend the pitch of the note in real time- much like a musician bending a guitar string or sliding a trombone.

Machine Shown in Class

Assignment Brief

The assignment challenged us to create a musical instrument using Arduino technology. The requirements were clear: incorporate at least one digital sensor (such as a switch or button) and at least one analog sensor (like a potentiometer, photoresistor, or distance sensor). The instrument should respond to user input in a way that is both interactive and expressive.

Conceptualisation

The idea for this project emerged from my fascination with the simplicity of early electronic instruments. I remembered a childhood toy keyboard that could produce a handful of notes, and how magical it felt to create music with just a few buttons. I wanted to recreate that sense of wonder, but with a modern DIY twist. I also wanted to explore how analog and digital sensors could work together to give the user expressive control over the sound.

Process

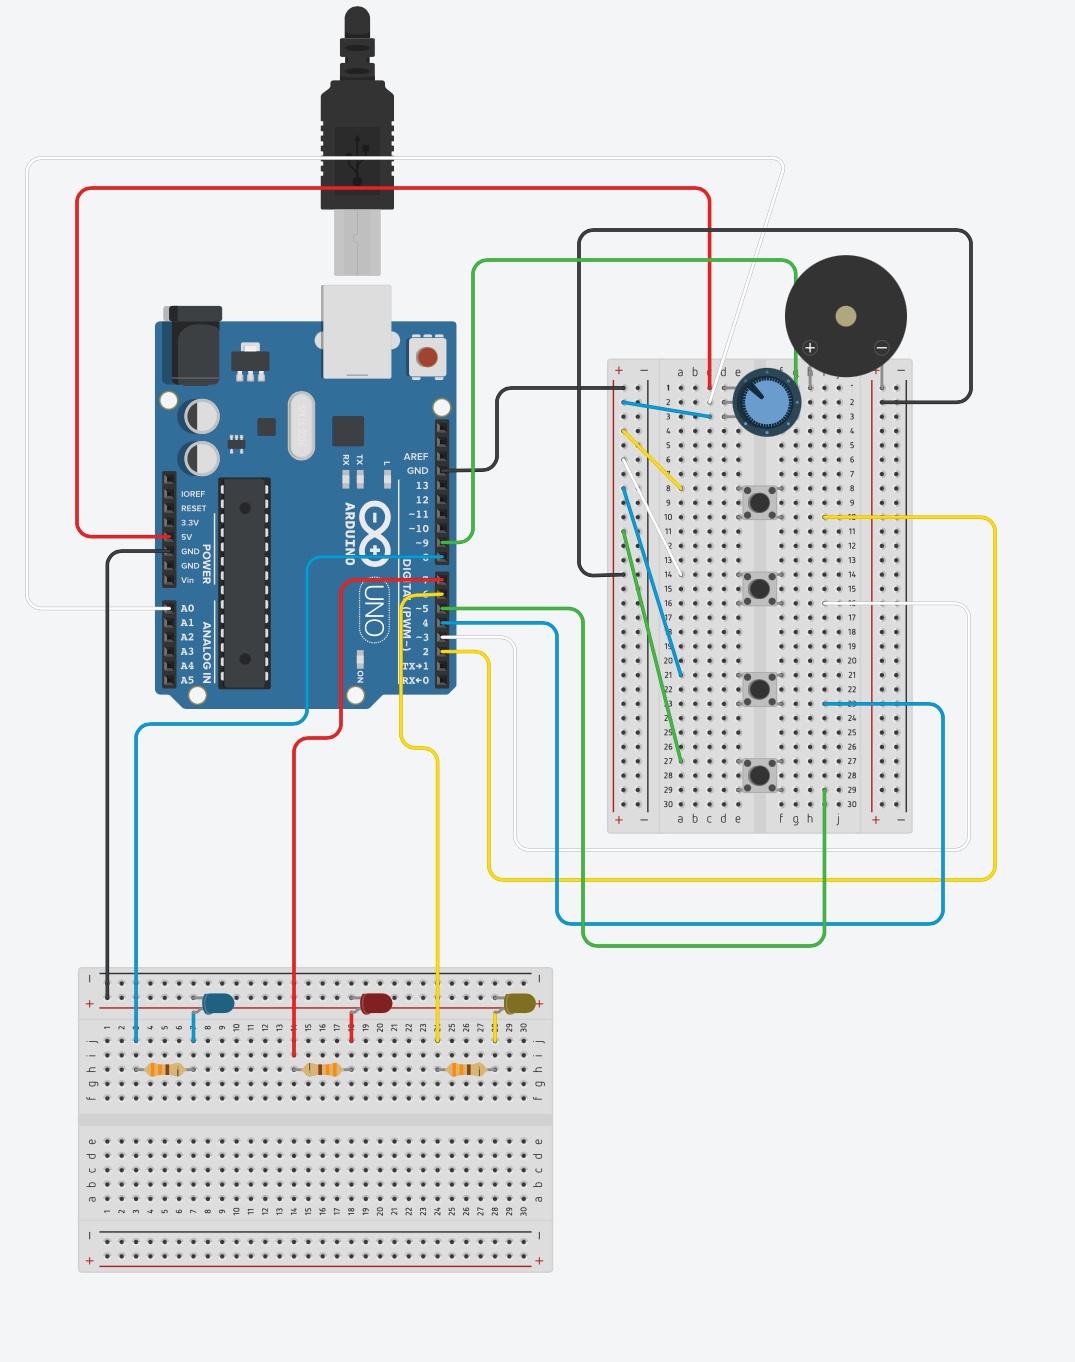
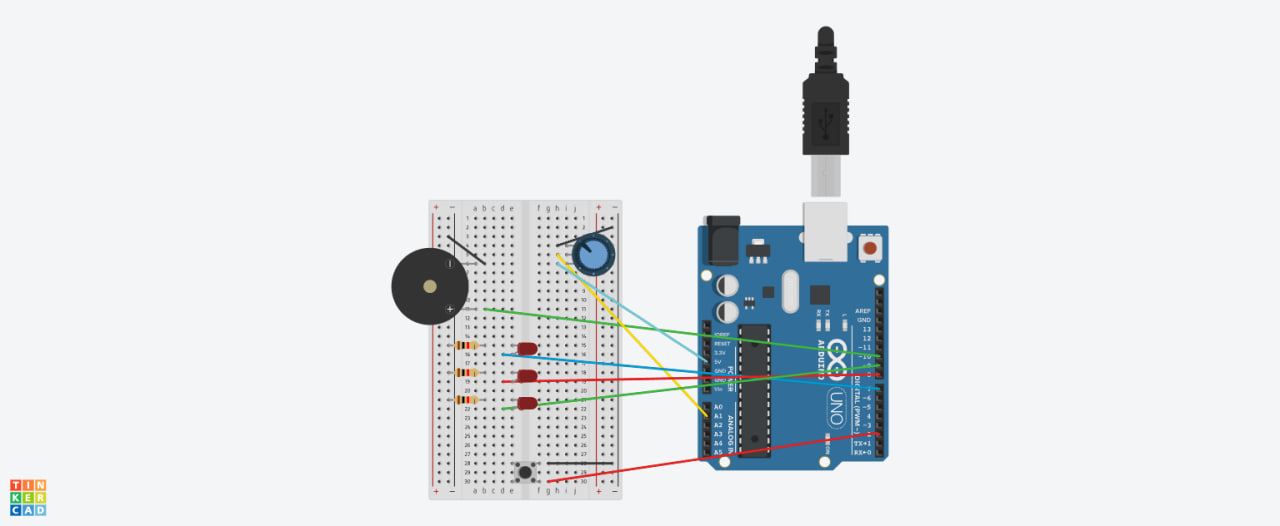
Component Selection: I started by gathering the essential components: an Arduino Uno, a breadboard, three push buttons, a potentiometer, a piezo buzzer, jumper wires, and a handful of resistors. The buttons would serve as the digital inputs for note selection, while the potentiometer would act as the analog input to modulate pitch.

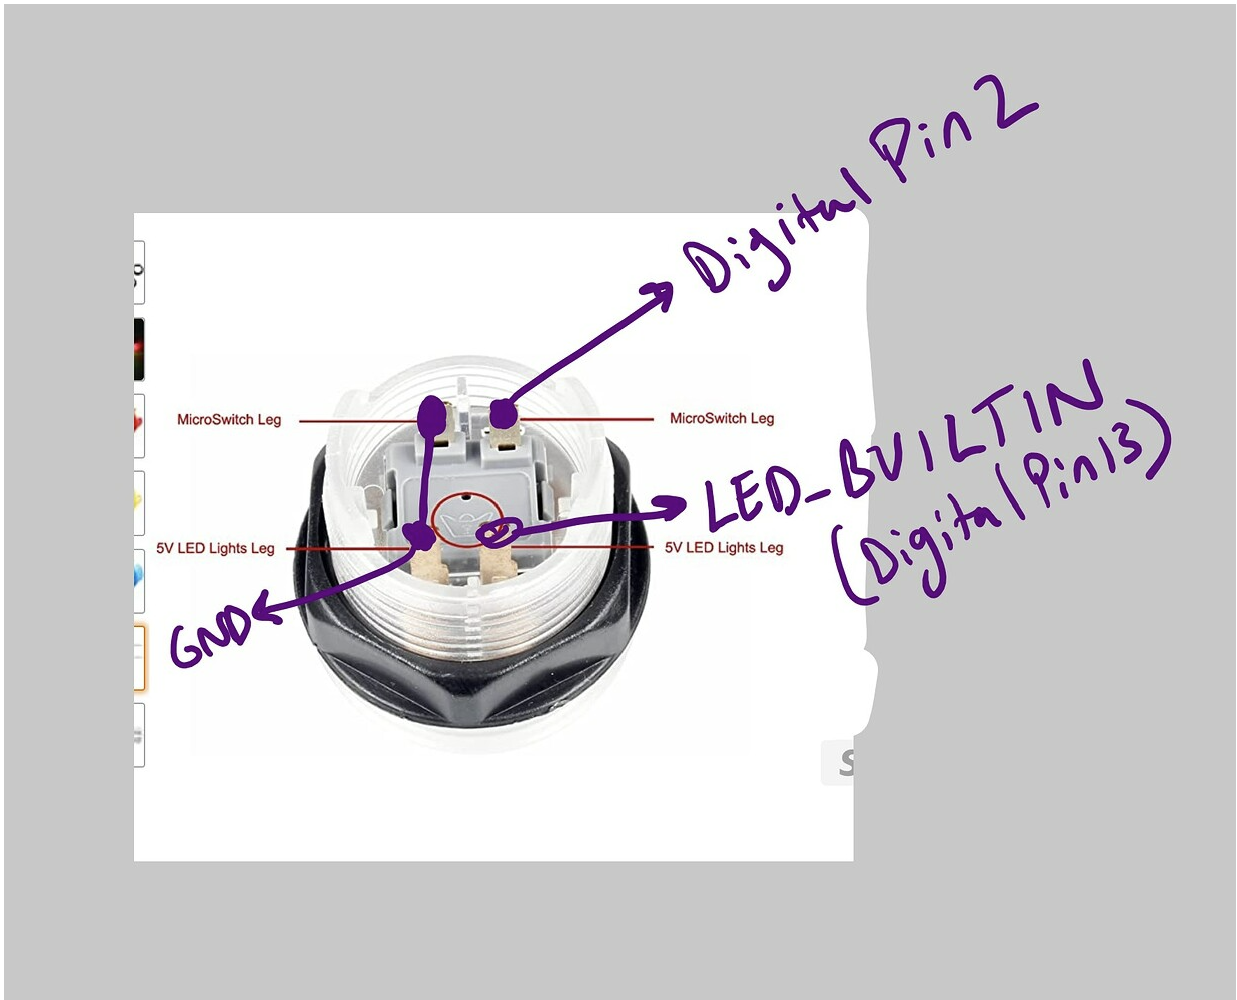
Circuit Assembly: The buttons were wired to digital pins 2, 3, and 4 on the Arduino, with internal pull-up resistors enabled in the code. The potentiometer’s middle pin was connected to analog pin A0, with its outer pins going to 5V and GND. The piezo buzzer was connected to digital pin 8, ready to bring the project to life with sound.

Code Development: I wrote Arduino code that assigned each button a specific musical note: C, D, or E. The potentiometer’s value was mapped to a pitch modulation range, so turning it would raise or lower the note’s frequency. This allowed for playful experimentation and made the effect of the potentiometer obvious and satisfying. I tested the code, tweaking the modulation range to make sure the pitch bend was dramatic and easy to hear.

Testing and Tuning: Once everything was wired up, I played simple tunes like “Mary Had a Little Lamb” and “Hot Cross Buns” by pressing the buttons in sequence. The potentiometer added a fun twist, letting me add vibrato or slides to each note.

Challenges

Pitch Range Calibration:
Finding the right modulation range for the potentiometer was tricky. If the range was too wide, the notes sounded unnatural; too narrow, and the effect was barely noticeable. After some trial and error, I settled on a ±100 Hz range for a musical yet expressive pitch bend.

Wiring Confusion:
With multiple buttons and sensors, it was easy to mix up wires on the breadboard. I solved this by colour-coding my jumper wires and double-checking each connection before powering up.

Potential Improvements

More Notes:
Adding more buttons would allow for a wider range of songs and melodies. With just three notes, the instrument can play simple tunes, but five or more would open up new musical possibilities.

Polyphony:
Currently, only one note can be played at a time. With some code modifications and additional hardware, I could allow for chords or overlapping notes.

Alternative Sensors:
Swapping the potentiometer for a light sensor or distance sensor could make the instrument even more interactive.

Visual Feedback:
Adding LEDs that light up with each button press or change colour with the pitch would make the instrument more visually engaging.

Schematics

Source Code

const int button1Pin = 2;
const int button2Pin = 3;
const int button3Pin = 4;
const int potPin = A0;
const int buzzerPin = 8;

// Define base frequencies for three notes (C4, E4, G4)
const int noteC = 262;  // C4
const int noteE = 330;  // E4
const int noteG = 294;  // D4

void setup() {
  pinMode(button1Pin, INPUT_PULLUP);
  pinMode(button2Pin, INPUT_PULLUP);
  pinMode(button3Pin, INPUT_PULLUP);
  pinMode(buzzerPin, OUTPUT);
}

void loop() {
  int potValue = analogRead(potPin);
  // Map potentiometer to a modulation range
  int modulation = map(potValue, 0, 1023, -100, 100);

  if (digitalRead(button1Pin) == LOW) {
    tone(buzzerPin, noteC + modulation); // Button 1: C note modulated
  } else if (digitalRead(button2Pin) == LOW) {
    tone(buzzerPin, noteE + modulation); // Button 2: E note modulated
  } else if (digitalRead(button3Pin) == LOW) {
    tone(buzzerPin, noteG + modulation); // Button 3: G note modulated
  } else {
    noTone(buzzerPin);
  }
}

Week 9 – Reading Response

Physical Computing’s Greatest Hits (and misses)

I used to believe that something could only be considered unique if it was entirely new or never seen before. That made me overlook the value of familiarity. But now, I’ve come to understand that familiarity isn’t a limitation—it can actually deepen meaning and make an idea more impactful. From reading about the musical instrument examples and others too, I realized how something as common as an instrument can still be a powerful space for creativity and interaction. It showed me how familiar forms can be reimagined in playful, thoughtful ways. This has shifted how I think about uniqueness, and I’m now considering using the concept of a musical instrument as inspiration for my final project—not because it’s entirely new, but because it holds potential for creative reinterpretation.

Making Interactive Art: Set the Stage, Then Shut Up and Listen

This was such an eye-opening and exciting read—it completely shifted how I view and approach interactive art and media. Before engaging with the article, I believed it was essential not only to guide the audience on how to interact with my work but also to explain how they should feel while doing so. I struggled with finding the boundary between offering direction and allowing personal interpretation. Now, I understand that interactive art is less about delivering a fixed message and more about creating an open-ended environment—one that invites the audience to explore, interpret, and respond in their own unique way. It’s not about scripting every possible outcome but rather about designing the space, the elements, and the cues in a way that encourages genuine engagement and discovery. Going forward, I aim to embrace this approach in my future projects. I want to focus more on creating spaces that speak for themselves—spaces that offer intuitive cues, invite interaction, and allow viewers to craft their own interpretations. I’m excited to stop over-explaining and start listening more, letting the dialogue between artwork and audience unfold naturally.


Week 10 – Assignment

Concept: Music Box

Our inspiration for this project was from a music box, which is a pretty nostalgic instrument that plays melodies when you wind it up. Music boxes are usually these small, mechanical devices that play a set of tunes with a simple winding mechanism, and have a sweet, tinkling sound.

Our version of this is more interactive and customizable. Instead of just one melody, our “music box” allows the users to choose between two pre-programmed songs , which are Twinkle Twinkle Little Star and Frère Jacques. In addition to that, they can also increase or decrease the tempo of the song with a button, adjust the pitch of the melody with the potentiometer, and as the music plays, the LEDs flash and change, synchronized to the rhythm and notes.

Code Snippet/Difficulties

One aspect we had difficulties with was getting the LED’s to align with music and the notes played, however after a few tries we were able to get this code. In summary, to get this “visualizer” effect, we used the flashVisualizer() function , and called it inside the playSong() function, right after each note was played. The i variable, which is the index of the current note in the song, is passed to flashVisualizer(), and so, as the song progresses, the i value increments, causing the 3 LEDs we used to cycle through in sequence. In general, every time a note is played, the flashVisualizer() function is called, which results in a flash of an LED that matches the timing of the note. So, the flashing LED visualizes the rhythm of the music, and since the song is made up of an array of notes, the LEDs change with each note.

// Function to play the melody
void playSong(int *melody, int *durations, int length) {
  for (int i = 0; i < length; i++) {
    int baseNote = melody[i];
    int noteDuration = tempo * (4.0 / durations[i]);  // Calculate note duration

    // Read potentiometer and calculate pitch adjustment
    int potVal = analogRead(potPin); // range: 0–1023
    float pitchFactor = 0.9 + ((float)potVal / 1023.0) * 0.4;  // pitch range: 0.9–1.3
    int adjustedNote = baseNote * pitchFactor;

    if (baseNote == 0) {
      noTone(buzzer); // Pause
    } else {
      tone(buzzer, adjustedNote, noteDuration); // Play adjusted tone
      flashVisualizer(i); // Flash LEDs
    }

    delay(noteDuration * 1.3); 
  }

  // Turn off all LEDs after song ends
  digitalWrite(led1, LOW);
  digitalWrite(led2, LOW);
  digitalWrite(led3, LOW);
}

// LED Visualizer Function
void flashVisualizer(int index) {
  // Turn off all LEDs first
  digitalWrite(led1, LOW);
  digitalWrite(led2, LOW);
  digitalWrite(led3, LOW);

  // Turn on one LED based on index
  if (index % 3 == 0) digitalWrite(led1, HIGH);
  else if (index % 3 == 1) digitalWrite(led2, HIGH);
  else digitalWrite(led3, HIGH);
}

Reflections/Improvements

Overall, this project was very fun and engaging, and we are very happy with how it turned out as we were able to implement most of the ideas we brainstormed. That said, there are a few things we’d improve. For one, we could expand the number of songs it can play. Also, the current LED visualizer is pretty simple and linear, so adding more LEDs or creating more complex patterns based on pitch, tempo, or things like that, could make it feel more like a true light show.


Week 10 – Group Musical Instrument

1. Concept and Process of Ideation

At first, we wanted to create the instruments we liked – for Samuel, a drum set, and for Alisa, a violin. However, we encountered large challenges that would take up too much time or complexity within this homework timeframe, so we changed our idea. The next idea has two parts of one piano – so that Samuel’s musical instrument to play the lower notes as you would on a piano with your left hand, which can be paired with Alisa’s instrument that plays higher notes as you would on a piano with your right hand.

However, the last idea was revised again because Samuel’s musical instrument has fast feedback while Alisa’s instrument takes longer to register the orientation and play the correct note accordingly. So, Samuel’s musical instrument plays the higher notes (more soprano) which have much more crisp and clear sounds for the listener, while Alisa’s instrument is the accompaniment that can be used to play each lower note (more bass) for a longer amount of time in general.

Samuel’s musical instrument is for the “left hand of a piano”, with musical notes C, D, E, F, G, A that can be played using force sensors (analog sensors). In the process of coming up with this idea, we considered which sensors would be similar to a piano, registering presses. Push buttons and force sensors were our options, but we went for the force sensors (for Alisa, it was because she thought she hadn’t tried using the force sensors yet!)

Although Alisa’s musical instrument was considered earlier as for the “right hand of a piano,” it really does look like much more of a music box so it is now a “music box.” In the process of coming up with the music box, we thought of taking the last project with the gyroscope and using a button press to play the sound of musical notes, with the notes differing based on the orientation of the gyroscope. Samuel thought of using the arcade LED button (digital sensor) we found as we looked around the components in the IM Lab, and I thought that if the LED button could light up when being pressed, that would be great feedback for the user.

2. Highlights

One crucial challenge in creating the “music box,” was that we wanted to use Arcade LED Button but we did not have access to the manual. Alisa tried researching online, and thought it seemed like the LED button needed connections to one positive (+) and GND (-) for the LED, as well as one positive (+) and GND (-) for the button itself. She tried this based on the colours of the cable (2 red and 2 black) she found soldered already. However, upon further research, Alisa found out that these cable colours are misleading…

Alisa inspected the component and found ‘BAOLIAN’ on the component as possibly the brand name. She did further research online and found two useful sources:

  • ezbutton library resource- https://arduinogetstarted.com/tutorials/arduino-button-library
  • https://forum.arduino.cc/t/using-arcade-buttons-solved/677694

One of these sources includes a diagram explaining connections as shown below. Notice the crown – this was also on the component. Given that it was circled, it must be important that the crown was facing upwards. I connected it in this way, edited the code from the forum, and the LED button lights up when I press it!

Arcade Button Connections

I used the gyroscope of the MPU-6050 for my last project, but MPU-6050 contains both a gyroscope and acceleromter. While the gyroscope is smooth (since it uses integration), it has the problem of accumulating errors over time. On the other hand, the accelerometer readings fluctuate very much, but are very accurate. Therefore, to balance accuracy and smoothness, I needed to combine gyroscope readings with accelerometer readings through a  Kalman filter. I used this playlist to help me: the accelerometer calibration must be done manually as in video 14, and video 15 shows how gyroscope and accelerometer readings can be combined.

To have music box play different notes depending on orientation, the code needed to integrate if conditions checking whether the filtered roll angle and filtered yaw angle read from the readings combining gyroscope and accelerometer are within certain ranges.

In making the FSR keyboard some of the challenges we encountered included faulty resistors that detected readings even when not pressed and for this we had to try out each one of the resistors separately and this was very resourceful.

Another challenge was that the buzzer only played one frequency and also because tone() is a non-blocking function at a time and therefore playing a chord as was the original plan became a challenge. We therefore settled to using only notes unless we had a buzzer for each fsr.

3. Video

4. Reflection and ideas for future work or improvements

One key limitation we faced was the Arduino UNO’s constraint of only six usable analog input pins for AnalogRead(), which restricted us to mapping just six musical notes for the FSR keyboard. Ideally, we would have included a seventh note to complete a full octave. In future iterations, we could consider using a mega arduino with more analog input options.

Additionally, a valuable improvement for the music box would be providing real-time feedback to the user indicating which note is currently being played. This could be achieved by incorporating an OLED display, an array of LEDs corresponding to each note, or even serial monitor outputs during development. These enhancements would improve usability and allow for a more intuitive and engaging musical experience.

Week 10 – Reading Response 

Week 10 – Reading Response 


A Brief Rant on the Future of Interaction Design:

This text provides thoughtful critiques of current visions of future technology. The author speaks about reassessing our hands, not as tools for swiping but as instruments of manipulation. One of the points the author made that I found interesting was the contrast between tying shoelaces by touch and trying to do it with numb fingers. This made me reflect on how easily we accept one-dimensional interactions with our devices. However, that being said, the main idea of the text was not to be anti-technology, but rather call for better, more human design. 

After reading this, I reflected on how I think about interactive design. I came to a realization that I have become extremely compliant in accepting the current state of touchscreens and “smart” devices when in reality, they usually feel flat and disconnected from our full human range. It made me question things like why we aren’t advancing into interfaces that are more engaging with the entire body and not just a single fingertip.


Responses: A Brief Rant on the Future of Interaction Design: 

This is a brutally honest text that embraces criticism, clarifying the purpose of the original piece and not proposing the solution, but rather sparking the right kind of thinking. Something I found memorable in this text was the author’s defense of incomplete visions, where rather than pretending to know the future, he leans into uncertainty. This encourages thorough research into unfamiliar areas like tangible interfaces, haptics, and dynamic materials. To me, it served as a reminder that good design doesn’t necessarily come from certainty, but from curiosity and exploration. I appreciated the comparison he made to photography in 1900, black-and-white film was revolutionary then, however, we didn’t stop there. 

This text made me reflect on the fact that valuable critique doesn’t always solve problems directly, but sometimes, it can just help us ask better questions. Additionally, it emphasized how modern design usually overlooks the human body instead of embracing it. We see many instances where rather than crafting tools that align with our physical capabilities, we’re designing around them. Overall, we all need to push ourselves to question what type of future we’re shaping, and if we are ready to imagine something a lot more meaningful than a world controlled by simple swipes and glass screens.

Week 10 – Group Musical Instrument

Week 10 – Group Musical Instrument

Our Concept

For our musical instrument, we were inspired by DJ sets and how DJs interact with their equipment during live performances. We wanted to bring that experience into a smaller format, so we built a mini DJ controller using an Arduino board.

Our DJ set includes:

  • potentiometer to control the volume, just like DJs do when they’re mixing tracks

  • LEDs that react to the sound changes, creating a responsive visual effect

  • piezo buzzer that produces the sound itself

Set-up

Code

GitHub

Week 10 – Reading Resonse

I agree with the rant so much! At first I didn’t really think about how we unknowingly use the feel we get from our fingers to deeply understand everything around us. From the fullness of the cup to the amount of pages of the book we are holding, we constantly see the world through our hands without even knowing it. The tablets and the screens are taking that away from us. The screens do bring us so much good, and are useful in many situation, but they are taking the real world away from us. Newer generations especially are so glued to the screen so they can’t see anything real around them (I’m beginning to sound like my parents). The response to the rant was specifically infuriating to me, not because of the reply from the author, but because of the questions people were asking and the opinions they were giving. There is nothing that makes me more angry then seeing a family out for dinner and their kid staring at their iPad the whole time. The same goes for when the young kids spend their whole day laying down stuck to the screen, watching videos or playing video games. Kids should be kids, explore the world, play around without worry, not spend hours sitting and staring at the screen, there will be plenty of time for that later! I might’ve strayed away from the topic a bit, but overall I do agree that unfortunately technology is taking away our way of seeing the world.