Reading Reflection – Week 10

A Brief Rant on the Future of Interaction Design:

This was a really nice read! I enjoyed this new rant-style writing that was also very visually telling of what the author was ranting about. I definitely agreed with his point at the start, and that only solidified more and more as I read all of the examples he pointed out, where everyday activities seem so simple, yet are actually complex, but we just do it out of instinct.

The fact that we have different types of fundamental grips for different purposes is so interesting! It really put hand manipulation into perspective because there’s only so many options you can do with a touch screen, and all of them are the same sliding or tapping on a glassy screen.

Another really interesting point he made was how we often think vision carries us a lot, but that’s because we’re not consciously thinking about the significance of touch. This example in particular really stood out to me and made me think twice about how important it is for our hands to feel things and understand weight and texture as well.

Try this: close your eyes and tie your shoelaces. No problem at all, right? Now, how well do you think you could tie your shoes if your arm was asleep? Or even if your fingers were numb? When working with our hands, touch does the driving, and vision helps out from the back seat.

Although I do agree that “pictures under glass” technology limits our physical interaction and connection with the devices, as well as the power and capabilities of our hands, I think it’s still crucial to consider how easy and accessible digital devices can make things. Yes, we wouldn’t be able to tell how far into a book we are if it’s digital instead of physical, but it could save the burden of carrying 4 thick textbooks with you throughout the school day, or make it easier for people to access international books that aren’t physically sold in their country. There are pros and cons to either side of things, and it would be revolutionary if we could find a way to somehow combine human capabilities and glassy technology by making it multi-sensory.

Responses on the Rant:

Reading people’s responses to the author’s rant as well as the author’s responses to those readers’ responses was quite fascinating and the way he explained and defended himself was nicely straight to the point. I enjoyed how he was kind of sarcastic in the initial response and then followed up with some true examples to further defend his case, such as:

Yeah! iPhone bad! iPad bad!

No! iPad good! For now! In 1900, Eastman’s new Kodak camera was good! The film was black-and-white, but everyone loved it anyway. It was genuinely revolutionary! But it was also obvious that something was missing, and research continued. Practical color film was released thirty years later, and gradually took over.

Reading Reflection 7: Rant Continued

Thoughts on Pictures under Glass:

I share Bret Victor’s perspective on “pictures under glass” technology, and I believe touchscreen LEDs have overstayed their welcome in many fields. This includes devices like the Kindle—a non-glare touchscreen designed for reading that now also accommodates audiobooks. While these devices offer practical benefits, such as saving storage space and promoting a paperless world, they come at the cost of the rich sensory experience that traditional books provide.

Touchscreens have permeated so many areas of our lives, saturating us with constant notifications, flashing updates, and endless scrolling. This widespread use of touchscreens has left us overstimulated, as we’re constantly pulled in multiple directions by the same technology that now powers even our reading devices. This overstimulation detracts from the act of reading itself, making it harder to slow down and engage in the immersive, focused way that physical books invite. In fact, the Kindle’s interface, with its flat screen and standardized e-book format, feels more like another digital task than an invitation to read.

A physical book, by contrast, invites us to unplug, slow down, and focus. Its varied textures, the scent of the pages, and even the way it changes over time as it’s passed from one reader to the next all contribute to the act of reading as a sensory experience. Books are unique; each one feels different to the touch and engages the senses in ways that screens simply can’t emulate.

More than that, a well-worn book carries visible signs of love and use—cracked spines, dog-eared corners, or a few scribbled notes. These details create a sense of shared history and connection between readers across generations. No matter how advanced, a Kindle can never replicate that. Physical books leave an imprint not only on us but also of us, and in that way, they foster a relationship with readers that digital devices lack.

Reading Reflection #7

A Brief Rant on the Future of Interactive Design

I believe that the author’s frustrations with the current trends/future of interactive design are completely justified. It is undeniable that many developers now seek to make things digital just for the sake of being digital, subjugating everything behind a glass panel for no substantive reason. In this pursuit of digitalization, we often forget that humans are in fact very dependent on tactility to interact with the world around us; to reduce everything to swipes on a flat, glassy screen is to gradually reduce our cognitive abilities to respond to different forms of input from our senses.

Of course, this is not to say that touch screens are devil’s spawn and must be retired, but to suggest that perhaps efforts in technological advancement are too focused on applications of touch screens and it would be much more worthwhile to explore how other human needs can be aided by other forms of interactive design.

Follow-up

It’s quite surprising how many of the responses to the rant seemed to misunderstand the author’s point. It’s unreasonable to expect the author to singlehandedly provide a solution to the problem, which seems to be what many readers expected him to do. The point of the rant was to point out a problem and hopefully direct future research to solve that problem.

I think analogy in the last section of the article sums up the author’s argument perfectly: “A child can’t understand Hamlet, but can understand Cat In The Hat. Yet, it’s Shakespeare, not Dr. Seuss, who is the centerpiece of our culture’s literature…A tool for adults should take full advantage of the adult capabilities of both mind and body. Tools that are dumbed down for children’s minds or children’s bodies are called ‘toys’.” Ultimately, it is important to keep in mind that useful, well-designed tools make things easier while helping us develop our existing skills instead of simply dumbing things down and impose homogeneity to every activity in the name of digitalization.

Week 10: Musical Instrument (with Elizabeth and Linus)

Concept

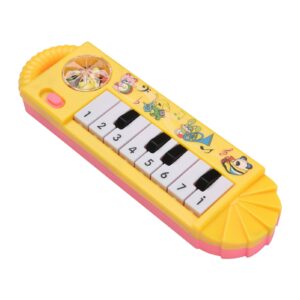
For this assignment, we were inspired by the toy pianos that we’ve all played with at least a few times as children. These toys were often quite limited, as they only had enough space to accommodate the keys for a single octave. We decided to create a miniature piano that could play the notes from C to A, with a knob that can be turned to change octaves.

Mini 8-Key Electronic Piano Toy for Children Early Musical Education, Yellow : Amazon.ae: Toys

Setup and Code

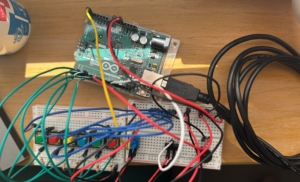
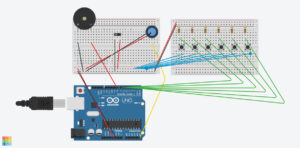
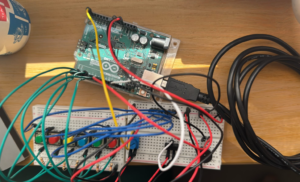
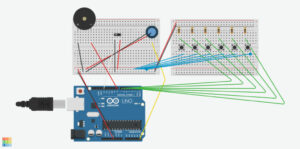
We set up a row of buttons that play a note when pressed, a potentiometer that changes the octave, and a switch that switches the notes to their respective sharp notes.

We created arrays that store the frequencies of the natural notes across seven octaves, doing the same for the sharp notes. The range of the potentiometer is mapped to a range of 0-6 and determines which octave the notes will be played in. When the switch is low, natural notes are played, and vice versa.

To prevent the notes from continuously playing, the noTone() function stops the buzzer playing any sound when no button is pressed.

Full code on Github

if (buttonState7 == LOW && buttonState6 == LOW && buttonState5 == LOW && 
    buttonState4 == LOW && buttonState3 == LOW && buttonState2 == LOW) {
  noTone(8);  // Stop any tone on pin 8
}

Demo

Reflection

Overall, this group project was a success as we managed to recreate our inspiration using Arduino. We were really satisfied with how we made sure to implement the natural notes as well as sharp notes in our project. A few struggles we faced was that the wires and resistors were really crowded on our small breadboards, making it a little difficult to reach the buttons. Ideally, we would want to get bigger breadboards in the future so that there would be more room for interacting with the product. Additionally, the bread board was just a little too small for us to add the 7th natural note, so we could only fit 6, as we’re missing a B note. 

In the future, we would like to add two different colored led lights that switch on and off along with the natural or sharp notes. This way, it would help users know if they are currently playing natural or sharp notes, as not everyone is familiar with musical notes in that sense.


Assignment Week 10: Interactive Musical Instrument

Inspiration

The WaveSynth project is inspired by the theremin, one of the first electronic instruments, invented in 1920 by Russian physicist Léon Theremin. Known for its eerie, vocal-like sound and its unique, touchless control, the theremin uses two antennas to detect the position of the player’s hands: one antenna controls pitch, and the other controls volume. By moving their hands through electromagnetic fields, players can create smooth, flowing sounds without touching the instrument. This expressive control has influenced generations of musicians and has become iconic in sci-fi, horror, and experimental music.

Concept

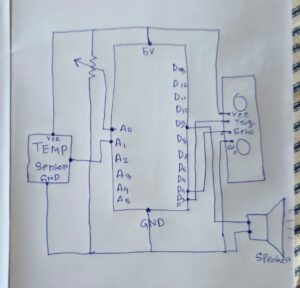
The WaveSynth is a gesture-controlled musical instrument that turns hand movements and environmental factors into dynamic sound. Designed to be both intuitive and expressive, the WaveSynth combines multiple sensors—ultrasonic, temperature, and a potentiometer—to create a cohesive interface.

The ultrasonic sensor detects hand distance, adjusting either pitch or volume based on the player’s proximity. The potentiometer serves as a mode selector, allowing the user to switch between pitch and volume control, as well as access different sound effects like vibrato, pulse, and temperature modulation. The temperature sensor adds an additional layer of subtlety, with ambient temperature shifts introducing slight pitch modulations, making the instrument responsive to its surroundings.

List of the hardware components used in the WaveSynth project:

  • Arduino Uno
  • HC-SR04 Ultrasonic Sonar Sensor (for gesture-based distance measurement)
  • TMP36GZ Temperature Sensor (for ambient temperature-based modulation)
  • 10k Ohm Potentiometer (for mode and effect selection)
  • Piezo Speaker (for sound output)
  • Connecting Wires (for connections between components and the Arduino)
  • Breadboard (for prototyping and circuit connections)
  • 310 Ohm Resistor (for LED circuit)

Schematic Diagram:


Code:

// Pin definitions
const int potPin = A0;            // Analog pin for potentiometer
const int tempPin = A1;           // Analog pin for TMP36GZ temperature sensor
const int trigPin = 3;            // Digital pin for sonar trigger
const int echoPin = 4;            // Digital pin for sonar echo
const int speakerPin = 9;         // Digital pin for speaker
const int ledPin = 5;             // Digital pin for LED (PWM-enabled)

// Variables
int effectType = 0;               // Tracks which effect is active (0: none, 1: vibrato, 2: pulse, 3: temperature modulation)

void setup() {
  pinMode(speakerPin, OUTPUT);      // Speaker as output
  pinMode(trigPin, OUTPUT);         // Sonar trigger as output
  pinMode(echoPin, INPUT);          // Sonar echo as input
  pinMode(ledPin, OUTPUT);          // LED as output
  Serial.begin(9600);               // For debugging output
}

// Function to read distance from the sonar sensor
long readDistance() {
  digitalWrite(trigPin, LOW);
  delayMicroseconds(2);
  digitalWrite(trigPin, HIGH);
  delayMicroseconds(10);
  digitalWrite(trigPin, LOW);

  // Measure the pulse duration on the echo pin
  long duration = pulseIn(echoPin, HIGH);
  
  // Calculate distance in centimeters
  long distance = duration * 0.034 / 2;
  return distance;
}

// Function to read temperature from the TMP36GZ
float readTemperature() {
  int tempReading = analogRead(tempPin);             // Read analog value from TMP36
  float voltage = tempReading * (5.0 / 1023.0);      // Convert reading to voltage (0-5V)
  float temperatureC = (voltage - 0.5) * 100.0;      // Convert voltage to temperature in Celsius
  return temperatureC;
}

void loop() {
  // Potentiometer to control mode and effect
  int potValue = analogRead(potPin);                  // Read potentiometer (0-1023)
  bool pitchMode = potValue < 512;                    // Below midpoint is pitch mode, above is volume mode
  
  // Determine the effect based on the potentiometer value ranges
  if (potValue < 256) {
    effectType = 0;                                   // No effect
  } else if (potValue < 512) {
    effectType = 1;                                   // Vibrato
  } else if (potValue < 768) {
    effectType = 2;                                   // Pulse
  } else {
    effectType = 3;                                   // Temperature modulation
  }

  // Read sonar distance and map to a lower pitch range for soothing tones
  long distance = readDistance();                     // Distance in cm
  int baseToneValue = pitchMode ? map(distance, 5, 50, 150, 600) : 440;  // Map distance to pitch if in Pitch Mode
  
  // Control LED brightness based on distance
  int ledBrightness = map(distance, 5, 50, 255, 0);   // Closer is brighter (5 cm = max brightness)
  ledBrightness = constrain(ledBrightness, 0, 255);   // Constrain within 0-255
  analogWrite(ledPin, ledBrightness);                 // Set LED brightness
  
  // Read temperature and map it to a gentle pitch effect
  float temperature = readTemperature();
  int tempEffect = map(temperature, 20, 35, 20, 80);  // Map temperature to subtle pitch modulation
  
  // Debug output to Serial Monitor
  Serial.print("Distance: ");
  Serial.print(distance);
  Serial.print(" cm, LED Brightness: ");
  Serial.print(ledBrightness);
  Serial.print(", Pot Value: ");
  Serial.print(potValue);
  Serial.print(", Effect Type: ");
  Serial.print(effectType);
  Serial.print(", Temperature: ");
  Serial.print(temperature);
  Serial.println(" C");

  // Play sound based on the selected effect type
  switch (effectType) {
    case 0: // No effect
      tone(speakerPin, baseToneValue); // Basic tone based on distance
      break;
    
    case 1: // Smooth Vibrato
      for (int i = 0; i < 20; i++) {
        int vibratoTone = baseToneValue + (sin(i * 0.3) * 10); // Soft vibrato effect with lower amplitude
        tone(speakerPin, vibratoTone, 50); // Short tone bursts for vibrato
        delay(20); // Slightly slower delay for soothing vibrato effect
      }
      break;
      
    case 2: // Gentle Pulse
      tone(speakerPin, baseToneValue);      // Play base tone continuously
      analogWrite(speakerPin, 128);         // Soft fade for pulse effect
      delay(100);                           // Adjust pulse duration for gentler effect
      noTone(speakerPin);                   // Turn off sound briefly to create pulse
      delay(100);                           // Wait before next pulse
      break;
      
    case 3: // Temperature Modulation
      int tempModulatedTone = baseToneValue + tempEffect;  // Adjust pitch slightly based on temperature
      tone(speakerPin, tempModulatedTone); // Continuous tone with slight modulation
      delay(200); // Keep tone smooth
      break;
  }
  
  delay(50); // Small delay for stability
}

Media:

Working Process:


  1. Initial Setup and Calibration:
    1. When powered on, the Arduino initializes all sensors and components, including the ultrasonic sensor, temperature sensor, potentiometer, and speaker.
    2. The potentiometer’s position is read to determine the initial mode (Pitch or Volume) and effect (Vibrato, Pulse, Temperature Modulation, or None). The instrument is ready to interpret the player’s gestures and environmental inputs to start producing sound.
  2. Gesture Detection and Distance Measurement:
    1. The player positions their hand near the ultrasonic sensor and moves it to change sound properties.
    2. The ultrasonic sensor measures the distance between the player’s hand and the sensor by sending out an ultrasonic pulse and timing how long it takes for the pulse to bounce back.
    3. The distance value is calculated and then mapped to control either pitch or volume based on the selected mode:
      1. Pitch Mode: The distance between the sensor and the player’s hand changes the pitch of the sound. Closer hand positions produce higher pitches, while farther positions result in lower pitches.
      2. Volume Mode: In this mode, the distance controls the volume of the sound. Closer distances yield louder sounds, and farther distances make the sound quieter.
  3. Sound Modification through Effects:
    1. The potentiometer serves as a selector for various sound effects that add dynamic layers to the base tone. Depending on the potentiometer’s position, the following effects are applied:
      1. No Effect (Basic Tone): The sound responds directly to the pitch or volume based on the hand distance with no additional modulation.
      2. Vibrato Effect: The instrument adds a wave-like oscillation to the pitch, producing a gentle, undulating sound. This effect is applied continuously, allowing the sound to vary smoothly.
      3. Pulse Effect: The sound output is pulsed, creating a rhythmic on-and-off pattern. This effect provides a percussive quality, ideal for rhythmic play.
      4. Temperature Modulation: Ambient temperature subtly adjusts the pitch, creating an atmospheric and evolving sound that changes with the surrounding environment. This effect responds more slowly, allowing the sound to naturally vary over time.
  4. Environmental Adaptation with Temperature Modulation:
    1. When Temperature Modulation is selected, the temperature sensor reads the ambient temperature. The Arduino then uses this temperature reading to modulate the pitch subtly.
    2. For example, warmer temperatures gradually increase the pitch, while cooler temperatures lower it. This effect is gradual and blends naturally with the other sound properties, adding a unique, ambient quality to the instrument’s sound.
  5. Real-Time Sound Output:
    1. The piezo speaker produces sound based on the interpreted data, transforming distance measurements, temperature readings, and selected effects into real-time audio.
    2. The speaker continuously updates its output to reflect the current settings and environmental conditions, providing an immediate response to hand movements and mode changes.
    3. As the player moves their hand closer or farther from the ultrasonic sensor, the sound changes instantly in pitch or volume. Additionally, adjustments to the potentiometer instantly modify the effect applied to the sound.
  6. Interactive Feedback Loop:
    1. The player continuously interacts with the WaveSynth by adjusting their hand position, changing the potentiometer setting, and experiencing the evolving sound.
    2. This interactive feedback loop allows the player to dynamically control and modify the instrument’s output, creating an immersive musical experience that feels responsive and alive.


Future Improvement and Challenges

One of the primary challenges encountered was calibrating the sensors to respond smoothly and accurately to the user’s hand movements. Fine-tuning the pitch range and ensuring that the effects—such as vibrato and pulse—blended naturally with the sound output took several iterations to achieve a pleasing result.

The temperature sensor was tough to work with on the Arduino board.

Additionally, integrating digital sound synthesis or MIDI compatibility would enable users to connect the WaveSynth with other musical devices or software, greatly expanding its versatility as a tool for music creation.

Another possible enhancement could be the inclusion of LEDs or other visual feedback elements to indicate mode selection and provide dynamic light effects that correspond to the sound output. This would enhance the visual aspect of the instrument, making it even more engaging for live performances.

Assignment 10: Musical Instrument – Piano

Concept:

For this assignment, we were inspired by the toy pianos that we’ve all played with at least a few times as children. These toys were often quite limited, as they only had enough space to accommodate the keys for a single octave. We decided to create a miniature piano that could play the notes from C to A, with a knob that can be turned to change octaves.

Toy Piano

Setup and Code:

We set up a row of buttons that play a note when pressed, a potentiometer that changes the octave, and a switch that switches the notes to their respective sharp notes.

We created arrays that store the frequencies of the natural notes across seven octaves, doing the same for the sharp notes. The range of the potentiometer is mapped to a range of 0-6 and determines which octave the notes will be played in. When the switch is low, natural notes are played, and vice versa.

To prevent the notes from continuously playing, the noTone() function stops the buzzer playing any sound when no button is pressed.

Github Code

if (buttonState7 == LOW && buttonState6 == LOW && buttonState5 == LOW && 
    buttonState4 == LOW && buttonState3 == LOW && buttonState2 == LOW) {
  noTone(8);  // Stop any tone on pin 8
}


Demo:


Reflection:

Overall, this group project was a success as we managed to recreate our inspiration using Arduino. We were really satisfied with how we made sure to implement the natural notes as well as sharp notes in our project. A few struggles we faced was that the wires and resistors were really crowded on our small breadboards, making it a little difficult to reach the buttons. Ideally, we would want to get bigger breadboards in the future so that there would be more room for interacting with the product. Additionally, the bread board was just a little too small for us to add the 7th natural note, so we could only fit 6, as we’re missing a B note.

In the future, we would like to add two different colored led lights that switch on and off along with the natural or sharp notes. This way, it would help users know if they are currently playing natural or sharp notes, as not everyone is familiar with musical notes in that sense.

Reading Responses: Brief Rant

As a reader and technology enthusiast, I find Bret Victor’s “A Brief Rant on the Future of Interaction Design” to be a thought-provoking critique of current trends in human-computer interaction. Victor’s argument against “Pictures Under Glass” technology and her call for more tactile, three-dimensional interfaces resonates with my own experiences and frustrations with touchscreen devices.Victor’s vivid descriptions of how we use our hands to manipulate objects in the real world highlight the limitations of current touchscreen interfaces. I’ve often felt that something was missing when using my smartphone or tablet, and Victor’s examples of reading a book or drinking from a glass perfectly capture that sense of disconnection. The richness of tactile feedback we get from physical objects is indeed absent in our flat, glassy screens

However, I believe Victor’s critique, while insightful, doesn’t fully acknowledge the benefits of touchscreen simplicity and accessibility. In my experience, touchscreens have made technology more approachable for a wider range of users, including children and the elderly. The ease of use and intuitiveness of swiping and tapping have democratized access to digital tools in ways that more complex interfaces might not.That said, I agree with Victor’s call for more ambitious visions in interaction design. Her example of Alan Kay envisioning the iPad decades before its creation is inspiring and reminds us of the power of long-term, visionary thinking.

As someone who uses technology daily, I’m excited by the possibility of interfaces that better utilize our hands’ capabilities and even our entire bodies.Victor’s argument extends beyond just hands to encompass our entire bodies, noting that we have “300 joints” and “600 muscles”

This resonates with my own experiences of how we naturally use our whole bodies when interacting with the physical world. I’ve often felt constrained by the limited range of motion required to use current devices, and the idea of more holistic, full-body interfaces is intriguing.While I appreciate Victor’s vision, I also recognize the practical challenges of implementing more tactile and three-dimensional interfaces. Issues of cost, durability, and scalability would need to be addressed. Additionally, I believe the future of interaction design will likely involve a combination of approaches, including enhanced haptic feedback, hybrid interfaces that combine touchscreens with physical controls, and multimodal interaction incorporating touch, voice, and gesture.

Week 10: “Banana!!!!!”

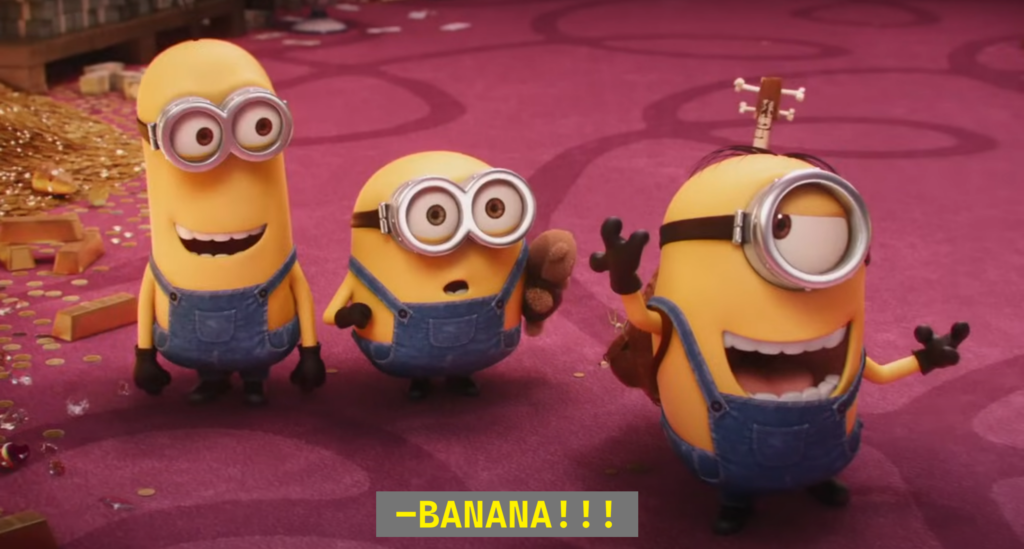
Yup, I was watching “Minions: Rise of Gru” over the weekend in order to find some inspiration for this week’s project, and I sure found the basis of my project when I watched this:

Concept

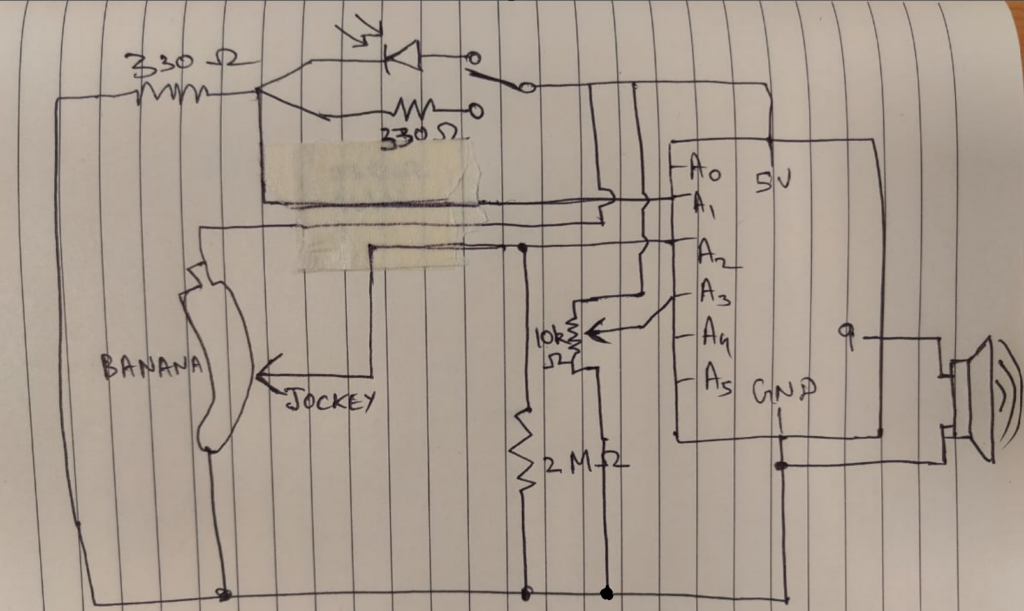
I decided on using a wheatstone bridge setup with two variable resistors (one photoresistor, and ‘the’ banana), and find the absolute difference between the two values and emit different sounds. I also decided to use a potentiometer to determine the pitch of the notes.

Apart from that, the user also has an option to not use the photoresistor at all by toggling the fixed 330 Ohm resistor in its place.

Material Required
  • Arduino Board
  • Jumper Wires
  • Breadboard
  • Potentiometer
  • 10k Ohm Resistors
  • 330 Ohm Resistors
  • SEN-09088 Photocell
  • Potentiometer
  • Banana
Schematic


Demonstration Video
Code

This Arduino code reads the voltage difference between V1 and V2, maps it to a frequency for the speaker, and uses a potentiometer to shift the octave.

// Pin configuration
const int v1Pin = A1;       // V1 of Wheatstone bridge
const int v2Pin = A2;       // V2 of Wheatstone bridge
const int potPin = A3;      // Potentiometer for octave control
const int speakerPin = 9;   // Speaker pin

// Variables for calibration and tuning
float baseFrequency = 220.0;  // Base frequency in Hz for a low A note
float maxVoltageDifference = 5.0;  // Maximum expected voltage difference (adjust as necessary)
int maxOctaveShift = 7;       // Maximum number of octaves to shift

void setup() {
  Serial.begin(9600);
  pinMode(v1Pin, INPUT);
  pinMode(v2Pin, INPUT);
  pinMode(potPin, INPUT);
  pinMode(speakerPin, OUTPUT);
}

void loop() {
  // Read voltage difference across V1 and V2
  float v1 = analogRead(v1Pin) * (5.0 / 1023.0);
  float v2 = analogRead(v2Pin) * (5.0 / 1023.0);
  float voltageDifference = abs(v1 - v2);

  // Map voltage difference to a frequency
  float noteFrequency = map(voltageDifference * 100, 0, maxVoltageDifference * 100, baseFrequency, baseFrequency * 2);

  // Read potentiometer and map to octave shift
  int potValue = analogRead(potPin);
  int octaveShift = map(potValue, 0, 1023, 0, maxOctaveShift);

  // Apply octave shift to the frequency
  noteFrequency *= pow(2, octaveShift);

  // Output the frequency to the speaker
  tone(speakerPin, noteFrequency);
  
  // Debugging output
  Serial.print("Voltage Difference: ");
  Serial.print(voltageDifference);
  Serial.print(" V, Frequency: ");
  Serial.print(noteFrequency);
  Serial.println(" Hz");

  delay(50);  // Delay for bouncing error
}
Conclusion and Reflection

Constructing this banana-powered musical instrument was a fun and an instructive process combining artistic design with technological principles. By using a Wheatstone bridge, I was quite free to play around on how I wanted to shape my music instrument.

Challenges Faced

1. Stabilizing the Output:
One major challenge was stabilizing the audio output, as random values were being read when the pencil jockey wasn’t in contact with the banana. This caused unwanted noises and a “wobbling” effect. To overcome this, I decided that I needed a pulldown resistor (here I used 2 Mega Ohms) to avoid reading noise in the Analog Pin A2

2. Mapping Voltage to Frequency Accurately:
Mapping the voltage difference to frequencies that sound musical took some experimentation. Adjusting the base frequency and range, as well as the octave shift, required fine-tuning to achieve the desired range of notes without distorting the sound.

Jingle Bells – Speed Variation

Concept 

In this assignment, I collaborated with @Nelson and we both love Christmas. The famous song Jingle Bells brings memories of the the times. So we explored various possibilities and decided to come up with speed variation of the Jingle Bells melody with respect to distance.

Here is the demonstration Video:

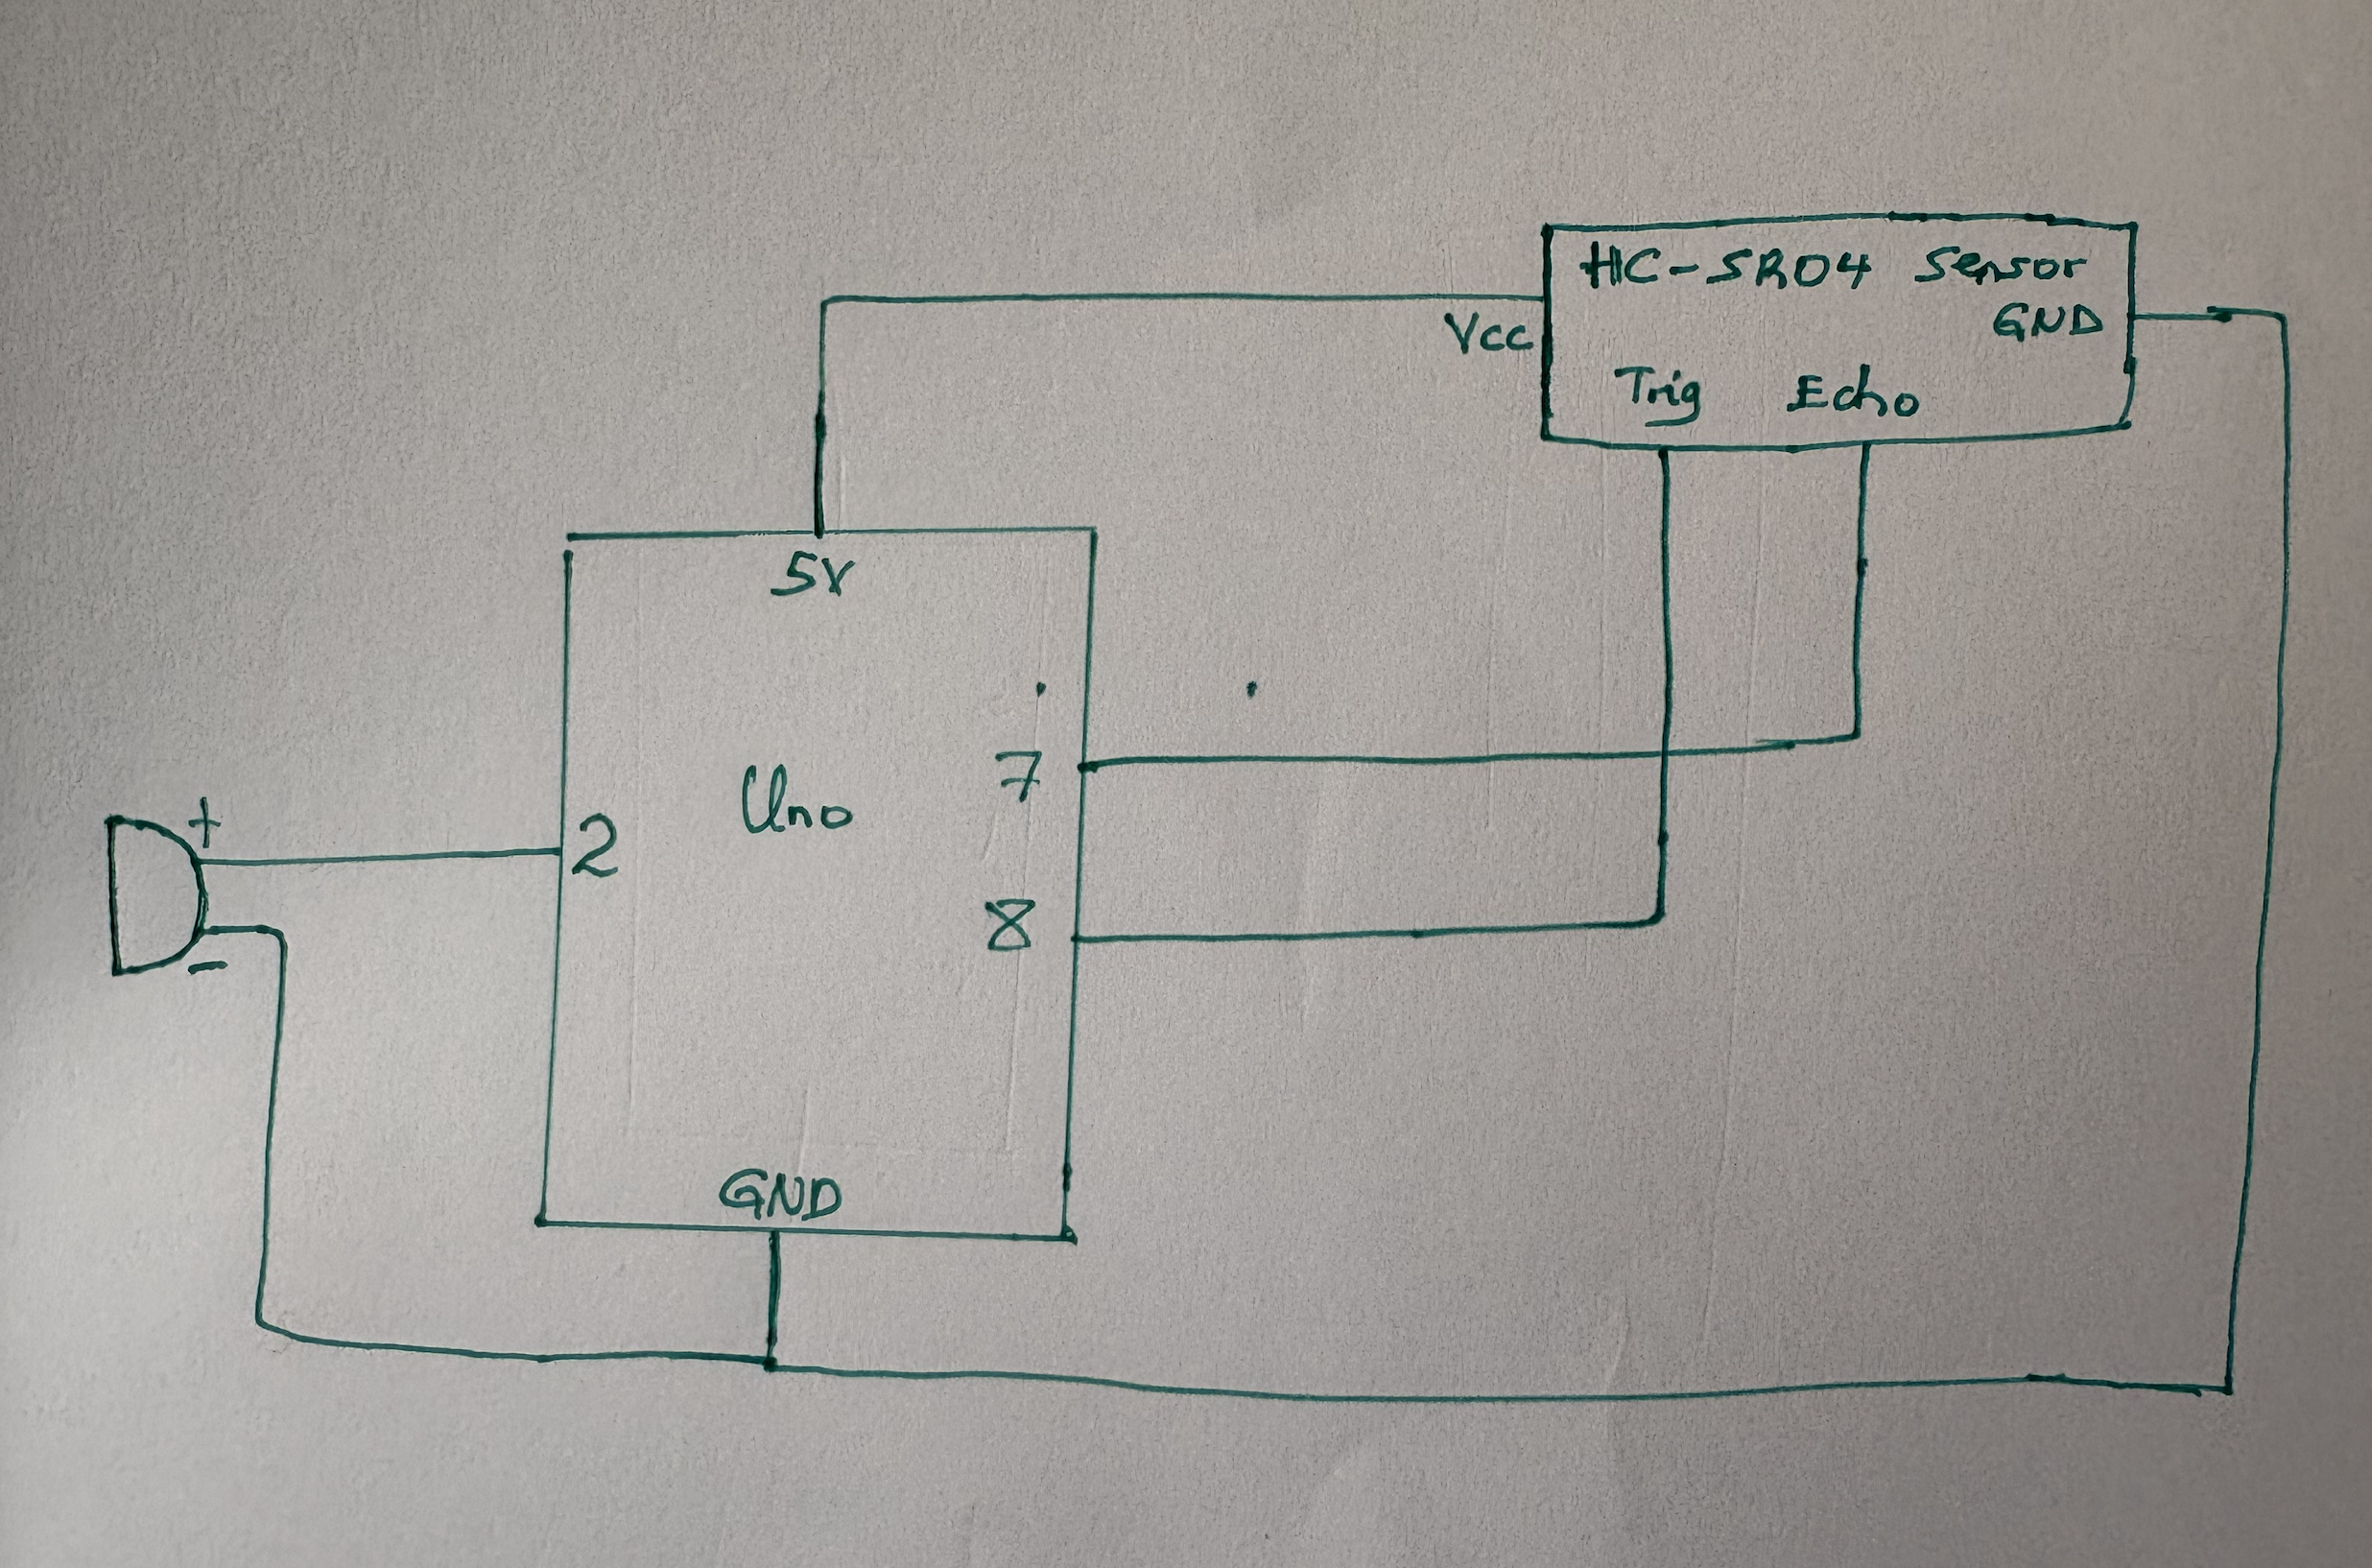
Schematic 

Here is the Schematic  for our Arduino connections:

Code:

In the implementation of our our idea, we searched for possible combinations of the notes and durations to match the Jingle Bells melody and stored them in an array. We then implemented the code mapping distance with durations. The variations in durations for each note make it seem playing faster or slower. Here is the code:

#include "pitches.h"
#define ARRAY_LENGTH(array) (sizeof(array) / sizeof(array[0]))

// Notes and Durations to match the Jingle Bells 
int JingleBells[] = 
{
  NOTE_E4, NOTE_E4, NOTE_E4, NOTE_E4, NOTE_E4, NOTE_E4, NOTE_E4, NOTE_G4,
  NOTE_C4, NOTE_D4, NOTE_E4, NOTE_F4, NOTE_F4, NOTE_F4, NOTE_F4, NOTE_F4,
  NOTE_E4, NOTE_E4, NOTE_E4, NOTE_E4, NOTE_E4, NOTE_D4, NOTE_D4, NOTE_E4,
  NOTE_D4, NOTE_G4, NOTE_E4, NOTE_E4, NOTE_E4, NOTE_E4, NOTE_E4, NOTE_E4, NOTE_E4, NOTE_G4,
  NOTE_C4, NOTE_D4, NOTE_E4, NOTE_F4, NOTE_F4, NOTE_F4, NOTE_F4, NOTE_F4,
  NOTE_E4, NOTE_E4, NOTE_E4, NOTE_E4, NOTE_E4, NOTE_D4, NOTE_D4, NOTE_E4,
  NOTE_D4, NOTE_G4,
};

int JingleBellsDurations[] = {
  4, 4, 4, 4, 4, 4, 4, 4,
  4, 4, 4, 4, 4, 4, 4, 4,
  4, 4, 4, 4, 4, 4, 4, 4,
  4, 4, 4, 4, 4, 4, 4, 4, 4, 4,
  4, 4, 4, 4, 4, 4, 4, 4,
  4, 4, 4, 4, 4, 4, 4, 4,
  4, 4
};

const int echoPin = 7;
const int trigPin = 8;;
const int Speaker1 = 2;
const int Speaker2 = 3;
int volume;

void setup() 
{
// Initialize serial communication:
  Serial.begin(9600);
  pinMode(echoPin, INPUT);
  pinMode(trigPin, OUTPUT);
  pinMode(Speaker1,OUTPUT);
}

void loop() 
{
  long duration,Distance;
  
// Distance Sensor reading
  digitalWrite(trigPin, LOW);
  delayMicroseconds(2);
  digitalWrite(trigPin, HIGH);
  delayMicroseconds(5);
  digitalWrite(trigPin, LOW);
  duration = pulseIn(echoPin, HIGH);
  Distance = microsecondsToCentimeters(duration);

// Map Distance to volume range (0 to 255)
  volume = map(Distance, 0, 100, 0, 255);  
  volume = constrain(volume, 0, 255); 

// Play melody with adjusted volume


 playMelody(Speaker1 , JingleBells, JingleBellsDurations, ARRAY_LENGTH(JingleBells), volume);
  
// Debug output to Serial Monitor
  Serial.print("Distance: ");
  Serial.print(Distance);
  Serial.print("    Volume: ");
  Serial.print(volume);
  Serial.println();
}
// Get Centimeters from microseconds of Sensor
long microsecondsToCentimeters(long microseconds) 
{
  return microseconds / 29 / 2;
}
// PlayMelody function to accept volume and adjust note duration
void playMelody(int pin, int notes[], int durations[], int length, int volume) 
{
  for (int i = 0; i < length; i++) 
  {
// Adjust the note Duration based on the volume
    int noteDuration = (1000 / durations[i]) * (volume / 255.0);  

// Play the note with adjusted Durations
    tone(pin, notes[i], noteDuration);
// Delay to separate the notes
    delay(noteDuration * 1.3);  
    noTone(pin); 
  }
}
Reflection

This week’s assignment was especially interesting because we had a chance to collaborate on the project and combine our imagination and skills to create something original. I really enjoyed working with @Nelson. We worked great as a team by first coming up with an idea and then adjusting the concept to choose the ideal balance between randomness and something ordinary to achieve the final result.

I believe that this project has a lot of potential for future improvements, and perhaps I will use some parts of this week’s assignment for my future ideas and projects. Looking forward to the next weeks of the course!

Week 10 – Musical Instrument

Implementation
Tinh and I going into this were slightly stuck on the creative idea first. However, during a brainstorm session, we came across a video of a ballerina music box – inspiring us to create something similar to this whilst sticking to the ‘instrument’ concept of the assignments. As we did not have a mini ballerina, I had a mini figurine nonetheless – a small penguin rubber (Basil Jr). Now that we had a figurine, we had to figure out how to implement the ‘instrument’ concept into this, as we did not want to make it into a passive music box.

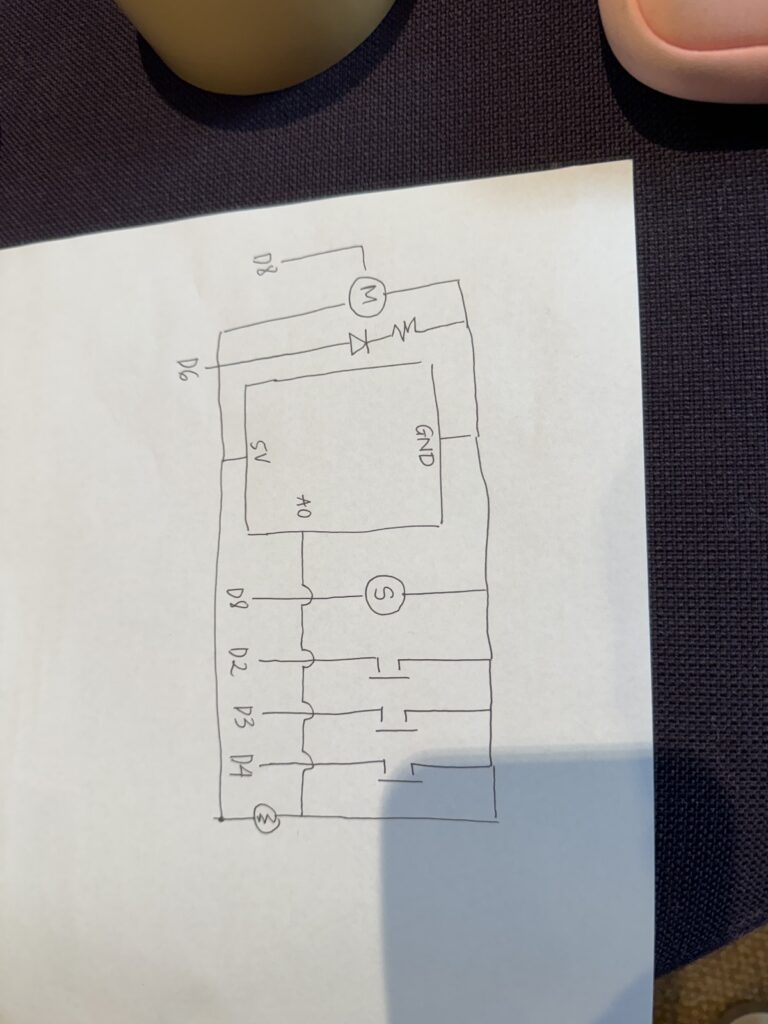
Therefore, we decided we wanted to control the movement of the penguin with the instrument. We ended up deciding that buttons could be used as the method to control movement — we decided that each button would correspond to a note, and each note has a specific rotation. Originally, we wanted to use 8 buttons to correspond to the 8 notes, however, due to the limited space on our breadboard, we chose to stick with three – C,D,E.
Implementation

Circuit: Servo Motor, Sound sensors, 3 buttons, resistor, photoresistor.


In the code, we use 2 functions for moving the motor and creating sound. The input button from the user will be recorded and passed into the function accordingly.

#include <Servo.h>
#include "pitches.h"


const int photoPin = A0;        // Photoresistor analog pin
const int ledPin = 6;           // LED pin
const int buttonPins[] = {2, 3, 4};  // Button pins for sound triggers
const int photoThreshold = 100; // Threshold for photoresistor reading
const int speakerPin = 8;

Servo penguinServo;             // Create servo object
const int servoPin = 9;         // Servo pin

void setup() {
    // Initialize the photoresistor, LED, and buttons
    pinMode(ledPin, OUTPUT);
    for (int i = 0; i < 3; i++) {
        pinMode(buttonPins[i], INPUT_PULLUP);  // Using internal pull-up resistor
    }

    // Attach servo to pin
    penguinServo.attach(servoPin);

    Serial.begin(9600);  // For debugging if needed
}

void loop() {
    // Read the photoresistor value
    int photoValue = analogRead(photoPin);
    Serial.println(photoValue);

    // Control the LED based on photoresistor value
    if (photoValue < photoThreshold) {
        digitalWrite(ledPin, HIGH);  // Turn on LED if it's dark
    } else {
        digitalWrite(ledPin, LOW);   // Turn off LED otherwise
    }

    // Check each button 
    for (int i = 0; i < 3; i++) {
        if (digitalRead(buttonPins[i]) == LOW) { // Button pressed
            playPitch(i);
            movePenguin(i);  // Move penguin based on button pressed
        }
    }
}

// Function to move the penguin based on the button pressed
void movePenguin(int buttonIndex) {
    switch (buttonIndex) {
        case 0:
            penguinServo.write(0);   // Move penguin in one direction
            break;
        case 1:
            penguinServo.write(90);  // Move penguin to center
            break;
        case 2:
            penguinServo.write(180); // Move penguin in the other direction
            break;
    }
    delay(1000);  // Hold position for 1 second
    penguinServo.write(90);  // Return to center
}


void playPitch(int buttonIndex) {
    switch (buttonIndex) {
        case 0:
            tone(speakerPin, NOTE_C4, 300); // Play note C4
            break;
        case 1:
            tone(speakerPin, NOTE_D4, 300); // Play note D4
            break;
        case 2:
            tone(speakerPin, NOTE_E4, 300); // Play note E4
            break;
    }
    delay(300);
    noTone(speakerPin);
}

Final Product