
For this piece I was inspired by the work of previous students, I liked how they managed to use simple shapes and combine them to make the portrait more visually appealing. I used a combination of circles, ellipses, arcs, and rectangles to create my portrait. I also wanted to incorporate motion yet keep it simple since I’m new to coding, I used Chatgpt to learn how to create the circular loop by asking for the code.
For the background, I chose a baby pink color since it’s my favorite color, and I wanted that to be shown in my portrait. Moreover, I used my color palette to represent me, a black shirt because I tend to always wear black. I wish I would’ve done a couple of things differently, like adding more details such as lashes, hair pieces, cheeks, and a more thought-out mouth. However, I’m generally happy with the final product and excited to see what I can learn throughout this course!
Month: January 2024
Assignment 1 (Production 1) – Smiley Face
MOUSE CLICK! MOVE THE MOUSE AROUND!
I had so much fun creating this piece and I was inspired by the “smiley face” or the concept of “emojis” for this production. What makes this a self portrait is that it has a little of touches that I added to it like the cap, the hair and the lipstick that makes it seem more like myself. I made the portrait interactive by having the skin tone change into different colors just like the emojis with different skin tones. I also made it a bit more fun by adding little circles that appear when the mouse is clicked. This was a bit challenging to me because, even with my coding experience, using P5 was not something that I usually do since I only have beginner experience with processing.
Creating a class and new functions to make the production more interactive was the most challenging part. This function:
function mousePressed() {
  let r = random(30, 70); // Make bubbles bigger
  let newColor = color(random(255), random(255), random(255)); // Generate a random color
  let b = new Circle(mouseX, mouseY, r, newColor); // Pass the random color to the Circle
  bubbles.push(b);
}
class Circle {
 // Constructor is called when a new Circle object is created
  constructor(x, y, r, color) {
    this.x = x; // x position of the bubble
    this.y = y; // y position of the bubble
    this.r = r; // radius of the bubble
    this.color = color;
  }

 // Method to add a random motion to the bubble's current position
  move() {
    this.x = this.x + random(-2, 2); // Randomly move the x position
    this.y = this.y + random(-2, 2); // Randomly move the y position
  }

 // Method to display the bubble on the canvas
  show() {
    stroke(255); // Set the color of the bubble's stroke (outline)
    fill(this.color); // Set the fill color of the bubble
    ellipse(this.x, this.y, this.r * 2); // Draw the bubble as an ellipse at (x, y) with diameter of r*2
  }
}
Was created for the mouse pressed function that generates randomly colored bubbles (circles) all around the screen. The Circle class was created to easily manage and organize the properties and behaviors of the bubbles that appear when the mouse is pressed. By using a class, we can create many Circle objects (bubbles), each with its own position, size, and color, and easily call their move and show methods to update and display them on the canvas. It’s a neat way to encapsulate (wrap up) properties and behaviors related to the bubbles.
I think this was a really interesting way to start with P5 and adapt to it.
Amal Almazrouei – Self Portrait
I tried my best to include the Abaya and Sheila in my Self Portrait, even though it took a lot of trial and error I think I did a good job.
I actually watched a couple of videos in order to reach this point, however there is a lot of room for improvement. I overlapped ellipses in order to create the hijab, and then I wanted to have an interactive element where the pupils followed the mouse. I wanted the background to be of the stars with elements loosely related to The Starry Night.
I would probably add a nose next time, and would like to eventually add an additional interactive element probably in the background.
Assignment 1: (self) Portrait – Aneeka
(Click on screen- Audio on)
For this assignment, I initially wanted to create a self-portrait. However, I didn’t like the idea of recreating myself using basic shapes because they could never encompass some of my features. I was then thinking of a character that I would like to create a portrait of. I decided on the character Satoru Gojo from the anime Jujutsu Kaisen for two reasons: one being that I’m currently obsessed with the show, and second being that he covers his eyes usually with a blindfold which meant that I didn’t need to spend time on creating eyes.
I chose mostly simplistic features so that my code doesn’t become too complex. The portrait was inspired by this particular scene below.
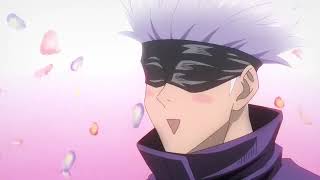
I decided to animate the background as a moving gradient. The direction of the gradient switches after a while. I was inspired by this code: https://editor.p5js.org/stalgiag/sketches/webaJ2Dpe and I modified the algorithm to move the gradient downwards and change the colors (pink was to refer to the scene, blue was to refer to his bright blue eyes under the blindfold). This is the part of my code that I wanted to highlight since it added a different dynamic to my portrait.
if (startColor > height + 255 || startColor < 255) {
    speedAnimate *= -1; } //reversing direction if goes beyond screen
  startColor += speedAnimate;
  let numRectangles = 21;
  let rectHeight = height / numRectangles;
  for (let y = 0; y < height; y += rectHeight) {
    let pinkShade = startColor - y; //calculates  pink shade based on the distance from the top of the canvas.
    let red = 255-pinkShade; // Adjust red color to create gradient
    fill(red, 191, 210);
    rect(0, y, width*2, rectHeight);
  }
I also wanted to add an interactive feature. When one clicks on the portrait, it plays the character’s signature laugh. I used this tutorial to add the audio: https://www.youtube.com/watch?v=MDX5VaMOzZg
Overall, I am happy with the result and how some features such as the hair turned out. If I had to improve on this particular portrait, I would try to add shading and more details. I would also add an alternate version of him without the blindfold. Furthermore, I want to experiment more with animation and audio in future assignments.
Week 1 Assignment: Self-Portrait
While I had some experience with Processing through Intro to CS, I was new to JavaScript and especially p5, so this assignment took longer than I expected. My goal was to make the portrait as detailed and true to life as possible with just basic shapes on p5.js, while at the same time not drowning in code. My final result is a compromise between these two parameters.
For my portrait, I first took a few pictures of myself as a reference. I began by basing the basic proportions of the shapes based on the proportions of different parts of my face.
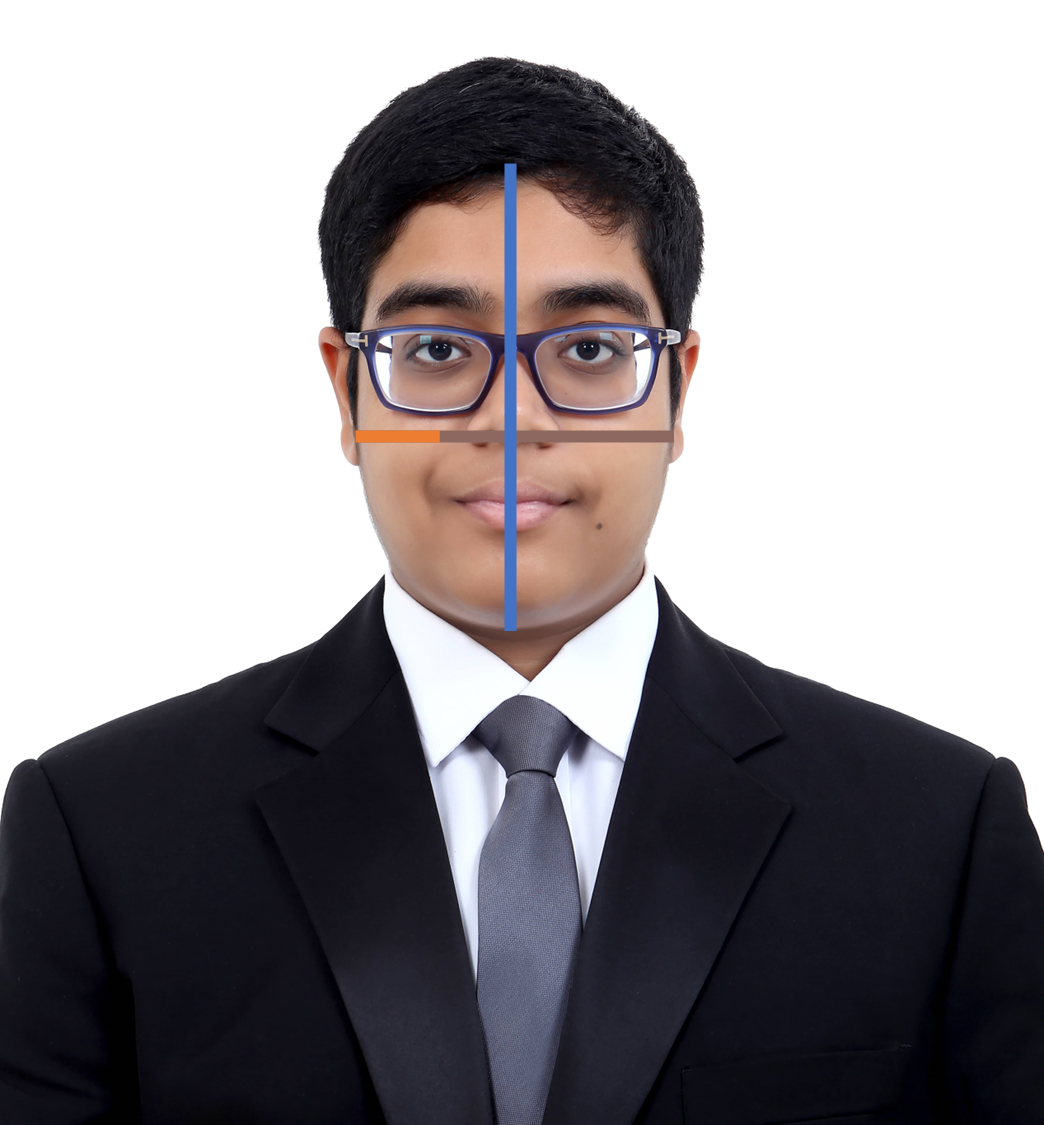
I knew that a simple ellipse would not be enough to represent my face, so I decided to combine a rectangle with multiple arcs to get the “rounded square” shape of my face. A few more arcs (yes, this is a recurring theme throughout this assignment) were used to round out the jaw and the chin and then I was done with the first part.
I then decided to work on the neck and the shirt, as that would be easy to get out of the way. They just required a rectangle and a quadrilateral respectively, and I used more arcs to round out the shoulders and collar to avoid a blocky look.
Next, I worked on the eyes which, which was probably the most time-consuming step. Inspired by examples on the Intro to IM website, I decided to challenge myself by making some Bezier curves. This tutorial was very helpful in understanding how they work. Yet, it was time-consuming to make a decent shape out of them, especially as they are not as intuitive as they would be on graphics editing software such as Adobe Illustrator (and according to me, they’re not very intuitive even there). I settled for combining an arc for the upper portion of the eye, and a Bezier curve for the lower portion, which I feel gives the desired result. While learning to use Bezier curves took more time than I would have wanted, it was valuable for other steps in this assignment and in future ones.
function drawDayEyes(){
  //cornea
  strokeWeight(2);
  stroke(hairColor);
  fill(corneaColor);
  //right
  arc(4.13*width/10, 4.28*height/10, 0.8*width/10,
0.55*height/10, PI+0.1, -0.1, OPEN);
  bezier(3.73*width/10,4.23*height/10,4*width/10,
4.5*height/10, 4.25*width/10, 4.45*height/10,
4.5*width/10, 4.23*height/10);
  //left
  arc(5.87*width/10, 4.28*height/10, 0.8*width/10,
0.55*height/10, PI+0.1, -0.1, OPEN);
  bezier(5.47*width/10, 4.23*height/10, 5.77*width/10,
4.45*height/10, 6.07*width/10, 4.5*height/10,
6.27*width/10, 4.23*height/10);
  //irises
  noStroke();
  fill(irisColor);
  ellipse(4.13*width/10, 4.2*height/10, 0.34*width/10);
  ellipse(5.87*width/10, 4.2*height/10, 0.34*width/10);
  //pupils
  fill("black");
  ellipse(4.13*width/10, 4.2*height/10, 0.18*width/10);
  ellipse(5.87*width/10, 4.2*height/10, 0.18*width/10);
}
After the eyes came the obvious next step, my glasses. The basic frame was not too hard to make, but required a bit of trial and error to get a decent-looking shape. Within the glasses, I decided to include the optical lensing that occurs due to the high negative power of my lens, which makes it appear as if my face is shrunken inward when viewed face-to-face. This also helped me correct for making my eyes inadvertently small as I had forgotten that the reference also had the optical lensing effect.
Next were the lips and the nose. I was afraid of using Bezier curves for a shape as complex as lips but decided that I didn’t need them anyway. I simulated the shape of the lips using arcs and triangles, which seemed suitable enough. The nose too was similarly done, with the nostrils being made of simple ellipses, the apex being made of a moderately thick arc, and the dorsum (the front part of the nose) being made of thinner arcs. I still used Bezier curves to get the iconic shifted curved look of the nasal alae (the “wings” of the nose around each nostril).
This is when I decided to add hair to my portrait. The head hair was just a bunch of triangles, ellipses, and arcs overlapping to get the hair’s fringes. The eyebrows were also arcs drawn using a thick stroke weight. I wanted to include eyelashes, but they were annoying to implement, so I skipped them.
Next were the ears, which were also daunting. I knew that this required a complex Bezier curve shape. I experimented with the beginShape() and bezierVertex() functions to get the complex shape needed for the ears. This too required a lot of trial and error to get the shapes and sizes right.
  //right ear
  beginShape();
  vertex(2.85*width/10, 3.8*height/10);
  bezierVertex(2.5*width/10, 3.6*height/10, 2.4*width/10, 4.025*height/10, 2.55*width/10, 4.55*height/10);
  bezierVertex(2.625*width/10, 4.65*height/10, 2.4*width/10, 5.05*height/10, 2.8*width/10, 5*height/10)
  endShape();
  //left ear
  beginShape();
  vertex(7.15*width/10, 3.8*height/10);
  bezierVertex(7.5*width/10, 3.6*height/10, 7.6*width/10, 4.025*height/10, 7.45*width/10, 4.55*height/10);
  bezierVertex(7.375*width/10, 4.65*height/10, 7.6*width/10, 5.05*height/10, 7.2*width/10, 5*height/10)
  endShape();
At the very end, I decided to include some rudimentary interactivity by making a lamp that could be clicked on to cycle between “wake” and “sleep”. If-else statements dictate which elements to draw or not, and I quickly made a pair of “closed eyes” which are essentially just a pair of arcs.
Here is what my final self-portrait looked like:
Overall, I am really happy with the result. It did take a long while and quite a bit of effort, but I feel it was worth it to help set a strong foundation in p5.js while also making a decent self-portrait.
Assignment 1: Self-Portrait
Inspiration and Concept
I wanted my self-portrait to highlight two main things: my glasses and my big curly hair. There were also a few artistic elements I identified early on that I wanted to incorporate. Growing up, the first thing I learned to draw was flowers. Since then, I have incorporated flowers, specifically sunflowers, into much of my artwork. Hence, I planned to have flowers as a recurrent motif in my self-portrait. Another thing I wanted to stand out in my self-portrait is good color coordination. A specific self-portrait I found that resonated with all of these ideas and captured the essence of what I wanted to create is by Erika Norma, which can be found in this Medium article she wrote.
Process and Implementation
 I started by creating a rough sketch of the outline. The majority of the outline is composed of curves and smooth lines. To ensure that my shapes looked smooth, I relied on curveVertex() to specify vertices (points) along which a curve would be drawn. I used curves to draw the face and the hair. To make the self-portrait look more animated, I decided to add a wave movement animation to the hair. I was able to create the desired effect by adding curves with vertices whose x and y coordinates are defined by sinusoidal functions (this example was a very helpful demonstration of simulating sine waves in p5.js and I derived inspiration from it as I animated the hair). I played around for some time with different angle increments, amplitude, and shifts until I was happy with the result. Although it is not perfect and is probably not the cleanest way to implement this effect, I would say this portion of the code for drawing and animating the hair is the one I am most proud of as it perfectly demonstrates how mathematics can be directly used to generate art. It also took me the most amount of time to get right so I was very satisfied once all the components fell into place.
function hair() {
  push();
  beginShape();
  fill(72, 60, 50);
  stroke(72, 60, 50);
  // right side
  for (let i = 0; i < 20; i++) {
    // calculate x and y positions dynamically using the counter i and sinusoidal functions to create wave movement
    // used helpful demonstration of using sinusoidal functions for waves https://p5js.org/examples/math-sine-wave.html
    let x = 350 + i * 20;
    let y = i * 15 + sin(hairAngle + (i * PI) / 2) * 10 + 90;
    // add vertex to the curve
    curveVertex(x, y);
  }
  // left side
  for (let i = 20; i > 0; i--) {
    let x = 310 - i * 20 ;
    let y = i * 13 - sin(hairAngle + (i * PI) / 2) * 10 + 50;
    curveVertex(x, y);
  }
  endShape(CLOSE); // close the shape to connect the last and first points

  // bottom of the hair
  noFill();
  strokeWeight(200); // use large stroke to cover the bottom edge of the conjoined left and right hair shape
  beginShape();

  for (let i = 0; i < 30; i++) {
    let x = i * 40 + cos(hairAngle + (i * PI) / 2) * 10 - 100;
    let y = 400 + sin(hairAngle + (i * PI) / 2) * 10;
    curveVertex(x, y);
  }
  endShape();
  pop();
}
One obstacle I had with the hair was creating one closed-shaped curve that would be the moving hair. When I attempted to join the two sides of the hair by closing the shape formed by them, I realized that the bottom would be automatically closed with a straight line. I resorted to a rather gimmicky way of resolving this by adding a bottom moving curve with a large stroke that would cover that straight line. If I were to redo this, I would try and dynamically create all sides of the hair using one shape and be more careful with calculating the vertices.
I also used curves and cosine functions to animate the movement of the earrings using the same principles.
The implementation of the flowers was a modification of this reference. The flowers were used to create the dress and are a part of the interactive background that is displayed when the mouse is clicked. The flower petals are implemented using ellipses. To create the rotation animation, all flower components rotate by an angle that is dynamically changing each frame. For the sake of generalization, I implemented the following drawFlower() function to allow for the creation of all the different colors, shapes, and types of flowers (including sunflowers!) that I needed.
function drawFlower(
  r,
  g,
  b,
  dx,
  dy,
  petalX,
  petalY,
  petalW,
  petalH,
  centerR,
  rotationAngle,
  isSunFlower = false
) {
  // helpful guide: https://editor.p5js.org/xinxin/sketches/0j7vGT3u6
  push();
  noStroke();
  ellipseMode(CENTER);
  translate(dx, dy);
  rotate(radians(rotationAngle));
  fill(r, g, b);

  for (let i = 0; i < 20; i++) {
    // flower petals
    ellipse(petalX, petalY, petalW, petalH);
    rotate(PI / 10);
  }

  // fill center with a darker color if sunflower
  if (isSunFlower) {
    fill(r - 11, g - 22, b);
  }

  ellipse(0, 0, centerR, centerR);
  pop();
}
To add a small interactive component, the background of the sunflower would display a falling sunflower animation once the mouse is clicked. The original background and the animated background alternate with every click. In the setup function, a number of sunflower object literals with x, y, and speed attributes are defined. All values are randomized from a certain range (e.g. the y position is randomized between -1000 px and -50 to ensure that each flower is initially displayed above the canvas). Each flower is then added to a global array,fallingFlowers.
The animation itself was done by incrementing each flower’s y position by its speed attribute in every frame, ensuring its position is reset again above the canvas at a random position once it hits the bottom.
Reflections and ideas for future work or improvements
I am overall satisfied with the outcome. It was close to how I envisioned it would look like. I especially loved the aesthetics of the moving hair and earrings. I also enjoyed playing with colors – especially daring to choose yellow and purple for the glasses – and the process of making creative decisions, such as adding in lips last minute. As I mentioned, however, I would have loved to find a cleaner way to implement the hair shape and animation without having to resort to adding in an extra curve shape. In my next projects, I aim to delve deeper into creating more complex curves and exploiting mathematical relations to create interesting animations.
Assignment 1 – Self Portrait (Haziel)
For this assignment, I decided to create a simple 2D portrait using primitive shapes and a few of my favorite colors. The concept and objective was to represent key characteristics of my appearance, which became quite challenging as I don’t have much experience with p5. So, I drew my current black hair (Emphasizing this because I used to change my hair color really often :D) and a Brazilian t-shirt. Additionally, I used green for the background, since it’s my favorite color and the tone also gave a good contrast with my drawing.
In portrait itself, I used basic geometric shapes. Ellipse to create the face and eyes; Arc for the hair, mouth, eyebrows, and the t-shirt; and triangle for the nose.
When it comes to the reflection, I believe there are some areas where I could improve to enhance the representation of my identity in the portrait. One key aspect would be to add more details, such as incorporating more complex shapes or finer lines to capture the nuances of my appearance. For example, my curly hair could be depicted with a more diverse range of shapes and textures.
Looking ahead, I’m excited to learn more advanced skills and techniques using p5. Exploring new methods for digital art and honing my abilities with the software will enable me to create more dynamic and expressive projects in the future. So, I’m really looking forward to experimenting with different styles and approaches to further develop my artistic side.
Here’s my code:
function setup() {
  createCanvas(400, 400);
}

function draw() {
  background('#59A65C');

  // Face
  fill(255, 204, 153);
  ellipse(200, 200, 200, 250);

  // Hair
  fill(0);
  arc(200, 140, 180, 130, PI, TWO_PI);

  // Eyes
  fill(0);
  ellipse(160, 180, 30, 30);
  ellipse(240, 180, 30, 30);

  // Eyebrows
  noFill();
  strokeWeight(3);
  arc(160, 170, 40, 10, PI, TWO_PI);
  arc(240, 170, 40, 10, PI, TWO_PI);

  // Mouth
  fill(255);
  strokeWeight(1);
  arc(200, 220, 50, 50, 0, PI);

  // Nose
  fill(255, 204, 153);
  triangle(200, 200, 190, 230, 210, 230);

  // Brazilian T-shirt
  fill('yellow');
  arc(200, 380, 200, 160, 0, PI);
  fill('green');
  arc(200, 380, 200, 160, PI, TWO_PI);
}
Assignment 1 – Self Portrait (Redha Al Hammad)
For this assignment I have produced a self portrait of myself with two defining features: my glasses and my camera.
Initially, the concept I wanted to pursue involved a simplistic rendering of my face with mouse tracking applied to the eyes and camera. I am most proud of the fact that I managed to achieve this idea with the eyes (albeit with some help from the p5js reference page). The main difficulty with this for me was trying to understand how the mouseX and mouseY functions worked in relation to the constrain function. However, with lots of experimentation, I managed to figure out how to implement mouse tracking the way I intended for the eyes. I have included the code for it below:
 // eyeballs
 fill(255)
 ellipse(150, 175, 50, 40)
 ellipse(250, 175, 50, 40)

   // pupils
 fill(80, 40, 10);

let leftPupilX = constrain(mouseX, 140, 160);
 let leftPupilY = constrain(mouseY, 170, 180);
 ellipse(leftPupilX, leftPupilY, 25, 25);

 let rightPupilX = constrain(mouseX, 240, 260);
 let rightPupilY = constrain(mouseY, 170, 180);
 ellipse(rightPupilX, rightPupilY, 25, 25);
This leads onto the many aspects which I wanted to implement but could not with the main one being the implementation of mouse tracking on the camera. Ideally, the intended outcome was to have the eyes track the camera as it moved around with the mouse in order to create a more dynamic and interactive experience. However, I could not figure out how to apply mouse tracking to multiple shapes. Some other details which I wished to include were facial hair (I was unsure how to go about it and ran out of time) as well as the curve in my glasses which connects the two lenses (I wanted to make a curved rectangle but could not find how). Moreover, I was unsure of how to present my hair so I just opted for a rounded rectangle which may be perceived as a hat.
In terms of the code itself, I feel that I should have made use of variables in order to make the act of placing the different shapes on the canvas in relation to each other easier. One point that I liked which came as a result of not using variables was that certain features were slightly off centre (e.g mouth, nose) which made the outcome feel more playful and hand drawn.
Assignment 1 – “Self-Portrait” by Sara Al Mehairi
Overview
For this assignment, I initially had a bit of uncertainty about the theme involved with creating a self-portrait using JavaScript. Stick figures seemed like a starting point, but I decided to draw inspiration from the cartoon TV show Gravity Falls. My goal was to capture the same facial structure that made the show so memorable from my childhood, appreciating its cool graphics. So, let me introduce you to Sara, the new character on Gravity Falls!
Challenges
Drawing inspiration from Gravity Falls presented several challenges, particularly in replicating the facial structures of the original characters using only ellipses, rectangles, and triangles. Coordinating the shapes, especially the triangles, definitely tested my patience. Gladly & after several attempts, I sought assistance from Desmos (advanced graphing calculator) to recreate and visualize my canvas in terms of coordinates, I found that pretty helpful!
reflection
My initial intention was to animate multiple objects on the screen, including the sun transforming into a darker color against an ombre background to symbolize sunset (ideally, user-controlled). However, I underestimated the time required for the graphic design itself & hope to implement animations in future projects. While I consider myself familiar with other languages, I wouldn’t claim that p5.js is my expertise. Overall, I found great enjoyment in this project and am proud of the results, particularly the implementation of a simple animation for the “Mukhawar” or Emirati traditional wear. If anyone is interested in the code, you can find it below!
// Welcome to the behind-the-scenes of Sara's self-portrait!

function setup() {
  createCanvas(500, 600);
  frameRate(10);
}

function draw() {
  background(153, 175, 191);

  // sun
  noStroke();
  fill(242, 209, 44);
  ellipse(0, 0, 300, 300);

  // clouds
  noStroke();
  fill(240);

  ellipse(100, 200, 60, 50);
  ellipse(60, 200, 60, 50);
  ellipse(20, 200, 60, 50);
  ellipse(75, 180, 60, 50);
  ellipse(45, 180, 60, 50);

  ellipse(500, 170, 70, 60);
  ellipse(460, 170, 70, 60);
  ellipse(420, 170, 70, 60);
  ellipse(485, 140, 70, 60);
  ellipse(445, 140, 70, 60);

  ellipse(300, 80, 70, 60);
  ellipse(260, 80, 70, 60);
  ellipse(220, 80, 70, 60);
  ellipse(280, 60, 70, 60);
  ellipse(245, 60, 70, 60);

  // ground
  fill(54, 99, 57);
  rect(0, 500, 500, 100);

  // neck
  fill(138, 98, 134);
  rect(190, 295, 130, 100);

  // hijab
  noStroke();
  fill(138, 98, 134);
  ellipse(245, 300, 190, 140);
  rect(165,180,175,120)
  triangle(325, 158, 410, 480, 300, 680);

  // face
  noStroke();
  fill(214, 176, 150);
  ellipse(240, 295, 160, 120);
  rect(175,180,145,120)

  //eyelashes
  push();
  stroke(0);
  strokeWeight(2)
  line(160, 240, 200, 255);
  line(170, 230, 200, 255);
  line(295, 240, 200, 255);
  line(285, 230, 200, 255);
  pop();

  // eyes
  fill(255);
  stroke(0)
  ellipse(200, 250, 60, 60);
  ellipse(255, 250, 60, 60);

  fill(0);
  ellipse(200, 245, 7, 7);
  ellipse(255, 245, 7, 7);

  // hair
  noStroke();
  fill(38, 20, 2);
  push();
  rotate(PI/9);
  rect(280, 45, 98, 50);
  rotate(PI/-6);
  rect(135, 200, 80, 30);
  pop();

  // hijab 2 (top part)
  fill(138, 98, 134);
  arc(253, 180, 175, 100, PI, TWO_PI);
  rect(165, 185, 10, 30);

  // hair 2
  fill(38, 20, 2);
  arc(250, 185, 155, 60, PI, TWO_PI);

  // mouth
  fill(255);
  stroke(0);
  arc(230, 305, 60, 37, 0, PI, CHORD);

  // hijab 3
  fill(138, 98, 134);
  noStroke();
  rect(166, 177, 9, 30);
  rect(320, 170, 17, 60);

  // eyebrows
  push();
  stroke(21, 19, 19);
  strokeWeight(2);
  noFill();
  arc(195, 215, 35, 10, PI, TWO_PI, OPEN);
  arc(255, 215, 35, 10, PI, TWO_PI, OPEN);
  pop();

  // body
  fill(163, 106, 145);
  rect(130, 385, 240, 255, 20, 15, 10, 5);
  push();
  rotate(PI/14);
  rect(210, 343, 65, 225, 20, 15, 10, 5);
  rotate(PI/-9);
  rect(260, 427 , 65, 220, 20, 15, 10, 5);
  pop();

  // sleeves
  fill(138, 98, 134);
  triangle(330,440,350,600,340,600);
  triangle(165,440,140,600,130,600);

  // dress
  fill(50, 46, 82);
  rect(210, 390, 65, 220, 20, 15, 10, 5);

  // crystal animation
  // inspired by https://editor.p5js.org/nanou/sketches/rJ-EMpxa
  var spot = {
  x:50,
  y: 25,
  };

  var col = {
      r:255,
      g:0,
      b:0,
  };

  spot.x= random (215, 270);
  spot.y= random (390, 480);

  noStroke();
  col.r = random (100, 255);
  col.g = (0);
  col.b = random (100, 200);

  fill (col.r, col.g, col.b, 120);
  ellipse (spot.x, spot.y, 10, 10);

  // neckline
  fill(138, 98, 134);
  arc(240, 384, 100, 80, 0, PI, CHORD);

  // mark
  fill(0,95);
  ellipse(280,290,2,2);

  // nose
  fill(214, 176, 150);
  stroke(0);
  arc(228, 279, 15, 25, 0, PI/3 + PI);

}

// Thank you so much!
Assignment 1: Self Portrait
Concept
My p5.js self-portrait is more than simply a picture of my face; it’s a story that illuminates my path to enroll in the “Introduction to Interactive Media” course. The artistic representation of that voyage is this portrait. My conversation with my friends regarding me not being able to enroll in this course until senior spring revolved around how I might be in the hall of fame for not being able to complete my minor because of an introductory course.
The goal of my portrait is to elevate the accomplishment by placing my face on a pedestal and using a lighted stage as the background. It acts as a metaphor for the significant problems I faced since freshmen fall to enroll in this course to complete my minor. Pedestals are typically used to display objects of significant worth or significance. I also thought of adding an interactive element (by clicking the mouse button) that allows me to change the emotions on my face. The face changes from a smile to a laughing face which serves as a cathartic release for the difficulties during the journey.
Sketch
Code
The code that I am proud of is how I was able to illustrate two different expressions with an easy mouse-click interactive technique. Initially, the value of isLaughing is set to false and when the mouse clicks the value changes to true.
function mouseClicked() {
  // Toggle the laughing state
  isLaughing = !isLaughing;
}
The drawFace function is the core code for making this sketch possible. This code uses the mouse-toggled laughing boolean variable to show different expressions. The portrait has a lot of facial details that resemble me in real life. The addition of stud-adorned ears, a neck, and a cap enhances the portrait’s authenticity and individuality.
function drawFace(laughing) {


  // Ears
  fill(skinColor);
  // Left ear
  ellipse(135, 156, 30, 40);
  // Right ear
  ellipse(265, 156, 30, 40);

  // Making studs on both ears
  fill(255,255,255);
  // stud on left ear
  ellipse(131, 167, 8, 8);
  fill(255,255,255);
  // stud on right ear
  ellipse(269, 167, 8, 8);

  // Drawing the neck
  fill(skinColor);
  rect(175, 206, 50, 60);

  // Drawing the head
  fill(skinColor);
  ellipse(200, 156, 125, 170);


  // Cap
  fill(0);
  arc(200, 120, 115, 125, PI, TWO_PI, OPEN);
  strokeWeight(10);
  line(150,115,110,115)
  strokeWeight(1);

  if (laughing) {
    // Laughing face
    // Eyes closed
    fill(0);
    // left eye closed
    ellipse(170, 136, 30, 10);
    // right eye closed
    ellipse(230, 136, 30, 10);

    // Tears
    fill(0, 191, 255);
    // tears from left eye
    ellipse(165, 151, 10, 25);
    // tears from right eye
    ellipse(235, 151, 10, 25);

    // Open mouth - laughing state
    fill(255);
    arc(200, 206, 60, 40, 0, PI, CHORD);

  } else {
    // Smiling Face
    // Eyes
    fill(255);
    // left eye
    ellipse(170, 140, 35, 25);
    // left eye
    ellipse(230, 140, 35, 25);

    // Pupil
    fill(0);
    // left eye - pupil
    ellipse(170, 145, 15, 15);
    // right eye - pupil
    ellipse(230, 145, 15, 15);

    // Mouth
    noFill();
    arc(200, 206, 60, 15, 0, PI);
  }

  // Nose (same for both faces)
  line(200, 165, 200, 190);
}
Lastly, the concept was achieved by using the pedestal in the center of the room with spotlights showing a significant person.
// Background image of pedestal
function preload(){
  bgImage = loadImage("https://st2.depositphotos.com/1051355/6256/i/450/depositphotos_62569733-stock-photo-illuminated-empty-stage-podiums-for.jpg")
}
Challenges
There were a few challenges that I faced while doing this assignment. Initially, I planned on giving hair to my portrait, however, I was not able to achieve that. So I had to improvise and I made a cap instead.
Another challenge was to determine the x and y coordinates. To solve this issue I printed the cursor’s x and y values in the console using the draw function.
function draw() {
  // finding the value of x and y
  print(mouseX, mouseY)
}
Reflection and Improvements
All the IM courses that I have taken have encouraged me to find meaning behind what I am doing or to show a story. I am happy with the portrait that I have made, it is close to what I look like in real life and also can show the story behind making it.
There is always room for improvement. For example, the portrait may show various emotions depending on which keyboard keys are pressed. Also, the portrait does not have eyebrows, so the eyebrows can follow the mouse when hovering over the portrait.
References
- I took a reference from schemecolor.com to use the exact skin color for my portrait.
- Another reference was the background image of the pedestal.