Benny the Fish (Midterm Progress)

The idea of my game originated from me and my team’s Communications Lab comic assignment, Benny the Fish. This comic  narrates the story of Benny, a little fish that got adopted. The game, named as the comic, will follow Benny as he navigates the ocean and avoids obstacles that will hurt him. I want the user to control Benny with the keyboard arrows as “villains,” as I call them on my code, come from the right side of the screen as if Benny was moving trough the ocean.

Update 1: Controls 🎮  (February 24th – February 28th)

I began my process by creating the tittle screen, instructions and the main character. I inserted the logo as an image, the instructions as a text element, and the playable character as a .png image. I then added if statements with Key_Code indications, as learned during class, to make Benny move. I played arround with the speed to make sure it works well. I also added boundaries on the screen so Benny can’t leave and a subtle bouncing effect to make it feel better. My next steps are:

      1. Building the villains and their interactions with Benny.
      2. Recording the sounds.
      3. Building a simple sprite sheet to simulate swimming.
      4. Remove the instructions and logo when a key is pressed.

Update Villains: Experimenting (March 1st – March 2nd) 👾

When thinking about the idea of the game, I did not realize how much of a challenge it would be to design the villains. [Quick backstory: When I was a kid, I used to call Goombas in Mario Bros villains and my cousins would mock me for it endlessly. Hence, my code :)] I started experimenting a little on the above sketch (from update 1) and quickly wrote some lines that would prevent the rest of the code from running. Thus, I decided to figure out all the details on a separate file, and then, add it to another file.

My first step was to create a class called Villain. I gave it parameters of x, y, width, color, and speed. Then, I created three arrays for the three types of villains I will have.  I am unsure if this was the right choice, as I have not been able to have each array have a different number of objects. (See lines 9 and 14). Then, I made them move at different speeds and appear randomly each time they crossed the screen. I spent an embarassing amount of time playing with the speed values to make sure it looked natural and similar to other games I’ve played before.


You will also see in my code that I began adding some lines to figure out the interactivity within the circles. I, however, am struggling to create the distance statement to all the different radii and circle centers.

Next steps in my process and planned timeline are:

      1. Fine-tune the radii math –> Wednesday
      2. Combine both sketches. –> Wednesday
      3. Design the villains. –> Wednesday
      4. Recording the sounds. –> Thursday
      5. Building a simple sprite sheet to simulate swimming. –> Thursday
      6. Remove the instructions and logo when a key is pressed. –> Thursday

Update 2: Integration (Monday March 2nd Class) 🔗


During class I worked with integrating two of the above sketches: the villains and the playable character. An immediate next step I must take is to, through conditionals, make the tittle & instructions part of the opening screen only as opposed to the whole game.

Update 3: Conditionals & Design (March 3rd – 6th) 🏞

This might be one of the, if not the biggest update for Benny the Fish. After integrating the villains & controls during Wednesday’s class I spent a lot of time with the conditionals. During the initial days of this weekend, I wrote in my code a switch statement that would create the modes of (1) intro screen, (2) gameplay, (3) losing screen, (4) winning screen. This allowed me to have a much more structured product. I also added if statements to build the killing of Benny mechanism, while adding a live count.  I also added images as backgrounds which make the experience of playing much better. Currently, the game has many elements to be fixed, bugs and improvements, but as soon as I add the designs for the villains and figure out how to restart the bottles.push() & canPlastic.push() for loops, the game will be a playable and great initial product. I still have a lot of work ahead, but believe the game looks very promising.

As always, my immediate next steps are:

    1. Designing the villains & adding them into the game.
    2. With the villains’ design, I can make sure that the distance interactions are as accurate as possible to give the game a better feel. (Not looking forward for this step)
    3. Add Background music, bumping, dying, & eating sounds.

Some overall steps I want to take are:

    1. Figure out how to win. Time? Eating Mechanism?
    2. Adding different levels. I would love for Benny to grow & change of scenery as he does in the comic.
    3. Adding the tail animation for swimming.

Data Visualization

I was scrolling through twitter and I found Kim Kardashian to be trending, therefore, I thought it would be interesting to search Kim Kardashian on Google Trends, and it showed me how much people searched Kim Kardashian over time. I turned it into a graph and added. a picture of Kim as the Background as we learned last class. One of the difficulties I met was that I wanted the graph to be more stretched out on the Y-axis to look better. I used circles instead of normal lines and added a color that I think represents Kim Kardashian haha.

Midterm Progress- Nicholas

Idea

The idea for my game is based on those old-school flash games I used to play in middle school: I wanted a simple single player game with moderate replayability. I settled on the concept of a game where the user would spam a button on the keyboard to accomplish some goal with ranging levels of difficulty, using weight lifting as a theme.

Implementation

I started by creating the game class, which involves a variable holding the current screens and methods for each screen. I needed a game start screen, an ingame screen, and a game complete screen. I also created a clickable rectangle component I used for buttons that had optional text inside, with a method that returns whether or not the button is being hovered or not.

The game also has a weight variable which controls the amount of resistance the game will enact on the user so a higher weight makes the game harder. I used buttons to dynamically change the weight value.

As of now, the user mashes space bar to increase the current level of completion, and if the user is unable to complete the game within a specific timeframe, the game results in a loss.

To control the game restart, I used another method that reinitializes the game, setting all class variables back to their original value, which also gets called in the constructor.

Play the WIP game here

TODO (in order of importance):

  1. Implement background images that reflect the progression of the game
  2. Implement music to play in the back
  3. Implement sounds for the users button presses (can get annoying to make sure it isn’t too loud)
  4. Styling for colors and text

Week 5 – Midterm prototype

Ideation

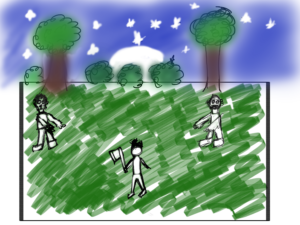
For my midterm, I wanted to make some form of pixel art-type monster fighting game in a 2D world. My inspiration for this comes from games like pokemon that I played on my Gameboy as well as newer Nintendo Switch games like Towerfall. I drew up a sketch of what I wanted my game to look like but I was open to making changes so that the gameplay is smooth.

I know this is going to be challenging and quite time-consuming but I want to see how far I can push myself and create a fun game that I and others can enjoy.

Assets

I was thinking of making my own pixel art assets but soon found that I do not have the skills nor the time to learn the skills to make them myself right now. I would like to explore this further in the coming weeks but for now, I used assets from Itch.io. I found some player and object sprite sheets that are free for non-commercial use.

Movement

I flipped the sprite sheet to obtain movement in the left and right directions with Preview on my laptop. Using the boilerplate code from class that Professor Aaron provided, I was able to get my player up and running.

Attack

This was a bit tricky as I wanted all the attack sprites to loop with a mouse click. I couldn’t figure it out at first because I was using a while loop which made my program freeze. With some help from discord, I implemented it using an attack boolean. Although this increased the amount of code I had, the attack was working fine now.

Stage

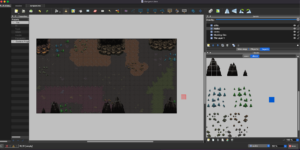
I was hoping to find a stage online that I could use for my game but I didn’t really find anything that I liked. I did some googling and found something called tilesets which is similar to sprite sheets but for building 2D levels. I use this dungeon tileset that was free to download along with Tiled to create my own basic level.

Controls

w – move up
s – move down
a – move left
d – move right

mouse left click – attack

Game

Note: This is a work in progress.


Yunho Lee Text Visualization Assignment – Text Rain

My first intention was to display simultaneously the input by users to the screen. The task could be solved by referring to the materials from the class of the example of creating a “Letter” Object and adding an extra “Letter” object in the Array of Letters. The result is the following.

function keyTyped() {
let lettercheck = key;
if (lettercheck.length == 1){
myString += lettercheck;
mycharArr = [];
let x=25;
let y=80;
for (let i=0; i<myString.length; i++){
if(x >= 560) {
x = 25;
y += 25;
}
mychar = new letter(x,y,myString[i])
mycharArr.push(mychar);
x += 15;
}
}

The next step was to make letters fall when the screen is clicked. I decided to do this by adding a boolean in letters to change to true when the screen is clicked.

function mousePressed(){
for (let i=0; i<myString.length; i++){
mycharArr[i].isfall = true;
}
}

I included BACKSPACE to delete the last input made by users, Enter to reset the position of the letters after falling, and TAB to clear the screen and reset the input by the user.

The final result is the following.


Assignment 4

My assignment is based on Generative text output. I liked the Professor’s example of text displayed in a circle and I wanted to do use images to make text (like in the example where circles are drawn as text). It was like using an exclamation mark image and displaying it for the word ‘hello’, I wanted the animation to scream ‘hello’ at the viewer!

However, when in this case, the for loop has to run for every point in the text letters. And every time I had to call the image. This made my program extremely slow and I couldn’t even type (I got really scared because the screen felt frozen).

So, I scrapped this idea and then was looking to display text in a circle and move it in a circular direction. I put my text ‘hello world’ and then divided it using the split function. The split function splits the string after the given parameter occurs. I used to rotate and translate functions to position the text to look like a triangular/star. Using speed, I made the text move. Here is what it looks like:

I saw an example on the web that used for-loop to display every letter in an array and split function as I did in mine which was also like an inspiration to do this one.
Here’s the link.

The Professor’s example of ‘circular orbit’ using sine and cosine was difficult to use here as I wanted the zig-zag pattern of ‘hello world'(it would have required me to create multiple objects and then manipulate the angles for each circle)

Overall, this was very fun to implement and tricky at certain points.


Assignment 4: Generative Text

For this assignment I began with my first iteration which just basically drew out my desired shape onto my text outline using texttopoint. I followed a similar theme from my past assignments of working with rainbow squares, just because I like to explore how I can manipulate the movement of this same shape and its random colors to make different generative art. I also played with using cosine to see how differently my rects would move when I began adding interaction

My next step was adding interaction. For this part, I mainly followed professor’s code. I changed the values so it can correspond to an outcome that I was aiming for which is to be rigid in its movements, as the rectangles on their own feel quite stiff, so I wanted the rigidness to be consistent. After manipulating the values and adding some of my own math, I ended up with this final outcome:

I ended up removing the value that causes the rectangles to move slightly, because I liked how it looked in place ( like a glitch effect). I also made my rectangles smaller since the word was fussy to look at when everything was too close to each other. I also attempted to reuse cosine in noise so that when the mouse hovers over the letters, the rectangles expand in a cool pattern.

Generative text

For this assignment I wanted to try using mathematical equations to make a cool text animation. I decided to use a sin wave because the values don’t go higher than 1 and not lower than -1 so i thought it would be a good way to make the ellipses expand and shrink continuously. Initially i tried using just the sin wave within the ellipse function to determine the size of each ellipse but then I realized that the ellipses were too small so I messed around with a bunch of different values to get an effect that I liked. I also decided to use comic sans and alternate between different shades of purple because I felt like they portray my personality. Overall I am really happy with the outcome 🙂

Week 5 Examples – Images and Sounds (& conditionals)

Images Basic (mouse over):

Sprite sheet (person) (use arrows to navigate):

Sprite sheet (running cat) (use arrows):

Short sound files (click mouse):

Looping sounds file (sounds don’t work while embedded, click link):

Conditionals