Tom Igoe’s perspectives on physical computing and interactive art present a compelling reevaluation of how creativity is often framed, particularly the expectation of producing entirely novel works. He argues persuasively for the value of revisiting and reinterpreting existing themes, thus challenging the traditional pursuit of absolute novelty in both art and technology. This approach strikes me as both practical and liberating, suggesting that innovation can flow from iteration—a continuous dialogue with established ideas—rather than emerging ex nihilo. This notion that revisiting familiar concepts can be a rich soil for personal expression and originality really resonates with me, encouraging a more inclusive and sustainable model of creative practice.
Building on Igoe’s redefined approach to creativity, his analogy of interactive art to a stage set for audience participation further deepens the dialogue about the creator-audience relationship. This model, which advocates for minimal intervention by the artist after the artwork’s initial presentation, challenges traditional notions of artistic control and opens up new possibilities for viewer engagement. Personally, I find this perspective transformative; it shifts the completion of an artwork’s meaning to the realm of audience interaction, thereby changing how art is consumed and interpreted. This democratization not only makes art more accessible but also enhances its depth by welcoming a multitude of interpretations.
For this assignment, my aim was to create a simple gamified experience that engaged the user. I used to play this intuition game with my sister where she would think of a random number and I would try to “read” her mind and guess what that number was. With context clues of how “warm” or “cold” my guess was, I would eventually be able to get to the correct answer. My circuit is effectively a realization of this in hardware form.
Implementation
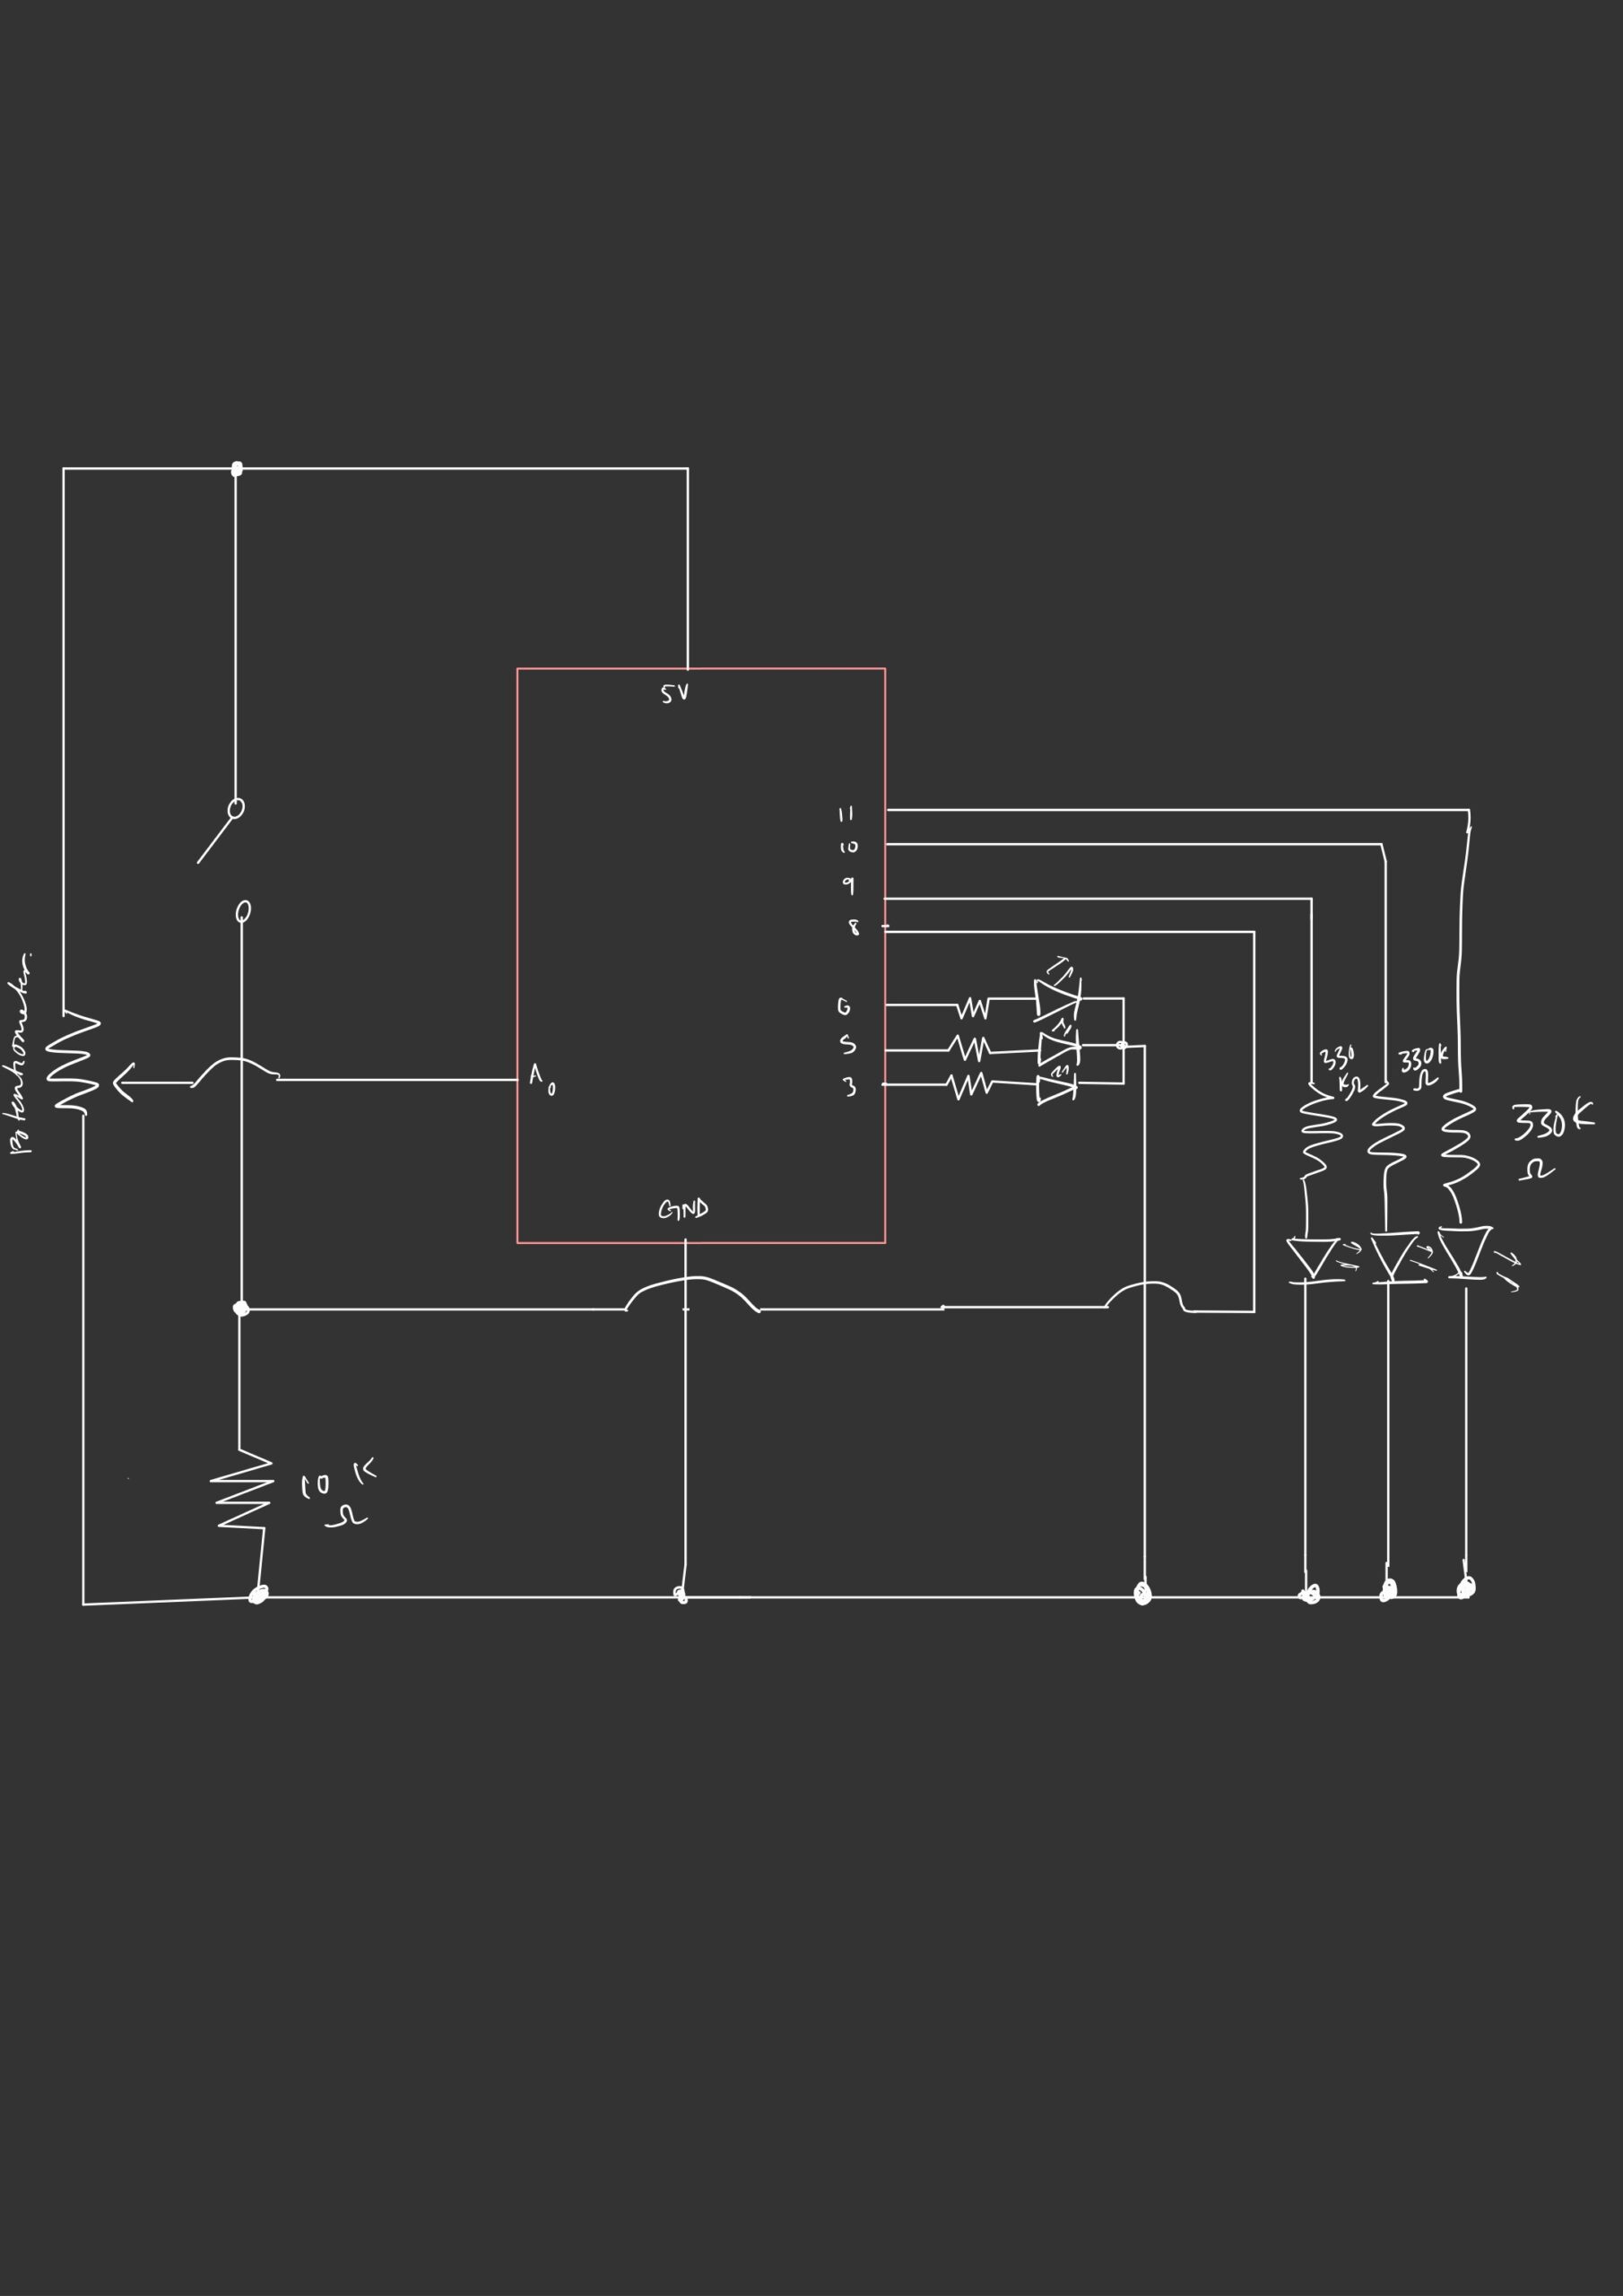
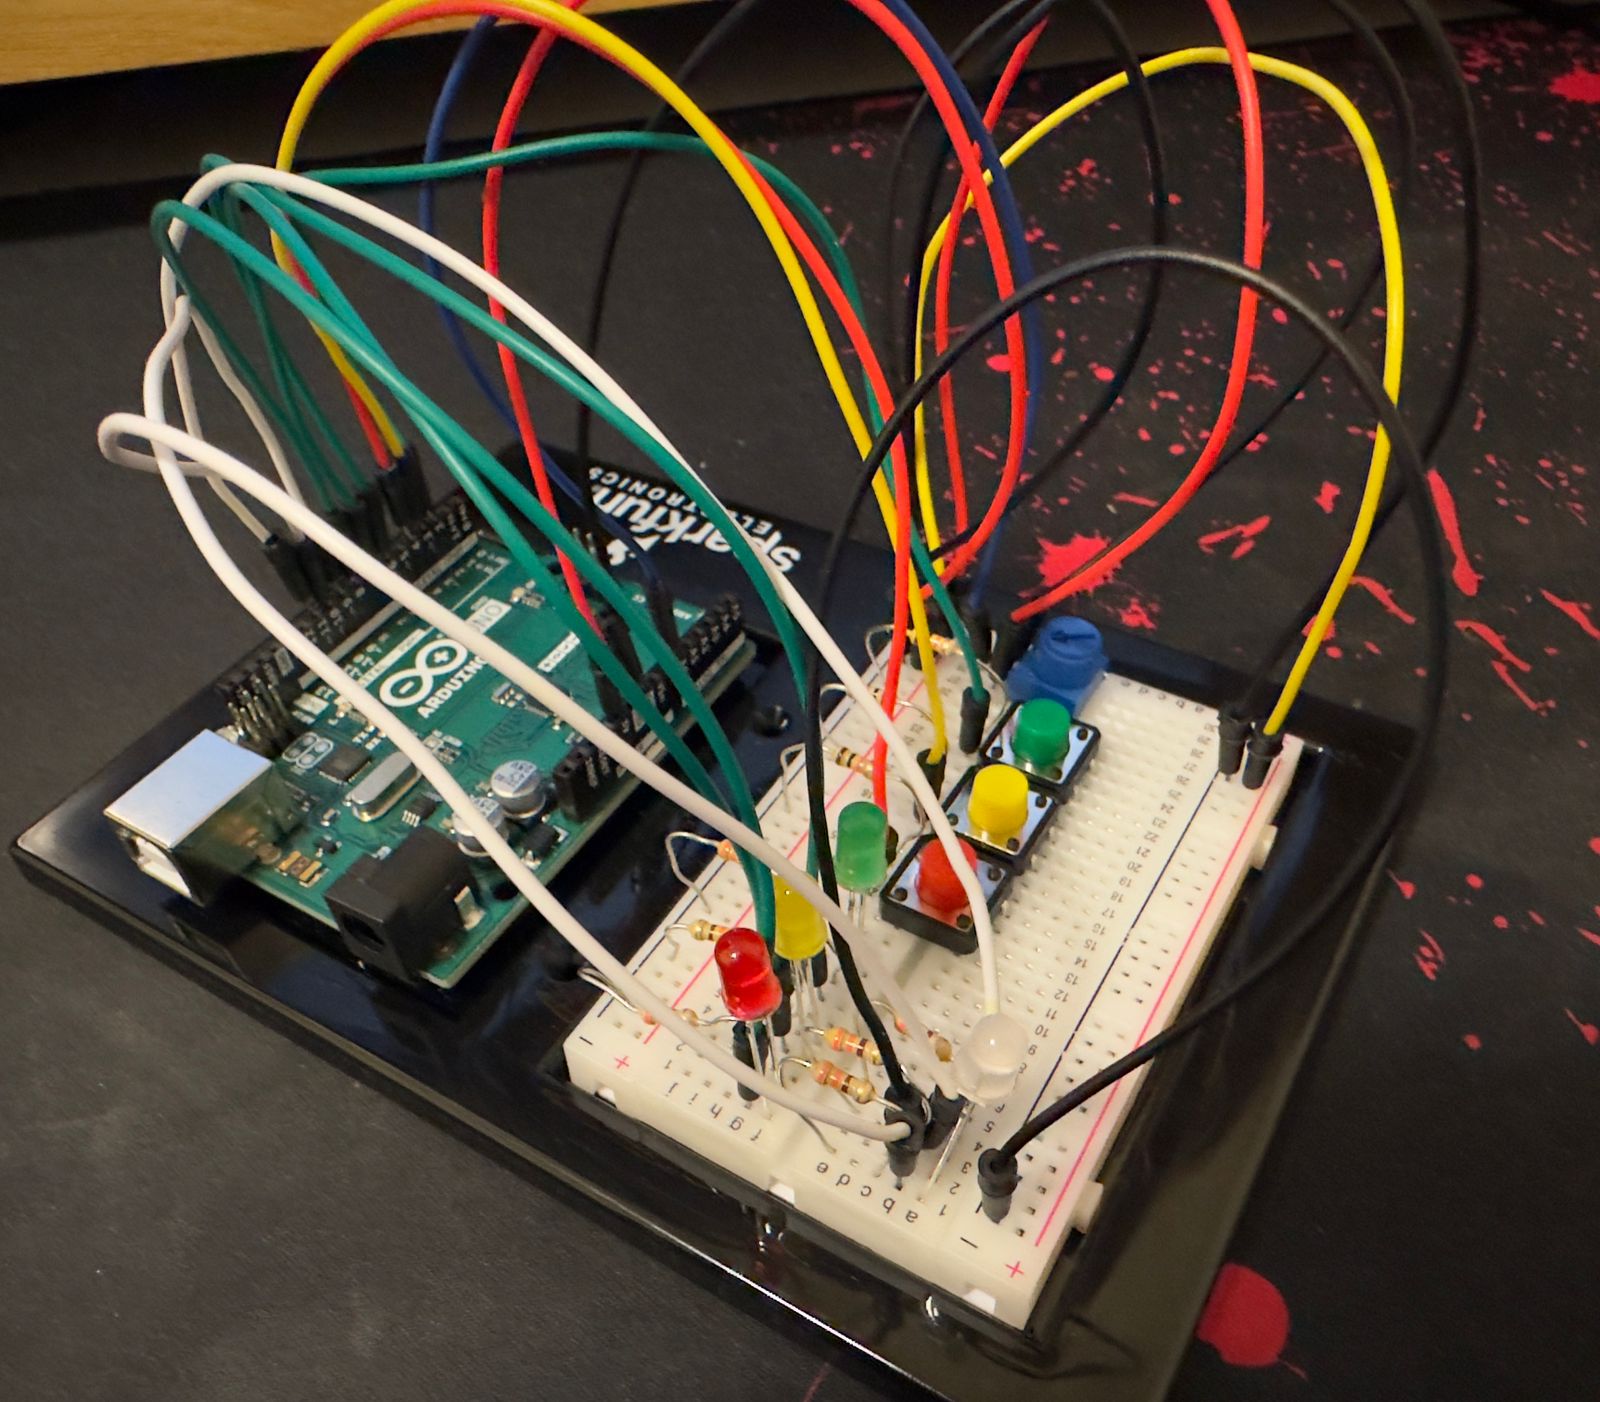
The circuit is composed of one RGB LED, three LEDs, a potentiometer, and a momentary switch. The game starts with the user pressing on the momentary switch (the digital sensor), upon which the Arduino program initializes a random number to be guessed. Upon activating the circuit, the RGB LED lights up in a pink color, indicating that the game is underway. The user then has to guess the number by using the potentiometer (the analog sensor) to find the correct value. The blue LED is lit if the current guess is far away from the correct number. The red LED lights up if the user is within a close range of the answer (±100 in my implementation). Once the number is guessed, the green LED lights up and the game is won. If the game is won, the RGB LED light show starts to celebrate the win, with different colors illuminating in succession. The user can turn off all the LEDs and restart the game using the momentary switch.
Code Snippets
The function setColor controls the color of the RGB LED in an analog fashion. This function is called when the game is started using the switch to set the color of the RGB LED to pink, and when the game is won, transitioning the RGB LED from having a static color to a dynamic light show (implementation below). The principle of blinking without delay is used to ensure the RGB LED seamlessly transitions from one color to the next and that the user is able to turn off all the lights without lags using the momentary switch.
void setColor(int redValue, int greenValue, int blueValue) {
  analogWrite(redRGBPin, redValue);
  analogWrite(greenRGBPin, greenValue);
  analogWrite(blueRGBPin, blueValue);
}
if (won && gameState){
  if (millis()>timer){
    timer = millis()+interval;
    i = (i+1)%5;
  }
  if (i == 0){
    setColor(255, 0, 0); // red
  }
  else if (i==1){
    setColor(0, 255, 0); // green
  }
  else if (i==2){
    setColor(0, 0, 255); // blue
  }
  else if (i==3){
    setColor(255, 255, 255); // white
  }
  else if (i==4){
    setColor(170, 0, 255); // purple
  }
}
The game logic occurs inside the loop function, where the potentiometer value is read and compared against the number to be guessed. The potentiometer controls which LED lights up based on its value’s distance from the correct number (blue if the guess is far away from the correct answer, red if the guess is close, and green if it is correct).
if (gameState && !won){
    setColor(227,50,121); // pink
    if (abs(pentSensorVal - randNum) == 0){ // if number is guessed correctly
      digitalWrite(greenPin, HIGH);
      digitalWrite(bluePin, LOW);
      digitalWrite(redPin, LOW);
      won = true;
    }
    else if (abs(pentSensorVal - randNum) < 100){ // getting warmer
      digitalWrite(greenPin, LOW);
      digitalWrite(bluePin, LOW);
      digitalWrite(redPin, HIGH);
    }
    else{ // you are way off
      digitalWrite(greenPin, LOW);
      digitalWrite(bluePin, HIGH);
      digitalWrite(redPin, LOW);
    }
  }
Circuit Schematic
Here’s the schematic of the wiring of the hardware components:
Demo
Reflections and Extensions
After last week’s reading, I wanted to focus more on the creative idea than the technical complexity of the hardware components. It proved to be quite challenging to think of building something creative with the input sensors and output devices that we have been using in class. I spent a lot of time ideating and the implementation portion was not as time-consuming, especially since I made sure to diagram the schematic and outline the software logic prior to wiring the circuit and connecting the Arduino. One thing that I should have anticipated, however, is how easy the game would be due to the limited directionality of the potentiometer. If you know that your guess is not correct by dialing the potentiometer all the way to the left, for example, the answer must be found by dialing it all the way to the right. To make the game a little harder, I made the trivial modification of adding a second potentiometer. The guess is considered correct if the sum of the potentiometer readings is within 50 of the number to be guessed. I increased the “warm” range from ±100 to ±500 as it was getting extremely difficult to play the game.
Admittedly, adding a second analog sensor introduced complexity that came at the expense of interpretability. It becomes harder to strategize one’s guesses, partly due to the nature of the potentiometer values being hard to track. Perhaps using a display, like an LCD, to reveal the current potentiometer values would be helpful.
This weeks readings were very interesting, not only because they served as a great inspiration for my final project but at the same time made me think more deeply about my designs and projects.
Starting of from the Physical Computing reading, I really resonated with the sentence that says that everything is already done and we can not just imagine or make something new. Those type of moments happen very often, where you think that whatever you want to invent has already been made and there is no point in copying it but we can always add a personal twist. Let’s look at some examples:
Pi’s midterm game: Has a game ever been played on an Instrument: Yes. Has a game ever been made with p5.js: A ton of them. Was Pi’s midterm projects something unique and fascinating: TOTALLY! By adding some personal elements and experiences Pi actually made a great game which he controlled by a guitar which is a huge part of his personality.
Interactive dolls and pets are mentioned, and I couldn’t stop thinking about the project from Thecla Schiphorst called Soft(n). More info bellow:https://www.sfu.ca/~tschipho/softn/index.html. The thing about this projects is so unique and it only comes from a simple concept: You hug one pillow, and another pillow gets that information and gives the feeling of being hugged to a different user.
As we can see, creativity has no limits and we can all mix match and invent something interesting as well as add a personal element to it.
As for the second reading, we are once again getting back to simple and most important PROPER Design. As the reading says, if an artist needs to talk for hours and hours explaining and introducing the users on how to use or interact with his exhibition, then he has not done a good job. A very well designed exhibition should be obvious to the users but at the same time add a level of discoverability so that the user can feel more “in-touch” or resonate with it. That is why we as artists or creators have an obligation to really think about how our users or viewers will interact with our creations and really make the process as smooth and fun as possible.
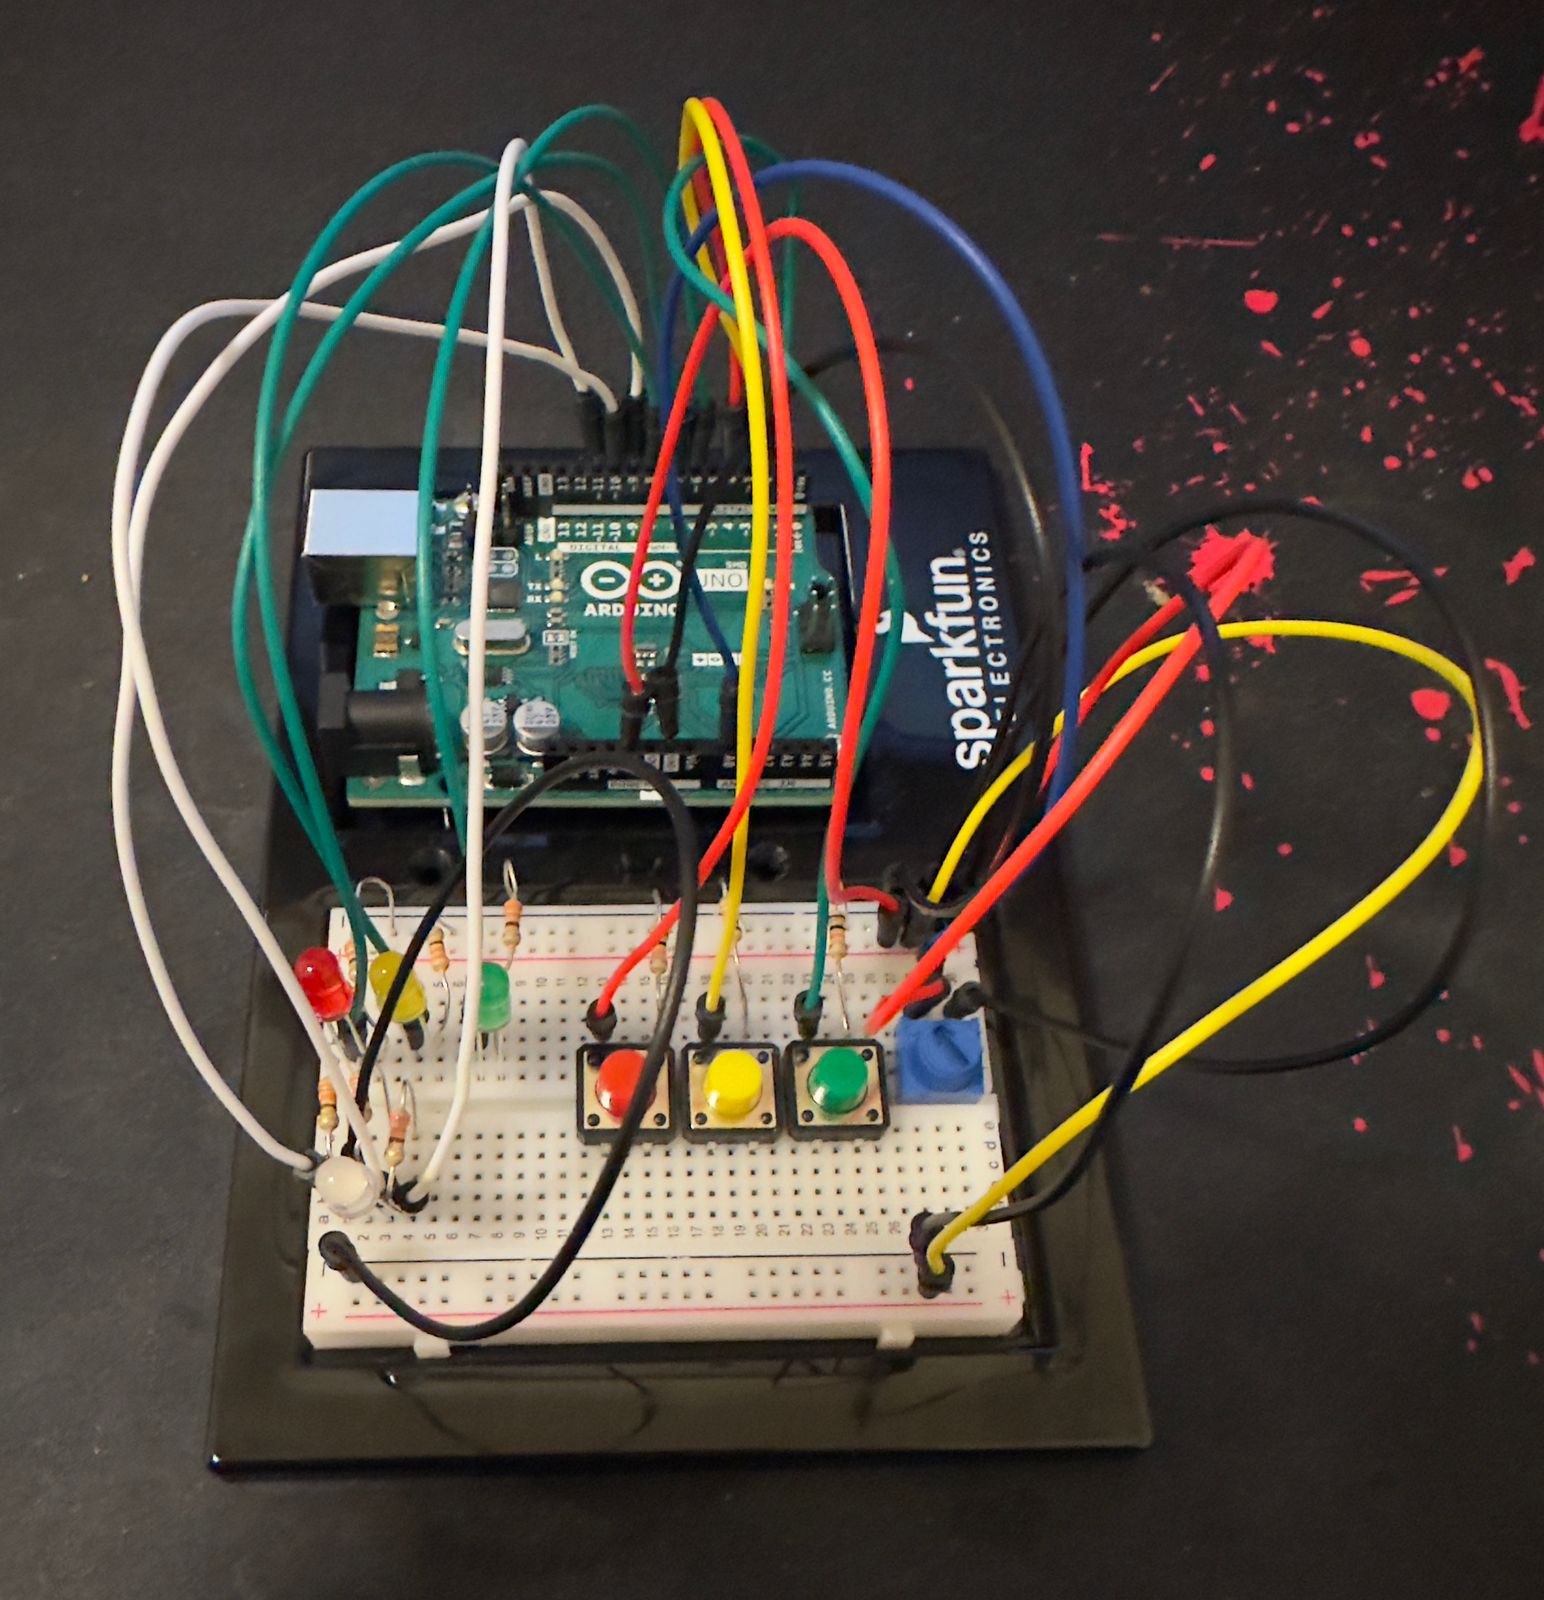
This week, I set out to blend analog and digital elements into a single creative project, leading me to design a reaction game inspired by the “reaction lights” game by Lummic I stumbled upon a few months ago. In this game, players test their reflexes by pressing a button as soon as its corresponding light turns on.
I integrated a tricolor RGB light that serves as a real-time indicator of the player’s reaction time—green signals excellent speed, blue is moderate, and red denotes a slower response. To add a twist and enhance engagement, I included a potentiometer to adjust the game’s difficulty, effectively changing the time intervals that define the three color responses. This setup not only challenges players but also gives them control over the complexity of the task, making each round adaptable and uniquely challenging.
Images
Components Used
Arduino Uno
Tricolor RGB LED
Pushbuttons (3)
Resistors:
330 ohm resistors (3)
10k ohm resistors (3)
Potentiometer
Breadboard
Jumper Wires
Circuit Setup
RGB LED
The common cathode of the RGB LED connects to the Arduino’s ground.
The red, green, and blue anodes are connected to PWM-capable digital pins (9, 10, and 11) through 330-ohm resistors to limit current.
Pushbuttons
Each button is connected to one of the digital input pins (2, 3, and 4).
The other side of each button is linked to the ground through a 10k-ohm resistor to ensure the pin reads LOW when the button is unpressed.
Potentiometer
One outer pin connects to the 5V on the Arduino, and the other to the ground. The middle wiper pin is connected to analog input A0, allowing the Arduino to read varying voltage levels as the potentiometer is adjusted.
Video
Code
void setup() {
  for (int i = 0; i < 3; i++) {
    pinMode(buttonPins[i], INPUT_PULLUP);
    pinMode(ledPins[i], OUTPUT);
  }

  // Set up RGB LED pins as outputs
  pinMode(redPin, OUTPUT);
  pinMode(greenPin, OUTPUT);
  pinMode(bluePin, OUTPUT);

  Serial.begin(9600);
}
Input pins (buttonPins): Configured with INPUT_PULLUP to use the internal pull-up resistors, ideal for buttons.
Output pins (ledPins and RGB LED pins): Set as outputs to control LEDs.
void loop() {
  int potValue = analogRead(potPin);
  // Adjust the max delay range for more sensitivity
  int maxDelay = map(potValue, 0, 1023, 5000, 2000);
  Serial.print("Potentiometer Value: ");
  Serial.print(potValue);
  Serial.print(", Max Delay (ms): ");
  Serial.println(maxDelay);

  if (!gameActive) {
    gameActive = true;
    targetLed = random(0, 3);
    digitalWrite(ledPins[targetLed], HIGH);
    startTime = millis();
    Serial.print("Game started, respond before ");
    Serial.print(maxDelay);
    Serial.println(" ms for the best score!");
  }

  if (digitalRead(buttonPins[targetLed]) == LOW) {
    // Debounce by ensuring at least 50 ms has passed
    if (millis() - startTime > 50) {
      unsigned long reactionTime = millis() - startTime;
      Serial.print("Reaction Time: ");
      Serial.println(reactionTime);

      setColorFromReactionTime(reactionTime, maxDelay);
      // Show result for 1 second
      delay(1000);
      // Turn off RGB LED
      setColor(0, 0, 0);
      digitalWrite(ledPins[targetLed], LOW);
      gameActive = false;
      delay(1000);
    }
  }
}
There are 3 main steps in the loop function:
Read Potentiometer: Determines the difficulty level by reading the potPin and mapping its value to define maxDelay, the maximum time allowed for a response.
Game Control
If gameActive is false, the game starts by picking a random LED to light up and marks the start time.
If the corresponding button is pressed (digitalRead(buttonPins[targetLed]) == LOW), it checks for debouncing (to ensure the button press is genuine) and then calculates the reaction time.
Serial Output: Outputs debug information such as potentiometer value and maximum delay time to the serial monitor.
void setColorFromReactionTime(unsigned long reactionTime, int maxDelay) {
  // Set RGB LED color based on reaction time as a fraction of maxDelay
  if (reactionTime < maxDelay / 5) {
    // Fast: Green
    setColor(0, 255, 0);
  } else if (reactionTime < maxDelay / 2) {
    // Moderate: Blue
    setColor(0, 0, 255);
  } else {
    // Slow: Red
    setColor(255, 0, 0);
  }
}
It is based on the player’s reaction time, this function sets the color of the RGB LED:
Fast Response: Less than 1/5 of maxDelay, the LED turns green.
Moderate Response: Less than 1/2 but more than 1/5 of maxDelay, it turns blue.
Slow Response: Slower than 1/2 of maxDelay, it turns red.
The main focus of Tom Igoe’s perceptive essay is the change from the artist serving as the exclusive storyteller to acting as a facilitator. Artists have historically used their creations to directly communicate a message or an emotion. On the other hand, interactive art plays a transforming function, whereby the artwork acts as a catalyst for the audience’s discovery. I like this transition as this aligns with the tenets of user experience design, which emphasize empowering users to choose their paths rather than trying to control them.
In traditional art, viewers often interpret a piece based on the artist’s description and the experience they want to show their viewers. Interactive art, however, offers a different dynamic. Each interactive piece is a canvas for numerous personal narratives, evolving with every user interaction. Here, the artwork doesn’t present a fixed story; instead, it allows for a multitude of stories to emerge, each shaped by individual interactions. The artist sets the framework, but it’s the participants who create their unique narratives through their engagement with the piece.
This is evident in modern interactive installations like “Rain Room,” where the experience of walking through a rainstorm without getting wet engages visitors in a unique conversation with the elements. I feel that the development of virtual reality environments adheres to these same principles that Igoe is proving in his argument. VR creators set the stage for experiences, but it is ultimately the users, through their actions and decisions, who navigate and mold these virtual worlds.
The text even highlighted that the user must be given hints or basic information about the interactive art piece. However, this made me ponder how the balance between guiding the audience and allowing freedom shapes the outcome of interactive art. Can there be too much or too little of either?
The review of recurrent project themes in educational settings captures the fine line between redundancy and innovation. Igoe’s encouragement for students to breathe new life into old ideas resonates with me, as it emphasizes the importance of creativity and personal expression in learning which is something that I feel strongly about. Personally, I find the discussion about the longevity and adaptability of simple projects like the Theremin and video mirrors particularly engaging. These projects, while simple, serve as a testament to the foundational skills being taught and the creativity they can unlock. The idea that a simple gesture, like moving your hand over a sensor, can create music or alter images is both magical and empowering. The section on video mirrors struck a chord with me; it’s described as the “screen-savers of physical interaction,” which is both amusing and apt. It underlines how some projects may lean more towards aesthetic value than interaction depth, but still hold significant educational value in terms of the skills they teach and their ability to engage viewers.
Moreover, Igoe’s mention of projects that have become almost iconic within the community, like the Drum Gloves and Mechanical Pixels, highlights an interesting aspect of physical computing: its blend of technology and tangible, interactive art. This intersection is where I see a lot of personal and academic growth potential, bridging the gap between technical skills and artistic expression.
“Making Interactive Art: Set the Stage, Then Shut Up and Listen”
This article also resonates with me because it champions the idea that art is not just an artist’s expression but a dynamic interaction. The artist’s role shifts from being a narrator to a facilitator who sets up the environment and then steps back to let the audience interact and derive their own meanings. The author persuasively argues against the traditional view of art as a static expression, pointing out that interactive art should be more like a conversation or a performance that evolves. The analogy of the artist as a director who does not strictly dictate but rather guides actors (or participants, in this case) allows for a genuine, emergent experience. This perspective is enlightening as it underlines the shift from passive consumption to active engagement. I appreciate Igoe’s emphasis on the importance of simplicity and clarity in setting up interactive environments. The directive to “arrange the space” thoughtfully and to “remove anything extraneous” serves as a crucial guideline for creating an immersive and intuitive experience. This approach ensures that each participant’s interaction is meaningful and personal, rather than overshadowed by the artist’s own interpretations or expectations.
Moreover, the concept of listening to how people interact with the artwork—and the notion that these interactions might change over time—adds a layer of complexity to the creation and exhibition of interactive art. It suggests that the artwork is not complete upon its initial display but continues to evolve and resonate differently as people engage with it.
In order to demonstrate both digital and analog input processing, my project uses an Arduino Uno to control two LEDs depending on input from an analog photo resistor and a digital pushbutton. The circuit consists of a pushbutton that activates the system when pressed and a photoresistor that controls the state of a red and a green LED by measuring the amount of ambient light. Pressing the button causes the system to come alive, activating a flag that maintains the LEDs’ responsiveness to light variations. The green LED shines in brighter lighting, while the red LED flashes in low light to signify darkness.
This is my code:
// Define pin numbers
const int buttonPin = 2;     // Digital pin connected to the button
const int redLEDPin = 3;     // Digital pin connected to the red LED
const int greenLEDPin = 4;   // Digital pin connected to the green LED
const int photoResistorPin = A0; // Analog pin connected to the photoresistor

bool ledsActive = false;  // State variable to keep track of LEDs' activity

void setup() {
  pinMode(buttonPin, INPUT);
  pinMode(redLEDPin, OUTPUT);
  pinMode(greenLEDPin, OUTPUT);
}

void loop() {
  int buttonState = digitalRead(buttonPin);
  int lightLevel;

  // Check if the button is pressed
  if (buttonState == HIGH) {
    ledsActive = true;  // Remember that LEDs should be active
  }

  // Control LEDs based on the 'ledsActive' state
  if (ledsActive) {
    // Read light level from the photoresistor
    lightLevel = analogRead(photoResistorPin);

    // Determine which LED to keep on based on light level
    if (lightLevel < 512) {  // Threshold for light level can be adjusted
      digitalWrite(redLEDPin, HIGH);  // Turn on red LED if dark
      digitalWrite(greenLEDPin, LOW); // Turn off green LED
    } else {
      digitalWrite(redLEDPin, LOW);   // Turn off red LED if bright
      digitalWrite(greenLEDPin, HIGH); // Turn on green LED
    }
  } else {
    // Turn off both LEDs if the LEDs should not be active
    digitalWrite(redLEDPin, LOW);
    digitalWrite(greenLEDPin, LOW);
  }
}
And this is the setup of my Arduino:
I really enjoyed playing around with the photoresistor in this project and seeing how variations in the surrounding light dynamically affected the LEDs’ behavior, providing a concrete example of how electronic components interact with their surroundings. In addition to adding another level of interest, this investigation into light sensitivity helped me gain a deeper comprehension of analog sensors. Nevertheless, I did struggle with a couple of things. At first, I had trouble wiring the circuit correctly and dealing with connections that were wrongly placed in incorrect places on the breadboard. Even though they were annoying, these errors taught me a great deal about circuit design and debugging and made me realize how important it is to pay close attention to detail when working with electronics.
Please view the video to visualize how my project works:
“Physical Computing Greatist Hits and (misses)” is a compilation of recurrent physical computing themes that are popular and integrated into many projects. Reading this article at this stage in the class was important for me as I contemplated the range of things one could do with a simple Arduino kit. I do indeed find myself quite compelled to ditch ideas that used common physical interaction principles because they were simply too common. Instead of thinking of the novel ways one could use an input to a sensor, I frequently found myself looking for the least used sensor to incorporate in my future projects. I realize now, after reading the article, that it is more important what one does with input from a human interaction, rather than focusing on the complexity of the circuitry or the parts used. It also allowed me to see the various ways in which one could combine different themes together to create original work (e.g. video mirrors and mechanical movements in Soyoung Park’s Waves of Leaves).
“Making Interactive Art: Set the Stage, Then Shut Up and Listen” establishes a necessary shift of perspective for those who are designing human-computer interactive pieces. As someone who grew up dabbling in artistic projects, from composing poetry in my journal to oil landscape paintings and abstract multi-media pieces to adorn the walls of my room, I reflect on the prescriptive nature of those early artworks. It centered me, the artist, in the meaning-making process of the art. My central focus in making them was that those who came into contact with them were able to easily discern what I wanted them to discern. Designing interactive art, however, involves the ability to make space for the audience to insert themselves into the piece. The trick lies in designing a piece that is effectively able to accommodate all the different reactions it garners. This involves being able to predict people’s possible responses, perhaps aided by some process of user testing, and planning accordingly. Providing users with precisely the minimum amount of guiding context that affords them a sense of agency that operates within the predefined parameters the piece was designed to accommodate is truly an art that is worth mastering.
I’ve always had this theory that if aliens ever visited Earth 👽, they’d mistake our art galleries for some silent, sacred worship spaces. I mean, where else will you find humans voluntarily hushed, tiptoeing about like they’re scared of disturbing the air itself?
Then I read the article by Tom Igoe, “Making Interactive Art: Set the Stage, Then Shut Up and Listen,” and it actually made me totally reconsider my previously formed opinion but from another point of view. Maybe our future cosmic friends would understand that in the quietude of an art space, there’s a loud, unspoken conversation between human and creation. And that’s precisely what Igoe is advocating for – an unscripted, raw dialogue where the artwork doesn’t just speak but listens too.
In “Making Interactive Art: Set the Stage, Then Shut Up and Listen,” Igoe takes a poke at would-be über-ambitious creators who helicopter-parent their creations. I can’t help smiling at his blunt advice not to interpret your own work.
It sounds very much as if one would tell a parent, “Yeah, you gave birth to it, but don’t you dare tell it what to be!” 😂
What an interesting notion, as I have to do the complete opposite more often than not in my professional life as a computer engineer: spoon-feeding users about what to do with my creation. I once preached in the IM class on exactly that, remember? “If an app needs a manual, you’ve done it wrong.” Yes. That point Tom made about the art being “a conversation,” not a monologue, is a beauty. You don’t dictate; you just help guide the process.
Now, moving on to “Physical Computing’s Greatest Hits (and misses),” it was really hard not to chuckle at the analogy Igoe is trying to make of evergreen themes of projects and how they could be recycled.
It’s like that old joke about there being only seven original plots in all of literature 😂 (Yes, there are only seven types of stories in the world, according to some) . Sure, we’ve seen a hundred theremin-like instruments or video mirrors, but it’s the individual spin—that touch of personal madness—that makes them fresh and edgy. It’s like cooking; the same stuff can come up with many different flavors. And, as a computer engineer, I’ve seen too many cliché tech implementations. This idea is literally a breath of fresh air.
What really floats my boat, and tickles my pickles in this article is that Igoe gives a subtle nod toward the creative process.Even in the most clichéd themes, there’s a window for innovation. This is somewhat comforting, especially when one has to look at yet another “innovative” app idea that feels like déjà vu. This makes me think that maybe it’s not what you build but how you spin it.
In both articles, Igoe offers insightful perspectives on art and interactivity that echo many of my own beliefs. As creators, our job is not to impose but to propose. We set the stage, provide the tools, and in the most beautiful act of humility, we step back and let the symphony of interaction play. In that symphony is learning, growth—a perennial scope of innovation. Time to make more systems, in art and technology, that don’t just talk at us, but with us.
Because the best kind of conversation isn’t the one in which you’re the only one speaking.
I found both articles very interesting and it was fun reading both, maybe that was partly because they were written by the same person. In any case, starting with the “shut up, and listen” article; I have always found the interpretation of art to be a tricky subject. Mainly because I don’t believe that many of the interpretations that people see in the artwork were thought up by the artist him or herself. Often I get annoyed by some of the interpretations that people come up with since I feel it is so far from the original art but recently that has been less the case. The reason is, and also this is what I kept thinking about while reading the article, is that I have recently begun to think of art being able to stand on its own. What do I mean by that? Well, I mean that an artist isn’t really the creator of the artwork, but rather he is more a spectator. I say this because of one main reason (there are others but I can’t describe or explain it in detail and with clarity), an artist does not really come up with the idea of the artwork out of nowhere, he can say what “inspired” him but I believe inspiration are only things that resemble the idea not that the inspiration was the source of the idea. In thinking about this I searched to see if there were any quotes or artists that were quoted as saying something that fits/resembles my opinion.
“I saw the angel in the marble and carved until I set him free.” – Michelangelo
“I never know what I’m going to put on the canvas. The canvas paints itself. I’m just the middleman.” – Peter Max
Of course not every artist or person is of the same opinion, but had it not been for the article I just read I would have never thought deeply about this.
As for the other article; I didn’t have thoughts or ideas that were as philosophical. As I was reading I realized that this article would be a great help for when we make the musical instruments using the Arduino’s after the Eid break. I also thought of how facial recognition could be used nowadays. Since the article was made in 2012 facial recognition was not nearly as advanced or reliable so the closest thing to that was the video tracking and the other things that were mentioned. Just something to think about.