You can visit my project titled “3 rooms” by clicking this link: https://editor.p5js.org/iremnaz/full/aFq48HNIB
or
Project Background:
This project is a visual, auditory, and interactive experience that hopes to include the user through interactivity allowed only in limited ways. The level of involvement and “the representation” of the user slowly recedes, only to be established somewhat at the end. The experience hopes to be enjoyable, surprising, disorienting, and thought-provoking.
Each room is chosen and designed after many trials and errors, as there is no set way of looking and behaving for each room, except for the feelings it should be awakening.
The Workings Of It:
Prior to each room, the instructions of what you can do is explicitly given.
For room 1 you can use the arrow keys.
For room 2 you can use the mouse to Click only on the decided sections of the screen.
For room 3 you can only press the ENTER key.
The user is able to proceed using the W key between information pages, but can never go back or exit the experience. These were conscious choices.
Things That Work and Do Not Work:
Room 1 definitely turned out well, as I especially love the colors, movements, and songs inside it.
Room 2 feels like there is room for improvements, purely by using self-created and themed artwork instead of outsourcing from royalty-free pieces. I have the feeling that experience in room 2 has more room for improvement.
Room 3 was especially meaningful for me. I feel like I did all of this project to actually be able to make room 3. It also, as a theme, holds a lot of meaning for me, and I totally enjoyed making it.
Code Snippets:
The code for the sketch runner is as follows:
Codes for rooms are not given here as there are nearly 800+ code lines. Please check them out in the p5.js sketch.
let roomChoice = 0;
let tintB=255;

//preloading the necessary images and sounds
function preload() {
  sound1 = loadSound("myMusic.mp3");
  imgT = loadImage("myTrees.png");
  ph2 = loadImage("mount.png");
  ph3 = loadImage("cliff.png");
  img1 = loadImage("1.jpg");
  img2 = loadImage("2.jpg");
  img3 = loadImage("3.jpg");
  img4 = loadImage("4.jpg");
  img5 = loadImage("5.jpg");
  img6 = loadImage("6.jpg");
  sound = createAudio("chatter.mp3");
}

//setting up with the canvas size
function setup() {
  createCanvas(400, 400);
  setRoom2();
  img = img1;
}

//the room selection menu is follows in draw
function draw() {
  switch (roomChoice) {
    case 0:
      main();
      break;
    case 1:
      preRoom1();
      break;
    case 2:
      ready1();
      break;
    case 3:
      situation1 = runRoom1();
      if (situation1 == true) {
        roomChoice = 4;
      }
      break;
    case 4:
      preRoom2();
      break;
    case 5:
      ready2();
      break;
    case 6:
      situation3 = runRoom2();
      if (situation3 == true) {
        roomChoice = 7;
      }
      break;
    case 7:
      preRoom3();
      break;
    case 8:
      ready3();
      break;
    case 9:
      runRoom3();
      break;
  }
}

//this is the main room (intro room)
//setsup the initial aura
function main() {
  stroke(255);
  strokeWeight(1);
  background(0);
  fill(255);
  textFont("Georgia", 15);
  text("Welcome to the experience!", 5, height / 10);
  text("This is you:", 5, (2 * height) / 10);
  hello = new user1(width / 2, height / 2);
  hello.draw();
  text("You will be experiencing 3 rooms.", 5, (8 * height) / 10);
  text("Press W to proceed.", 5, (9 * height) / 10);
  boundary1();
  if(tintB>0){
  background(0,tintB);
  tintB-=1;}
}

//just before the room 1 opens this is the last time
//to take breather, press 2 to proceed
function ready1() {
  stroke(255);
  strokeWeight(1);
  background(0);
  fill(255);
  textFont("Georgia", 15);
  text("Are you ready?", width / 2 - 50, (1.5 * height) / 10);
  text("Press W to proceed.", width / 2 - 65, (9 * height) / 10);
  hello = new user1(width / 2, height / 2);
  hello.draw();
  boundary1();
}

//are you ready page before room 2 resumes
function ready2() {
  stroke(255);
  strokeWeight(1);
  background(0);
  fill(255);
  textFont("Georgia", 15);
  text("Are you ready?", width / 2 - 50, (1.5 * height) / 10);
  text("Press W to proceed.", width / 2 - 65, (9 * height) / 10);
  hello = new user1(width / 2, height / 2);
  hello.draw();
}

//are you ready page before room 3 resumes
function ready3() {
  stroke(255);
  strokeWeight(1);
  background(0);
  fill(255);
  textFont("Georgia", 15);
  text("Are you ready?", width / 2 - 50, (1.5 * height) / 10);
  text("Press W to proceed.", width / 2 - 65, (9 * height) / 10);
}

//this is the page where instructions for room 1 is given
function preRoom1() {
  stroke(255);
  strokeWeight(1);
  background(0);
  fill(255);
  textFont("Georgia", 50);
  text("Room 1", 5, height / 10);
  textFont("Georgia", 15);
  text("Yellow line is your boundary.", 150, (3 * height) / 10);
  text("You exist, within it.", 7, (4.5 * height) / 10);
  text(
    "Experience room 1 by using the 4 arrow keys to move.",
    10,
    (6 * height) / 10
  );
  text(
    "Don't forget to dance, even if you don't want to.",
    30,
    (7.5 * height) / 10
  );
  text("even if you are lonely.", (2.5 * width) / 4, (8 * height) / 10);
  textFont("Georgia", 20);
  text("We are all happy here.", (1.2 * width) / 4, (8.8 * height) / 10);
  textFont("Georgia", 15);
  text("Press W to proceed to room 1.", 60, (9.5 * height) / 10);
}

//this is where instructions for room 2 is given
function preRoom2() {
  stroke(255);
  strokeWeight(1);
  background(0);
  fill(255);
  textFont("Georgia", 50);
  text("Room 2", 5, height / 10);
  textFont("Georgia", 15);
  text("You ONLY exist inside the yellow boundary.", 100, (3 * height) / 10);
  text(
    "When you click while you exist, you give life to the plant.",
    5,
    (4.5 * height) / 10
  );
  text("Experience room 2 by giving life to the plant.", 80, (6 * height) / 10);
  text(
    "When you click, you give love. You show effort.",
    5,
    (6.8 * height) / 10
  );
   text(
    "You have to show effort until you can move on.",
    70,
    (7.5 * height) / 10
  );
  textFont("Georgia", 20);
  text(
    "Is your love enough to grow the plant?",
    (0.4 * width) / 4,
    (8.5 * height) / 10
  );
  textFont("Georgia", 15);
  text("Press W to proceed to room 2.", (2 * width) / 4, (9.5 * height) / 10);
}

//this is where instructions for room 3 are given
function preRoom3() {
  stroke(255);
  strokeWeight(1);
  background(0);
  fill(255);
  textFont("Georgia", 50);
  text("Room 3", 5, height / 10);
  textFont("Georgia", 15);
  text("You DON'T exist.", 150, (2.5 * height) / 10);
  text("Until you are welcome here.", 7, (4 * height) / 10);
  textFont("Georgia", 20);
  text("Until you feel welcome here.", (1.5 * width) / 4, (5 * height) / 10);
  textFont("Georgia", 15);
  text("When you don't, everything looks foreign.", 30, (6 * height) / 10);
  text("Gather your courage and talk.", (2 * width) / 4, (7 * height) / 10);
  text("You talk when you PRESS on it. When you are ready.", 30, (7.8 * height) / 10);
  text(
    "Experience room 3 by pressing the ENTER key.",
    (0.2 * width) / 4,
    (8.8 * height) / 10
  );
  text("Press W to proceed to room 3.", (2 * width) / 4, (9.5 * height) / 10);
}

//this takes the keyboardinformation to change between
//loading pages as well as the in-room movements
function keyPressed() {
  if (keyCode == ENTER) {
    counter = 0;
  }
  if (keyCode == 87 && roomChoice!=3 && roomChoice!=6) {
    roomChoice++;
    if (roomChoice == 3) setRoom1();
    if (roomChoice == 9) setRoom3();
    if (roomChoice == 10){tintB=255; roomChoice=0;}
  }
}
Reflections:
This midterm project really pushed me out of my comfort zone as I was confronted by artistic and built issues at the same time.
Per artistic issues, I feel that the way I have designed the introductory pages, the theme of the user icon with a ring around, as well as the themes in each room were kind of struggling to come through the other users. This was something I have realized both in my friends as well as classmates. In order to solve this, I did try to reorganize my introductory pages, and have the “Are you ready” pages stay until the user wishes to continue. These pages were where the difference in the user icon was explicitly shown different, and these pages were previously timed so that there were not enough time to grasp differences. However, I can see that even after making changes, the same issues persist to some degree. I think that by changing the design and flow of these intermediary stages between rooms, the experience can be improved. This is something that I definitely should focus on.
Per coding issues, I feel that each room was a struggle to make it work. Especially room 1, it was hard to figure out the pattern changes, their succession, and the user icon interaction with its environment. As there were many loops that are ongoing at the first part, we can see the icon motions lagging. Moreover, it was a lot of trial and error to have a feel for when to have the patterns change according to the song. Similarly, for room 2 sprites were quite the issue as they were not made in equal gaps, so I had to manually try and crop them. There was also a lot of trial and error in their placement in the sketch and the way they are cropped. In room 2, choosing any of the images was quite hard due to their processing but more importantly how they looked together. Room 3 was quite simple and straight forward in terms of the coding part, but figuring out the lines to be printed on the scene was quite hard.
I believe when I look at my journey overall, figuring out the storyline in each room, and the overall cohesion has been quite hard. Even after finishing the project, I can see that there is room for growth. I think an approach to figuring out this issue would be writing down the storyline on paper and seeing how it feels, instead of running the project over and over again.
Overall, I enjoyed making this project very much. However, it was definitely time-consuming as it pushed my creative and coding boundaries during the each stage. I feel excited to come back to this project and let it grow in the future.

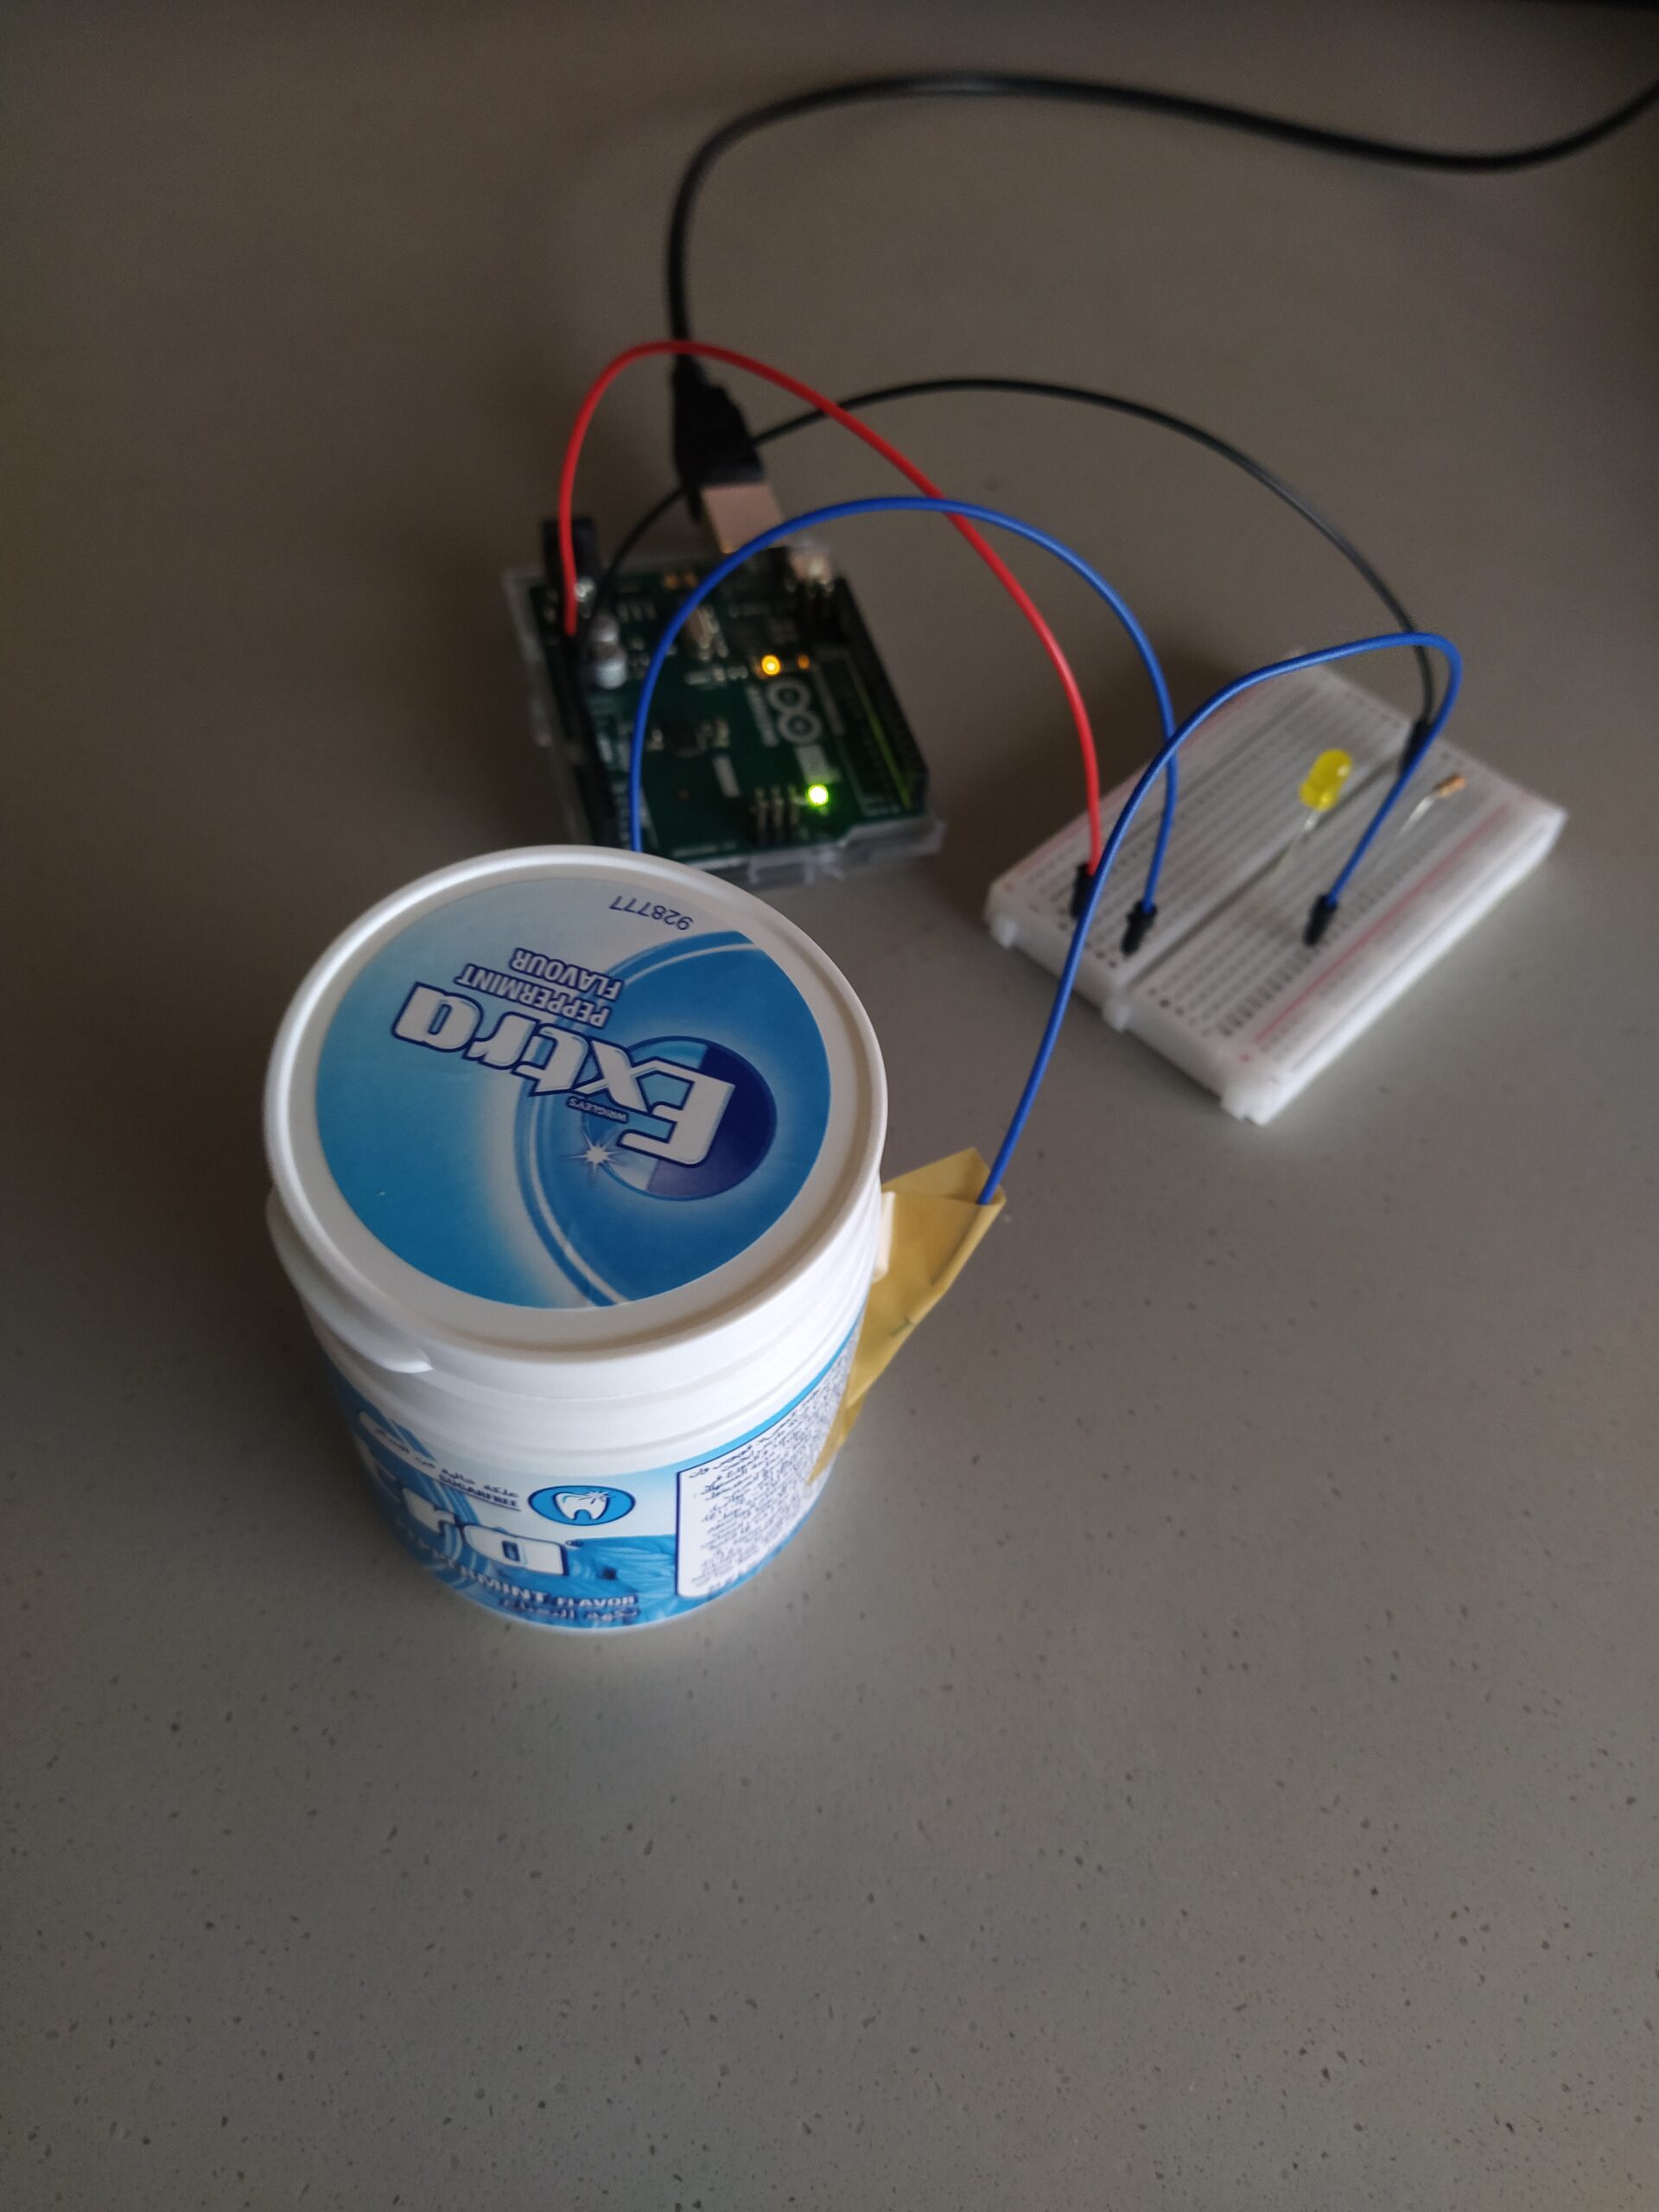
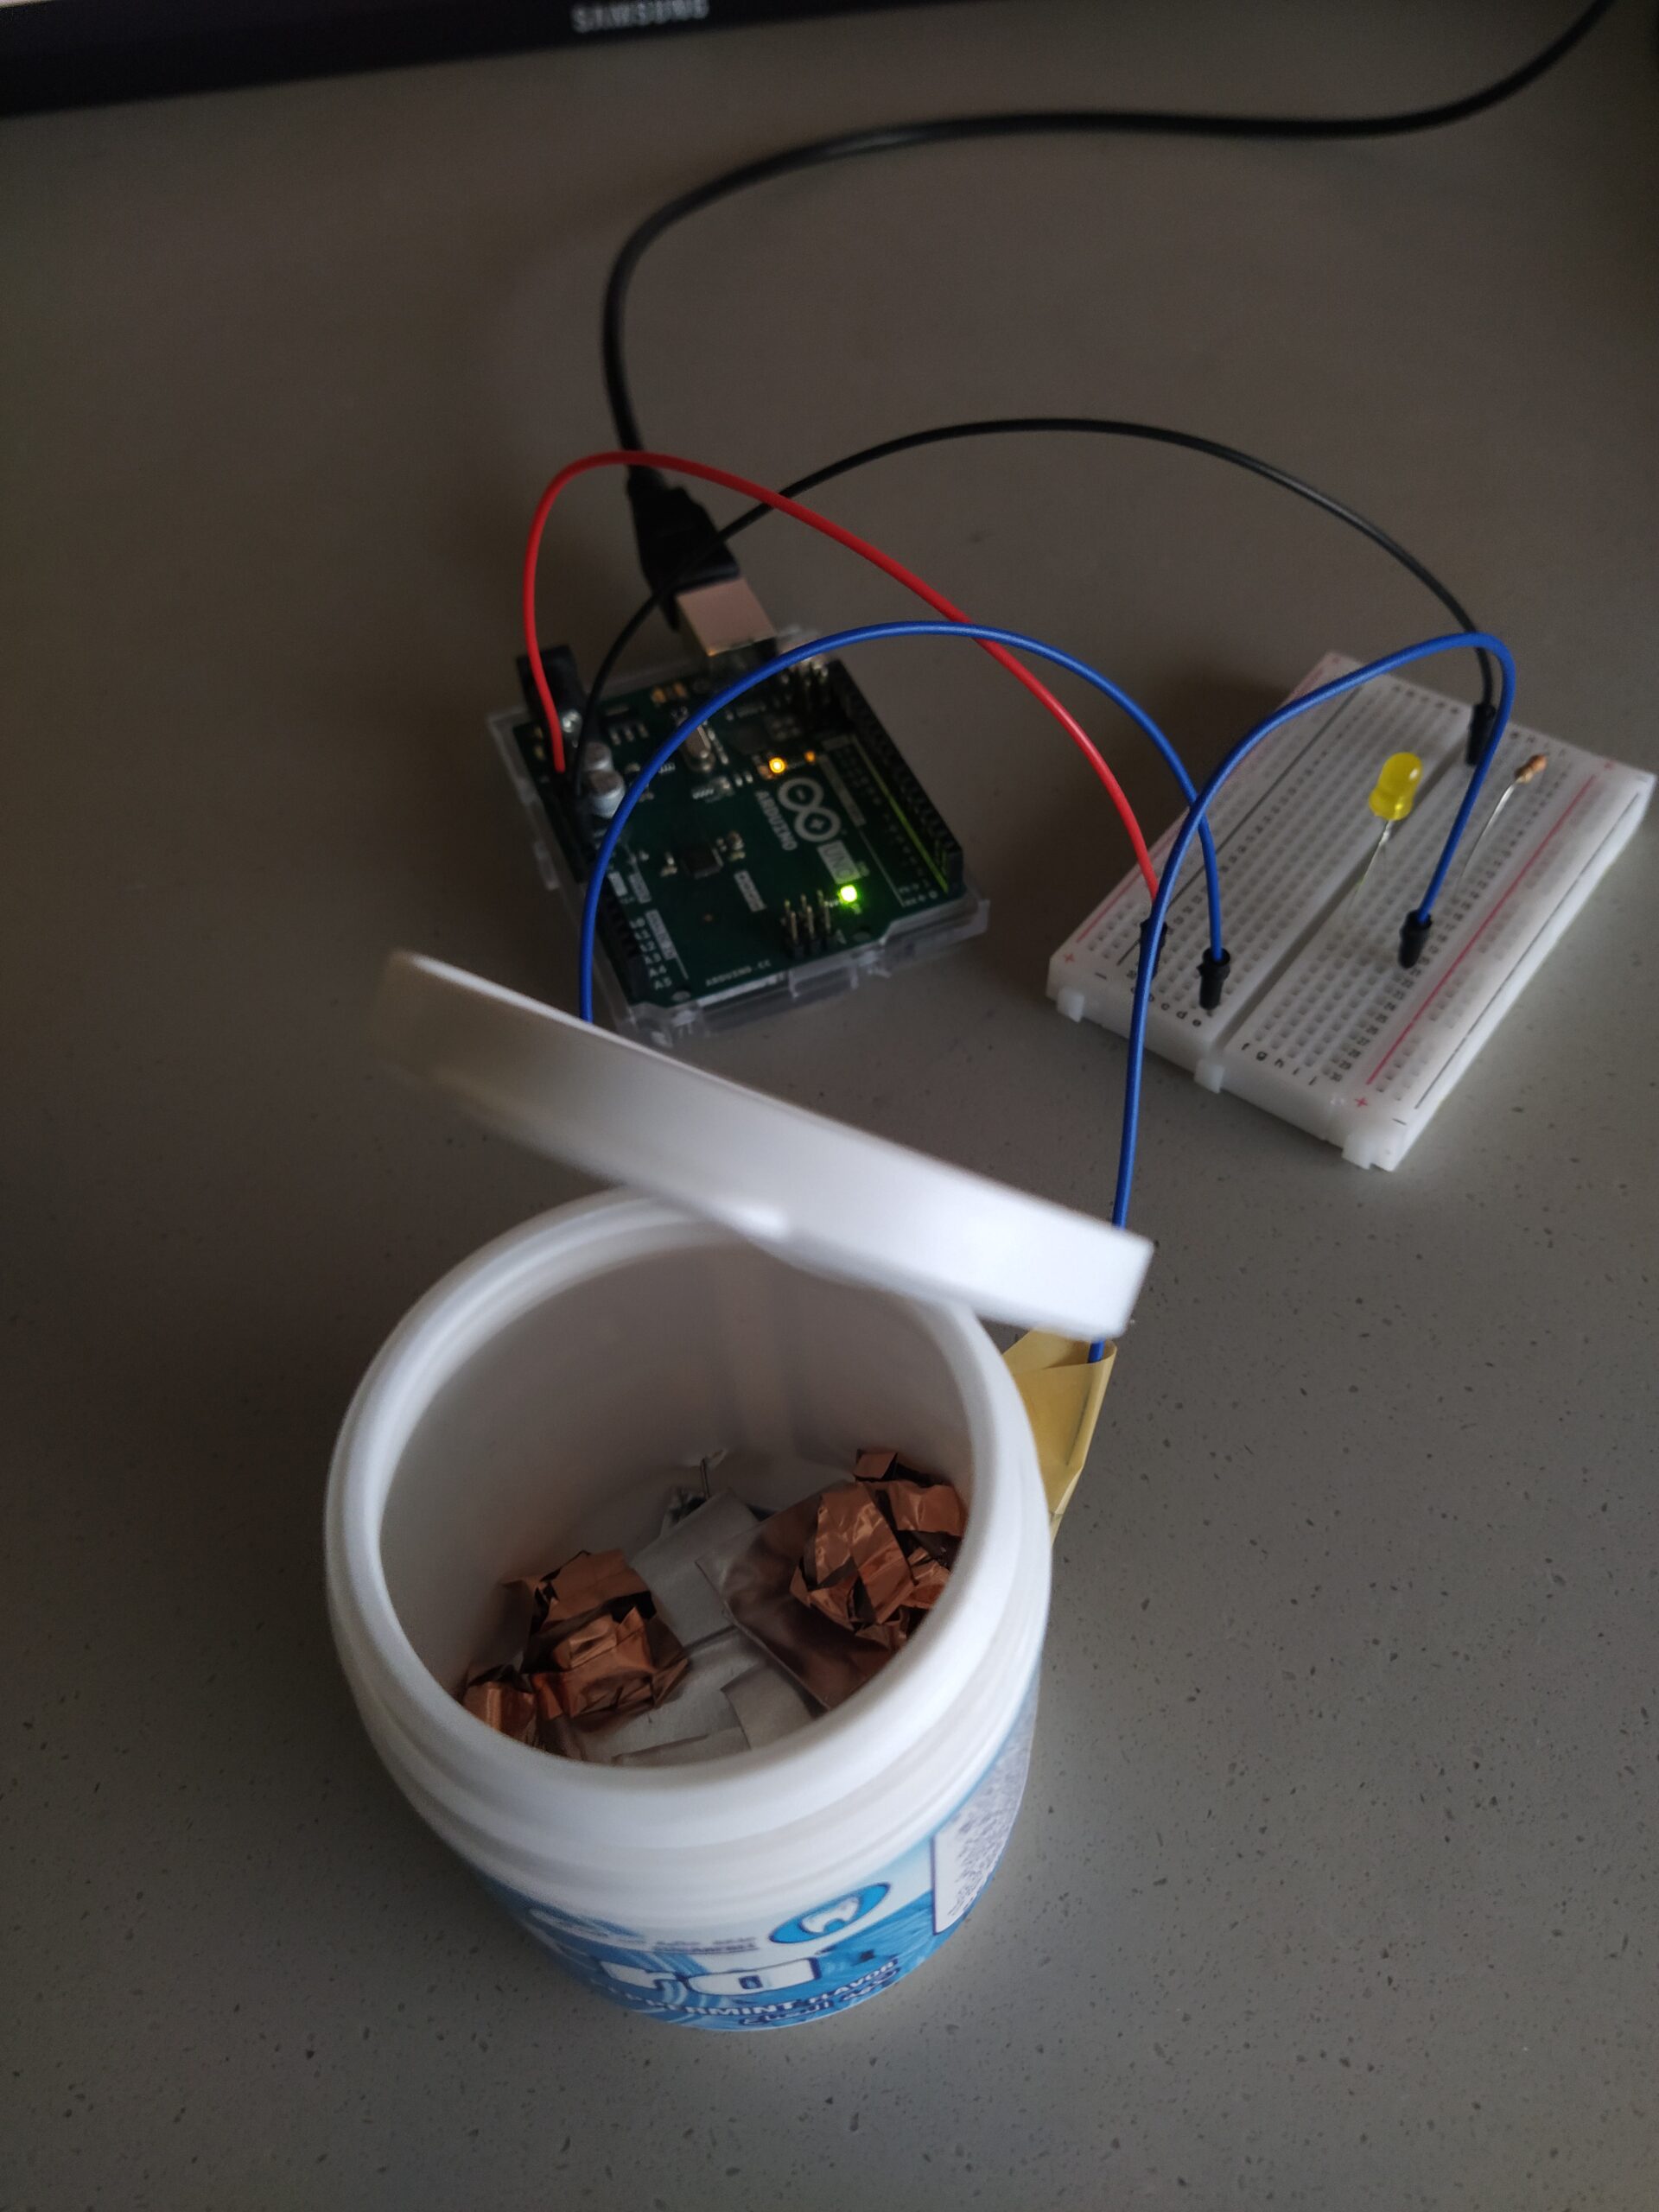
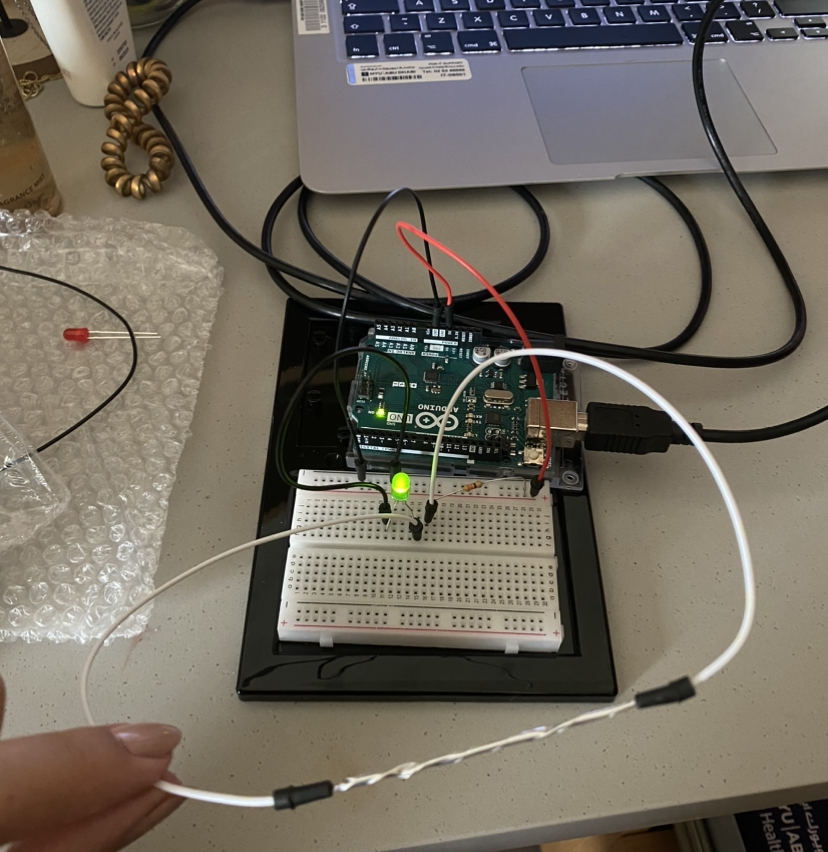 Step 1
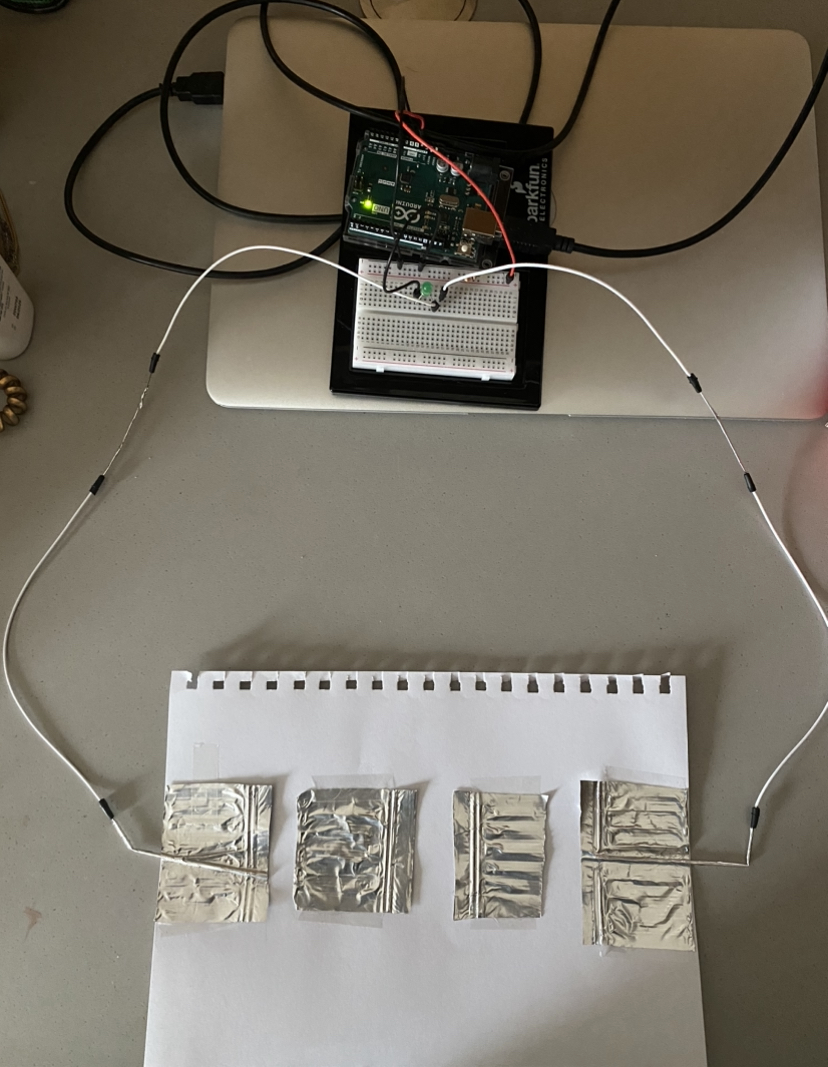 Step 2
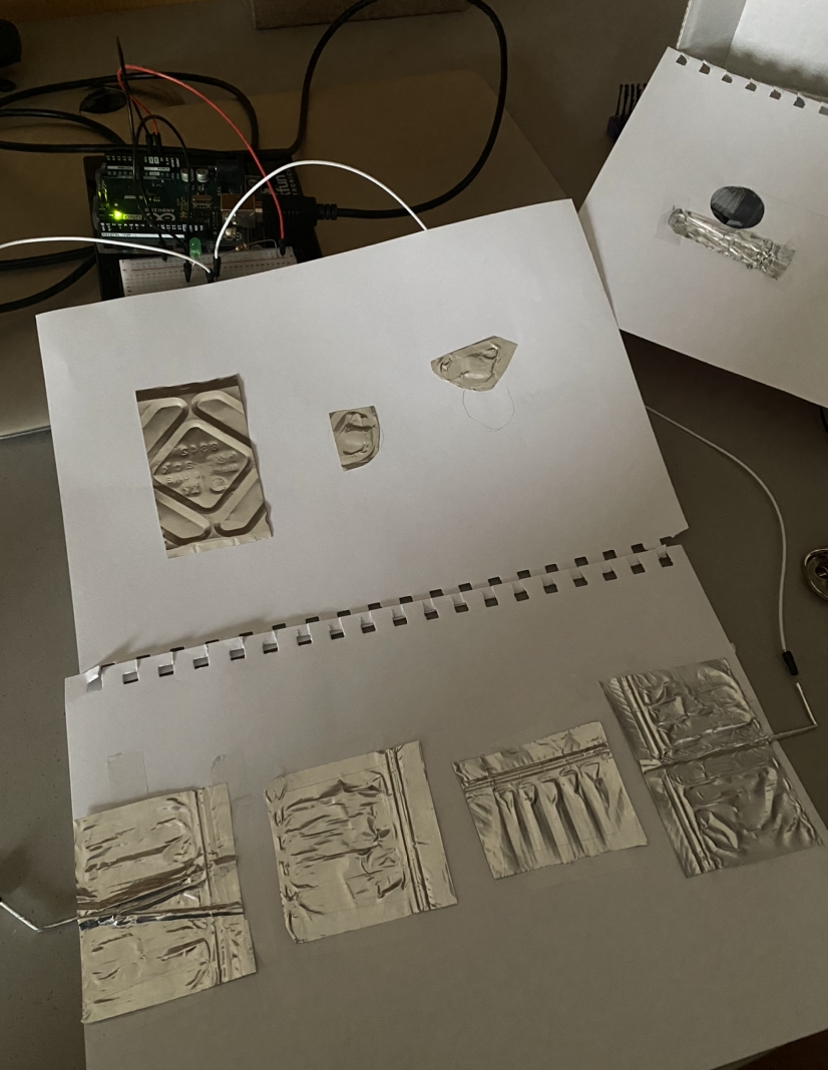 Step 3
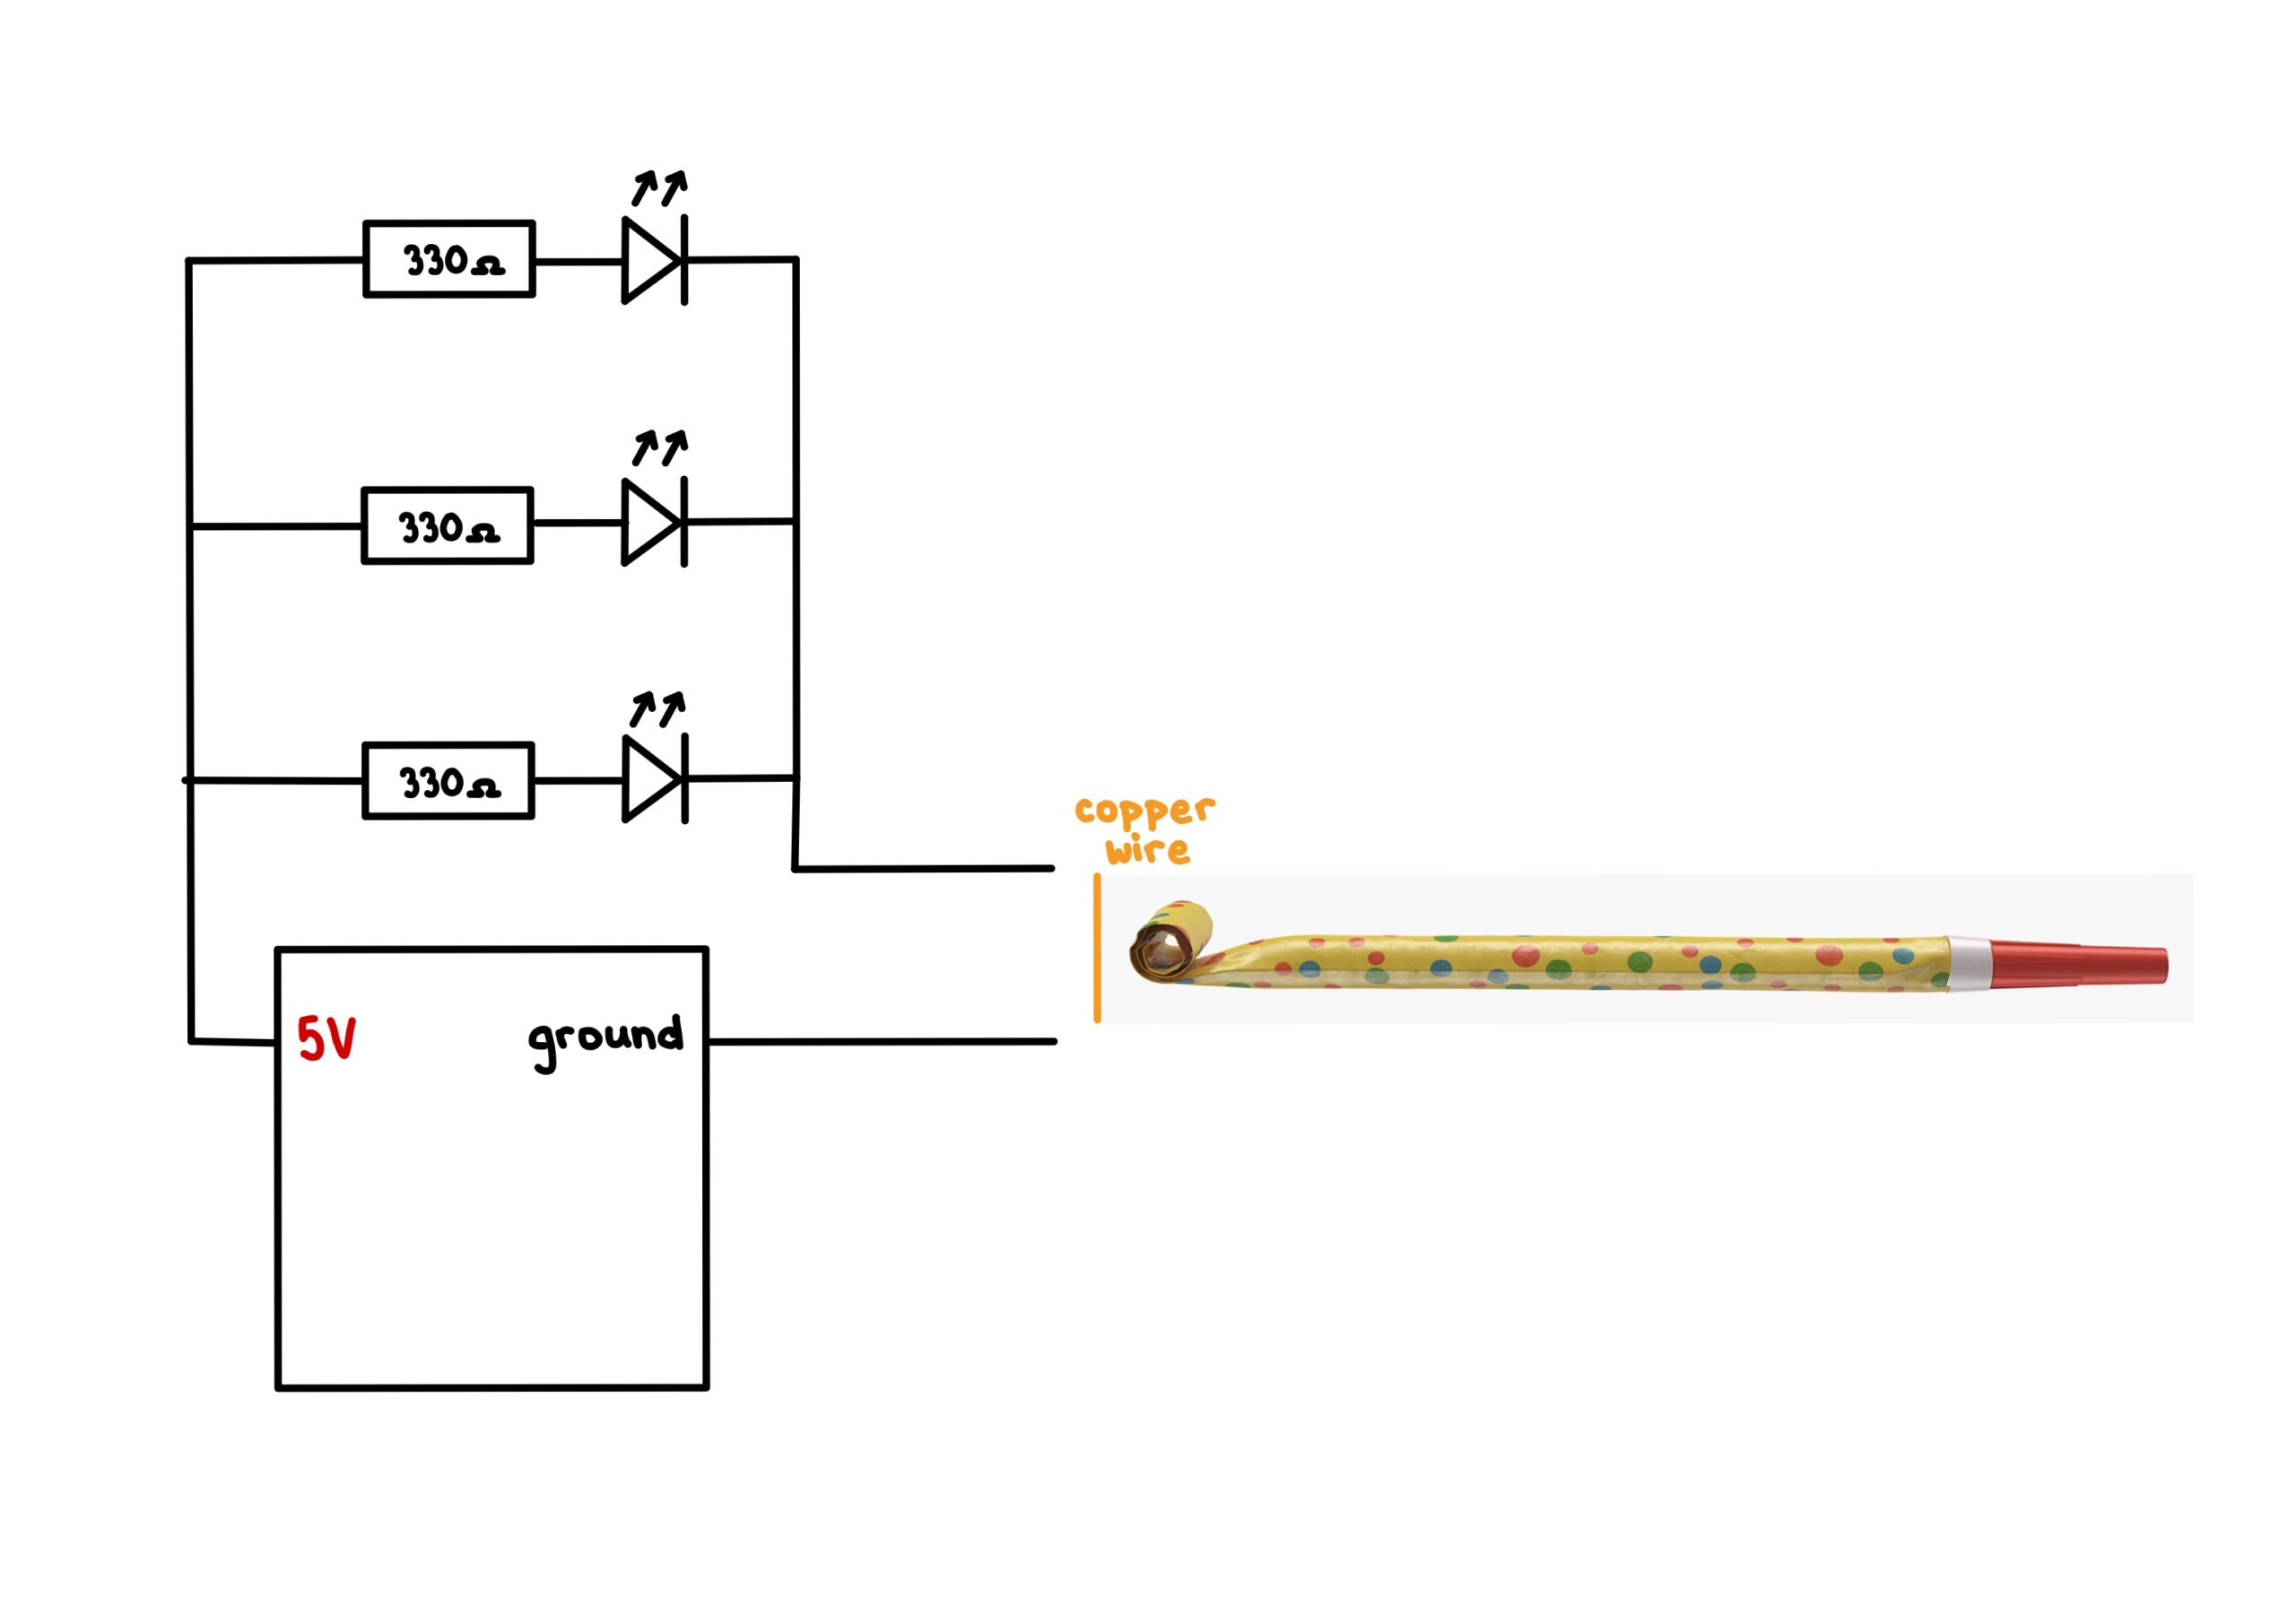
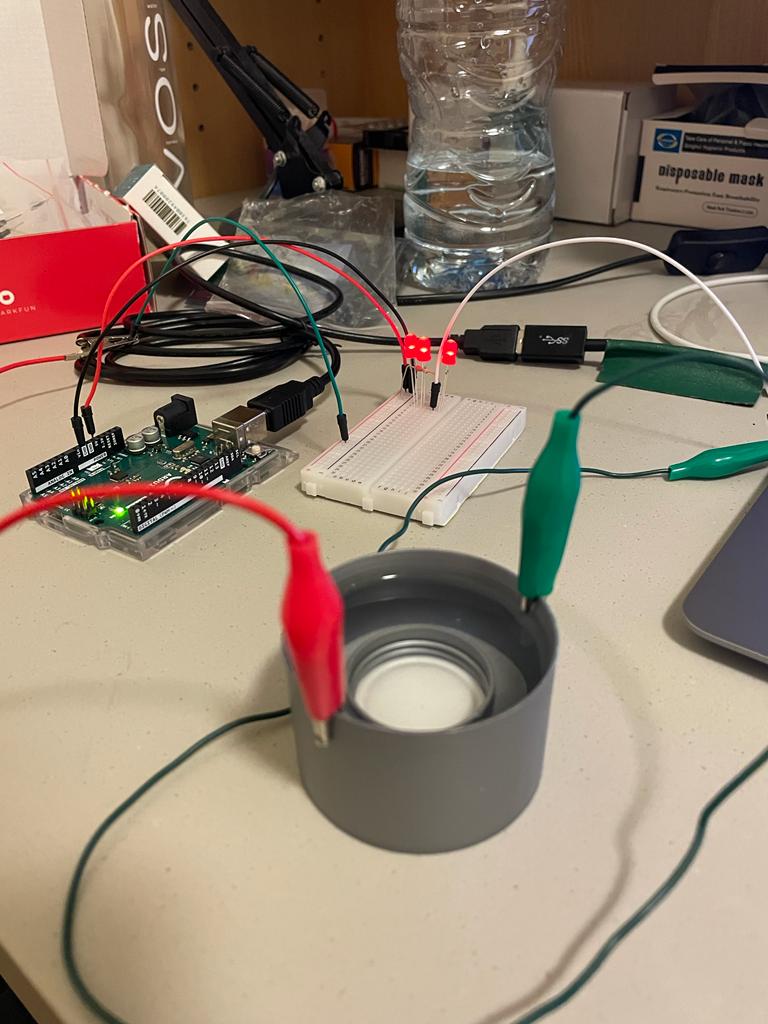
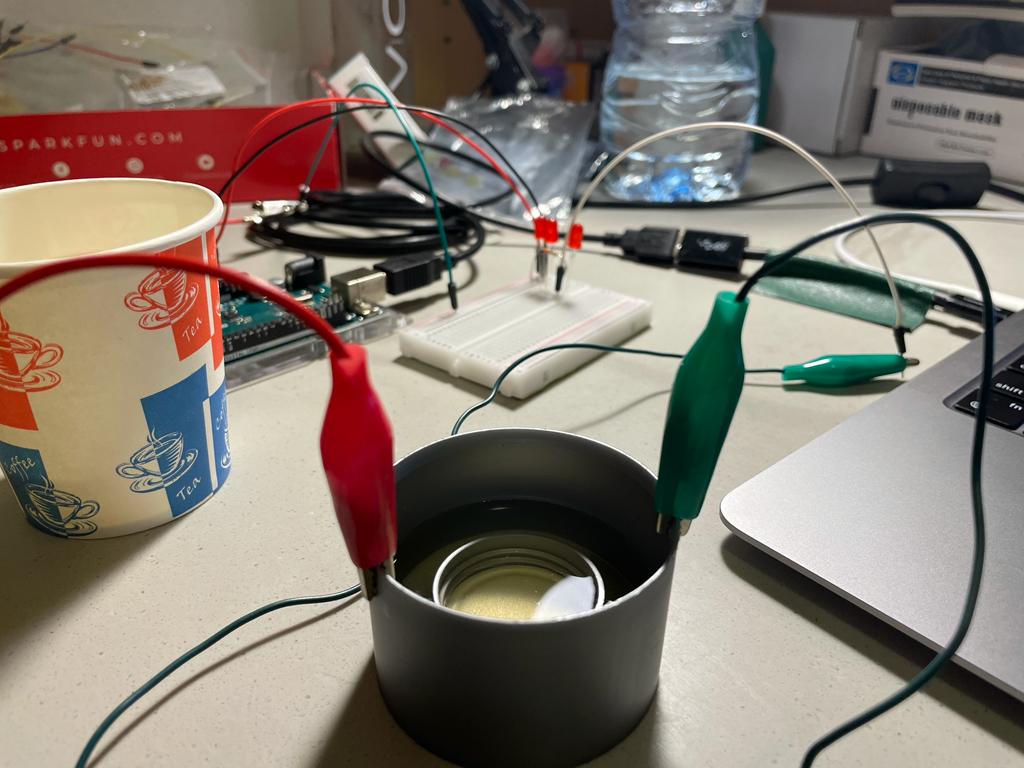
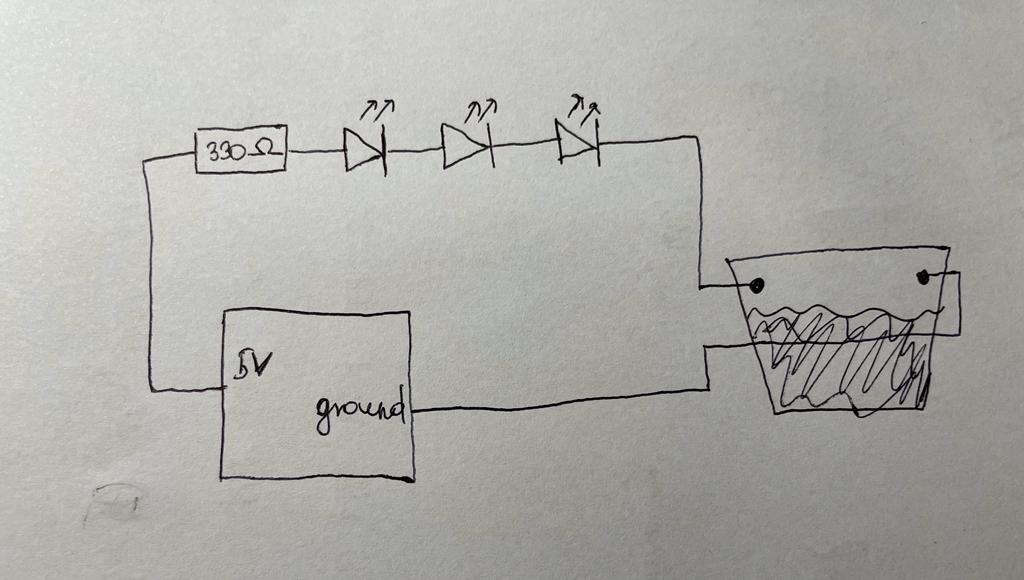
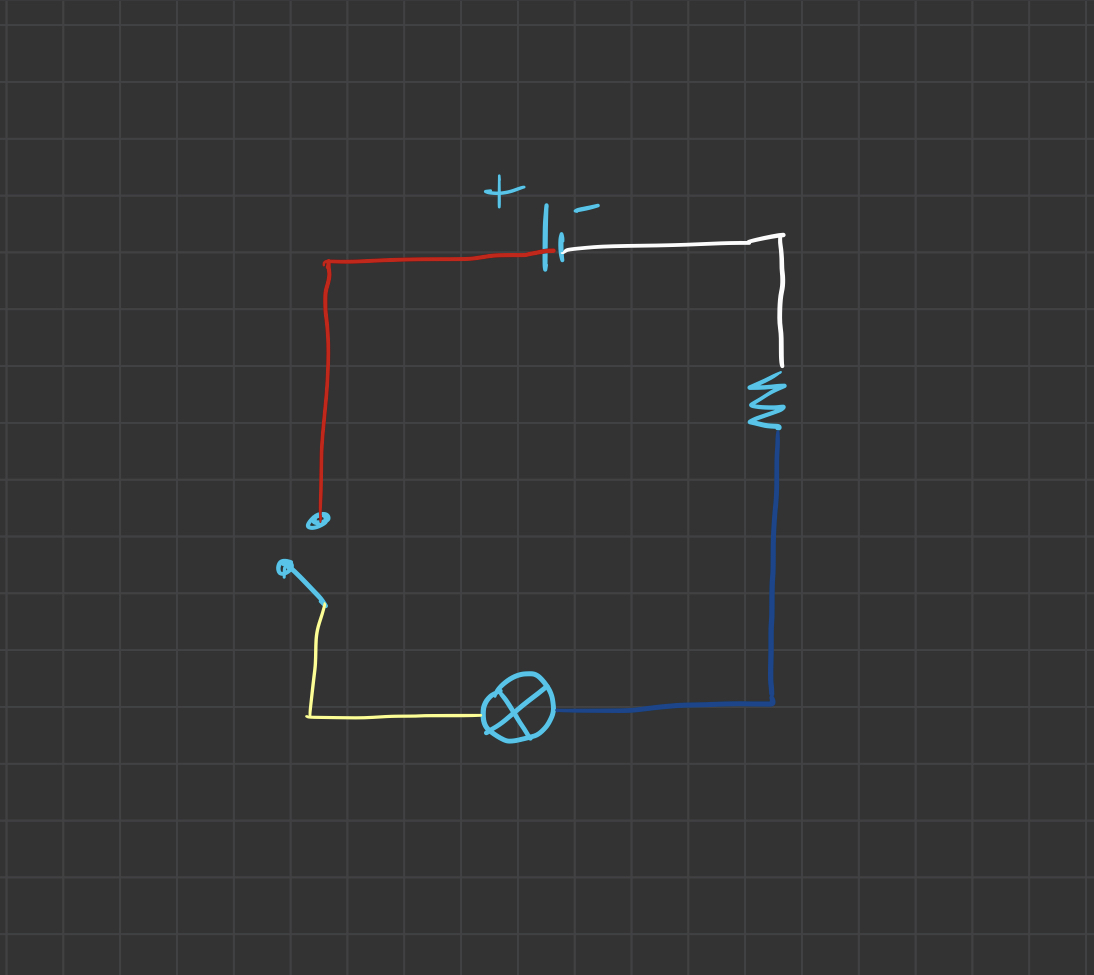
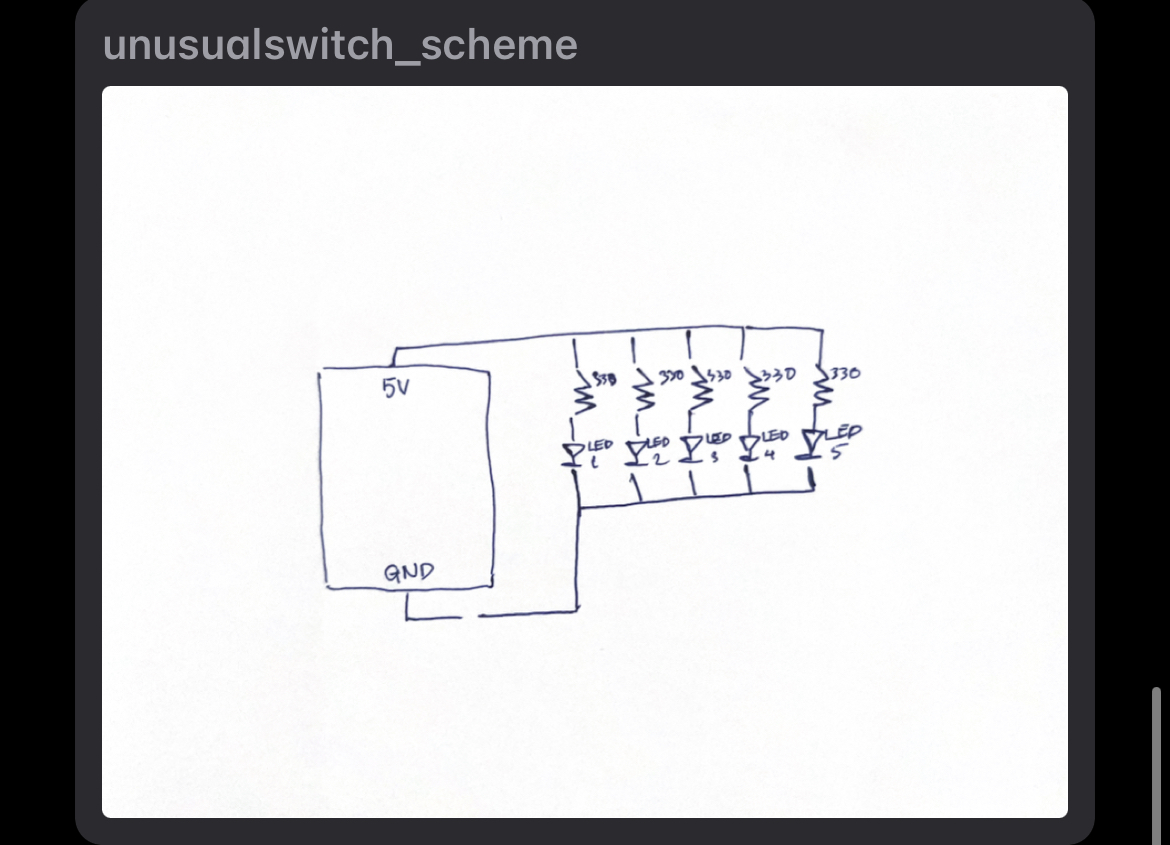
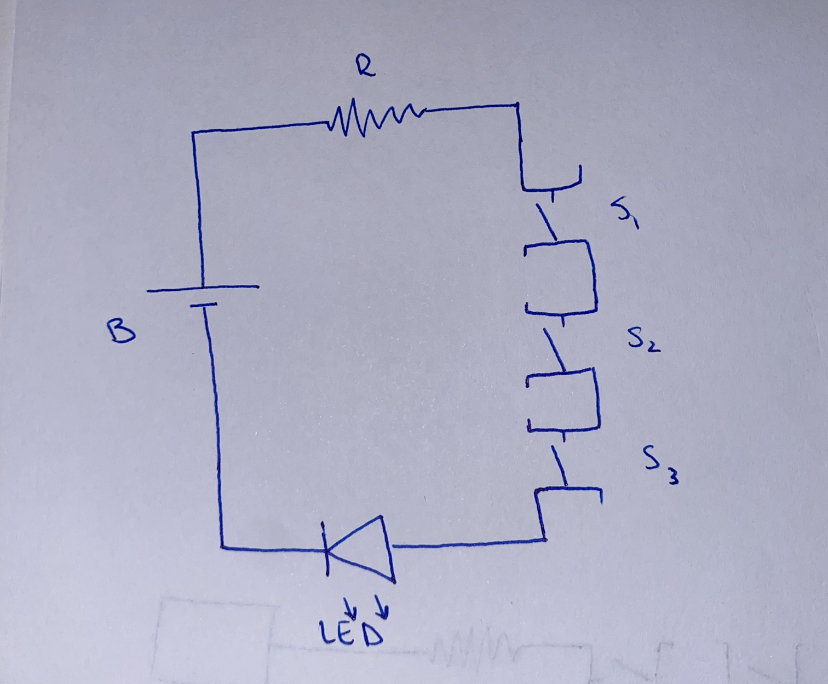 Circuit Diagram