Assignment 1 – Self Portrait – Ahsen Saaim

For this assignment I went for a clean, simplistic emoji-esc style for my portrait. I wanted my avatar to be outdoors, so I chose colors that I thought best complimented the light blue sky like white, maroon and yellow. I used different dimensions of ellipses for the sun, face, eyes, body and buttons, while the clouds are a cluster of overlapping ellipses. The nose is a triangle, while the mouth and hair are varying rectangles. Although I liked the aesthetic of my portrait it felt somewhat stiff, so I animated the cloud to move slowly across the sky by changing the x coordinates of the ellipse-cluster slightly with every repetition of the draw function.

This project was fun to work on but it was frustrating not being able to depict my vision onto the canvas. I tried to make my hair more true to life but didn’t suceed so I back peddaled to a simple rectangle. This shows I need a lot more experience to bring my  thoughts to life. In the future I hope to make more intricate projects with a larger arsenal of shapes and animations to work with.

Self Portrait – Assignment 1

For this assignment , I decided to use a reference photo of myself because I wanted to focus on recreating general shapes in p5.js , instead of worrying about design aspects. By doing this, I ended up with an actually pretty detailed version of my picture. While I initially wanted to make the hair gradient to match the picture, I ran into some technical trouble. Instead, I decided to challenge myself by figuring out coordinates for creating lines for things in my code such as “armlines” and “necklace”. Eventually, I did end up using a coordinate finder which really helped familiarize me with how the canvas is setup.


Self Portrait Assignment 1 – Hind Younus


At first I wanted to go for something more abstract, but also felt like that doesn’t represent me. So I went for some realism for my portrait. I tried to use all the tools we learnt in class to help me construct my form and face. In addition, I added things I am passionate about and like. In my left hand I put a cute duck because I love anything to do with birds, and the right a dumbbell as I really love going to the gym and doing calisthenics. The background I made my favourite color purple.

Overall, I think next time I would try to experiment with more abstract shapes as I could have branched out more in that direction, but in the end I am happy with how this portrait turned out.

Self-Portrait, Assignment 1

Actually, I don’t have red hair and purple skin. But, red, purple, and black are my favorite colors. So, this portrait conveys my “self” to my audience implicitly. I started by drawing a basic face structure: an ellipse. Then, I worked on probably the most technical part of this sketch which was the hairstyle. I used a rectangle, triangle, and an arc to do that. I also learned how to make intersecting strokes with varying weights through this exercise. I made the eyebrows using this method. In the future, I will try to add animations and more details to this portrait to assess my growth in proficiency with p5js.

Assignment 1 – Self-Portrait

For this assignment, we had to create a self-portrait using P5js. I used simple drawing functions such as ‘circle’, ‘arc’, ‘rect’, ‘triangle’ in order to achieve my self-portrait. This was my first time coding so it was definitely an interesting experience.

I began by using a simple ellipse shape and then added all the different facial features (eyes, nose, glasses, nose pin and etc). Simultaneously I played around with different colours. I used a colour picker tool online to get the colours I wanted (lilac is my favorite colour hence I chose that for my background). The trickiest part was definitely the hair and bangs – positioning the accurate size of the bangs took me a while to figure out. It required a lot of trial and error, as did other features of the portrait. In addition, the shape of the ear with the PI constant was not easy to figure out. In the future, I would like to add a hijab/headscarf to my portrait.

Self Portrait – Assignment 1

Brainstorming

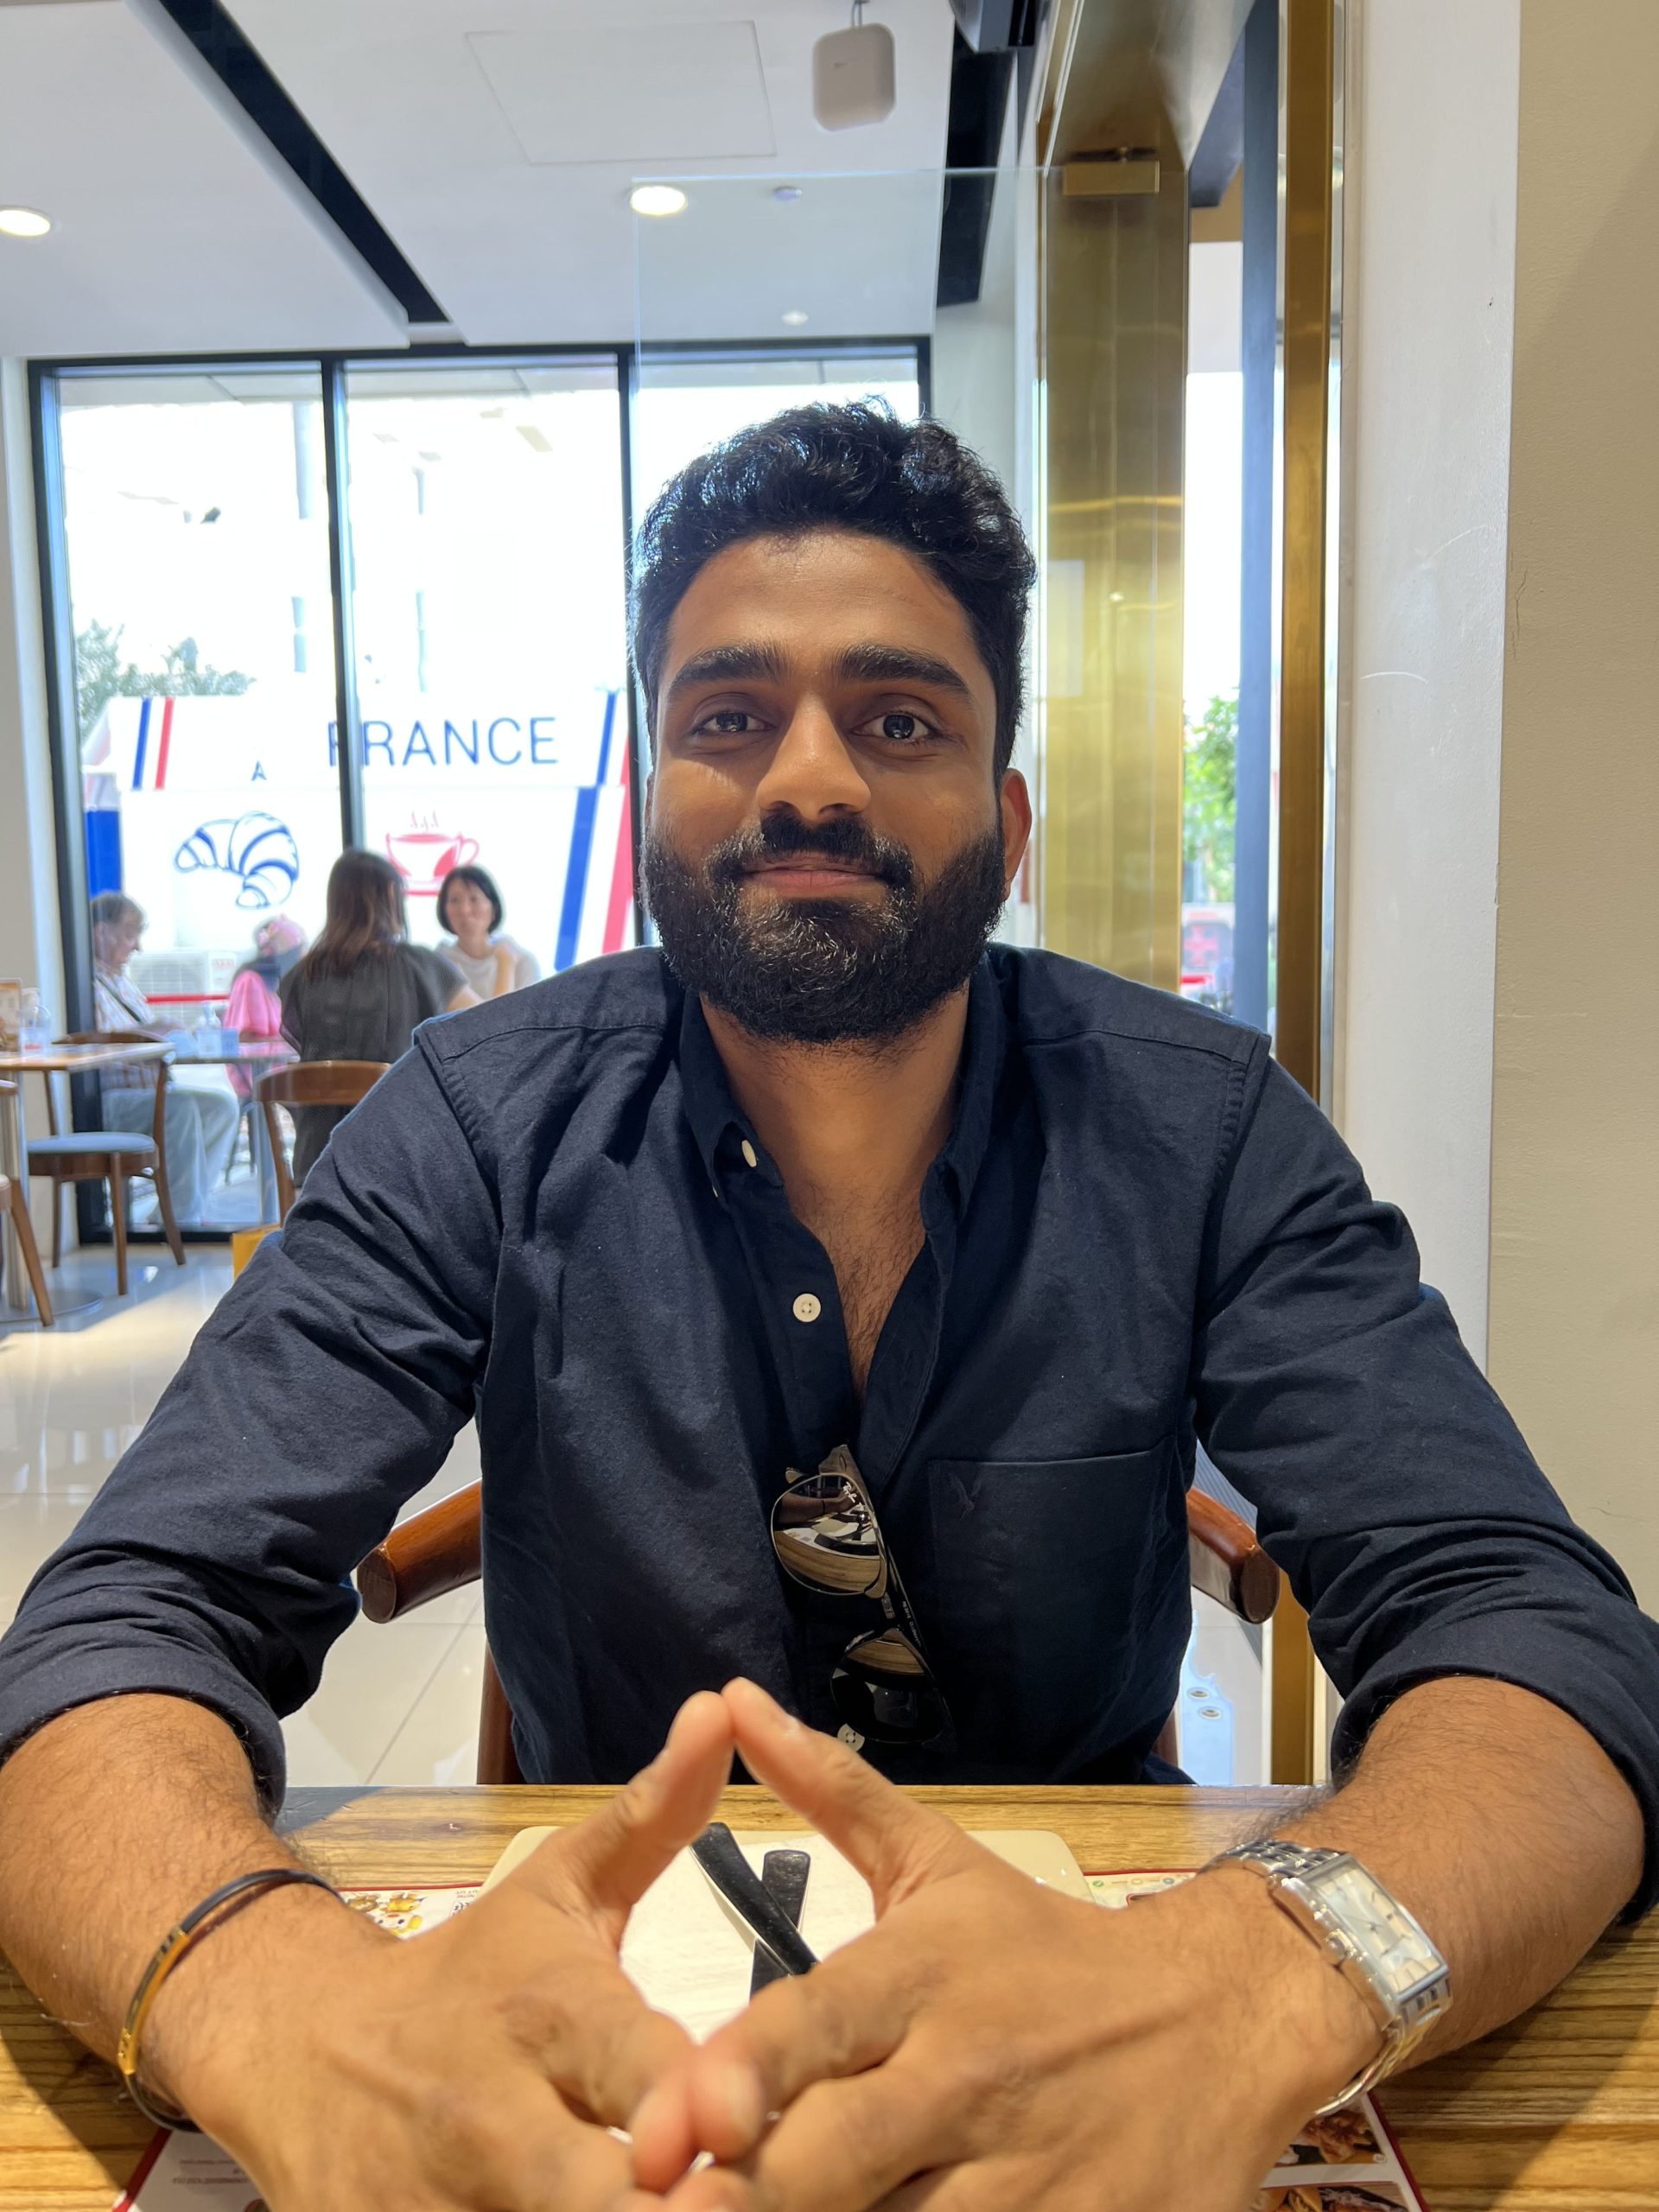
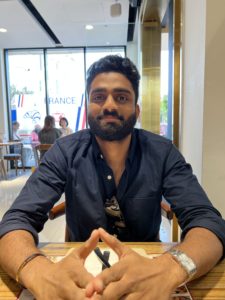
For this first assignment in Intro to Interactive Media, I had to create a self-portrait. This task seemed very daunting at first because I have never used p5js and I know that my design skills are not the best. However, this did not impede my motivation and I began by first looking for a good picture to try and replicate in a cartoonish manner with simple shapes. I settled on the picture below to use as my inspiration.

Inspiration portrait

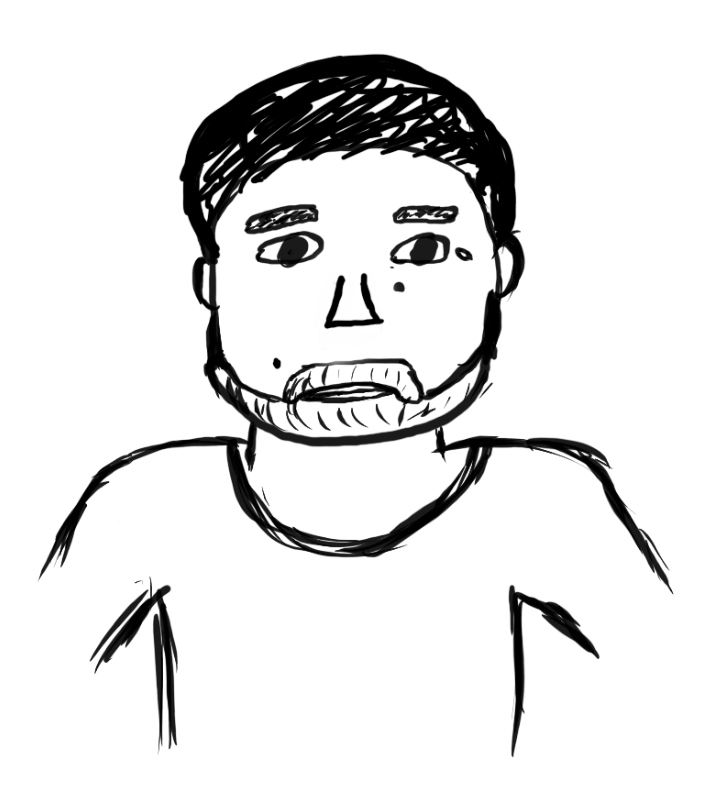
To give me an idea for the basic shapes, I drew a simple sketch after which I began coding.

Sketch

Coding

I separated the different features into different functions (mouth, ears, eyes,  etc) and called them in the face function. All the sizes were relative and this helped me later in creating a magnify button that would allow you to zoom in to the image. This is what the final portrait looked like when I finished.

From this assignment, I learned to use some of the more advanced shapes like Bezier curves and also to use the mousePressed function to create some interactivity.

The code for the assignment can be found here on GitHub as well as below.

function setup() {
  createCanvas(640, 480);
}

let size = 2;
function draw() {
  background(63, 83, 212);
  let centerX = width / 2;
  let centerY = height / 2;
  face(centerX, centerY, size);
}

function face(centerX, centerY, size) {
  magnify();
  neck(centerX, centerY, size);
  ears(centerX, centerY, size);
  fill(203, 130, 98);
  ellipse(centerX, centerY, size * 110, size * 145); // face shape
  mouth(centerX, centerY, size);
  nose(centerX, centerY, size);
  eyes(centerX, centerY, size);
  hair(centerX, centerY, size);
  beard(centerX, centerY, size, 3);
  mole(centerX, centerY, size);
}

function magnify() {
  fill(0);
  strokeWeight(10);
  line(50, 40, 70, 70);
  strokeWeight(1);
  fill(225);
  circle(50, 40, 40);
}

function mousePressed() {
  if (mouseX > 30 && mouseX < 70 && mouseY < 60 && mouseY > 20) {
    if (size === 1) {
      size = 2;
    } else {
      size = 1;
    }
  }
}

function mole(centerX, centerY, size) {
  circle(centerX + size * 13, centerY - size * 6, size * 1);
}

function neck(centerX, centerY, size) {
  //neck
  fill(203, 130, 98);
  quad(
    centerX - size * 20,
    centerY + size * 40,
    centerX + size * 20,
    centerY + size * 40,
    centerX + size * 40,
    centerY + size * 90,
    centerX - size * 40,
    centerY + size * 90
  );
}

function mouth(centerX, centerY, size) {
  // mouth
  let controlAx = centerX - size * 30;
  let controlAy = centerY - size * 20;

  let controlBx = centerX + size * 30;
  let controlBy = centerY - size * 20;

  let startAx = centerX - size * 20;
  let startAy = centerY + size * 40;

  let startBx = centerX + size * 20;
  let startBy = centerY + size * 40;

  fill(167, 76, 78);
  curve(
    controlAx,
    controlAy,
    startAx,
    startAy,
    startBx,
    startBy,
    controlBx,
    controlBy
  );
  line(startAx, startAy, startBx, startBy);
}

function nose(centerX, centerY, size) {
  // nose
  line(
    centerX - size * 10,
    centerY + size * 20,
    centerX + size * 10,
    centerY + size * 20
  );
  curve(
    centerX - size * 20,
    centerY + size * 20,
    centerX - size * 10,
    centerY + size * 20,
    centerX - size * 6,
    centerY + size * 2,
    centerX - size * 20,
    centerY + size * 2
  );

  curve(
    centerX + size * 20,
    centerY + size * 2,
    centerX + size * 6,
    centerY + size * 2,
    centerX + size * 10,
    centerY + size * 20,
    centerX + size * 20,
    centerY + size * 20
  );
}

function eyes(centerX, centerY, size) {
  // eyes
  fill(220);
  ellipse(centerX - size * 25, centerY - size * 20, size * 25, size * 20);
  ellipse(centerX + size * 25, centerY - size * 20, size * 25, size * 20);
  fill(0);
  ellipse(centerX - size * 25, centerY - size * 18, size * 12, size * 12);
  ellipse(centerX + size * 25, centerY - size * 18, size * 12, size * 12);
  fill(255);
  ellipse(centerX - size * 25, centerY - size * 18, size * 3, size * 3);
  ellipse(centerX + size * 25, centerY - size * 18, size * 3, size * 3);

  //eyebrows
  rectMode(CENTER);
  fill(43, 43, 38);
  rect(
    centerX - size * 25,
    centerY - size * 36,
    size * 28,
    size * 8,
    size * 10
  );
  rect(
    centerX + size * 25,
    centerY - size * 36,
    size * 28,
    size * 8,
    size * 10
  );
}

function hair(centerX, centerY, size) {
  fill(16, 23, 38);
  // sideburns
  let x1 = centerX - size * 40;
  let y1 = centerY - size * 60;
  let x2 = centerX - size * 33;
  let y2 = centerY - size * 50;
  let x3 = centerX - size * 53;
  let y3 = centerY - size * 20;
  triangle(x1, y1, x2, y2, x3, y3);
  
  let x21 = centerX + size * 40;
  let y21 = centerY - size * 60;
  let x22 = centerX + size * 33;
  let y22 = centerY - size * 50;
  let x23 = centerX + size * 53;
  let y23 = centerY - size * 20;
  triangle(x21, y21, x22, y22, x23, y23);

  //hair
  let controlAx = centerX - size * 44;
  let controlAy = centerY - size * 45;

  let controlBx = centerX + size * 44;
  let controlBy = centerY - size * 45;

  let anchorAx = centerX - size * 50;
  let anchorAy = centerY - size * 85;

  let anchorBx = centerX + size * 50;
  let anchorBy = centerY - size * 85;

  bezier(
    controlAx,
    controlAy,
    anchorAx,
    anchorAy,
    anchorBx,
    anchorBy,
    controlBx,
    controlBy
  );
}

function ears(centerX, centerY, size) {
  //ears
  fill(206, 128, 80);
  arc(
    centerX - size * 50,
    centerY - size * 15,
    size * 25,
    size * 25,
    HALF_PI,
    PI + HALF_PI
  );
  arc(
    centerX + size * 50,
    centerY - size * 15,
    size * 25,
    size * 25,
    PI + HALF_PI,
    HALF_PI
  );
}

function beard(centerX, centerY, size, weight) {
  let beardStart = centerY + size * 25;

  strokeWeight(weight);
  // moustache
  for (let i = centerX - size * 25; i < centerX + size * 25; i += 3) {
    line(i, beardStart, i + 3, beardStart + size * 14);
  }
  for (let i = centerX - size * 25; i < centerX + size * 25; i += 3) {
    line(i, beardStart, i + 2, beardStart + size * 14);
  }

  // goatee
  for (let i = centerX - size * 30; i < centerX + size * 30; i += 3) {
    line(i, beardStart + size * 22, i + 3, beardStart + size * 40);
  }
  for (let i = centerX - size * 30; i < centerX + size * 30; i += 3) {
    line(i, beardStart + size * 25, i + 2, beardStart + size * 45);
  }
  for (let i = centerX - size * 20; i < centerX + size * 20; i += 3) {
    line(i, beardStart + size * 35, i + 3, beardStart + size * 50);
  }

  //sides
  for (let i = centerX - size * 43; i < centerX - size * 20; i += 3) {
    line(i, beardStart + size * 15, i + 3, beardStart + size * 30);
  }
  for (let i = centerX - size * 38; i < centerX - size * 18; i += 3) {
    line(i, beardStart + size * 15, i + 2, beardStart + size * 35);
  }

  for (let i = centerX + size * 20; i < centerX + size * 43; i += 3) {
    line(i, beardStart + size * 15, i + 3, beardStart + size * 30);
  }
  for (let i = centerX + size * 18; i < centerX + size * 38; i += 3) {
    line(i, beardStart + size * 15, i + 2, beardStart + size * 35);
  }

  //connectors
  for (let i = centerX - size * 30; i < centerX - size * 20; i += 3) {
    line(i, beardStart + size * 5, i + 3, beardStart + size * 20);
  }

  for (let i = centerX + size * 20; i < centerX + size * 30; i += 3) {
    line(i, beardStart + size * 5, i + 3, beardStart + size * 20);
  }

 // side burns
  for (let i = centerX - size * 50; i < centerX - size * 40; i += 3) {
    line(i, beardStart + size * 1, i + 2, beardStart + size * 20);
  }
  for (let i = centerX - size * 55; i < centerX - size * 48; i += 3) {
    line(i, beardStart - size * 10, i + 2, beardStart + size * 5);
  }

  for (let i = centerX + size * 40; i < centerX + size * 50; i += 3) {
    line(i + 2, beardStart + size * 1, i, beardStart + size * 20);
  }
  for (let i = centerX + size * 48; i < centerX + size * 55; i += 3) {
    line(i + 2, beardStart - size * 10, i, beardStart + size * 5);
  }
}

Nicholas Week 1 Self-Portrait

Inspiration

I initially had no idea how I wanted my portrait to look, but I knew I wanted to do something a bit conceptually out there. Probably something within the lines of weird colors and shapes that don’t make sense.

The Process

I decided I wanted a background that cycled through colors and was dynamic. I looked at the color picker on google and moved the color slider bar around and saw that the HSV method of describing color would be easiest to represent as a rainbow-like cycle in HSV was to go from (0°,x%,y%) to (360°,x%,y%) and back down. I found a converter for HSV to RGB and wrote a function that translated HSV to RGB from this page in p5.js and had a variable increase that I used as a parameter.

function hsv_to_rgb(h, s, v) {
  h = h % 360;
  let c = v * s;
  let x = c * (1 - abs(((h / 60) % 2) - 1));
  let m = v - c;
  let rp, gp, bp;
  //r,g,b prime depend on value of h in degrees
  if (0 <= h && h < 60) {
    [rp, gp, bp] = [c, x, 0];
  } else if (60 <= h && h < 120) {
    [rp, gp, bp] = [x, c, 0];
  } else if (120 <= h && h < 180) {
    [rp, gp, bp] = [0, c, x];
  } else if (180 <= h && h < 240) {
    [rp, gp, bp] = [0, x, c];
  } else if (240 <= h && h < 300) {
    [rp, gp, bp] = [x, 0, c];
  } else{
    [rp, gp, bp] = [c, 0, x];
  }
  //return r g b values
  return [(rp + m) * 255, (bp + m) * 255, (gp + m) * 255];
}

I then decided to make a function to draw a shirt, using the cycle but switching the b and g values so that a different cycle is used. Using variables, I centered the shirt and added a small triangle for the neck.

let shirtheight = 180;
let shirtwidth = 250;
let triangleoffset = 20;
let triangleheight = 20;
function drawshirt(r,b,g){
  //drawing a shirt with random colors
  fill(r,b,g)
  stroke(200)
  rect((width-shirtwidth)/2, height-shirtheight, shirtwidth, shirtheight, 60, 60, 0, 0);
  //draw a triangle over the shirt 
  fill(255)
  triangle(width/2+triangleoffset,height-shirtheight,width/2-triangleoffset,height-shirtheight,width/2,height-shirtheight+triangleheight) 
}

Then I looked to add a head with some dynamic parts: a moving head, pupils, mouth, and an offset so I can have multiple heads. All these parts were made with variables for height and width so that all objects function with varying canvas sizes. the use of the min and max functions are for creating bounds for the movement of body parts. I decided to use a sine function with bounds that moved with the shade of the background to have some type of synchronization with the background, but it’s difficult to see it on the canvas. The mouth is bound rectangularly, and the user can move their cursor to change the shape.

function drawface(offsetx, offsety){
  fill(255)
  //lets draw a head
  rect((width-headwidth)/2+offsetx, height-shirtheight-headheight+offsety, headwidth, headheight, 60, 60, 60, 60);
  
  fill(255)
  //add some eyes
  rect((width-headwidth)/2+eyeoffset+offsetx, height-shirtheight-headheight+eyeheightoffset+offsety, leyewidth, leyeheight, 60, 60, 60, 60);
  
  rect(width-(width-headwidth)/2-eyeoffset-reyewidth+offsetx, height-shirtheight-headheight+eyeheightoffset+offsety, reyewidth, reyeheight, 60, 60, 60, 60);
  
  //add some pupils that move, bounded by the height of the eyes
  fill(0)
  rect(width-(width-headwidth)/2-eyeoffset-reyewidth+offsetx, min(max(height-shirtheight-headheight+eyeheightoffset,height*sin(currbg/lpupiledelay)),height-shirtheight-headheight+eyeheightoffset+reyeheight-pupilheight)+offsety, reyewidth, pupilheight, 60, 60, 60, 60);
  rect((width-headwidth)/2+eyeoffset+offsetx, min(max(height-shirtheight-headheight+eyeheightoffset,height*sin(currbg/rpupiledelay)),height-shirtheight-headheight+eyeheightoffset+leyeheight-pupilheight)+offsety, leyewidth, pupilheight, 60, 60, 60, 60);
  
  //add a triangular mouth in the center of the face
  triangle(
    min(width/2+mouthoffset+offsetx,max(mouseX,width/2-mouthoffset+offsetx)),
   min(max(height-shirtheight-2*mouthoffset+offsety, mouseY),height-shirtheight+offsety),
   width/2+mouthoffset+offsetx,
   height-shirtheight-mouthoffset+offsety,
   width/2-mouthoffset+offsetx,
   height-shirtheight-mouthoffset+offsety
  )

}

Since all positional values had an offset x and y, I added a for loop in the draw function that added and removed faces at a rate dependent on variable faceincval limited by variable numfaces.

for(let x = 1; x <=numfaces; x+=1){
    drawface(x*10,x*10)
  }
numfaces = maxfaces*sin(faceincval)
faceincval+=0.05

The final product looks as follows:

Conclusion:

I had a lot of fun with the dynamics in this assignment, with all the moving parts.  I think I was able to create a portrait that is unconventional and a bit unnatural but still represents me on a more metaphorical level.

I found that the code began to get more complicated as I added more pieces, with subtractions from subtractions based on many components quickly began to make less and less sense the more I built. Looking forwards, I’d like to write cleaner code that is more legible and makes more sense to another user.

How to embed a p5js sketch in your blog post

In the p5js editor under File click Share:

Copy the code it has there under Embed:

In the upper left hand corner of the WordPress editor click Text:

Paste the embed code there in the spot where you’d like your sketch to be placed in your post. Add the width and height of your sketch to your iframe element and add about 44 pixels to account for the p5 logo above the embedded sketch. For example, if your sketch is 640×640 pixels add width=640 height=684 as follows:

<iframe src="https://editor.p5js.org/aaronsherwood/full/frz0CrVWJ" width=640 height=684></iframe>


To include a code snippet you can use the Enlighter syntax highlighter. In the WordPress editor click the {..} code insertion icon.

Paste your code snippet and select JavaScript as the code language.

The result should look like this:

// create a sine wave, adjusting the frequency based on our speed and x position
let wave = sin(frameCount*speed+x);

// change the range of the sine wave from -1 <-> 1 to 0 <-> 2
wave += 1;