F0r my piece this week, I designed a generative text output sort of like madlibs. I made 3 strings of text files: adjectives, nouns, verbs, and one array: settings. Each of these strings/ arrays contained words I would refer to in function draw to randomly construct a sentence based on the formula I arranged.
The sentence structure was as follows:
the ‘adjective’ ‘noun’ ‘verb’ ‘setting’
For example:
the nutty professordanced into the night
Code highlight
function preload() {
helveticaFont = loadFont("Helvetica-Bold-Font.ttf"); // downloaded font from online
// loads text files as strings
adjectives = loadStrings("english-adjectives.txt");
nouns = loadStrings("english-nouns.txt");
verbs = loadStrings("english-verbs.txt");
// background i uploaded
gradient1 = loadImage("gradient1.png");
}
function setup() {
createCanvas(400, 400);
}
function draw() {
background(gradient1);
// loop to generate random stars on the bottom portion of canvas
for (let i = 55; i < 250; i++) {
fill(200, 150); // color of stars and transparency
noStroke();
circle(random(400), random(251, 400), random(1, 2));
}
Finally kinda figured out loops, also surprised I knew how to use loadStrings… lol.
Embedded sketch
Click on the canvas to randomly generate sentences.
It’s fun, trust me! My personal favorite is:
the fat frog breakdanced into the metaverse
Reflection and improvements
Would have liked to have made it so that when a specific setting would pop up, I would be able to generate a design that correlates with it. For example, if the setting “into the snow” gets generated, a snowfall design would pop up to go with it.
The ‘settings’ string that referred to the text file I created would sometimes generate blanks, so I had to replace it with an array.
Some sort of visual representation of the sentence constructed instead of just displaying the text.
I’m still not fully competent using p5js, but I am getting more comfortable!
As this was my first time coding or creating any type of output like this, I found this assignment to be slightly difficult, and tried to express myself as much as I could.
This picture represents who I am on multiple levels. I moved to the UAE when I was less than a year old, and grew up here. However, I always saw Egypt as home. I only visit Egypt for 2 months a year, yet every year, I build a stronger connection with it and I grow to become even more patriotic. This self portrait is a way for me to describe how I feel when I am away from Egypt: indifferent. I love living in the UAE, but Egypt will always be where I feel most comfortable, like I’m right where I’m supposed to be.
The line represents how disconnected I feel from my family over there when I am in the UAE. It feels like there is a barrier between us, and between my home and I. (The 3 triangles represent the pyramids 🙂 )
A highlight of some code that I’m particularly proud of
I am not necessarily proud of a specific part of my code, since it is mostly coding shapes and their dimensions, but finding accurate dimensions was very time-consuming and I’m proud that the dimensions ended up looking normal.
Reflection and ideas for future work or improvements
For my next assignment, I hope I will be able to add interactivity or movements in the code to make it look better and to be able to express myself more. For example, in this assignment, I wanted to move the stickman over to Egypt and back, with the indifferent face changing to a happy one, but I was unable to. Next time, I hope I can apply ideas like this.
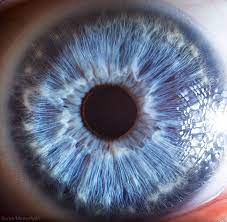
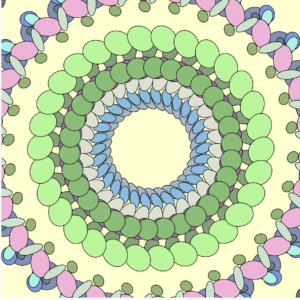
I made a generative artwork using a Ring class created when the user clicks on the mouse. I was inspired by the form and color distribution of human eye and wanted to recreate similar pattern to that:
I also wanted to create a hypnotic effect when we look with our eyes at the “Eye”. That’s why I tried to move the rings into and out of the center.
Example of one of the patterns:
Code:
The ring is created using the loop of ellipses which is then rotated:
for (let i = 0; i < 30; i++) {
ellipse(this.x, this.y, this.flowerWidth, this.flowerHeight);
rotate(PI/15);
}
Function to create rings when mouse is clicked:
function mouseClicked() {
//random assignment of speed and sizes
let xSpeed = map(mouseX, 0, height, gXSpeedMax, -gXSpeedMax);
let ySpeed = map(mouseY, 0, height, gYSpeedMax, -gYSpeedMax);
let ringWidth = random(minSize, maxSize);
let ringHeight = random(minSize, maxSize);
//create new ring based on the mouse position
let newRing = new Ring(
mouseX,
mouseY,
ringWidth,
ringHeight,
xSpeed,
ySpeed
);
// Add it to the global array of all rings
ringArray.push(newRing);
}
It allows the ellipses to form into a circle and then form a flower necklace. When user clicks on the upper part of the canvas, rings fly from the center,when bottom part is clicked, rings fly to center and go outwards. Code for the movements of the rings:
let xSpeed = random(-gXSpeedMax, gXSpeedMax);
let ySpeed = random(-gYSpeedMax, gYSpeedMax);
this.x += this.xSpeed;
this.y += this.ySpeed;
Reflections
Working with the classes allowed me to better understand how to optimize the code and create more advanced actions for my art. For the fututre improvements, rings movement when mouse is clicked kinda works randomly, so it would be better if the action had specific order. Also, it would be cool to recreate exact picture of an eye like in the reference by learning how to draw that type of interesting curves and creating ombre effect.
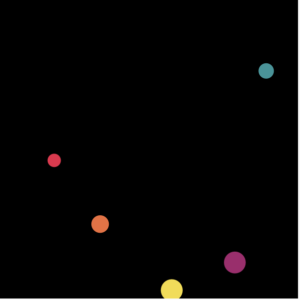
This is a simplistic extension of the wall bouncing puzzle shown in last class. The goal is twofold: make the ball bounce in a third dimension, and make the ball duplicate.
Code:
let gCircleSizeMax = 60;
let gCircleSizeMin = 10;
let gXSpeed = 2;
let gYSpeed = 4;
let gZSpeed = 1;
let gCircleArray = [];
let circlesMade = 0;
class BouncingCircle {
constructor(xpos, ypos, xSpeed, ySpeed, zSpeed, circleSize, ID) {
this.x = xpos;
this.y = ypos;
this.xSpeed = xSpeed;
this.ySpeed = ySpeed;
this.zSpeed = zSpeed;
this.circleSize = circleSize;
this.ID = ID;
}
//give ball speed
update() {
this.x += this.xSpeed;
this.y += this.ySpeed;
this.circleSize += this.zSpeed;
}
checkWallCollisions() {
let r = this.circleSize / 2;
if (this.x < r || this.x > width - r) {
this.xSpeed = -this.xSpeed;
}
if (this.y < r || this.y > height - r) {
this.ySpeed = -this.ySpeed;
}
}
checkBounce() {
if (this.circleSize <= gCircleSizeMin) {
if (this.xSpeed > 0 || this.ySpeed > 0 ) {
this.zSpeed = -99/100 * this.zSpeed;
this.xSpeed = 99/100 * this.xSpeed;
this.ySpeed = 99/100 * this.ySpeed;
if (this.zSpeed > gZSpeed/2) {
duplicate(this)
}
}
else {
//this.zSpeed = 0;
//gCircleArray.splice(circle.ID, 1);
}
}
if (this.circleSize >= gCircleSizeMax) {
this.zSpeed = -this.zSpeed;
}
}
drawSelf() {
fill(255);
ellipse(this.x, this.y, this.circleSize, this.circleSize);
}
}
function duplicate(circle) {
//if (circlesMade < 4) {
//if (random(100) > 50) {
print("Double Trouble")
let xpos = circle.x;
if (xpos > width - gCircleSizeMax)
xpos = width - gCircleSizeMax
if (xpos < gCircleSizeMax)
xpos = gCircleSizeMax
let ypos = circle.y;
if (ypos > height - gCircleSizeMax)
ypos = height - gCircleSizeMax;
if (ypos < gCircleSizeMax)
ypos = gCircleSizeMax;
let xSpeed = circle.ySpeed;
let ySpeed = circle.xSpeed;
let zSpeed = gZSpeed;
let circleSize = gCircleSizeMin + 5;
let ID = gCircleArray.length;
let newCircle = new BouncingCircle(xpos, ypos, xSpeed, ySpeed, zSpeed, circleSize, ID)
gCircleArray.push(newCircle);
print(gCircleArray);
circlesMade++
//}
//}
if (gCircleArray.length >= 25) {
gCircleArray.splice(0, gCircleArray.length / 2)
}
}
function setup() {
gCircleArray.push(new BouncingCircle(25, 72, gXSpeed, gYSpeed, gZSpeed, 15, 0));
createCanvas(400, 400);
smooth();
}
function draw() {
background(0);
for (var i = 0; i < gCircleArray.length; i++) {
gCircleArray[i].update();
gCircleArray[i].drawSelf();
gCircleArray[i].checkWallCollisions();
gCircleArray[i].checkBounce();
}
if (gCircleArray.length == 0) {
gCircleArray.push(new BouncingCircle(25, 72, gXSpeed, gYSpeed, gZSpeed, 15, 0));
}
circlesMade = 0
}
For this assignment, I chose between 3 ideas: a fishpond simulator, a fizzy drink, a popcorn machine, and an ant smasher game. I ultimately decided to go with a fishpond simulator. I thought it would be cool, and I also kind of missed my fish back home.
I started by looking at a particle simulation example from p5. I then wrote my own and modified it so that each particle was a fish rather than a particle. I then worked on making classes for the lilies, lilypads, and finally, the ripples.
A few things I added on were the camera that allows you to see your reflection on the fishpond, a star function to more easily draw the patterns on the lilypads, and some light rotations on the fish.
The code I’m most proud of is probably the lilypad part because I finally got to understand how to rotate, push, and pop the petals without destroying everything.
fill("#f0f0f0")
translate(this.x, this.y)
for (var i = 0; i < 10; i++) {
ellipse(0, 40, 25, 32);
rotate(PI / 5);
}
fill("#ffffff")
for (var i = 0; i < 10; i++) {
ellipse(0, 30, 20, 32);
rotate(PI / 5);
}
In the end, I’m pretty happy with the final work! It generates a new pattern of lilies and pads whenever it’s run, and the fish just drift aimlessly throughout the pond. It definitely has the vibes of a fishpond. With a bit of music, it would be a very chill and zen piece to stare at and contemplate life with.
Final output (Open in P5js to show your reflection!)
The most difficult part was trying to make certain elements rotate without making the entire piece rotate around the origin. I still wish I did better on that aspect and will probably try to improve it still.
I want to improve my piece by adding a few things: a particle simulator for bubbles rising up in the background (here’s one I’m looking at from Nature of Code), an interaction where the fish move towards a hovering cursor then scatter off when clicked, and rotating / subtly floating lilies and lilypads. I also wish the fish pointed in the direction they were swimming.
Other minor things I would add are speckled or multi-colored fish, lily buds and stems, and a way to “ripple” the camera photo when the screen is clicked.
At first, I wanted to try to make a race track and multiple race cars running on the track by making boundaries for them so they will never work backward. Then I faced the difficulty of how to make the car title sideways in the bird’s eye view since it’s seen in a birds-eye view. Then I faced the difficulty of making the cars stuck within the boundaries of the race track. So I gave up on that Idea instead I wanted to make spaceships that would move elegantly in the space while the player is controlling one of them.
I think one part, in particular, in the code which took some time online to understand which is figuring out Perlin noise and how can I use it to power the computer spaceships. At first, it was outputting the same value and the spaceships were kind of moving diagonally. Then I figured out that the value inside of “noise()” needs to be changed every time so that it can come up with a new different value. And to fix the diagonal thing just increment the x movement by a number different from the y movement.
Moreover, moving the player’s spaceship with the arrows was also pretty difficult. I tried to use the basic libraries but I think they were not enough so I watched a video that explains how it should be done.
Also making the classes themselves and understanding how the classes work was very interesting. As I at the beginning didn’t understand what does the term “this” mean. But sooner I learned about it and realized the potential in classes. Manipulating the array to make objects of spaceship class was a challenge as well.
The Sketch:
Reflections:
Reflections:
Regarding my piece, I’m not really sure of my feelings. I put a lot of effort into it, but I was unable to achieve the degree of originality I had in mind. On the plus side, I think I’ve picked up a lot of knowledge, and I still have a lot to learn. I would improve the piece by making it more intricate, complicated, and possibly animated.
Since we had to use OOP for the assignment, my initial thought was to create a game. Initial ideas were Super Mario and Pacman. But I have some experience with those two using Processing, so I thought of making something similar to Flappy Bird, which I remember playing a lot as a child. In this version of Flappy Bird, the bird is a circle. I did think of using a sprite image instead of a circle and that could be a nice feature to add on later.
Code:
Below are all the necessary classes and the objects I instantiated to start the game:
I took inspiration from this YouTube channel called “Ihabexe.”
Furthermore, to add some touch of creativity to it – I tried giving it a trippy feeling. The game has three backgrounds which change as you progress – increasing the level of difficulty. I also added electronic beats to it., which play when mouse is over the canvas.
Here’s what it looks like (click the canvas to make the circle jump):
Reflections:
I should also have implemented a main menu screen where you can choose when to start the game. Apart from that it was fun to make and to continue making something along the lines of psychedelic art.
The object-oriented programming assignment was one of the toughest “cookie cutters” I had to ever deal with while preparing some cookies, both in the literal and metaphorical sense, as a novice coder. The inspiration for this piece came from the bracelet weaving and “cookie making” (haha) night that I enjoyed with my friends. Every time the program is run, a new woven pattern emerges, just like each person’s different bracelet.
I followed the step-by-step guide offered here to prepare the primary constructor of my design. The biggest takeaway from following and then initializing it, for me was that in coding I have to start with the simplest string of code possible and then keep on adding and adjusting its parameters to put together a unified piece.
After the first stage of coding the formation of the objects, I studied Dan Shiffman’s video to add movement and color to my object. One of the most challenging aspects of the code was to keep shifting the placement of the variables and constants. For example, when I put the “color palette” array from within the setup, the program continuously did not show any objects on the screen. The scope had to be shifted to a global variable. The final coded placement of the revised scopes of variables looked like this,
// Guiding tutorials-
//https://happycoding.io/tutorials/p5js/creating-classes
// https://www.youtube.com/watch?v=DEHsr4XicN8
// revised scopes, arrays are always global
const NR_CIRCLES = 5;
let circles = [];
let index = 0;
let cpallete = ['#fe4365', '#fc9d9a', " #f9cdad" , "#c8c8a9" , " #83af9b"];
To give the object a trail-like feature, I added an alpha value along with a value of black in the parameters of the background. Surprisingly, in the end, it added a stark change to the program.
From this…
…to this
Here is the final arrangement,
Reflections/Future improvements-
As I was coding OOPs for the first time, it took me a lot of time and multiple attempts to finalize my core constructor. I would want to practice more with multiple constructors placed on the canvas as a balanced design. I would also want to include mouse interactivity in my future pieces as I believe that is one of the key things missing from the design. Particularly, the inclusion of object communication whenever the mouse is placed or pressed within the canvas. Transformations, such as “translate, and its inclusion in the code still confuse me, and It would take me a bit more time and practice to utilize them creatively in my design.
In this assignment, my idea was to create a generative artwork that simulates rainfall and rainy clouds. The inspiration was from the falling ball example in class. I asked myself if there was a way to add meaning to the falling balls and I immediately thought of rain and snow.
My implementation of the assignment uses shapes, sound, an image background, gravity, and noise . I created a class for raindrops and clouds. The collection of raindrops produces the rain. At first I tried to make the cloud class inherit from the raindrop class. I tried this because I wanted each individual cloud to produce rain by itself. However my approach did not work as intended so I made the rain exclusive from the clouds while making the raindrops start at the y position of the clouds.
I also tried to include wind in the rain. I initially used the noise to simulate the wind but it became difficult to control the direction of the rainfall so I mapped the the y position of the mouse to an interval and added it to the raindrop coordinates. This way changing the mouse position will change the direction of fall thus creating the illusion of wind in a particular direction.
I tried to also add parallax to the raindrops but it didn’t work quite well so I played with the stroke weight of the raindrop to make some raindrops appear closer than others.
By clicking on the sketch you can make it rain or not.
The embedded code:
Conclusion:
Future improvements will focus on adding an umbrella to the mouse’s movement and blocking off the raindrops from the area the umbrella occupies. Furthermore, lightening bolts and thunder sounds will be randomly added to make the simulation close to actual rain.
The completed sketch that utilizes both arrays and object oriented programming is shown below. The link to the sketch on the p5.js web editor can be found here.
A screen capture that I particularly like is also shown below:
INSPIRATION & DESIGN:
The inspiration for this piece came to me when I came across a time lapse video showcasing the growth of different crystals. I was surprised at how how beautiful and calming the video was; one would think that there isn’t anything too special about the process of crystallization, but when looked at closely, it is revealed how mesmerizing and almost fantastical it is, and you can’t help but admire how amazing nature is. I also think that crystal growth works quite well for being translated to something that is generative: crystals tend to start off small and exponentially grow, but even after they are fully “bloomed”, the process still continues so long the environment remains unchanged.
For this project, I wanted to create something that mimicked the process of water turning into ice or snowflakes forming. I found this sketch to be very challenging in terms of making the crystallization to look as biologically accurate as possible, as well just generally making the sketch look aesthetically pleasing. However, I was really interested and committed to the sketch because using code to mimic processes found in nature, such as the golden ratio, trees, and Fibonacci numbers, has always sparked my curiosity.
CODING SPECIFICS
The sketch is built using a user defined Crystal class, and instances of this class are put into a single array (in the setup() function), in which methods of the class are applied on each object in the array (in the draw() function).
In setup():
function setup() {
createCanvas(700, 500);
//initializing an array of little crystals
for (let i = 0; i < 300; i++) {
start_x = random(-100, 100); //give each line random points
start_y = random(-100, 100);
end_x = random(-50, 50);
end_y = random(-50, 50);
max_opacity = random(20, 100); //set each line to have a maximum opacity to make it look more natural
cluster.push(new Crystal(start_x,start_y, end_x, end_y, max_opacity));
}
}
In draw():
function draw() {
translate(width/2, height/2);
background(116, 150, 183);
//background(0);
//iterate over each object in the array and apply methods to it
for (let i = 0; i < cluster.length; i++) {
cluster[i].move();
cluster[i].display();
}
}
Each individual crystal is actually just a single line, with semi-randomized starting and ending (x,y) positions, a randomized opacity, a jitter variable, and a direction variable (this.direction). These variables define where each line starts and ends, how opaque the stroke color is, and how much each line moves, and in what direction the line lengthens over time. It also has a a time keeper value (this.age) and a boolean value that defines when to draw more lines (this.has_child). These variables are what creates the “growth” effect are described in more detail later on in this post.
Crystal class constructor:
constructor(star_x, start_y, end_x, end_y, max_opacity) {
this.start_x = start_x; //start x pos
this.start_y = start_y; //start y pos
this.end_x = end_x; //end x pos
this.end_y = end_y; //end y pos
this.max_opacity = max_opacity;
this.jitter=0.2; //variable that causes it to move slightly
this.opacity = 0;
//variable that helps lengthen the lines
this.direction = atan2(this.end_y-this.start_y, this.end_x-this.start_x);
this.age = frameCount; //time keeper
this.has_child = false; //boole value
}
In the beginning of the draw() function, we iterate over the array of objects and call methods move() and display(), which do exactly as they sound: they move each line based on the jitter value and display them by increasing the opacity from 0 to the max opacity value each frame.
However, I created an additional method called grow_children() that is only called inside the Crystal class, which I think is the most interesting part of the code. This method essentially keeps initializing and adding new objects into the cluster array, where the move(), display(), and grow_children() functions are then applied to these new objects, and so on. Here is how it works:
Inside move() method, we create an if statement that evaluates to true only when the object that was just created has not drawn any children and when 20 frames have passed since the object was initialized (defined by this.age). If both these conditions are met, we call grow_children():
Then, inside grow_children(), we redefine the parameters start_x, start_y, end_x, and end_y so that the growth of the lines will spread outwards towards the edge of the canvas. Using these new parameters, we then push a new Crystal object into the cluster array:
grow_children(){
//adjusting the x and y positions of the child lines
start_x = this.end_x;
start_y = this.end_y;
end_x = random(start_x-100, start_x+100);
end_y = random(start_y-100, start_y+100);
max_opacity = random(20, 100);
//initiate new objects and set this.hasChild to True
cluster.push(new Crystal(start_x,start_y, end_x, end_y, max_opacity));
this.hasChild = true;
}
Finally, this.hasChild is set to true, and the process repeats.
REFLECTIONS
As I was making this sketch, I realize that what I was envisioning in my head was a little ambitious given the time frame. I became very wrapped up in trying to make it look realistic as possible, and I still don’t believe I have accomplished that. I would love to continue working on this project, and possibly make different variations of it too. Some improvements that I would like to work on are the shapes of the crystals. I chose to use lines for simplicity, but I would like to experiment with long triangles, skinny rectangles, or even my own custom shape. Another issue I want to tackle is how there is only 1 array of objects. Initially I envisioned having several clusters that would appear on different parts of the screen at different times, which would more accurately mirror how water crystallizes. Unfortunately, making one “cluster” was already very complex, and in the end I decided to just focus on one.