Assignment 3- Generative Arts OOP


In this third assignment, we were to Create a generative artwork using Object-Oriented Programming. Starting with the assignment, I struggled to find a source of inspiration. The artworks I came across that I could use as my inspiration were very difficult to create( at least to my liking ). I finally decided to create something off the ball example we saw in class; I could only think of a snowy scene(something more like a winter period scene).

PROCESS

My implementation basically makes use of shapes(ellipse), sound and an image. As required by the assignment, I used functions, classes, and arrays. I created a Snowflake class that represents a single snowflake. Each Snowflake object has an x and y position, a radius, and a speed that determines how fast it falls down the screen. In the setup() function, I create an array of 100 Snowflake objects with random positions, radii, and speeds. In the draw() function, I update and draw each Snowflake object by calling its move() and draw() methods. The move() method moves the snowflake down the screen and wraps it around to the top if it goes off the bottom. The draw() method simply draws the snowflake as an ellipse on the canvas. I also used the preload function to load a vector image as the background which I downloaded from “deposit photos” and included a piece of royalty-free background music which I downloaded from YouTube.

EMBEDDED CODE

FUTURE IMPROVEMENTS

In a future version I hope to be able to include wind and its effect on the direction of the snowflakes. I also hope to add some clouds and other features to make the whole simulation resemble a real snowstorm.

Assignment 3: Generative Art!

Concept

For the Third Assignment, my aim was to incorporate everything we have learned in class such as Arrays, collisions, and Classes, and use it to create an engaging piece of art. Initially, I planned to create a intricate animation, but realized that it was beyond the scope of the assignment. So, I settled on creating an animation that would pique the viewer’s interest and leave them wondering about how it was created.

I started off with replicating an in-class example of dropping snowflakes, which were reproduced, and I thought of replacing that with colored circles over a black background. This did look interesting, but seemed a bit basic – the circles were originally only rebounding from the walls (edges of the canvas). So I developed it further such that they collide with each other and exchange their speeds to seem interesting. Then, developing it further, I added a Neon Image on top of it and exchanged the images on collision as well.

I achieved a mixture of Chaos, but order. Everything had its set path – an order to follow. However, a lot of order among multiple objects that were not coordinated amongst each other caused Chaos. This is something I drew as an inspiration from an in-class discussion.

Embedded Canvas

The assignment outcome is attached as an embedded sketch as follows:

Try pressing the ‘m’ key! (In case it does not work, make sure to have clicked on the canvas)

Code

// Note: Press 'm' to view a messy functionality

let circles = []; //Array to store the circles
let noCircles = 20; //Number of circles that appear on the screen
let messup=false; //To enable the messy functionality

//Function to preload the graphics. This would load all the graphics before the setup function is run
function preload() {
  purple_img = loadImage('purple.png');
  green_img = loadImage('green.png');
  red_img = loadImage('red.png');

}

function setup() {
  createCanvas(400, 400);

  // Create objects of the class Circle and store them in an array
  for (let i = 0; i < noCircles; i++) {
    // A random positioning and size of each circle     
    let r = random(10, 30);
    let x = random(0, width-2*r);
    let y = random(0, height-2*r);


    // Check if a circle with the same position and size already exists
    let overlap = false;
    for (let j = 0; j < circles.length; j++) {
      let distance = dist(x, y, circles[j].x, circles[j].y);
      if (distance < r + circles[j].r) {
        overlap = true;
        break;
      }
    }

    // If there is no overlap, create a new circle
    if (!overlap) {
      circles[i] = new Circle(x, y, r);
    } else {
      i--;
    }
    
    // The above code blocks avoid any colliding circles being drawn in the initial stages
    
  }
}

function draw() {
  background(0);

  // Display objects in the array and update their position
  for (let i = 0; i < circles.length; i++) {
    circles[i].update();
    circles[i].display();

    // Check for collisions between circles
    for (let j = i + 1; j < circles.length; j++) {
      if (circles[i].collidesWith(circles[j])) {
        // If the messup functionality has been set, a different collision resolve function is called
        if (messup==true){
          circles[i].resolveCollisionWeird(circles[j]);
        }
        else{
          circles[i].resolveCollision(circles[j]); 
        }
      }
    }
  }
}

// Circle object
class Circle {
  constructor(x, y, r) {
    this.x = x;
    this.y = y;
    this.r = r;
    this.speed = random(1, 5);
    this.dx = random(-this.speed, this.speed);
    this.dy = random(-this.speed, this.speed);
    // A Number that checks the image_type to choose from the 3 types that we have
    this.image_type = int(random(1,4));
  }

  
  display() {
    // The circle image is displayed, depending on the image it got allotted in the constructor
    if(this.image_type%3==1){
      image(green_img, this.x, this.y, this.r*2, this.r*2);
    }
    else if(this.image_type%3==2){
      image(purple_img, this.x, this.y, this.r*2, this.r*2);
    }
    else{
      image(red_img, this.x, this.y, this.r*2, this.r*2);
    }
  }

  update() {
    this.x += this.dx;
    this.y += this.dy;

    // Check for collisions with the edges of the canvas
    if (this.x + this.r*2 > width || this.x < 0) {
      this.dx = -this.dx;
    }
    if (this.y + this.r*2 > height || this.y < 0) {
      this.dy = -this.dy;
    }
  }

  // Checks for collision with one another
  collidesWith(other) {
    // Calculates the distance between the current object and other objects
    let distance = dist(this.x, this.y, other.x, other.y);
    // If it is less than a threshold, it has collided!
    return distance < this.r + other.r;
  }

  // Once a collision is detected from the above function, the following function is called. It changes the speed of each, changes the image type with the other
  resolveCollision(other) {
    let tempX = this.dx;
    let tempY = this.dy;
    this.dx = other.dx;
    this.dy = other.dy;
    other.dx = tempX;
    other.dy = tempY;
    other.image_type = this.image_type;
  }
  
  // The following block of code was a modification of the above function which did not seem to work as I wanted it to, however it actually did something more artsy and interesting that I wanted to keep it as a hidden functionality to play with!  
  resolveCollisionWeird(other) {
    let angle = atan2(other.y - this.y, other.x - this.x);
    let overlap = 
        (this.r + other.r) - dist(this.x, this.y, other.x, other.y);
    this.x += cos(angle) * overlap / 2;
    this.y += sin(angle) * overlap / 2;
    other.x -= cos(angle) * overlap / 2;
    other.y -= sin(angle) * overlap / 2;
    
    let tempX = this.dx;
    let tempY = this.dy;
    this.dx = other.dx;
    this.dy = other.dy;
    other.dx = tempX;
    other.dy = tempY;
  }
  
}

// In the case that the key 'm' is pressed, the collision works differently.
function keyPressed(){
  if (key == 'm'){
   messup=true; 
  }
}


Problems

A small problem that I ran into was an issue where some of the images were colliding up to a point where an overlap could be observed. Since I started off with ellipses instead of the images, I was using their centre as a reference point, however, changing that to an image caused a shift in the reference point, which was now the top left of the image. This caused multiple issues including the one mentioned in the beginning of this paragraph.

It may not be noticeable to everyone, however I tried to resolve the issue and instead came up with something chaotic. You can press ‘m’ to see that!

The full canvas is linked here.

Week 3 – Object Oriented Programming Art

Concept:

Object Oriented Programming (OOP) and art are two separate concepts to me. I have only ever used it to create games, or different data structures, so when it came to creating art, I was in an art block. Since OOP is extremely useful when it comes to motion of objects and graphics on the screen, I was immediately drawn to something dynamic. But what? Since all of my friends are taking Foundations of Science, I am continuously surrounded by physics. This month, the topic was circular motion. When I think about circular motion, I think about rotation and revolution of celestial bodies. Hence, for this week’s project, I have created a small work that depicts the motion of planets (Mercury through Neptune sorry Pluto 🙁 ) around the Sun.

The Solar System 

Link: https://editor.p5js.org/ajlasacic/full/GIWVhC73H

Challenges:

To start off, circular motion was hard to think about when working with OOP. Since I was working with many orbits, it was a struggle to spread them adequately across the screen. The model is obviously scaled down, it is an artistic representation of the system, but managing the distances between the planets and setting up the asteroid belt was really tricky and took some fiddling to get right.

  this.display = function () {
    fill(this.color);
    ellipse(this.x, this.y, this.radius);
  };
}

// Move objects in a circle by updating the angle
move() {
  this.x = this.xPos + this.distance * cos(this.angle / this.speed);
  this.y = this.yPos + this.distance * sin(this.angle / this.speed);

  this.angle++;
}

The asteroid belt was another point of concern. I wanted to contain it in one place, so that it can be considered one object. Although I could have just used for loops outside of the code, I created another class which made it easier to control the specific parameters of the belt such as the size and number of circles.

// Asteroid belt 
class Belt {
  constructor(m, n) {
    // Number of belts
    this.n_belts = m;
    
    // Number of asteroids in belt
    this.n_rocks = n;
    
    // Array for storing asteroid objects
    this.beltArray = [];
  }

  // Produces a 2d array - this.beltArray[] 
  add_asteroids() {
    for (let i = 1; i <= this.n_belts + 1; i++) {
      let belt = [];
      for (let j = 1; j <= this.n_rocks; j++) {
        belt[j] = new Celestial(
          width / 2,
          height / 2,
          random(2, 4),
          i * (start - 10) + 170,
          j * 130 + i * random(10, 15),
          random(12.5, 37.5) * rotation,
          random(100, 200)
        );
      }
      this.beltArray.push(belt);
    }
  }

  // Displays each meteor by calling Celestial
  display_meteors() {
    for (let i = 1; i <= this.n_belts; i++) {
      for (let j = 1; j <= this.n_rocks; j++) {
        this.beltArray[i][j].move();
        this.beltArray[i][j].display();
      }
    }
  }
}

Unfortunately, when I came to that point, my code got deleted. In all honesty, it was my fault since I did not save the file once before leaving my workstation. From then on, it took another couple of hours to get back to my original progress, but I was devastated for quite some time because a split second was all it took to lose hours of work.

I was struggling to create the trail effect. In the beginning, I was trying to write more code in order to make it appear behind the celestial object. In the end, I realized that if I decrease the alpha of the background, a nice trail should be left behind by the celestial objects.

// Opacity can change for trail effect of moving objects
  background(0,0,0, opacity);

Finally, in order to introduce some creativity, I wondered whether an orbit can be drawn for each planet. For some time I tried to create it within the class, but since my Belt class creates instances of the Celestial class, it would make an orbit for each asteroid as well. I settled for creating a separate orbit() function that uses the start variable to size the orbits. Unlike C++ I could not make getter functions, so I could not extract radii for the planets which is why I ultimately could not make everything resizable .

function orbits() {
  // Sun glow
  for (let i = 0; i < 50; i++) {
    fill(241, 93, 34, 3);
    ellipse(width / 2, height / 2, i * 1.3);
  }
  
  noFill();
  stroke(255, 255, 255, val);
  ellipse(width / 2, height / 2, start * 4);
  ellipse(width / 2, height / 2, start * 6);
  ellipse(width / 2, height / 2, start * 10);
  ellipse(width / 2, height / 2, start * 14);
  ellipse(width / 2, height / 2, start * 24);
  ellipse(width / 2, height / 2, start * 28);
  ellipse(width / 2, height / 2, start * 32);
  ellipse(width / 2, height / 2, start * 37);
  noStroke();
}

function mousePressed() {
  val = 20;
}

function mouseReleased() {
  val = 0;
}

Reflection

Overall, I am satisfied by the look of the project. I altered some CSS parameters to make the canvas corners rounded which gives a nice effect to the piece. Although we can intuitively realize that this is our solar system, I wished to add more detail to the planets. For example, Saturn’s rings and Earth’s life, i.e., greenery. Unfortunately, since I lost all of my progress and had to trace my steps in order to remake the piece, I was left with little time to try and achieve that. Although I could have created a Saturn class, I wanted to make use of OOP and use one class for all planets. I am very happy with the trail and glow effect I created by utilizing the alpha variable of fill. In the future, I wish to create pieces that are more artistic, perhaps expressionist, but since I am not used to combining art with OOP, I know it will take some time.


Assignment 2: Creative Piece!

Concept

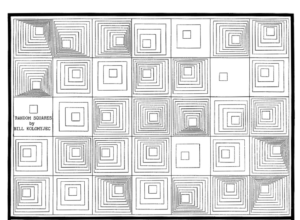
As part of the second assignment, for which the task was to produce a creative piece, something that caught my attention was the following image from COMPUTER GRAPHICS AND ART Aug1977.

Therefore, I decided to replicate that, but not only replicate a single instance, but make it interactive such that I can essentially see every single one of the types of squares. Starting off with a basic Mouse Movement in the in-class exercise, I built upon it to make it move periodically over a speed as an automated animation. When that was done, I moved forward with adding more colors and making it playful! If you press the RIGHT ARROW, LEFT ARROW, or the ‘a’ key, you can add specific colors!

The reason I made the animation squares move automatically in the manner seen below was to replicate the old ‘DVD’ behavior in Screen Savers of Old Televisions!

Embedded Canvas

The final production for my assignment is as follows:

Code

While the entire code is well commented, and very concise (linked below), one specific segment of it that I would like to share is the use of a single for loop with a map function to change the x and y directions of the animations. I started the usage of the map function to make the animation follow the mouse movement, however I later adapted it to be an automated sequence.

  // A loop to draw the different squares
  for (let i = 0; i<230; i=i+20)
  {   
      // Fill with the dark backgrounds in the pyramid style
      fill(i,i,i);
    
      // To add the different colors with the key presses, such that they are added in an incremental way
      // For the Red Color
      if (i==redColorCounter){
        fill(255,160,122)
      }
      // For the Blue Color
      if(i == blueColorCounter){
        fill(0, 0, 255);
      }
      // For the Yellow Color
      if(i == yellowColorCounter){
        fill(255, 255, 0);
      }
      
      // Changing xPosition and the yPosition of the squares
      xPos = i*(map(xInc, 250, 500, 1.0, 1.9))
      yPos = i*(map(yInc, 250, 500, 1.0, 1.9))
      rect(xPos,yPos, 500-(i*2))
  }
  // Make the colors 'climb' the different squares in the animation
  redColorCounter+=20;
  blueColorCounter+=20;
  yellowColorCounter+=20;
}


Improvements

As a future step, I really want to use a modular approach with functions and eliminate any and all duplications or repetitions of similar code pieces. One example would be the movement in the x & y directions by adding a function (which I tried but was not working the way I wanted it to!).

The full canvas is linked here.

Assignment 2- Art(Static Noise)

IDEA

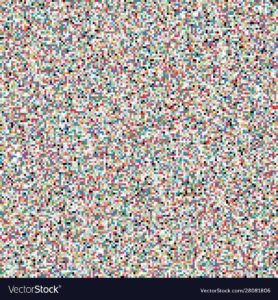
In this assignment, we were required to use the knowledge we acquired in class( mainly loops) to create an art of any form. At first, I tried out so many random combinations of shapes and loops to create a generative art drawing inspiration from so many online sources but I could not really come up with something very inspiring and aesthetically pleasing to me. As I kept on searching I came across the image below.

The image Image above is an image of what we term “Static noise”. It’s basically an output to a television screen when there is a bad signal.

PROCESS

I decided to recreate this using p5js. At first i tried out several shapes and finally settled on using rectangles. Using for loop, i generated several small rectangles to fill up the whole canvas and then used the random function to also give them color. The code is very simple and short. I used just two nested for loops in this assignment.


 REFLECTION

For me, my work for this assignment was very simple and less time consuming as compared to the first assignment. I think i am getting better at using p5js. I experimented on so many functions and was also able to add some sound to make the whole experience better.

Youssef’s self portrait

Self portrait project using P5.js. I made this image using different shapes and images. I also managed to add text to it, in order to add the ‘NYU’ on the shirt. It was very interesting working on this project, as it actually allowed me to understand the P5 grid system and how to create and locate different shapes on the canvas. The main challenge I faced was drawing the hair as I had to change the coordinates of each circle in order to create the curly hair effect. I believe that there is probably better way to draw the hair maybe using bezier curves, or different shapes that would give a more realistic look. I however, find this design using circles more fitting in this case as it goes well with the style of the face of the rest of the face.

I am happy about how the torso turned out with the design of the NYU Logo. I also attempted to add an actual picture in the background to create a whole University student vibe with the portrait.

One of the issues I faced was probably overlaying different shapes on the canvas, especially with the neck and the NYU logo. However, I found out the order of the code affects the layer of the shape on the canvas.

One challenge I solved was the code for the Logo. In the beginning, I was thinking I had to create it using different shapes. But, I found out that with this chunk of code I can facilitate the whole issue:

//NYU
textAlign(CENTER, CENTER);
textSize(50);
fill(255);
text(“NYU”, 250, 460);

Assignment 1 – Self Portrait

As I started the assignment, I had a bunch of trouble with the parameters of shapes that I used as well as the coordinate system. Thankfully, I was able to overcome this obstacle by consulting with the p5js Reference. I also used Owen Roberts’ grid code to help me position the shapes properly.

Initially, my idea was to recreate my passport photography in a minimalistic manner. I used a variety of shape primitives in p5 to make this happen and I also explored using RGB and Hex codes for color. Additionally, I wanted a piece of the portrait to represent NYU so I researched the RGB values of the NYU purple and used it as the background.

The following code was used to get the desired result:

function setup() {
  createCanvas(400, 400);
  background(87, 6, 140);
}

function draw() {
  //ears
  fill(232, 190, 172);
  stroke(0);
  ellipse(110, 200, 30, 60);
  ellipse(290, 200, 30, 60);

  //neck
  fill(232, 190, 172);
  stroke(0);
  rect(170, 290, 60, 80);

  //body
  fill("#5A5A5A");
  rect(75, 320, 250, 200, 40);
  fill(232, 190, 172);
  stroke(0);
  arc(200, 320, 80, 40, 0, PI, CHORD);
  fill(232, 190, 172);
  noStroke(0);
  arc(200, 320, 60, 40, 0, PI);

  //face
  fill(232, 190, 172);
  stroke(0);
  ellipse(200, 200, 180, 200);
  //eyes
  fill(255);
  ellipse(160, 180, 50, 30);
  ellipse(240, 180, 50, 30);
  fill("#1569C7");
  ellipse(160, 180, 20, 20);
  ellipse(240, 180, 20, 20);
  fill(0);
  ellipse(160, 180, 8, 8);
  ellipse(240, 180, 8, 8);
  //eye shine
  fill(255);
  ellipse(165, 175, 5, 5);
  ellipse(245, 175, 5, 5);
  // nose
  fill("#9F7967");
  noStroke(0);
  quad(190, 215, 210, 215, 220, 225, 180, 225);
  fill(0);
  ellipse(194, 220, 7, 7);
  ellipse(205, 220, 7, 7);
  stroke(0);
  line(210, 164, 210, 215);
  //hair
  fill("#c89f73");
  noStroke(0);
  ellipse(200, 108, 173, 65);
  triangle(110, 180, 115, 100, 150, 110);
  triangle(290, 180, 285, 100, 250, 110);
  //mouth
  fill(231, 106, 106);
  stroke(0);
  arc(200, 260, 60, 13, 0, PI);
  arc(200, 260, 60, 8, PI, 0);
  fill(0);
  stroke(0);
  line(170, 260, 230, 260);
}

As visible from the code I also played around with the outline of the used shapes.

Following is the final version of the self portrait.

In retrospect, this was a great assignment as an introduction to p5 and I really enjoyed doing it! In the future, I would like to focus more on making artwork interactive as I have a few ideas I would like to explore such as psychedelic art.

Assignment 1- Self Portrait


IDEA AND PROCESS

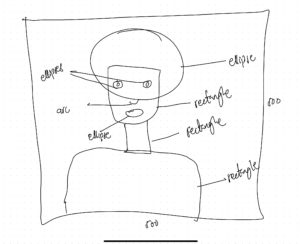
In this Assignment we were to use p5Js to create a portrait of ourselves. I used basic shapes ( ellipses, rectangles, lines and arcs ) in creating my figure. I used hex color codes in generating the colors in my portrait. The diagram below shows the rough work and though process that went into producing my portrait( though it doe not look exactly like me ).

REFLECTION AND FUTURE IMPROVEMENTS

For the code, i used basic coding technique and involved no functions  on my own. In future, I intend to explore ways to make the portrait more interactive and dynamic. I intend make the eyes move relative to the position of the mouse, and also incorporate some objects into the background.

Sponge Bob Portrait

Portrait of SpongeBob SquarePants

function setup() {
  createCanvas(700, 500);
  background(32, 210, 245);
  angleMode(DEGREES);
}

function draw() {
  strokeWeight(1);

  //drawing points to get curve shape
  point(244, 422);
  point(228, 402);
  point(234, 374);
  point(223, 351);
  point(234, 320);
  point(220, 293);
  point(231, 262);
  point(222, 240);
  point(238, 230);
  point(262, 236);
  point(288, 229);
  point(320, 234);
  point(358, 231);

  //rightside curve
  point(450, 402);
  point(439, 376);
  point(448, 351);
  point(430, 321);
  point(444, 294);
  point(430, 265);
  point(438, 241);
  point(418, 228);
  point(393, 235);
  point(439, 421);

  //creating hands
  stroke(0);
  fill(255, 255, 255);
  ellipse(225, 377, 23, 40);

  stroke(0);
  fill(255, 255, 255);
  ellipse(449, 377, 23, 40);

  //creating curve from points

  stroke(197, 207, 19);
  strokeWeight(4);
  fill(241, 245, 32);
  beginShape();
  curveVertex(244, 422);
  curveVertex(244, 422);
  curveVertex(228, 402);
  curveVertex(234, 374);
  curveVertex(223, 351);
  curveVertex(234, 319);
  curveVertex(220, 293);
  curveVertex(231, 262);
  curveVertex(222, 240);
  curveVertex(238, 230);
  curveVertex(262, 236);
  curveVertex(288, 229);
  curveVertex(262, 261);
  curveVertex(320, 234);
  curveVertex(358, 229);
  curveVertex(358, 231);
  curveVertex(393, 235);
  curveVertex(418, 228);
  curveVertex(438, 241);
  curveVertex(430, 265);
  curveVertex(444, 294);
  curveVertex(430, 321);
  curveVertex(448, 351);
  curveVertex(439, 376);
  curveVertex(450, 402);
  curveVertex(439, 421);
  curveVertex(439, 421);
  endShape();

  //drawing for eyes
  stroke(0);
  strokeWeight(2);
  fill(255, 255, 255);
  circle(365, 310, 70);

  //2nd eyes
  stroke(0);
  strokeWeight(2);
  fill(255, 255, 255);
  circle(295, 310, 70);

  //inner circless for eyes
  stroke(0);
  strokeWeight(2);
  fill(32, 160, 245);
  circle(299, 310, 30);

  stroke(0);
  strokeWeight(2);
  fill(32, 160, 245);
  circle(355, 310, 30);

  //inner inner eyes

  stroke(0);
  strokeWeight(2);
  fill(0);
  circle(300, 310, 10);

  stroke(0);
  strokeWeight(2);
  fill(0);
  circle(355, 310, 10);

  //white patches of cirlcles to make eyes realistic
  //left eye
  noStroke(0);
  fill(255, 255, 255);
  circle(295, 306, 5);

  //lower circle
  noStroke(0);
  fill(255, 255, 255);
  circle(302, 315, 2.5);

  //for right eye
  noStroke(0);
  fill(255, 255, 255);
  circle(350, 306, 5);

  //lower circle
  noStroke(0);
  fill(255, 255, 255);
  circle(358, 315, 2.5);

  //lower rectangles
  stroke(0);
  fill(255, 255, 255);
  rect(241, 421, 206, 30, 10);
  fill(245, 153, 32);
  rect(245, 450, 199, 30);

  //smile on Bob's face
  stroke(0);
  strokeWeight(3);
  fill(241, 245, 32);
  arc(330, 350, 120, 80, 0, 180);

  stroke(0);
  strokeWeight(3);
  noFill();
  arc(270, 353, 20, 10, -180, 0);
  arc(390, 354, 20, 10, -180, 0);

  //red blushing of Bob
  // stroke(245, 99, 32);
  // strokeWeight(3);
  // noFill(197, 207, 19);
  // arc(270,345,50,35,-190,20)
  // arc(390,345,50,35,-190,20)

  //Bob's tie
  stroke(0);
  strokeWeight(2);
  triangle(290, 421, 330, 435, 338, 421);
  triangle(357, 421, 372, 435, 403, 421);

  stroke(0);
  strokeWeight(3);
  fill(245, 39, 32);
  arc(348, 422, 17, 35, 0, 180);
  arc(348, 455, 17, 35, 180, 0);

  // stroke(0);
  // strokeWeight(1);
  // strokeJoin(ROUND);
  // triangle(338,421,349,443,357,421)
  
  stroke(0);
  strokeWeight(2);
  fill(245, 245, 32);
  rect(288,480,10,25);
  rect(400,480,10,25)

  stroke(0);
  strokeWeight(2);
  fill(255, 255, 255);
  rect(320, 389, 12, 15);

  rect(336, 389, 12, 15);


  //ellipse for nose
  translate(61, -60);
  rotate(10);
  stroke(0);
  fill(241, 245, 32);
  ellipse(330, 339, 23, 40);

  translate(12, 1);
  rotate(1);
  noStroke();
  fill(241, 245, 32);
  rect(310, 348, 20, 20);

  //other spots on body
  translate(20, -60);
  rotate(10);
  stroke(197, 207, 19);
  fill(197, 207, 19);
  ellipse(270, 310, 20, 30);

  translate(20, -60);
  rotate(10);
  stroke(197, 207, 19);
  fill(197, 207, 19);
  ellipse(340, 370, 10, 15);

  translate(20, -60);
  rotate(10);
  stroke(197, 207, 19);
  fill(197, 207, 19);
  ellipse(470, 210, 10, 15);

  translate(20, -60);
  rotate(10);
  stroke(197, 207, 19);
  fill(197, 207, 19);
  ellipse(470, 210, 10, 15);

  translate(20, -60);
  rotate(10);
  stroke(197, 207, 19);
  fill(197, 207, 19);
  ellipse(550, 350, 15, 30);

  translate(20, -60);
  rotate(10);
  stroke(197, 207, 19);
  fill(197, 207, 19);
  ellipse(650, 170, 20, 30);
  
  // translate(20, -60);
  // rotate(-60);
  // stroke(0);
  // strokeWeight(1)
  // fill(245, 245, 32);
  // rect(-82, 692, 9, 80);


  print(mouseX + "," + mouseY);
}

Result:
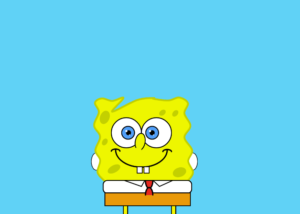
Here


run or gone!

concept:

This entire journey starst with me almost losing an eyeI was in the hospital due to an eye operation procedure that presented personal, medical, and academic circumstances I did not expect. After healing and returning home, my family and I had to go to our Emirate, Fujairah. As a result, I found myself without the Arduino kit we were given in class, but instead, a smaller one that I previously had when teaching myself coding throughout the summer. The Arduino kit did not have all of the equipment that a complete kit would offer but only included a potentiometer, a couple of wires, two buttons, a couple of resistors, and a Liquid Display Screen. Yet, rather than being demotivated and giving up, I took this as an opportunity to explore coding on the LCD!

This opened new doors allowing me to have more than one medium to display imagery. I ended up utilizing this by having the breadboard double as both a controller and a screen while the p5.js sketch is presented as a ‘game state’ indicator. Like all projects I have worked on throughout this course, I wanted to add an artistic element, so I ended up drawing all illustrations presented on p5.js to provide a sense of attraction to the user.
I wish I could have presented this during the IM showcase, as I would have loved to make it a competitive game where the highest score would win a prize and, as a result, attract more people. Nevertheless, despite the limitations and circumstances, I am happy with how the project turned out. I have attached the assets, code (including references), and demonstration video below (presenting the game from a stranger’s perspective).

code:

(code that is altered and commented is due to an Arduino update that messed around with the code. Please reach out if you have any questions)

                            // HAMAD ALSHAMSI

                      // RUN OR DONE: FINAL PROJECT


                                // code


// const int buttonPin = 2; // pin for the button
// int buttonState = 0; // variable to store the button state

// void setup() {
//   pinMode(buttonPin, INPUT); // set the button pin as an input
//   Serial.begin(9600); // start the serial connection
// }

// void loop() {
//   buttonState = digitalRead(buttonPin); // read the button state

//   // if the button is pressed, send a "1" over the serial connection
//   if (buttonState == HIGH) {
//     Serial.println("1");
//   }

//   delay(100); // delay to prevent sending too many "1"s
// }


//allow the incorporation of the LCD for the project
#include <LiquidCrystal.h>

//indicate used pin variables
#define pinPress 2
#define pinPlay 1
#define pinWriteNRead 10
#define pinBrightness 12

//indicate variables for game animations used
#define runAnimation1 1
#define runAnimation2 2
#define jumpAnimation 3
#define topJumpAnimation '.'
#define bottomJumpAnimation 4
#define noObstacleAnimation ' '
#define yesObstacleAnimation 5
#define yesRightObstacleAnimation 6
#define yesLeftObstacleAnimation 7

//fix position for character
#define characterPosition 1
//define obstacle attributes
#define obstacleYSize 16
#define obstacleBlank 0
#define obstacleBottom 1
#define obstacleTop 2
//define character running attributes and poses when on floor
#define characterLocationNul 0
#define characterLocationBottom1 1
#define characterLocationBottom2 2
//define character hopping attributes and poses
#define characterLocationHop1 3
#define characterLocationHop2 4
#define characterLocationHop3 5
#define characterLocationHop4 6
#define characterLocationHop5 7
#define characterLocationHop6 8
#define characterLocationHop7 9
#define characterLocationHop8 10
//define character running attributes and poses when on obstacle
#define characterLocationRunTop1 11
#define characterLocationRunTop2 12

//LCD attributes and pixel arrangement inspired from Rees5286 on YouTube
LiquidCrystal lcd(11, 9, 6, 5, 4, 3);
static char obstaclePresentTop[obstacleYSize + 1];
static char obstaclePresentBottom[obstacleYSize + 1];
static bool pushButton = false;

//assign specific pixels to light up for corresponding poses
void drawCanvasNPixels(){
  static byte canvasNPixels[] = {
    //first running pose
    B01100,
    B01100,
    B00000,
    B01110,
    B11100,
    B01100,
    B11010,
    B10011,
    //second running pose
    B01100,
    B01100,
    B00000,
    B01100,
    B01100,
    B01100,
    B01100,
    B01110,
    //high hop
    B01100,
    B01100,
    B00000,
    B11110,
    B01101,
    B11111,
    B10000,
    B00000,
    //low hop
    B11110,
    B01101,
    B11111,
    B10000,
    B00000,
    B00000,
    B00000,
    B00000,
    //on ground
    B11111,
    B11111,
    B11111,
    B11111,
    B11111,
    B11111,
    B11111,
    B11111,
    //right side on ground
    B00011,
    B00011,
    B00011,
    B00011,
    B00011,
    B00011,
    B00011,
    B00011,
    //left side on ground
    B11000,
    B11000,
    B11000,
    B11000,
    B11000,
    B11000,
    B11000,
    B11000,
  };

  int i;
  //code, referenced from AymaanRahman on YouTube, to skip using '0' and allow rapid character alterations
  for (i = 0; i < 7; ++i) {
      lcd.createChar(i + 1, &canvasNPixels[i * 8]);
  }
  for (i = 0; i < obstacleYSize; ++i) {
    obstaclePresentTop[i] = noObstacleAnimation;
    obstaclePresentBottom[i] = noObstacleAnimation;
  }
}

//move obstacle
void generateObstacles(char* obstacle, byte newObstacle){
  for (int i = 0; i < obstacleYSize; ++i) {
    char current = obstacle[i];
    char next = (i == obstacleYSize-1) ? newObstacle : obstacle[i+1];
    switch (current){
      case noObstacleAnimation:
        obstacle[i] = (next == yesObstacleAnimation) ? yesRightObstacleAnimation : noObstacleAnimation;
        break;
      case yesObstacleAnimation:
        obstacle[i] = (next == noObstacleAnimation) ? yesLeftObstacleAnimation : yesObstacleAnimation;
        break;
      case yesRightObstacleAnimation:
        obstacle[i] = yesObstacleAnimation;
        break;
      case yesLeftObstacleAnimation:
        obstacle[i] = noObstacleAnimation;
        break;
    }
  }
}

//move character
bool characterDraw(byte position, char* obstaclePresentTop, char* obstaclePresentBottom, unsigned int score) {
  bool collision = false;
  char topStore = obstaclePresentTop[characterPosition];
  char bottomStore = obstaclePresentBottom[characterPosition];
  byte top, bottom;
  switch (position) {
    case characterLocationNul:
      top = bottom = noObstacleAnimation;
      break;
    case characterLocationBottom1:
      top = noObstacleAnimation;
      bottom = runAnimation1;
      break;
    case characterLocationBottom2:
      top = noObstacleAnimation;
      bottom = runAnimation2;
      break;
    case characterLocationHop1:
    case characterLocationHop8:
      top = noObstacleAnimation;
      bottom = jumpAnimation;
      break;
    case characterLocationHop2:
    case characterLocationHop7:
      top = topJumpAnimation;
      bottom = bottomJumpAnimation;
      break;
    case characterLocationHop3:
    case characterLocationHop4:
    case characterLocationHop5:
    case characterLocationHop6:
      top = jumpAnimation;
      bottom = noObstacleAnimation;
      break;
    case characterLocationRunTop1:
      top = runAnimation1;
      bottom = noObstacleAnimation;
      break;
    case characterLocationRunTop2:
      top = runAnimation2;
      bottom = noObstacleAnimation;
      break;
  }
  if (top != ' ') {
    obstaclePresentTop[characterPosition] = top;
    collision = (topStore == noObstacleAnimation) ? false : true;
  }
  if (bottom != ' ') {
    obstaclePresentBottom[characterPosition] = bottom;
    collision |= (bottomStore == noObstacleAnimation) ? false : true;
  }

  byte digits = (score > 9999) ? 5 : (score > 999) ? 4 : (score > 99) ? 3 : (score > 9) ? 2 : 1;

  //create canvas for game
  obstaclePresentTop[obstacleYSize] = '\0';
  obstaclePresentBottom[obstacleYSize] = '\0';
  char temp = obstaclePresentTop[16-digits];
  obstaclePresentTop[16-digits] = '\0';
  lcd.setCursor(0,0);
  lcd.print(obstaclePresentTop);
  obstaclePresentTop[16-digits] = temp;
  lcd.setCursor(0,1);
  lcd.print(obstaclePresentBottom);

  lcd.setCursor(16 - digits,0);
  lcd.print(score);

  obstaclePresentTop[characterPosition] = topStore;
  obstaclePresentBottom[characterPosition] = bottomStore;
  return collision;
}

//take in digital button signal
void buttonPush() {
  pushButton = true;
}

//allow the button to act as an interruption to make the character hop
void setup(){
  pinMode(pinWriteNRead, OUTPUT);
  digitalWrite(pinWriteNRead, LOW);
  pinMode(pinBrightness, OUTPUT);
  digitalWrite(pinBrightness, LOW);
  pinMode(pinPress, INPUT);
  digitalWrite(pinPress, HIGH);
  pinMode(pinPlay, OUTPUT);
  digitalWrite(pinPlay, HIGH);
  attachInterrupt(0/*pinPress*/, buttonPush, FALLING);
  drawCanvasNPixels();
  lcd.begin(16, 2);
}

//constantly check for new obstacle generation
void loop(){
  static byte characterLoc = characterLocationBottom1;
  static byte newObstacleType = obstacleBlank;
  static byte newObstacleDuration = 1;
  static bool playing = false;
  static bool blink = false;
  static unsigned int distance = 0;

  if (!playing) {
    characterDraw((blink) ? characterLocationNul : characterLoc, obstaclePresentTop, obstaclePresentBottom, distance >> 3);
    if (blink) {
      lcd.setCursor(0,0);
      lcd.print("Press Start");
    }
    delay(250);
    blink = !blink;
    if (pushButton) {
      drawCanvasNPixels();
      characterLoc = characterLocationBottom1;
      playing = true;
      pushButton = false;
      distance = 0;
    }
    return;
  }

  //constantly move obstacles towards the character
  generateObstacles(obstaclePresentBottom, newObstacleType == obstacleBottom ? yesObstacleAnimation : noObstacleAnimation);
  generateObstacles(obstaclePresentTop, newObstacleType == obstacleTop ? yesObstacleAnimation : noObstacleAnimation);

  //create obstacle repeatedly
  if (--newObstacleDuration == 0) {
    if (newObstacleType == obstacleBlank) {
      newObstacleType = (random(3) == 0) ? obstacleTop : obstacleBottom;
      newObstacleDuration = 2 + random(10);
    } else {
      newObstacleType = obstacleBlank;
      newObstacleDuration = 10 + random(10);
    }
  }

  //allow character to jump if interruption senses
  if (pushButton) {
    if (characterLoc <= characterLocationBottom2) characterLoc = characterLocationHop1;
    pushButton = false;
  }

//constantly check if character is in collision, if so game ends
  if (characterDraw(characterLoc, obstaclePresentTop, obstaclePresentBottom, distance >> 3)) {
    playing = false;
  } else {
    if (characterLoc == characterLocationBottom2 || characterLoc == characterLocationHop8) {
      characterLoc = characterLocationBottom1;
    } else if ((characterLoc >= characterLocationHop3 && characterLoc <= characterLocationHop5) && obstaclePresentBottom[characterPosition] != noObstacleAnimation) {
      characterLoc = characterLocationRunTop1;
    } else if (characterLoc >= characterLocationRunTop1 && obstaclePresentBottom[characterPosition] == noObstacleAnimation) {
      characterLoc = characterLocationHop5;
    } else if (characterLoc == characterLocationRunTop2) {
      characterLoc = characterLocationRunTop1;
    } else {
      ++characterLoc;
    }
    ++distance;

    digitalWrite(pinPlay, obstaclePresentBottom[characterPosition + 2] == noObstacleAnimation ? HIGH : LOW);
  }
  delay(100);
}


                                      // references

//inspired projects
//https://www.youtube.com/@rees5286
//https://rishanda.github.io/BSE_Template_Portfolio/

//learning how to incorporate LCD in project
//https://www.youtube.com/watch?v=EAeuxjtkumM&ab_channel=AymaanRahman
//https://www.youtube.com/watch?v=dZZynJLmTn8&ab_channel=HowToMechatronics