Then, I didn’t really know what to do with it in terms of animation….
I discovered the built in P3D and started different experiments, but I didn’t know how to integrate more effects while using the While loop, so I experimented further and created the animation at the top of the post.
The inspiration of this post for me was to experiment as much as possible, since it’s been helping me understand the mechanics of the code. And to save different blocks of code on GitHub if I find something interesting I could integrate in a different art piece later.
My inspiration for this assignment came from two sources:
A quote that “success isn’t linear”,
Casey Reas’ talk on Chance.
Now, let me explain what I mean.
Human brains are wired in a way to notice only up’s of certain experiences (Kahneman, “Thinking, Fast and Slow”). When looking at success stories of other people, it is oftentimes tempting to simplify their path into a mere collection of linear dots and draw a straight line connecting all. This is why I wanted to challenge this notion through my Processing code, but most importantly, to make a kind reminder to myself, too 🙂
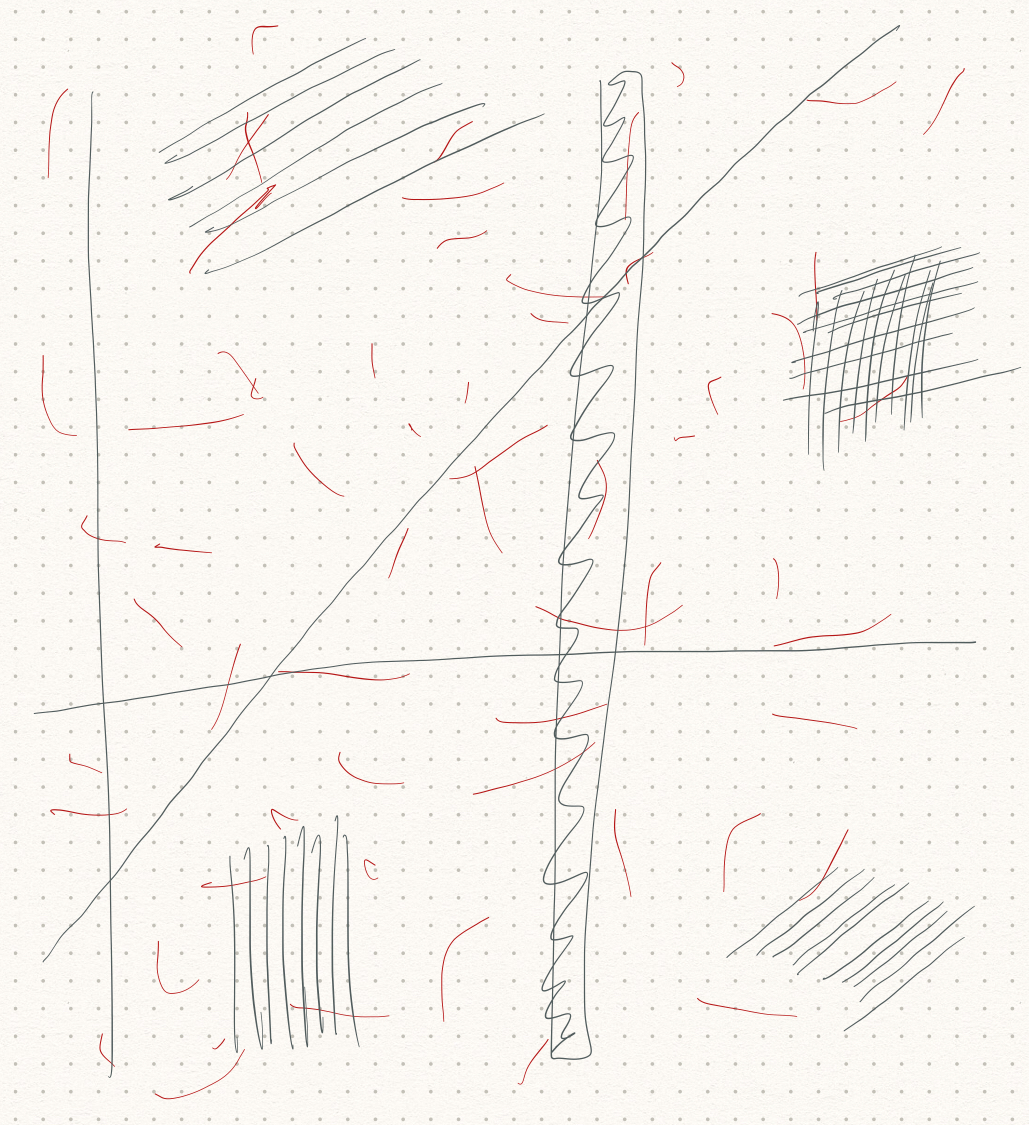
So I took out my iPad and started drawing the image that I was bearing in my head. After looking at some of the examples from the syllabus, I started off with simple, straight lines that were forming a rectangular pattern all throughout the setup window. Then, I decided to add random red lines throughout the screen to perform in a noise-like pattern. All these straight lines serve as a metaphor to a “linear path”.
Initial Sketch of the Idea
While I was implementing my sketch into code, I was listening to the Casey Reas’ talk on Chance which made me think a lot about random chances and possibilities in the meanwhile. I started playing around with my Processing code, challenging this “chance” to finally show in my work. Aaand…it did!
While I was taking this chance, one of my functions stopped working the way I expected it to work, and started to make a blinking effect on the screen instead. I took this as an opportunity to explore my options and made a slight shift to the initial idea.
It took me a while and a lot of web browsing to figure out how to place the red lines on the screen – however, all to turn the intended lines into rectangles and visit the class-example with the noise function and implement a similar one in my code.
So, in the very end, I got the following interpretation: in a black-and-white world where everything seems so linear, sometimes you have to be a red rectangle and take a step back to build your own, non-conventional path.
In this work I wanted to display how networks of people are created. The program starts off by creating several dots (people), and then randomly joins them together (relations). That is supposed to symbolize how humans form relations. Note that some of the lines change their color with time, as the relationship status changes as well. Even though people are connected randomly, they are capable of creating dense networks. I used the for loop to create the animation of two dots “coming” to each other.
For my first assignment using java, my main goal was to get used to the language. I just finished studying python in the previous semester, so I found that there are some useful similarities while I was coding this project. In general, doing this small exercise proved to be a good introduction to java, helping me develop important coding habits that relate to java.
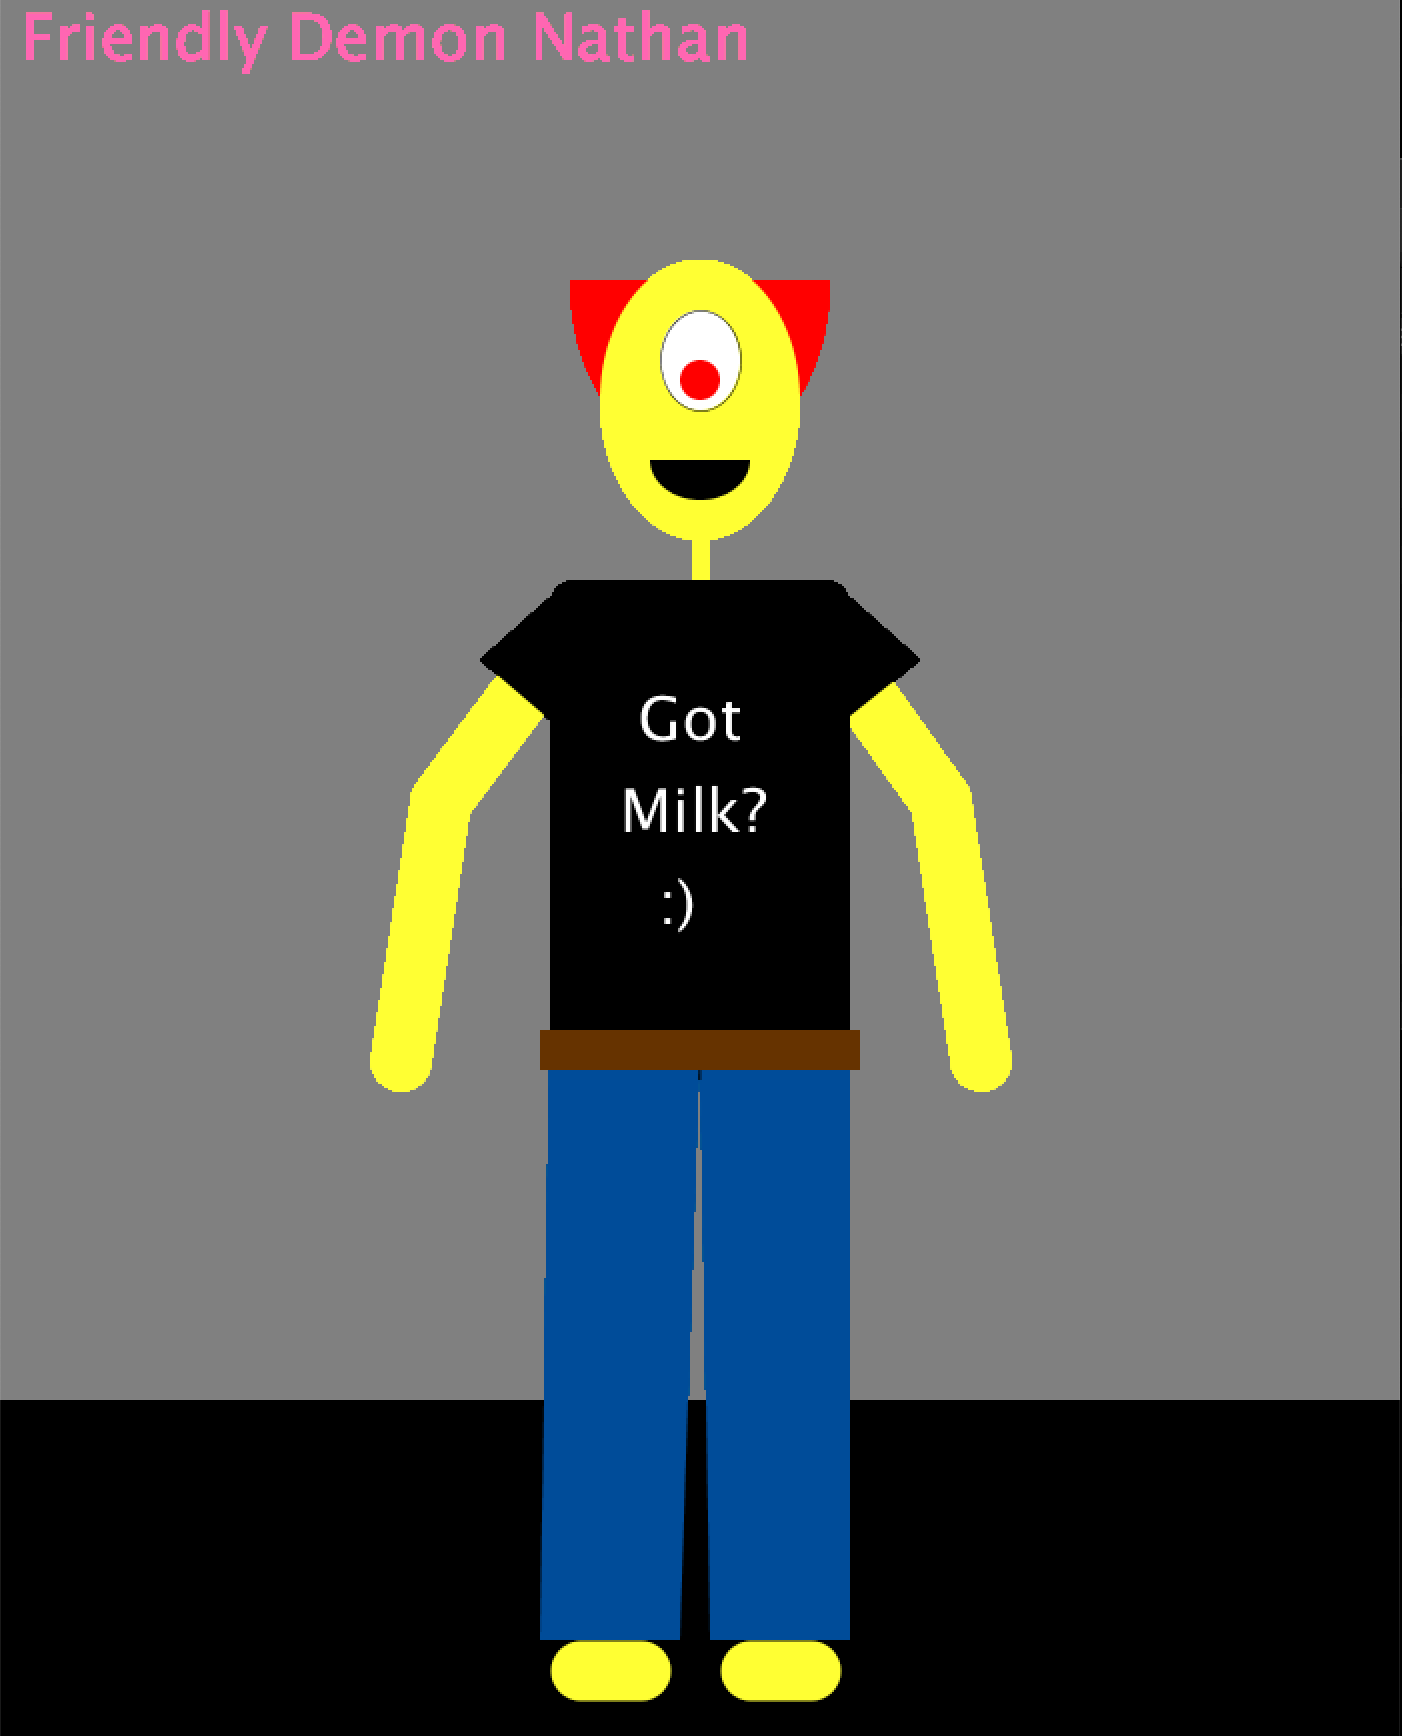
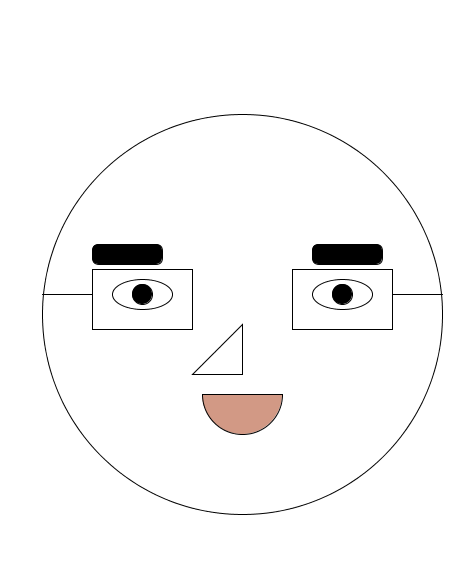
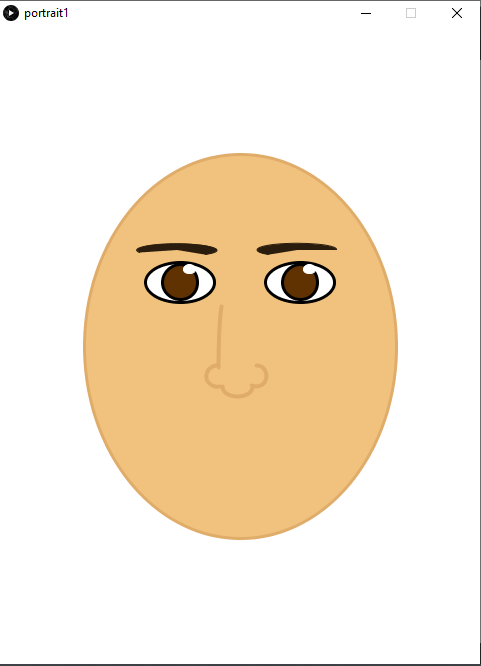
Project wise, we were asked to draw a not-so-accurate self-portrait of ourselves, so I took that requirement to somewhat of an extreme. I never really excelled at detailed intricate art anyways, so I decided to go a bit crazy and draw a demon version of myself. I have one red eye, red hair, and I knew demons can be scary for some people so I threw in some dad styles to cheer the picture up.
A big drawback to this week’s project is that I didn’t try to avoid hard coding that much, I felt like I wanted to start off just getting to know the language. In next week’s project, I want to design my code better and make it much more aesthetically pleasing.
Within the process of creating my self portrait , I struggled with a lot of different things ranging from simple writings and ordering of codes to changing various colors, shapes and sizes of different figures, and many more. I have absolutely zero experience with coding, therefore I was only able to create this five-year-old-like-drawing of mine. However, I hope to be able to get better at coding in the future and it would be really appreciated if any of you guys could give me tips or recommendations for websites that could help me with my coding skills so I wouldn’t have to look like a snowman.
For the first assignment in this course, we each had to make a self-portrait using Processing. The way I see it, self-portrait shows the way you want yourself to be presented to other people rather than how you precisely look on the exterior. Having grown in numerous different places I call home as a third-culture kid, I have always perceived myself as someone who has a spectrum of colors. Adapting was something that I grew accustomed to almost as if I became a chameleon. So even in this project I have incorporated an effect where my cartoon-like self-portrait is bouncing around the screen and, at the same time, changing colors (when a mouse is pressed). The change in color does not only happen in one area of the frame but rather everywhere in different variations. So when the background color changes, the color of my face, the color of my pupils, and the color of my name all change asynchronously. All of these animations were put into place so that I could illustrate how I adapt to the capricious environment. The following are the video of my animated self-portrait and code:
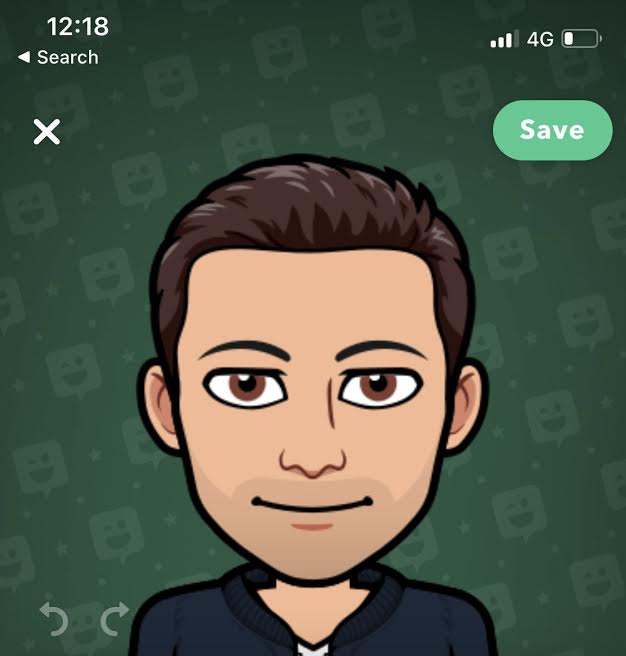
I struggled at first to actually start doing anything that is meaningful because I like to plan things ahead and foreseeing how the coding will go is quite difficult. I took inspiration from my Snapchat Bitmoji, knowing it’s just for ideas not copying.
my bitmoji avatar
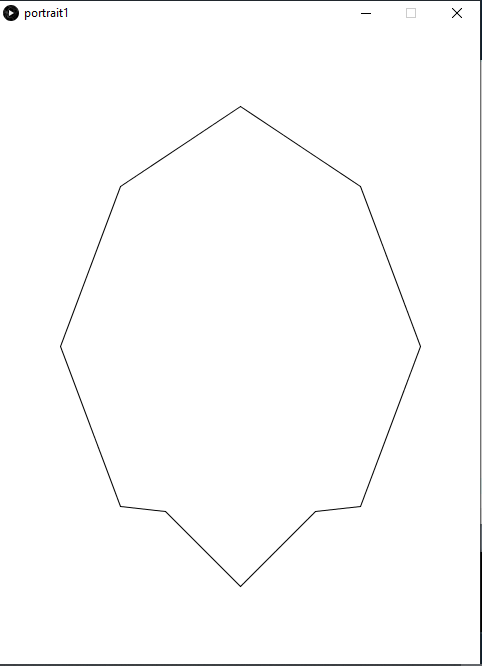
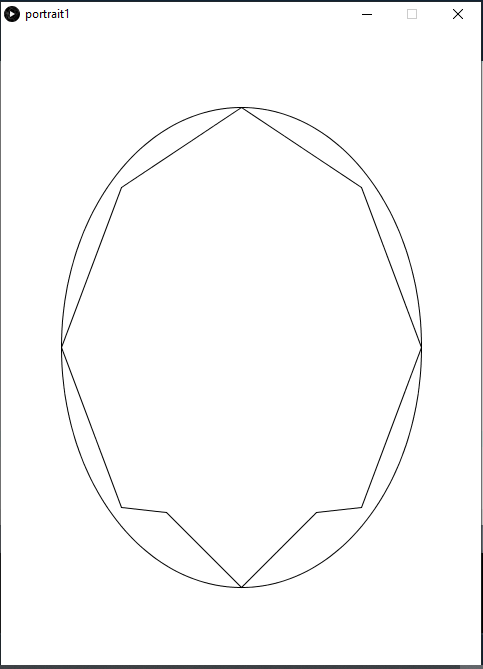
I made some quick research on Processing’s Reference pages and decided that the beginShape() might be a very suitable method for drawing the face, hair, and eyes (basically figures I thought would require complex drawing to be perfected).
I tried out the function and this is what I was able to do before realizing that the shape of the face can just be an ellipse for the sake of simplicity and because beginshape() will take a very long time to draw a curved shape.
The closest thing to a face I did using the functionAfter spending a very long time, I decided the ellipse was much better
I then started to master the small operations that I code for each part of the portrait, and I drew a very detailed eye which contains the eye itself, the brown iris, the white sclera, the pupil, and dark brown eyebrows.
Even though the eye was on point, I realized that making the portrait realistic will just make it weird and ugly so the rest of the face should just be more cartoon-like.
the face before adding the mouth, ears, hair, etc.
I drew a simple nose with just one outline from the right and some detail at the bottom, and I made a very simplistic but appropriate slightly-smiling mouth. The main function used was the “arc” function and I also struggled at first to understand how the radian angles calculations were carried out but I got things right simply by very long trial and error.
After completing most of the face, I decided to draw the hair using the beginShape() function which I struggled with earlier, and it turned it to be extremely useful for irregular shapes. By now, I was almost blindly typing numbers and automatically making calculations of dimensions and distances.
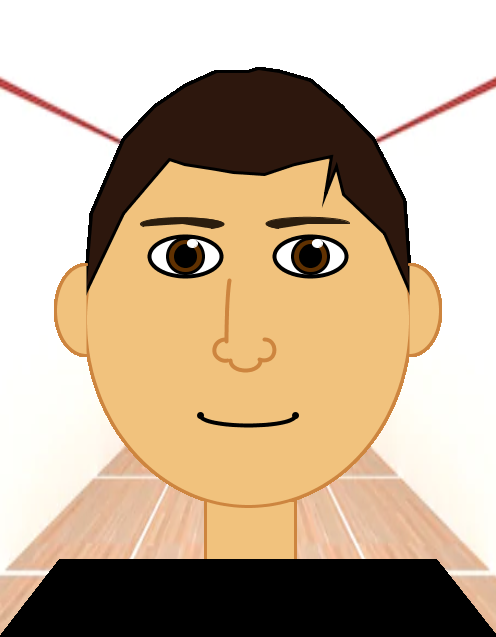
I made the ears using another arc function, and I decided to make the background a still photo of something that represents me; squash. I played squash for 5 years and even though I stopped playing years ago, I adore the sport and still play for fun until today.
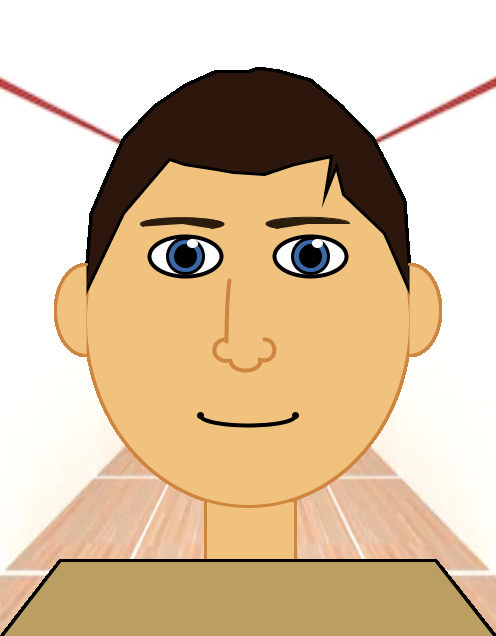
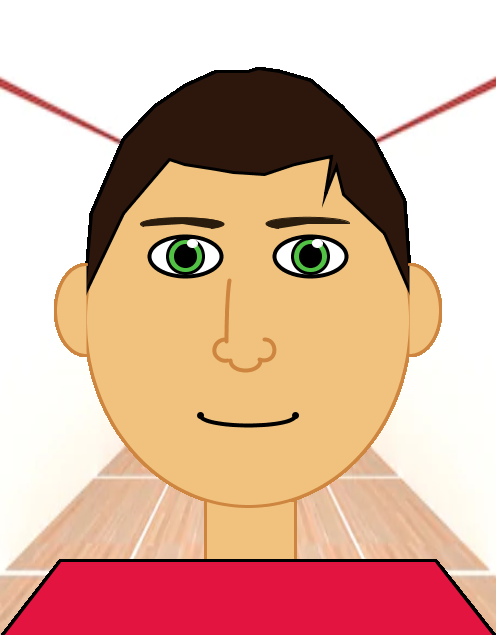
Lastly, I decided to make use of the clicking of mouse function in a simple creative way where if you click the mouse the colors of the eyes and the clothing randomly change simultaneously.
My Final Piece
Randomized colors of the portraitanother randomized version
//Assignment 1 Yahia Beethoven Tayel self portrait

//Initializing the variables before any function
//In case the image doesn't load
int backgroundColor = 255;
//dimesnions of the portrait
float x;
float y;

//randomized variables for the color of the clothes when mouseclicked
float r = 0;
float g = 0;
float b = 0;

float r1 = 96;
float g1 = 49;
float b1 = 1;

//setting up the plane on which the portrait is drawn
void setup() {
  size(500, 640);
  x = width/2;
  y = height/2;
  PImage img;
  img = loadImage("squash_background.PNG");
  img.resize(500, 640);
  background(backgroundColor);
  background(img);
}

//the main draw function that makes the face
void draw() {


//draws neck
fill(241, 194, 125);
stroke(205, 133, 63);
rect(x - 43, y+180, 90, 60);

//draws the face
strokeWeight(3);
fill(241, 194, 125);
stroke(205, 133, 63);
ellipse(x, y, 6.5*x/5, 7*y/6);

//draws the hair
strokeWeight(3);
fill(45, 23, 13);
stroke(0);

beginShape();
vertex(x/4 + 24, y - 25);
vertex(3*x/8, 2*y/3);
vertex(x/2, y/2.3);
vertex(5*x/8, y/3);
vertex(3*x/4, y/3.75);
vertex(7*x/8, y/4.45);
vertex(x, y/4.5);
vertex(x+10, y/4.7);
vertex(9*x/8, y/4.45);
vertex(5*x/4, y/4);
vertex(11*x/8, y/3);
vertex(3*x/2, y/2.3);
vertex(13*x/8, 2*y/3.2);
vertex(x+3*x/4 - 24, y - 25);
vertex(13*x/8 - 20, 2*y/3 +20);
vertex(3*x/2 - 30, y/2.3 +55);
vertex(11*x/8 - 5, y/3 +60);
vertex(5*x/4 +15, y/2.3 +55);
vertex(11*x/8 - 10, y/3 +50);
vertex(9*x/8 +15, y/2.3 +25);
vertex(9*x/8 - 15, y/2.3 +35);
vertex(x- 15, y/2.3 +33);
vertex(7*x/8, y/2.3 +30);
vertex(5*x/8 +30, y/2.3 +25);
vertex(5*x/8 +15, y/2.3 +20);

vertex(x/2, 2*y/3);
endShape(CLOSE);


//draws the eyes
strokeWeight(4);
fill(255);
stroke(0);

ellipse(3*x/4, 4*y/5, x/3.5, y/8);
ellipse(5*x/4, 4*y/5, x/3.5, y/8);

//draws the iris
strokeWeight(3);
fill(r1, g1, b1);
stroke(0);

ellipse(3*x/4, 4*y/5, x/7, y/9);
ellipse(5*x/4, 4*y/5, x/7, y/9);

//draws the pupil

fill(0);
stroke(0);

ellipse(3*x/4, 4*y/5, x/13, y/15);
ellipse(5*x/4, 4*y/5, x/13, y/15);

//draws the white spot
strokeWeight(1);
fill(255);
stroke(255);

ellipse(3*x/4 + x/38, 4*y/5 - y/25, x/25, y/40);
ellipse(5*x/4 + x/38, 4*y/5 - y/25, x/25, y/40);

//draws the eyebrows
strokeWeight(1);
fill(43, 29, 14);
stroke(43, 29, 14);
arc(3*x/4 - 3, 4*y/5-y/10, x/3, 13, HALF_PI+QUARTER_PI + 0.4, TWO_PI+QUARTER_PI/2 +0.4);
arc(5*x/4 -3 , 4*y/5-y/10, x/3, 13, HALF_PI+QUARTER_PI, TWO_PI+QUARTER_PI/2 - 0.4);

//draws the nose
noFill();
stroke(205, 133, 63);
strokeWeight(4);

//arc(x+12, 5*y/6 + 10, 7, y/2.5, 0, HALF_PI);
arc(x-18, 5*y/6 + 75, 7, y/2.5, PI, PI+QUARTER_PI+0.5);
//took the two nostrils idea from aysha of this class
arc(x - 23, y+30, 21, 21, HALF_PI-QUARTER_PI/3, PI+2*QUARTER_PI);
arc(x+16, y+30, 21, 21,  -HALF_PI, HALF_PI+QUARTER_PI/2);
arc(x-3, y+40, 30, 21,  0, PI);

//draws the mouth
noFill();
stroke(0);
arc(x, y+95, 95, 21,  0, PI);
strokeWeight(7);
point(x+47.5, y+95);
point(x-47.5, y+95);

//draws the ears
strokeWeight(3);
fill(241, 194, 125);
stroke(205, 133, 63);

arc(x/4 + 26, y - 10, x/4, y/3.5, HALF_PI, PI+HALF_PI );
arc(x+3*x/4 - 26, y - 10, x/4, y/3.5, -HALF_PI, PI-HALF_PI);


//draws shoulders
fill(r, g, b);
stroke(0);
beginShape();
vertex(0, 2*y);
vertex(x/4, y+240);
vertex(x+3*x/4, y+240);
vertex(2*x, 2*y);
endShape();

}
//functions that are called when the mouse is clicked to randomly change the colors of both the eyes and the clothes simultaneously
void mousePressed() {
   r = random(255);
   g = random(255);
   b = random(255);

   r1 = random(255);
   g1 = random(255);
   b1 = random(255);
}
I learned a lot through this simple assignment and I look forward to future assignments which will help develop my skills in programming much more.
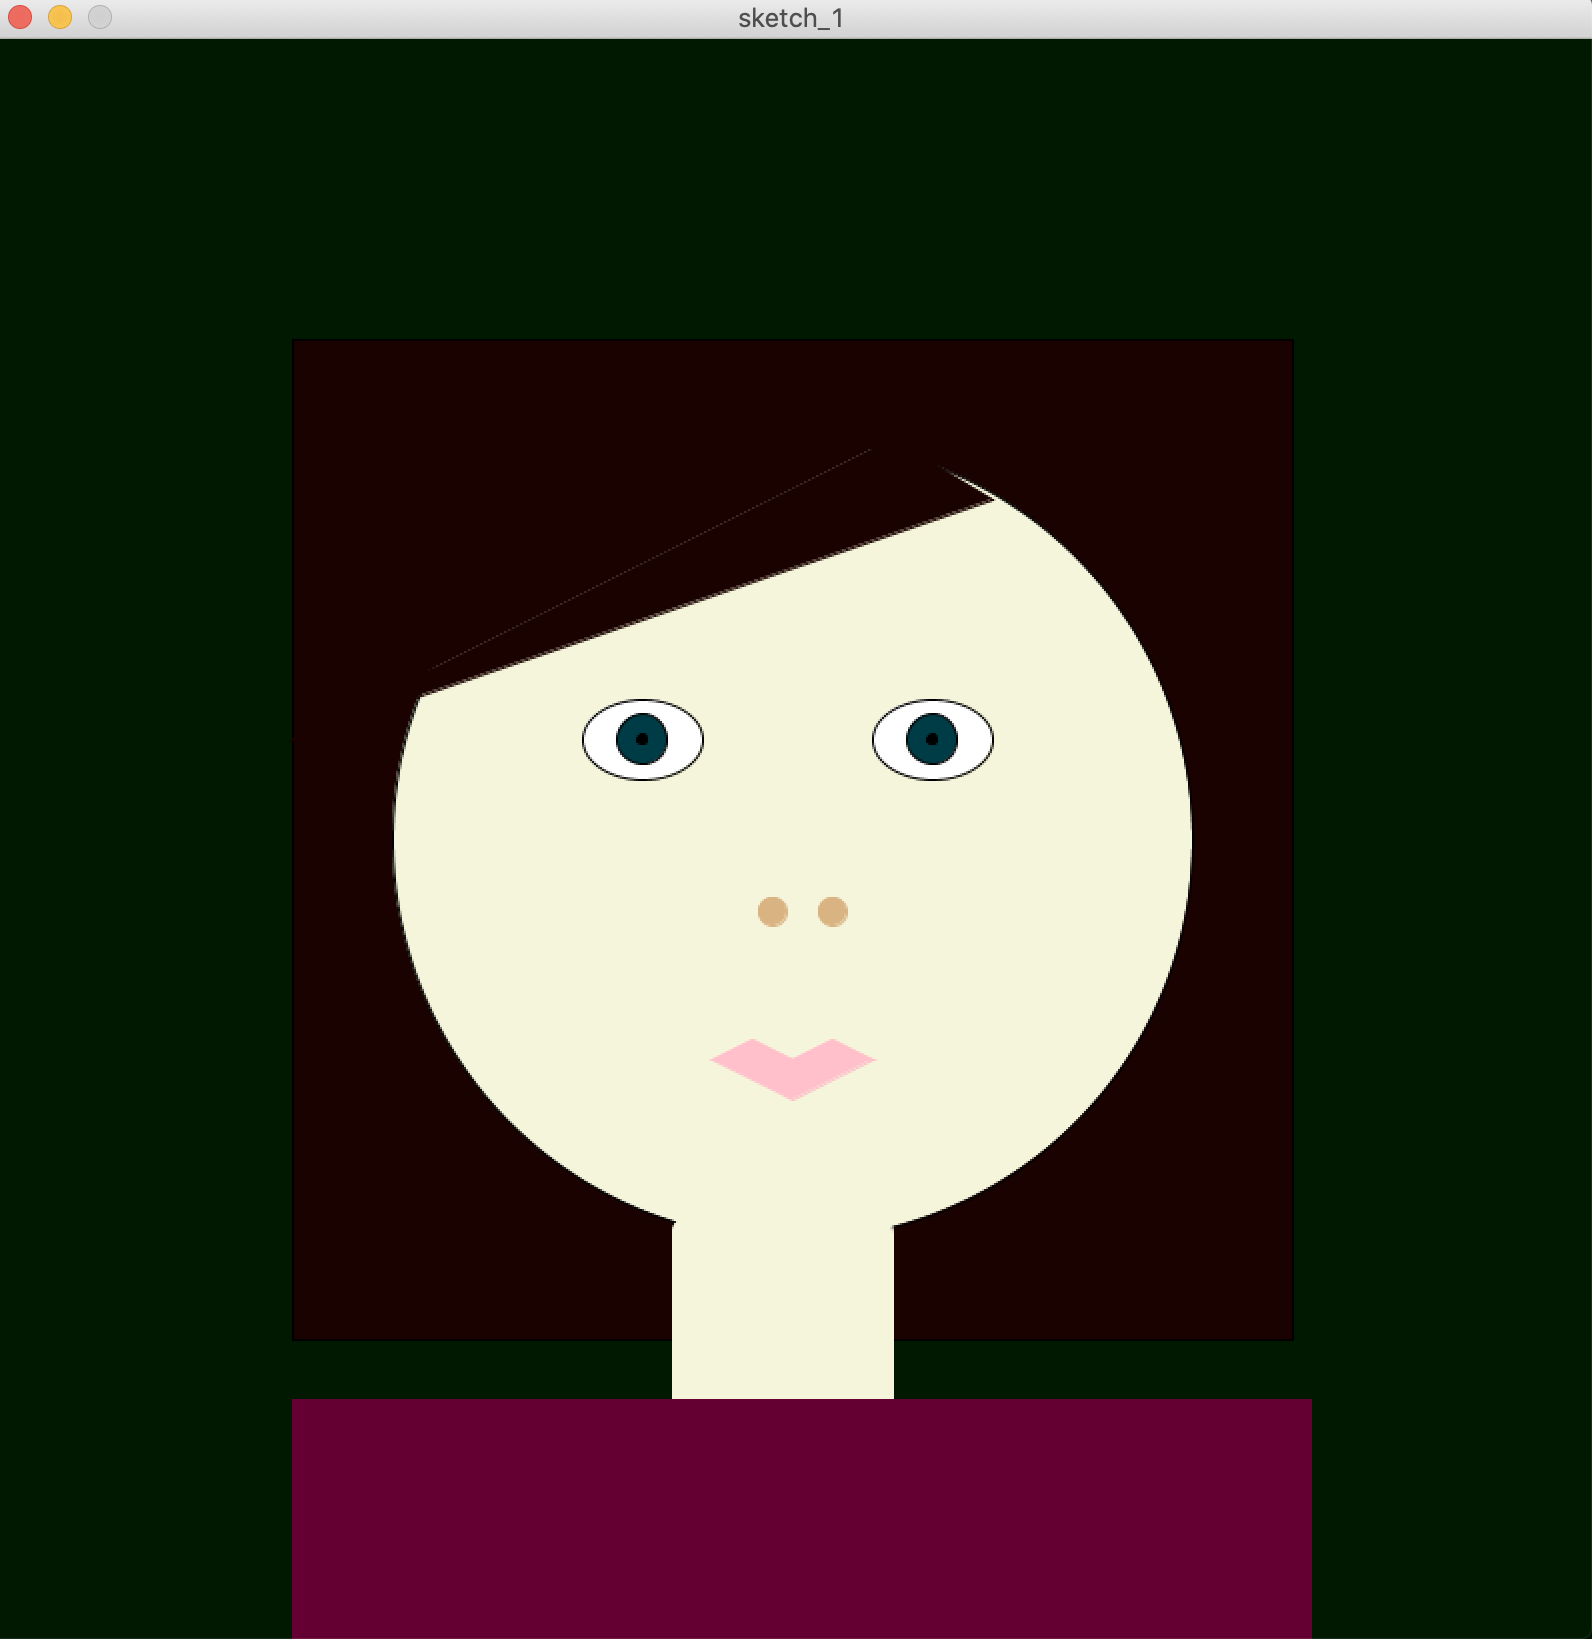
For this project, we were supposed to use coding to make a portrait of ourselves, or other versions of ourselves (cartoon, anime, avatars, etc). I call her Avatar Aysha.
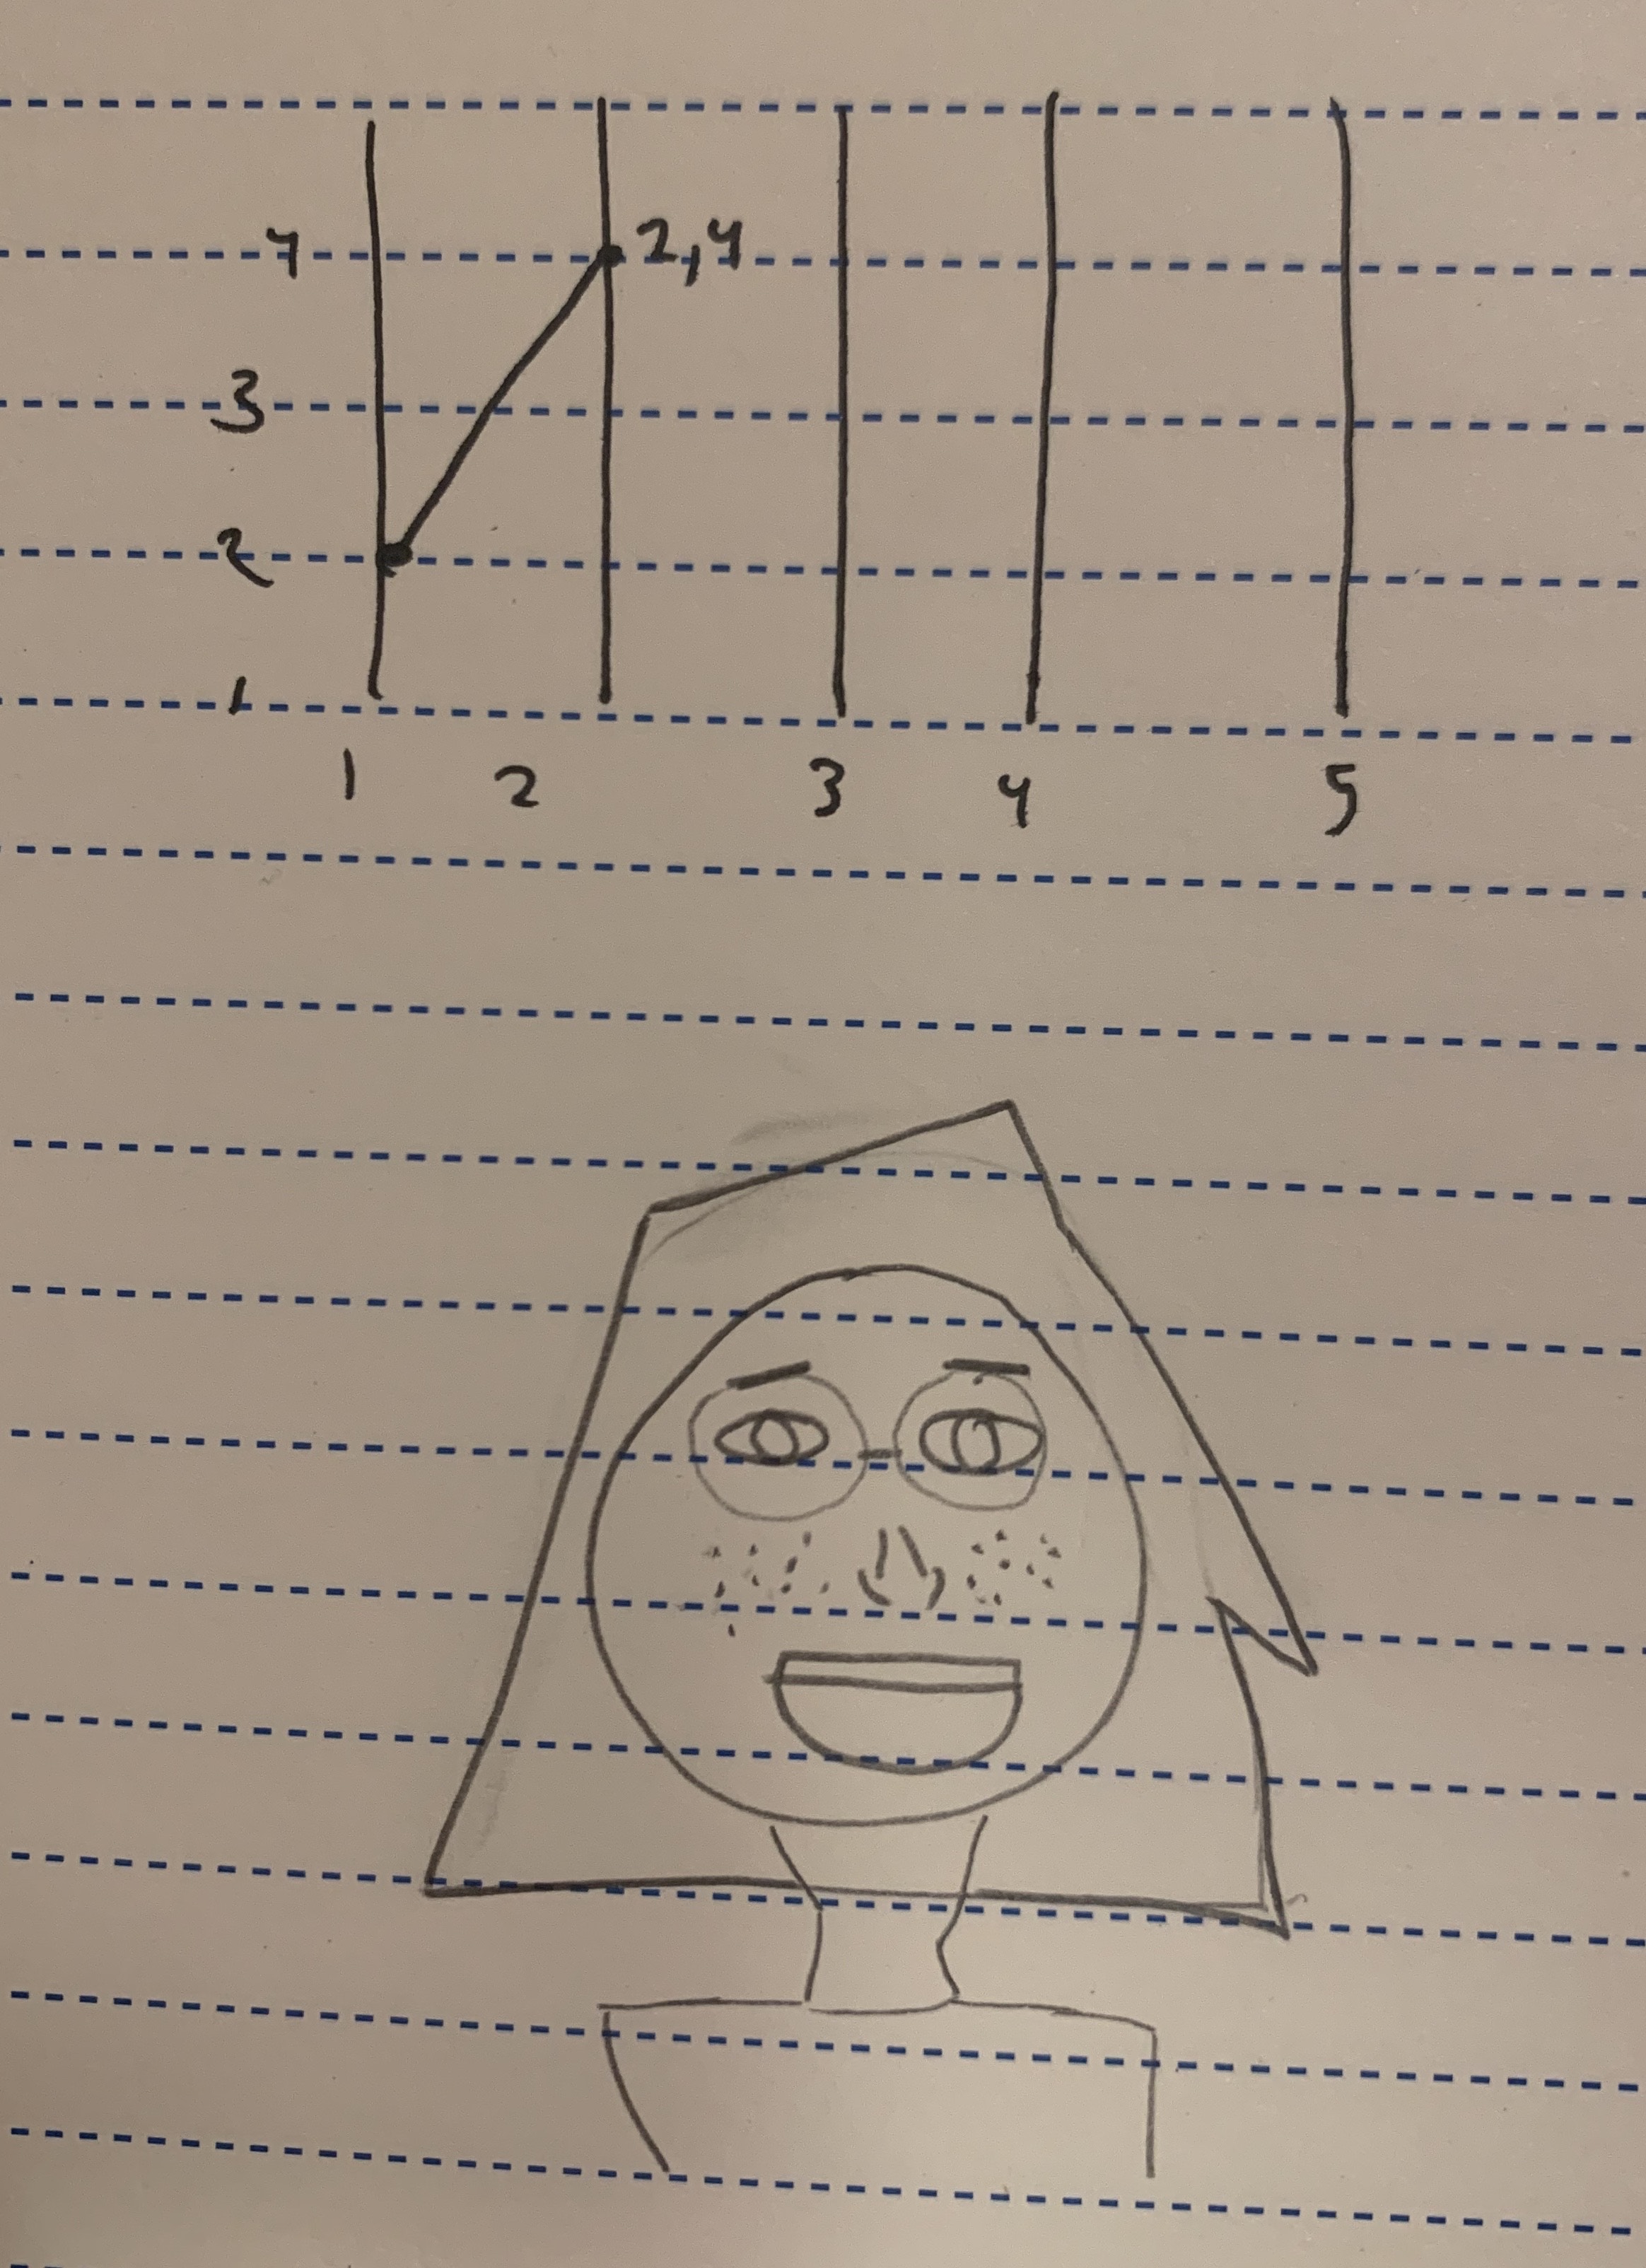
I started off with a simple sketch for my simple portrait. I just wanted it to be an avatar that I could play with in a video game. I think that growing up, I got used to my xbox avatar, which is where I got some of my inspiration from.
An example of an Xbox avatarSketch! And me trying to make sense of the line function.
Aysha’s Avatar
This is my avatar in her NYUAD violet T-shirt. It may not look on camera, but my eye color matches both my eyebrow and hair color so I added that to my portrait. I would also NEVER forget my glasses. I added some freckles, nostrils, and teeth.
I also wanted to add a simple interaction for the sake of experimenting and having fun. By pressing the keys from 1-7, a background from NYUAD campus appears, considering we’re all in quarantine :(. Choose your background and say cheese!
Here’s a simple demonstration.
This project really helped me improve my visual skills and visual imagination. At the beginning, I mainly struggled with drawing a line and with the function beginShape(). I mostly nailed the shapes by multiple trial and errors. However, later on, with enough practice I started to understand the x and y axes and their four quadrants. Moreover, creating the nostrils was a challenge for me as I needed to fully understand the angles in radians for the arcs. I also learned new functions such as arc(), strokeWeight(), beginShape() and endShape().
Personally, “Find in Reference” was a life-saver. I was also often inspired from the processing website itself, and its option for finding “related” functions.
Overall, I had so much fun doing this assignment! Hopefully more is yet to come!