
I tried recreating The Strokes’s “Is This It” album cover for this project. Here’s the reference picture:

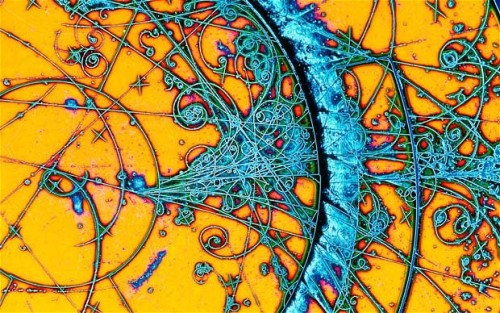
The album originally had a different cover, but some time after the first batch of vinyls had already been pressed, frontman Julian Casablanca called his product manager saying he found “something even cooler.” The record label obliged, and later productions of the album appeared with a picture from CERN’s Big Bang experiments in the 70s. This new image shows tracks left by subatomic particles in a bubble chamber. As each charged particle moves through superheated liquid hydrogen, it leaves a trail of “bubbles” as the liquid boils in its wake. The trajectory of their paths can then be analyzed to identify the particles. For example, two particles with opposite charges would travel in opposite directions, because of how they interact with the magnetic field in the chamber.
This is how I approached the problem of animating these particles: I use a for loop to generate some sets of random values (within defined limits) for initial coordinates, radii, angles, and stroke weights. Each set determines the initial frame for each particle. A heavier particle, such as an alpha particle, would have a smaller radius than a smaller particle, such as an electron, because the heavier particle moves slower, which is why each track needs to have a different radius. They can also curve in one direction or the other as they travel, depending on the charge they carry. So the angle needed to be randomized between negative and positive values.
// array to store trail "head" information
for (let i = 0; i < 20; i++) {
  let x = random(width);
  let y = random(height);
  let weight = int(random(1, 5));
  let angle = random(-TWO_PI, TWO_PI);
  let radius = random(1, 10);
  particleArray.push({ x, y, weight, angle, radius });
}
Every time the draw() function is called, I offset the values in each set by a little, to define the new position for a particle, and then draw a line joining these two coordinates. The for loop in this function goes over each “particle” in the array and gives it a new position to be at. When the frame refreshes, this happens all over again.
There’s a lot more that’s going on in the album cover, and I’m trying to make my artwork something more than just lines on a yellow background. So far I’ve only added some grain to the canvas. I can also make out some drop shadow in the original picture, but it’s a little complicated to achieve that effect with code. Since the arcs are comprised of infinite small lines, I don’t have the shape of the full arc at any point in time, so I can’t add drop shadow to the whole arc. But if I add shadows to each little line, the shadow falls not just on the background but on neighboring lines too, and that makes the arc look disjointed. I just added some noise to the coordinate calculation so that the arc look just slightly more realistic and not completely smooth.
I think the trickiest part was figuring out the logic for how to connect each coordinate. At first, I was trying to use ellipses instead of lines, and wrote some more complicated logic to connect them in an arc, but I did something wrong so it would connect points of different arcs, shown below. It looks cool in its own right, but it just wasn’t what I was trying to do.