Darkness in the Darkness

Darkness in the Darkness

For this exercise, I have utilized the Geomerative library to trace the points within the text string, inspired from Aaron’s repository on geomerative text. Using this library, I wanted to show the general tracing of one point to another in a sorted order by drawing a line from i to i+1 in a loop – which created a mysterious illusion as if it is a handwriting.

To add some tweak, I have made each point as particles that starts off at random positions on the screen that eventually reaches its original position in the text. Also, the frameRate changes depending on the location of the cursor in respect to the X-axis.

The following are the source code and a short recording of the exercise:

import geomerative.*;
int iterator, count;
color c;
RFont font;
RPoint[] pnts;
Particle[] particles;

float w, h, mapVal;

void setup() {
  size(640, 480);

  RG.init(this);

  // set the font, the size, and left, center, or right adjusted
  font = new RFont("Franklin Goth Ext Condensed.ttf", 150, RFont.CENTER);
  
  // get the points along a String
  pnts = getPoints("DARKNESS");
  
  particles = new Particle[pnts.length];
  for (int i=0; i<particles.length; i++) {
    particles[i] = new Particle(random(-width/2, width/2), random(-height, height), pnts[i].x, pnts[i].y);
  }
  
  w = width/2;
  h = height/1.5;
  
  count = 1;  
  c = color(random(0,255), random(0,255), random(0,255));
  
  noFill();
  strokeWeight(3);
}

void draw() {
  mapVal = map(mouseX, 0, width, 10, 120);
  frameRate(mapVal);
  iterator = count % (particles.length-1);
  if (iterator == 0) {
      c = color(random(50,255), random(50,255), random(50,255));
    }
  
  fill(0, 11);
  noStroke();
  rect(0, 0, width, height);
  pushMatrix();
    translate(w, h);
    stroke(c);
    fill(c);
    for (int i=0; i<particles.length; i++) {
      particles[i].update();
    }
    line(particles[iterator].x, particles[iterator].y, particles[iterator+1].x, particles[iterator+1].y);
    count++;
  popMatrix();
}

// function that returns an array of RPoints based on a string
RPoint[] getPoints(String str) {
  // change this number to change the resolution of points outlining the circle
  RCommand.setSegmentLength(5);
  RCommand.setSegmentator(RCommand.UNIFORMLENGTH);
  RGroup grp;
  grp = font.toGroup(str);
  grp = grp.toPolygonGroup();
  return grp.getPoints();
}
class Particle {
  float x, y, destX, destY, xSpeed, ySpeed;
  float dirX, dirY, rand;
  color c;
  
  Particle(float _x, float _y, float _destX, float _destY) {
    x = _x;
    y = _y;
    destX = _destX;
    destY = _destY;
    xSpeed = 0;
    ySpeed = 0;
  }
  
  void update() {
    dirX = destX - x;
    dirY = destY - y;
    xSpeed = (dirX*0.003);
    ySpeed = (dirY*0.003);

    xSpeed *= 0.95;
    ySpeed *= 0.95;
    x += xSpeed;
    y += ySpeed;
  }
}


Reading Response – The Digitization of Just About Everything

The author illustrates digitization through Waze, a mobile GPS application that provides users the fastest way to a destination depending on the time, traffic, and other variables. We are situated in the moment where nearly all of the “offline” data are becoming digitalized – and these raw data are floating around the medium we know of as “the internet”. Some are being efficiently utilized, such cases shown through Waze where it uses the sensor data of its users’ mobile devices on top of general map information and GPS data. However, I would say that most of other raw data are still waiting for their turn to be polished into a proper use – which leads to new terminologies like Big Data.

As the author describes as “data explosion”, I agree with his claim on how statisticians will be one of the sexy jobs. To put it simply, we have tons of increasing number of ingredients but we do not have enough people to refine those ingredients to make something new – and this is where the hype of data science comes in. A lot of the innovations are hidden under these sets of data and once we can analyze these septillions of data, maybe we can answer many questions about behavioral sciences as well as automation of complex human tasks.

Response on Design Meets Disability

In the reading, we see that the application of design for disability in the past had a more focus on being invisible. The concept of fashion has just started to appear in the recent decades on these untouched fields. However, it was fascinating to find out the progression of how glasses turned into a wearable from usable and people who wear glasses as wearer rather than patient. The author mentions in the reading that for an eyewear, “the words design and disability are mentioned in the same breath … the exemplar of a product that addresses a disability, yet with little or no social stigma attached” (15). The integration of design in these tools for disability has made the them into items of fashion – where now people use glasses as a fashion item to define themselves. Also, it was interesting to see how, after eliminating the stigma behind glasses, our society presents the old ugly criticized model as vintage and people go crazy for these glasses – once the stigma was removed, the old designs for disability were re-visited.

Good design often requires the courage to value simplicity over being “all things to all people” (85)

The author of this article tries to refute the concept of how products should be designed for everyone. The example of Leckey’s product showed a clear reason to how the attempt to fit everything in the design to satiate everyone can actually be detrimental to the original targeted group – especially in Leckey’s case of designing for disability. The author points out that “too much adjustability and modularity can result in a design that is visually complex … the equipment itself stigmatizes the kids among their new peers.” (76), which shows that it is “better to deny the user a feature that could have been useful, in favor of a better overall experience” (86).

The main comparison that popped in my head was the difference between the user interface of an iPhone and a Galaxy Series Phone. The number of functionalities in the galaxy phones win without doubt compared to the iPhone – but does everyone use the Galaxy Series? The answer would be no since most people would raise their hands for the iPhone due to its simplicity in UI, smoother UX, and lower learning curve – thus boosting the overall experience compared to the galaxy series..

Keeping the simplicity while maintaining the level of overall experience is a difficult task. And, it brings up the need for consistent communication between the users and the designers in order to attain this simplicity. As interactive media students, it is crucial for us to value simplicity to fit the target persona over use-for-everyone with chaotic functionalities. The “more” is not always good.

Response on Chance Operations

Chance Operations – Casey Reas (Eyeo 2012)

After watching the talk by Casey Reas on chance operations, I was fascinated with the utilization of randomness with sets of control and limitations into a creative and intriguing digital art. From the revolution one line code of repetition and randomness using the Commodore 64 to the current creative platform Processing, the field of using randomness as a core tool has vastly progressed to diverse areas. One of the examples that Reas brought up in his talk was about his use of reproduction of cancer cells data – and how data, with a controlled randomness, can create a unique pattern and open the new era of computer art.

Personally, I found the idea of using simple and individual elements like a dash (-) or a slash (\, /) with controlled randomness  to create a pattern the most interesting – especially relating back to Reas’s co-authored book “10 PRINT CHRS$(205.5+RND(1)); : GOTO 10”. These things may look simple, but the simpleness allow us to look closer and deeper – to use them in unique ways to create something novel. And, Reas’s talk made me to think deeper on the idea of randomness and its application on small components.

The talk, in general, definitely opened me up to numerous ideas and variations that I can apply into previous or existing works, and  raised my excitement in using Processing to make these ideas come true.

Recreation on Computer Graphics & Art

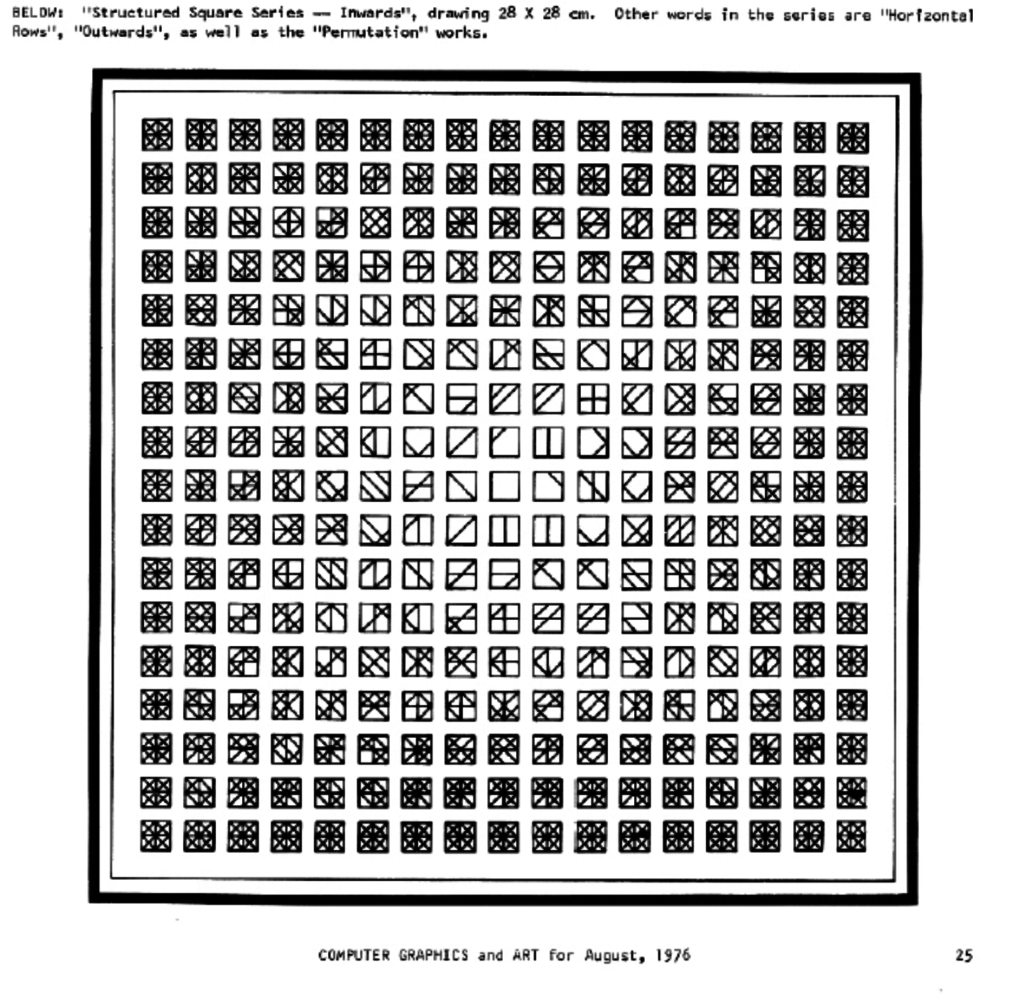
For the following exercise, I have chosen to recreate “Structured Square Series — Inwards” featured in Computer Graphics and Art for August, 1976.

In the computer generated art below, the title of the piece gave me the biggest clue of how this operates as well as how the piece was designed. In the piece, the outer layer has total of 8 lines within the box (horizontal, vertical, diagonal [R-L], diagonal [L-R], and four lines triangulating the square  into total of 16 equal triangles. And, as each you approach the middle of all the layers, a line is omitted – when you reach the middle, all the lines are omitted.

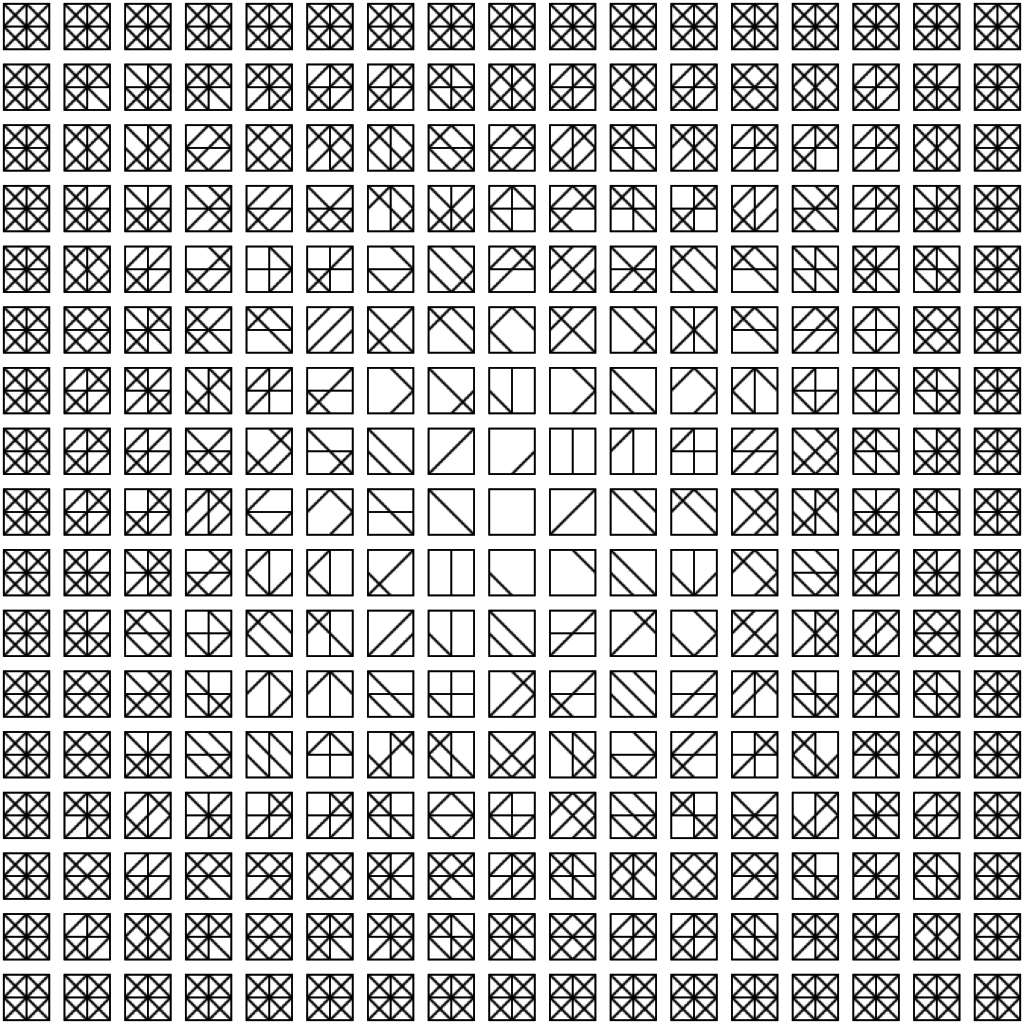
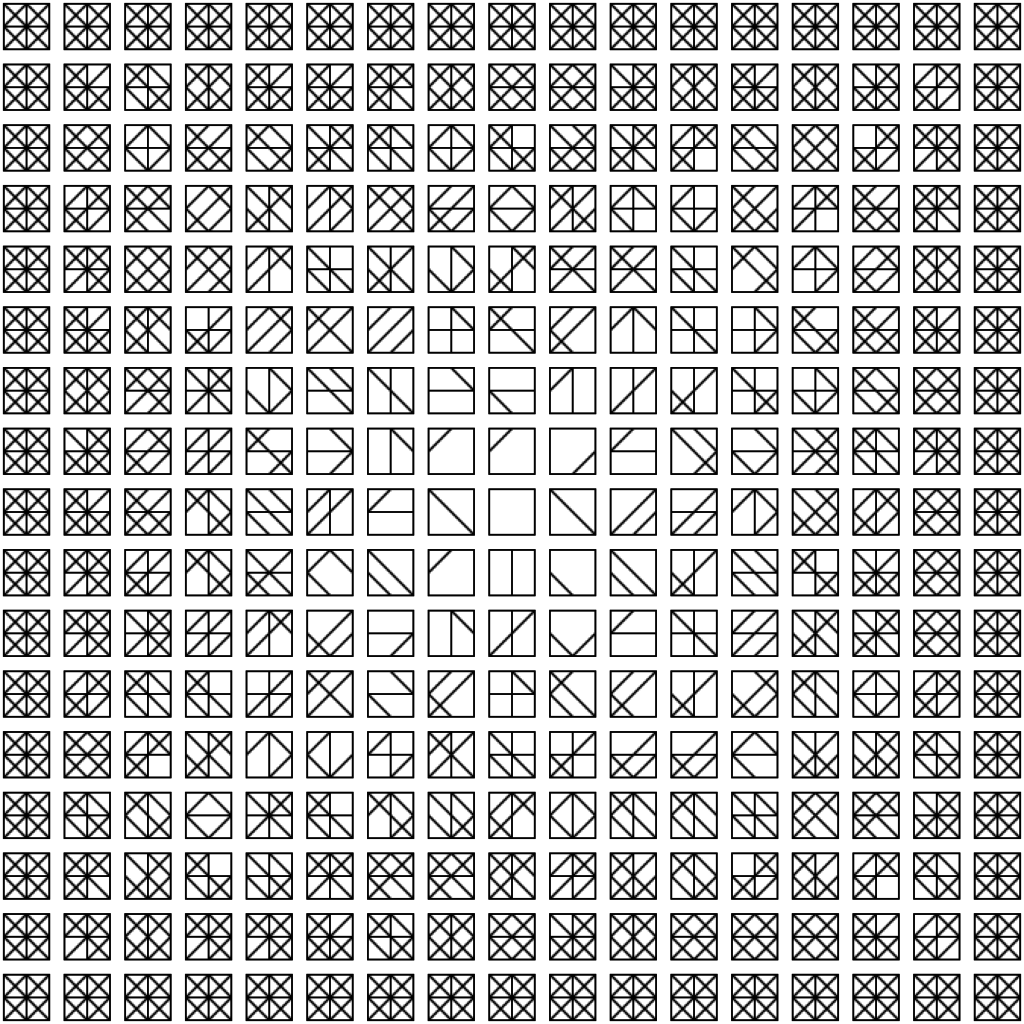
So, I have recreated the above artwork using processing and the results are show in the images below. For the recreation process, I have used an ArrayList and an IntList, where the arrayList contains eight arrays of quads that represent the coordinates for the triangulating lines and the IntList containing integers from 0 to 7 to represent the indexes for accessing the arrays in the arrayList.

The inner loop for k runs from k=0 to k=7 with incrementing k for every loop, and I have utilized this with a conditional check depending on the location of the squares. For instance, if the location of the square is at the third layer from the outside, it should have 6 lines drawn – and I was able to do this by adding a conditional statement that it should draw the line when k < 6. This was done for each layer to recreate the art piece correctly. Also, to create the random configuration of strokes, I have used the shuffle function of the IntList to mix the order of the stroke quads for each squares.

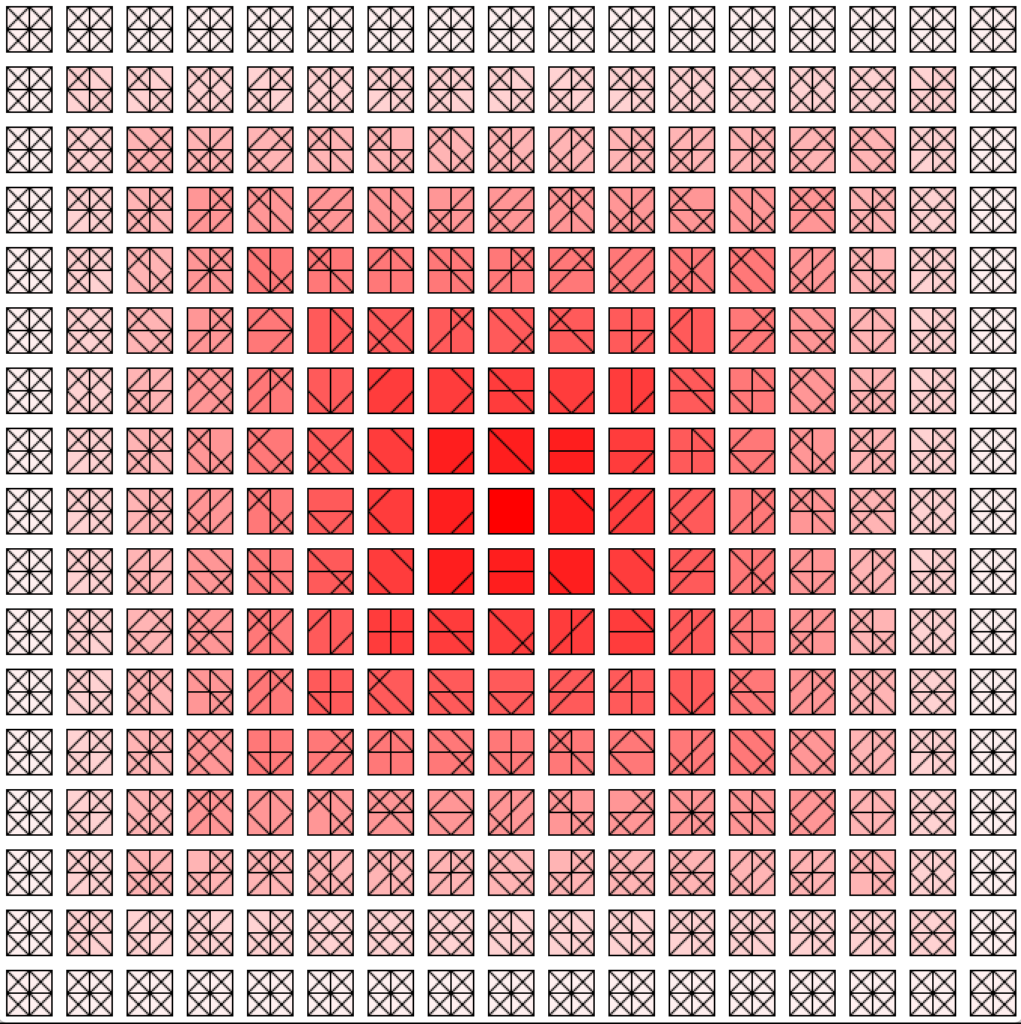
A version with added fill color:

<Source Code>

int w = 40;
int h = 40;
IntList indexes;
ArrayList<int[]> coords;

void setup() {
  size(680, 680);
  rectMode(CENTER);
  coords = new ArrayList<int[]>();
  indexes = new IntList();
  
  for (int i = 0; i < 8; i++) {
    indexes.append(i);
  }
  
  indexes.shuffle();
  
  int[] coords1 = {-15, 0, 15, 0};
  int[] coords2 = {-15, 0, 0, -15};
  int[] coords3 = {-15, 0, 0, 15};
  int[] coords4 = {-15, -15, 15, 15};
  int[] coords5 = {0, -15, 0, 15};
  int[] coords6 = {0, -15, 15, 0};
  int[] coords7 = {0, 15, 15, 0};
  int[] coords8 = {15, -15, -15, 15};
  
  coords.add(coords1);
  coords.add(coords2);
  coords.add(coords3);
  coords.add(coords4);
  coords.add(coords5);
  coords.add(coords6);
  coords.add(coords7);
  coords.add(coords8);
}

void draw() {
  background(255);
  for (int i=0; i < height; i += h) {
    for (int j=0; j < width; j += w) {  
      pushMatrix();
        translate(i+w/2, j+h/2);
        for(int k = 0; k < 7; k++) {
          if (i+w/2 < 40 || j+h/2 < 40 || i+w/2 > 640 || j+h/2 > 640) {
            fill(255, 240, 240);
            if (k == 0) {
              rect(0, 0, 30, 30);
              line(-15, 0, 15, 0);
              line(-15, 0, 0, -15);
              line(-15, 0, 0, 15);
              line(-15, -15, 15, 15);
              line(0, -15, 0, 15);
              line(0, -15, 15, 0);
              line(0, 15, 15, 0);
              line(15, -15, -15, 15); 
            }
          }
          else if (i+w/2 < 80 || j+h/2 < 80 || i+w/2 > 600 || j+h/2 > 600){
            fill(255, 210, 210);
            if (k == 0) {
              rect(0, 0, 30, 30);
            }
            int coordArr[] = coords.get(indexes.get(k));
            line(coordArr[0], coordArr[1], coordArr[2], coordArr[3]);
          }
          else if (i+w/2 < 120 || j+h/2 < 120 || i+w/2 > 560 || j+h/2 > 560){
            fill(255, 180, 180);
            if (k == 0) {
              rect(0, 0, 30, 30);
            }
            if (k < 6) {
              int coordArr[] = coords.get(indexes.get(k));
              line(coordArr[0], coordArr[1], coordArr[2], coordArr[3]);
            }
          }
          else if (i+w/2 < 160 || j+h/2 < 160 || i+w/2 > 520 || j+h/2 > 520){
            fill(255, 150, 150);
            if (k == 0) {
              rect(0, 0, 30, 30);
            }
            if (k < 5) {
              int coordArr[] = coords.get(indexes.get(k));
              line(coordArr[0], coordArr[1], coordArr[2], coordArr[3]);
            }
          }
          else if (i+w/2 < 200 || j+h/2 < 200 || i+w/2 > 480 || j+h/2 > 480){
            fill(255, 120, 120);
            if (k == 0) {
              rect(0, 0, 30, 30);
            }
            if (k < 4) {
              int coordArr[] = coords.get(indexes.get(k));
              line(coordArr[0], coordArr[1], coordArr[2], coordArr[3]);
            }
          }
          else if (i+w/2 < 240 || j+h/2 < 240 || i+w/2 > 440 || j+h/2 > 440){
            fill(255, 90, 90);
            if (k == 0) {
              rect(0, 0, 30, 30);
            }
            if (k < 3) {
              int coordArr[] = coords.get(indexes.get(k));
              line(coordArr[0], coordArr[1], coordArr[2], coordArr[3]);
            }
          }
          else if (i+w/2 < 280 || j+h/2 < 280 || i+w/2 > 400 || j+h/2 > 400){
            fill(255, 60, 60);
            if (k == 0) {
              rect(0, 0, 30, 30);
            }
            if (k < 2) {
              int coordArr[] = coords.get(indexes.get(k));
              line(coordArr[0], coordArr[1], coordArr[2], coordArr[3]);
            }
          }
          else if (i+w/2 < 320 || j+h/2 < 320 || i+w/2 > 360 || j+h/2 > 360){
            fill(255, 30, 30);
            if (k == 0) {
              rect(0, 0, 30, 30);
            }
            if (k < 1) {
              int coordArr[] = coords.get(indexes.get(k));
              line(coordArr[0], coordArr[1], coordArr[2], coordArr[3]);
            }
          }
          else
          {
            fill(255, 0, 0);
            rect(0, 0, 30, 30);
          }
        }
      indexes.shuffle();
      popMatrix();
    }
  }
  delay(50);
}
          
void mousePressed() {
  noLoop();
}

void mouseReleased() {
  loop();
}


Self Portrait

Since the self-portrait needs a lot of different shapes other than the given functions such as rect() or ellipse(), I have played around with the beginShape() and endShape(), utilizing vertex and curveVertex to formulate the curves. I have also tried to use the rotate() function, but since the rotate() function rotates the art board and not the configured shape, I was stuck on creating figures using the built-in vertex functions. The image below is the self-portrait I have created following with the source code on Processing.

color backgroundColor = color(0,132,255);
color black = color(0, 0, 0);

color skin = color(255, 219, 172);
color skinDark = color(241,194,125);

int unit = 72;

void setup() {
  size(720, 720);
}

void draw() {
  background(backgroundColor);
  noStroke();
  strokeWeight(1);
  
  // *NECK
  fill(skinDark);
  rect(unit*4, unit*6, unit*2, unit*1);
  
  // *FACE
  
  fill(skin);
  arc(unit*5, unit*3, unit*4, unit*7, 0, PI);
  
  // *UPPERHEAD
  fill(skin);
  arc(unit*5, unit*3, unit*4, unit*4, PI, TWO_PI);
  
  //*HAIR
  fill(0);
  beginShape();
  curveVertex(unit*4, unit*2);
  curveVertex(unit*4, unit*2);
  curveVertex(unit*3.8, unit*2.8);
  curveVertex(unit*3, unit*3);
  curveVertex(unit*3, unit*3);
  endShape();
  
  beginShape();
  curveVertex(unit*4, unit*2);
  curveVertex(unit*4, unit*2);
  curveVertex(unit*5, unit*3);
  curveVertex(unit*7, unit*3);
  curveVertex(unit*7, unit*3);
  endShape();
  
  beginShape();
  curveVertex(unit*3, unit*3);
  curveVertex(unit*3, unit*3);
  curveVertex(unit*3.2, unit*1.3);
  curveVertex(unit*5.05, unit*1);
  curveVertex(unit*5.05, unit*1);
  endShape();
    
  beginShape();
  curveVertex(unit*3.4, unit*1.85);
  curveVertex(unit*3.4, unit*1.85);
  curveVertex(unit*5.5, unit*0.6);
  curveVertex(unit*6.8, unit*1.5);
  curveVertex(unit*7, unit*3);
  curveVertex(unit*7, unit*3);
  endShape();
 
  // *EYEBROW_LEFT
  beginShape();
  vertex(unit*3.5, unit*3.25);
  vertex(unit*4.5, unit*3.25);
  vertex(unit*4.5, unit*3.4);
  vertex(unit*3.5, unit*3.4);
  endShape();
  
  // *EYEBROW_RIGHT
  beginShape();
  vertex(unit*5.5, unit*3.25);
  vertex(unit*6.5, unit*3.25);
  vertex(unit*6.5, unit*3.4);
  vertex(unit*5.5, unit*3.4);
  endShape();
  
  // *EYE_LEFT
  stroke(0);
  strokeWeight(3);
  fill(skin);
  arc(unit*4, unit*3.9, unit, unit*0.2, PI+0.5, TWO_PI);
  
  // *EYE_RIGHT
  arc(unit*6, unit*3.9, unit, unit*0.2, PI, TWO_PI-0.5);
  
  //*NOSE
  beginShape();
  curveVertex(unit*5, unit*4.1);
  curveVertex(unit*5, unit*4.1);
  curveVertex(unit*4.9, unit*4.7);
  curveVertex(unit*4.5, unit*5.1);
  curveVertex(unit*5, unit*5.2);
  curveVertex(unit*5, unit*5.2);
  endShape();
  
  // *MOUTH
  arc(unit*5, unit*5.2, unit*2, unit*1.5, 0.7, PI-0.7);
  
  // *BODY
  noStroke();
  fill(50);
  beginShape();
  vertex(0, unit*10);
  vertex(0, unit*8);
  vertex(unit*4, unit*7);
  vertex(unit*6, unit*7);
  vertex(unit*10, unit*8);
  vertex(unit*10, unit*10);
  endShape();
}


Reading Response – Emotion & Design: Attractive Things Work Better

Emotion & Design: Attractive Things Work Better – Don Norman

“One person’s acceptance is another one’s rejection. Worse, what is appealing at one moment may not be at another.” (Norman, 33).

After reading the following chapter on Emotion & Design by Norman, the quote indicated above struck me. It is one of the most difficult part of designing a product that I could not trace its roots, and often had to conclude the struggle to find the solution by acknowledging the fact that it cannot be explained. However, Norman tries to describe the following complexity by analyzing the three levels of processing in human brains, and I realized that it is crucial for the design to touch on the behavioral and reflective levels in order to acquire the satisfaction from the users.

As Norman mentions in the later part of the chapter, all humans are relatively similar in the visceral level but can be very different in the behavioral and reflective levels. And, the following idea, I believe, is the crucial part that the designer should have in mind at all times when designing a product. The interaction that the users take can be formulated based on their behavioral level and the take-away is determined by the reflective levels – which can explain the phenomenon of how users feel different when interacting with a product.

However, even though it is important to know the following concept, it still presents a huge problem for the designer. In order to reach the satisfaction for most users, the designers have to take into account of the “different” processing levels of the users’ brains and, ultimately, design something that can have the similar effect for all. Or, at the same time, it comes to the question of rather designing something for “all”, can we use the concept of processing levels to grasp and be effective on a specific type of users? If we were to change the view into targeting a specific group of users, I believe that understanding the processing levels will be absolutely helpful.

Reading Response – Her Code Got Humans on the Moon

Her Code Got Humans on the Moon – And Invented Software Itself – Robert McMillan

The following article on Margaret Hamilton’s involvement in the creation of the code for the Apollo Mission was an interesting read, not only that she serves as “the mother” of software engineering, but also that she programmed the software while predicting the possible error that the “higher-ups” thought was insignificant. The mindset of Hamilton’s higher-ups at the time represent what most engineers presume – the users will not make any mistakes. However, just as Hamilton created a supplement code to prevent the crash from using P01, it is necessary to think of all the possible interaction that can happen and be prepared for the implications. In the worst case, the crash could have led all the astronauts to die out in space.

The following idea was implemented in a recent project that I did in 24X event in early March, where I have designed a hypertext web application. After the product was completed and in the process of testing, I have realized that I would press the “back” button on the browser when I felt that I have made a mistake – and this led to a crash. Even though some people believed that I was thinking too much, I have added a supplement sets of code to prevent from going back. And, at the day of the presentation, I have witnessed many attendees trying to go back to revert their choices.

The software we design does not get to that point severity, but it still holds the point that as programmers and designers, we should not expect the users to exactly follow the path that is in our heads. And, this means that we need to think about all the possible unwanted directions and create either a preventive measure in the code or something that will place the user back into a forward direction, not backwards or crash. So, always debug, debug, and debug!

Responses to the Reading

Making Interactive Art: Set the Stage, Then Shut Up and Listen

Don’t interpret your own work

As creators and artists, the idea of providing the user an interactive experience without description is always the hardest part of the creation. Since we are used to giving description of the “what” and “how” of a product, we are often faced with questions how to let the users flow through the interaction without these pre-described elements. Personally, I have always tried to create a unique experience for the user through my creation, but I tend to end up trying to guide the users in a certain direction – limiting them to think in different perspective on the product. After reading this blog article, I realized I have to make the operation of the product discoverable, setting only the necessary elements to “begin the conversation”. This brought me back to the importance of signifiers- to allow the users to easily navigate through the experience without the creator mentioning any instructions. Also, I realized that using personas – the different cases of the experience based on potential users – will help the creators better visualize and understand what elements are necessary to be added or omitted to make the product suitable for users to interact without the creator stepping in.

My mid-term project definitely showed this fault of having myself to explain how it works and what to expect from the product. For the final project, I will encompass these traits so that I do not have to limit the possible interactive possibilities and let the users take their own approach.

Physical Computing’s Greatest Hits (and misses)

The articles provides with a number of variations of a physical computing products as well as the necessary components involved to create the product. The article definitely opened up the various pathway that I can take for my future projects since it also provided concrete example that I can take as an influence. Especially, I was intrigued by the idea of using flex sensors in gloves – as a drum gloves. From this idea, I wanted to implement a MIDI system of multiple EDM sounds that you can manipulate using different fingers to make your own electronic song – a launch pad transferred to gloves.

Moreover, the idea of “originality” used to be one of the main aspects that I consider during my creation process. I have always believed that the products I create has to be “unique”. So, whenever I encounter an interesting idea for the product, I would search on Google to see whether there is an existing creation. If I do find on on the internet, I would try to think of something else. However, after reading this article, it led me to think again about my process. First, I have never copy & pasted an existing code to my creation. Second, if I have been influenced by an existing idea or theme, I always gave a tweak. With these two parts of the process, I realized that the product is already original. And, this led me to look back at all the different ideas that I discarded.


Midterm Project – RED MONSTER and the BLUE MONSTER

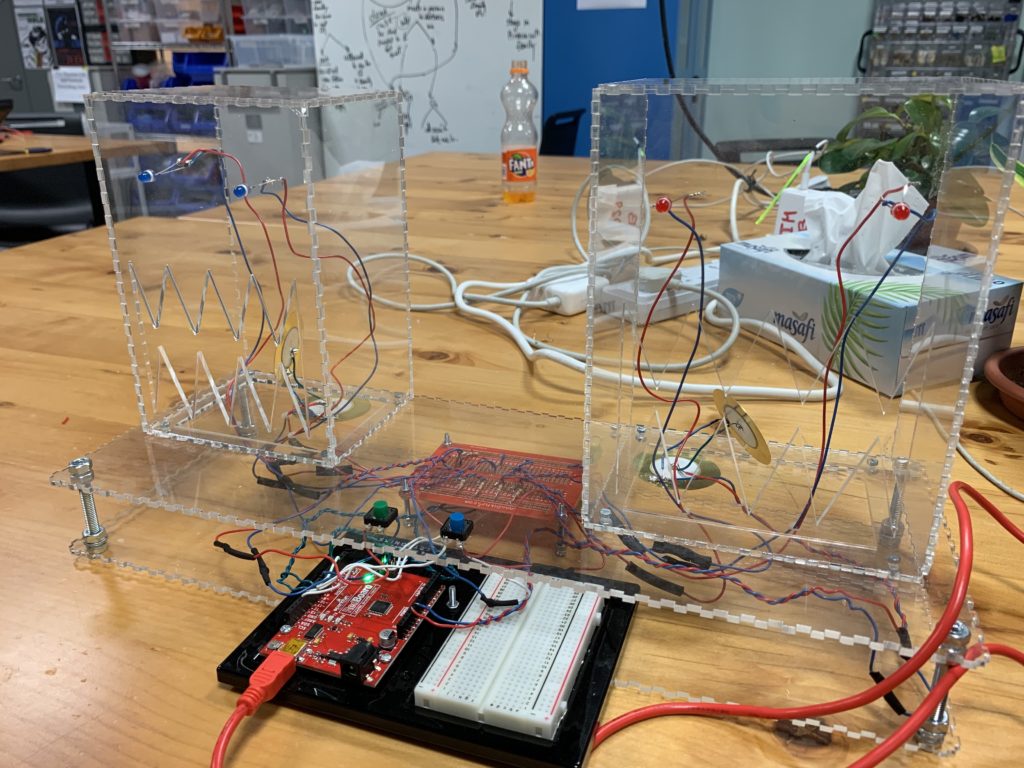
My main interest for this project was the transferring the feedback of one medium to another medium, especially dealing with pattern of sound created using the piezo disc. And, for the midterm project, I have created two monsters: the RED and the BLUE indicated by the color of their eyes, where the blue monster follows the pattern played by the red monster. On the interface, there are two buttons: the green and the blue. When the green button is pressed, the red monster’s LED lights up, the buzzer inside it activates. The duration of the rest period in between the press and the duration of the buzzer activated will be saved, and when the blue button is pressed, the blue monster will follow the pattern that the red monster has played in a continuous loop.

For the structure of the data for this project, I have used the STL library which encompasses vector. Since, an array has to be predetermined with its size, I could not implement the array as my duration container when the length of the pattern is indeterminable. Whereas, using a vector, I can just push_back the new duration at the end – which served as a perfect container for this project.

Initially, I had multiple issue with the difference in the speed of the patter played for either monsters. At first, the saved duration values of the Red Monster were incrementing too fast, which I fixed using the modulus of it by 2500 to slow down the increments. Then, when the Blue Monster was playing the saved pattern, the intended speed of the pattern and the actual speed was different. So, I had to include careful selection of delay values to match them.

An interesting note about the project was that the enclosure was done with a transparent acrylic with the base being open on the sides. According to Critical Interface Toolbox by Joana Moll and Andrea Noni, one of the highlights of the definition of interface was “Users are entitled to know what the interface hides. Access to knowledge is a fundamental right“. Plus, after reading through different examples of the enclosure boxes, I was intrigued by the design of open-sides boxes, especially the “Moshi Moshi” created by Aaron. Therefore, I came to a conclusion to make the container of the project transparent for the audience to see what is happening underneath the system.

[Quick Play-through of the Project]

[Source Code for the Project]

#include <ArduinoSTL.h>

// ===== Declaring Variable Pin ===== //
const int triggerPin = 2;
const int buttonPin = 7;

const int buzzerOnePin = 12;
const int buzzerTwoPin = 13;

const int ledPinOne = 3;
const int ledPinTwo = 4;

const int ledPinThree = 10;
const int ledPinFour = 11;

// ===== Declaring Initial State ===== //
int prevPadState = 0;
int currentPadState = 0;

int currentTriggerState;
int prevTriggerState;

int savedRestDuration = 0;
int savedPlayedDuration = 0;

// Time Duration to slow down the accumulation of saved duration for the later loop
long timeDuration = 0;

// Conditions to check which loop to proceed:
// 1. TRUE :: BLUE MONSTER playing the saved duration of the vector
// 2. FALSE :: RED MONSTER playing and recording the pattern played into the vector
bool playLoopState = false;

unsigned long prevTime = 0;
unsigned long currentTime = 0;

// Interval Index is set as 1 so that when the trigger button is pressed,
// the savedNotes vector is played in the beginning disregarding the first rest period.
int intervalIndex = 1;

int resetIndex = 0;

// The container vector of durations for rest and playing of the note;
// ============================
// The even number index - REST;
// The odd number index - PLAY;
// ============================

std::vector<int> savedNotes;
 
void setup() {
  //Serial Port begin
  Serial.begin (9600);

  // RED MONSTER Buzzer
  pinMode(buzzerOnePin, OUTPUT);

  // BLUE MONSTER Buzzer
  pinMode(buzzerTwoPin, OUTPUT);

  // button - RED MONSTER
  // trigger - triggers the BLUE MONSTER to mimic the pattern of the RED MONSTER
  pinMode(buttonPin, INPUT);
  pinMode(triggerPin, INPUT);

  // RED MONSTER LEDs
  pinMode(ledPinOne, OUTPUT);
  pinMode(ledPinTwo, OUTPUT);

  // BLUE MONSTER LEDs
  pinMode(ledPinThree, OUTPUT);
  pinMode(ledPinFour, OUTPUT);
}
 
void loop() {

  currentTriggerState = digitalRead(triggerPin);
  currentPadState = digitalRead(buttonPin);
  
// ========================================================= //

  if (!playLoopState) {  
    if ((timeDuration%2500) == 0) {
      if (currentPadState == 1 && prevPadState == 1) {
        /*
         *  Button is being pressed = the buzzer is playing
         */
        Serial.print("Keep Playing!: ");
        tone(buzzerOnePin, 100);
        savedPlayedDuration++;
        Serial.println(savedPlayedDuration);
      }
  
      if (currentPadState == 0 && prevPadState == 0) {
        /*
         *  Button is not being pressed = the buzzer is resting
         */
        Serial.print("Keep Resting!: ");
        noTone(buzzerOnePin);
        savedRestDuration++;
        Serial.println(savedRestDuration);
      }
  
      if (currentPadState == 1 && prevPadState == 0) {
        /*
         *  The first loop when the button is pressed. This means that prior to the button press,
         *  the buzzer was resting. So I saved the accumulated duration of rest at this point.
         */
        tone(buzzerOnePin, 100);
        prevPadState = currentPadState; 

        // Start of playing duration;
        savedPlayedDuration++;

        digitalWrite(ledPinOne, HIGH);
        digitalWrite(ledPinTwo, HIGH);

        Serial.print("SAVED REST NOTE :");
        Serial.println(savedRestDuration);

        // Push the rest duration into the vector & reset the duration;
        savedNotes.push_back(savedRestDuration);
        savedRestDuration = 0;
        
      } else if (currentPadState == 0 && prevPadState == 1) {
         /*
         *  The first loop when the button is released. This means that prior to the button press,
         *  the buzzer was playing. So I saved the accumulated duration of playing at this point.
         */
        noTone(buzzerOnePin);
        prevPadState = currentPadState;

        // Start of rest duration;
        savedRestDuration++;

        digitalWrite(ledPinOne, LOW);
        digitalWrite(ledPinTwo, LOW);

        Serial.print("SAVED PLAY NOTE :");
        Serial.println(savedPlayedDuration);

        // Push the played duration into the vector & reset the duration;
        savedNotes.push_back(savedPlayedDuration);
        savedPlayedDuration = 0;
      }
    }
    
// ========================================================= //

  } else { 
    if (intervalIndex < savedNotes.size()) {
    /* ==========================================================
     * When the blue-button is pressed, the loop iterates through
     * the savedNotes vector from the designated interval index 
     * to the size of the vector.
     * ========================================================== */ 
      Serial.println(savedNotes[intervalIndex]);
      
      if ((currentTime) - (prevTime) <= savedNotes[intervalIndex]) {
        if ((intervalIndex % 2) == 0) {
          /* =========================================================
           * When the index of the vector saveNotes is an EVEN number,
           * the value of the vector at that index is the duration of
           * how long the "rest" period was. The loop is repeated until
           * currentTime - prevTime is equal to or larger than the
           * duration value of the saved rest.
           * ========================================================= */ 
          Serial.println("REST");
          noTone(buzzerTwoPin);
          digitalWrite(ledPinThree, LOW);
          digitalWrite(ledPinFour, LOW);
          delay(125);
        } else if ((intervalIndex % 2) == 1) {
          /* ========================================================
           * When the index of the vector saveNotes is an ODD number,
           * the value of the vector at that index is the duration of
           * how long the "played" period was. The loop is repeated 
           * until currentTime - prevTime is equal to or larger than 
           * the duration value of the saved rest.
           * ======================================================== */ 
          Serial.println("PLAYED");
          tone(buzzerTwoPin, 500);
          digitalWrite(ledPinThree, HIGH);
          digitalWrite(ledPinFour, HIGH);
          delay(125);
        }
      } else {
        /* ==========================================================
           * When the saved duration of the note/rest is done playing,
           * it will move on to the next index of the vector while
           * resetting the time.
           * ======================================================== */ 
        Serial.print("Next Index: ");
        Serial.println(intervalIndex);
        prevTime = currentTime;
        intervalIndex++;
      }
      
    } else {
       /* =========================================================
       * All the played/saved notes were iterated, repeating the
       * loop to play from the beginning of the vector
       * ========================================================= */ 
      Serial.println("Loop Finished & REPEAT");
      intervalIndex = 0;
      currentTime = 0;
      prevTime = 0;
    }
    
    currentTime++;
  }

  if (currentTriggerState == HIGH && prevTriggerState == LOW) {
    /* ================================
     * For the reset index:
     * 1. When the reset button is pressed for the first time, the index is    0 - signnaling the start the pattern loop for BLUE MONSTER
     * 2. When the reset button is pressed for the second time, the index is 1 - signaling the reset of the patter loop and go back to recording with the RED MONSTER
     * ================================*/
    if((resetIndex % 2) == 1) {
      Serial.println("CLEAR");
      
      // The vector is reset to be ready for next set of inputs from the RED MONSTER
      savedNotes.clear();
      intervalIndex = 1;

      savedRestDuration = 0;
      savedPlayedDuration = 0;

      noTone(buzzerTwoPin);
      noTone(buzzerTwoPin);

      digitalWrite(ledPinOne, LOW);
      digitalWrite(ledPinTwo, LOW);
      digitalWrite(ledPinThree, LOW);
      digitalWrite(ledPinFour, LOW);
    } 
    playLoopState = !playLoopState;
    resetIndex++;
    prevTriggerState = currentTriggerState;
  } else {
    prevTriggerState = currentTriggerState;
  }

  timeDuration++;
}