Final Project – Final Code / Testing Videos

Concept Overview)
This post includes edits as there were some feature changes after presenting to the class before the IM showcase. This reflects the finalized version that was shown on the day of IM showcase.

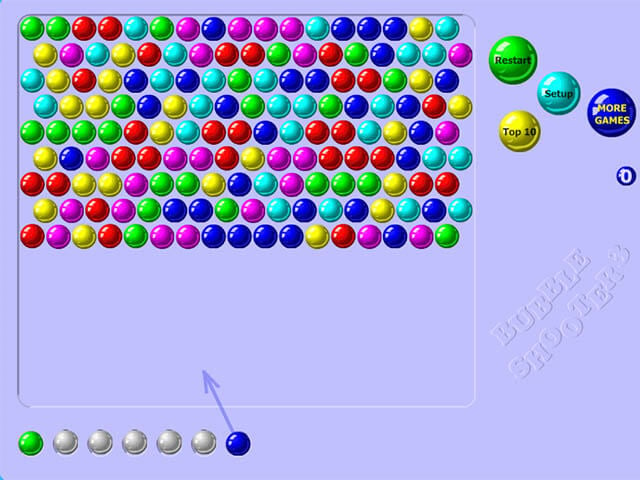
To go over the basic format of the game, this is a bubble shooter game. The player shoots a bubble with a colour- if it hits another ball with the same colour, they pop, giving the player scores.

I made this a time-attack format: I gave each game 1 minute to make sure that the game doesn’t drag on for too long and the game is intense.

I also wanted to create something fun and stress relieving- so I used the actions ‘punching’ and ‘screaming.’

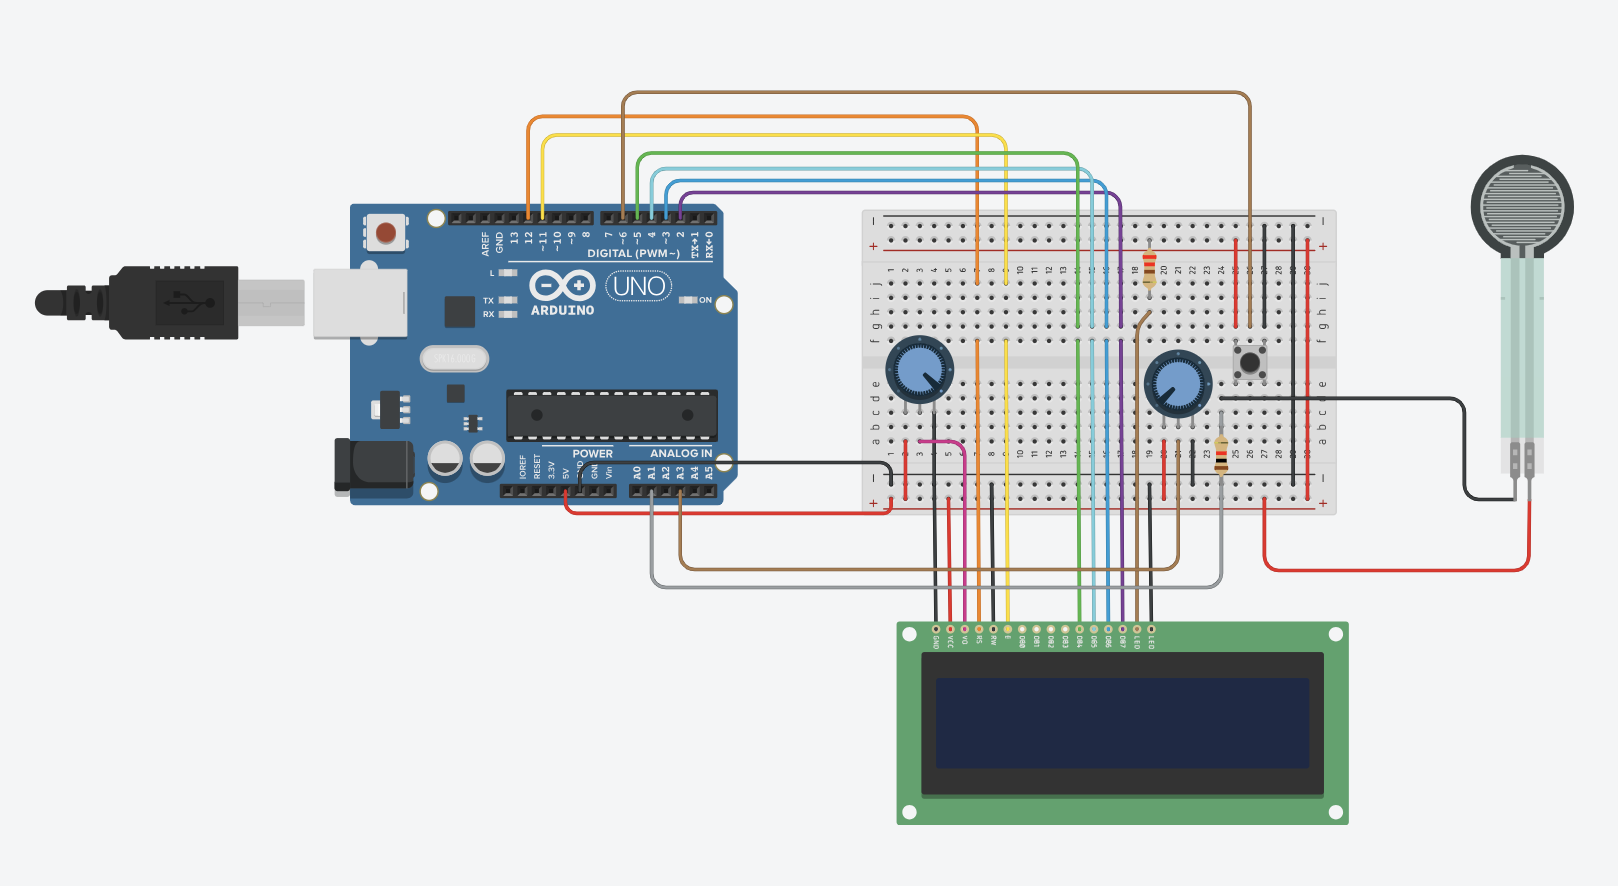
The shooter’s direction/angle is controlled by the joystick (rotate). This was created by glueing a sphere-shaped pencil sharpener to a potentiometer.

The shooter will shoot if the player hits the table with their hand with the glove on- this has a force sensor on it.

If the player shouts loud and long enough, the gauge at the bottom right corner will fill up- once filled, it will provide a black ball. A black ball is a bonus: this ball can pop any coloured balls if it hits them.

Challenges)
There were multiple challenges. The first was figuring out how to make sure there’s a reason for the player to shout. Another thing I had to figure out was how to make the game intense as the game is pretty simple.

Also, on the day of the IM showcase, there were multiple players that came to try the game. Eventually, after about an hour, the force sensor on the glove ripped. I had a back up in my code, that allowed the ENTER Key to work as a shooter too. So, from some point of the IM showcase, the glove was replaced by the ENTER key.

Code)
There are multiple pages like initializePage, startPage, gamePage, gameOverPage, leaderboard etc. Depending on conditions and button clicks, the currentPage variable is assigned as different pages.

Set Up / Draw:

function setup() {
  createCanvas(600, 700);
  nextBallColor = random(bubbleColors);
  shooter = new Shooter(width / 2, height - 50, nextBallColor);
  shooter.canShootFlag = true; 
  leaderboard = new Leaderboard();
  mic = new p5.AudioIn();
  mic.start();
  timer = 60000; // set game timer to 60 seconds
  if (!serialActive) {
    currentPage = new InitializePage();
  }
  else {
    currentPage = new StartPage();
  }
}

function draw() {
  clear();
  background(220);
  
  currentPage.display();
  currentPage.handleKeyPress();
  
  
  if (currentPage instanceof GamePage) {
    // update timer
    if (timer > 0) {
      timer -= deltaTime;
    } else {
      currentPage.endGame();
    }
    volume = mic.getLevel() * 10000;
    //console.log('Volume: ', volume);

    //////////////////////////////////
    //SEND TO ARDUINO HERE (handshake)
    //////////////////////////////////
    let sendToArduino = score + "\n";
    writeSerial(sendToArduino);

    shooter.update();
    shooter.display();

    for (let i = balls.length - 1; i >= 0; i--) {
      balls[i].update();
      balls[i].display();

      // check if ball hits top border of game box
      if (balls[i].y - balls[i].radius <= 100) {
        balls[i].stop();
      }

      // check if ball hits another ball
      for (let j = 0; j < balls.length; j++) {
        if (i !== j && balls[i].intersects(balls[j])) {
          if ((balls[i].color === 'black' || balls[i].color === balls[j].color) && !balls[i].isPopping() && !balls[j].isPopping()) {
            balls[i].delayedPop();
            balls[j].delayedPop();
            shooter.setCanShoot(false);
            setAutoShootTimeout();
            autoShoot();
          } else {
            balls[i].stop();
          }
        }
      }
      // check if ball hits side border of game box
      if (balls[i].x - balls[i].radius <= 50 || balls[i].x + balls[i].radius >= 550) {
        balls[i].bounceOffWall();
      }
    }
    if (volume > 1000 && gaugeValue < maxGaugeValue){
      gaugeValue += 1;
    } else if (volume < 700 && gaugeValue > 0) {
      gaugeValue -= 1;
    }
    if (gaugeValue >= 100) {
      nextBallColor = 'black';
      shooter.setColor('black');
      gaugeValue = 0;
    } 
    
    // set values & draw guage
    let gaugeX = width - 120;
    let gaugeY = height - 110;
    let gaugeWidth = 100;
    let gaugeHeight = 20;
    
    drawGauge(gaugeX, gaugeY, gaugeWidth, gaugeHeight, gaugeValue, maxGaugeValue);

  }
  //
}

In the setup function, I start the microphone input and set up the timer for the game. I also check if the serial port is connected and set the currentPage. (If not connected, we go to InitializePage and if connected, it goes to startPage.)

Draw function displays each display part of different pages. So, each page has a display function. It also does a few jobs when the currentPage is gamePage:
– communicate with arduino
– make the timer run
– calculate volume/gauge for display

gamePage:

class GamePage {
  constructor() {
    stroke('white');
    this.homeButton = new Button(188, 56, "Home", 138, 50, true);
    this.restartButton = new Button(410, 56, "Restart", 138, 50);
    setAutoShootTimeout();
  }
  
  score () {
    // show score
    textAlign(LEFT, TOP);
    textSize(20);
    fill(0);
    text('Score: ' + score, width - 130, 50);
  }


  display() {
    // bring border
    clear();
    background('black');
    image(gameBorderImage, -76, -10, 756, 750);

    shooter.update();
    shooter.display();

    // update & draw balls
    for (let i = balls.length - 1; i >= 0; i--) {
      // check if balls cross the bottom border of game box
        // shot value is used to make sure it doesn't consider newly shot balls
      if (balls[i].y + balls[i].radius >= height - 60 && balls[i].y - balls[i].radius <= height - 60 && balls[i].shot == 1 && !balls[i].isPopping()) {
        this.endGame();
      }
      
      balls[i].update();
      balls[i].display();

      // check if balls touch the top border of game box
      if (balls[i].y - balls[i].radius <= 100) {
        balls[i].stop();
      }

      // check if ball touches another ball
      for (let j = 0; j < balls.length; j++) {
        if (i !== j && balls[i].intersects(balls[j])) {
          if ((balls[i].color === 'black' || balls[i].color === balls[j].color) && !balls[i].isPopping() && !balls[j].isPopping()) {
            // if ball hits another ball of same colour, make them disappear after a short delay
            balls[i].delayedPop();
            balls[j].delayedPop();
            shooter.setCanShoot(false); // prevent shooting until the balls pop
            setAutoShootTimeout();
          } else {
            // ball hit another ball of different colour
            balls[i].stop();
          }
        }
      }
      // check if balls touch the side borders of game box
      if (balls[i].x - balls[i].radius <= 50 || balls[i].x + balls[i].radius >= 550) {
        balls[i].bounceOffWall();
      }
    }
    
    // display timer
    textAlign(LEFT, BOTTOM);
    textSize(20);
    fill('white');
    text("Time: " + Math.ceil(timer /  1000) + 's', 45, height - 10);

    this.homeButton.display();
    this.restartButton.display();
  }

  handleButton() {
    if (this.homeButton.isMouseOver()) {
      currentPage = new StartPage();
    } else if (this.restartButton.isMouseOver()) {
      this.handleRestartButton();
    }
  }

  handleKeyPress() {
    // nothing to do
  }
  
  handleRestartButton() {
    // reset variables
    timer = 60000;
    score = 0;
    balls = [];
    nextBallColor = random(bubbleColors);
    shooter.setColor(nextBallColor);
    shooter = new Shooter(width / 2, height - 50, nextBallColor);
    shooter.setCanShoot(true);
    setAutoShootTimeout();
  }
  
  endGame() {
    console.log("Game Over");
    currentPage = new GameOverPage(score);
  }
  
  reset() {
    // reset variables
    timer = 60000;
    score = 0;
    balls = [];
    nextBallColor = random(bubbleColors);
    shooter.setColor(random(bubbleColors));
    shooter = new Shooter(width / 2, height - 50, nextBallColor);
    shooter.setCanShoot(true);
    setAutoShootTimeout();
  }
  
}

gameoverPage:

class GameOverPage {
  constructor(score) {
    this.score = score;
    this.playerName = '';
    this.submitButton = new Button(354, height - 75, 'Submit', 180, 70);
    this.isSubmitting = false;
    this.minNameLength = 4;
  }

   display() {
    clear();
    background('black');
    stroke('white');
    image(gameOverImage, 0, 0, 600, 700);
     
    textSize(60);
    textAlign(CENTER, CENTER);
    text(this.score, 160, 590);

    // max number of characters for player name: 10
    this.playerName = this.playerName.substring(0, 10);
    textSize(32);
    text(this.playerName, width / 2, 405);

    this.submitButton.display();
  }

  handleButton() {
    if (this.submitButton.isMouseOver()) {
      this.isSubmitting = true;

      // validity check for player name
      if (this.isNameValid()) {
        leaderboard.addScore(this.playerName, this.score);
        currentPage = leaderboard;
      } else {
        console.log("Invalid player name");
      }
    }
  }

  isNameValid() {
    // validity check: length / taken or not
    return (
      this.playerName.length >= this.minNameLength &&
      this.playerName.length <= 10 &&
      !leaderboard.isNameTaken(this.playerName)
    );
  }

  handleKeyPress() {
    if (keyCode === BACKSPACE && keyIsPressed) {
      this.playerName = this.playerName.slice(0, -1);
      keyCode = -1;
    } 
  }
  
  keyTyped() {
    if (keyCode >= 65 && keyCode <= 90 && this.playerName.length < 10) {
      this.playerName += key;
    }
  }
}

leaderBoard:

class Leaderboard {
  constructor() {
    this.scores = [];
    this.replayButton = new Button(390, 660, 'Replay', 105, 50);
    this.homeButton = new Button(210, 660, 'Home', 105, 50, true);
  }

  addScore(playerName, score) {
    // add score to leaderboard
    this.scores.push({ playerName, score });

    // store all scores if there are fewer than 'maxScores'(=max number of scores it can store) scores
      // if not, sort and only keep 'maxScores'(=max number of scores it can store) scores
    if (this.scores.length > this.maxScores) {
      // sort scores (highest to lowest)
      this.scores.sort((a, b) => b.score - a.score);
      this.scores = this.scores.slice(0, this.maxScores);
    }
  }

  isNameTaken(playerName) {
    // check if another player took the name (has the same name as typed name)
    return this.scores.some(entry => entry.playerName === playerName && entry.playerName.length === playerName.length);
  }

  display() {
    
    clear();
    background('black');
    stroke('white');
    image(leaderBoardImage, 0, 0, 600, 700);

    // sort scores (highest to lowest)
    this.scores.sort((a, b) => b.score - a.score); //needed? isn't it already sorted?

    // print all players + scores
    strokeWeight(1);
    for (let i = 0; i < this.scores.length; i++) {
      const entry = this.scores[i];
      let textSizeValue = 22; // default text size (ranks 3, 4, 5)
      let text_x;
      let text_y;

      // set x, y coordinates & text size for each ranker
      if (i === 0) {
        textSizeValue = 36; 
        text_x = 90;
        text_y = 205;
      } else if (i === 1) {
        textSizeValue = 28;
        text_x = 110;
        text_y = 305;
      } else if (i == 2) {
        text_x = 135;
        text_y = 405;
      } else if (i == 3) {
        text_x = 135;
        text_y = 495;
      } else if (i == 4) {
        text_x = 135;
        text_y = 580;
      }

      textSize(textSizeValue);
      fill('white');

      // print player + score
      textAlign(LEFT, CENTER);
      text(`${entry.playerName}`, text_x, text_y);
      textAlign(RIGHT, CENTER);
      text(`${entry.score}`, width - text_x, text_y);
    }

    this.replayButton.display();
    this.homeButton.display();
  }

  handleButton() {
    if (this.replayButton.isMouseOver()) {
      // reset variables
      timer = 60000;
      score = 0;
      balls = [];
      shooter.setCanShoot(true);
      setAutoShootTimeout();
      currentPage = new GamePage();
    } else if (this.homeButton.isMouseOver()) {
      // reset variables
      timer = 60000;
      score = 0;
      balls = [];
      nextBallColor = random(bubbleColors);
      shooter.setColor(random(bubbleColors));
      shooter = new Shooter(width / 2, height - 50, nextBallColor);
      shooter.setCanShoot(true);
      setAutoShootTimeout();
      currentPage = new StartPage();
    }
  }

  handleKeyPress() {
    // nothing to do
  }
}

reading serial from arduino:

function readSerial(data) {
  ////////////////////////////////////
  //READ FROM ARDUINO HERE
  ////////////////////////////////////
  if (data != null) {
    //console.log(data);
    let fromArduino = split(trim(data), ",");
    if (fromArduino.length == 2) {
      potValue = int(fromArduino[0]);
      forceValue = int(fromArduino[1]);
      
      if (currentPage instanceof GamePage){
        const previousBallMoving = balls.length === 0 || !balls[balls.length - 1].isMoving();
        
        if (forceValue == 1 && shooter.canShoot() && previousBallMoving) {
        
        if (shooter.canShoot())
        console.log("shooting through force sensor");
        let ball = new Ball(shooter.x, shooter.y, shooter.angle, nextBallColor);
        balls.push(ball);
        nextBallColor = random(bubbleColors);
        shooter.setColor(nextBallColor);
        shooter.setCanShoot(true);
        setAutoShootTimeout();
      }
        
      }
      
    }
  }
}

class ball:

class Ball {
  constructor(x, y, angle, color) {
    this.x = x;
    this.y = y;
    this.diameter = 50;
    this.radius = this.diameter / 2;
    this.speed = 10;
    this.angle = angle;
    this.color = color;
    this.stopped = false;
    this.popping = false;
    this.popTimer = 0; // timer for delayed popping
    // value to check if it's newly shot ball or not
      // 0 means it's a new ball that's being shot / moving
      // 1 means it's a ball that was shot before
    this.shot = 0;
  }

  update() {
    if (!this.stopped && !this.popping) {
      this.x += cos(this.angle) * this.speed;
      this.y += sin(this.angle) * this.speed;
    }
    
    if (this.shot === 0) {
        for (let j = 0; j < balls.length; j++) {
          if (this !== balls[j] && this.intersects(balls[j])) {
            // ball hit another ball
            this.shot = 1;
            this.stop();
            break;
          }
        }
        if (this.y - this.radius <= 100) {
          // ball hit the top border
          this.shot = 1;
          this.stop();
        }
      }

    // update pop timer
    if (this.popTimer > 0) {
      this.popTimer -= deltaTime;
      if (this.popTimer <= 0) {
        this.pop();
        shooter.canShootFlag = 'true';
      }
    }
  }

  display() {
    fill(this.color);
    ellipse(this.x, this.y, this.diameter, this.diameter);
  }

  stop() {
    this.stopped = true;
    if (this.color === 'black') {
      // black ball: bonus ==> pop regarldess of colour
      for (let j = 0; j < balls.length; j++) {
        if (this !== balls[j] && this.intersects(balls[j]) && !balls[j].isPopping()) {
          balls[j].delayedPop();
          this.delayedPop();
        }
      }
    }
  }

  delayedPop() {
    this.popTimer = popDelay;
    this.popping = true;
  }

  pop() {
    this.x = -100; // moving it off screen
    this.y = -100;
    this.stopped = true;
    score += 1;
  }

  bounceOffWall() {
    this.angle = PI - this.angle;
  }
  intersects(otherBall) {
    // ball intersection must consider the strokewieght of the balls
      //otherwise, the balls are drawn in a seemingly overlapping way
    let thisEffectiveRadius = this.radius + this.diameter * 0.05; 
    let otherEffectiveRadius = otherBall.radius + otherBall.diameter * 0.05; // Adjust the factor based on stroke weight
  
    let distance = dist(this.x, this.y, otherBall.x, otherBall.y);
    let minDistance = thisEffectiveRadius + otherEffectiveRadius;

    return distance < minDistance;

}

  isMoving() {
    return !this.stopped && !this.popping;
  }

  isPopping() {
    return this.popping;
  }
}


Below is the project:

Even without the console, the game works with left and right arrow keys and ENTER keys.

Below is a video of players trying the game:

Parts I’m Proud Of:
I think for this project, there was a lot of attention to detail. I had to take care of minor things like
– the check of balls hitting each other considering the stroke weight for non overlapping display of balls
– leaderboard keyboard input (had lots of errors)
– leaderboard name validity check (min/max length, duplicate)
– left/right arrow keys for shooter angle and enter key for shooter (for back up in case arduino is not connected etc)
– etc

Because the game was interactive, I though that it had to make sense and smooth in order for the player to not be distracted.

I also think the features of screaming and punching added a kick to the game. This is a fairly simple retro game and needed additional features to make it more fun and interactive. Last time, I used the screaming aspect but wasn’t the perfect use. I think this game gave good reason for players to scream. Also, I believe the punching (more of hitting the table) part made sense- hitting the table to shoot seems intuitive and understandable for the player.

Improvements / Future Expansions:
I think it’d be really nice if I can develop it to make it like the real bubble shooter. Right now, when I shoot a ball and hit another ball of the same colour, it only pops the ball it hit and the ball it shot. In original bubble shooter, all the connected balls with the same colours pop, and if certain parts are totally disconnected, they fall down all together.

This part wasn’t implemented in the project and I think this addition would be a nice add.

Final Project – Final Idea

I just wanted to take a short moment to lay out the the details as some has changed.

As I finalized last time, I created a bubble shooter game. As inputs, I am using a potentiometer, force sensor and sound. For sound, I’m not getting it from the arduino but through p5js directly.

The sound is responsible for auto shoot speed. The player would need to shout and scream to slow down the auto shooter- otherwise, the auto shoot will go crazy.

The potentiometer works as the knob to adjust the angle of the shooter.

The force sensor is attached to a glove. The player would have the glove on one hand and hit the ground with their hand to shoot.

There is a leaderboard that shows the top 5 players.

Final Project – Idea Finalization

In my last post, I’ve already shared most of what my  game may be and how it’ll work. However, there have been more adjustments and decisions made and I would like to share my final project idea.

I have finalized the idea as the bubble shooter game (shown in the image above). The required functions are simple- the player should be able to choose directions and shoot bubbles. So, I would like to clarify how I will be using different components of the arduino and its sensors.

My bubble shooter game will have a gauge, that will increase as the player manages to remove certain number of lines. I plan to show this on the LCD screen.

Once this gauge is full, the player will be able to punch on the force sensor, which will work as an item that will break additional 3-5 lines of bubbles.

The player will be able to adjust the direction of bubbles being shot with the potentiometer and the shot will be made with a push button.

As of now, getting the graphics on p5js is the biggest issue and the primary goal so I’ve been focusing on it. I plan to get the graphics done and work on the different parts of the arduino, and connect them.

Final Project Idea

Concept)
I still haven’t fully decided what I want to do for my final project, but I plan to have the main concept as ‘screaming.’ I created a game that required the player to scream and I really liked the concept. One thing I regret from last project is that if I made it so that the player would have to continue screaming in order to make the game playable (i.e. slower the speed), it would’ve made more sense. I think trying this approach in my final project would be nice.

I have two different types (still very general ideas) in mind.

One is a game that would have the goal of attacking (like aircraft wargame). In this case, I think I’ll give a gauge that can be filled up by screaming. Once the gauge is full, the player will be able to press the force sensor to use a booster. When this booster is used, the player will become invincible like players in mariokart when they have used starman (refer to the video below).

Second type is a more challenge-focused game without attacks. One example can be puzzle bubble. Also in this concept, I’ll have a gauge that makes the player scream. When the gauge is full, the player will be able to punch (or press) on the fore sensor. This will work as special item such as clearing 3 lines etc.

Although I’m still thinking about the general structure of the game, I have decided that I will make use of ‘screaming’ and ‘force sensor’ as the main theme of my game. By punching the force sensor, I mean something like below:

Implentation)

I think the first thing to do would be to get the general structure of the game decided. After that, I will decide how to make it clear that there’s a strong incentive for the player to scream and punch. I will first test simple codes with the sensors (arduino) separately, the p5js part separately, and then combine the two parts.

Week 11 – Reading Reflection

I really liked the approach of the reading. I think until now, based on the readings we’ve had, most of my  discussion on these posts and in class have been from a perspective that design tends to focus on a certain group of people- usually, the healthy and the capable. I remember multiple discussions I had with my classmates in our in-class discussion how different designs and pursuits of certain designs tend to leave out the minority. We had a shared emotion that this may be logical (from a company  or designer’s point of view) but such a sad downside of designs that pursue convenience or attractiveness.

I think this reading really makes us ask ourselves if really, a pursuit of something in a design means a give-up in other factors of a design, and if that’s ideal. One topic the reading looks at discretion and fashion. It talks about how they are concepts with tension, but not the opposite. I feel like there are some factors that we take to blindly think are at opposite ends and a pursuit of one means we would need to give up the other. I think as designers, one of our role is to realize such factors that are actually not at opposite ends and figure out how a design can pursue both (although there would be tension between them).

Week 11 – Production

Teammate: Jiho

1st exercise: 
We used the existing example: Week 11 Bidirectional serial communication(p5js Sketch) to fulfill the 1st exercise. We created a new variable “moveEllipse” to map the alpha value to the canvas width. We then used our variable as the x-position of the ellipse, successfully enabling the ellipse to move from one edge to the other as the potentiometer value increased.

let moveEllipse = map(alpha, 0, 1023, 0, width);
stroke(0);
ellipse(moveEllipse, height / 2, 60);


2nd exercise:
Editing that same example, we added the bouncing ball javascript from p5.js: https://editor.p5js.org/icm/sketches/BJKWv5Tn . The LED becomes brighter when the ball moves towards the right edge of the canvas. Conversely, the LED becomes dimmer when the ball moves towards the left edge of the canvas. We edited the arduino to replace digitalWrite with AnalogWrite to enable the control of the LED brightness.

let x = 320;
let y = 180;
let xspeed = 3;
let yspeed = 2;
let r = 25;

ellipse(x, y, r*2, r*2);
// mapping brightness to canvas width
let rightValue = map(x, 0, width, 0, 255);
right = int(rightValue);

x += xspeed;
y += yspeed;
if (x > width - r || x < r) {
xspeed = -xspeed;
}
if (y > height - r || y < r) {
yspeed = -yspeed;
}
}


3rd exercise: https://youtu.be/YFucULMGidI

I took the main structure of the code from the exercise we looked at in class- where we had to press our spacebar to connect to our board. There, I added the code with the bouncing ball given to us through this link(https://editor.p5js.org/aaronsherwood/sketches/I7iQrNCul).

The approach was to call bounceBall() function once the serial is activated, where p5js will continuously send touch value (1 means it touched the ground and 0 means it’s above ground) to the arduino. In return, the arduino would send lightStatus value (the input read from the light sensor). If the received value is bigger than 500, the wind blows from left to right and right to left if below.

Below are parts of code that highlights the appraoch:
P5js

if (position.y > height-mass/2) {
      velocity.y *= -0.9;  // A little dampening when hitting the bottom
      position.y = height-mass/2;
    touch = 1;
    //////////////////////////////////
    //SEND TO ARDUINO HERE (handshake)
    //////////////////////////////////
    let sendToArduino = touch + "\n";
    console.log(touch);
    writeSerial(sendToArduino);
    touch = 0;
    sendToArduino = touch + "\n";
    writeSerial(sendToArduino);
    }

Arduino

int ledPin = 5;
int lightPin = A1;
int lightStatus;

void setup() {
  Serial.begin(9600);
  pinMode(ledPin, OUTPUT);
  pinMode(lightPin, INPUT);

  // start the handshake
  while (Serial.available() <= 0) {
    digitalWrite(LED_BUILTIN, HIGH);
    Serial.println("0");
    delay(1000);
    digitalWrite(LED_BUILTIN, LOW);
    delay(100);
  }
}

void loop() {
  while (Serial.available()) {
    digitalWrite(ledPin, HIGH);

    int ledLight = Serial.parseInt();
    lightStatus = analogRead(lightPin);
    if (Serial.read() == '\n') {
      digitalWrite(ledPin, ledLight);
      delay(50);
      digitalWrite(ledPin, LOW);
      Serial.println(lightStatus);
      delay(5);
    }
  }
  digitalWrite(LED_BUILTIN, LOW);
}


Week 10 Production – Instrument

Concept)
There were two conditions I wanted to meet when creating this instrument
– it should involve both hands
– it should be able to play different notes separately  (i.e. the sound is not continuous)

It naturally made sense to have one of the hands be responsible of how long a note should be played, and the other hand to specify the note. I saw different videos for inspiration and saw instruments that use the distance to decide the note to be played.

Production)

Code)

int trig = 10;
int echo = 11;
int light = 5;
long  duration;
long  distance;
int   buttonState;


void setup() {
  pinMode(echo, INPUT);
  pinMode(trig, OUTPUT);
  pinMode(light, OUTPUT);
  Serial.begin(9600);
}

void loop() {
  digitalWrite(trig, LOW);
  delayMicroseconds(2);
  digitalWrite(trig, HIGH);
  delayMicroseconds(10);
  digitalWrite(trig, LOW);
  duration = pulseIn(echo, HIGH);
  distance = (duration / 2) * 0.0344;
  /*
    duration = time it took for ultrasonic pulse to travel to and back from the object
    distance equation: conversion from duration to distance
    because the duration includes the travel time to and back from the object, 
      divided by 2
    multiplied by 0.0344: speed of sound in air (in room temperature
                            = 343 m/s ==> convert to cm
  */


  int notes[7] = {261, 294, 329, 349, 392, 440, 494};
  //C, D, E, F, G, A, B

  buttonState = analogRead(A1);

  int sound;

  if (distance < 0 || distance > 50 || buttonState < 100) {
      sound = -1;
  } else if (distance <= 5) {
      sound = 0;
  } else if (distance <= 10) {
      sound = 1;
  } else if (distance <= 15) {
      sound = 2;
  } else if (distance <= 20) {
      sound = 3;
  } else if (distance <= 30) {
      sound = 4;
  } else if (distance <= 40) {
      sound = 5;
  } else {
      sound = 6;
  }

  if (sound != -1) {
      digitalWrite(light, HIGH);
      Serial.println(sound);
      tone(12, notes[sound]);
  } else {
      noTone(12);
      digitalWrite(light, LOW);
  }

}

I think the most interesting part of this code was figuring out how to convert the duration to distance, and the distance to different notes.

Future Improvements)
I think it’s be interesting if I can connect a force censor, for instance, to create the beat on the background. Then, it would have a simple instrument that consists of the base beat (like a drum) and the melody part through the hands.

[Week 10] Reading Response

< A Brief Rant on the Future of Interactive Design>

Looking at the video, I think my very shallow but instant impression was: cool. It definitely is close to what I’ve been picturing- something that’s been displayed to us through media (like Netflix Black Mirror series) until now, somewhat brainwashing this is what we have coming and this is all we could expect.

I love how the reading questions if the aspect of our future daily lives shown in the video is the next form of ‘technology’, or interaction, as the author focuses.

I think a big part of why technology has limited power to fascinate people and bring joy with the littlest thing is that lack of feeling. The reading talks about how if we were to read a book, we’d be able to feel it. With basic interactions with ‘Pictures Under Glass’, this is not possible. I think we’ve all felt this limitation with certain technology like e-books and simply visually satisfying games.

The author acknowledges that this is just a rant and that the current developments the world is showing are still great. It’s just a matter of how do we progress from here, using everything humans can do. Regardless of any statements that can be made around his opinion, I like how he approached the concept of ‘tool’ and what that can mean when we are inventing or developing a tool.

Week 9 – Reading Response

Greatest Hits (and Misses)
The reading went over how different materials were used in different projects. I think there is 2 ways of approaching a project: come up with the idea first and look at available technologies or methods, or look at available technologies or methods and think about what you can do with it.

I wouldn’t say any of them is superior than the other. However, I do want to say that it does mean knowing what’s available will be helpful in terms of thinking outside the box, doing remix, and creating your project.  In this sense, it was interesting to see how different technologies were used. Some were crazier than others, but regardless, they still make it to my reference list.

Making Interactive Art
I think the reading very well points out how certain performers or artists tend to directly guide the audience to think a specific way or come to a specific conclusion. I think it’s easier to fall into this pitfall as an interactive media creator, as there’s a limitation to different types or cases of interactions we can think of as creators, which will make us limit the conclusion and the emotions we create with our project.

I think this can both work against you or work in your favour. It is true we, as creators, should try not to have a set conclusion and just ‘educate’ our audience of it. However, at the same time, interactive media holds the power to guide people to experience certain things and, in return, think a certain thing. I think this is a strength not many forms of media has. For instance, a painting may go through so many interpretations of different individuals. While I agree the charm lies within this characteristic, it is also very true that the painter may fail in delivering the message with the correct context and depth.

Week 9 – Production

Concept)

When I thought about what I could do with 2 LEDs, I again thought about the colours. Looking at buttons and red and blue LED lights, I thought of an old-style game that used to be played on primary school sports day: “Blue Flag, Red Flag.”

How you play the game:
There’s one referee who gives orders like…
– Hold up red flag
– Don’t hold up red flag and hold up blue flag
– etc..
It makes much more sense and has more thrill in Korean grammar.. The grammatical order of English kind of giving everything away.

Anyways, I wanted to create a game control for this game.

Materials I Used:
– Arduino Uno
– 2 LEDs (red & blue)
– 4  resistors (330 ohm)
– 2 push button switches
– breadboard
– jumper wires

Video: (just realized the top part is a little cut off, but the subtitles on top of the video or examples of the orders)

Code:

const int redButton = 3;
const int blueButton = A1;
const int redLight = 6;
const int blueLight = 5;

void setup() {
  Serial.begin(9600);
  pinMode(redLight, OUTPUT);
  pinMode(blueLight, OUTPUT);
  pinMode(redButton, INPUT);
}

void loop() {

  int redState;
  int blueState;

  redState = digitalRead(redButton);
  blueState = analogRead(blueButton);

  //Serial.print("restate: ");
  //Serial.println(redState);
  //Serial.print("bluestate: ");
  //Serial.println(blueState);
  if (redState != 0)
  {
    Serial.println("red high");
    digitalWrite(redLight, HIGH);
    delay(100);
    digitalWrite(redLight, LOW);
  }
  if (blueState > 500)
  {
    Serial.println("blue high");
    digitalWrite(blueLight, HIGH);
   delay(100);
    digitalWrite(blueLight, LOW);
  }
}


The code is very simple as it’s just recognizing the buttons and turning on the LED lights. It is notable that the push of the buttons are recognized differently (analog and digital input) and therefore the if statement is a little different.