Final Project

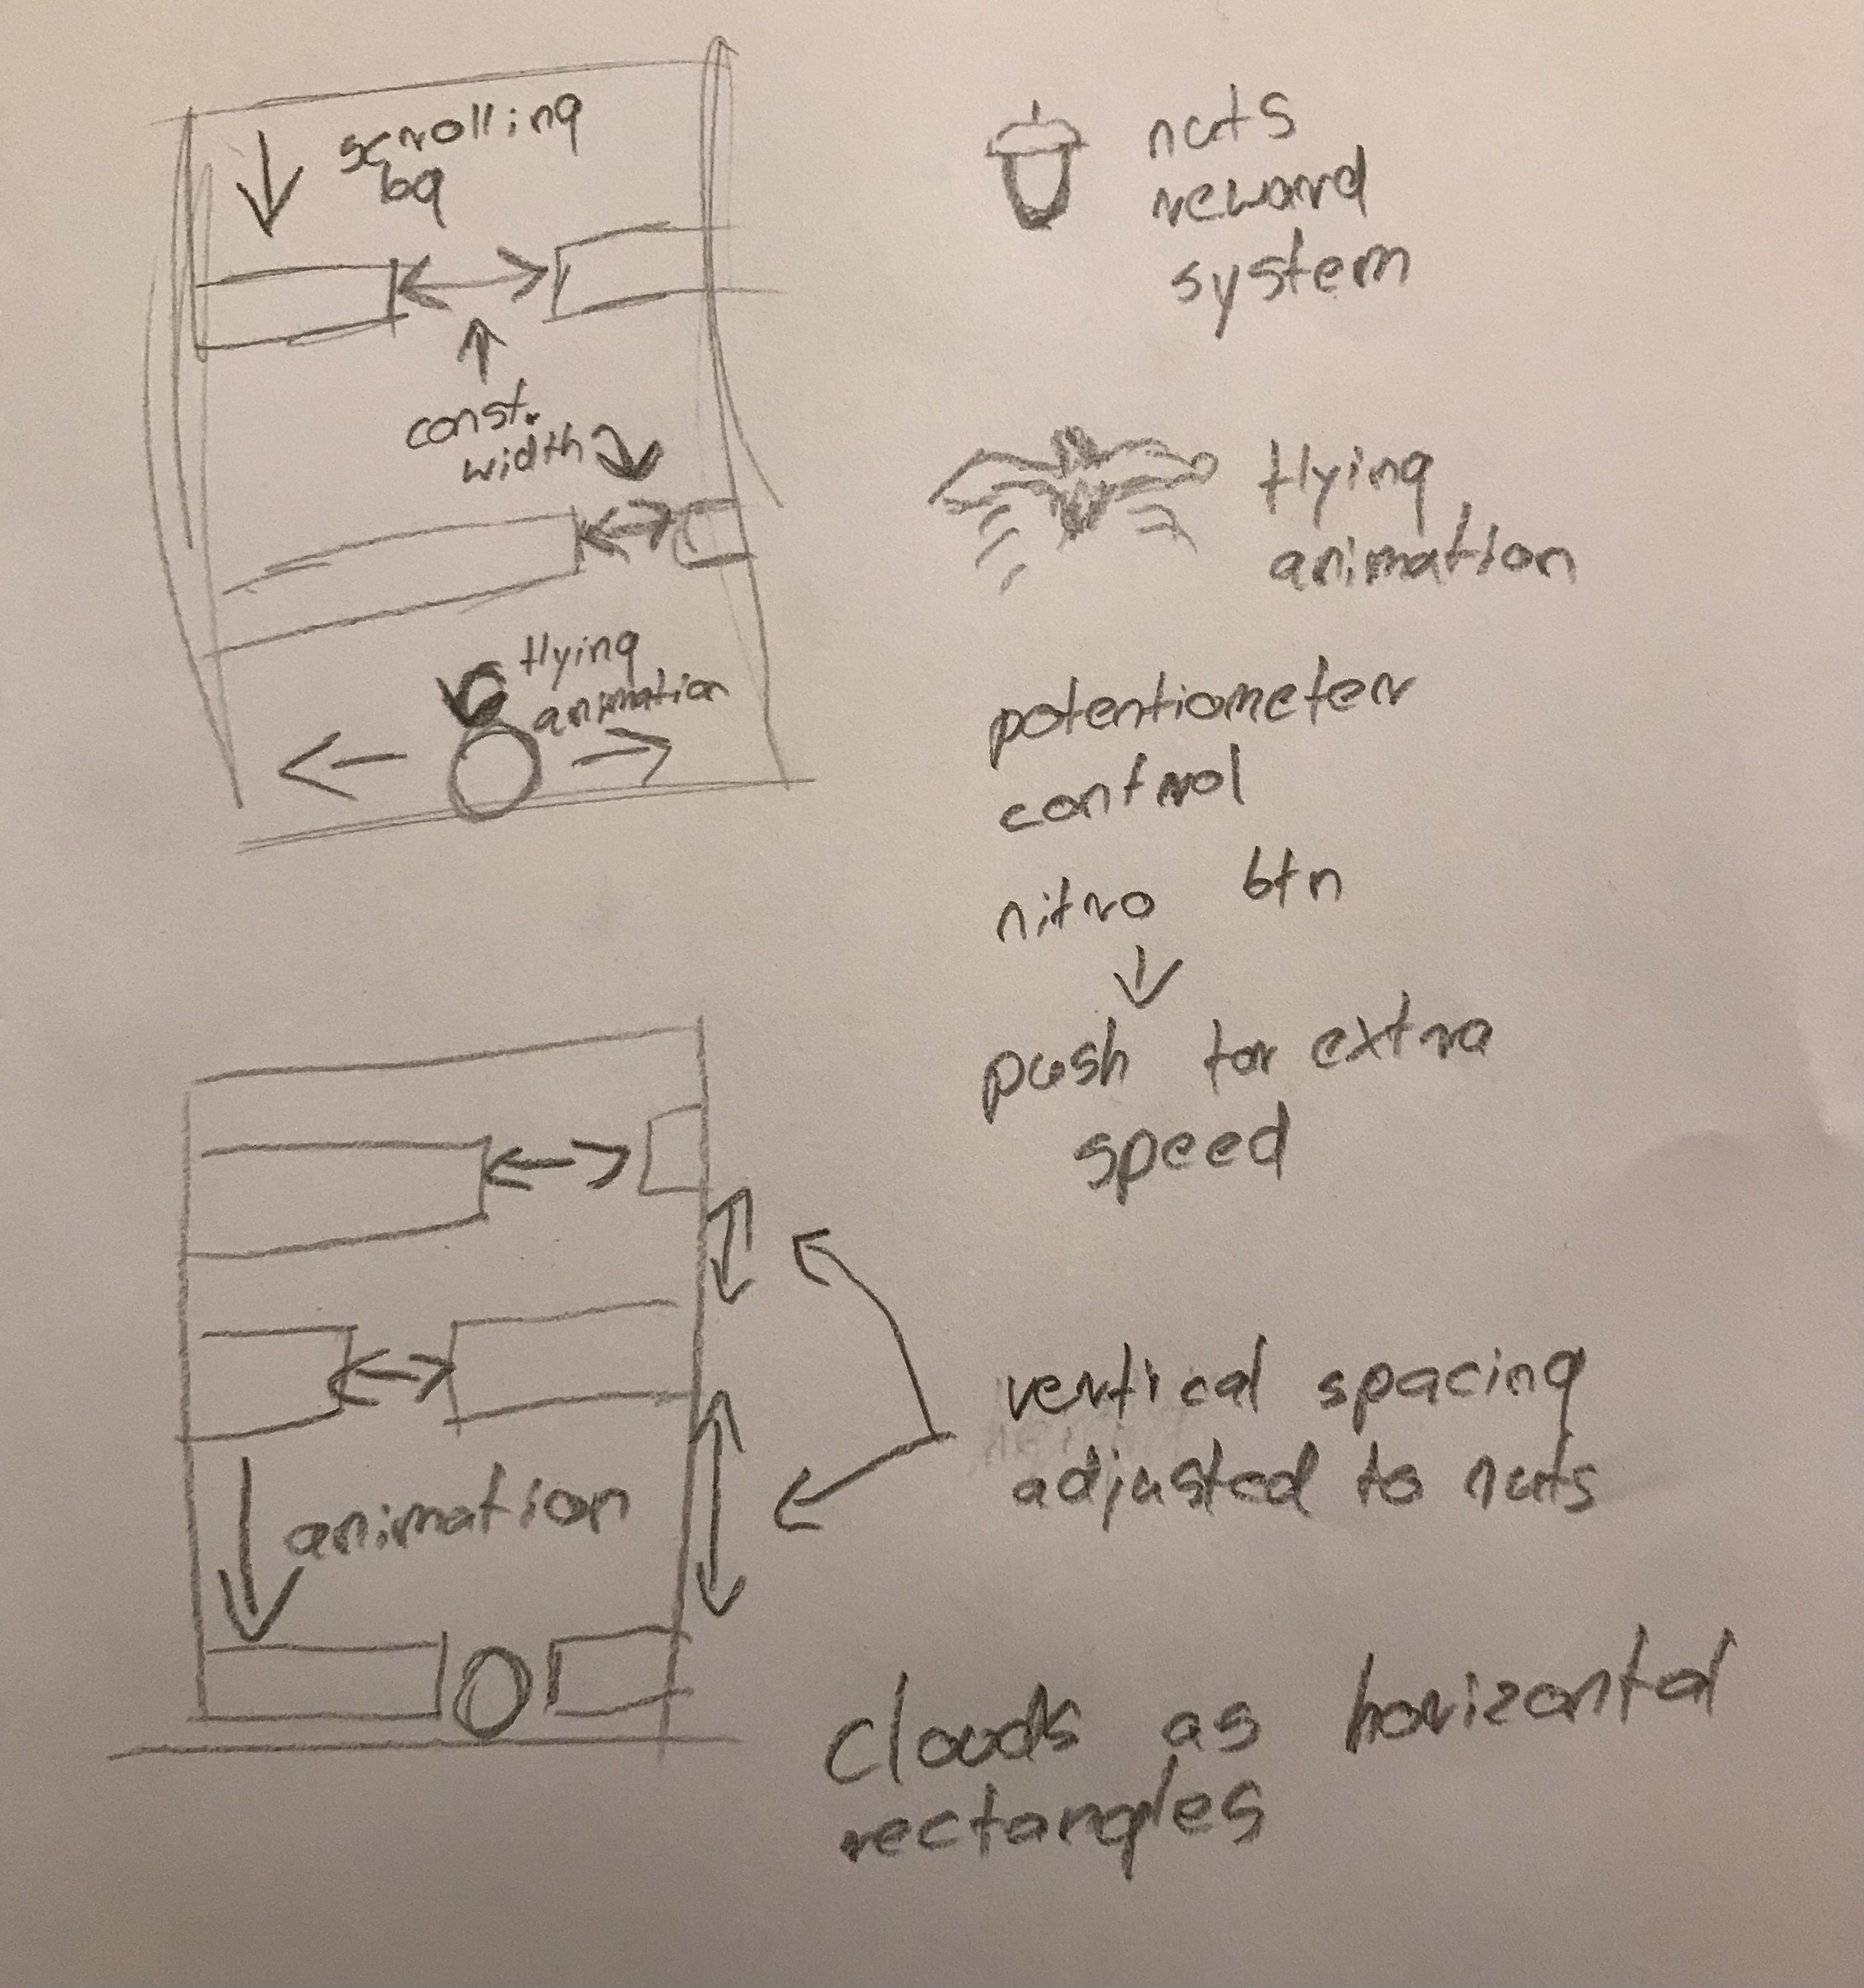
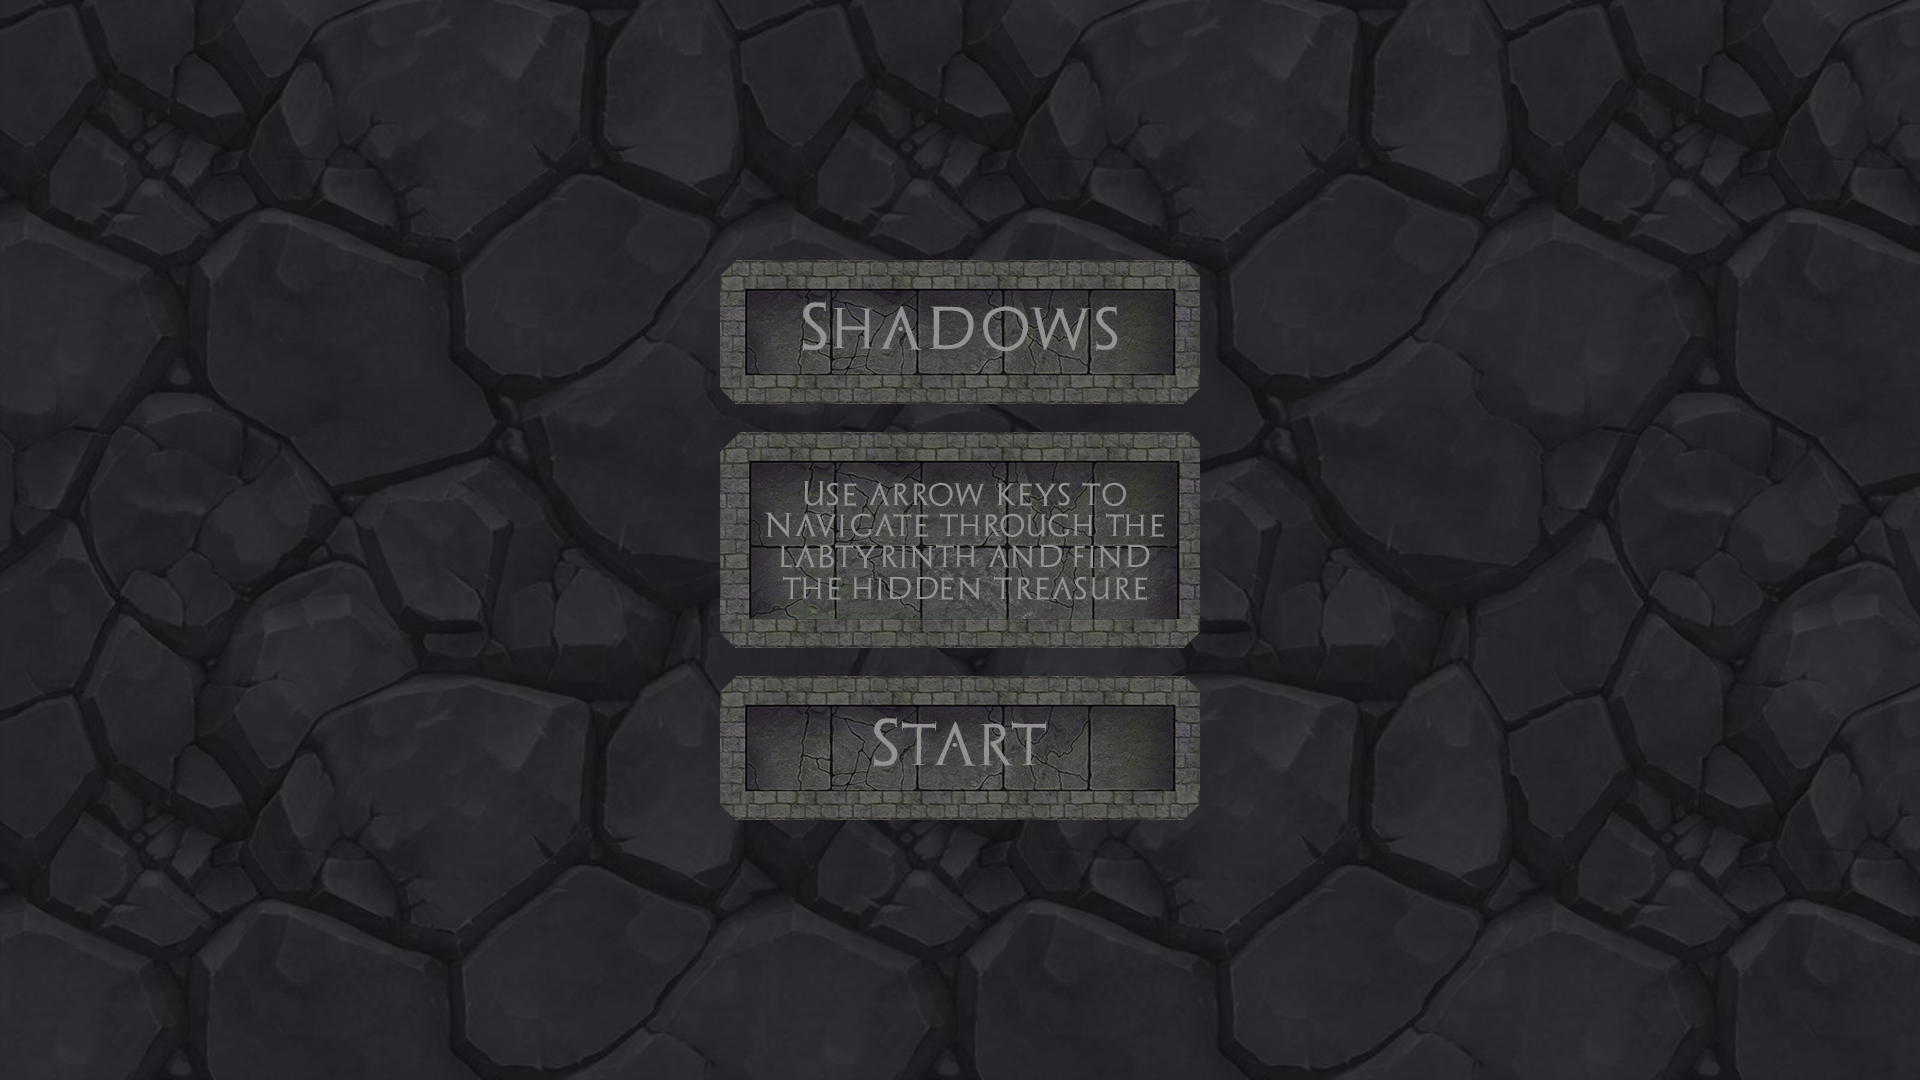
For the final project I wanted to go with the arcade vibe of Arduino and create a game.

With simple controls in the form of the potentiometer the game relies on the player controlling a bird, which wants to fly high into the air. On its way,  the bird encounters stormy clouds, which it should avoid at all cost. Also, to reward the bird on its adventure, it will encounter some delicious smaller birds, which work as the scoring mechanism for the game.

As the player will collect more points, the animation frequency will increase making the game progressively harder and harder.

To add some spice to the game I introduced a SLOW TIME button, which significantly decreases the animation frequency.

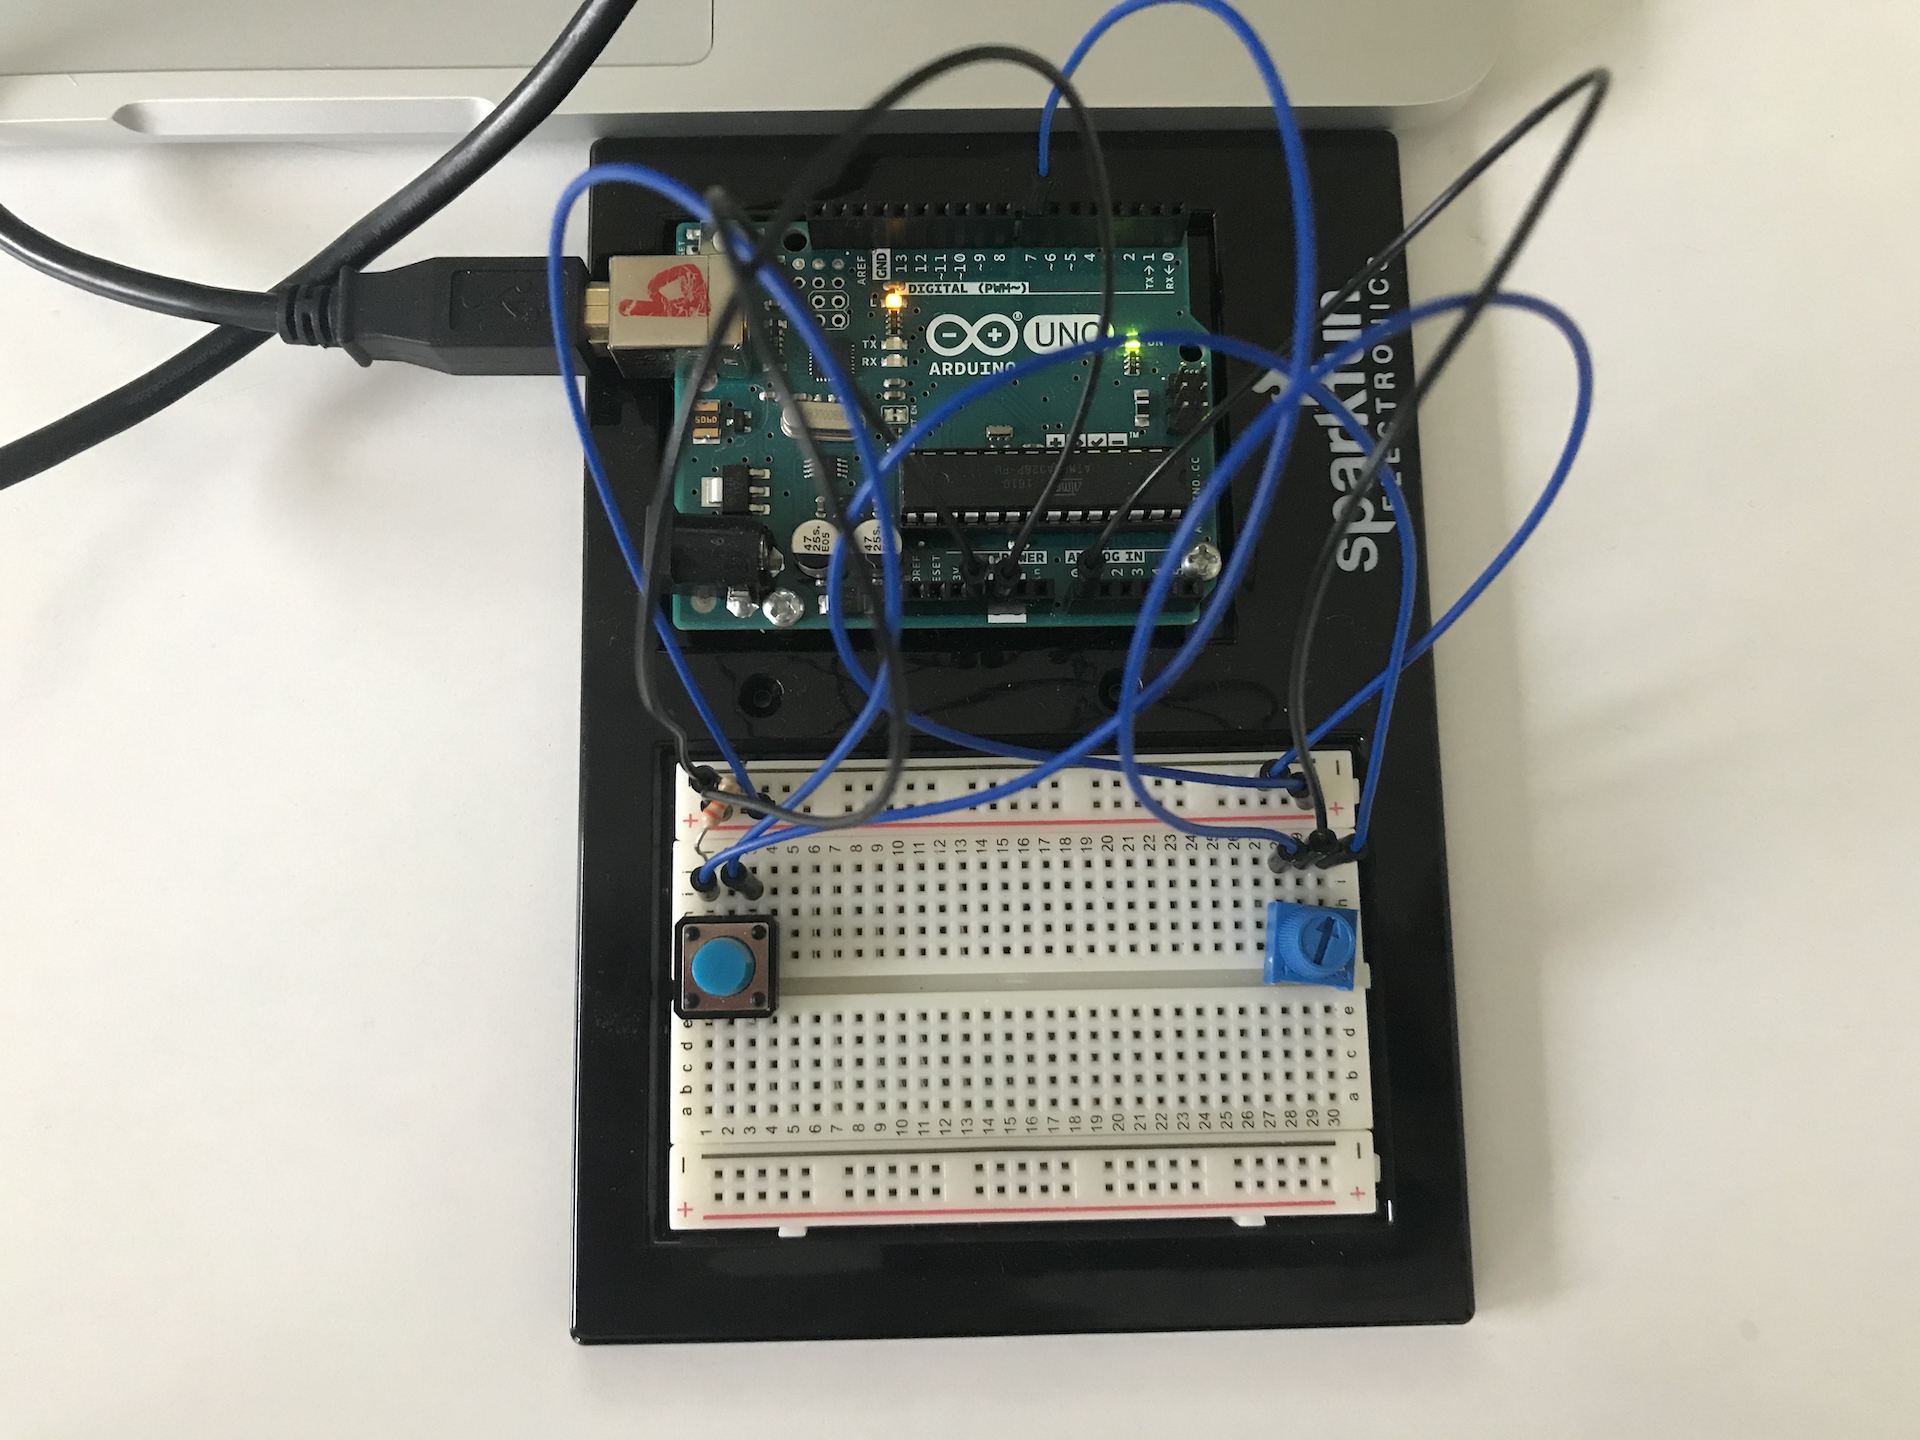
The projects seemed a bit daunting with all the vertical animations and ways of achieving top quality responsiveness from Arduino kit. I smoothed out the potentiometer values and used a single button to control the flow of the game as well as the SLOW MODE.

In my project Arduino provided the input for the bird control. The bird movement was mapped from the potentiometer, which fits the role perfectly. In addition to that, the slow mode button provided a mechanism for slowing down vertical transitions.

The processing layer was responsible for displaying the game as well as the logic. It takes the potentiometer value from Arduino and displays the bird on an according position. It also takes care of the slow mode triggers from the button.

The main challenge of the project was working with all the animations as they change throughout the game. I couldn’t just change the frameRate of the game, as that would case sudden drops in frameRate, rather than make the transition smooth. Therefore I worked around that by introducing the bgFreq which stands for background frequency. That variable controlled the speed at which all the pieces of UI were moving on the screen, depending on the gameScore.

During user testing I played a lot with different parameters of the game. The bird speed, as well as the cloud speed. As discussed in the class I decided on making the bird speed uniform and same as that of the background. That makes it easier for the user to predict the future position of the bird and plan their moves ahead more efficiently, increasing the strategical aspect of the game. The clouds on the other hand vary in speed, adding an extra layer of difficulty to an already difficult game. Arcade games never were easy, so I believe that choice of adding extra difficulty to my game was crucial.

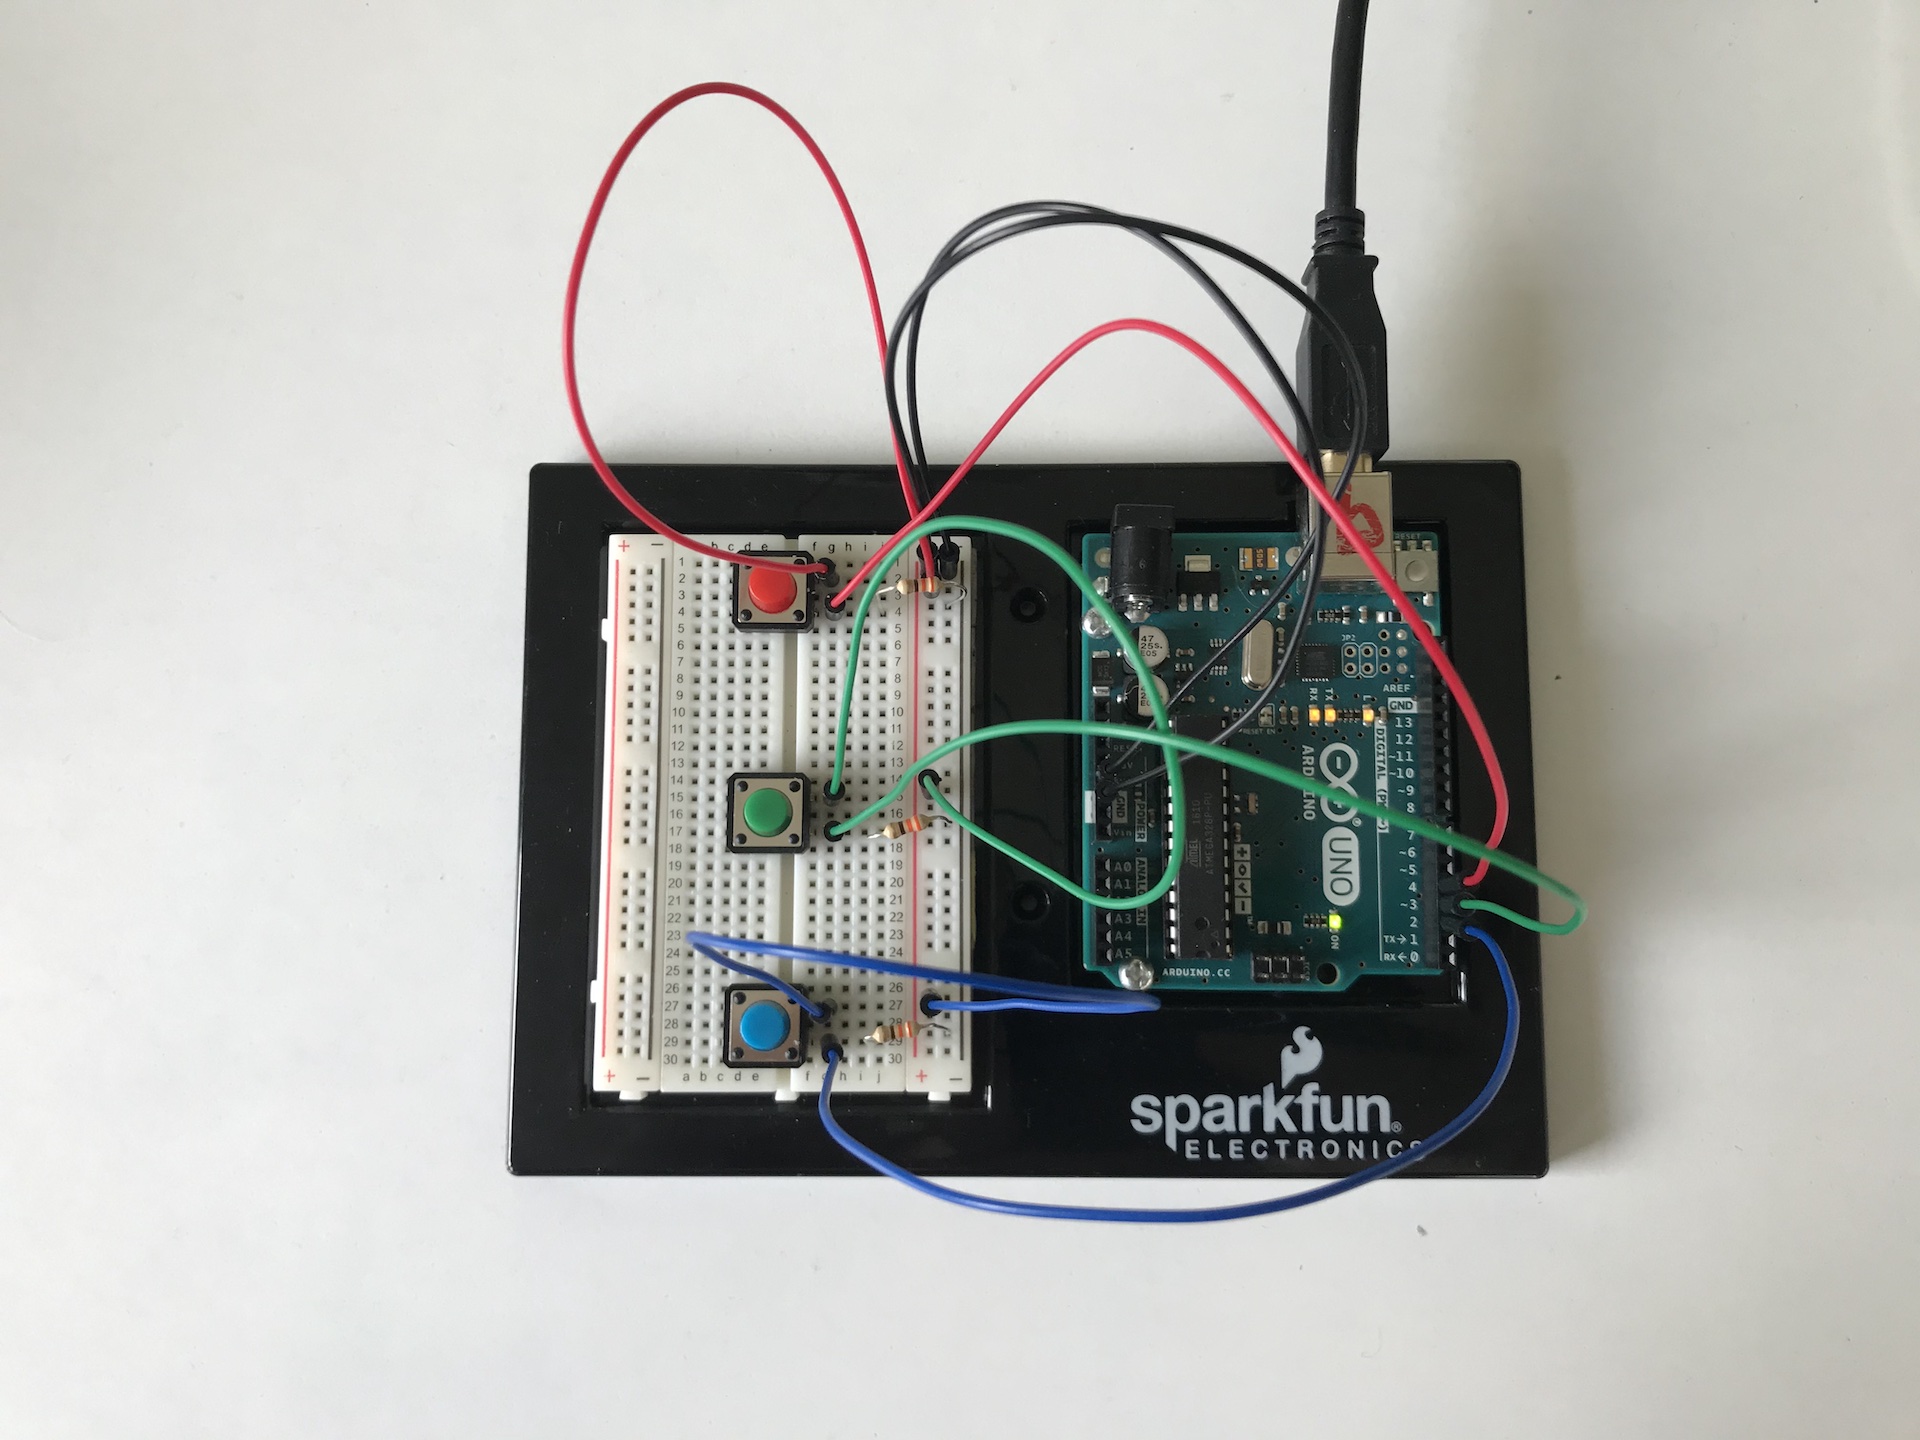
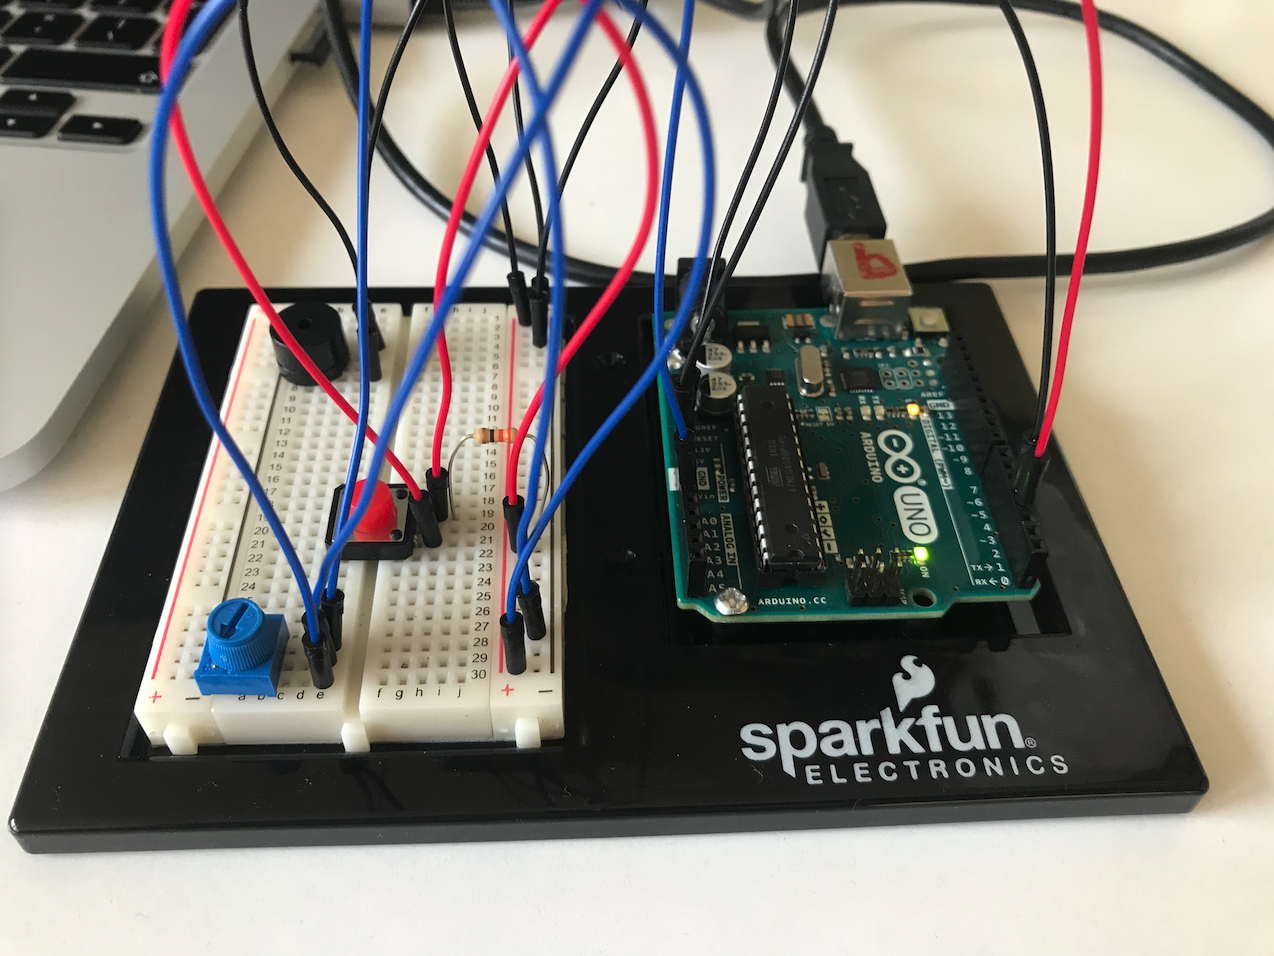
The Arduino setup of the final work:


Footage of actual gameplay:

At last, here is a link to my project if you wanted to play with it yourself:

https://github.com/miki-debicki/Eagle.git

Guitar Hero on a budget

For this weeks project I wanted to play with Arduino and create a really low budget version of the famous guitar hero game.

In the game, player has to press a button of the color corresponding to the note which is currently at the strum line. In my game I introduced 3 buttons Red, Green and Blue, which work on the 3 paths of the corresponding colors. When a note falls down to the bottom of the screen the user needs to press the button. Notes appear in random time intervals.

The hardest part of this weeks assignment was picking right time windows for the button reads. Calibrating that to the Arduino module took me quite some time.

Here is my Arduino setup:

Here is me playing the game:

And at last my code:

import processing.serial.*;

Serial myPort;
Note[] notes = new Note[5];
int counter = 0;
int[] positions = {100, 250, 400};
int points = 0;

void setup() {
  size(500, 400);
  frameRate(30);
  textSize(30);
  String pName = Serial.list()[2];
  myPort = new Serial(this, pName, 9600);
}

void draw() {
  drawBackground();
  if (frameCount%30 == 0) {
    addNote();
  }
  drawNotes();
}

void serialEvent(Serial myPort) {
  String msg = myPort.readStringUntil('\n');
  msg = trim(msg);
  if (msg != null) {
    int btnVals[]=int(split(msg, ';'));
    if (btnVals.length == 3) {
      if (btnVals[0] == 1) {
        checkNote("red");
      }
      if (btnVals[1] == 1) {
        checkNote("green");
      }
      if (btnVals[2] == 1) {
        checkNote("blue");
      }
    }
  }
  myPort.write('0');
}

void checkNote(String col) {
  int xPos = 0;
  switch (col) {
  case "red":
    xPos = 100;
    break;
  case "green":
    xPos = 250;
    break;
  case "blue":
    xPos = 400;
    break;
  }

  for (int i=0; i<notes.length; i++) {
    if (notes[i] != null) {
      if (notes[i].x == xPos && notes[i].y > 350) {
        notes[i] = null;
        points+=1;
      }
    }
  }
}

void drawBackground() {
  background(30);
  noStroke();  
  fill(90, 0, 0);
  rect(50, 0, 100, 400);

  fill(10, 90, 0);
  rect(200, 0, 100, 400);

  fill(0, 20, 90);
  rect(350, 0, 100, 400);

  fill(80);
  rect(0, 350, 500, 50);

  fill(255);
  text(points, 5, 30);
}

void drawNotes() {
  if (notes != null) {
    for (int i=0; i<notes.length; i++) {
      if (notes[i] != null) {
        notes[i].drawNote();
        if (notes[i].y > height) {
          notes[i] = null;
          points = 0;
        }
      }
    }
  }
}

void addNote() {
  notes[counter] = new Note(positions[int(random(3))]);
  counter = (counter+1)%5;
}

class Note { 
  int x;
  int y = 0;
  Note (int xPos) {  
    x = xPos;
  } 
  void drawNote() {
    y += 5;
    switch(x) {
    case 100:
      stroke(255, 0, 0);
      break;
    case 250:
      stroke(0, 255, 0);
      break;
    case 400:
      stroke(0, 0, 255);
      break;
    }

    strokeWeight(50);
    point(x, y);
    strokeWeight(10);
    stroke(255);
    ellipse(x, y, 20, 20);
  }
}
const int redBtn = 4;
const int greenBtn = 3;
const int blueBtn = 2;
 
void setup() {
  Serial.begin(9600);
  Serial.println("0,0");
  pinMode(redBtn, INPUT);
  pinMode(greenBtn, INPUT);
  pinMode(blueBtn, INPUT);
}
 
void loop() {
  if (Serial.available() > 0) {
    char inByte = Serial.read();
    
    int red = digitalRead(redBtn);
    int green = digitalRead(greenBtn);
    int blue = digitalRead(blueBtn);
    
    Serial.print(red);
    Serial.print(';');
    Serial.print(green);
    Serial.print(';');
    Serial.println(blue);
  }
}


Final Project Idea

For the final project I want to go with the arcade vibe of Arduino and create a game.

With simple controls in the form of the potentiometer the game will rely on the player controlling a bird, which wants to fly high into the air. On its way,  the bird will encounter stormy clouds, which it should avoid at all cost. Also, to reward the courageous bird on its adventure, it will encounter some delicious nuts, which will work as the scoring mechanism for the game.

As the player will collect more and more nuts, the vertical spacing between the clouds will begin to shrink making the game progressively harder and harder.

To add some spice to the game I am also thinking about introducing a BOOST button, which will significantly increase birds flying speed. I think it would be fan to watch the bird dash through the clouds.

The projects seems a bit daunting with all the vertical animations and ways of achieving top quality responsiveness from Arduino buttons but I have two more weeks to figure that out 🙂

Breakout rooms brainstorming brought me a new idea. Instead of speeding things up the button will slow the time and make it easier to move though the clouds. The downside of that will be losing nuts for each second spent in the slow mode.

Also the game difficulty will change basing on the number of nuts collected. Their number will change the speed of downward animation, instead of reducing the vertical spacing of the clouds. That would make the game go faster and faster with each nut collected.

In my project Arduino will provide the input for the bird control. The bird movement will be mapped from the potentiometer, which fits the role perfectly. In addition to that, the slow mode button will provide a mechanism for slowing down vertical transitions.

The processing layer will be responsible for displaying the game as well as the logic. It will take the potentiometer value from Arduino and display the bird on an according position and watch out for the slow mode trigger from the button.

I’m gonna find them all :D

Seven nations army is a classic and that should never be questioned. It is also very repetitive which is helpful if you’re trying to make your Arduino board play it.

For this weeks assignment I created a knob steered Seven Nations Army player, where the users can go through the notes of the tune and play it themselves. I also introduced the breaks, where in-between the notes there are 0 notes, which emit no sounds. By doing that I gained manual control over the length of each note played. I also used a RED EMERGENCY BUTTON for when the speaker was getting to nerve wrecking. When the button is pressed no sounds is emitted 🙂

#include "pitches.h"

#define speaker 4
#define btn 3
#define knob 2

int whichNote = 0;
int knobValue;
int lastNote = 14;

int notes[15] = {0, NOTE_E2, 0, NOTE_E2, 0, NOTE_G2, 0, NOTE_E2, 0, NOTE_D2, 0, NOTE_C2, 0, NOTE_B1, 0};

void setup() {
  pinMode (btn, INPUT);
  Serial.begin (9600);
}

void loop() {
  if (digitalRead(btn) == LOW) {
    whichNote = map(analogRead(A0), 0, 1023, 0, 14);
    tone(4, notes[whichNote], 1000);
  }

  if (whichNote == lastNote) {
    int i, k, t;
    int n = sizeof(notes) / sizeof(notes[0]);
    for (i = 0; i < n / 2; i++) {
      t = notes[i];
      notes[i] = notes[n - i - 1];
      notes[n - i - 1] = t;
    }
    if (lastNote == 0) {
      lastNote = 14;
    }
    else {
      lastNote = 0;
    }
  }
}


The Police

In this weeks assignment I was inspired by current protests in Poland. The police lights are flashing all the time in Warsaw nowadays and I wanted to have some control over that. At least on my mini Arduino board 🙂

I decided to have two modes, which I could switch around by pressing the button. One is the rapid mode, where the two LEDs blink rapidly in the police fashion. The other is the controlled mode, where the user can switch between the two LEDs by the means of the potentiometer. By doing that, they can control the LEDs and almost play with them just as the DJs do with their sounds decks .

And here is my code:

int buttonPin = 2;
int blueLedPin = 7;
int redLedPin = 8;
int prevBtnState = 0;
bool mode1 = true;
long timer = 0;
long debounce = 200;

void setup() {
  pinMode(blueLedPin, OUTPUT);
  pinMode(redLedPin, OUTPUT);
  pinMode(buttonPin, INPUT);
  Serial.begin(9600);
}

void loop() { 
  int knobValue = map(analogRead(A0), 190, 860,  10, 500);
  int btnState = digitalRead(buttonPin);
  
  if (!btnState && prevBtnState  && millis() - timer > debounce){
    mode1 = !mode1;
    timer = millis();
  }  
  
  if (mode1) {
    Serial.println("MODE 1");
      digitalWrite(redLedPin, HIGH);
      delay(75);
      digitalWrite(blueLedPin, HIGH);
      delay(75);
      digitalWrite(redLedPin, LOW);
      delay(75);
      digitalWrite(blueLedPin, LOW);
      delay(75);
  }
  else {
      if (knobValue < 250) {
        digitalWrite(blueLedPin, HIGH);
        digitalWrite(redLedPin, LOW);
      }
      else {
        digitalWrite(blueLedPin, LOW);
        digitalWrite(redLedPin, HIGH);
      }
  }  
  prevBtnState = btnState;
}

LED Challenge

For this weeks assignment I wanted to really challenge myself. I feel really comfortable with coding so I decided not to code at all and depend only on the physical components of our Arduino sets!

When I think about LEDs they always reminds of simple colors. And what could be simpler than a color in RGB representation. With that idea in mind I decided to create a form of button steered RGB representation.

I discovered that in our kits we have an actually RGB LED. Having read about it on the internet I plugged it accordingly. I wanted to have 3 separate buttons, which would control the amount of Red, Green and Blue in the final LED.

I plugged regular buttons in corresponding colors as well as check up LEDs next to them. Then I connected everything with the separate pins of the RGB LED.

Here are some pics of the board:

Here is a demo video:

Shadows Game

Game concept

Shadows is a pathfinding game, where your goal is to find a treasure in an ancient labyrinth. The problem with that is, that no one was there for hundreds of years and it’s buried deep underground so there is no light in there. Surrounded by shadows you enter the labyrinth hoping to find its treasure.

Mechanics

The most important part of the game is the light mechanics. I decided that it would be super fun to create an actual labyrinth game, where you do not see the whole board from the very beginning and just navigate through it. In my game you will have to actually explore the labyrinth, memorize the paths and hopefully find the treasure.

Graphics

I used some tile sets for DnD found on the internet to create the labyrinth board.

Then I added the light layer and created the light source at my mouse coordinates:

Tomorrow I’m going to work on my character, the intro menu as well as the labyrinth hit boxes. Probably they will be the hardest part of the project after the lighting, but I’m sure I’ll figure something out.

Update

Having finished the game I might say that creating it was easier than I expected. The issue that I was concerned by the most was creating the hitboxes. Having such a complicated map with all the bending corridors would be horrendous to hardcode (as almost everything is lol).

In order to solve the hitbox issue I made use of the pixels array. Before the game begins an extra graphic is loaded, where all the pathways are white and all the rest is black. That simple graphic is then stored in pixels. During the game the only thing to do to check for hitboxes is simply checking the color value on the corresponding x,y in the presaved pixels array. If it is not black, the character can move. If it’s black it means they are in front of a wall.

Here is the graphic I prepared for the hitboxes function:

By this small chunk of code I managed to check the hitboxes for the whole map. It compares the x and y coordinates of the character with the corresponding color in the preloaded pixels array (it remains loaded with the above image). if the corresponding pixel is black, the character doesn’t change its position, as only when the pixel is white, dx and dy are added to its location correspondingly. I also took into account the dimensions of the character itself and the perspective of the 2.5D graphics. ScaleX and scaleY variables are responsible for proper scaling to lower screen sizes.

void didTouchHitbox() {
  if ((pixels[x+(y+1)*width-int(scaleX*20)]!=color(255, 255, 255) || pixels[x+int(y+20*scaleY)*width-int(scaleX*20)]!=color(255, 255, 255)) && dir==2) {}
  else if ((pixels[x+(y+1)*width+int(scaleX*20)]!=color(255, 255, 255) || pixels[x+int(y+20*scaleY)*width+int(scaleX*20)]!=color(255, 255, 255)) && dir==3) {}
  else if ((pixels[x+y*width-int(5*scaleX)]!=color(255, 255, 255) || pixels[x+y*width+int(5*scaleX)]!=color(255, 255, 255)) && dir==1) {}
  else if ((pixels[x+(y+int(30*scaleY))*width-int(5*scaleX)]!=color(255, 255, 255) || pixels[x+(y+int(30*scaleY))*width+int(5*scaleX)]!=color(255, 255, 255)) && dir==0) {}
  else {
    x+=dx;
    y+=dy;
  }
}


I do not want to post more graphics not to spoil the labyrinth for you guys, so I will just leave a screen from the menu 🙂

At last, here is my code. I’m quite happy as I managed to squeeze it into less than 300 lines.

Shadows

Happy maze solving 🙂

Pixel camera

In this weeks work I tried to experiment with live video input.

I decided to distort it by creating a particle class. The video is basically drawn by a collection of particles.

By doing that I tried to achieve a sense of anonymity. Many hackers nowadays can access our laptop cameras easily. Thinking about blurring them out with an external program may be useful and definitely not that hard to code.

https://editor.p5js.org/miki-debicki/sketches/ruqFjPV6r

Text alteration

For this weeks assignment I decided to further upgrade my scrolling text program. During class time I managed to get it to display a single line of text continuously, with a restriction that the line had to be shorter than the width of the screen. I have upgraded my code, so that now it displays texts of various lengths without any issue. I have also added a new functionality. The input for the news bar is taken directly from a text file, so you can simply type all the great news and they will be displayed automatically.

During coding, the hardest part was to get the moment of switching right. When one string has already left the screen and the other one needs to overwrite the main movement variable OffsetX. This happens when the last letters of the first string leave the screen. I had to add some padding in form of a constant, so that it would appear even smoother.

PFont f;
PImage img;
String myString;
int offsetX;
int textHeight = 370;
int spaceConst = 40;

void setup(){
  size(400, 400);
  f = createFont("Monaco", 40);
  textFont(f);
  myString = "";
  textAlign(LEFT);
  offsetX = width;
  noStroke();
  
  img = loadImage("news.jpg");
  
  String[] lines = loadStrings("text.txt");
  for (int i=0 ; i < lines.length; i++) {
    myString += "| " + lines[i] + " ";
  }
  
  image(img, 0, 0, width, 320);
}

void draw(){
  fill(255,255,0);
  rect(0, 320, width, 80);
  fill(0);
  for (int i=0; i< myString.length(); i++){
    if (offsetX+textWidth(myString) < (width)){
      text(myString.charAt(i), offsetX+textWidth(myString)+spaceConst+textWidth(myString.charAt(i))*i, textHeight);
    }
    text(myString.charAt(i), offsetX+textWidth(myString.charAt(i))*(i+1), textHeight);
    
    if (offsetX+textWidth(myString) < -spaceConst) {
      offsetX = offsetX+int(textWidth(myString))+int(textWidth(myString.charAt(i))*(i+1));
    }
  }
  offsetX -= 2;
}


Snake

For this weeks assignment I decided to create the popular Snake game. In the creative process I tried to optimize it and I am quite happy with the results. I created a simple class for a snake element and then reused it while creating food items.

To make the game even more optimized I decided to draw the snake in a specific fashion. When the snake eats their food, the food is not “added” to it. Rather than that, the last part of the snake is not removed from it a single time, as it would usually be. That makes the transition a lot smoother and also makes the code cleaner.

With regard to the hit boxes I made them simple as the game was designed on a 10px grid. As a result the snake elements are 10px/10px. Due to that, I could simply compare the X and Y dimensions of the Snake’s leading tile against food’s location, rather than comparing whole ranges, which would be much less efficient.

class snakeRect {
  constructor(x, y) {
    this.x = x;
    this.y = y;
  }
}

score = 0;
food = new snakeRect(-10,-10);
vx = -10;
vy = 0;

snake = [new snakeRect(200, 200),
         new snakeRect(210, 200),
         new snakeRect(220, 200),
         new snakeRect(230, 200),
        ];

function setup() {
  createCanvas(400, 400);
  textSize(50);
  food.x = round(random(0, (width-10)/10))*10;
  food.y = round(random(0, (height-10)/10))*10;
}

function draw() {
  background(220);
  fill(255);
  textAlign(LEFT);
  text(score, 20, 50);
  if (isGameOver()){   
    textAlign(CENTER);
    translate(width/2, height/2);
    fill(255);
    text('Game Over', 0, 0);
    return;
  }
  
  drawSnake();
  drawFood();

  if (frameCount%5==0) {
    moveSnake();
  }
}

function getFood() {
  randX = round(random(0, (width-10)/10))*10;
  randY = round(random(0, (height-10)/10))*10;
  
  for(i=0; i<snake.length; i++) {
    if (snake[i].x==randX && snake[i].y==randY) {
      getFood();
    }
  }
  
  food.x = randX;
  food.y = randY;
}

function drawFood() {
  fill(255, 255, 0);
  rect(food.x, food.y, 10, 10);
}

function drawSnake() { 
  fill(200,200,0);
  for (i=0; i<snake.length; i++) {
      rect(snake[i].x, snake[i].y, 10, 10);  
  }
}

function moveSnake() { 
  newElem = new snakeRect(snake[0].x+vx, snake[0].y+vy);
  snake.unshift(newElem);

  if (snake[0].x === food.x && snake[0].y === food.y) {
    score+=10;
    getFood();
  }
  else {
    snake.pop();
  }
}

function keyPressed() {
  if (keyCode===LEFT_ARROW && vx!=10) {
    vx=-10;
    vy=0;
  }
  else if (keyCode === RIGHT_ARROW && vx!=-10) {
    vx=10;
    vy=0;
  }
  else if (keyCode === UP_ARROW && vy!=10) {
    vx=0;
    vy=-10;
  }
  else if (keyCode === DOWN_ARROW && vy!=-10) {
    vx=0;
    vy=10;
  }
}

function isGameOver() {  
  for (i=4; i<snake.length; i++)
  {    
    if (snake[i].x === snake[0].x && snake[i].y === snake[0].y) {
      return true;
    }
  }
  return snake[0].x<0 ||  snake[0].x>width-10 || snake[0].y<0 || snake[0].y>height-10;
}