Dance Breaker: Completion! 💃🏼🤸 (and Presentation Challenges)

Final Product 🌟🕺🏼:

We have all played Just Dance and spent most of the time fixating on figuring out which specific movements on the controller give a higher score. We have all played Dance, Dance revolution and forgotten that it was a dancing game while we are too focused on getting the arrows right. This is because these games are focused on earning a high score rather than enjoying your movements  to the sound of music. Thus, Lily and I decided to build a game, Dance Breaker, that focuses on dancing. How you move, how you groove to the melody and how you show the world your emotions with your movement. With a dancing mat, the game will push you out of your comfort zone by pausing the music randomly and telling you to assume a break dance pose. There is no score, no losing, no winning, but a set of instructions and a dynamic game that will motivate you to give it all out. Our game is a fun space to take a break and dance, but of course, it is only as fun as you make it. 

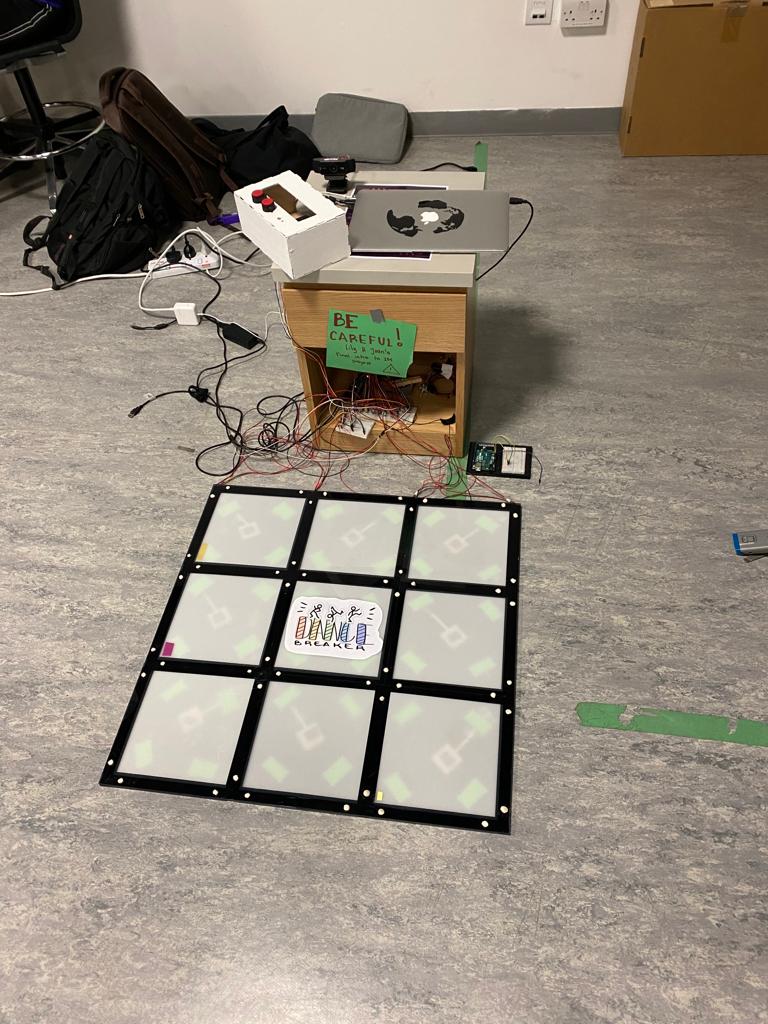
The final product is composed of two physical pieces and a P5.Js sketch. 

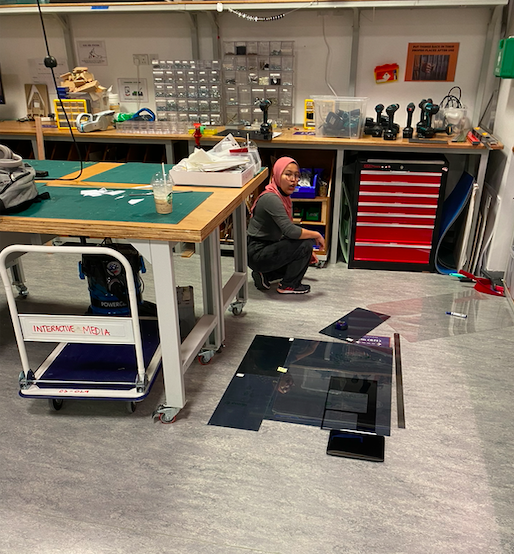
      1. Dancing Mat: a grid of panels built with acrylic sheets. It contains 8 pressure sensors and the logo of the game in the middle. 
      2. Control Box: a Box with two potentiometers and a button used to control parameters of the music and choose the song. 
      3. P5.js: Contains the instructions for the game, as well as the screens for all the different songs. It is the source of user feedback to interaction, and displays a computer vision sketch to visualize the movements.

After many late nights of hard work, we are very satisfied and proud of how Dance Breaker looks. It is a comprehensive, clean-looking game that has given me, and everyone else who has helped us with user testing a fun and engaging time. It accomplished our purpose (established in previous documentation) of exploring multiple mediums, tools and opportunities that are presented to us as IM students, and building something that resembles a real life product in the market.

Final Product 👣🚨:

Sketch and Code:

** Make sure to see the sketch on full screen.

#include <Servo.h>


Servo myservo;

void setup() {
   myservo.attach(9);
  Serial.begin(9600);
  pinMode(3, INPUT);


   while (Serial.available() <= 0) {
    Serial.println("0,0"); // send a starting message
    delay(300);            // wait 1/3 second
  } 
 
}
void loop() {

  delay(15);

  while (Serial.available()) {
    int left = Serial.parseInt();
    int right = Serial.parseInt();
    int reward = Serial.parseInt();
    
  int zeroValue = analogRead(A0);

  int oneValue = analogRead(A1);
   
  int twoValue = analogRead(A2);

  int threeValue = analogRead(A3);
 
  int fourValue = analogRead(A4);

  int fiveValue = analogRead(A5);

  int sixValue = analogRead(A6);
   
  int sevenValue = analogRead(A7);

  int eightValue = analogRead(A8);
 
  int nineValue = analogRead(A9);

// RELEVANT FOR BUTTON
  int tenValue = digitalRead(3);


    int sensorValue = zeroValue;
    Serial.print(sensorValue);
    Serial.print(",");    
    sensorValue = oneValue;
    Serial.print(sensorValue);
    Serial.print(",");
    sensorValue = twoValue;
    Serial.print(sensorValue);
    Serial.print(",");
    sensorValue = threeValue;
    Serial.print(sensorValue);
    Serial.print(",");
    sensorValue = fourValue;
    Serial.print(sensorValue);
     Serial.print(",");
    sensorValue = fiveValue;
    Serial.print(sensorValue);
    Serial.print(",");
    sensorValue = sixValue;
    Serial.print(sensorValue);
    Serial.print(",");
    sensorValue = sevenValue;
    Serial.print(sensorValue);
    Serial.print(",");
    sensorValue = eightValue;
    Serial.print(sensorValue);
    Serial.print(",");
    sensorValue = nineValue;
    Serial.print(sensorValue);
    Serial.print(",");
    // RELEVANT FOR BUTTON 
    sensorValue = tenValue;
    Serial.print(sensorValue);
    Serial.println();
  //  delay(1);     

  if (reward == true){
    myservo.write(0);
  } else {
     myservo.write(90);
    }
}

  
  }

Despite being very proud of Dance Breaker, there are some elements that we would like to improve if we had more time and experience:

      1. We would like to make the transitions between pages smoother.
      2. We would like to add different elements to the computer vision for each song. This, however, was a massive and time consuming task that would not add significantly to the experience. We were also uncertain in how to do this without slowing the frame rate even more.
      3. We would like to introduce more songs, and a way for users to record the computer vision of themselves.
      4. We would like to work on the frame rate and optimization of the code. As seen during the class presentation, if the frame rate slows down, the screen triggering the dancing mat takes too long to appear.
      5. Some small signifiers and dynamic were planned (stickers for every panel, a mark on the floor indicating the place to dance, images in the instructions) that would make the game more comprehensible.
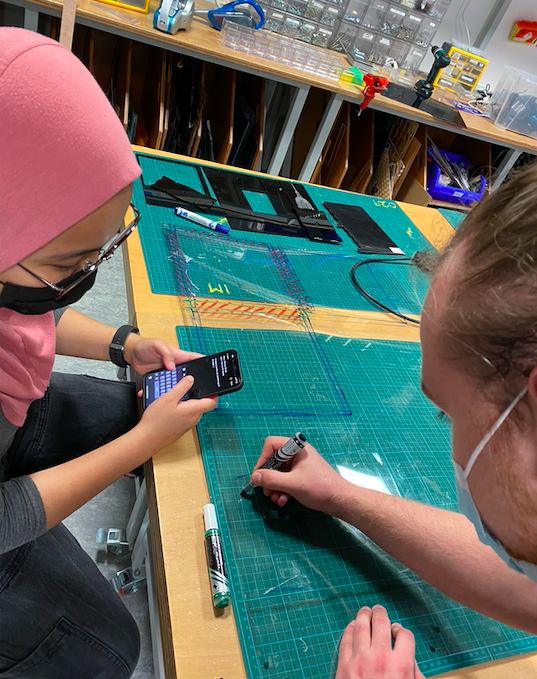
Process 🦾:

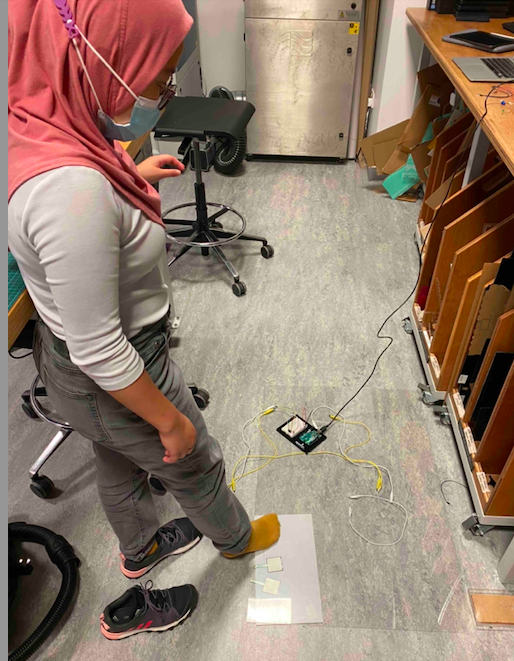
After an initial phase of user testing, we still had a long way to go. By the end of last week, Lily and I met to assemble the board and wire it all together. We realized that we needed a bigger Arduino for the 10 analog inputs that we intended to have, and asked a few friends to test the mat. From this we realized that:

      1. Our initial spring mechanism did not work well, as the material we were using was very brittle. We replaced it with double sided tape which worked wonders, and provided a smoother experience. 
      2. We figured out which tool we needed to cut the bolts and smooth the mat. 
      3. We did not need a third potentiometer and decided to replace it with a button. 

During the weekend, we focused on the mechanics of the game in P5.js. We adjusted everything to the new wires, located all the sensors, and made some important changes. With a basic game mechanic and the physical component ready, we began to test the game. Simultaneously, we worked hard on building the computer vision and making the user experience better. Multiple instances of user testing happened throughout the process. The game, in its different stages, was tested by:

        • Valentin Josan (again)
        • Joe Mrad
        • Nour Mrad
        • Nicholas Raffone

From their testing we adjusted the timings of the random pauses and the composition of the computer vision. This was done through frame difference, and we mostly altered threshold and RGB colors from class examples. We, however, had one big mistake which led to some challenges in the class presentation. 

Class Presentation 😶‍🌫️: Challenges & Solutions

The presentation of our project did not go as planned. This is because, while plugged to the projector, the frame rate of the sketch significantly decreased. We user tested the mat extensively and the set up with the projector, but it was not until the final set up that we realized this would happen. Thus, we were not able to successfully showcase our project.  As it can be seen in the video below the game runs smoothly when played on the computer screen. We also reduced the pixel density in the computer vision sketches to make the code run smoother. Here is how the project looked in the end, after correcting these details. It can be seen played by one and two people, and overall proves to be a fun and engaging experience.

(MUST WATCH) DanceBreaker in Action 💃🏼🤸 :


Dance Breaker: User Testing & Construction 💃🏼🤸

Building Process: Update 1 🗜

As you could observe in our previous post, we still had a lot to do on the construction of Dance Breaker. Thus, the initial days after last update were spent advancing as much as we could in order for user testing to be the most useful. This, of course, considering the Lily’s capstone written report was due on May 4th. During the break, we finished the illustrator sketches and cut with Kyles help. We, however, ran into a small time delay, as we did not factor that there would be no IM lab assistants during the Eid break. Regardless, after many hours of hard work, we were able to build a prototype for one of the pedals, and combine it with the current code.


User Testing 1: Dancing Mat Feedback & Help 💡

We came to Kyle, an expert in the IM lab with our prototype and soldered sensors (we finished them during last class). He pointed out a lot of design flaws and elements we had not considered, and spent a full afternoon helping us improve the design and prepare all of the materials. Some of the key elements he pointed out were:

      1. We did not have a spring in our “pedal” and the 1mm acrylic could break really easily as we had planned.
      2. We had underestimated the amount of acrylic we needed. He helped us make all illustrator files and shift our design in a way that reduces waste.
      3. He suggested we use a digital switch instead of an analog pressure sensor, as it would make the connections easier.
      4. He taught us how to use acrylic glue and showed us that it was not the best way to go. We used nuts and bolts, and had to add these holes to all the  illustrator files.

After all of these major design alterations, we laser cut all the parts necessary and prepared for a second round of user testing. A big shout out to Kyle for all the time he spent teaching us tools and techniques to improve our project, and using the machinery we are not yet allowed to use.

Building Process: Update 2

Lily and I assembled our prototype, and built one analog switch (as originally planned) and one digital switch. We also worked a little on the p5.js sketch by making the introduction and choosing screen and adjusting some pixels. We began to work on a different visualization for a different song or for replacing the black and white aesthetic (TBD). Furthermore we chose the songs we were going to use, worked on the logo and visuals of the game.

We also took the Cats and Box instrument and shifted some sensors arround for it to work as the reward box and the control panel.

User Testing 2: Types of Sensor and Space 🔩

With the laser cut pieces, assembled prototype and P5.js sketch, we invited my roomate, Valentin Josan, to help us User test what we have so far. Here’s how it went:

After trying it as well, Lily and I wrote some comments that we have to work on:

    • The Acrylic gets really dirty when people step on it. Do we want to ask them to be on their socks?
    • People perceive the acrylic to be very fragile. How resistant is it? How do we make it so that it doesn’t break and people treat it nicely.
        • We ask this, because with the current nature of the game, people are prompted to jump down to touch the panels  as soon as possible. We are worried one of these jumps will break the springs
    • The analog pressure sensor works significantly better than the digital switch. This is because it is more smooth  and measures pressure. We could play arround with the auditory feedback.
        • We added a piece of tape on top of the sensor to make it focal, and it significantly improves performance.
    • Is there any way to make the panel light up as it is stepped on?
    • Where will we position the camera so that the person can see themselves even when they are on the mat? (See screen recording towards the end of Valentin having to step forward to press the mat)

One other component that we User Tested was the space. We do not have all of our panels built, but we attached the pieces on the ground with tape and asked Valentin to play arround in them. This to make sure he, a person with big feet, has enough space to play and move arround, as well as to see how hard he steps on the acrylic. Here’s how it went:

Next Steps: 🔜

We have 6 days prior to the project presentation, and need to accomplish a lot in these days. Nevertheless, Lily has already turned on her capstone written assignment and I have finished two classes. Hence, we will be able to dedicate a lot more hours to our project. Immediate next steps are:

      1. Assemble the Dance Mat
      2. Connect the game to the Dance Mat as opposed to the small prototype.
      3. Add the random component to the game (So far you need to press all sensors in order for music to continue)
        • With this, add the visual indicators (in LED’s or on the P5.js) for where you need to step
      4. Build the code for the control box.
      5. Print stickers with logos and foots and hands.

Valentin, Tomás and Valentina (my friends) have all been sent a google calendar invite to come next Saturday to perform a third round of user testing. Here we hope to fine tune the computer vision components as well as measure the strength of the Acrylic and how intuitive our instructions and design are.


Dance Breaker: The Beginning 💃🏼 🤸

Planning Stage


Before we began to work, we needed to sort out a grand variety of details. Which materials were we going use?  How would we use them? When would we meet and build our project? Given that Lily is a senior and has her capstone paper due in less than 2 days, and her presentation a few days before the final submission, our team needed to make sure we were properly managing our time and planning realistic deadlines according to our schedule. We wrote a detailed outline with parts of our project and internal deadlines that we plan to keep in order to make our project the best final project. During this initial planning meeting, we also gave our project the name Dance Breaker. It is an ode to breakdancing AND hints to how the game will work: the music will stop (break) and you need to press the sensors to un-break it. Get it?

SEE OUR PLAN HERE

We also created our internal deadline system into google calendar and set working hours. Once we had our work cut out for us, we began the execution of our plan.

Building Progress

Game Mechanics:

      •  We worked mostly on the P5.js code for the songs and serial connection. To do this he constructed a board with smaller sensors and pieces from a previous project that would allow for testing on a smaller scale. He also began to work with computer vision. The current p5.js sketch loads pixels and has a light threshold akin to previous class exercises. It took a long time to figure out how to mirror the image in order to have a comprehensive experience. Furthermore, he built conditional statements so that all sensors need to be pressed in order for a song to play. The arduino code should not require any changes after today except for the addition of the reward system.
      • Next steps for the game mechanics are:
          • Implement a functioning random timer (which was already created but not aligned with the music) to stop the song randomly and resume the game.
          • Randomize the sensors that need to be pressed in order for the music to continue.
          • Add a design to the computer vision beyond a threshold.


void setup() {
  Serial.begin(9600);
 
}
void loop() {
  int oneValue = analogRead(A0);
   
  int twoValue = analogRead(A1);

  int threeValue = analogRead(A2);
 
  int fourValue = analogRead(A3);
   
  int fiveValue = analogRead(A4);


    int sensorValue = oneValue;
    Serial.print(sensorValue);
    Serial.print(",");
    sensorValue = twoValue;
    Serial.print(sensorValue);
    Serial.print(",");
    sensorValue = threeValue;
    Serial.print(sensorValue);
    Serial.print(",");
    sensorValue = fourValue;
    Serial.print(sensorValue);
    Serial.print(",");
    sensorValue = fiveValue;
    Serial.print(sensorValue);
    Serial.println();
    delay(1);     

  }

Physical Component: Dance Mat and Projector

      • We booked the necessary materials (a vertical projector, a camera) through the portal.
      • We also picked up the necessary sensors and acrylic to build our dance mats. We ran some simple tests with the materials in order to make sure that they work as imagined, and have begun to build the illustrator sketches for the laser cutting.
      • Next steps for the physical components are:
        • Finish the illustrator design and laser cut the materials
        • Print Stickers and Logo
        • Cut and assemble the base.

Communicating Serially 🎙

Exercise 1:

    • P5.Js:

  • let serial; // variable to hold an instance of the serialport library
    let portName = "/dev/cu.usbmodem14101"; // fill in your serial port name here
    let xPos=0;
    let yPos=0;
    let onOff=0;
    
    function setup() {
      createCanvas(640, 480);
      serial = new p5.SerialPort(); // make a new instance of the serialport library
      serial.on("list", printList); // set a callback function for the serialport list event
      serial.on("connected", serverConnected); // callback for connecting to the server
      serial.on("open", portOpen); // callback for the port opening
      serial.on("data", serialEvent); // callback for when new data arrives
      serial.on("error", serialError); // callback for errors
      serial.on("close", portClose); // callback for the port closing
    
      serial.list(); // list the serial ports
      serial.open(portName); // open a serial port
    }
    
    function draw() {
      background(255);
      ellipse(xPos, height/2, 50, 50); // draw the circle
      if (mouseIsPressed){
        if(mouseX<=width/2)
          onOff=1;
        else
          onOff=2;
      }else{
        onOff=0;
      }
    }
    
    // get the list of ports:
    function printList(portList) {
      // portList is an array of serial port names
      for (let i = 0; i < portList.length; i++) {
        // Display the list the console:
        print(i + " " + portList[i]);
      }
    }
    
    function serverConnected() {
      print("connected to server.");
    }
    
    function portOpen() {
      print("the serial port opened.");
    }
    
    function serialEvent() {
      // read a string from the serial port
      // until you get carriage return and newline:
      let inString = serial.readLine();
     
      //check to see that there's actually a string there:
      if (inString.length > 0) {
        let sensors = split(inString, ","); // split the string on the commas
        if (sensors.length == 2) {
          // if there are three elements
          xPos = map(sensors[0], 0, 1023, 0, width); // element 0 is the locH
          yPos = map(sensors[1], 550, 250, 0, height); // element 1 is the locV
        }
      }
    
      serial.write(onOff);
    }
    
    function serialError(err) {
      print("Something went wrong with the serial port. " + err);
    }
    
    function portClose() {
      print("The serial port closed.");
    }
    
    /* ARDUINO CODE
    
    void setup() {
      Serial.begin(9600);
      pinMode(2, OUTPUT);
      pinMode(5, OUTPUT);
      while (Serial.available() <= 0) {
        Serial.println("0,0"); // send a starting message
        delay(300);              // wait 1/3 second
      }
    }
    void loop() {
      while (Serial.available() > 0) {
        // read the incoming byte:
       int inByte = Serial.read();
        switch (inByte) {
          case 0:
            digitalWrite(2, LOW);
            digitalWrite(5, LOW);
            break;
          case 1:
            digitalWrite(2, HIGH);
            break;
          case 2:
            digitalWrite(5, HIGH);
            break;
        }
        int sensorValue = analogRead(A0);
        Serial.print(sensorValue);
        Serial.print(",");
        sensorValue = analogRead(A1);
        Serial.print(sensorValue);
        Serial.println();
      }
    }
    
    */


    • Arduino:

      void setup() {
        Serial.begin(9600);
        pinMode(2, OUTPUT);
        pinMode(5, OUTPUT);
        while (Serial.available() <= 0) {
          Serial.println("0,0"); // send a starting message
          delay(300);              // wait 1/3 second
        }
      }
      void loop() {
        while (Serial.available() > 0) {
          // read the incoming byte:
         int inByte = Serial.read();
          switch (inByte) {
            case 0:
              digitalWrite(2, LOW);
              digitalWrite(5, LOW);
              break;
            case 1:
              digitalWrite(2, HIGH);
              break;
            case 2:
              digitalWrite(5, HIGH);
              break;
          }
          int sensorValue = analogRead(A0);
          Serial.print(sensorValue);
          Serial.print(",");
          sensorValue = analogRead(A1);
          Serial.print(sensorValue);
          Serial.println();
        }
      }


Exercise 2:

    • P5.js:

 let serial; // variable to hold an instance of the serialport library
let portName = "/dev/cu.usbmodem14101"; // fill in your serial port name here
let xPos=0;
let yPos=0;
let onOff=0;

function setup() {
  createCanvas(640, 480);
  serial = new p5.SerialPort(); // make a new instance of the serialport library
  serial.on("list", printList); // set a callback function for the serialport list event
  serial.on("connected", serverConnected); // callback for connecting to the server
  serial.on("open", portOpen); // callback for the port opening
  serial.on("data", serialEvent); // callback for when new data arrives
  serial.on("error", serialError); // callback for errors
  serial.on("close", portClose); // callback for the port closing

  serial.list(); // list the serial ports
  serial.open(portName); // open a serial port
}

function draw() {
  background(255);
  
  xPos = mouseX;
  mappedxPos = map(xPos, 0, 640, 0, 255);
  print(mappedxPos);

  ellipse(xPos, height/2, 50, 50); // draw the circle
  
}

// get the list of ports:
function printList(portList) {
  // portList is an array of serial port names
  for (let i = 0; i < portList.length; i++) {
    // Display the list the console:
    print(i + " " + portList[i]);
  }
}

function serverConnected() {
  print("connected to server.");
}

function portOpen() {
  print("the serial port opened.");
}

function serialEvent() {
  // read a string from the serial port
  // until you get carriage return and newline:
  let inString = serial.readLine();
 
  //check to see that there's actually a string there:
  if (inString.length > 0) {
    let sensors = split(inString, ","); // split the string on the commas
   /* if (sensors.length == 1) {
      // if there are three elements
      xPos = map(sensors[0], 0, 1023, 0, width); // element 0 is the locH
      // element 1 is the locV
    } */
  }

  serial.write(mappedxPos);
}

function serialError(err) {
  print("Something went wrong with the serial port. " + err);
}

function portClose() {
  print("The serial port closed.");
}

/* ARDUINO CODE

void setup() {
  Serial.begin(9600);
  pinMode(2, OUTPUT);
  pinMode(5, OUTPUT);
  while (Serial.available() <= 0) {
    Serial.println("0,0"); // send a starting message
    delay(300);              // wait 1/3 second
  }
}
void loop() {
  while (Serial.available() > 0) {
    // read the incoming byte:
   int inByte = Serial.read();
    switch (inByte) {
      case 0:
        digitalWrite(2, LOW);
        digitalWrite(5, LOW);
        break;
      case 1:
        digitalWrite(2, HIGH);
        break;
      case 2:
        digitalWrite(5, HIGH);
        break;
    }
    int sensorValue = analogRead(A0);
    Serial.print(sensorValue);
    Serial.print(",");
    sensorValue = analogRead(A1);
    Serial.print(sensorValue);
    Serial.println();
  }
}

*/
    • Arduino:

void setup() {
  Serial.begin(9600);
  pinMode(3, OUTPUT);
  pinMode(5, OUTPUT);
  while (Serial.available() <= 0) {
    Serial.println("0,0"); // send a starting message
    delay(300);              // wait 1/3 second
  }
}
void loop() {
 
  while (Serial.available() > 0) {
    // read the incoming byte:
   int inByte = Serial.read();
       analogWrite(5, inByte);
       analogWrite(3, inByte);
    int sensorValue = analogRead(A0);
    Serial.print(sensorValue);
    Serial.println();
  }
}


Exercise 3:


void setup() {
  Serial.begin(9600);
  pinMode(3, OUTPUT);
  pinMode(5, OUTPUT);
  while (Serial.available() <= 0) {
    Serial.println("0,0"); // send a starting message
    delay(300);              // wait 1/3 second
  }
}
void loop() {
 
  while (Serial.available() > 0) {
    // read the incoming byte:
     int inByte = Serial.read();
  switch (inByte) {
      case 0:
        digitalWrite(3, HIGH);
        digitalWrite(5, HIGH);
        break;
      case 1:
        digitalWrite(3, LOW);
        digitalWrite(5, LOW);
        break;
  }
   int sensorValue = analogRead(A0);
    Serial.print(sensorValue);
    Serial.println();
}}


International Super Dancer 📸🤸 – Final Project Proposal

Inspiration 🕺🏼📺

When I was younger, I was OBSESSED with the Backyardigans. Maybe I still am a little 👀 . I watched it daily on Discovery Kids at 7:30pm before going to bed, and vividly remember there being one special two-part episode: Season 2 Episode 15: International Super Spy. (Yes this is the show and episode of that viral song.) I would pray for it to come on every night, and jump arround in joy when they did. For my final project for intro to IM, I am looking forward for constructing an interface similar to the one where Pablo has to dance to save Tasha from the lady in pink. (See Below or HERE if it does not work)

In this interface, Pablo stands on a pad and mimics a screen as it displays a character dancing. His movements are recorded and, if correct, marked in a progress bar. It indicates that he needs to complete the dance to earn a reward. I want to do something similar, where a displayed character can mimic or indicate specific dance moves from a person standing in front.

Idea ⌨️

For this concept, the display will be built with P5.Js, where a simple character, instructions and music will be shown. I would like to project this using one of the vertical projects. Furthermore, Arduino sensors will be used to record the position of the person. I imagine some pressure sensors in the floor to calculate where the user is standing (and with how many feet) , and a camera or infrared sensors to indicate the positions of key body parts (i.e hands, elbows, knees, toes, head). I would ask the person to get into a specific position, and record the difference in movement in a set period of time to determine if the movement is correct or not.

The feedback would mostly be similar to the one shown in the video, with a green progress bar that gets red and makes an error sound when a position is missed. I’d also like to include a reward system built with Arduino motors to give out a price for those of you who know how to dance.

I still want to develop this idea further, as I want to add elements to the design and concept that are mine. Yes, I want the vibe and situation of the Backyardigans, but I also want it to be signed Juanma. Perhaps adding more gimmicks or an extra step to the interface would be cool.

Drive Safe 🚙 (Assignment 6)

Inspiration 🚘:

When faced with the use of both analog and digital sensors, my mind initially went to cars. Especially their interface right in front of the steering wheel that indicates fuel, if lights are turned on or off, speed, and many other components. I imagine they must use both,  digital and analog circuits, for all these LED’s and indicators. And thus, decided to build my own. Throughout my brainstorm process I was also reminded of Ruta, my favorite card game. In this board game, you need a green light card to signify the car running. A yellow/red light would indicate you could not drive, nor obtain points.

Building Process 🚧:

Going off from this concept, I placed three LED’s, a red one, a yellow one, and a green one in the shape of a stoplight. This would be my visualization of the car running or not. I then added three elements that are crucial for driving successfully:

      1. Pressing the Accelerator
      2. Adjusting the Steering Wheel
      3. Turning on the Headlights if it’s dark

With these requirements, I built the following:

      1. A digital circuit for the red light. It is on, only if you press on the red button, which represents the gas pedal.
      2. A circuit with an analog sensor for the yellow LED. It will blink unless the steering wheel, a potentiometer,  is oriented towards the right side, in which it will be turned off.
      3. An analog circuit with the Blue LED light. It will light up as per the light it receives from the photosensor.
      4. IF the light received passes a certain threshold, the accelerator is pressed, and the steering wheel is facing the correct way, the green light will turn on, and you will be on your way!

Here is my Code:

const int greenPin = 7;
const int yellowPin = 4;
const int redPin = 2;
const int buttonPin = 3;
const int wheelPin = 8;
const int bluePin = 9;
unsigned long timer = 0;
bool onOff = LOW;

void setup() {
  Serial.begin(9600);
 pinMode(greenPin, OUTPUT);
 pinMode(yellowPin, OUTPUT);
 pinMode(redPin, OUTPUT);
 pinMode(bluePin, OUTPUT);
 pinMode(buttonPin, INPUT);

}

void loop() {
bool redState = digitalRead(redPin);
bool yellowState = digitalRead(yellowPin);

// RED //
byte buttonState = digitalRead(buttonPin);

if (buttonState == HIGH) {
  digitalWrite(redPin, LOW);
} else
{digitalWrite(redPin, HIGH);}
// RED//

//YELLOW//
int wheelValue = analogRead(A0);
int mappedValue = map(wheelValue, 0, 1023, 0, 255);


if (mappedValue > 110 && mappedValue < 140) {
  digitalWrite(yellowPin, LOW);
} else {

 if(millis()>timer){
      onOff = !onOff;
      timer = millis() + 200;
      digitalWrite(yellowPin, onOff);
      }
      }

//YELLOW//


// BLUE //
int lightValue = analogRead(A1);
int mappedLightValue = map(lightValue, 655, 1000, 0, 255);
int constrainedValue = constrain(mappedLightValue, 0, 255);

analogWrite(bluePin, constrainedValue);
//Serial.println(lightValue);
// BLUE //

// GREEN //
if (redState == LOW && yellowState == LOW && mappedValue > 110 && mappedValue < 140 && constrainedValue > 200){
 
 digitalWrite(greenPin, HIGH);
} else {
  digitalWrite(greenPin, LOW);  
  }
// GREEN //
 
}


Initially, I had the yellow LED to blink at a speed determined by the analog input of the potentiometer. The higher the value, the fastest the blinking. However, this gave the project an unorganized structure and distracted the user from the goal of turning on the car. Thus, I gave it a set value.

Another important thing to note is that during the day, the blue LED will always be turned on. This is intentional, and is used to signify how headlights are only needed at night. If you wish to change this, alter the mappedLightValue variable and make the 655 higher to a threshold of about 950+.

Final Product 🚨:

I am very happy with how Drive Safe turned out. After I completed the circuit, I made some decorations to make it look cleaner and easier to understand. I have tested it multiple times, in multiple scenarios and it seems to work perfectly fine. I also wrote a set of instructions for anyone using it without me.

In the future, I would like to experiment with other type of sensors, and figure out a way to make cables not visible, as they damage the aesthetic quality of the piece a lot.

Sail Boat ⛵️(Assignment 5)

When asked to do a switch that did not require hands, I am unsure why but my head immediately went to a paper boat. My initial idea was to have a little boat on a plate with water that, when blown would move, touch another object and BAM LED light turns on. Nevertheless my design changed significantly throughout my process.

The first step in my process was to create the circuits. I created a circuit with two LED lights of different colors that, if connected to a ground cable would light up the LED.  Thus, the boat would activate a different led in a different side of the plate. My switch would then have three modes (Off, Yellow, Green). As instructed in class I used resistors of 330, red cables connecting to 5Volts and black cables leading to ground for the circuits. I then, used colored cables according to the LED they were working on.

After this was done, I spent some time re-learning how to build paper boats and trying them out on a plate. At this point, I realized how complex it would be to use water, considering the little control I had over the boat’s movement and direction. So I thought I’d just ditch water but keep the boat. I came up with this prototype, which made the connection circuit very unreliable. The paper was too heavy and, again, I had little control over its movements.

After a lot of testing and new ideas I got to a switch that responds to wind. Blowing to be specific. I used copper tape and wires as well as two popsicle sticks to build my circuit. I, again, realized that having a fully connected circuit needs a lot of attention to detail. I needed to spend some serious time making small adjustments to the cables’ position and alter small details that would make my switch consistent and easy to use.

Yet, I would not drop the boat idea. Many boats, sail boats run on wind. So perhaps my switch is a mechanism to indicate which way the wind is blowing into. This was perfect. I built a boat to put my switch in and on we go!

Final Product: 🌬

Here is how my circuit works:

Here is my boat: ⛵️


Benny the Fish (Midterm Entry)

Benny The Fish 🐳

Final Product 💥

Concept 📌

As explained during my first blog entry, I wanted to turn Benny the Fish, my CommLab comic into a game. The art style, design and plot of the comic would be reflected in my creative process for the game. In its current and final form, the game goes like this:

      1. The players begin in an introductory screen where they see the logo, the playable character, and a short set of instructions. They begin to play by pressing any of the keyboard arrow keys.
      2. Then, they will be able to move the character around in a setting that resembles a fishbowl. As the first level of this game, the background parallels the initial fishbowl where Benny is. In this case, however, Benny has to evade water bottles and eat food.
        1. – Every piece of food eaten increases the player’s score. Every 5, the size of Benny increases by 10%, making the game harder.
        2. -If the player touches a bottle, they will be taken to a screen reiterating it is bad for Benny to touch plastic. Then, with arrow keys, players can continue exactly where they left off. Bottles around the fish are moved back as to not cause problems.  Every time this happens lives (initially 3) decrease by 1.
      3. If the player runs out of lives, they are taken to a game over screen indicating Benny’s death and prompting the user to restart the game.
      4. After 25 pieces of food, the player is taken t o level two. Benny grows into a whale (Plot Twist) and there is a new enemy in sight. The rest of the mechanics are the same.
      5. Upon  reaching a score of 50, the user is taken to a winning screen. Benny can’t stop growing and, thus, they are prompted to click anywhere to restart the game.

Materials 🔎

    • The idea for the comic and characters was  in collaboration  Jeongin Lee, Chaehyun Ha and Mike Kattan.
    • All of the objects were designed by me in Adobe Illustrator, and the backgrounds & logos in Procreate.
    • The sounds were taken from  https://freesound.org/

Reflection 👨🏼‍💻

Working on Benny was a big challenge for me. It was a great exercise to make sure I was proficient in all of the concepts covered in class, and made me grow a lot as a coder. I learned that there is not always one way to solve a problem. Creativity, resilience and patience are necessary to make sure you can execute your vision. Having started which such a defined and specific vision for my game made it so that I had to adapt the code to my preferences. Not the other way around. For this, I am very proud. Albeit Failing to do the sprite sheet for Benny, I managed to include all of the other elements and mechanics that I wanted to, ending with what I believe to be a very successful game. Me and my roomates have played the game a few times and can vouch for it having a logical flow and technical stability. I am very proud of the final result. I hope you enjoy meeting Benny the Whale.

Journey 🛬

Given the fragility of my computer and previous experiences, I saved multiple backups of the game throughout my process. These are shown in all of my updates, and display my progress through time. Here are the updates in my project since March 2nd. (See previous post for updates 1, 2, villains)

Update 3: Conditionals & Design (March 3rd – 6th) 🏞

This might be one of the, if not the biggest update for Benny the Fish. After integrating the villains & controls during Wednesday’s class I spent a lot of time with the conditionals. During the initial days of this weekend, I wrote in my code a switch statement that would create the modes of (1) intro screen, (2) gameplay, (3) losing screen, (4) winning screen. This allowed me to have a much more structured product. I also added if statements to build the killing of Benny mechanism, while adding a live count.  I also added images as backgrounds which make the experience of playing much better. Currently, the game has many elements to be fixed, bugs and improvements, but as soon as I add the designs for the villains and figure out how to restart the bottles.push() & canPlastic.push() for loops, the game will be a playable and great initial product. I still have a lot of work ahead, but believe the game looks very promising.

As always, my immediate next steps are:

    1. Designing the villains & adding them into the game.
    2. With the villains’ design, I can make sure that the distance interactions are as accurate as possible to give the game a better feel. (Not looking forward for this step)
    3. Add Background music, bumping, dying, & eating sounds.

Some overall steps I want to take are:

    1. Figure out how to win. Time? Eating Mechanism?
    2. Adding different levels. I would love for Benny to grow & change of scenery as he does in the comic.
    3. Adding the tail animation for swimming.

Update 4: Error Fixing (March 6th) ⚓️

When hit by a villain, I would press any arrow key to continue playing, but would often find myself amongst a group of villains, making it impossible to continue the game. Thus, I spent a lot of time trying to reset the for loop that moved the villains. Nevertheless, I was able to more easily fix this situation by adding a conditional statement within the function  moveVillain() to reset the positions of the villains surrounding the starting area of Benny. Finally I managed to have the dynamic be: if Benny is killed, he stays in the place he died, where the player can continue. However, all villains in a 200 px would move to y=0.

I also added a little element so that you can see the silhouette of Benny when killed, and organized some of the code.

Update 5: Food, Water Bottles & Lives Counter (March 7th) ❤️❤️❌

An important element I wanted to include in my game was a way to win. In the comic, Benny ends up in the ocean and growing. I needed to include this in the game. Thus, I added a food mechanism that allows the fish to eat, and increase the player’s score.

I also designed a temporary image for the villain water bottles. I switched the circle for a rectangle and spent an embarrassing amount of time playing with the distance function to make sure the dynamics feel natural but are a little forgiving.

My next steps after this update would be to:

    1. Add a growing Mechanism
    2. Add a second level & winning screen
    3. Add sounds to the game

Update 6: Level 2 & Winning Screen (March 8th) 🪜

This is probably the update that took the longest to make. I wanted update 6, the last update before the final entry to be a submittable project. That is, a sketch that would fulfill all the requirements for this midterm assignments. I added a second level with the whale sprite as I wanted to be a little more faithful to the comic, and I added a winning screen. This allowed Benny the Fish to be a much more complete experience. Furthermore, I added upbeat music for the background of the game to simulate previous experiences I’ve had with games.

Benny the Fish (Midterm Progress)

The idea of my game originated from me and my team’s Communications Lab comic assignment, Benny the Fish. This comic  narrates the story of Benny, a little fish that got adopted. The game, named as the comic, will follow Benny as he navigates the ocean and avoids obstacles that will hurt him. I want the user to control Benny with the keyboard arrows as “villains,” as I call them on my code, come from the right side of the screen as if Benny was moving trough the ocean.

Update 1: Controls 🎮  (February 24th – February 28th)

I began my process by creating the tittle screen, instructions and the main character. I inserted the logo as an image, the instructions as a text element, and the playable character as a .png image. I then added if statements with Key_Code indications, as learned during class, to make Benny move. I played arround with the speed to make sure it works well. I also added boundaries on the screen so Benny can’t leave and a subtle bouncing effect to make it feel better. My next steps are:

      1. Building the villains and their interactions with Benny.
      2. Recording the sounds.
      3. Building a simple sprite sheet to simulate swimming.
      4. Remove the instructions and logo when a key is pressed.

Update Villains: Experimenting (March 1st – March 2nd) 👾

When thinking about the idea of the game, I did not realize how much of a challenge it would be to design the villains. [Quick backstory: When I was a kid, I used to call Goombas in Mario Bros villains and my cousins would mock me for it endlessly. Hence, my code :)] I started experimenting a little on the above sketch (from update 1) and quickly wrote some lines that would prevent the rest of the code from running. Thus, I decided to figure out all the details on a separate file, and then, add it to another file.

My first step was to create a class called Villain. I gave it parameters of x, y, width, color, and speed. Then, I created three arrays for the three types of villains I will have.  I am unsure if this was the right choice, as I have not been able to have each array have a different number of objects. (See lines 9 and 14). Then, I made them move at different speeds and appear randomly each time they crossed the screen. I spent an embarassing amount of time playing with the speed values to make sure it looked natural and similar to other games I’ve played before.


You will also see in my code that I began adding some lines to figure out the interactivity within the circles. I, however, am struggling to create the distance statement to all the different radii and circle centers.

Next steps in my process and planned timeline are:

      1. Fine-tune the radii math –> Wednesday
      2. Combine both sketches. –> Wednesday
      3. Design the villains. –> Wednesday
      4. Recording the sounds. –> Thursday
      5. Building a simple sprite sheet to simulate swimming. –> Thursday
      6. Remove the instructions and logo when a key is pressed. –> Thursday

Update 2: Integration (Monday March 2nd Class) 🔗


During class I worked with integrating two of the above sketches: the villains and the playable character. An immediate next step I must take is to, through conditionals, make the tittle & instructions part of the opening screen only as opposed to the whole game.

Update 3: Conditionals & Design (March 3rd – 6th) 🏞

This might be one of the, if not the biggest update for Benny the Fish. After integrating the villains & controls during Wednesday’s class I spent a lot of time with the conditionals. During the initial days of this weekend, I wrote in my code a switch statement that would create the modes of (1) intro screen, (2) gameplay, (3) losing screen, (4) winning screen. This allowed me to have a much more structured product. I also added if statements to build the killing of Benny mechanism, while adding a live count.  I also added images as backgrounds which make the experience of playing much better. Currently, the game has many elements to be fixed, bugs and improvements, but as soon as I add the designs for the villains and figure out how to restart the bottles.push() & canPlastic.push() for loops, the game will be a playable and great initial product. I still have a lot of work ahead, but believe the game looks very promising.

As always, my immediate next steps are:

    1. Designing the villains & adding them into the game.
    2. With the villains’ design, I can make sure that the distance interactions are as accurate as possible to give the game a better feel. (Not looking forward for this step)
    3. Add Background music, bumping, dying, & eating sounds.

Some overall steps I want to take are:

    1. Figure out how to win. Time? Eating Mechanism?
    2. Adding different levels. I would love for Benny to grow & change of scenery as he does in the comic.
    3. Adding the tail animation for swimming.

Sunshine (Assignment 4)

I took a very beautiful picture of the sunset a few days ago, and when looking for inspiration for this assignment I decided to make this the theme of my artwork. I planned to have two lines of text, one with the word “Sunshine”, and another with its definition. That way, I would get to explore with different styles and dynamics.

Before writing any code, I decided to browse through the in-class examples a few more times. I really liked the circles example, and decided to do something similar with my main line of text. I struggled to understand its elements and, thus, had to watch a tutorial to fully grasp textToPoints. With this, I built my first draft. I included it as a picture given that it has no interactivity or other component to it. My next step was to figure out if I could include images and add my second line of text.

This is how it began to take shape:

After investigating, asking my friends, and Monday’s class, I figured out how to add an image and alter its transparency. I initially played arround with tint, and got the piece to a very beautiful aesthetic. Nevertheless, it made my computer very very slow and ruined the experience. I fixed this problem by adding the image and drawing a black rectangle in front of it, which I gave a low opacity, to increase the transparency  of the image.

For the interactivity, since I was using a picture of a sunset, I thought it would be really cool to alter the size of the ellipses forming the letters only on the x-axis, as to create an arch-like path that would imitate the sun rising and setting. In the final piece, move the cursor from left to right and see how it resembles this natural movement.

I am very very happy with the overall look and feel of this piece. Working with text was very interesting to me, and I am very curious to see what else can be done with textToPoints. Furthermore, I would like to include object oriented programming to perhaps, give each ellipse  its own identity. Could I get the ellipses shaping the word to make the shape of a sun upon a click?