Reflection on Design and Disability

The article delves into the relationship between design and disability, emphasizing the critical importance of well-crafted design in creating accessible and inclusive goods. I agree with the article’s concept that good design is essential in serving the different demands of those with disabilities, both aesthetically and functionally. The emulation of the iPod’s iconic simplicity and functionality is a powerful tribute to the success that can be achieved via smart design. The Muji CD player and Leckey Woosh chair emphasize minimalism as a key design principle. I agree with the emphasis on addressing varied demands while ensuring products remain intuitive and user-friendly as the piece navigates the delicate balance between simplicity and universality. 

In reviewing the article, I found resonance in the plea for a more inclusive and sensitive design approach that incorporates cognitive accessibility and cultural inclusion. The inclusion of designers from various backgrounds and experiences, particularly in the field of disability-related goods, resonates with my belief in the value of varied perspectives in the creative process. The end of the post, advocating for the importance of simplicity and user-centered design in developing true inclusivity and accessibility, resonates strongly with my own beliefs.

Lastly,the various tensions explored between fashion and caution in designing for people with disabilities highlight the complexities of this interaction. Finding a healthy balance between showing good representations of disability and avoiding the accidental implication of shame, in my opinion, is critical. The study of the difficult balance required between fashion and invisibility in the essay aligns with my conviction that products should promote positive representations of disabilities without resorting to concealment. In summary, these tensions highlight the complicated interplay between making items that are accessible while also upholding cultural and aesthetic values, a challenge that I eagerly accept.

Final Project – Space & Sonification


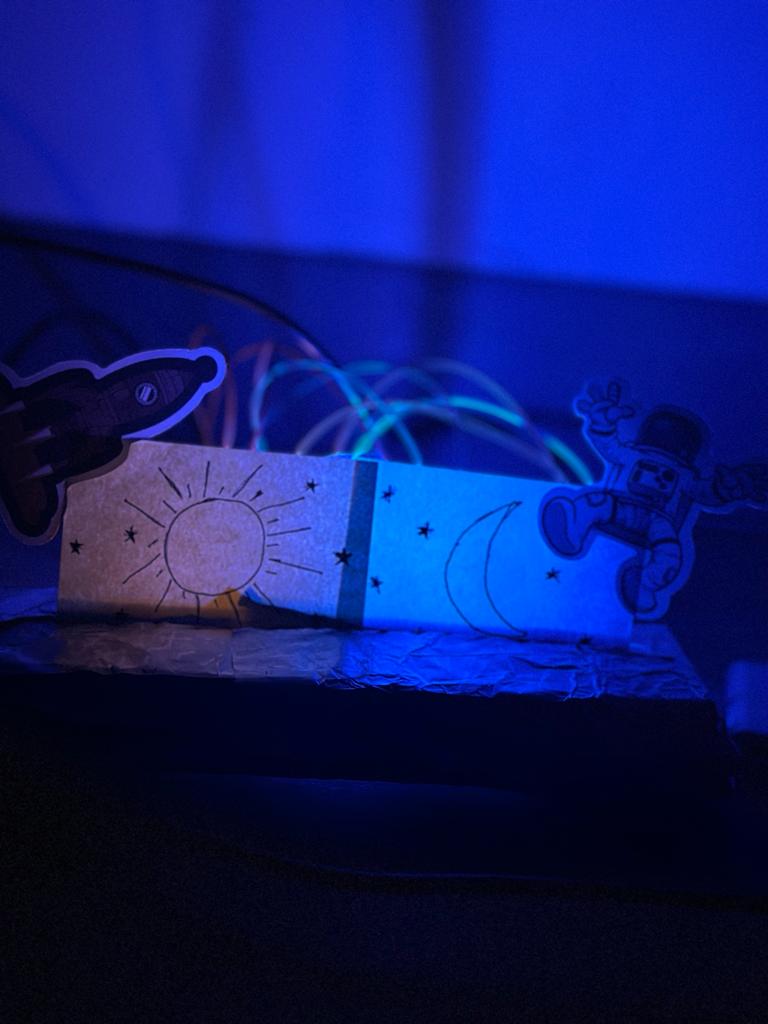
Concept & Motivation:

I drew inspiration for my final project from the concept of sonification within the realm of astronomy, a fascination that emerged during my exploration in an astronomy and cosmology course. Despite deviating from my initial plan to incorporate specific data, the overarching aim of the project was to offer an engaging educational experience, shedding light on the absence of sounds in outer space. Alternatively, one might say it aimed to introduce users to sonification, a process wherein astronomical data is translated into audible sounds, fostering a profound connection with the cosmos. Sonification proves particularly valuable when dealing with extensive datasets that may be challenging to visualize or analyze. Through sound, individuals can more easily perceive alterations in waves, frequencies, and patterns.

How it Works:

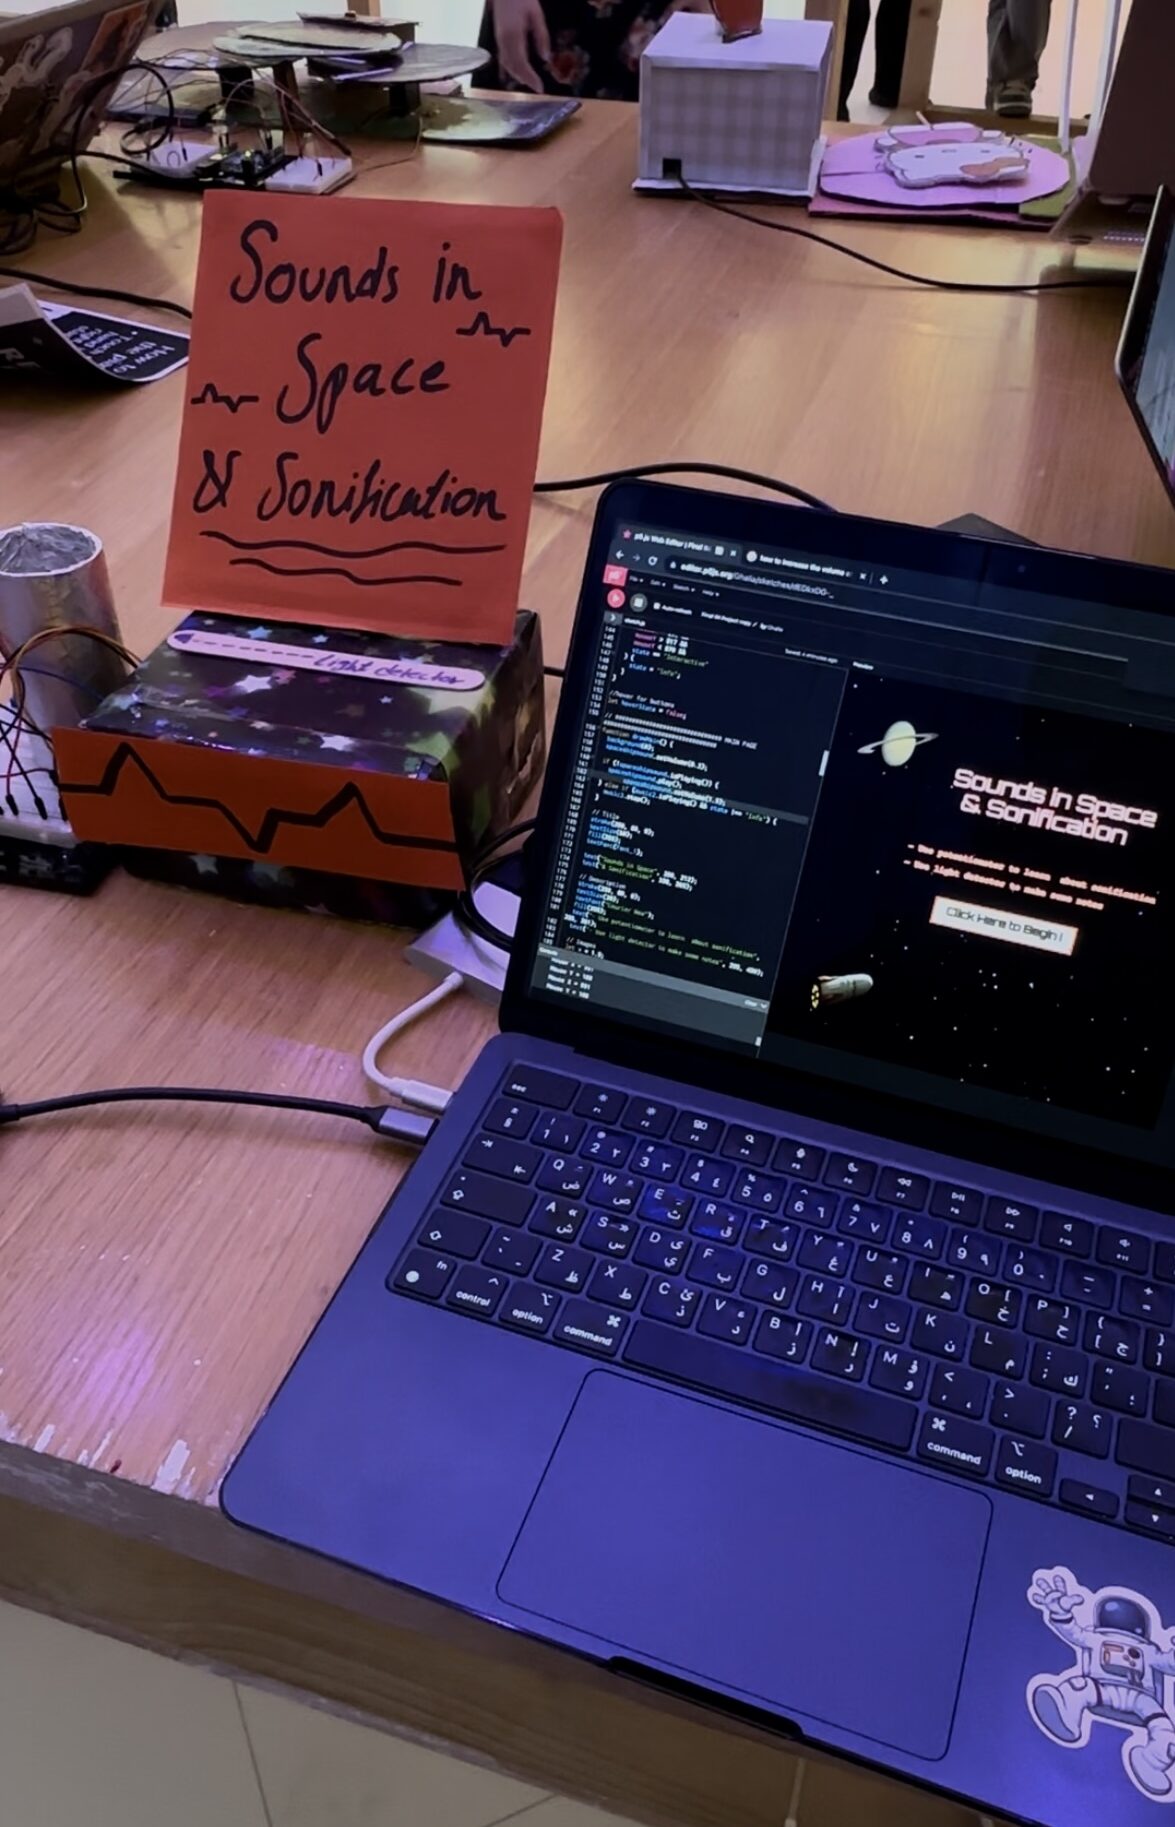
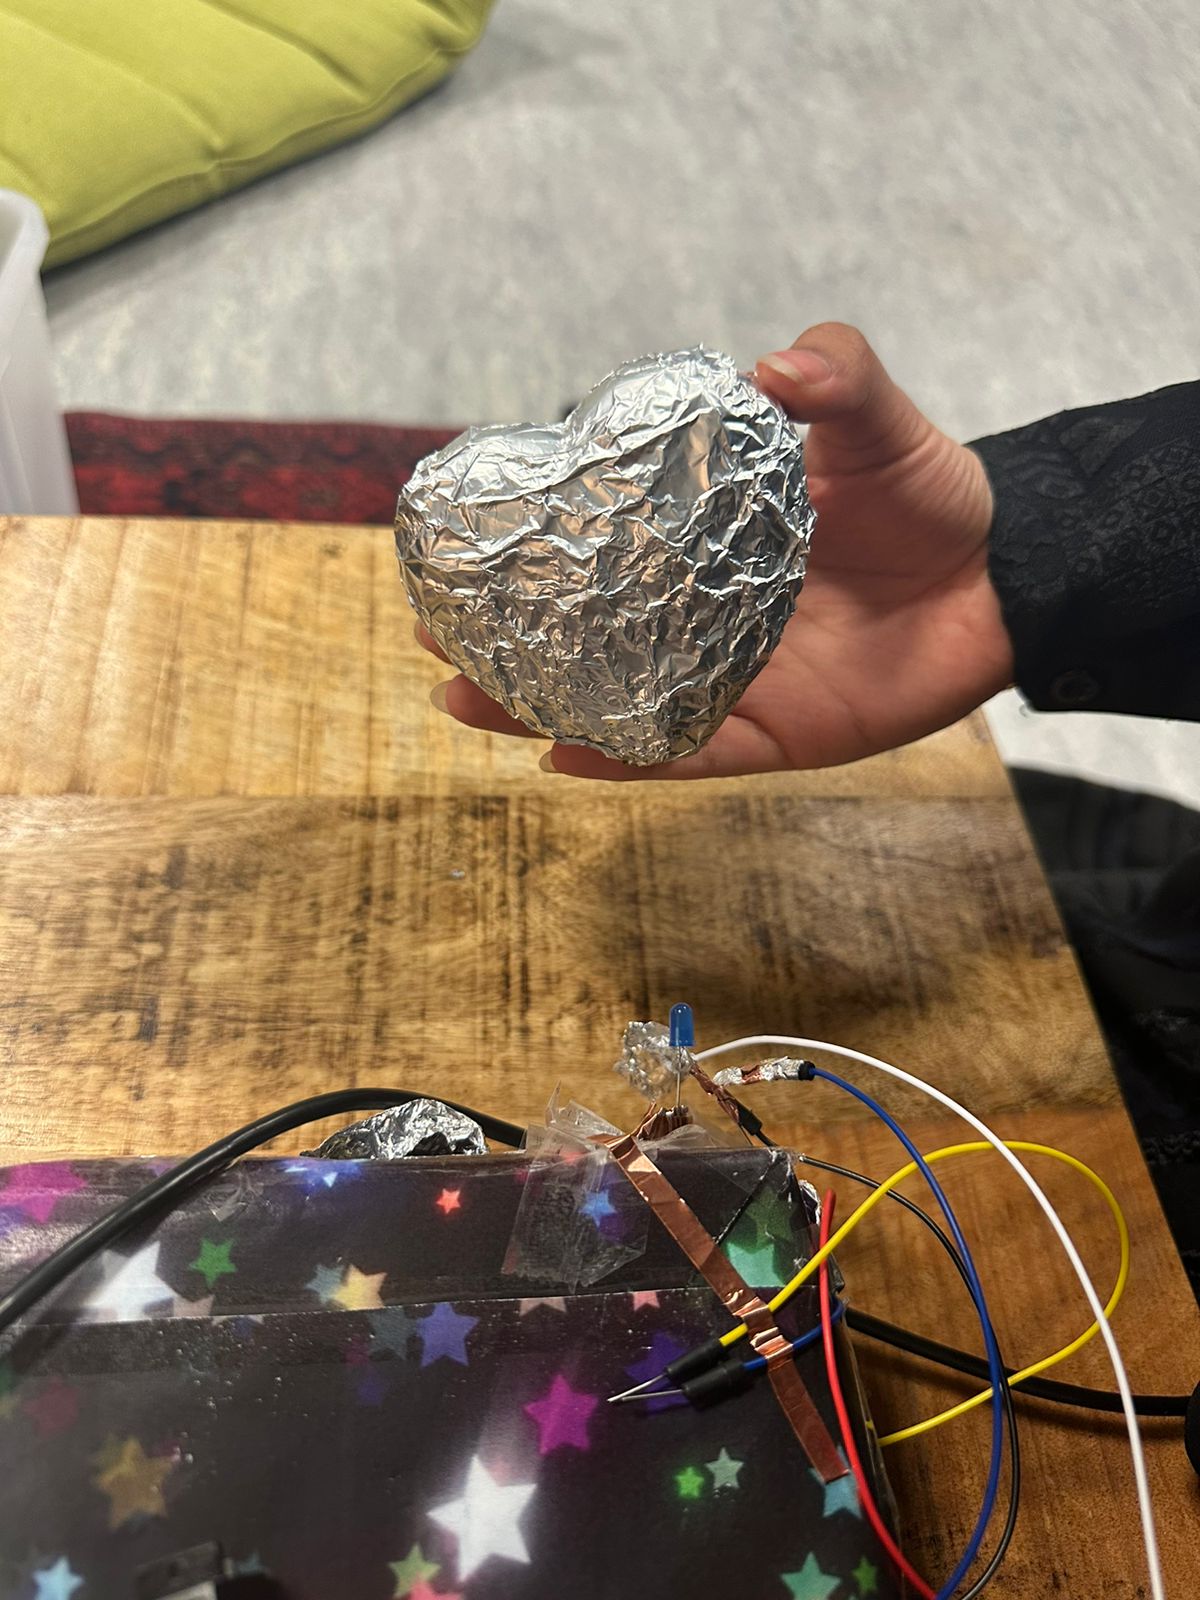
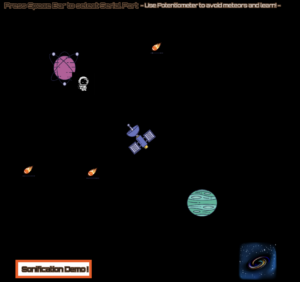
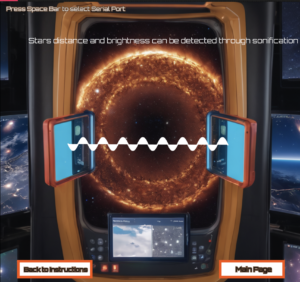
The functionality of this educational game commences on the main page, featuring instructions on utilizing the potentiometer and light sensor. Users initiate the game by clicking the start button. The first page serves as an informational hub, prompting users to employ the potentiometer to maneuver a miniature astronaut towards various celestial objects (planets, satellites, etc.). At each element encountered, informative text is displayed, delving into topics such as sounds in space, how media portrays such sounds, the concept of sonification, and two practical examples of its application. The unique challenge lies in reading this information while navigating the astronaut through the cosmos and avoiding incoming meteors. The subsequent section of the educational game offers a hands-on demonstration of sonification. Users can use the palm of their hands and a flashlight which can be detected by a light sensor. This detection is then translated into piano notes, with low, moderate, and high pitches corresponding to varying levels of brightness. Users can both hear the resulting musical notes and observe a wave visualization representing the light frequency, facilitating a comprehensive understanding of the process.


Communication between Arduino and P5js :

Most of the communication between the hardware and software involved messages from arduino sending to p5js where the output is. These messages are values from the potentiometer and the light sensor, hence the values are splitted by a comma. The serial connection is implemented using the serial port library.

//Arduino Code final IM project

//  Example of bidirectional serial communication

// Inputs:
// - A0 - sensor connected as voltage divider (e.g. potentiometer or light sensor)
// - A1 - sensor connected as voltage divider 
//
// Outputs:
// p5js sound


void setup() {
  // Start serial communication so we can send data
  // over the USB connection to our p5js sketch
  Serial.begin(9600);

  // We'll use the builtin LED as a status output.
  // We can't use the serial monitor since the serial connection is
  // used to communicate to p5js and only one application on the computer
  // can use a serial port at once.
  pinMode(LED_BUILTIN, OUTPUT);

  // start the handshake
  while (Serial.available() <= 0) {
    digitalWrite(LED_BUILTIN, HIGH); // on/blink while waiting for serial data
    Serial.println("0,0"); // send a starting message
    delay(300);            // wait 1/3 second
    digitalWrite(LED_BUILTIN, LOW);
    delay(50);
  }
}

void loop() {
  // wait for data from p5 before doing something
  while (Serial.available()) {
    digitalWrite(LED_BUILTIN, HIGH); // led on while receiving data
    int left = Serial.parseInt();
    int right = Serial.parseInt();
    if (Serial.read() == '\n') {
      int sensor = analogRead(A0);
      delay(50);
      int sensor2 = analogRead(A1);
      delay(5);
      Serial.print(sensor);
      Serial.print(',');
      Serial.println(sensor2);
    }
  }
   digitalWrite(LED_BUILTIN, LOW);
}


  • P5js Code :

For this assignment, I endeavored to introduce a novel approach for navigating between pages, distinct from the method employed in my midterm project. Within my draw function, I utilized the concept of state to showcase various pages and their respective elements whenever a mouse-click event occurred at specific coordinates. Drawing inspiration from Fausto Fang’s code, I sought to understand and implement this technique.  The primary innovations incorporated into my final project revolved around the integration of hardware input and laptop-generated output. Specifically, I harnessed data from a light sensor and a potentiometer, utilizing specific ranges to orchestrate the movement of a miniature astronaut and the production of musical notes as a form of sonification. 

  • Reflection & improvements: 

I addressed neglected or previously inefficiently implemented elements, such as ensuring buttons visually stand out when the mouse hovers over them. Furthermore, I implemented features like displaying a warning when meteors collide with the mini astronaut (controlled by the potentiometer) and triggering the playback of three distinct sounds on each page, including an explosion audio resulting from the meteor clashing with the astronaut. I was particularly proud of the aesthetic and the idea itself. I’m very passionate about science and astronomy, and I’m always looking for ways to integrate it in my technological field, and creating an educational game was one of the best ideas. 

There is always room for improvement. First of all, if I had the chance, I would’ve used the panel mount pot potentiometer instead of the trim pot, simply because it would be easier for users to handle it. I would display the directions of the game differently by explaining how the potentiometer works and where to use it exactly because not everyone knows how it works. When it comes to the hardware, I think I should’ve placed more effort into creating the concept of sonification by using a flash light attached to a star structure or something that resembles the concept more. Additionally , it takes it a minute to load everything and I haven’t been able to figure out a way around it.

User Experiences:

When users attempted to play the game, some read the directions and understood where to start and what to expect as results, while others were either confused by the functionality of the potentiometer, and some didn’t know what the controls are and how to make the game work. Although I had some instructions, I think I need to be more precise about what the potentiometer does, how it’s supposed to be rotated, and when exactly they can use the light sensor.

Note: I added some background sound that is originally in the project but it was too loud for it to be heard in the recording.


Overall Experience:

Overall, the experience is good enough and easy to work with. However, I felt the need to explain how to use the potentiometer often and when to use the light sensor. I had to explain why is sonification used in the field of astronomy, so maybe that’s something I could add in the project itself. One can understand how it works through the instructions but they can be improved in terms of how apparent and visible they are to the users and giving more details to how the sensors work along with p5js.


References:

https://mixkit.co/free-sound-effects/

https://eprints.hud.ac.uk/id/eprint/15922/2/

https://www.youtube.com/watch?v=g4lRij_xcHg

https://p5js.org/examples/sound-oscillator-frequency.html

Finalized Concept for the Project

What if Space had Sound?
  • Concept

For my final project, I decided to go with my first idea since I’m interested in gaining more experience in the scientific field and data visualization with a creative twist. My idea is to deliver to the audience some fun facts about space and its exploration through the method of sonification , which is transforming data from electromagnetic waves to sound and musical rhythms.

NASA translates Milky Way images into sound using sonification: Digital  Photography Review

  • Design and description of what your Arduino program will do.

For the Arduino program, I would use the infrared distance measuring sensor and the light sensor. The user would have control over the notes (sound) using both sensors together but each would have different note sound effects, however, they would have similar pitches depending on distance and light, representing electromagnetic waves from pulsar stars. For example, when there is a short distance, there will be high pitch representing stronger radiation, and more light would also mean a higher pitch, representing stronger radiation from a star.

Input – light and distance values /Output – sound and visual changes of wave patterns.How sonification brings sounds from faraway galaxies' black holes - ABC  Classic

  • Design and description of what P5 program will do.

The P5js would represent a starting page, where the user can click either for information about the project with sounds playing in the background from data in a csv file or click “Begin Experience” to head to the space themed page with wave patterns where they use controls from arduino to change the notes while an ambience background sound plays. It will be receiving values from distance measuring sensor and light sensor.


Ideas For Final Project


Idea 1 

For the first idea, I’m thinking of using either real-time data or just existing data and creating a creative visualization that can be controlled by the user through an ultrasonic sensor. My second option for data visualization is to apply the concept of sonification in the field of astronomy where data is converted into sound as an output demonstrating  some waves that are being radiated in space or a black hole studied by NASA. If I go with this idea, I’ll probably try to connect the sound of those waves with the user’s interaction with the ultrasonic sensor and connect it to what’s displayed on p5js.

Idea 2

My second idea does not involve any data its more like a game. The game would either involve a journey in an old house and the user will be moving through different rooms or it would be a whole night journey in multiple settings like a home, forest, streets, etc. The main concept is that they will be using their phones as a flashlight to search for certain objects asked by the game in order to win or complete the narrative. The light would be detected by the light sensor and it would be connected to p5js so the space they are in is bright enough for them to look for the item. This idea might be tough because I’m not sure to what extent it is plausible to implement.

Class Exercises

  1. make something that uses only one sensor  on Arduino and makes the ellipse in p5 move on the horizontal axis, in the middle of the screen, and nothing on arduino is controlled by p5.

Ex1 video demo

2. make something that controls the LED brightness from p5

Ex2 video demo

3. take the gravity wind example (https://editor.p5js.org/aaronsherwood/sketches/I7iQrNCul) and make it so every time the ball bounces one led lights up and then turns off, and you can control the wind from one analog sensor.

Ex3 video demo

Reflection – Week 10

Interaction Design

Bret Victor’s critique of the current state of interaction design grabbed my attention because I hadn’t really delved into thinking deeply about existing interaction designs before, nor had I formed a strong opinion on the matter. According to Victor, the current approach lacks boldness and visionary thinking, urging a shift beyond established norms to cultivate a more ambitious perspective for the future. While I agree with his viewpoint, transitioning from familiar interaction patterns to something entirely different is not a simple task. People need time to adapt to new lifestyles and products, so changing how we interact with technology may require considerable effort and adjustment.

Considering the evolution of current interaction technology, it becomes apparent that what we have today likely originated from visionary ideas but underwent gradual enhancements over time. As I understood it from the subsequent response, Victor’s vision revolves around the concern that contemporary and future technology might limit our mobility. I believe that the trajectory of people’s vision for interactive technology has remained somewhat consistent. Victor’s frustration with incremental changes to existing products resonates with me, as I think we need to strike a balance. Some technologies, like iPads and iPhones, are user-friendly and effective, but there’s a need to transition to more actively interactive technology  and something that involves more of our senses that we are naturally utilizing without fully realizing and without compromising physical health. Achieving this shift would require engaging brainstorming, diverse suggestions, and expertise from various fields to make it both interesting and feasible.

Week 10 Group Assignment

whimsical musical mixer box

Concept

In this project, we designed a unique musical box with a playful twist. Rather than a conventional music box, our creation serves as a musical instrument. The distinctive feature lies in its utilization of an ultrasonic sensor to generate melodies. Additionally, the musical box incorporates a servo motor and an LED light for night use, both controllable digitally. It features an original melody, namely “Ode to Joy,” adding a personalized touch to the musical experience. Inspired by the spirited character Vanellope from the animated movie “Wreck-It Ralph,” we aimed for a funky and whimsical vibe. To enhance its visual appeal, we crafted the box using cardboard and adorned it with starry A4 paper, giving it a delightful and eye-catching appearance, and used a heart-shaped object to play the original song.

Video: 

Musical instrument Project

Code & Highlights
#include "pitches.h"


// Defining the pins for the ultrasonic sensor and buzzer
const int trigPin = 9;
const int echoPin = 10;
const int buzzerPin = 11;


// Background melodies
int backgroundMelody1[] = {262, 294, 330, 349, 392, 440, 494, 523};
int backgroundMelody2[] = {330, 349, 392, 440, 523, 587, 659, 698};
int backgroundMelody3[] = {392, 440, 494, 523, 587, 659, 698, 784};
int backgroundBeat[] = {200, 200, 200, 200, 200, 200, 200, 200};


// Setup function runs once at the beginning
void setup() {
 // Setting the pin modes for the ultrasonic sensor and buzzer
 pinMode(trigPin, OUTPUT);
 pinMode(echoPin, INPUT);
 pinMode(buzzerPin, OUTPUT);
 //  serial communication for debugging
 Serial.begin(9600);
}


// Loop function runs repeatedly
void loop() {
 // This sends a short pulse to trigger the ultrasonic sensor
 digitalWrite(trigPin, LOW);
 delayMicroseconds(2);
 digitalWrite(trigPin, HIGH);
 delayMicroseconds(10);
 digitalWrite(trigPin, LOW);


 // Measure the duration of the echo
 long duration = pulseIn(echoPin, HIGH);
 int distance = duration * 0.034 / 2;


 // Print the distance to the serial monitor for checking
 Serial.print("Distance: ");
 Serial.println(distance);


 // Play different notes or melodies based on distance
 if (distance < 7) {
   playMelody();
 } else if (distance < 20) {
   playNote(330);
   playBackgroundMelody1();
 } else if (distance < 30) {
   playNote(392);
   playBackgroundMelody2();
 } else if (distance < 40) {
   playNote(440);
   playBackgroundMelody3();
 } else {
   noTone(buzzerPin);
 }


 delay(500); // Adjust the delay based on your preference
}


// Function to play a single note
void playNote(int frequency) {
 tone(buzzerPin, frequency);
 delay(500);  // Adjust the duration based on your preference
 noTone(buzzerPin);
}


// Functions to play background melodies
void playBackgroundMelody1() {
 for (int i = 0; i < 8; i++) {
   tone(buzzerPin, backgroundMelody1[i]);
   delay(backgroundBeat[i]);
   noTone(buzzerPin);
 }
}


Reflection  and Areas of improvement

When we first implemented this project, we were aiming to have more than one song or melody that the user can switch to with a button, unfortunately, we faced a lot of difficulties and issues, when it came to the code and hardware, specifically the buttons connection to switching from one song to another, including how it was affected when other hardware devices were added. Another area we struggled with is the servo motor’s ability to move in a 360 loop. If we were to create this again, we would have added more songs instead of just one original song, and include a switch to control the volume.


References:

https://github.com/robsoncouto/arduino-songs/tree/master


Reading Response – Week 9

Physical Computing’s Greatest Hits (and Misses) & Making Interactive Art: Set the Stage, Then Shut Up and Listen

Both readings provided me with valuable information and insights regarding physical computing and the concept of interactive art. They share a common theme centered around originality and interpretation. The article on physical computing illustrates how even seemingly commonplace projects possess a unique touch each time different individuals recreate them. In my view, a person’s subtle influences, expressions, intentions, and interpretations of their project imbue it with a distinct originality and authenticity. Each creator infuses the project with passion, interest, and a personal story, though not always evident to the audience. This unique narrative provides value to the project unless it is an exact copy without any differences, purpose, or clear story.

Transitioning to the second article on interactive art, I concur with the author’s stance that artists should not fully disclose their interpretation and explanation of their artwork. Allowing the audience to form their own interpretations enhances the art’s impact. However, I disagree with the author’s assertion that art is solely a statement and not an expression. I firmly believe that the beauty of art lies in the story behind it, not necessarily the artist’s interpretation, but their experiences, as the author emphasizes, the art “sets the stage”; meaning that you give some insight of your experience, life, or just some context for the audience and give them a chance to interpret it on their own, since that is also one of the factors that prove the quality of an art work.

From my perspective, interactive art encompasses various fields, ranging from intricately detailed works with rich narratives to visually appealing, randomized creations. Regardless of the project type, it invariably reflects the artist’s expression. Even if the final result involves intentional or unintentional randomness, this randomness is infused with a story, emotions, and connections between perspectives, ideas, and life experiences. Even when the artist is not consciously deliberate in their production, they make decisions based on their interpretation of their own art. In some cases, the result may simply be visually appealing but still open to interpretation. Thus, I believe art can indeed make a statement, but it will always carry an expression to varying extents.


Digital & Analog Sensors

Concept

For this assignment, I thought of making a multipurpose sensor but I decided to create a rough design of a night lamp that has a space touch to it. I used two LEDs, a blue and a yellow one, where the blue was used for the moon and the yellow was used for the sun. For the digital aspect of this assignment, I used a button that turns on the blue light, and when clicked for the second time, the blue light starts to blink as well as the yellow light if it’s on, and when clicked for the third time, the blue light turns off. For the analog aspect, I used the sensor to detect light, so when it’s dark enough or the brightness is below 500, the yellow light turns on, and it can be in blinking mode along with the blue light if the button is clicked. 

Code 

if (isButtonPressed) {
    buttonMode = (buttonMode + 1) % 3;
    isButtonPressed = false;

    switch (buttonMode) {
      case 0: // Off
        analogWrite(BUTTON_LED_PIN, 0);
        break;

      case 1: // On
        analogWrite(BUTTON_LED_PIN, 255);
        break;

      case 2: // Fading
        break;
    }
  }

The overall code was not very challenging, but it’s definitely new to me and  it took me a while to make sure I have my code right so that I could focus on the hardware. I liked this piece of code because I’m using the switch function which really helped me organize what I had in mind. Also, I initially wanted the lights to fade but I need to work on it to figure out why its blinking.

Reflection 

This assignment challenged me to learn more about the bread board and the arduino and how to separate different functions from each other. I started this assignment by experimenting with what I already learned in class and making a few adjustments, and thought of just leaving it as a multipurpose sensor that can be used in a bedroom setting, a museum, or anywhere else, but I wanted it to have some creative aspect to it, and hence, I used whatever tools I had with me to create a rough design of a night lamp.

Video : https://intro.nyuadim.com/wp-content/uploads/2023/11/lampsensors.mp4

Smart Journal

Concept 

For this assignment, I decided to make something that can be used in real life. Although the project I made is not necessarily convenient, the concept can be applied in our daily lives. The idea is that sometimes we might want to journal at night on our beds or write a few thoughts in our diaries, and might not have a lamp or quick access to light, hence, I decided to attach the light to the notebook, so that once it’s opened, the light turns on for visibility. This idea definitely needs proper implementation and more serious tools for it to be convenient and easy to use, easy to plug and unplug in reality and it definitely requires a brighter or bigger LED to be connected. Text book with bulb Royalty Free Vector Image - VectorStock

Highlight : I would say that the highlight of this assignment is figuring out how the connection between the wires work and where and how aluminum can be used to facilitate the implementation. I personally found it interesting to play around with the wires and learn how aluminum can connect the wires together to make the LED light up. 

Reflection: I made one mistake in my assignment by using the 10k resistor instead of the 330 without knowing the difference. I’ve also experienced 330 made the LED brighter but I’m not sure if that’s actually the case. It did take me a while to think of something creative without using code which I think was the main challenge in this assignment. I would have tried to make it look more decent and convenient if I had this idea from the start. I initially wanted the LED to light up when someone presses a pen on a piece of paper as they write but I faced some difficulties and thought of this!  For the implementation I used the instructions from the instructors notes and went on ahead with experimenting my ideas.


Video demonstration: https://intro.nyuadim.com/wp-content/uploads/2023/11/IM-Sjournal.mp4