FINAL PROJECT – USER TESTING AND FINAL TESTING


Project Documentation

Project Title:

Traffic Light Game


Project Idea:

The original idea was to use LED lights connected to an Arduino to simulate a traffic light. The lights would signal when a car (controlled by the user) should stop or move. However, I transitioned to using p5.js to create a digital simulation of the traffic light and car movement, while the Arduino controlled the car’s behavior through a physical button.


Concept:

The project combines physical hardware (Arduino) and digital visualization (p5.js) to simulate real-world traffic rules:

  • Traffic Lights: Designed in p5.js to change states (green, yellow, red) at timed intervals.
  • Car Movement: Controlled through an Arduino-connected button. Pressing the button sends “MOVE” signals to the p5.js interface, while releasing it sends “STOP.”
  • Strike System: Violations occur when the car moves during a red light or fails to move during green light. A buzzer (Arduino) provides audible feedback for violations.

Step-by-Step Arduino Connection

Components Required:

  • Arduino Uno
  • Breadboard
  • 1 Push Button (Switch)
  • 1 10kΩ Resistor
  • 1 Buzzer
  • Jumper Wires (Male-to-Male)

Step-by-Step Connection:

  1. Connect the Switch:
    • Place the push button (switch) on the breadboard, bridging the middle gap.
    • Connect one leg of the switch to Digital Pin 2 on the Arduino.
    • Connect the same leg of the switch to 5V on the Arduino.
  2. Connect the Resistor:
    • Attach a 10kΩ resistor from the other leg of the switch to the GND rail on the breadboard.
    • This acts as a pull-down resistor, ensuring the switch reads LOW when not pressed.
  3. Connect the Buzzer:
    • Place the buzzer on the breadboard.
    • Connect the positive leg of the buzzer to Digital Pin 8 on the Arduino.
    • Connect the negative leg of the buzzer to the GND rail on the breadboard.
  4. Power Connections:
    • Connect the 5V pin on the Arduino to the breadboard’s + rail.
    • Connect the GND pin on the Arduino to the breadboard’s – rail.

Arduino Connection

The diagram below shows the Arduino and Breadboard connections for the push button and buzzer:

https://drive.google.com/file/d/198DnUSxek9c-3ebID0bJrLljIN0VNa_O/view?usp=drive_link


Code Implementation

1. p5.js Code

The p5.js code handles the simulation of traffic lights, car movement, and strike detection. It also integrates with the Arduino using serial communication to receive “MOVE” and “STOP” signals and send feedback for violations (buzzer activation).

/*
 Course: Introduction to interactive media
 Final Project
 Section: Mang-F2024
 Name: Bismark Buernortey Buer
 Title: Superman Saves
*/

// Declare global variables
let roadY = 0; // Vertical position of the road markings
let gameState = "INSTRUCTIONS"; // Tracks the current state of the game
let carImage, backgroundImage, startSound, gameSound, gameOverSound; // Assets: images and sounds
let gameOverImage, restartImage, quitImage, gameOverBg, startButtonImage; // UI images
let countdownSound; // Countdown sound effect
let carX, carY; // Car position coordinates
let lightState = "green"; // Current state of the traffic light
let strikes = 0; // Counter for traffic violations
let lightTimer = 0; // Timer to track light changes
let isMoving = false; // Boolean flag for car movement (controlled by Arduino)
let violationTimer = 0; // Timer to check violations

let countdown = 3; // Countdown value before the game starts
let countdownStartTime = 0; // Timer start time for countdown
let countdownActive = false; // Flag for countdown state

let serial; // Serial communication object for Arduino
let gracePeriodActive = false; // Flag for grace period after light change
let graceStartTime = 0; // Timer start for grace period

// Preload images and sounds before setup
function preload() {
  carImage = loadImage("car.png");
  backgroundImage = loadImage("background.jpg");
  gameOverImage = loadImage("gameover.png");
  restartImage = loadImage("restart.png");
  quitImage = loadImage("quit.png");
  gameOverBg = loadImage("gameover_bg.jpg");
  startButtonImage = loadImage("start.png");

  startSound = loadSound("start_sound.mp3");
  gameSound = loadSound("gameplay_sound.mp3");
  gameOverSound = loadSound("gameover_sound.mp3");
  countdownSound = loadSound("countdown_go.mp3");
}

// Initial setup for the game
function setup() {
  fullscreen(); // Set fullscreen mode
  createCanvas(windowWidth, windowHeight); // Create a canvas with full window size
  carX = width / 2; // Set car's horizontal position
  carY = height - 200; // Set car's vertical position

  // Initialize serial communication with Arduino
  serial = new p5.SerialPort();
  serial.open("/dev/tty.usbmodem1201"); // serial port
  serial.on("data", serialEvent); // Define event for incoming serial data

  startSound.loop(); // Play start sound on loop
}

// Resize canvas dynamically when the window size changes
function windowResized() {
  resizeCanvas(windowWidth, windowHeight);
}

// Main draw loop: controls the game state
function draw() {
  if (gameState === "INSTRUCTIONS") {
    showInstructions(); // Display instructions screen
  } else if (gameState === "COUNTDOWN") {
    showCountdown(); // Display countdown before game starts
  } else if (gameState === "PLAY") {
    playGame(); // Main game logic
  } else if (gameState === "END") {
    endGame(); // End game screen
  }
}

// Display instructions screen
function showInstructions() {
  background(backgroundImage); // Set background
  textAlign(CENTER);
  textSize(32);
  fill("black");
  text("🚦 Traffic Light Game 🚦", width / 2, height / 6); // Title
  textSize(24);
  text("Green: Move | Red: Stop | Yellow: Keep Moving", width / 2, height / 4);
  text("Press and hold the button to stop the car", width / 2, height / 3);
  text("React in time to avoid strikes!", width / 2, height / 2.75);

  image(startButtonImage, width / 2 - 100, height / 2, 200, 100); // Start button

  // Start game on button press
  if (mouseIsPressed && mouseX > width / 2 - 100 && mouseX < width / 2 + 100 && mouseY > height / 2 && mouseY < height / 2 + 100) {
    startSound.stop();
    countdownSound.play();
    countdownStartTime = millis(); // Start countdown timer
    countdownActive = true;
    gameState = "COUNTDOWN";
  }
}

// Show countdown before game starts
function showCountdown() {
  let currentTime = millis();
  let elapsed = Math.floor((currentTime - countdownStartTime) / 1000); // Time passed
  let flashColor = frameCount % 20 < 10 ? color(255, 0, 0) : color(255, 255, 0); // Flashing background effect

  background(flashColor);
  textAlign(CENTER);
  textSize(150);
  fill(255);

  if (elapsed <= 3) {
    countdown = 3 - elapsed;
    text(countdown, width / 2, height / 2); // Show countdown numbers
  } else {
    fill(0, 255, 0);
    text("GO!", width / 2, height / 2); // Show "GO!" when countdown ends

    if (countdownActive) {
      countdownActive = false;
      setTimeout(() => {
        gameSound.loop(); // Start gameplay sound
        gameState = "PLAY";
        lightTimer = millis(); // Start light timer
        violationTimer = millis(); // Start violation timer
        startGracePeriod();
      }, 1000);
    }
  }
}

// Main gameplay logic
function playGame() {
  background("SkyBlue");
  let currentTime = millis();

  updateTrafficLight(currentTime); // Update traffic light state
  updateRoad(); // Draw road
  drawCar(carX, carY); // Draw car
  drawTrafficLight(); // Draw traffic light

  if (isMoving && !gameSound.isPlaying()) gameSound.loop(); // Loop game sound when moving
  else if (!isMoving && gameSound.isPlaying()) gameSound.stop(); // Stop sound if not moving

  // Check for violations every 2 seconds
  if (currentTime - violationTimer >= 2000) {
    checkViolations();
    violationTimer = currentTime;
  }

  fill("black");
  textSize(24);
  text(`Strikes: ${strikes}`, 50, 50); // Display strikes

  // End game after 3 strikes
  if (strikes >= 3) {
    gameSound.stop();
    gameOverSound.play();
    gameState = "END";
  }
}

// Display game over screen
function endGame() {
  background(gameOverBg);
  image(gameOverImage, width / 2 - 150, height / 4, 300, 150);
  image(restartImage, width / 2 - 220, height / 2, 200, 100); // Restart button
  image(quitImage, width / 2 + 20, height / 2, 200, 100); // Quit button

  textAlign(CENTER);
  textSize(24);
  fill("black");
  text("Choose an option:", width / 2, height / 2 - 50);

  // Restart or quit game based on mouse position
  if (mouseIsPressed) {
    if (mouseX > width / 2 - 220 && mouseX < width / 2 - 20 && mouseY > height / 2 && mouseY < height / 2 + 100) {
      restartGame();
    }
    if (mouseX > width / 2 + 20 && mouseX < width / 2 + 220 && mouseY > height / 2 && mouseY < height / 2 + 100) {
      returnToStartPage();
    }
  }
}

// Function to restart the game
function restartGame() {
  gameState = "COUNTDOWN"; // Set game state to countdown
  strikes = 0; // Reset strikes
  lightState = "green"; // Reset traffic light to green
  lightTimer = millis(); // Reset light timer
  violationTimer = millis(); // Reset violation timer
  isMoving = false; // Stop the car movement
  gameOverSound.stop(); // Stop the game over sound
  countdownSound.play(); // Play countdown sound
  countdownStartTime = millis(); // Start countdown timer
  countdownActive = true; // Activate countdown
}

// Function to return to the start page
function returnToStartPage() {
  gameState = "INSTRUCTIONS"; // Return to the instructions screen
  strikes = 0; // Reset strikes
  isMoving = false; // Stop car movement
  lightState = "green"; // Reset traffic light to green
  lightTimer = millis(); // Reset light timer
  violationTimer = millis(); // Reset violation timer
  gameOverSound.stop(); // Stop the game over sound
  startSound.loop(); // Replay the start sound
}

// Function to update the traffic light based on time
function updateTrafficLight(currentTime) {
  if (lightState === "green" && currentTime - lightTimer > 15000) {
    lightState = "yellow"; // Change to yellow after 15 seconds
    lightTimer = millis(); // Reset timer
  } else if (lightState === "yellow" && currentTime - lightTimer > 5000) {
    lightState = "red"; // Change to red after 5 seconds
    lightTimer = millis(); // Reset timer
    startGracePeriod(); // Start grace period for violations
  } else if (lightState === "red" && currentTime - lightTimer > 8000) {
    lightState = "green"; // Change back to green after 8 seconds
    lightTimer = millis(); // Reset timer
    startGracePeriod(); // Start grace period for green light
  }
}

// Function to check for traffic light violations
function checkViolations() {
  let currentTime = millis();
  if (gracePeriodActive && currentTime - graceStartTime < 1000) return; // Skip checks during grace period

  // Add strikes for incorrect actions based on traffic light state
  if (lightState === "green" && !isMoving) addStrike("Didn't move during green!");
  else if (lightState === "red" && isMoving) addStrike("Moved during red!");
  else if (lightState === "yellow" && !isMoving) addStrike("Stopped during yellow!");
}

// Function to handle strikes and send feedback to Arduino
function addStrike(message) {
  strikes++; // Increment strikes count
  console.log(message); // Log the violation message
  serial.write("BUZZER\n"); // Send a buzzer signal to Arduino
}

// Function to draw the traffic light on the screen
function drawTrafficLight() {
  fill("black");
  rect(20, 20, 50, 150, 10); // Draw the traffic light box

  // Draw the red light
  fill(lightState === "red" ? "red" : "gray");
  ellipse(45, 50, 30, 30);

  // Draw the yellow light
  fill(lightState === "yellow" ? "yellow" : "gray");
  ellipse(45, 95, 30, 30);

  // Draw the green light
  fill(lightState === "green" ? "green" : "gray");
  ellipse(45, 140, 30, 30);
}

// Function to draw the car on the screen
function drawCar(x, y) {
  image(carImage, x - 50, y, 100, 150); // Draw the car image centered at (x, y)
}

// Function to update the road movement
function updateRoad() {
  let centerY = height / 2; // Center of the screen vertically
  let centerX = width / 2; // Center of the screen horizontally
  let roadUpOffset = 50; // Width of the road at the top
  let roadDownOffset = 150; // Width of the road at the bottom
  let markingLength = 40; // Length of road markings

  roadY += isMoving ? 5 : 0; // Move road markings downward if car is moving
  if (roadY > markingLength * 2) roadY = 0; // Reset markings position when off-screen

  // Draw the grass background
  noStroke();
  fill("lime");
  rect(0, centerY, width, centerY);

  // Draw the road as a trapezoid
  fill("gray");
  quad(centerX - roadUpOffset, centerY, centerX + roadUpOffset, centerY,
       centerX + roadDownOffset, height, centerX - roadDownOffset, height);

  // Draw dashed road markings
  stroke(255);
  strokeWeight(5);
  for (let i = centerY; i < height; i += markingLength * 2) {
    let y = i + roadY; // Adjust position with road movement
    line(centerX, y, centerX, y + markingLength);
  }
}

// Event function for receiving data from Arduino
function serialEvent() {
  let data = serial.readStringUntil("\n"); // Read serial data line by line
  if (data.trim() === "MOVE") isMoving = true; // Set car to moving if Arduino sends "MOVE"
  if (data.trim() === "STOP") isMoving = false; // Stop car if Arduino sends "STOP"
}

// Function to activate grace period after light changes
function startGracePeriod() {
  gracePeriodActive = true; // Activate grace period
  graceStartTime = millis(); // Set grace period start time
}


2. Arduino Code

The Arduino code reads input from the physical button and sends “MOVE” or “STOP” signals to p5.js via serial communication. Additionally, it listens for the “BUZZER” command from p5.js and activates the buzzer for violations.


const int buttonPin = 2;       // Pin for the switch
const int buzzerPin = 8;       // Pin for the buzzer
int buttonState = HIGH;        // Current state of the switch
int lastState = HIGH;          // Last state of the switch
unsigned long lastDebounceTime = 0; // For debounce timing
const unsigned long debounceDelay = 50; // Debounce delay in milliseconds

void setup() {
  pinMode(buttonPin, INPUT_PULLUP); // Use internal pull-up resistor for the switch
  pinMode(buzzerPin, OUTPUT);       // Set buzzer pin as OUTPUT
  Serial.begin(9600);               // Start serial communication at 9600 baud
}

void loop() {
  int currentButtonState = digitalRead(buttonPin);

  // Debounce the button input
  if (currentButtonState != lastState) {
    lastDebounceTime = millis();
  }

  if ((millis() - lastDebounceTime) > debounceDelay) {
    if (currentButtonState != buttonState) {
      buttonState = currentButtonState;

      // Send "MOVE" or "STOP" signal based on button state
      if (buttonState == LOW) {
        Serial.println("MOVE"); // Button pressed
      } else {
        Serial.println("STOP"); // Button released
      }
    }
  }

  // Check for commands coming from p5.js
  if (Serial.available() > 0) {
    String command = Serial.readStringUntil('\n'); // Read command until newline
    command.trim(); // Remove unnecessary whitespace

    if (command == "BUZZER") {
      activateBuzzer(); // Activate buzzer when "BUZZER" command is received
    }
  }

  lastState = currentButtonState; // Update last state
}

// Function to activate the buzzer for 0.5 seconds
void activateBuzzer() {
  digitalWrite(buzzerPin, HIGH);
  delay(500); // Turn buzzer ON for 500 milliseconds
  digitalWrite(buzzerPin, LOW);
}


User Testing

Objective:
To test the game’s functionality, usability, and interaction between the Arduino hardware and p5.js interface.

Process:
I asked my roommate to play the game:

  1. He interacted with the physical button to control the car and watched how the car responded to the traffic lights on the screen.
  2. He initially found the yellow light behavior confusing but quickly understood the rules after a second try.

Feedback and Observations:

  • Challenge: Understanding the yellow light instructions.
    • Solution: Clarified instructions on the screen.
  • Positive Feedback: He found the buzzer feedback helpful for identifying violations.

Video:


Final Testing

Objective:
To ensure smooth operation of the system after incorporating feedback from user testing.

Testing Checklist:

  1. Traffic Light Changes: Tested timed transitions between green, yellow, and red lights.
  2. Car Movement: Verified car responded immediately to MOVE/STOP signals from Arduino.
  3. Strike System: Checked that violations were detected correctly, and strikes were incremented.
  4. Buzzer Activation: Ensured the buzzer activated for 0.5 seconds during violations.
  5. Game Over Screen: Verified that the game ended and displayed the correct options after 3 strikes.

Results:

  • All functionalities worked as expected without delays or glitches.
  • User feedback was implemented successfully, resulting in an improved experience.

Videos: 


Conclusion:

The project successfully integrates p5.js for visual simulation with Arduino hardware for user interaction. Combining digital visuals with physical inputs created an interactive and engaging experience that simulates real-world traffic rules.

This is the whole game:

Final Project Idea

Project Title:

Traffic Light Control Game


Overview:

The Traffic Light Control Game is an interactive simulation where a car on the p5.js screen reacts to traffic light LEDs controlled by an Arduino Uno. Players use keyboard arrow keys to control the car’s movement, adhering to basic traffic light rules:

  • Red LED: Stop the car.
  • Green LED: Move the car.
  • Yellow LED: Serves as a warning with no required interaction.

The game emphasizes real-time interaction between physical components and digital visuals, showcasing the integration of hardware and software.


Key Features:

  1. Traffic Light Simulation:
    • Red, yellow, and green LEDs simulate a real-world traffic light.
    • The lights change sequentially in predefined intervals.
  2. Interactive Car Movement:
    • Players use arrow keys to control the car:
      • Up Arrow: Move forward.
      • Down Arrow: Stop the car.
    • The car’s behavior must match the traffic light signals.
  3. Real-Time Feedback:
    • If the car moves during a red light or stops during a green light, a buzzer sounds to indicate a violation.
  4. Game Over:
    • If repeated violations occur, the game ends with a “Game Over” screen.

Objective:

The goal is to follow traffic light rules accurately and avoid violations. The game offers an educational yet engaging experience, simulating real-world traffic scenarios.


Technical Components:

Hardware:
  1. Arduino Uno:
    • Controls traffic light LEDs and buzzer.
  2. 3 LEDs:
    • Represent traffic lights (red, yellow, green).
  3. Buzzer:
    • Provides auditory feedback for rule violations.
  4. Resistors:
    • Ensure proper current flow for LEDs and buzzer.
  5. Breadboard and Wires:
    • Connect and organize the components.
Software:
  1. Arduino IDE:
    • Manages traffic light logic and sends the light states to p5.js via serial communication.
  2. p5.js:
    • Displays the car and road.
    • Handles player input and real-time car behavior based on the light states.

Implementation Plan:

1. Traffic Light Control:
  • The Arduino controls the sequence of LEDs:
    • Green for 5 seconds.
    • Yellow for 3 seconds.
    • Red for 5 seconds.
  • The current light state is sent to p5.js via serial communication.
2. Car Movement:
  • The p5.js canvas displays:
    • A road with a car.
    • The current traffic light state using on-screen indicators.
  • Arrow keys control the car’s position:
    • Right Arrow: Move forward.
    • Up Arrow: Stop.
3. Feedback System:
  • If the car moves during a red light or doesn’t move during a green light:
    • A buzzer sounds via Arduino.
    • Violations are logged, and after three violations, the game ends with a “Game Over” message.

Expected Outcome:

  • Players will interact with a dynamic simulation where their actions on the keyboard directly correspond to the car’s behavior.
  • The integration of physical LEDs and buzzer with digital visuals will create a seamless interactive experience.
  • The project demonstrates a clear understanding of hardware-software integration and real-time interaction design.

Extensions (STILL THINKING ABOUT IT):

  1. Scoring System:
    • Reward correct responses with points.
  2. Dynamic Difficulty:
    • Reduce light duration intervals as the game progresses.
  3. Enhanced Visuals:
    • Add animations for the car (e.g., smooth movement, brake effects).


Week 11 Reading Reflection and In-class Exercise

This week’s reading, Design Meets Disability, made me think differently about how we design for people with disabilities. Instead of just focusing on making tools that work, the reading talks about making them look good too. One idea that stood out to me was how assistive devices, like hearing aids, can be designed to match the user’s style. This turns them from something people might feel shy about into something they’re proud to wear.

I also liked the focus on working directly with the people who will use these designs. When users are involved, the tools are not only more useful but also feel more personal and meaningful. For example, the way glasses became a fashion statement over time shows how design can change how we see things, not just how they work.

This reading made me think about my own projects and how I can use similar ideas. I want to make designs that are simple and easy to use but still look creative and fun. I also want to involve users more, so the designs feel like they belong to them, not just something made for them.

In the end, this reading reminded me that design isn’t just about fixing problems—it’s about improving lives in ways that make people feel seen and valued. It’s a small change in thinking but one that can make a big difference.


Week 11: In-class Exercise


Final Video Demonstration can be found here: https://youtu.be/CTLXGrMEBxU

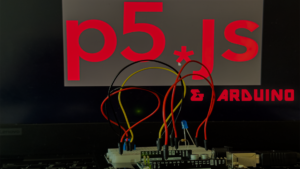
Cover image for this week’s production.
Exercise 1:

“make something that uses only one sensor  on Arduino and makes the ellipse in p5 move on the horizontal axis, in the middle of the screen, and nothing on Arduino is controlled by p5”

The following code was utilized for this particular exercise:

let sensorValue = 0; // To store the sensor value from Arduino

function setup() {
  createCanvas(640, 480);
  textSize(18);
}

function draw() {
  background(220);

  if (!serialActive) {
    text("Press Space Bar to select Serial Port", 20, 30);
  } else {
    text("Connected", 20, 30);

    // Display the sensor value
    text('Sensor Value: ' + sensorValue, 20, 50);

    // Map the sensor value to the horizontal position of the ellipse
    let ellipseX = map(sensorValue, 0, 1023, 0, width);

    // Draw the ellipse in the middle of the canvas vertically
    fill(255, 0, 0);
    ellipse(ellipseX, height / 2, 50, 50);
  }
}

function keyPressed() {
  if (key == " ") {
    setUpSerial(); // Start the serial connection
  }
}

// This function is called by the web-serial library
function readSerial(data) {
  if (data != null) {
    let fromArduino = trim(data); // Trim any whitespace
    if (fromArduino !== "") {
      sensorValue = int(fromArduino); // Convert the sensor value to an integer
    }
  }
}

The following code was used in the Arduino IDE for this exercise:

// make something that uses only one sensor  on Arduino and makes the ellipse in p5 move on the horizontal axis,
// in the middle of the screen, and nothing on arduino is controlled by p5

int sensorPin = A0; // Single sensor connected to A0

void setup() {
  Serial.begin(9600);
}

void loop() {
  int sensorValue = analogRead(sensorPin); // Read sensor value
  Serial.println(sensorValue); // Send sensor value to p5.js
  delay(50); // Short delay for stability
}
Exercise 2:

“make something that controls the LED brightness from p5”

The following code was used to make this exercise come to fruition:

let brightness = 0; // Brightness value to send to Arduino

function setup() {
  createCanvas(640, 480);
  textSize(18);

  // Create a slider to control brightness
  slider = createSlider(0, 255, 0);
  slider.position(20, 50);
}

function draw() {
  background(220);

  if (!serialActive) {
    text("Press Space Bar to select Serial Port", 20, 30);
  } else {
    text("Connected", 20, 30);

    // Display brightness value
    text("Brightness: " + brightness, 20, 90);

    // Update brightness from the slider
    brightness = slider.value();
    
    // Send brightness to Arduino
    writeSerial(brightness + "\n");

  }
}

function keyPressed() {
  if (key == " ") {
    setUpSerial(); // Start the serial connection
  }
}

function readSerial(data) {
  if (data != null) {
    let fromArduino = trim(data); // Trim whitespace
    brightness = int(fromArduino); // Parse data into an integer
  }
}

The following Arduino code was used for this particular exercise:

//make something that controls the LED brightness from p5

int ledPin = 3;

void setup() {
  Serial.begin(9600);
  pinMode(ledPin, OUTPUT);
}

void loop() {
  if (Serial.available()) {
    int brightness = Serial.parseInt();
    if (Serial.read() == '\n') {
      brightness = constrain(brightness, 0, 255);
      analogWrite(ledPin, brightness);
      Serial.println(brightness); // Send brightness to p5.js
    }
  }
}
Exercise 3:

The following code is an alteration of professor Aaron Sherwood’s code which was used for this exercise:

let velocity;
let gravity;
let position;
let acceleration;
let wind;
let drag = 0.99;
let mass = 50;

let windSensorValue = 0; // Value from the wind sensor
let connectButton; // Button for connecting to the serial port

function setup() {
  createCanvas(640, 360);
  noFill();

  position = createVector(width / 2, 0); // Initial position of the ball
  velocity = createVector(0, 0); // Initial velocity
  acceleration = createVector(0, 0); // Initial acceleration
  gravity = createVector(0, 0.5 * mass); // Gravity force
  wind = createVector(0, 0); // Initial wind force

  // Create a button to initiate the serial connection
  connectButton = createButton("Connect to Serial");
  connectButton.position(10, 10);
  connectButton.mousePressed(setUpSerial); // Trigger serial connection on button press
}

function draw() {
  background(255);

  if (!serialActive) {
    text("Click 'Connect to Serial' to start", 20, 50);
    return; // Exit the draw loop until the serial connection is established
  }

  // Map wind sensor value to wind force (affects horizontal movement)
  wind.x = map(windSensorValue, 0, 1023, -1.5, 1.5); // Adjust force range as needed

  // Apply forces
  applyForce(wind); // Apply wind force
  applyForce(gravity); // Apply gravity force

  // Update velocity and position
  velocity.add(acceleration);
  velocity.mult(drag); // Apply drag (friction)
  position.add(velocity);
  acceleration.mult(0); // Reset acceleration

  // Ball bounce logic (vertical boundary)
  if (position.y > height - mass / 2) {
    position.y = height - mass / 2; // Place the ball on the ground
    velocity.y *= -0.9; // Reverse and dampen vertical velocity

    // Notify Arduino to toggle the LED when the ball touches the ground
    writeSerial("1\n"); // Send '1' to Arduino
  } else {
    // Ensure the LED is off when the ball is not touching the ground
    writeSerial("0\n"); // Send '0' to Arduino
  }

  // Draw the ball
  ellipse(position.x, position.y, mass, mass);
}

function applyForce(force) {
  // Newton's 2nd law: F = M * A -> A = F / M
  let f = p5.Vector.div(force, mass); // Scale force by mass
  acceleration.add(f); // Add force to acceleration
}

// Reset the ball to the top of the screen when the space key is pressed
function keyPressed() {
  if (key === " ") {
    position.set(width / 2, 0); // Reset position to top center
    velocity.set(0, 0); // Reset velocity to zero
    mass = random(15, 80); // Randomize mass
    gravity.set(0, 0.5 * mass); // Adjust gravity based on new mass
  }
}

// Serial communication: Read sensor value from Arduino
function readSerial(data) {
  if (data != null) {
    let trimmedData = trim(data);
    if (trimmedData !== "") {
      windSensorValue = int(trimmedData); // Read wind sensor value
    }
  }
}

The following code was used in the Arduino IDE to bring this to life:

//gravity wind example
int ledPin = 2;     // Pin connected to the LED
int windPin = A0;   // Analog pin for the potentiometer (A0)

void setup() {
  Serial.begin(9600);        // Start serial communication
  pinMode(ledPin, OUTPUT);   // Set the LED pin as an output
  digitalWrite(ledPin, LOW); // Turn the LED off initially
}

void loop() {
  // Read the analog value from the potentiometer
  int windValue = analogRead(windPin);

  // Send the wind value to p5.js over serial
  Serial.println(windValue);

  // Check if a signal is received from p5.js for the LED
  if (Serial.available()) {
    char command = Serial.read(); // Read the signal from p5.js
    if (command == '1') {
      digitalWrite(ledPin, HIGH); // Turn on the LED when the ball touches the ground
    } else if (command == '0') {
      digitalWrite(ledPin, LOW);  // Turn off the LED
    }
  }

  delay(5); // Small delay for stability
}

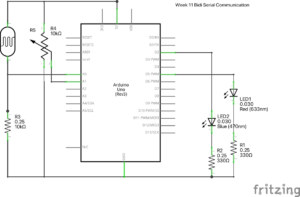
The following schematic was used for all 3 of the exercises with slight moderations, provided in class:


Week 10: The Arduino Piano (Takudzwa & Bismark)

The final product for you convenience is here: https://youtu.be/62UTvttGflo

Concept:

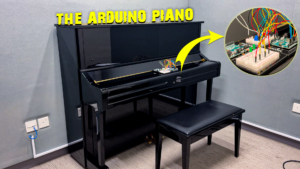
The motivation behind our project was to create a unique piano-like instrument using Arduino circuits. By utilizing two breadboards, we had a larger workspace, allowing for a more complex setup. We incorporated a potentiometer as a frequency controller—adjusting it changes the pitch of the sounds produced, making the instrument tunable. To enhance the experience, we added synchronized LED lights, creating a visual element that complements the sound. This combination of light and music adds a fun, interactive touch to the project. Here’s the project cover:

The tools used for this project were: The potentiometer, Piezo Speaker, LEDs, 10k & 330 ohm resistors, push buttons and jump wires.

Execution:

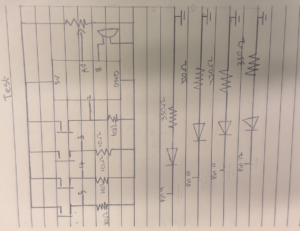
The following was the schematic for our project, which served as the foundation that allowed us to successfully execute this project:

The following Arduino code snippet brought our project to life, controlling both sound and light to create an interactive musical experience:

void setup() {
  // Set button and LED pins as inputs and outputs
  for (int i = 0; i < 4; i++) {
    pinMode(buttonPins[i], INPUT);       // Button pins as input
    pinMode(ledPins[i], OUTPUT);         // LED pins as output
  }
  pinMode(piezoPin, OUTPUT);             // Speaker pin as output
}

void loop() {
  int potValue = analogRead(potPin);                    // Read potentiometer value
  int pitchAdjust = map(potValue, 0, 1023, -100, 100);  // Map pot value to pitch adjustment range

  // Check each button for presses
  for (int i = 0; i < 4; i++) {
    if (digitalRead(buttonPins[i]) == HIGH) {         // If button is pressed
      int adjustedFreq = notes[i] + pitchAdjust;      // Adjust note frequency based on potentiometer
      tone(piezoPin, adjustedFreq);                   // Play the adjusted note
      digitalWrite(ledPins[i], HIGH);                 // Turn on the corresponding LED
      delay(200);                                     // Delay to avoid rapid flashing
      noTone(piezoPin);                               // Stop the sound
      digitalWrite(ledPins[i], LOW);                  // Turn off the LED
    }
  }
}


Finally, the final project can be found here: https://youtu.be/62UTvttGflo

Reflection:

Although our project may seem simple, we encountered several challenges during its development. Initially, we accidentally placed the digital pins incorrectly, preventing the project from functioning as expected. After hours of troubleshooting, we sought help to identify the issue. This experience turned into a valuable teamwork activity, helping us grow as students and problem-solvers. I view challenges like these as opportunities to build skills I can apply to future projects, including my final one. To enhance this project further, I would improve its visual design and sound quality to make it more appealing to a wider audience. That’s all for now!

A Brief Rant on the Future of Interaction Design

In A Brief Rant on the Future of Interaction Design, Bret Victor argues that most interaction design today isn’t meaningful enough. He believes designers focus too much on making things look nice on screens rather than creating tools that help people think or solve real problems. This stood out to me because I agree that design should do more than just look good—it should make our lives easier or allow us to do more.

As someone studying computer science and interested in interactive media, I think Victor’s ideas are important. He makes me want to focus on designing tools that actually help users accomplish things rather than just looking nice. His views remind me that good design should be about creating real benefits for people, not just entertainment or convenience.

The responses to A Brief Rant on the Future of Interaction Design show different views. Some people agree with Victor and think design should be more useful, while others say his ideas are too difficult to make real. One response I read pointed out that many companies prefer simple screen designs because they make money more easily. This made me think about the challenges of aiming high in design while facing real-life limits, like budgets or technology.

These responses remind me that good design is a balance between what’s possible and what’s ideal. While Victor’s ideas are inspiring, they also show the need for practical solutions. Moving forward, I want to think more about how to push for meaningful design within real-world limits.

Week 9

Project: Dual-Control LED System with LDR Night Light and Button-Controlled LED

 Concept

This project explores the integration of analog and digital controls using an LDR (Light Dependent Resistor) and a button to control two LEDs. The first LED functions as an automatic night light, turning on in low-light conditions as detected by the LDR. The second LED is controlled by a button, which allows the user to toggle it on and off. This setup demonstrates the use of both analog and digital inputs to create interactive light control.

Design and Execution

Components
– LDR: Senses ambient light and provides analog input for the night light.
– Button: Serves as a digital switch for the second LED.
– LED 1: Acts as a night light that responds to light levels.
– LED 2: Controlled by the button for manual on/off functionality.
– 220Ω Resistors: Limit current to protect the LEDs.

Schematic Diagram

The circuit is designed on a breadboard, with the LDR setup on one side and the button on the other. Power and ground rails connect both sides to the Arduino.

1. LDR Circuit: Creates a voltage divider with a 10kΩ resistor connected to analog pin A0.
2. Button Circuit: Connected to digital pin 7 with an internal pull-up resistor enabled in the code.
3. LEDs: LED 1 is controlled by the LDR (analog), and LED 2 by the button (digital).

Code

// Dual-Control LED System: LDR and Button

// Pin definitions
const int led1 = 8;            // LED for night light (LDR-based)
const int sensorPin = A0;      // LDR sensor pin
const int buttonPin = 7;       // Button pin for second LED control
const int led2 = 9;            // Second LED pin (button-controlled)

// Threshold for LDR to turn on the night light
const int threshold = 500;     // Adjust based on ambient light

// Variables
int sensorValue;               // LDR sensor reading
int buttonState;               // Button state

void setup() {
  pinMode(led1, OUTPUT);             // Set LED1 as output
  pinMode(buttonPin, INPUT_PULLUP);  // Set button as input with pull-up
  pinMode(led2, OUTPUT);             // Set LED2 as output
  Serial.begin(9600);                // Initialize serial communication
}

void loop() {
  // LDR-controlled LED (Night Light)
  sensorValue = analogRead(sensorPin);  // Read LDR value
  Serial.println(sensorValue);          // Print for debugging
  
  if(sensorValue < threshold) {         // If below threshold, turn on LED1
    digitalWrite(led1, HIGH);
  } else {                              // Otherwise, turn off LED1
    digitalWrite(led1, LOW);
  }

  // Button-controlled LED
  buttonState = digitalRead(buttonPin); // Read button state
  if (buttonState == LOW) {             // If button is pressed
    digitalWrite(led2, HIGH);           // Turn on LED2
  } else {
    digitalWrite(led2, LOW);            // Turn off LED2
  }
  delay(100); // Small delay for stability
}


Observations

– Night Light Sensitivity: The LDR-based LED responds to ambient light, offering a basic “automatic night light” functionality. The threshold value can be adjusted to suit different lighting conditions.
– Button Responsiveness: The button controls the second LED reliably, allowing manual toggling.

Video Demonstration

https://drive.google.com/file/d/1wugSSY6orAYq02qOQg9335lDeIQAwCms/view?usp=drive_link

Reflection and Future Improvements

This project demonstrates the integration of analog and digital inputs for LED control, offering insights into how sensors can drive interactive behavior. Future improvements could include adding adjustable sensitivity for the night light or introducing more complex patterns for the button-controlled LED.

This project enhanced my understanding of basic sensor interactions, providing a foundation for more advanced input/output controls in Arduino projects.

Week 9: Reading responses.

Reflection on “Physical Computing’s Greatest Hits and Misses”

This reading covers both the successes and failures in the field of physical computing. It shows that the best projects are designed to be simple and easy for people to use, while projects that try to be overly complex or focus too much on technology alone often fail. The reading highlights that successful projects blend new technology with a strong focus on what users actually need and find helpful. Reading this, I realized how important it is to keep users in mind when designing, focusing on how they will interact with the system rather than just on the technology itself. When I work on my own projects, this idea of user-centered design can help me make choices that make my designs feel more useful and intuitive. This reflection reminds me to aim for a balance between innovation and usability, focusing on what will make the design easy and enjoyable to use.


Reflection on “Making Interactive Art: Set the Stage, Then Shut Up and Listen”

This reading talks about how artists can create interactive art by giving the audience space to explore and interpret the work on their own. Instead of controlling every aspect of the experience, the artist should set up a framework and then let the audience interact with it however they want. This approach lets people bring their own ideas and feelings into the art, creating a more personal connection. I find this approach inspiring because it gives people the freedom to experience the art in their own way, rather than the artist guiding them to a specific idea or feeling. In my own work, I usually try to direct how users should interact, but this reading has me thinking about how allowing more freedom can create a deeper, more meaningful experience. By stepping back and letting users take control, I can create projects that are more engaging and leave room for different interpretations.

Week 8 Reading Response

Her Code Took Us to the Moon

Reading about Margaret Hamilton’s work on the Apollo mission taught me a lot about how careful and exact programming needed to be. The mission depended on software, so even a small mistake could lead to failure. This reading reminds me that when working on physical programming projects, I need to pay close attention to every detail. As we move into the hands-on part of the course, I’ll focus on testing my projects carefully, just like the Apollo team used simulations to catch problems early and make sure everything worked as it should.

Norman’s “Emotion & Design: Why Good Looks Matter”

In Norman’s reading, I found it interesting how he connects emotions and looks with how well things work. He says that when something is nice to look at, it makes people feel good, and that makes it easier to use. This idea makes me want to design things that aren’t just useful but also make people curious and excited to try them. Moving forward, I’ll try to add features that make people want to explore, while keeping things simple to use. Norman’s ideas showed me that good looks can improve the whole experience, helping people enjoy and connect with what they’re using.


Week 8 Assignment

Ultrasonic Distance-Based LED Switch

Concept: This project uses an HC-SR04 ultrasonic sensor and an Arduino to activate an LED when an object is within 10 cm. This distance-based switch can serve as a touchless light control.

Materials
– Arduino Uno
– HC-SR04 Ultrasonic Sensor
– LED
– 220Ω Resistor
– Breadboard and Jumper Wires

Process:
1. Setup: The ultrasonic sensor’s Trig and Echo pins connect to Digital Pins 12 and 13 on the Arduino, while the LED is connected to Digital Pin 2 with a resistor.
2. Code: The Arduino reads the distance from the sensor. If within 10 cm, it lights the LED; otherwise, it turns off.
3. Testing: The LED successfully turns on when an object is close, providing feedback on proximity.

CODE: 

const int echo = 13;     // Echo pin of the ultrasonic sensor
const int trig = 12;     // Trigger pin of the ultrasonic sensor
int LED = 2;             // LED pin

int duration = 0;        // Variable to store pulse duration
int distance = 0;        // Variable to store calculated distance

void setup() {
  pinMode(trig, OUTPUT);    // Set trig pin as output
  pinMode(echo, INPUT);     // Set echo pin as input
  pinMode(LED, OUTPUT);     // Set LED pin as output
  Serial.begin(9600);       // Initialize serial monitor for debugging
}

void loop() {
  // Send out a 10 microsecond pulse on the trig pin
  digitalWrite(trig, LOW);
  delayMicroseconds(2);
  digitalWrite(trig, HIGH);
  delayMicroseconds(10);
  digitalWrite(trig, LOW);

  // Read the echo pin and calculate distance
  duration = pulseIn(echo, HIGH);
  distance = (duration / 2) / 29.1;  // Convert duration to distance in cm

  // Turn on the LED if the distance is less than 10 cm
  if (distance < 10 && distance > 0) {  // Check distance within range
    digitalWrite(LED, HIGH);  // Turn on LED
  } else {
    digitalWrite(LED, LOW);   // Turn off LED
  }

  // Print distance to the serial monitor for debugging
  Serial.print("Distance: ");
  Serial.print(distance);
  Serial.println(" cm");

  delay(500);  // Delay for stability
}

VIDEO DEMONSTRATION


Reflection: This project demonstrates basic sensor integration and is adaptable for touchless applications in home automation.

MIDTERM PROJECT: SUPERMAN SAVES

INTRODUCTION

For my midterm project, I decided to build upon an earlier project concept, evolving it into a full-fledged interactive game called “Superman Saves”. This project incorporates the concepts and techniques I’ve learned in class so far.

CONCEPT

The concept of the game is simple: Superman has to rescue a person from danger by navigating obstacles such as clouds and birds. The player uses arrow keys to control Superman’s movements, helping him avoid the obstacles while trying to rescue the person in time. As the player progresses through different levels, the game increases in difficulty by speeding up the obstacles, making it more challenging to achieve the objective. 

RESOURCES

For the background image, i used DALL.E AI to generate it. I got the sounds from freesound.org

HIGHLIGHTS

One of the more challenging aspects of the project was implementing accurate collision detection between Superman and the moving obstacles (clouds and birds). The collision detection logic ensures that when Superman gets too close to an obstacle, he loses a life, and his position is reset. The difficulty lies in precisely calculating the distance between Superman and the obstacles, accounting for the different speeds and movements of the clouds and birds.

The code snippet below handles collision detection for both clouds and birds, resetting Superman’s position and decreasing his lives if a collision occurs:

function checkCollision() {
  // Check collisions with clouds
  if (dist(supermanX, supermanY, cloudX1, cloudY1) < 50 ||
      dist(supermanX, supermanY, cloudX2, cloudY2) < 50 ||
      dist(supermanX, supermanY, cloudX3, cloudY3) < 50) {
    supermanX = width / 2;
    supermanY = height - 100; // Reset Superman's position
    lives -= 1; // Lose a life
    return true;
  }

  // Check collisions with birds
  if (dist(supermanX, supermanY, birdX, birdY) < 50) {
    supermanX = width / 2;
    supermanY = height - 100; // Reset Superman's position
    lives -= 1; // Lose a life
    return true;
  }
  return false;
}


CHALLENGES AND IMPROVEMENTS

Creating the dynamic background and ensuring smooth movement was initially challenging. Managing multiple moving elements (clouds, birds, stars) required a balance between performance and visual appeal. Looking ahead, I plan to add more features such as power-ups for Superman, different types of obstacles, and possibly multiplayer options.


EMBEDDED CODE


LINK TO FULL SCREEN