Final Project Documentation

Concept

Choosing to take Intro to IM as my first coding experience was akin to taking a giant leap for me. Yet I am surprised how bit by bit this class cleared so many concepts and provided me with the hands-on experience I needed in coding platforms. For my final project, as promised and discussed in previous posts, I tried to create a painting/drawing platform by connecting P5js to Arduino. Interactive Media in itself is a form of creative expression and I wanted this project to be a platform for a digital form of artistic expression. This attempt at coding as etch-a-sketch is an ode to that childish playfulness that often gets subdued as we grow up.
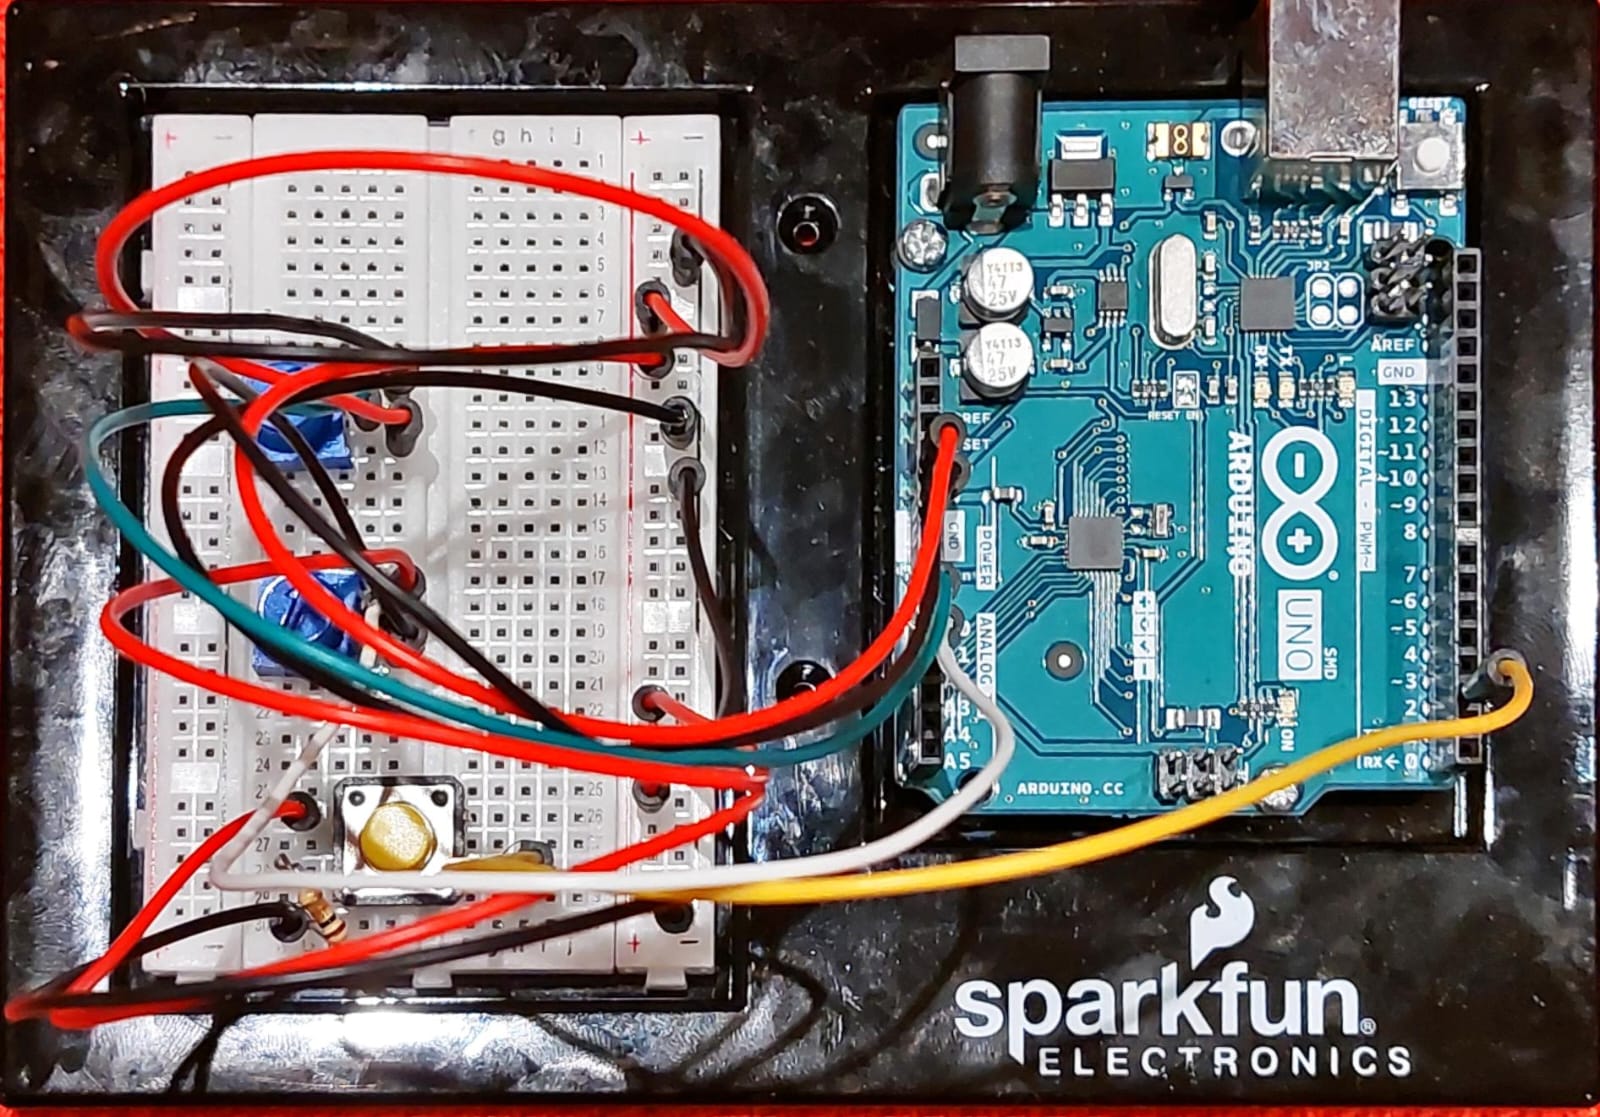
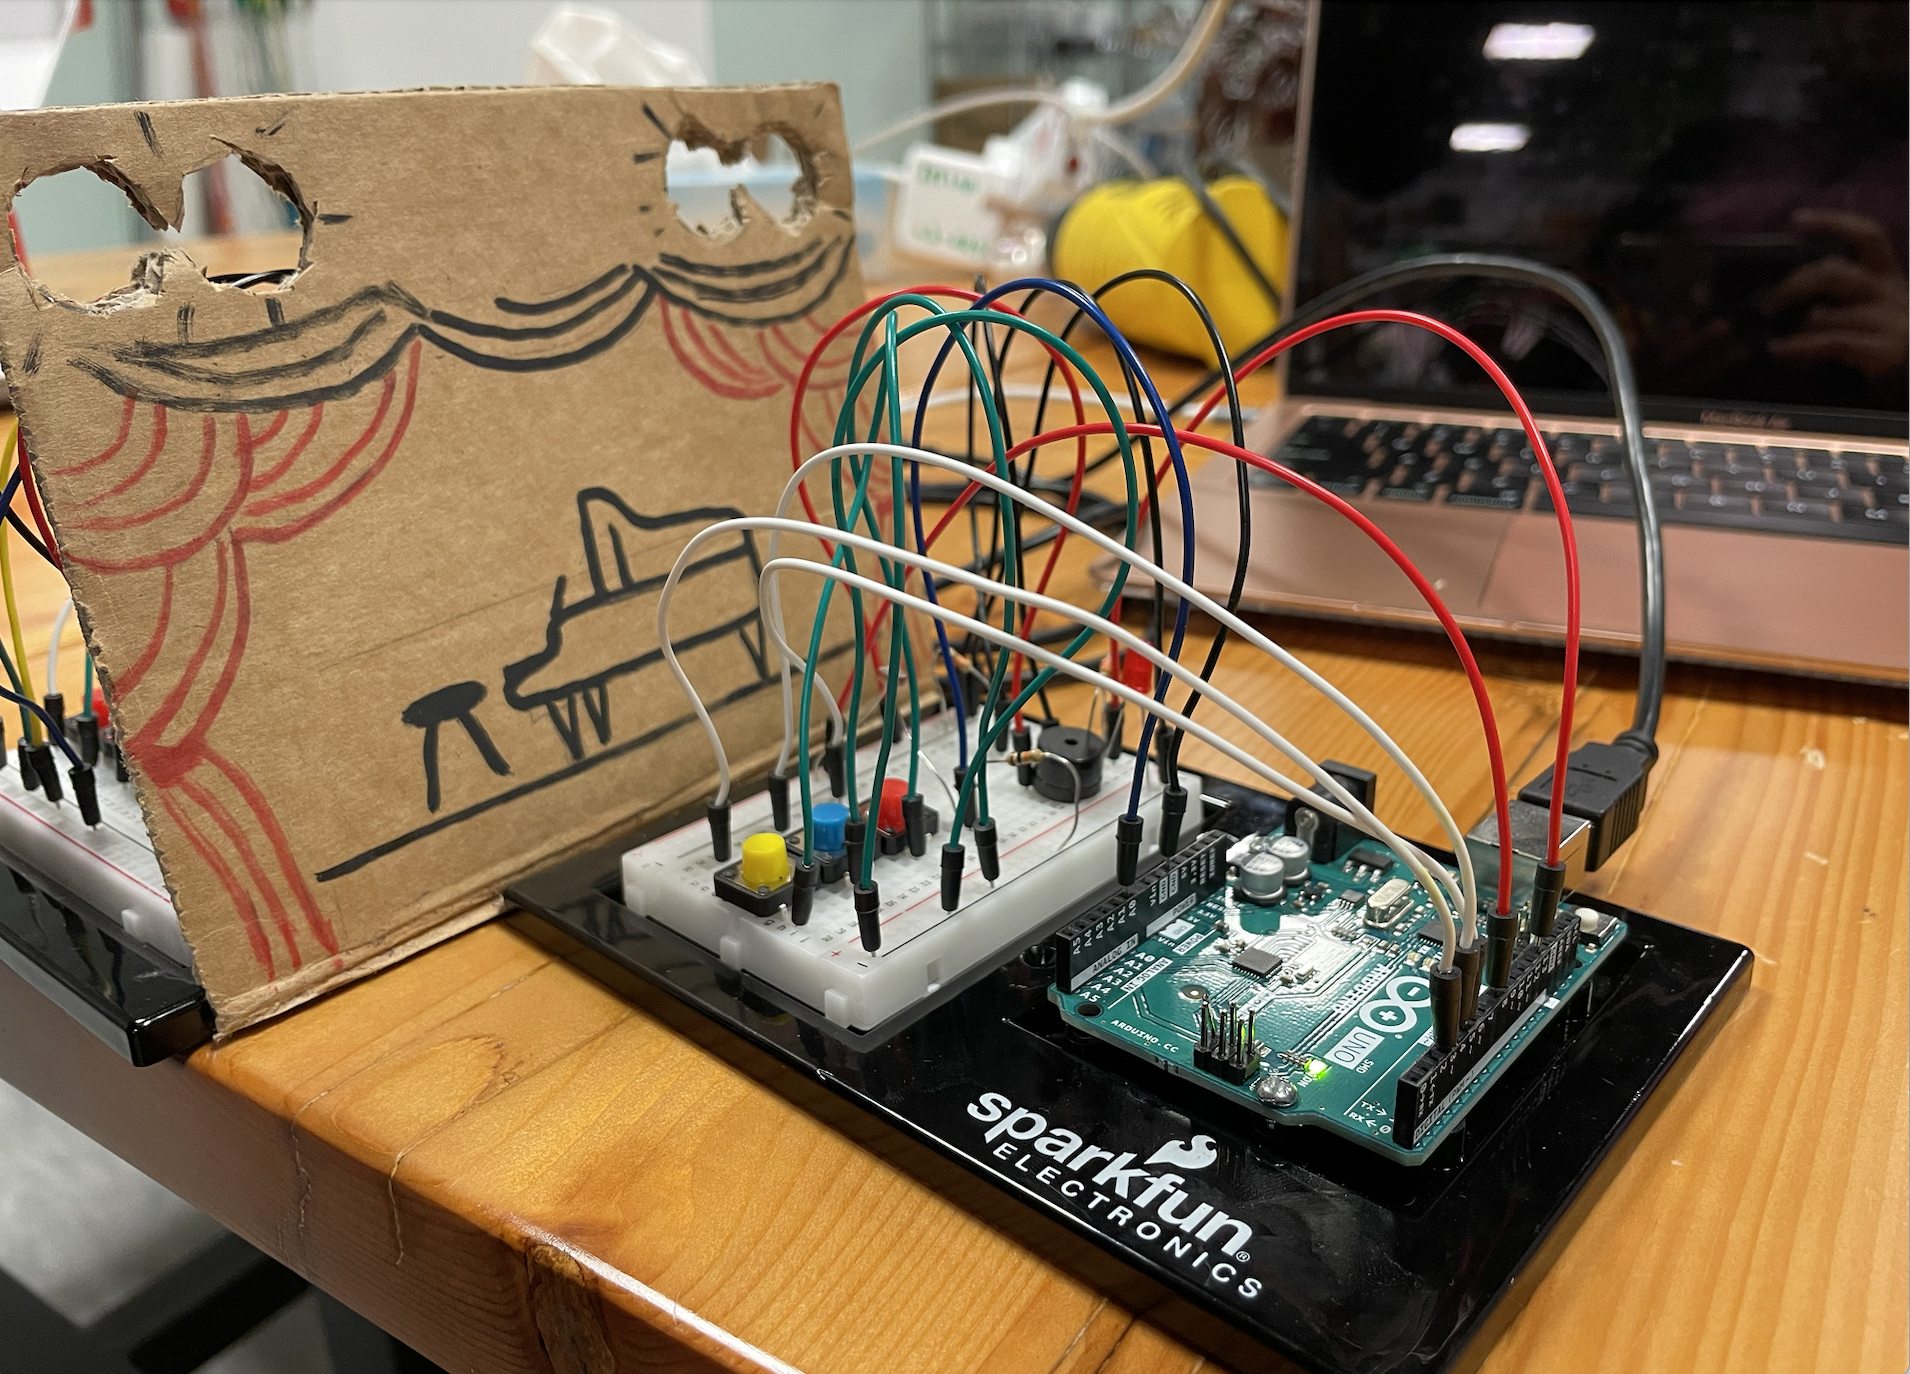
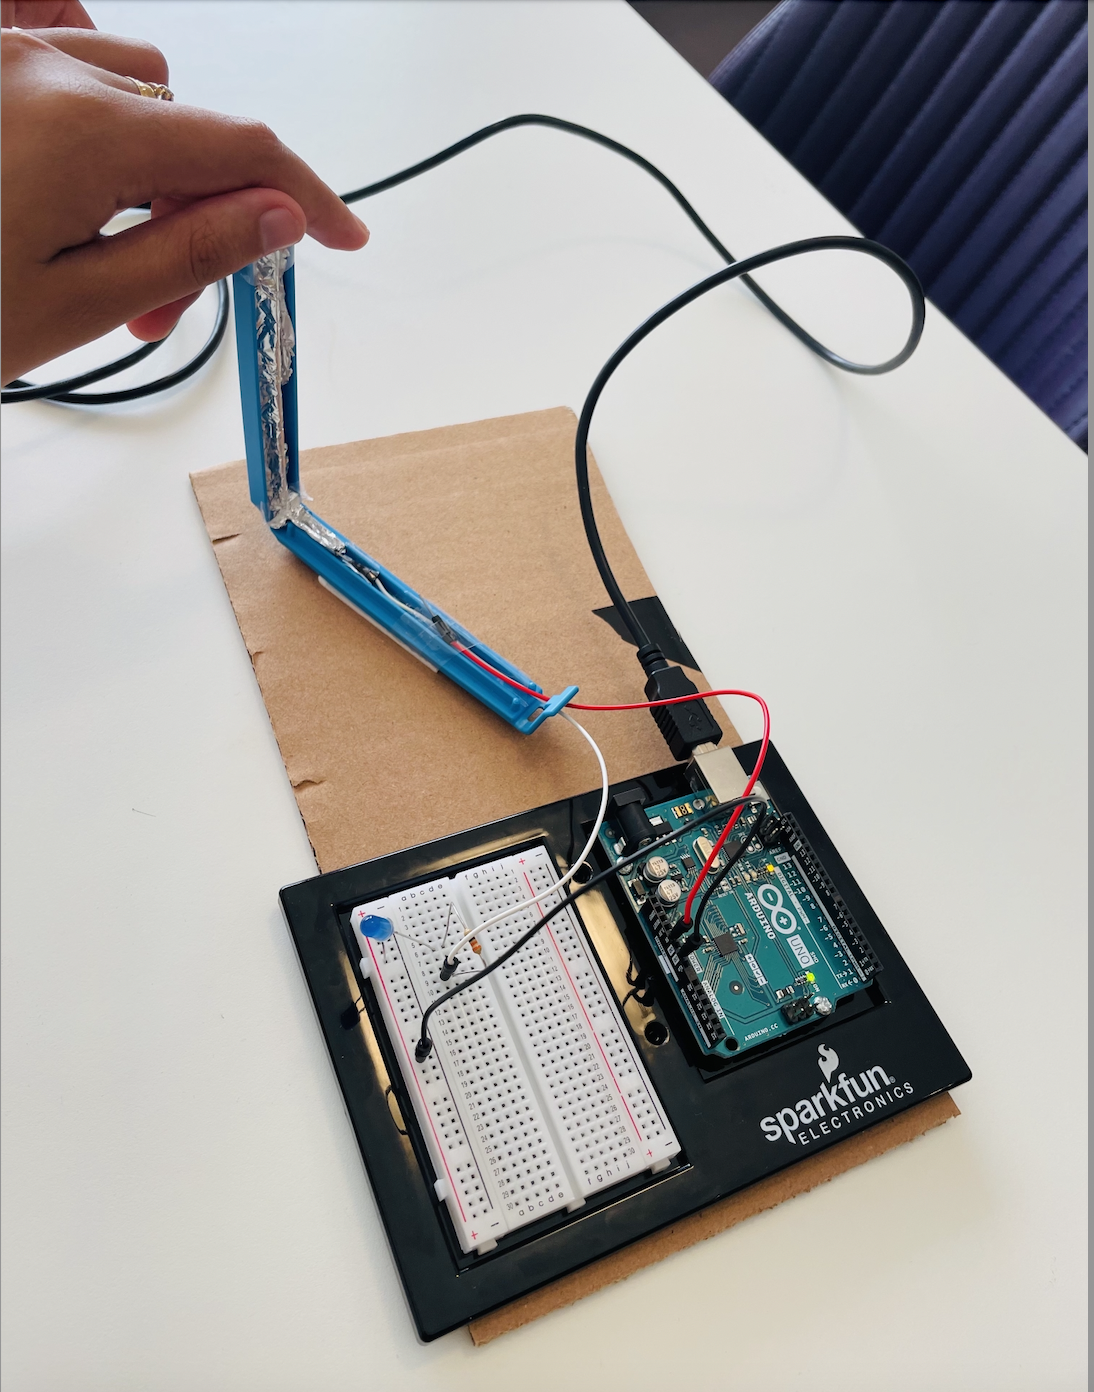
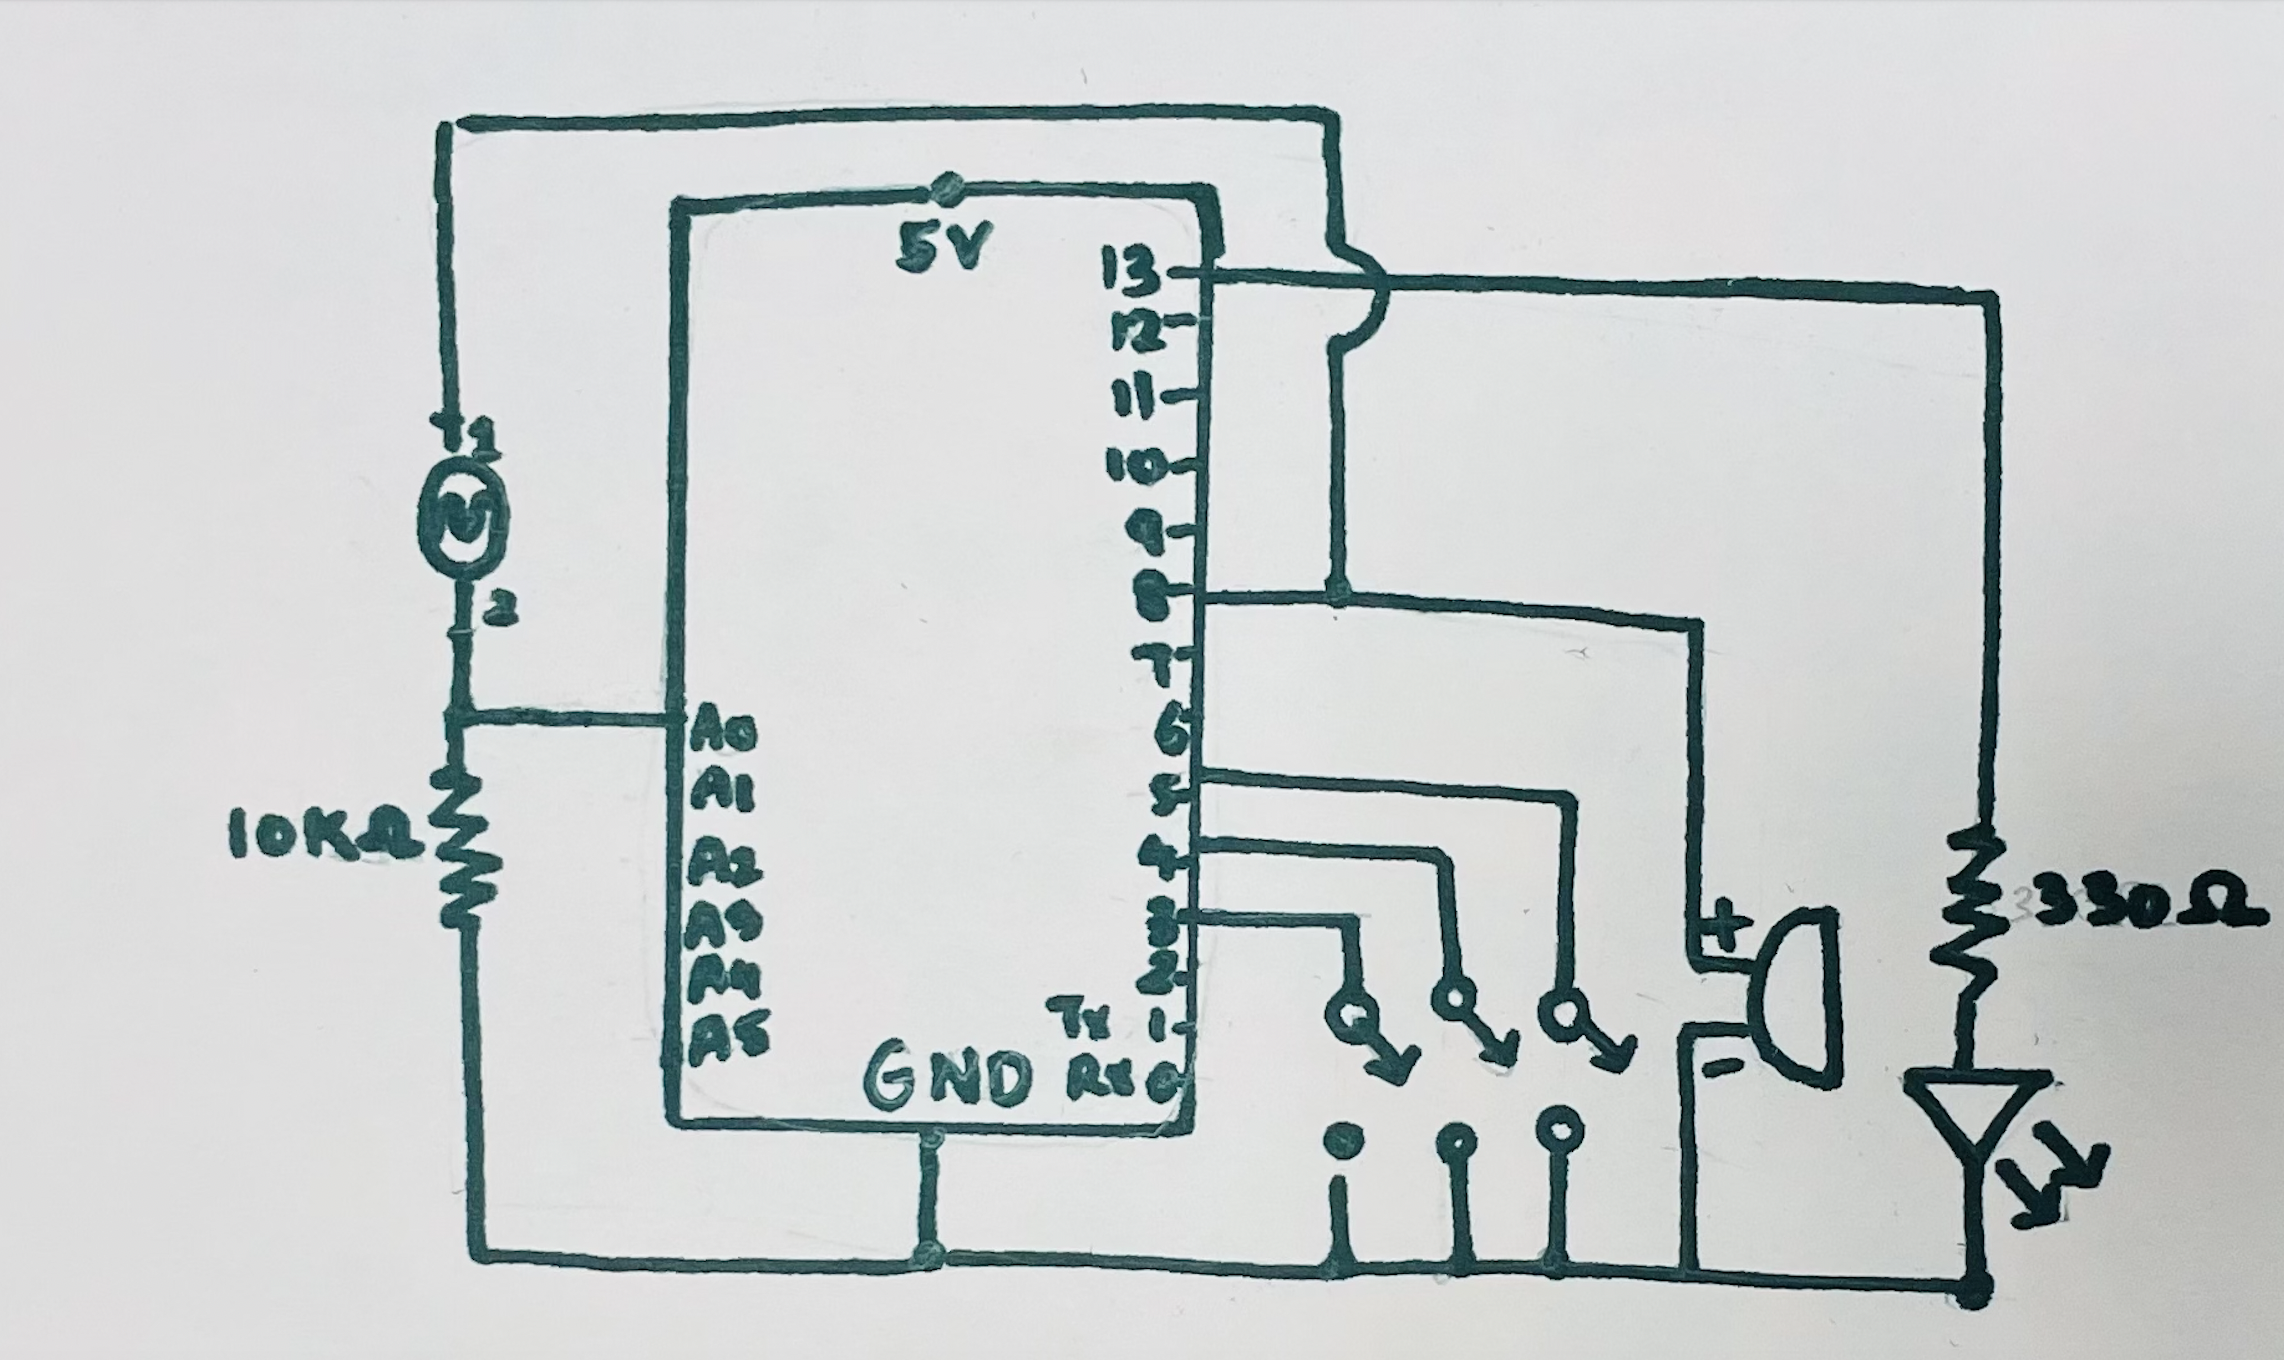
Arduino setup-

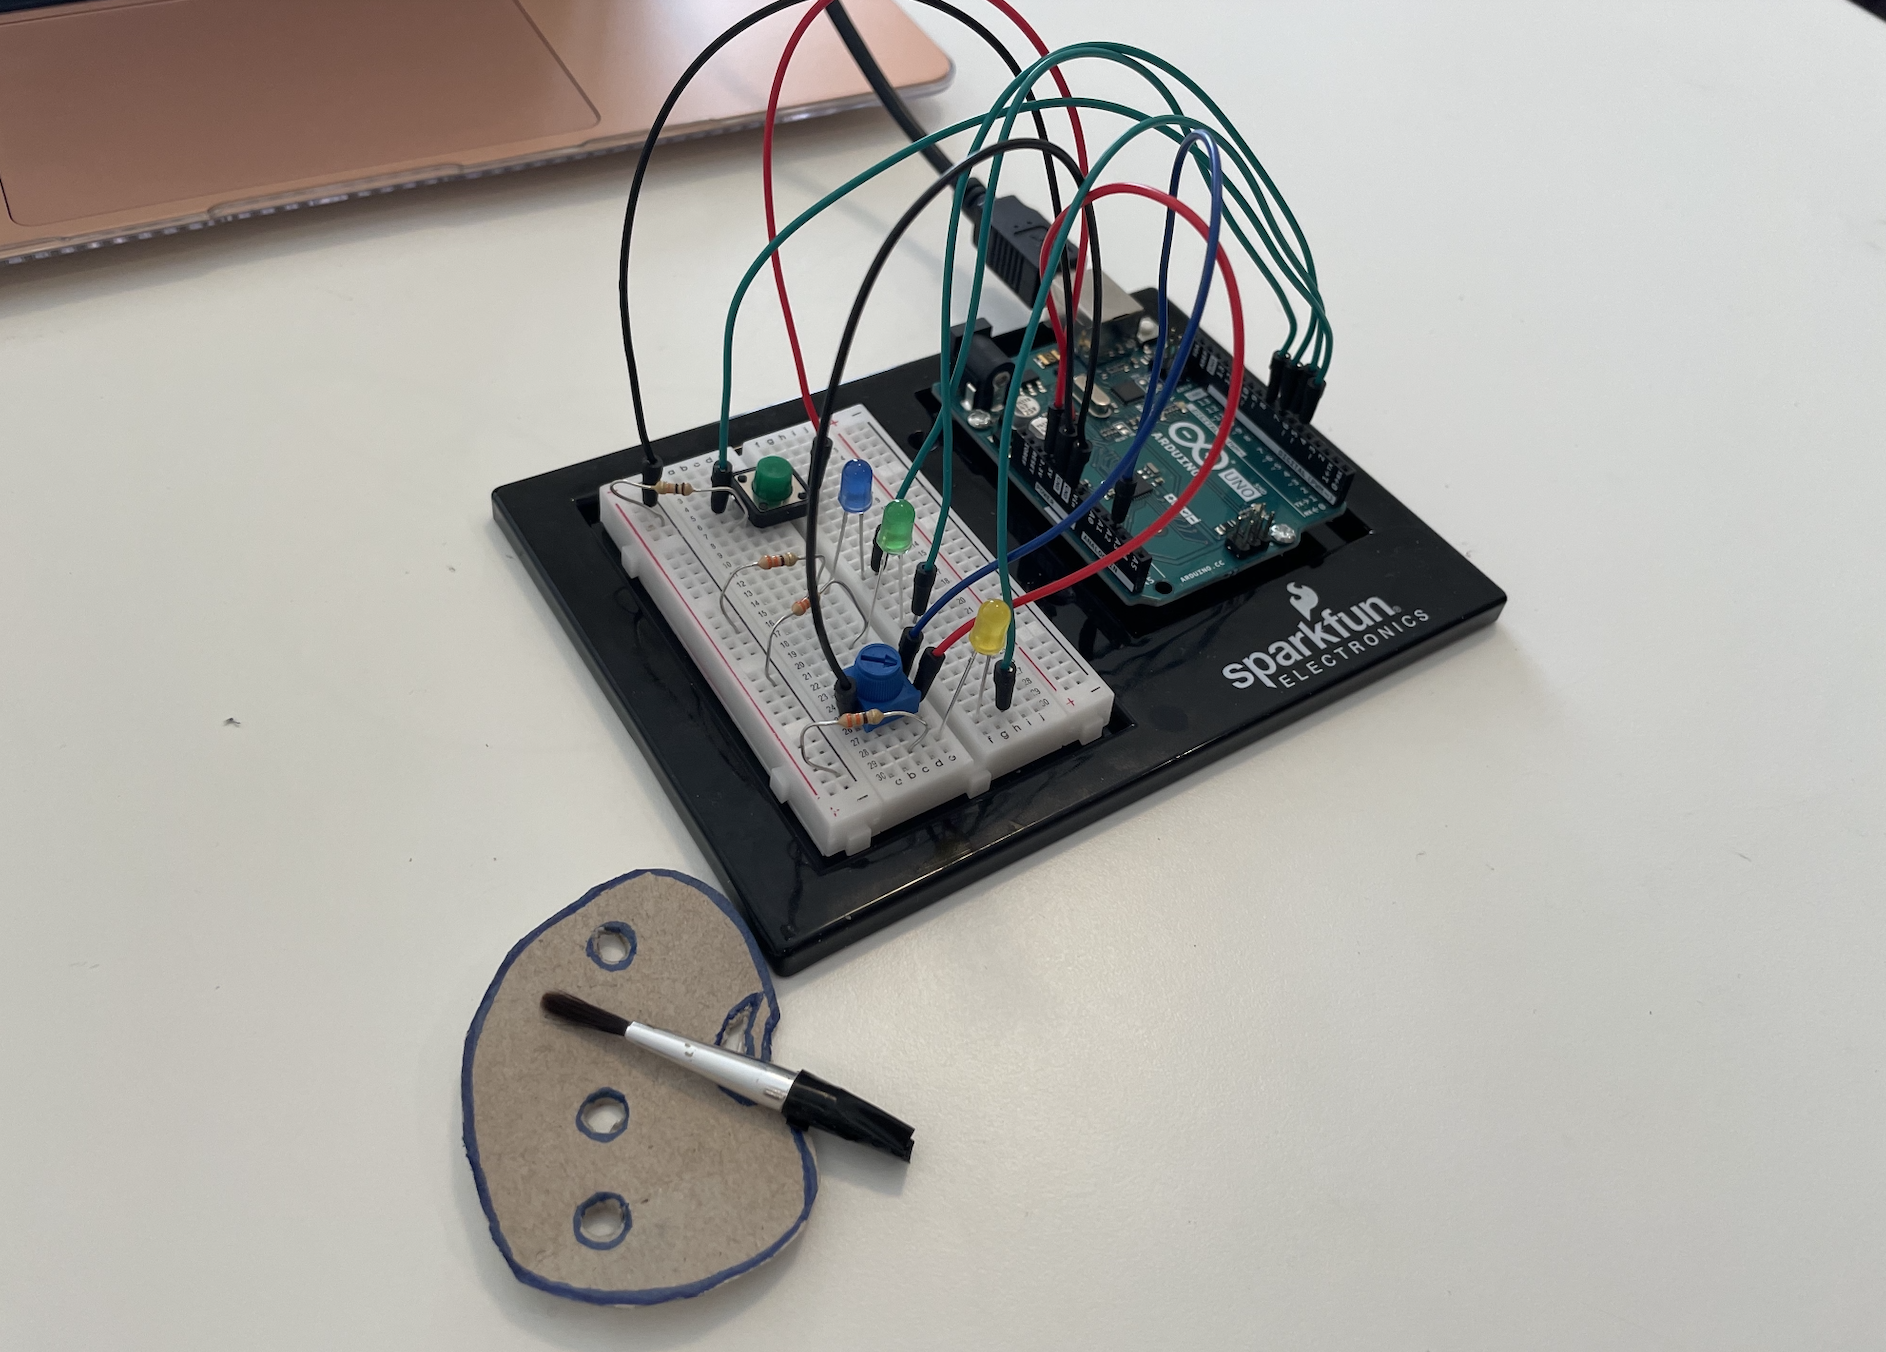
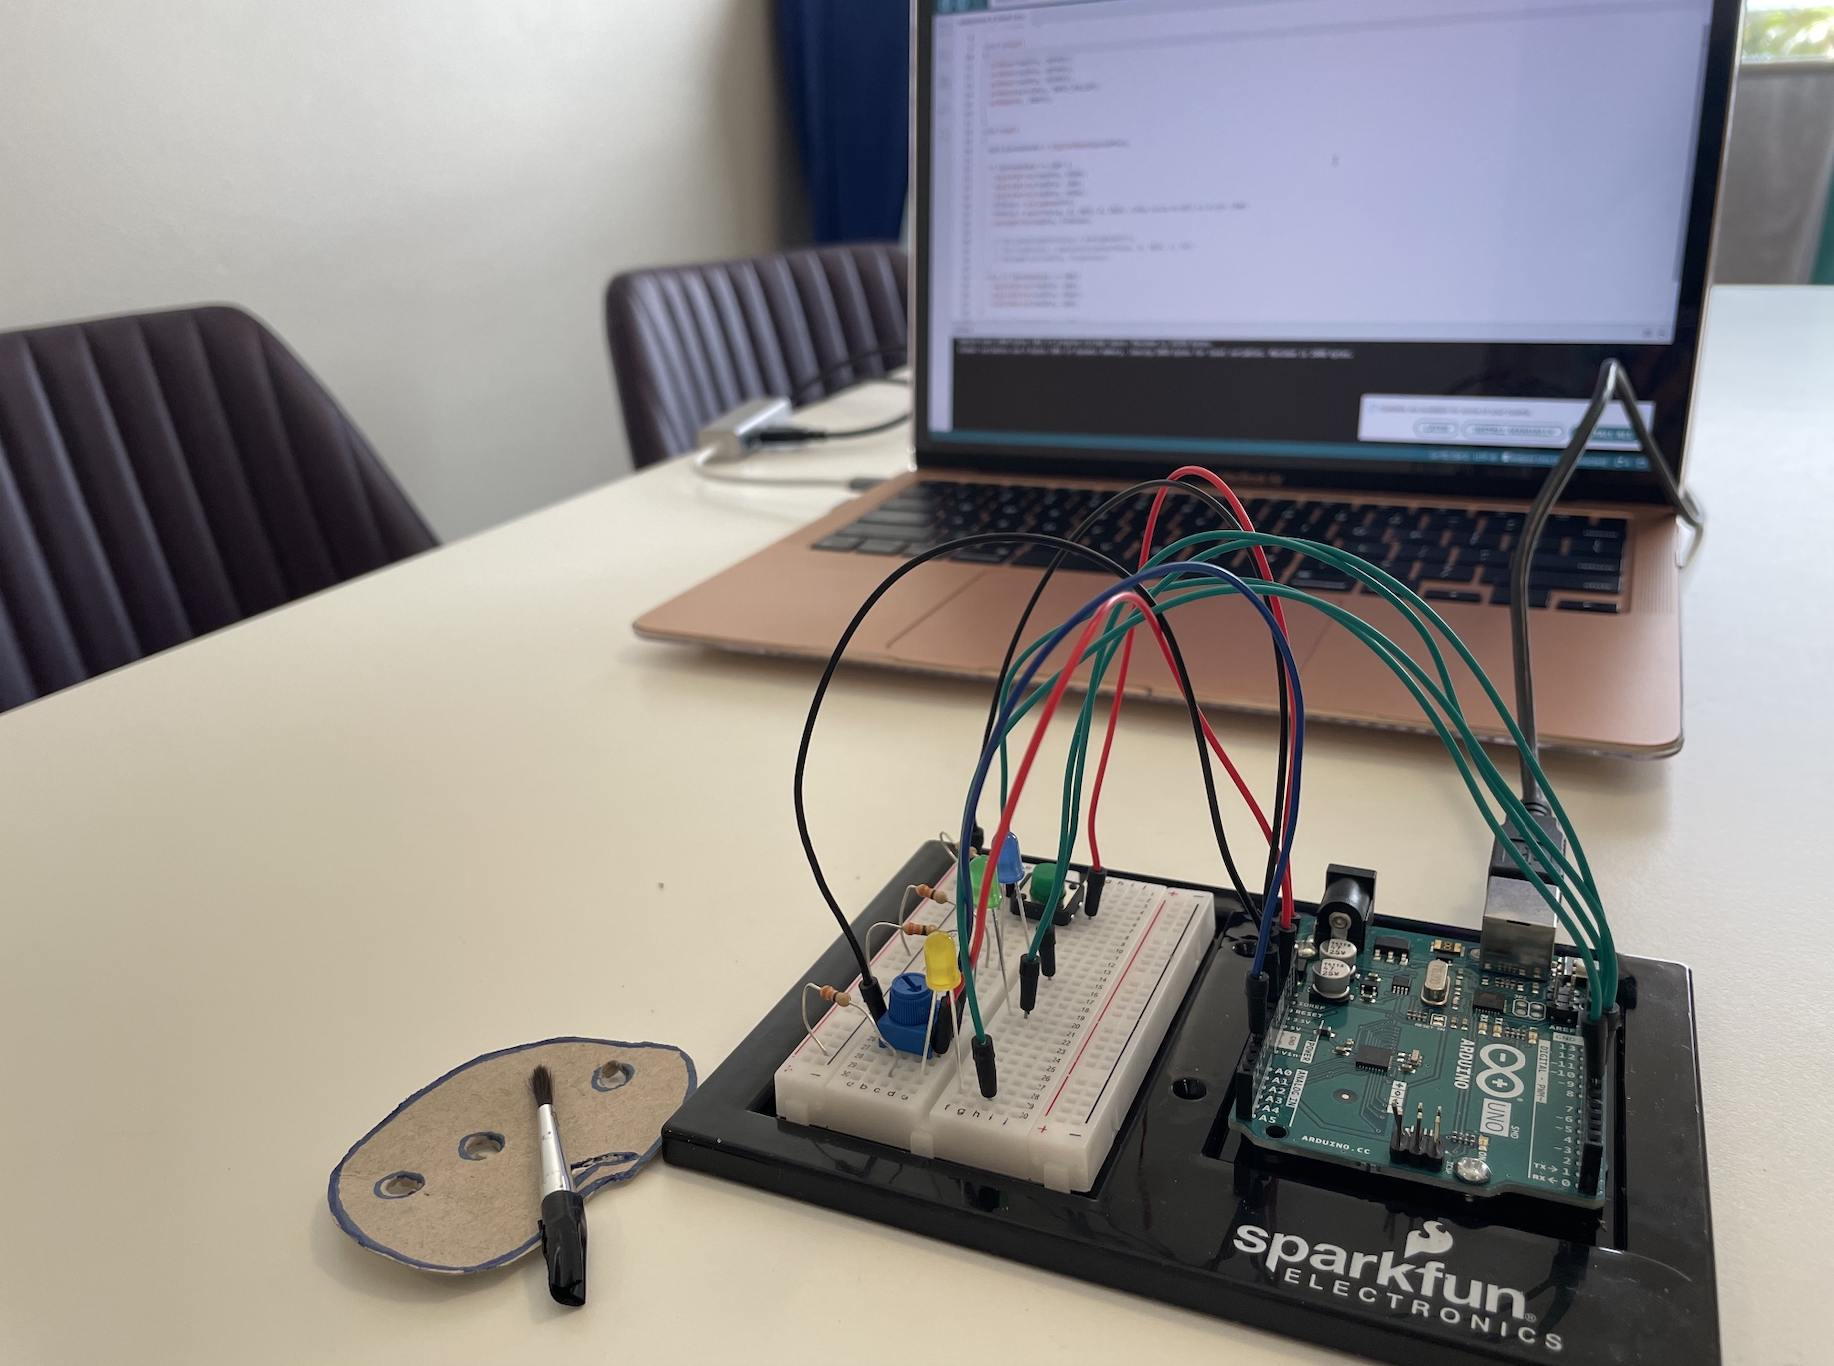
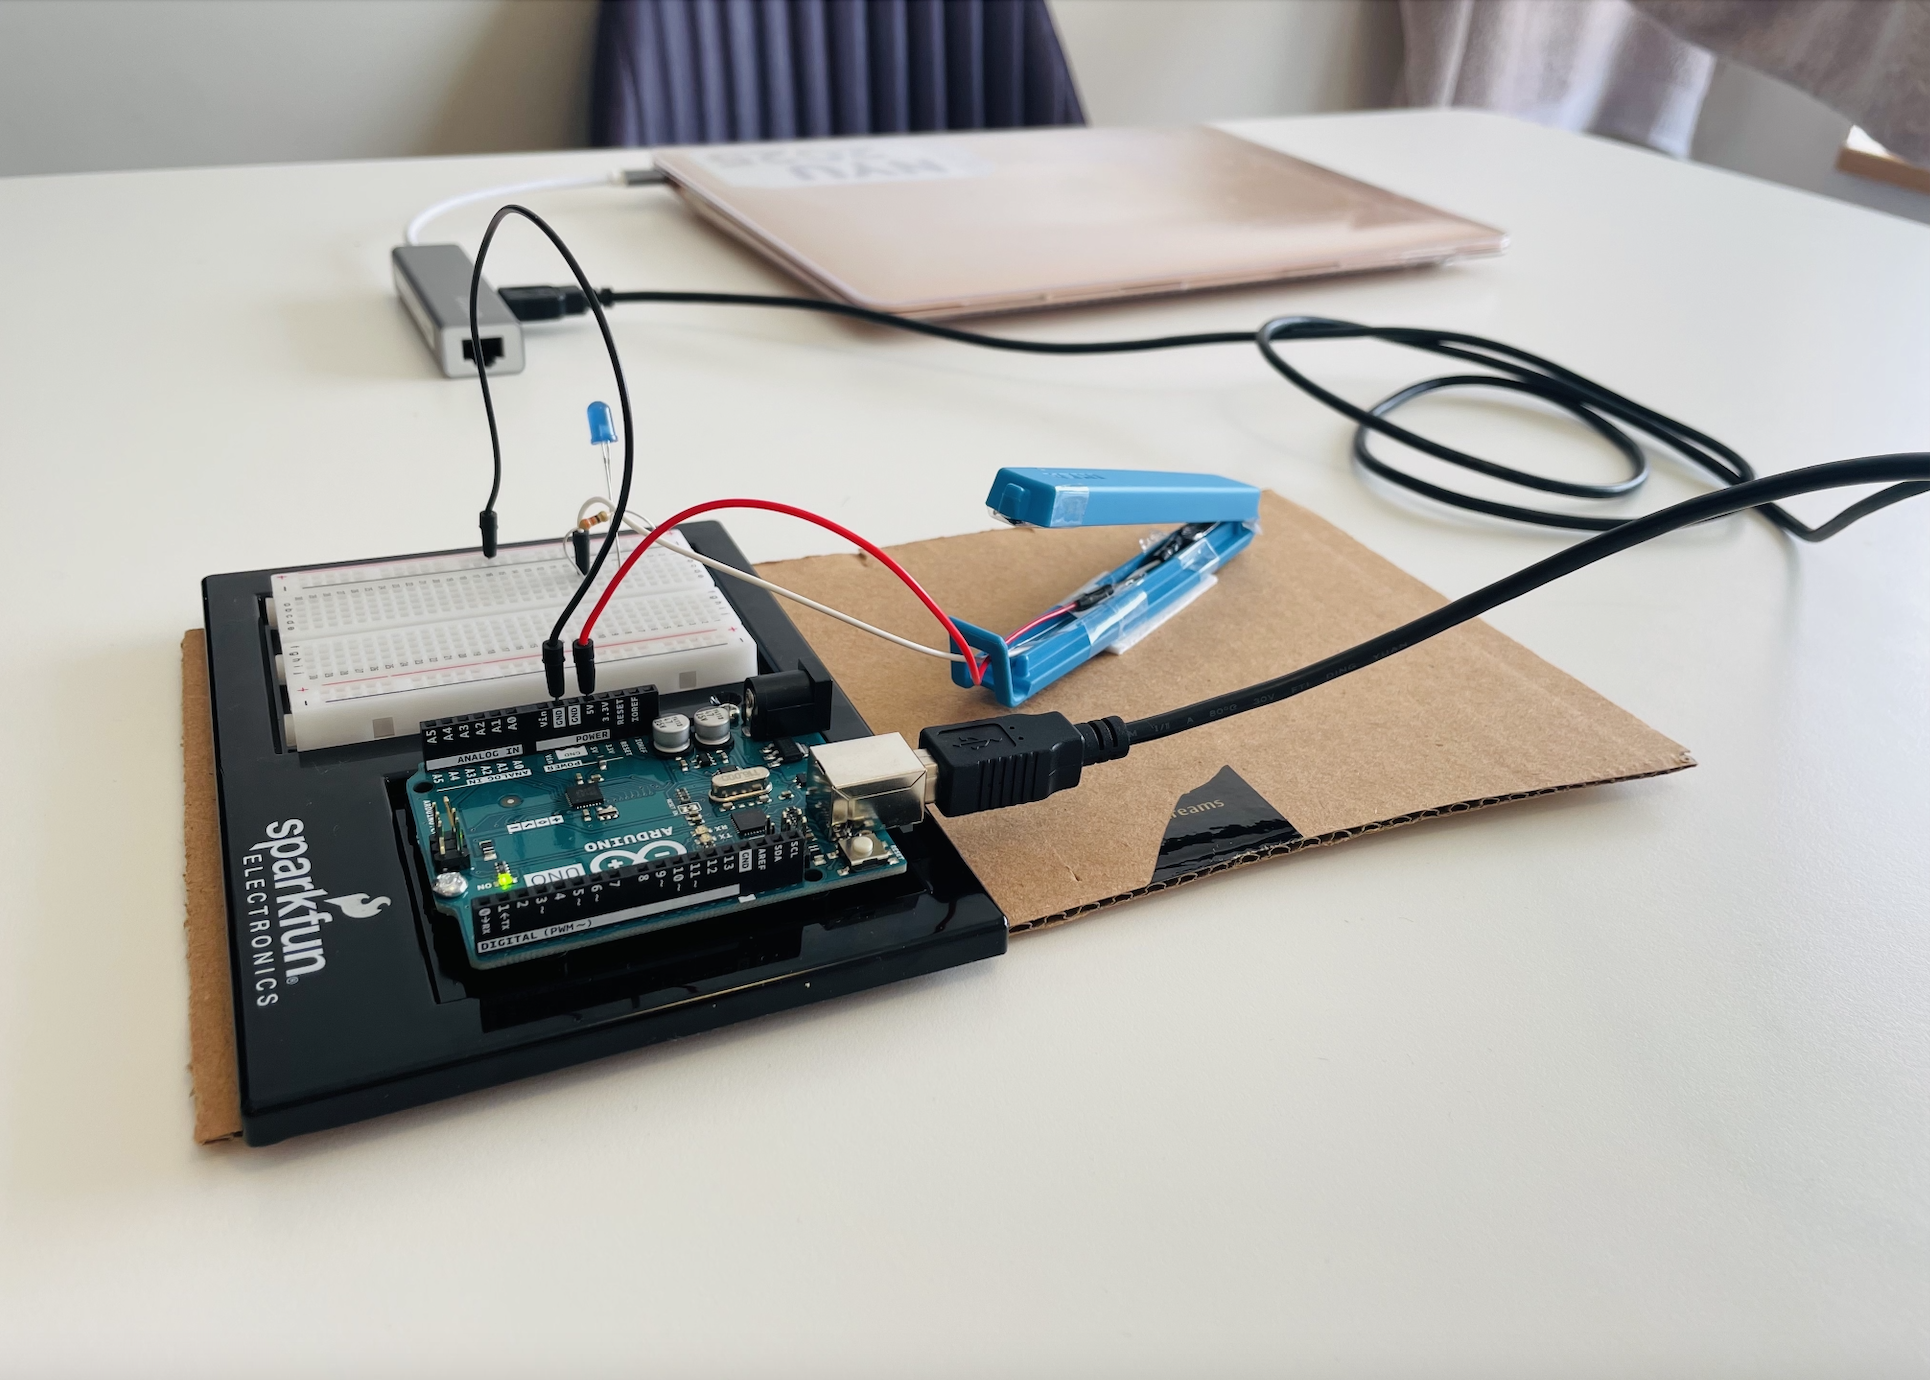
Revised console-setup-

Implementation

The project mainly includes two potentiometers and a switch. The values sent from the first potentiometer map the vertical movement of the ellipse that is drawn based on its R-value (RGB color). It moves the ellipse up and down. Similarly, the movement of the second potentiometer maps the horizontal value of the ellipse and makes it go left and right. The way in which the first potentiometer controls the r-value, the second potentiometer also adjusts the alpha value of the ellipse that is drawn. when both the potentiometers are moved together, the user is able to draw curved lines as well. The third main component is the switch which when pressed clears the canvas for a new sketch to be drawn.

The p5.js component is crucial to the functioning of the program since it handles everything from sending data to the Arduino to displaying the design that is drawn in the most effective way. Three functions are primarily added in the p5js code. They include draw, readSerial, and frame. The draw function is where the ellipse is drawn and moved along the canvas. The readSerial function establishes the serial connection between the Arduino port and the p5js sketch when the space bar is pressed by the user within the canvas based on bilateral handshaking. After pressing the space bar, the port selection dialog box pop-ups from which the suitable port is selected. A global variable called the “buttonState” is defined at the beginning of the code that clears the canvas every time the digital switch is pressed or in other words when its state changes from 0 to 1.

Finally, the frame function deals with the aesthetics of the project. It draws the authentic etch-a-sketch style background to make the screen look more inviting. I have also looped a whimsical song that plays in the background every time the serial connection is established and as long as the program is running.

The Arduino side mainly executes the commands that are sent by the p5js sketch. The analog sensors (potentiometers) are read and then their values are printed similarly through the addition of a local variable within the loop function, the digital values being sent from the switch are read. The pin mode has been added in the setup as the input. The other digital and analog values are added and read in the loop function.

Arduino Code

// Inputs:
// - A0 - first potentiomemter 
// - A1 - second potentiomemter
// - 2  - switch 


void setup() {
  // Serial communication is started to send the data
  Serial.begin(9600);

   pinMode(2, INPUT); 


  // bidirectional communication starts
  while (Serial.available() <= 0) {
    Serial.println("0,0"); // send a starting message
  }
}

void loop() {
  // waits to receive data from p5js first and then starts executing
  while (Serial.available()) {

    int left = Serial.parseInt();
    int right = Serial.parseInt();
    if (Serial.read() == '\n') {
      int sensor = analogRead(A0);
      delay(5);
      int sensor2 = analogRead(A1);
      delay(5);
      int button = digitalRead(2);
      delay (5);

      Serial.print(sensor);
      Serial.print(',');
      Serial.print(sensor2);
      Serial.print(',');
      Serial.println(button);
    }
  }
}

P5js sketch and Code

Components I am Proud of

Overall, I am quite pleased with my humble outcome as it performs its bilateral communication functions quite smoothly. I am particularly proud of how the addition of mapping the alpha values of the ellipses that are being drawn on the screen gives a special “sketchy” effect to the project. Moreover, as we toggle the speed of the potentiometers the density of the stroke changes which is quite similar to the manner in which strokes that are drawn by a sketch pen change with varying pressure.

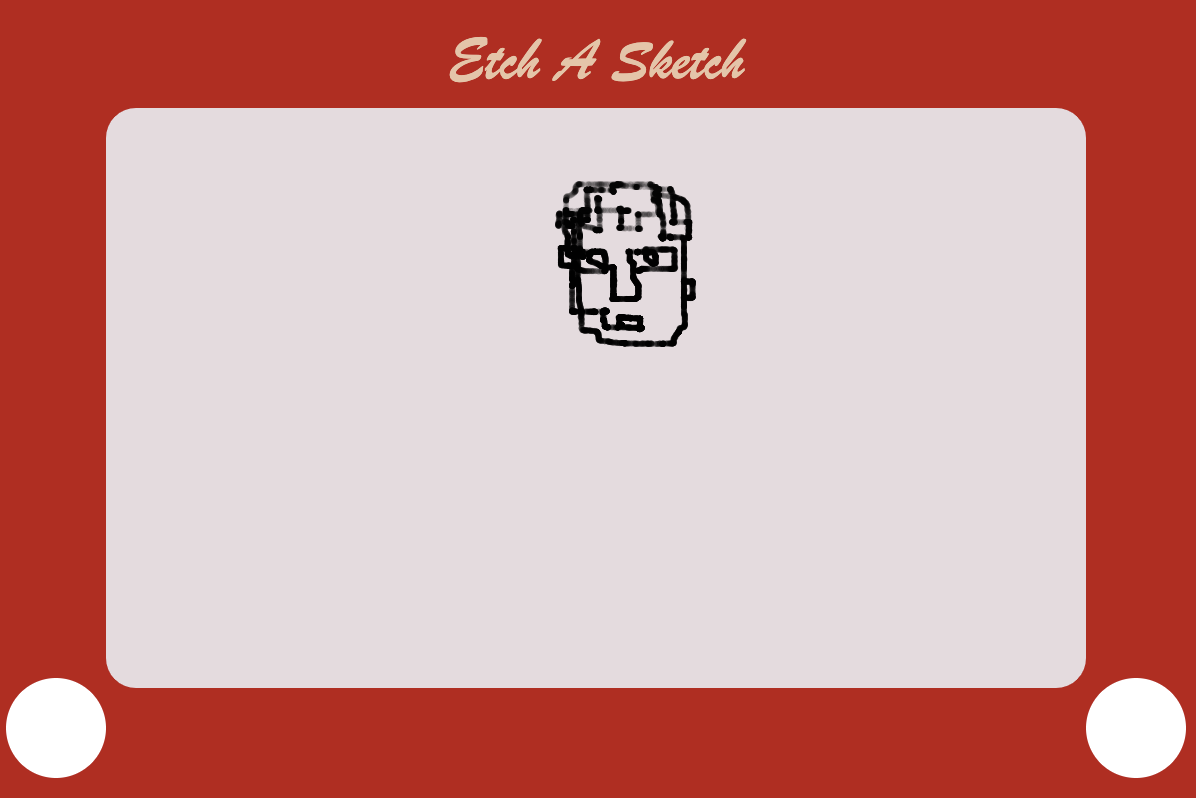
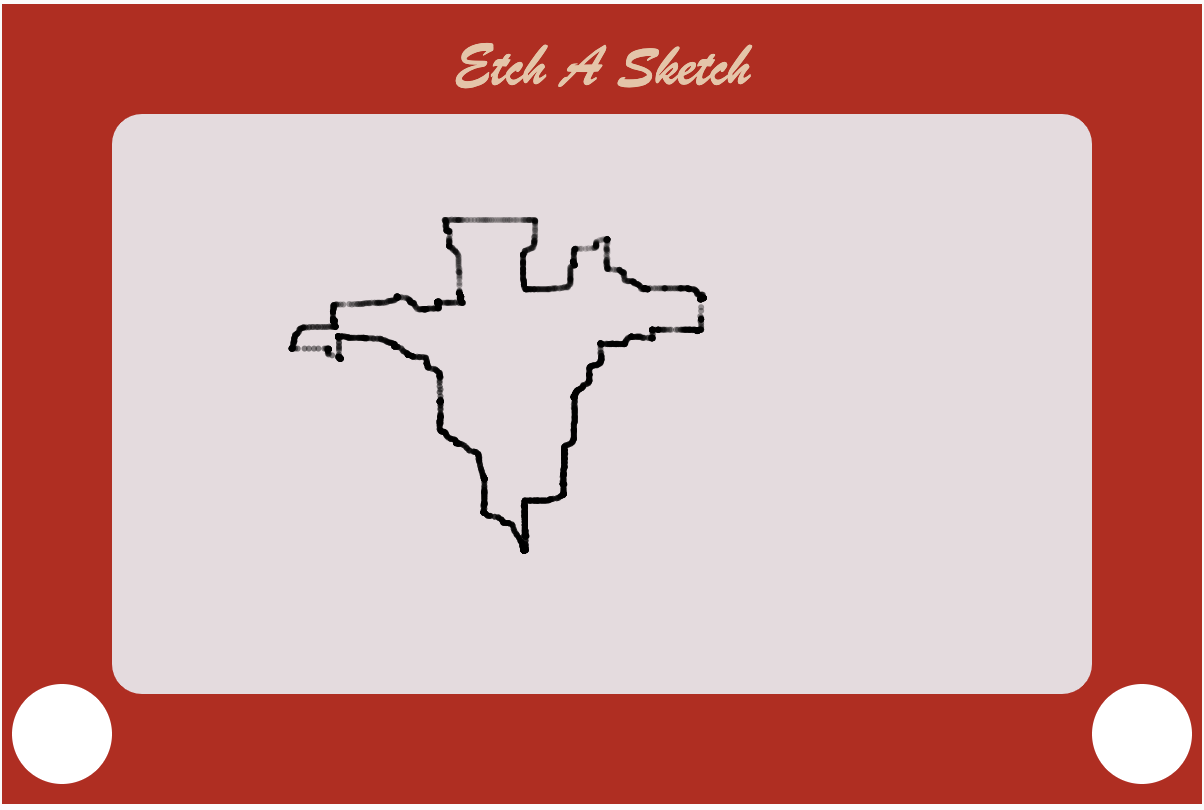
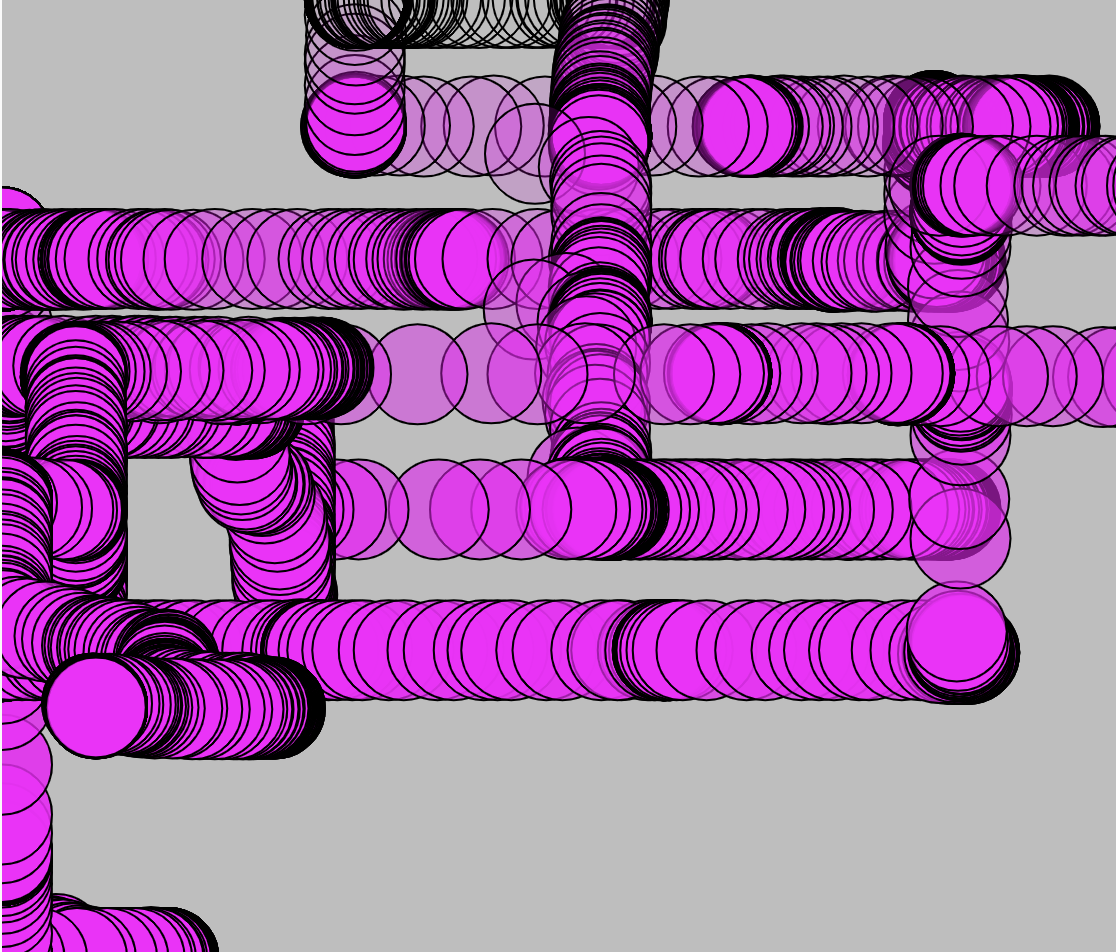
A few Sketches and user interaction-

Blind Contouring a portrait-


Plotting the map of India-

User interaction-


Future Improvements

I would have loved to add another switch in the project that allowed the user to change the color of the stroke from black to another color. But through my best possible attempts in the given time frame, I was able to add a switch that changes the color of the stroke when it is being continuously pressed. This beat its practical purpose though since the user would have to use both of his hands to toggle the potentiometers and at the same time keep pressing the switch.

Final Project- User Testing

Following my last blog post, I am nearly done with my project. As of now the setup of the Arduino consists of two potentiometers that function as the dials of my etch-a-sketch and a switch that provides a clean slate to the user once they are done and want to start over.

Screenshots of the Arduino setup-

I have also designed the interface of the p5js sketch, giving it a sense of the authentic playfulness that an etch-a-sketch symbolizes.

I have also looped in a playful audio that excites the user to stay stuck and keep working on the sketch. moreover, I am pretty happy with the way the potentiometers toggle with the alpha values of the strokes that are drawn as they lend it a sort of outlook of an actual sketch being drawn on the screen.

P5js Sketch:

User Testing

I think user testing was quite an important part of the project as it allowed me to think about improving on quite a few things to make the project even more interactive and user-friendly. First off the potentiometers are placed quite close to each other on the board which makes the movement a bit restrictive for the user. Secondly, the wiring keeps on shifting at times which makes strokes appear randomly on the board as opposed to where the user wants them to go. and lastly, the switch is in between the wires which disturbs the user when they want to clean the slate.

User Testing Video:

Improvements

I am currently working on designing a better console for the game so that the project becomes more efficient. Time permitting I shall also like to include another color component in my sketch be it in terms of another stroke of my pen or pixelating the screen before clearing it to add another animated component to the sketch.

Final Project Progress

Concept and Design

As for my final project, I have decided to work on an interactive painting program that allows its users to draw on the p5js sketch. So far the progress has been slow and steady as it is a well-known fact that any piece of art takes time, haha.

The main Arduino components I have included in my circuit are two potentiometers. When they are toggled the ellipse starts creating a generative art in whichever direction the user chooses to move the analog sensors. Since the alpha and r values of the ellipse have been mapped, every time the speed of the potentiometer changes, depending on how fast or slow it goes, the transparency and the hue change. I have also included a switch which when pressed clears the screen.

Initial advancement-

P5js Code

Draw function-

function draw() {
  
  fill(255, 0, 255, map(alpha, 0, 1023, 0, 255));
  ellipse(map(rVal, 0, 1023, 0, width), map(alpha,  0, 1023, 0, height), 50);
  
  if (buttonState == 1){
    // background(map(rVal, 0, 1023, 0, 255), 255, 255);
    background (190)
    
  }

Serial Communication-

function readSerial(data) {
  
  if (data != null) {
    // make sure there is actually a message
    // split the message
    let fromArduino = split(trim(data), ",");
    // if the right length, then proceed
    if (fromArduino.length == 3) {
      // only store values here
      // do everything with those values in the main draw loop
      rVal = fromArduino[0];
      alpha = fromArduino[1];
      buttonState = fromArduino[2];
    }
    

    //////////////////////////////////
    //SEND TO ARDUINO HERE (handshake)
    //////////////////////////////////
     let sendToArduino = left+ "," + right + "\n";
    writeSerial(sendToArduino);
  }
}

Arduino Code

void setup() {
  Serial.begin(9600);

   pinMode(2, INPUT); 

  // start the handshake
  while (Serial.available() <= 0) {
    Serial.println("0,0"); // send a starting message
    // delay(300);            // wait 1/3 second
  }
}

void loop() {
  while (Serial.available()) {

    int left = Serial.parseInt();
    int right = Serial.parseInt();
    if (Serial.read() == '\n') {
      int sensor = analogRead(A0);
      delay(5);
      int sensor2 = analogRead(A1);
      delay(5);
      int button = digitalRead(2);
      Serial.print(sensor);
      Serial.print(',');
      Serial.print(sensor2);
      Serial.print(',');
      Serial.println(button);
    }
  }
}

Improvements

I am still working on a lot of components and hope to include them.

  1. Add another switch that allows the user to shift between shapes such as from an ellipse to a square.
  2.  I want the values of the colors to change when the shape enters a certain side of the canvas while it is being controlled by the P5js.
  3.  Design a creative P5js interface than just plain background.
  4.  I am still working on designing a board wherein I could attach the switches and the potentiometers.

Final Project- Preliminary Concept

As an art and art history major, I have had the opportunity to work with multiple media and styles while completing an artwork. One of the main reasons I took the intro to IM was to get my hand dirty with a new style of creative expression. Honing that, for my final project I would like to work on a painting project that includes physical computing. So far I have been thinking about the following:

a) potentiometer that would work as the brush/pen-probably like etch-a-sketch where, as the user will interact with it the cursor would draw on the screen.

b) I would mainly like to include basic shapes such as circles or squares to allow the user to create a distinct pattern each time the program is run by overlaying the same shapes.

c) I may also add switches that may control the different values of colors when pressed. For instance, they could also change the size of the stroke as well.

d) I am a bit worried as to how the canvas would get cleaned or if the design would stop once it is complete. And I might have to assign a separate sensor with a function to do that.

Assignment 11- Serial Communication

For the first-in-class exercise, we attached a potentiometer to the breadboard and connected Arduino to the P5js sketch. As we adjusted the serial input value of the potentiometer the ellipse moved up and down. We replaced the y coordinate of the ellipse with the incoming serial value to do so.

Here is the link to the video.

Code

P5js

// variable to hold an instance of the p5.webserial library:
const serial = new p5.WebSerial();
 
// HTML button object:
let portButton;
let inData;
// for incoming serial data
let outByte = 0;              // for outgoing data
 
function setup() {
  createCanvas(400, 300);          // make the canvas
  // check to see if serial is available:
  if (!navigator.serial) {
    alert("WebSerial is not supported in this browser. Try Chrome or MS Edge.");
  }
  // if serial is available, add connect/disconnect listeners:
  navigator.serial.addEventListener("connect", portConnect);
  navigator.serial.addEventListener("disconnect", portDisconnect);
  // check for any ports that are available:
  serial.getPorts();
  // if there's no port chosen, choose one:
  serial.on("noport", makePortButton);
  // open whatever port is available:
  serial.on("portavailable", openPort);
  // handle serial errors:
  serial.on("requesterror", portError);
  // handle any incoming serial data:
  serial.on("data", serialEvent);
  serial.on("close", makePortButton);
}
 
function draw() {
  
   background(0);
   fill(255);
   text("sensor value: " + inData, 30, 50);
  ellipse (200, inData, 50, 50)
  
}
// if there's no port selected, 
// make a port select button appear:
function makePortButton() {
  // create and position a port chooser button:
  portButton = createButton("choose port");
  portButton.position(10, 10);
  // give the port button a mousepressed handler:
  portButton.mousePressed(choosePort);
}
 
// make the port selector window appear:
function choosePort() {
  if (portButton) portButton.show();
  serial.requestPort();
}
 
// open the selected port, and make the port 
// button invisible:
function openPort() {
  // wait for the serial.open promise to return,
  // then call the initiateSerial function
  serial.open().then(initiateSerial);
 
  // once the port opens, let the user know:
  function initiateSerial() {
    console.log("port open");
  }
  // hide the port button once a port is chosen:
  if (portButton) portButton.hide();
}
 
// pop up an alert if there's a port error:
function portError(err) {
  alert("Serial port error: " + err);
}
// read any incoming data as a string
// (assumes a newline at the end of it):
function serialEvent() {
  inData = Number(serial.read());
  console.log();
  
}
 
// try to connect if a new serial port 
// gets added (i.e. plugged in via USB):
function portConnect() {
  console.log("port connected");
  serial.getPorts();
}
 
// if a port is disconnected:
function portDisconnect() {
  serial.close();
  console.log("port disconnected");
}
 
function closePort() {
  serial.close();
}

Arduino Code

void setup() {
  Serial.begin(9600); // initialize serial communications
}
 
void loop() {
  // read the input pin:
  int potentiometer = analogRead(A0);            
  // remap the pot value to fit in 1 byte:
  int mappedPot = map(potentiometer, 0, 1023, 0, 255); 
  // print it out the serial port:
  Serial.write(mappedPot); 
    // slight delay to stabilize the ADC:
  delay(1);                                                          
                                      
  
  // Delay so we only send 10 times per second and don't
  // flood the serial connection
  delay(100);
}


Assignment 10- Musical Instrument

Concept 

For this assignment, we decided to remake a piano, but add some adjustments to its stage presence. We all know that there are a lot of stage lights mechanisms when a pianist performs, but what happens when there is no light or lights are directed at people? Our piano changes its tunes and how it sounds. The main technology behind this piano is the usage of the photoresistor which sends different sensor values and with the changing frequency of the sensor, the note fluctuates.

Materials used-

  • LED
  • 3 Switches (digital)
  • Photoresistor (analog)
  • Wires 
  • Resistors – 10 K ohm and 330 ohm

Here is the spotlight session in progress,


Code and Schematic

The code that we used starts off with the assignment of a variable to each component of the circuit. The piezo buzzer is connected to three switches that produce a different tone each time a different switch is pressed. After arranging the switches in a series, we added an LED that lights up every time a piano note is played. We mainly added the tone() function to generate a square wave of a certain frequency on three pins that were attached to their respective switches.  Lastly, to play with the concept of a stage spotlight, we added a photoresistor and mapped the values within it so that the frequency of the note that is playing fluctuates when a flashlight is shone or the stage is put in the dark.

int piezoPin = 8;

int LED = 13;

int button1 = 5; //Set up the input pins connected to the buttons. 
int button2 = 4; 
int button3 = 3; 

int frequency = 0; 

int sensorPin = 0;
int sensorValue = 0;

const int delayTime = 500; //Set up a constant for the variable of delay time in the tone() function.
void setup() {
pinMode(button1, INPUT_PULLUP); 
pinMode(button2, INPUT_PULLUP); 
pinMode(button3, INPUT_PULLUP); 
pinMode(LED, OUTPUT);
}
void loop() {
  sensorValue = analogRead(sensorPin);
  //Map the different values of the potentiometer to a set of frequencies for each of the three buttons. 
  if (digitalRead(button1) == LOW) {
  frequency = map(sensorValue, 0, 1023, 400, 499); 
  digitalWrite(LED,HIGH);
  }
  else if (digitalRead(button2) == LOW) {
    frequency = map(sensorValue, 0, 1023, 300, 599); 
    digitalWrite(LED,HIGH);  
  }
  else if (digitalRead(button3) == LOW) {
    frequency = map(sensorValue, 0, 1023, 500, 599); 
    digitalWrite(LED,HIGH);  
  }
  else {
    frequency = 0; 
    digitalWrite(LED,LOW);
  }
  tone(piezoPin, frequency, delayTime); //Set up the tone() functions with variables. 
}

Reflections and Future Improvements

Overall, we are happy with the playfulness of the output but would like to experiment with other notes. We had some difficulties with creating more audible differences when the light settings changed. Perhaps, it was due to the little difference photoresistor could detect, or we could play around changing the value, but it didn’t really work out as it was making the noise bad as the mapped values were being changed. Moreover, the LED just switches on and off when the switch is pressed perhaps its brightness could also be changed when a new note is played.


Assignment 9- The Color Palette

For this assignment, I started off by placing an LED and playing with the switch to control its blinking parameter. Gradually, I added two more LEDs to the circuit. And controlled them alternatively when the switch was switched on and off. After playing with it for a while, I decided to give it a whimsy twist to highlight the process of how we make secondary colors on the color palette when two primary colors get mixed. Hence, when a blue “colored” LED is mixed with a yellow “colored” LED, we get the green “color” or in other words, the switch controls the primary colors (blue and yellow) and the potentiometer creates the secondary color (green).

CODE AND CHALLENGES

It took me quite some time to figure out how three LEDs had to be controlled using a single switch in the code and then to alternate their blinking movements too. Initially, the three LEDs in the series were not switching on and off so I had to change the input value to INPUT_PULLUP.

int switchPin = 5;
 int led1Pin = 6;
 int led2Pin = 7;
 int led3Pin = 8;
 

void setup()
{
  pinMode(led1Pin, OUTPUT);
  pinMode(led2Pin, OUTPUT);
  pinMode(led3Pin, OUTPUT);
  pinMode(switchPin, INPUT_PULLUP);
  
}
void loop()
{
  byte buttonState = digitalRead(switchPin);
  
  if (buttonState == LOW) {
    digitalWrite(led1Pin, HIGH);
    digitalWrite(led2Pin, LOW);
    digitalWrite(led3Pin, HIGH);
  }
  else if (buttonState != LOW){
    digitalWrite(led1Pin, LOW);
    digitalWrite(led2Pin, HIGH);
    digitalWrite(led3Pin, LOW);
}
}

Secondly, connecting the potentiometer to control the green LED’s brightness through an analog input was a task too. It was either the switch or the potentiometer that was controlling the LEDs, I had to code them in the same button state if-else conditional to get them to work together.

else if (buttonState == LOW) {
//     int prValue = analogRead(Pr);
//     int brightness = map(prValue, 0, 1023, 0, 255);
//     analogWrite(led3Pin, brightness);    
//   }

Here is the artist session!

REFLECTIONS

Since I coded in C++ for the first time, I had to go through multiple tutorials to finalize my code. I am happy with the final outcome but would also like to further experiment with analog and sensor switches separately before putting them together. The animation is still very simple, but I would also like to work a bit more on them for example make the first LED blink once, the second LED twice, and so on. I did try to incorporate these cases in my project through delay() but was not able to do so while connecting both sensory and analog switches.

Assignment 8

I played with a few different, everyday materials and mechanisms to create a switch for this assignment. And finally settled on the conventional sealing clips, attached with pieces of conductive aluminum foil. When both of the claws of the sealing clip meet the LED bulb gets illuminated in a similar manner to a door closing or something being sealed.

The plastic outer body acts as the insulating material and has pieces of the aluminum inside it. When pushed together the conductive materials get connected with the wires and act as a whimsy switch that you can tinker with to turn the light on and off.

Here is the video,

Mid term project- Aayat Azim

Concept

What happens when you are swamped with work and all you can think about is the upcoming deadlines? You code your way out of it of course! For this assignment, I was fueled by the fascination I have always had with shooting games. And the enforced time during my injury allowed me to subtly “elevate” my game. I played with the underlying phenomenon of something that we go through on a daily basis and that is getting work done, be it creative or otherwise. And even though the task came with its fair share of challenges, the end result was a sweet surprise.

Here it is,

Workings of the Game

The game primarily consists of three main characters-the player (worker), the bullets (finished work), and the enemies (deadlines). These at first glance seemed like bland soup (even to me), but they got polished as I played around with my concept and the game progressed.  I started off simply by placing basic shapes on the screen and tweaking their movements. The player was initially an ellipse tracing the cursor and was changed into a loaded gif. Similarly, images were loaded and adjusted in the place of bullets and enemies that were circles and rectangles respectively.

Picking up from there, for each character, I initially coded functions. like this bullet and its draw function.

let bullets = [];

function setup() {
  createCanvas(400, 400);
}

function draw() {
  noCursor();
  background(220);
  rectMode(CENTER);
  let xc = constrain(mouseX, 15, 385);

  //   player position
  let player = { x: constrain(mouseX, 15, 385), y: height - 50 };
  circle(player.x, player.y, 25);

  drawBullet();
}

// function to draw bullets
function drawBullet() {
  for (let bullet of bullets) {
    bullet.y -= 10; // bullet moves up
    circle(bullet.x, bullet.y, 10);
  }
}

function mousePressed() {
  let bullet = {
    x: constrain(mouseX, 15, 385),
    y: 350,
  };
  bullets.push(bullet);
}

But later on, it seemed like a better choice to transform the program into an OOP as it allowed me to have a fixed set of operations on things, and as the code evolved I could add new things and attributes. I also went through a couple of resources to get a gist of how shooting games work wherein Dan Shiffman’s coding challenge on space invaders provided me with a broad idea about the concept that was being implemented in my code. The idea of loading various classes as separate p5js files in the main sketch was something remarkable that I picked up from this video that helped me to efficiently visualize and tidy my code.

Challenges

One of the portions of the code that took me some time to figure out was how to prevent the objects from trailing off of the screen. Finally, I added the constrain function as shown in the code below to fix the movement of my player as well as the bullets.

class Bullet {
  constructor() {
    let xc = constrain(mouseX, 45, 335)
    this.x = xc
    this.y = 350;
  }
class Player {
  constructor () {
    this.x = width/2;
    this.y = height - 50;
  } 
  
  display() {
     imageMode(CENTER);
    image(gif_player, this.x, this.y, 170, 170);
}
 move (){
   let xc = constrain(mouseX, 45, 335)
   this.x = xc
   this.x = xc + 5;
}

}

Secondly, creating a single object within OOP was relatively easy but I had to go back and forth while figuring out how to place an array of objects within OOP. The basic reference list on the main p5js website helped me in implementing it.

Moreover, this bit was among the bigger challenges that I encountered. After I had added the collision between my bullet and the enemy through splice to remove the abovementioned objects from their arrays, the enemies just stopped appearing on the screen. A setInterval function for spawning new enemies had to be added to fix this.

function setup() {
  createCanvas(400, 400);

  //   loop for player
  myPlayer = new Player();

  //  spawning new enemies
  setInterval(() => {
    enemies.push(new Enemy());
  }, random(500, 1000));
} // end of setup function

Lastly, it took me a while to place my entire game within game states. I initially began by assigning the game state as a variable and then added different values so that every time the game is played the game state functions get smoothly called. In a way, the entire game became a combination of functions and OOP wherein different object classes interacted with the game states within the code. And the entire draw function was just primarily coded to call the game states. But as the game ended, the start screen was not becoming visible without refreshing the page. By referring to the p5js code samples provided in the lecture notes I realized that I had to add a separate restart function to make it work.

function restartGame() {
  // Reset character position, lives, etc
  gameState = 0;
  enemies = [];
  bullets = [];
  score = 0;
}

function draw() {
  background(210);

  // game gtates and their functions defined and called
  if (gameState == 0) {
    startGame();
  } else if (gameState == 1) {
    playGame();
  } else if (gameState == 2) {
    finishGame();
  }
} // end of draw function
Reflections

In the future, I would also like to work with sound and loading different backgrounds for each screen. I am also a bit worried that after a certain point the generation of new enemies that are being pushed may become uncontrollable, especially when the program keeps running on the page, and for that, I would have to further think and code in functions such as framerate and millis. Nonetheless, this assignment genuinely gave me a chance to tap into the academic as well as the creative side of interactive media. It feels like a win-win.

Assignment 3- OOP-Weaves

The object-oriented programming assignment was one of the toughest “cookie cutters” I had to ever deal with while preparing some cookies, both in the literal and metaphorical sense, as a novice coder. The inspiration for this piece came from the bracelet weaving and “cookie making” (haha) night that I enjoyed with my friends. Every time the program is run, a new woven pattern emerges, just like each person’s different bracelet.

I followed the step-by-step guide offered here to prepare the primary constructor of my design. The biggest takeaway from following and then initializing it, for me was that in coding I have to start with the simplest string of code possible and then keep on adding and adjusting its parameters to put together a unified piece.

After the first stage of coding the formation of the objects, I studied Dan Shiffman’s video to add movement and color to my object. One of the most challenging aspects of the code was to keep shifting the placement of the variables and constants. For example, when I put the “color palette” array from within the setup, the program continuously did not show any objects on the screen. The scope had to be shifted to a global variable. The final coded placement of the revised scopes of variables looked like this,

// Guiding tutorials-
//https://happycoding.io/tutorials/p5js/creating-classes
// https://www.youtube.com/watch?v=DEHsr4XicN8


// revised scopes, arrays are always global
const NR_CIRCLES = 5;
let circles = [];
let index = 0;
let cpallete = ['#fe4365', '#fc9d9a', " #f9cdad" , "#c8c8a9" , " #83af9b"];

To give the object a trail-like feature, I added an alpha value along with a value of black in the parameters of the background. Surprisingly, in the end, it added a stark change to the program.

From this…

…to this


Here is the final arrangement,


Reflections/Future improvements-

As I was coding OOPs for the first time, it took me a lot of time and multiple attempts to finalize my core constructor. I would want to practice more with multiple constructors placed on the canvas as a balanced design. I would also want to include mouse interactivity in my future pieces as I believe that is one of the key things missing from the design. Particularly, the inclusion of object communication whenever the mouse is placed or pressed within the canvas. Transformations, such as “translate, and its inclusion in the code still confuse me, and It would take me a bit more time and practice to utilize them creatively in my design.