Ellipse in p5 move on the horizontal axis, in the middle of the screen, and nothing on Arduino is controlled by p5
let rVal = 0;
let alpha = 255;
let left = 0; // True (1) if mouse is being clicked on left side of screen
let right = 0; // True (1) if mouse is being clicked on right side of screen

function setup() {
  createCanvas(640, 480);
  textSize(18);
}

function draw() {
  // one value from Arduino controls the background's red color
  background(255)

  // the other value controls the text's transparency value
  fill(255, 0,0)

  if (!serialActive) {
    text("Press Space Bar to select Serial Port", 20, 30);
  } else {
    text("Connected", 20, 30);
    // Print the current values
    text('rVal = ' + str(rVal), 20, 50);
    text('alpha = ' + str(alpha), 20, 70);
  }

  // click on one side of the screen, one LED will light up
  // click on the other side, the other LED will light up
  if (mouseIsPressed) {
    if (mouseX > rVal-50 && mouseX < rVal+50 && mouseY > height/2-50 && mouseY < height/2+50) {
      right = 1;
    }
  } else {
    right = 0;
  }
  ellipse(rVal, height/2, 50,50)
}

function keyPressed() {
  if (key == " ") {
    // important to have in order to start the serial connection!!
    setUpSerial();
  }
}

// This function will be called by the web-serial library
// with each new line of data. The serial library reads
// the data until the newline and then gives it to us through
// this callback function
function readSerial(data) {
  ////////////////////////////////////
  //READ FROM ARDUINO HERE
  ////////////////////////////////////

  if (data != null) {
    // make sure there is actually a message
    // split the message
    let fromArduino = split(trim(data), ",");
    // if the right length, then proceed
    if (fromArduino.length == 2) {
      // only store values here
      // do everything with those values in the main draw loop

      // We take the string we get from Arduino and explicitly
      // convert it to a number by using int()
      // e.g. "103" becomes 103
      rVal = int(fromArduino[0]);
      alpha = int(fromArduino[1]);
    }

    //////////////////////////////////
    //SEND TO ARDUINO HERE (handshake)
    //////////////////////////////////
    let sendToArduino = left + "," + right + "\n";
    writeSerial(sendToArduino);
  }
}
Exercise 2:
Something that controls the LED brightness from p5
let rVal = 0;
let alpha = 255;
let left = 0; // True (1) if mouse is being clicked on left side of screen
let right = 0; // True (1) if mouse is being clicked on right side of screen

function setup() {
  createCanvas(640, 480);
  textSize(18);
}

function draw() {
  // one value from Arduino controls the background's red color
  background(map(rVal, 0, 1023, 0, 255), 255, 200);

  // the other value controls the text's transparency value
  fill(255, 0, 255, map(alpha, 0, 1023, 0, 255));

  if (!serialActive) {
    text("Press Space Bar to select Serial Port", 20, 30);
  } else {
    text("Connected", 20, 30);
    // Print the current values
    text('rVal = ' + str(rVal), 20, 50);
    text('alpha = ' + str(alpha), 20, 70);
  }


  // click on one side of the screen, one LED will light up
  // click on the other side, the other LED will light up
  if (mouseIsPressed) {
    if (mouseX <= width / 2) {
      left = 1;
    } else {
      right = 1;
    }
  } else {
    left = right = 0;
  }
}

function keyPressed() {
  if (key == " ") {
    // important to have in order to start the serial connection!!
    setUpSerial();
  }
}


function readSerial(data) {
  ////////////////////////////////////
  //READ FROM ARDUINO HERE
  ////////////////////////////////////

  if (data != null) {
    // make sure there is actually a message
    // split the message
    let fromArduino = split(trim(data), ",");
    // if the right length, then proceed
    if (fromArduino.length == 2) {
      // only store values here
      // do everything with those values in the main draw loop

      // We take the string we get from Arduino and explicitly
      // convert it to a number by using int()
      // e.g. "103" becomes 103
      rVal = int(fromArduino[0]);
      alpha = int(fromArduino[1]);
    }

    //////////////////////////////////
    //SEND TO ARDUINO HERE (handshake)
    //////////////////////////////////
    let sendToArduino = left + "," + right + "\n";
    writeSerial(sendToArduino);
  }
}
Exercise 3:
Bouncing ball
let velocity;
let gravity;
let position;
let acceleration;
let breeze;
let drag = 0.99;
let mass = 50;
let heightOfBall = 0;
function setup() {
  createCanvas(640, 360); // Create a canvas of 800x400 pixels

  noFill();
  position = createVector(width/2, 0);
  velocity = createVector(0,0);
  acceleration = createVector(0,0);
  gravity = createVector(0, 0.5*mass);
  breeze = createVector(0,0);
}
function draw() {
  background(215);
  fill(0);

  if (!serialActive) {
    text("Press the space bar to select the serial Port", 20, 50);
  }
  else
  {
    text("check the light.", 20, 50);

  applyForce(breeze);
  applyForce(gravity);
  velocity.add(acceleration);
  velocity.mult(drag);
  position.add(velocity);
  acceleration.mult(0);
  ellipse(position.x,position.y,mass,mass);

  if (position.y > height-mass/2) {
      velocity.y *= -0.9;  // A little dampening when hitting the bottom
      position.y = height-mass/2;

    heightOfBall = 0;

    }
    else {
      heightOfBall = 1;
    }
  }
}
function applyForce(force){
  // Newton's 2nd law: F = M * A
  // or A = F / M
  let f = p5.Vector.div(force, mass);
  acceleration.add(f);
}
function keyPressed() {
  if (key == " ") {
    // important to have in order to start the serial connection!!
    setUpSerial();
  }
}
// this callback function
function readSerial(data) {
    ////////////////////////////////////
    //READ FROM ARDUINO HERE
    ////////////////////////////////////

     if (data != null) {
    // make sure there is actually a message

    let fromArduino = split(trim(data), ",");

       // if the right length, then proceed
    if (fromArduino.length == 1) {
//sensor value is the input from potentiometer
      let sensorVal = int(fromArduino[0]);

//potentiometer value ranges from 0 - 1023
//for values less than 400,wind blows to right
      if (sensorVal < 400){
        breeze.x=1
      }
//if value between 400 and 500, wind stops so ball stops
      else if(sensorVal >= 400 && sensorVal < 500){
        breeze.x = 0
      }
//if value greater than 500, wind blows to left
      else {
        breeze.x = -1
      }
          //////////////////////////////////
          //SEND TO ARDUINO HERE (handshake)
          //////////////////////////////////
    }
//height of ball sent to arduino to check if ball on floor or not
    let sendToArduino = heightOfBall  + "\n";
    writeSerial(sendToArduino);
  }
}
in Arduino:
int leftLedPin = 2;

void setup() {
  // Start serial communication so we can send data
  // over the USB connection to our p5js sketch
  Serial.begin(9600);
  pinMode(LED_BUILTIN, OUTPUT);

  // Outputs on these pins
  pinMode(leftLedPin, OUTPUT);

  // Blink them so we can check the wiring
  digitalWrite(leftLedPin, HIGH);
  delay(200);
  digitalWrite(leftLedPin, LOW);


  // start the handshake
  while (Serial.available() <= 0) {
    digitalWrite(LED_BUILTIN, HIGH); // on/blink while waiting for serial data
    Serial.println("0,0"); // send a starting message
    delay(300);            // wait 1/3 second
    digitalWrite(LED_BUILTIN, LOW);
    delay(50);
  }
}

void loop() {
  while (Serial.available()) {
    digitalWrite(LED_BUILTIN, HIGH); // led on while receiving data

    int left = Serial.parseInt();
    if(left>=330){
       digitalWrite(leftLedPin, HIGH);
}

    if (Serial.read() == '\n') {
      digitalWrite(leftLedPin, left);
      int sensor = analogRead(A0);
      sensor = map(sensor,0,1023,-1,1);
      Serial.println(sensor);

    }
  }
  digitalWrite(leftLedPin, LOW);
}
My final project involves designing an automated car that intelligently accesses a parking space. This project is a development of a middle school project I worked on where I made a remote-controlled tank. I’ve now used Arduino to create a self-driving automobile that easily interacts with the P5.js environment thanks to my increased expertise.
The user sees in P5 the welcome slide and connects the serial communication from P5 to Arduino.
The next slide says “Press ‘Continue’ to open the gate!” (The parking gate opens)
The next P5 slide says “Let’s start the drive! Please turn on the car by clicking the central switch. (The car will start moving forward)
the final slide says “Proceed to Parking Spot 2”. (This is because Parking Spot 1 is already occupied by the 3D-printed car)
Activation and Navigation: The vehicle follows a predetermined black line on the ground when it is activated.
Parking Completion: The car stops at the end of the black line in front of the Parking 2 sign. At this moment, the traffic light turns from green to red, indicating that the space is now occupied, as the IRS sensor simultaneously measures the vehicle’s weight
4.1- Description of interaction design
4.2- Description of Arduino code + code snippets
Motor code:
void loop() {
 int rightIRSensorValue = digitalRead(IR_SENSOR_RIGHT);
 int leftIRSensorValue = digitalRead(IR_SENSOR_LEFT);


 Serial.print("Right IR Sensor Value: ");
 Serial.println(rightIRSensorValue);
 Serial.print("Left IR Sensor Value: ");
 Serial.println(leftIRSensorValue);


 if (rightIRSensorValue == HIGH && leftIRSensorValue == HIGH) {

   // Both sensors detect black - move forward
   rotateMotor(-MOTOR_SPEED, -MOTOR_SPEED);
   Serial.println("Both sensors detect black - Moving forward");
 } else if (rightIRSensorValue == LOW && leftIRSensorValue == HIGH) {

   // Right sensor detects white, left detects black - turn right
   rotateMotor(-MOTOR_SPEED, 0);
   while (digitalRead(IR_SENSOR_RIGHT) == LOW) {} // Wait until right sensor detects black
   rotateMotor(-MOTOR_SPEED, -MOTOR_SPEED);
   Serial.println("Right sensor detects white - Turning right");
 } else if (rightIRSensorValue == HIGH && leftIRSensorValue == LOW) {

   // Left sensor detects white, right detects black - turn left
   rotateMotor(0, -MOTOR_SPEED);
   while (digitalRead(IR_SENSOR_LEFT) == LOW) {} // Wait until left sensor detects black
   rotateMotor(-MOTOR_SPEED, -MOTOR_SPEED);
   Serial.println("Left sensor detects white - Turning left");
 } else {

   // Both sensors detect white - stop
   rotateMotor(0, 0);
   Serial.println("Both sensors detect white - Stopping");
 }
}


void rotateMotor(int rightMotorSpeed, int leftMotorSpeed) {

 // Set the direction and speed for the right motor
 digitalWrite(rightMotorPin1, rightMotorSpeed < 0 ? LOW : HIGH);
 digitalWrite(rightMotorPin2, rightMotorSpeed < 0 ? HIGH : LOW);


 // Set the direction and speed for the left motor
 digitalWrite(leftMotorPin1, leftMotorSpeed < 0 ? LOW : HIGH);
 digitalWrite(leftMotorPin2, leftMotorSpeed < 0 ? HIGH : LOW);
LED+Piezzo:
// LED Pins
const int redLEDPin1 = 12;
const int greenLEDPin1 = 11;
const int redLEDPin2 = 10;
const int greenLEDPin2 = 9;

// Sensor Pins
const int forceSensorPin1 = A0;
const int forceSensorPin2 = A1;

void setup() {
  Serial.begin(9600);

  // Initialize LEDs
  pinMode(redLEDPin1, OUTPUT);
  pinMode(greenLEDPin1, OUTPUT);
  pinMode(redLEDPin2, OUTPUT);
  pinMode(greenLEDPin2, OUTPUT);

  // Initialize Sensors
  pinMode(forceSensorPin1, INPUT);
  pinMode(forceSensorPin2, INPUT);
}

void loop() {
  int sensorValue1 = analogRead(forceSensorPin1);
  int sensorValue2 = analogRead(forceSensorPin2);
  Serial.print("Sensor 1: ");
  Serial.print(sensorValue1);
  Serial.print(" Sensor 2: ");
  Serial.println(sensorValue2);

  // Control for first set of LEDs
  if (sensorValue1 > 90) {
    digitalWrite(redLEDPin1, HIGH);
    digitalWrite(greenLEDPin1, LOW);
  } else {
    digitalWrite(redLEDPin1, LOW);
    digitalWrite(greenLEDPin1, HIGH);
  }

  // Control for second set of LEDs
  if (sensorValue2 > 100) {
    digitalWrite(redLEDPin2, HIGH);
    digitalWrite(greenLEDPin2, LOW);
  } else {
    digitalWrite(redLEDPin2, LOW);
    digitalWrite(greenLEDPin2, HIGH);
  }
Servo & serial communication:
#include <Servo.h>

Servo myservo;
const int servoPin = 9;

void setup() {
  myservo.attach(servoPin);
  Serial.begin(9600);
  while (!Serial); // Wait for serial port to connect. Needed for native USB port only
  Serial.println("Serial ready"); // Send ready message once serial is set up
  myservo.write(0); // Initialize servo to 0 degrees
}

void loop() {
  if (Serial.available() > 0) {
    String command = Serial.readStringUntil('\n');
    command.trim();
    if (command == "OPEN") {
      rotateServo();
      Serial.println("Gate opened"); // Acknowledge the command execution
    }
  }
}

void rotateServo() {
  myservo.write(90);
  delay(10000);
  myservo.write(0);
}
function startPresentation() {
  if (!serialActive) {
    // Attempt to set up serial directly in response to the button click
    setUpSerial().then(() => {
      console.log("Serial setup complete, starting presentation.");
      fullscreen(true);
      slideNumber = 0;
      startButton.hide();
    }).catch(error => {
      console.error("Failed to set up serial:", error);
      // Inform the user to retry or check permissions
      alert("Failed to set up serial. Please ensure you allow serial access and try again.");
    });
  } else {
    console.log("Serial already set up, starting presentation.");
    fullscreen(true);
    slideNumber = 0;
    startButton.hide();
  }
}

function getMessage() {
  switch (slideNumber) {
    case 0:
      return "Press 'Continue' to open the gate!";  // Initial message to open the gate
    case 1:
      return "Let's start the drive! Please turn on the car by clicking the central switch.";  // Message to start the car after gate opens
    case 2:
      return "Proceed to Parking Spot 2";  // Final slide message
  }
}

function nextSlide() {
  console.log(`Current slide before increment: ${slideNumber}`);
  if (slideNumber === 0) {
    console.log("Ready to open the gate.");
    sendOpenGateCommand(); // Sends command to open the gate
  } else {
    slideNumber++;  // Increment to move to the next slide for other cases
  }
  console.log(`Moved to slide: ${slideNumber}`);

  if (slideNumber < 2) {
    continueButton.show();
  } else if (slideNumber === 2) {
    continueButton.show();
  } else {
    slideNumber = 0;  // Reset slide number
    continueButton.hide();  // Hide continue button
    console.log("Reset slides and hid continue button.");
  }
}


function sendOpenGateCommand() {
  console.log("Serial already active. Now sending 'OPEN' command.");
  writeSerial('OPEN\n');
  slideNumber++;  // Increment after sending the command
}
4.4- Description of communication between Arduino and p5.js
Arduino and P5 communicate through serial communication when the user clicks to open the gate by pushing a screen button.
5- What are some aspects of the project that you’re particularly proud of?
Construction and Configuration: I take particular pride in the construction of the car itself. Mastering its intricate connections was a milestone for me. The process of assembling the car and ensuring all components communicated effectively was a substantial achievement.
Troubleshooting and Calibration: Another aspect I am particularly proud of is overcoming the challenges with the IR sensors. Calibrating these sensors and fine-tuning the code required persistence and innovation. This effort was crucial in achieving the precise movements I envisioned for the car, allowing it to navigate and respond to the environment as intended.
I really enjoyed printing the 3D model. It was something that I was very curious about and happy to have had this experience.
It was fun to play around with the Piezzo sensors connecting them to the green and red LEDs
7- Challenges faced and how you tried to overcome them
Initially, the original plan was that the user placed a car in P1 or P2. The IRS weight sensor would detect the car in the occupied space and send a message in P5 saying that the car should go to the free parking space. Subsequently, the car would go to the unoccupied parking slot. The problem was that I could not figure out the communication between P5 and Arduino. The car got confused when it had to choose whether to go left or right. Therefore, what I did was to have a predetermined route to P1. It is less interactive but I didn’t have the time to investigate a bit deeper. This problem tighs with the next question about future improvements.
Another challenge I faced was the initial connections of the car. I had a problem connecting the switch and the motor shield to the motors.
Additionally, my IRS sensors broke, so I replaced them with piezzo sensors. However, upon connecting the new sensors, I noticed they couldn’t accurately measure the weight of the car because they failed to detect the material of the wheels. Consequently, I sought out another pair of weight sensors capable of identifying the car wheel material.
8- What are some areas for future improvement?
There are a lot of areas that need improvement. 🙂
Starting from the design of the car. I would like to have used the laser cutting machine to make a chassis so that it looked a bit more real.
I envisioned a scenario where the user could select a parking slot, and the car robot would autonomously navigate to the opposite slot. My preference was for the car to navigate without the need for a black line to follow. Initially, I aimed for a fully autonomous vehicle. However, achieving this goal demands additional computational skills beyond my current capabilities.
Originally, I intended to equip the car with an ultrasonic sensor programmed to detect objects and trigger a pause. The concept involved the motors stopping when the ultrasonic sensor detected proximity to an object, prompting the buzzer to emit a two-second beep (similar to cars alerting you of imminent collision). I began coding the buzzer to work in tandem with the ultrasonic sensor, but due to time constraints, I couldn’t complete it. Within the limited timeframe, I struggled to devise a mechanism to temporarily stop the motor upon detection of an obstacle and resume its operation once the obstacle was no longer present.
The weight sensor for the car doesn’t always work. I would have liked to make a bigger area for the sensor to detect it more accurately.
9- IM show documentation, images, videos, and people interacting with your project
Overall, this project is something I am very proud of. I’ve learned so much and I’ve had a lot of fun 😉
Appendix:
Full car code
#include <Arduino.h>


// Define IR sensor pins
#define IR_SENSOR_RIGHT 11
#define IR_SENSOR_LEFT 12


// Define motor speed constant
#define MOTOR_SPEED 180


// Define pins for right motor
int enableRightMotor = 6;
int rightMotorPin1 = 7;
int rightMotorPin2 = 8;


// Define pins for left motor
int enableLeftMotor = 5;
int leftMotorPin1 = 9;
int leftMotorPin2 = 10;


void setup() {
 // Set the PWM frequency for motor control
 TCCR0B = TCCR0B & B11111000 | B00000010;  // Set frequency to 7812.5 Hz
  // Initialize motor control pins
 pinMode(enableRightMotor, OUTPUT);
 pinMode(rightMotorPin1, OUTPUT);
 pinMode(rightMotorPin2, OUTPUT);
  pinMode(enableLeftMotor, OUTPUT);
 pinMode(leftMotorPin1, OUTPUT);
 pinMode(leftMotorPin2, OUTPUT);


 // Initialize IR sensor pins
 pinMode(IR_SENSOR_RIGHT, INPUT);
 pinMode(IR_SENSOR_LEFT, INPUT);
  // Initialize serial communication at 9600 baud for debugging
 Serial.begin(9600);
  // Stop motors initially
 rotateMotor(0, 0);
}


void loop() {
 int rightIRSensorValue = digitalRead(IR_SENSOR_RIGHT);
 int leftIRSensorValue = digitalRead(IR_SENSOR_LEFT);


 Serial.print("Right IR Sensor Value: ");
 Serial.println(rightIRSensorValue);
 Serial.print("Left IR Sensor Value: ");
 Serial.println(leftIRSensorValue);


 if (rightIRSensorValue == HIGH && leftIRSensorValue == HIGH) {

   // Both sensors detect black - move forward
   rotateMotor(-MOTOR_SPEED, -MOTOR_SPEED);
   Serial.println("Both sensors detect black - Moving forward");
 } else if (rightIRSensorValue == LOW && leftIRSensorValue == HIGH) {

   // Right sensor detects white, left detects black - turn right
   rotateMotor(-MOTOR_SPEED, 0);
   while (digitalRead(IR_SENSOR_RIGHT) == LOW) {} // Wait until right sensor detects black
   rotateMotor(-MOTOR_SPEED, -MOTOR_SPEED);
   Serial.println("Right sensor detects white - Turning right");
 } else if (rightIRSensorValue == HIGH && leftIRSensorValue == LOW) {

   // Left sensor detects white, right detects black - turn left
   rotateMotor(0, -MOTOR_SPEED);
   while (digitalRead(IR_SENSOR_LEFT) == LOW) {} // Wait until left sensor detects black
   rotateMotor(-MOTOR_SPEED, -MOTOR_SPEED);
   Serial.println("Left sensor detects white - Turning left");
 } else {

   // Both sensors detect white - stop
   rotateMotor(0, 0);
   Serial.println("Both sensors detect white - Stopping");
 }
}


void rotateMotor(int rightMotorSpeed, int leftMotorSpeed) {

 // Set the direction and speed for the right motor
 digitalWrite(rightMotorPin1, rightMotorSpeed < 0 ? LOW : HIGH);
 digitalWrite(rightMotorPin2, rightMotorSpeed < 0 ? HIGH : LOW);


 // Set the direction and speed for the left motor
 digitalWrite(leftMotorPin1, leftMotorSpeed < 0 ? LOW : HIGH);
 digitalWrite(leftMotorPin2, leftMotorSpeed < 0 ? HIGH : LOW);


 // Apply PWM to the motors
 analogWrite(enableRightMotor, abs(rightMotorSpeed));
 analogWrite(enableLeftMotor, abs(leftMotorSpeed));
}
My game was all about creating a virtual archery game and linking a flex sensor to the bow, so it detects the bending motion and once bent the arrow shoots onto the target. For the theme of the entire game, I decided to link it with my childhood as well and use Minecraft as the main theme. As a 9 year old, I used to go to the archery range and play Minecraft at the time so it brought up a sense of nostalgic feeling.
For the bow, in order to give it a pixelated look, I decided to super glue the tiny wooden square blocks and paint over it. I attached the flex sensor on the top of the bow and attached a string to the flex sensor so when the string is pulled it shoots the arrow.
Future Improvements:
For future improvements, I’d like to add more visuals. I felt like it would’ve been more engaging if I did.
const serial = new p5.WebSerial();
let startButton;
let portButton;
let closeButton;
let sensorValue = 0;
let width = 900;
let height = 506;
let arrowSpeed = 5; // Speed at which arrow moves
let arrowDirection = 1;
let score = 0;
let shooting = false; // Indicates whether the arrow is currently being shot
let arrowX = width / 2; // X-coordinate of the arrow
let arrowY = height; // Y-coordinate of the arrow
let arrowScaleX = 1;
let arrowScaleY = 1;
let arrowWidth = 60;
let arrowHeight = 120;
let targetX = width / 2;
let targetY = height / 2;
let targetRadius = 100;

let started = false;

let bgImg;
let arrowImg;
let targetImg;
let sliderX = width - 50;
let sliderY = height / 2;
let lastScore = 0;
let textOpacity = 0;
let sliderHeight = 0;
let startShootFlag = 0;
let sliderIncrementor = 1;
let sliderTotalHeight = 100;
let startShootThreshHold = 40; //set flex sensor value at which we start for targetting

function allSerialStuff() {
  if (!navigator.serial) {
    alert("WebSerial is not supported in this browser. Try Chrome or MS Edge.");
  }
  // check for any ports that are available:
  serial.getPorts();
  // if there's no port chosen, choose one:
  serial.on("noport", makePortButton);
  // open whatever port is available:
  serial.on("portavailable", openPort);
  // handle serial errors:
  serial.on("requesterror", portError);
  // handle any incoming serial data:
  serial.on("data", serialEvent);
  serial.on("close", makePortButton);
  // add serial connect/disconnect listeners:
  navigator.serial.addEventListener("connect", portConnect);
  navigator.serial.addEventListener("disconnect", portDisconnect);
}

function serialEvent() {
  sensorValue = Number(serial.read());
  console.log(sensorValue);
  //if certain value from flex sensor get passed we get prepared for the shoot
  if (!shooting && sensorValue > startShootThreshHold) {
    startShootFlag = 1;
    sliderHeight = sensorValue + 20; // add 20 to elevate the value we need something in between 0-120
  }
  //if that value again crossed then we shoot
  if (!shooting && sensorValue < startShootThreshHold && startShootFlag) {
    startShootFlag = 0;
    if (!shooting && arrowY == height) {
      shooting = true; // Start shooting
    }
  }
}

// if there's no port selected,
// make a port select button appear:
function makePortButton() {
  // create and position a port chooser button:
  portButton = createButton("Choose Port");
  portButton.position(innerWidth / 2, 10);
  portButton.center("horizontal");
  // give the port button a mousepressed handler:
  portButton.mousePressed(choosePort);
}

// make the port selector window appear:
function choosePort() {
  if (portButton) portButton.show();
  serial.requestPort();
}

// open the selected port, and make the port
// button invisible:
// open the selected port, and make the port
// button invisible:
function openPort() {
  // wait for the serial.open promise to return,
  // then call the initiateSerial function
  serial.open().then(initiateSerial);

  // once the port opens, let the user know:
  function initiateSerial() {
    console.log("port open");
  }
  // hide the port button once a port is chosen:
  if (portButton) portButton.hide();
  makeCloseButton();
  if (closeButton) closeButton.show();
}

// pop up an alert if there's a port error:
function portError(err) {
  alert("Serial port error: " + err);
}
// read any incoming data as a string
// (assumes a newline at the end of it):

// try to connect if a new serial port
// gets added (i.e. plugged in via USB):
function portConnect() {
  console.log("port connected");
  serial.getPorts();
}

// if a port is disconnected:
function portDisconnect() {
  serial.close();
  console.log("port disconnected");
}

// if there's no port selected,
// make a port select button appear:
function makeCloseButton() {
  // create and position a port chooser button:
  closeButton = createButton("Close Port");
  closeButton.position(innerWidth / 2, 10);
  closeButton.center("horizontal");
  // give the close port button a mousepressed handler:
  closeButton.mousePressed(closePort);
}

function closePort() {
  serial.close();
  if (closeButton) closeButton.hide();
}

function preload() {
  bgImg = loadImage("/assets/background.jpg");
  targetImg = loadImage("/assets/target.png");
  arrowImg = loadImage("/assets/arrow.png");
}

function setup() {
  createCanvas(width, height);

  startButton = createButton("Start Game");
  startButton.addClass("start-button");
  startButton.position(innerWidth / 2, innerHeight / 2 + 10);
  startButton.center("horizontal");
  startButton.mousePressed(startGame);

  allSerialStuff();
}

function draw() {
  imageMode(CORNERS);
  image(bgImg, 0, 0, width, height);

  if (!started) {
    drawMenu();
  } else {
    // Draw target
    drawTarget();

    if (startShootFlag) {
      drawSlider();
    }

    //Draw score
    textAlign(LEFT, TOP);
    textSize(26);
    fill("red");

    text("Score: " + score, 10, 10);

    makeShooting();
    drawArrow();
    drawAddedScore();
  }
}

function drawMenu() {
  textSize(48);
  fill("#ff0033");
  textStyle(BOLD);
  textAlign(CENTER, BASELINE);
  text("VR Archery", width / 2, height / 2 - 100);
}

function startGame() {
  if (startButton) startButton.hide();
  started = true;
}

function makeShooting() {
  if (shooting) {
    // Calculate the trajectory towards the target
    let deltaY = height - targetY; // Difference in y-coordinates between arrow and target
    arrowY -= deltaY / 50; // Move the arrow towards the target
    if (arrowScaleY > 0.4) {
      arrowScaleY -= 0.004;
    }
    if (arrowScaleX > 0.4) {
      arrowScaleY -= 0.005;
    }
    // Stop shooting when arrow reaches the target
    if (arrowY - (arrowHeight * arrowScaleY) / 2 <= targetY) {
      shooting = false;

      // Check if the arrow hits the target
      let distance = dist(arrowX, arrowY - (arrowHeight * arrowScaleY) / 2, targetX, targetY); // Calculate distance between arrow tip and target center
      if (distance <= targetRadius - 20) {
        console.log("Hit!");
        arrowSpeed = 0;
        textOpacity = 255;
        updateScore(distance);
        //reset arrow after 2 seconds
        setTimeout(() => {
          arrowY = height;
          arrowScaleX = 1;
          arrowScaleY = 1;
          arrowSpeed = 5;
          textOpacity = 0;
        }, 2000);
      } else {
        console.log("Miss!");
        arrowY = height;
        arrowScaleX = 1;
        arrowScaleY = 1;
        shooting = false;
      }
    }
  } else {
    // Move arrow
    arrowX += arrowSpeed * arrowDirection;
    if (arrowX >= width || arrowX <= 0) {
      arrowDirection = -arrowDirection; // Reset arrow when it goes beyond the canvas
    }
  }
}

function drawTarget() {
  imageMode(CENTER);
  image(targetImg, targetX, targetY, targetRadius * 2, targetRadius * 2);
}

function drawArrow() {
  imageMode(CENTER);
  image(arrowImg, arrowX, arrowY, arrowWidth * arrowScaleX, arrowHeight * arrowScaleY);
}

function drawAddedScore() {
  fill(80, textOpacity);
  text("+ " + lastScore, targetX + 70, targetY - 60);
}

function drawSlider() {
  line(sliderX, sliderY, sliderX, sliderY + 120);
  line(sliderX - 10, sliderY, sliderX + 10, sliderY);
  line(sliderX - 10, sliderY + 60, sliderX + 10, sliderY + 60);
  line(sliderX - 10, sliderY + 120, sliderX + 10, sliderY + 120);
  fill(sliderHeight + 100, 200, 0);
  rect(sliderX - 10, sliderY, 20, sliderHeight);
}

//update score
function updateScore(distance) {
  console.log(distance);
  if (distance < 10) {
    score += 100;
    lastScore = 100;
  } else if (distance < 25) {
    score += 80;
    lastScore = 80;
  } else if (distance < 40) {
    score += 60;
    lastScore = 60;
  } else if (distance < 55) {
    score += 40;
    lastScore = 40;
  } else {
    score += 20;
    lastScore = 20;
  }
}

//handle mouse click event
function mouseClicked() {
  if (!shooting && arrowY == height) {
    //If arrow is not currently being shot
    shooting = true; // Start shooting
  }
}

function windowResized() {
  if (startButton) startButton.position(innerWidth / 2, innerHeight / 2 + 10).center("horizontal");
  if (portButton) portButton.center("horizontal");
  if (closeButton) closeButton.center("horizontal");
}
My final project was more of a product rather than a game to play. It is very simple to use where you just click on buttons from the computer to have your phone cleaned. I decided to do this project because our phones are in our hands most of the time, and it is necessary for it to be clean as many germs could be spread through the phone.
P5.js:
In p5.js, I first created a main page with some instructions, from there you can click on the space button to connect the serial port and proceed to the main page to clean your phone.
Cover PageMain page
(To open the following in full screen, press the “f” key.)
Arduino:
For the arduino part, I laser cut a 5in box to put the arduino, breadboards, and batteries inside. Outside the box, I had a servo motor controlling a spray and dc motors controlling two wheels . Under the box, there was a small wiper that dried out the spray while the wheels are moving.
For the serial communication part, it was a one way communication from p5.js to arduino. When the spray button is clicked, it activates the servo motor to spray the phone. When the clean button is clicked, it activates the two dc motors and moves the wheels to wipe the phone.
Challenges & Code I am most proud of:
The most challenging part was trying to include a ultrasonic distance sensor to detect the phone. However, I realized that it is not an important aspect of the project so I decided to focus on the servo and dc motors only.
It was very tricky to code the two motors according to the angle of the box and in a particular speed. That is the part of code I am most proud of.
Arduino:
   // Activate servo motion
 for (pos = 120; pos <= 180; pos += 1) { // goes from 0 degrees to 180 degrees
    // in steps of 1 degree
    myservo.write(pos);              // tell servo to go to position in variable 'pos'
    delay(4);                       // waits 15 ms for the servo to reach the position
  }
  for (pos = 180; pos >= 120; pos -= 1) { // goes from 180 degrees to 0 degrees
    myservo.write(pos);              // tell servo to go to position in variable 'pos'
    delay(4);                       // waits 15 ms for the servo to reach the position
  }

// Activate dc motion
forwardDirection = !forwardDirection;

    // Set direction for motor A
        if (forwardDirection) {
          digitalWrite(ain1Pin, HIGH);
          digitalWrite(ain2Pin, LOW);
        }
        else {
          digitalWrite(ain1Pin, LOW);
          digitalWrite(ain2Pin, HIGH);
        }

    // Set direction for motor B
        if (!forwardDirection) {
          digitalWrite(bin1Pin, HIGH);
          digitalWrite(bin2Pin, LOW);
        }
        else {
          digitalWrite(bin1Pin, LOW);
          digitalWrite(bin2Pin, HIGH);
        }

        // Turn both motors at this speed
        analogWrite(pwmAPin, 90);
        analogWrite(pwmBPin, 90);

        // Delay for a second
        delay(1000);

        // Slow down both motors
        Serial.println("slowing down");
        int speed = 100;
        while (speed--) {
          analogWrite(pwmAPin, speed);
          analogWrite(pwmBPin, speed);
          delay(100);
  }
P5.js:
function startSpraying() {
  spray = 1;
  clean = 0;
  // Send "1" to Arduino to activate spray

    //////////////////////////////////
    //SEND TO ARDUINO HERE (handshake)
    //////////////////////////////////

  let sendToArduino = "1" + "\n";
  writeSerial(sendToArduino);
  drawDots();
}

function startCleaning() {
  clean = 0;
  spray = 1;
  image(phone, 0, 0, windowWidth, windowHeight, 0, 0, phone.width, phone.height, CONTAIN);

  // Send "0" to Arduino to activate clean

    //////////////////////////////////
    //SEND TO ARDUINO HERE (handshake)
    //////////////////////////////////

  let sendToArduino = "0" + "\n";
  writeSerial(sendToArduino);
}
During the IM showcase, I got a lot of constructive feedback from faculty and students. I got a suggestion to include a sensor that detects the corners of the phone so that the wheels stop moving when it reaches the end of the phone. Someone also said that it would be more convenient if it was a little smaller, especially if they were to use it as a product at home. Another suggestion was to make it resizable or adjustable according to the person’s phone. These are all very interesting approaches I could take if I were to improve this project.
From my side, I would want to improve the design and aesthetics of the physical product and include a bigger spray so it would be more effective.
For now, I am glad that this idea worked to begin with as I was worried that the servo motor would not be strong enough to spray the phone, but it worked!
The initial idea of this project is a bit different from what I ended up with. The initial idea was designed for two players, each placing one hand on a heart rate monitor. This game uses heart rate data to measure and display the level of affection or excitement between the participants. The faster the heartbeats, the higher the presumed love connection. But after I heard that we’d have to return the items we borrowed from the IM lab I thought it would be better if I order my own two heart rate monitors and solder them myself, then I wouldn’t have to take apart my hard work. With my not-so-good soldering skills I ruined one heart rate monitor and had only one to work with. I had to improvise and solve this issue working with only one heart rate monitor which led to changing the theme of the game a bit. Professor Aaron helped me with coming up with a new game that measures the players Happiness Level by reading their heart rates through the heart monitor. The game was initially supposed to start by pressing on a yellow button but due to time constrains and many other technical difficulties, such as linking the Arduino and the P5 together, I still managed to make it work fine with the keyboard even though I feel like the yellow button gives it more of a “gamey” feel to it which is what I would’ve much preferred.
Arduino Code:
const int buttonPin = 3;      // Pin where the button is connected
const int heartRatePin = A0;  // Analog pin for heart rate sensor

int heartRateValue = 0;
bool buttonPressed = false;

void setup() {
  pinMode(buttonPin, INPUT_PULLUP);  // Set the button pin as input with internal pull-up resistor
  pinMode(heartRatePin, INPUT);
  Serial.begin(9600);
  while (Serial.available() <= 0) {  // on/blink while waiting for serial data
    Serial.println("0,0");
    delay(50);
  }
}

void loop() {
  heartRateValue = analogRead(heartRatePin);  // Read the value from the heart rate sensor
  int bpm = calculateBPM(heartRateValue);     // Convert the analog reading to BPM

  // Read button state
  int buttonState = 1 - digitalRead(buttonPin);


  while (Serial.available()) {


    int left = Serial.parseInt();

    if (Serial.read() == '\n') {
      Serial.print(buttonState);
      Serial.print("0,50");
      Serial.println(bpm);
    }
  }


  // Always send the current heart rate and button state
}

// Function to simulate BPM calculation - replace this with your sensor-specific calculation
int calculateBPM(int sensorValue) {
  return sensorValue / 10;  // Simplified calculation for demonstration
}
P5.Js Code:
class MainMenu extends Menu {
  constructor(id) {
    super(id);

    this.pos = createVector(width / 2, height / 2.7);
    this.size = 240;
    this.strokeCol = color(
      random(100, 255),
      random(100, 255),
      random(100, 255)
    );
    this.hearts = [];
    for (let i = 0; i < 20; i++) {
      this.hearts.push({ x: random(width), y: random(height) });
    }
    this.random_seed = random(100, 10000); //use for heard animations in the back
    this.heartPos = { x: width / 2, y: height * 2 };
  }

  render() {
    background("#24182e");
    textAlign(CENTER, CENTER);
    textSize(44);
    textFont(pixel_font);
    fill("#8249c6");
    stroke(this.strokeCol);
    strokeWeight(4);

    text("HAPPINESS  LEVEL", width / 2, 50);
    //change strokcol every 20 farmes
    if (frameCount % 60 == 0) {
      this.strokeCol = color(
        random(100, 255),
        random(100, 255),
        random(100, 255)
      );
      this.random_seed = random(100, 10000);
    }
    textSize(30);
    stroke(200, 100, 100);
    push();
    randomSeed(this.random_seed);
    textFont("arial");
    for (let h of this.hearts) {
      for (let h2 of this.hearts) {
        if (dist(h.x, h.y, h2.x, h2.y) < 10) {
          strokeWeight(2);
          line(h.x, h.y, h2.x, h2.y);
        }
      }
      text("♥", h.x, h.y);
      h.x = lerp(h.x, random(width), 0.01);
      h.y = lerp(h.y, random(height), 0.01);
    }
    pop();
    push();
    textFont("arial");
    textSize(160);
    this.heartPos.y = lerp(this.heartPos.y, height / 1.5, 0.1);
    stroke(255);
    fill("#B28CDEAA");
    text("♥", this.heartPos.x, this.heartPos.y);
    textSize(30);
    noStroke();
    fill(255);
    textFont(pixel_font);
    text(
      "PLACE YOUR FINGER ON THE HEART",
      this.heartPos.x,
      this.heartPos.y + 100
    );
    pop();
    noStroke();
  }
}
class GameMenu extends Menu {
  constructor(id) {
    super(id);

    this.heart = new Heart(createVector(width / 2, height / 2.7), 240);
  }

  render() {
    textAlign(CENTER, CENTER);
    textSize(18);
    background("#24182e");
    fill("#A88DC7");
    text("CHECKING YOUR LOVE LEVEL!", width / 2, height - 30);
    fill("#8249C67C");
    textFont("arial");
    textSize(34);

    for (let i = 0; i < 12; i++) {
      for (let j = 0; j < 8; j++) {
        let x = map(i, 0, 11, 0, width);
        let y = map(j, 0, 7, 0, height);
        if (frameCount % 40 < 20) {
          if (i % 2 == 0 || j % 2 == 0) {
            text("♥", x, y);
          }
        } else {
          if (i % 2 != 0 || j % 2 != 0) {
            text("♥", x, y);
          }
        }
      }
    }

    this.heart.render();
  }

  update() {
    this.heart.update();
    // Removed the timer decrement and check
  }

  reset() {
    this.heart = new Heart(createVector(width / 2, height / 2.7), 220);
  }
}
class EndMenu extends Menu {
  constructor(id) {
    super(id);

    this.finalScore = null;

    this.hearts = [];
    for (let i = 0; i < 2; i++) {
      this.hearts.push({ x: random(width), y: random(height) });
    }
    this.random_seed = random(100, 10000); //use for heard animations in the back
  }

  render() {
    background("#24182e");
    push();
    stroke(200, 100, 100);
    randomSeed(this.random_seed);
    textFont("arial");
    textSize(34);
    for (let h of this.hearts) {
      for (let h2 of this.hearts) {
        if (dist(h.x, h.y, h2.x, h2.y) < 100) {
          line(h.x, h.y, h2.x, h2.y);
        }
      }
      text("♥", h.x, h.y);
      h.x = lerp(h.x, random(width), 0.01);
      h.y = lerp(h.y, random(height), 0.01);
    }
    if (frameCount % 60 == 0) {
      this.random_seed = random(100, 10000);
    }
    pop();

    fill("#A88DC7");
    stroke(255);
    textFont(pixel_font);
    textSize(60);
    textAlign(CENTER, CENTER);
    text("THANK YOU !", width / 2, 160);
    noStroke();
    textSize(24);
    // text(
    //   `${this.finalScore}\n\nYOUR COMPATIBILITY SCORE`,
    //   width / 2,
    //   height / 1.5
    // );
    //     push();
    //     noStroke();
    //     fill(0);
    //     rect(0, 0, width, height);

    //     fill(255);
    //     textStyle(BOLD);
    //     textAlign(CENTER, CENTER);
    //     textSize(96);
    //     text("GAME OVER", width / 2, height / 4);

    //     textSize(40);
    //     text(`COMPATIBILITY SCORE: ${this.finalScore}`, width / 2, height / 2);

    //     textStyle(NORMAL);
    textSize(16);
    text("TRY AGAIN?", width / 2, height - 60);
    text("Yes", 100, height - 60);
    text("No", width - 100, height - 60);
    push();
    textFont("arial");
    pop();

    //     textSize(40);
    //     text("YES? OR NO?", width / 2, 640);

    //     pop();
  }

  reset() {
    this.finalScore = null;
  }
}
I’m content with the final product despite getting extremely sick two days before the showcase while having other final projects due the day before it. For future improvements I’d like to incorporate my initial idea and also add a different game mode, Lie Detector Mode, which sounds fun to make with using the heart rate monitor. Overall, I feel like I got exposed to many things in this course which makes me much more comfortable with the things we’ve been working with during the entirety of this semester. I’d also like to thank professor Aaron for being extremely patient and helpful with me 🙂
For the final project, I have created a bubble-popping game that involves both P5.js and Arduino. The main concept is that the user will pop as many bubbles as possible using hand gestures in a playful virtual environment, leveraging hand-tracking technology for a seamless and immersive experience and enjoy real bubble along the way. Initially, the project was supposed to be just a bubble maker that tracked the user and shot bubble at him/her continuously. Unfortunately, due to technical difficulties, I could not implement that, and after consulting with the professor, I decided to make a game instead.
How it works:
The user comes in front of the camera and raises his/her left hand. If the camera detects left hand raised on the left side of the screen (the right side by mirroring), the bubble starts to generate in the middle portion of the screen, and a timer gets started. The timer is set to 2 minutes of maximum time. Then the user will pop the bubbles with the finger tips by making popping a bubble gesture. Users get points for popping the bubble based on the popped bubble’s size. And if the user want, he/she can quit the game by raising his/her hand. While the game is on and the user scores cross a milestone, a signal is sent to the Arduino to turn on the servo motor and a DC motor fan. Servo takes the bubble-making stick in front of the fan and generates bubbles. The servo and the fan will keep generating bubbles while the game is on. Initially, I had 400 points (400, 800, 1200, … ) as milestones. However, after user testing, I reduced it to 100. So, after every 100 points, you get bubbles. The reasoning behind this was that all the users were more into the actual bubble popping experience and all wanted to get more real bubbles while playing the game. A This gives the user a more immersive bubble-popping experience, as from time to time they can pop the real bubbles too. During the gameplay the user can press “H” on the keyboard for the instructions. The game also keeps track of high scores and has a 2 minutes timer.
User testing:
After user testing, I made few changes. I had 2 user tests. During my initial testing, I received feedback to make the real bubble generation a reward for popping the on screen bubbles, which currently implemented in the game. And during my second user test, the user told me to make it a bit easier to get real bubbles. I have reduced the milestone from 400 to 100 afterwards. Other than this, I received reviews from the Professor. One was to make the on-screen bubble bigger and more visible (opacity). The second was to incorporate visuals and instructions. Both have been implemented in the game.
Schematic:
As the tinkercad did not have the SparkFun Motor Driver – Dual TB6612FNG (1A) used in the project, the schematic has been adjusted for L293D Motor Driver.
P5.js Code:
Serial communication is needed to run the game. The cover picture was made using DALL-E 2.
In this game, hand detection is accomplished using the ml5.handpose model. This model detects 21 hand keypoints representing different parts of the hand. Each keypoint provides an x, y, and z coordinate, but here, only the x and y coordinates are used. These keypoints are used to detect gestures and interact with the game objects (bubbles).
Gestures are detected based on the position of keypoints of all five fingers. Here’s how gestures to start and stop the game are handled:
const LEFT_FINGERS = [4, 8, 12, 16, 20]; // Indices of the left-hand finger tips
let play = 0; // 0 for paused, 1 for playing
let waveTimeout = null;
let waveCooldown = false;
let leftBoundary, rightBoundary;
let scaleX, scaleY;
let videoWidth = 640;
let videoHeight = 480;

function detectHandGesture() {
  if (hands.length > 0) {
    const fingerIndices = [4, 8, 12, 16, 20]; // Thumb, index, middle, ring, pinky tips
    let allInLeft = true;
    let allInRight = true;

    for (let index of fingerIndices) {
      let x = (videoWidth - hands[0].keypoints[index].x) * scaleX;
      if (x < leftBoundary) {
        allInRight = false;
      } else if (x > rightBoundary) {
        allInLeft = false;
      } else {
        allInLeft = false;
        allInRight = false;
      }
    }

    if (allInLeft && play === 0) {
      togglePlayState(1); // Start playing
    } else if (allInRight && play === 1) {
      togglePlayState(0); // Stop playing
    }
  }
}

function togglePlayState(newState) {
  play = newState;
  waveCooldown = true;

  if (play === 1) {
    startTime = millis(); // Start the timer when playing starts
  } else {
    updateHighScore(); // Update high score before resetting
    resetGame();
  }

  waveTimeout = setTimeout(() => {
    waveCooldown = false;
  }, 3000); // Add a 3-second cooldown to prevent repeated triggering
}
function drawBubbles() {
  let leftFingers = [];
  if (hands.length > 0) {
    let hand = hands[0];
    for (let index of LEFT_FINGERS) {
      let keypoint = hand.keypoints[index];
      leftFingers.push({
        x: (videoWidth - keypoint.x) * scaleX,
        y: keypoint.y * scaleY,
      });
    }
  }

  for (let i = 0; i < bubbles.length; i++) {
    let bubble = bubbles[i];
    fill(bubble.color[0], bubble.color[1], bubble.color[2], 100);
    noStroke();
    ellipse(bubble.x, bubble.y, bubble.size * 5, bubble.size * 5);

    bubble.x += bubble.speedX;
    bubble.y += bubble.speedY;
    bubble.x = constrain(bubble.x, leftBoundary, rightBoundary);

    // Check for collision with any of the left fingers and pop the bubble
    if (play === 1) {
      for (let finger of leftFingers) {
        if (dist(bubble.x, bubble.y, finger.x, finger.y) < bubble.size * 2.5) {
          bubbles.splice(i, 1);
          popped.play();
          score += floor(bubble.size / 2);
          i--;
          break;
        }
      }
    }
  }
}
The left-hand finger tips are used to pop bubbles.
The readSerial function communicates with an Arduino device by sending signals based on the player’s score. The function first initializes a milestone at 100, representing the initial target score. When the function is called with new data, it checks whether the player’s score has reached or surpassed this milestone. If the score meets or exceeds the milestone, it sends a signal to the Arduino to keep the game state active (play is set to 1) and then increments the milestone by 100 for the next target. If the score is below the milestone, it sends a signal to the Arduino to deactivate the game state (play is set to 0). The function ensures that the Arduino receives real-time feedback on the game’s progress, controlling external devices or triggers accordingly.
let milestone = 100; // Initialize the first milestone
function readSerial(data) {
  if (data != null && score != 0) {
    let sendToArduino;

    // If the score has crossed the milestone, keep `play` as 1
    if (score >= milestone) {
      sendToArduino = play + "\n";
      // Update to the next milestone (e.g., 100 to 200, 300 to 400, etc.)
      milestone += 100;
    } else {
      // Otherwise, set `play` to 0
      sendToArduino = "0\n";
    }

    writeSerial(sendToArduino);
  }
}
Arduino Code:
#include <Servo.h>

Servo myservo1;
Servo myservo2;
Servo myservo3;

int pos = 45;
int play = 0;
int high = 25;
int low = 85;

const int ain1Pin = 3;
const int ain2Pin = 4;
const int pwmAPin = 5;


void setup() {
  myservo1.attach(8);
  myservo2.attach(9);
  myservo3.attach(10);

  pinMode(ain1Pin, OUTPUT);
  pinMode(ain2Pin, OUTPUT);
  pinMode(pwmAPin, OUTPUT);

  Serial.begin(9600);
  while (Serial.available() <= 0) {
    digitalWrite(LED_BUILTIN, HIGH);
    Serial.println("0,0");
    delay(200);
    digitalWrite(LED_BUILTIN, LOW);
    delay(50);
  }
}

void loop() {
  while (Serial.available()) {
    play = Serial.parseInt();
    if (play && Serial.read() == '\n') {
      myservo1.write(45);
      myservo2.write(45);
      moveServoSlowly(myservo3, low, high, 20);
      analogWrite(pwmAPin, 255);
      digitalWrite(ain1Pin, HIGH);
      digitalWrite(ain2Pin, LOW);
      delay(3000);
      analogWrite(pwmAPin, 0);
      moveServoSlowly(myservo3, high, low, 20);
      delay(2000);
    }
    Serial.println(1);
  }
}

void moveServoSlowly(Servo &servo, int startPos, int endPos, int stepDelay) {
  int step = startPos < endPos ? 1 : -1;
  for (int pos = startPos; pos != endPos; pos += step) {
    servo.write(pos);
    delay(stepDelay);
  }
  servo.write(endPos);
}
I initially had issues with my servo motor movement. It was moving too quickly to the positions and. So I used the moveServoSlowly function. The moveServoSlowly function controls the movement of a servo motor gradually from a starting position to an ending position. It takes four parameters: a reference to the Servo object, the starting and ending positions (in degrees), and a delay time that dictates the speed of movement. The function calculates the direction of movement using a step variable, which is set to either 1 or -1, depending on whether the starting position is less than the ending position. It then iterates through the range of positions, incrementing or decrementing by the step value, and uses servo.write to set the servo’s position. A delay specified by stepDelay between each position change ensures smooth and gradual movement. Finally, it ensures the servo reaches the exact ending position.
Pulse-Scape’s concept is one that revolves around integrating humanness, the arts, and technology. Detecting heart beat from the pulse-sensor, I wanted to use my project, Pulse-Scape, to serve as a bridge between the physical and the digital world, helping curate an intimate, colorful, and abstract art piece as a result. This interactive and dynamic experience created using P5JS as a canvas for the art to come to life showcases the ways in which our humanness, shown through our heart beat, can make art come to life through technology. The integration of 3 different potentiometers that correspond to different RGB values helps make this experience even more personal by allowing for users to choose specific colors for their art. The experience has different modes: Flow, Wild, and Spots, further personalizing the experience to users’ art style. Therefore, it is through all of this did Pulse-Scape get crafted into an immersive experience where users engage with the essence of human emotion through visual art, color, and technology, just how I envisioned it to be.
Screenshots of Interface on P5:
Pulse-Scape in Action
Initial User-Testing:
Show-Case:
Example of art that Pulse-Scape can generate:
Implementation:
For the project, the main form of interaction design being implemented is pulse detection data from the pulse sensor and the 3 potentiometers that correspond to the R, G, and B values respectively. The potentiometers are responsible for changing the colors of the particles and perlin noise within the circular boundary, helping create a more personalized experience for users. Using data from the pulse sensor, dynamic flow fields appear within a circular boundary, which moves and oscillates based on the value being taken from the pulse sensor. Users can change the style of flow fields, depending on their moods or feelings in the current moment.
The Arduino component of my final project is mainly responsible for collecting data from the pulse sensor in order to move it to P5. The first component is for the particles and perlin noise to appear and move based on the data collected from the pulse sensor. The second component is using potentiometers to create a personalized color using specific amounts of R, G, and B values that users see fit to create a customized and colorful visualization based on pulse sensor data for the users to curate. The Arduino code can be seen below:
const int pulseSensorPin = A0; //Pulse sensor value connected to A0
const int potPin1 = A1;  // Potentiometer connected to A1
const int potPin2 = A2;  // Potentiometer connected to A2
const int potPin3 = A3;  // Potentiometer connected to A3

// Setup runs once
void setup() {
  Serial.begin(9600);
}

void loop() {
  int pulseSensorValue = analogRead(pulseSensorPin);

// Read values from potentiometers and maps it out to the color scale
  int redValue = map(analogRead(potPin1), 0, 1023, 0, 255);
  int greenValue = map(analogRead(potPin2), 0, 1023, 0, 255);
  int blueValue = map(analogRead(potPin3), 0, 1023, 0, 255);


// Send color component values and pulse sensor value to P5
  Serial.print(pulseSensorValue/8);
   Serial.print(',');
  Serial.print(redValue);
  Serial.print(',');
  Serial.print(greenValue);
  Serial.print(',');
  Serial.println(blueValue);

  delay (800);
}
P5, on the other hand, is the main display for my final project. It is where perlin noise and particles are displayed to showcase data from the pulse sensor. It is also in P5 where different modes are available to cater to different style preferences of users in order to personalize their experience. I did this by playing around with the code and multiplying different variables with the pulse sensor value to get different displays. The different styles of art being formulated by the pulse sensor is complimented with the different displays of color within the circle drawn in the center of the canvas. Given the fact that it is the main part of the project and was the part that took me the most time, the aspect of P5 that I am particularly proud of is the display of the particles, which can be found below.
//One of the Three Modes, this is the Flow mode
function mode1(){
 background(245,243,233,5);

// Displays pulse sensor value or prompt to select serial port
  if (!serialActive) {
    textStyle(NORMAL);
    strokeWeight(1);
    noStroke();
    textSize(18);
    textFont('Open Sans');
   fill('#727C81');
    text("Press Space Bar to Select Serial Port", windowWidth / 2 + 8 , windowHeight/ 2 + 368);
  }
//Display Sensor Value
  else {
    textStyle(NORMAL);
    strokeWeight(1);
    noStroke();
    textSize(18);
    textFont('Open Sans');
    fill('#727C81');
    text('Pulse Sensor Value = ' + str(pulseSensorValue),  windowWidth / 2 + 8 , windowHeight/ 2 + 368);
  }

//Instruction Header on the Top Left Corner of Canvas
  fill(188, 199, 205);
  rect(-8, 0, 740, 90, 10);
  fill('#727C81');
  textSize(21);
  textStyle(BOLD);
  text('How To:', 65, 35);
  textStyle(NORMAL);
  text('Put the Velcro Band Around Your Thumb and See the Magic Unfold!', 355, 65)

// Draws circular boundary for particles to stay within
  stroke('#727C81');
  noFill();
  strokeWeight(1);
  ellipse(windowWidth / 2, windowHeight / 2, boundaryRadius * 4);

// Continuously add new particles with random positions within the cirlce
  for (let i = 0; i < 5; i++) {
    particles.push(createVector(random(width), random(height)));
}

// Assigns the current particles to currentParticle variable, this repeats for each particle
  for (let i = particles.length - 1; i >= 0; i--) {
    let currentParticle = particles[i];

//If pulse sensor value is NOT zero, create flow fields
  if (pulseSensorValue !== 0) {
    //Calculates perlin noise for the current particles on dispaly
      let perlinNoise = noise(currentParticle.x * noiseScale, currentParticle.y * noiseScale, frameCount * noiseScale);
    //Maps perlin noise value to angle in order to create some kind of osscilations
      let noiseAngle = TAU * perlinNoise;
    // Create a movement vector based on Perlin noise angle, scaled by particleSpeed
      let noiseVector = createVector(cos(noiseAngle), sin(noiseAngle)).mult(particleSpeed);
  // Calculates the center of the canvas for the vectors
      let canvasCenter = createVector(width / 2, height / 2);
  // Calculates the distance between the current particle's postion on the canvas and the center of the canvas
      let distanceToCenter = p5.Vector.dist(currentParticle, canvasCenter);
  // Creates a vector that points from current particle position to center of the canvas and sets magnitude (length) of vector to 150, which is the boundary radius to effectively scale the vector to be within the circular boundary
      let boundaryVector = p5.Vector.sub(canvasCenter, currentParticle).setMag(boundaryRadius*2);
 // Move the particle towards the boundary if it's outside, modulate movement with pulse value
      if (distanceToCenter > boundaryRadius*2) {
        currentParticle.add(boundaryVector.mult(1 + pulseSensorValue));
      }
  // Update the position of the current particle by adding the noise-based movement vector
    currentParticle.add(noiseVector);
  // Remove particles that go off the canvas
    if (!onCanvas(currentParticle)) {
        particles.splice(i, 1);
      }
  //If particles are in the boundary,
    else {
        strokeWeight(2);
        stroke(redValue, greenValue, blueValue);
      // Draw particle as a point
        point(currentParticle.x, currentParticle.y);
      }
    }
  }
The main form of communication between Arduino and P5 is unidirectional, meaning that communication comes from only one direction. In my case, data is taken from Arduino and reflected on P5. As mentioned above, the Arduino collects data from both the pulse sensor and 3 potentiometers, which are processed as needed, and then transmitted serially to the computer running P5. This data, once transported to the computer, P5 receives it, interprets it, and then displays it through particles, oscillations, and perlin noise in the sketch itself. Using this one-way flow of information, the system remains simple but efficient, embodying the concept I initially intended for my final project.
The aspect of the project that I am particularly proud of is the flow field I created using noise and particles. This is because I had to restudy the presentations and look through youtube videos to understand how to implement the flow fields in the way I envisioned them to be. It was initially quite difficult to implement as I was still a beginner when it came to the technicalities of flow fields, noise, and particles but through practice and trial and error, I was able to overcome this challenge and was able to manipulate the particles and flow fields to be constrained within a circular boundary to create a simple, dynamic, and aesthetically pleasing interface for users to experience. In terms of areas of improvement, I believe that I could have added more interactivity in P5JS to create a more comprehensive interactive experience for users. For example, by adding a feature where particles within the circle will disperse when users click within the it would add more depth to the interactivity of the experience and make it more engaging for users who are experiencing it. I could have also added some form of wearable device, such as a glove or a bracelet, that the pulse sensor is attached to in order to improve user-experience and better the interactive experience as a whole. This is because it clearly shows users how to navigate the experience with no direct instructions, which is why it creates a more engaging, personal, and interactive experience for users. Reflecting on the process of creating my final project, I am really proud of the outcome and how far I have come with both P5 and Arduino. I am genuinely happy that I was able to create something that combined my interest of bringing out the humanness of human nature, through detecting the heart beat from users’ fingers, and integrating it into a form of technology to create an overall interactive experience for users to engage with.
I also want to say that I am incredibly proud of everyone and that I am really happy with how far we have all come. Congrats and have a great summer!
The allure of a jukebox, with its nostalgic charm and tangible interaction with music selection, inspires a unique blend of past and present in your project. This modern reinterpretation of the classic jukebox isn’t just about listening to music—it’s an experiential dive into the ritual of choosing sounds from different eras and styles, echoing the tactile joy that came from flipping through vinyl records or pressing the physical buttons on a jukebox. Your project revives this delightful sensory interaction by blending physical buttons and digital outputs, allowing users to actively engage with the music rather than passively streaming playlists. It embodies a revival of the golden age of jukeboxes but with a contemporary twist, using today’s technology to recreate a piece of the past that resonates with both nostalgia and the new digital era.
The decision to incorporate a variety of music channels such as English, Classical, and Al Khalidiya channels suggests a celebration of diversity and the rich tapestry of global music culture. It reflects a yearning to bring the world closer together through the universal language of music, wrapped in the classic format of a jukebox. This project does more than just play music; it invites users to journey through different cultures and time periods at the push of a button. It’s a bridge between generations and geographies, enabling a shared experience that is both educational and entertaining, which is likely what sparked the idea to reinvent the jukebox for a modern audience. This blend of educational purpose and entertainment, rooted in technological innovation, makes your jukebox project a meaningful nod to the past while eagerly embracing the future of interactive media.
P5js code:
// Initial state settings
let loading = true;
let channels = [[], [], []]; // Arrays for storing songs by channel: 0 - English, 1 - Classical, 2 - Al Khalidiya
let numberOfSongs = 0;
let numberOfSongsLoaded = 0;
let coinSound; // Sound effect for the coin insert
let selectedChannel; // Currently selected channel
let playing = false; // Is a song currently playing?
let songToPlay; // Current song playing

// Preload function to load sounds and other resources before the program starts
function preload() {
  soundPaths = loadStrings("soundFileNames.txt"); // Load list of sound file names
  coinSound = loadSound("sounds/coin.mp3"); // Load coin sound effect
}

// Setup function to initialize the environment
function setup() {
  createCanvas(600, 400);
  textAlign(CENTER, CENTER);

  // Loop through the sound paths and assign them to channels based on file names
  for (let i = 0; i < soundPaths.length; i++) {
    let words = soundPaths[i].split("_");
    let channel = words[words.length - 2] + "_" + words[words.length - 1]; // Determine the channel from the file name
    switch (channel) {
      case "english_channel.mp3":
        channels[0].push("sounds/" + words.join("_"));
        break;
      case "classical_channel.mp3":
        channels[1].push("sounds/" + words.join("_"));
        break;
      case "khalidiya_channel.mp3":
        channels[2].push("sounds/" + words.join("_"));
        break;
    }
  }
  numberOfSongs = soundPaths.length; // Total number of songs loaded
  // Load each song in the channels array
  for (let i = 0; i < channels.length; i++) {
    for (let j = 0; j < channels[i].length; j++) {
      channels[i][j] = loadSound(channels[i][j], () => {
        numberOfSongsLoaded += 1; // Increment the count of loaded songs
      });
    }
  }
  ratioPos = { x: width / 2, y: height * 2 };
  selectedChannel = floor(random(3)); // Randomly select a channel to start
  fft = new p5.FFT(); // Initialize Fast Fourier Transform for audio visualization
}

// Draw function to continuously execute and render the canvas
function draw() {
  background(40);
  if (loading) {
    // Show loading screen until all songs are loaded
    rectMode(CORNER);
    strokeWeight(2);
    textSize(34);
    fill(255);
    text("LOADING...", width / 2, height / 2 - 20);
    noStroke();
    fill(255);
    rect(width / 2 - 150, height / 2 + 20, 300, 40);
    fill(20);
    rect(
      width / 2 - 150,
      height / 2 + 20,
      map(numberOfSongsLoaded, 0, numberOfSongs, 0, 300),
      40
    );
    if (numberOfSongsLoaded == numberOfSongs) {
      loading = false;
    }
  } else {
    // Display the sound spectrum and UI once loading is complete
    let wave = fft.waveform();
    stroke(255, 50);
    noFill();
    beginShape();
    for (let i = 0; i < wave.length; i++) {
      let x = map(i, 0, wave.length, 0, width);
      let y = map(wave[i], -1, 1, height, 0);
      curveVertex(x, y);
    }
    endShape();

    rectMode(CENTER);
    ratioPos.y = lerp(ratioPos.y, height / 2, 0.1); // Smoothly move the UI element
    textSize(16);
    let channelName = "";
    switch (selectedChannel) { // Display the name of the selected channel
      case 0:
        channelName = " ENGLISH SONGS ";
        break;
      case 1:
        channelName = " CLASSICAL SONGS ";
        break;
      case 2:
        channelName = " KHALIDIYA SONGS ";
        break;
    }
    drawRadio(channelName, playing);
    drawChannels();
  }
}

// Event-driven functions to respond to keyboard presses for controlling the jukebox
function keyPressed() {
  switch (key) {
    case "n":
      nextChannel(); // Go to the next channel
      stopMusic(); // Stop the currently playing music
      break;
    case "b":
      prevChannel(); // Go to the previous channel
      stopMusic(); // Stop the music
      break;
    case " ":
      if (!playing) {
        playMusic(); // Start playing music if not already playing
      } else {
        stopMusic(); // Stop the music if playing
      }
      break;
  }
}

// Utility functions to control channels and playback
function nextChannel() {
  selectedChannel += 1; // Increment the channel index
  if (selectedChannel >= 3) {
    selectedChannel = 0; // Wrap around to the first channel
  }
}
function prevChannel() {
  selectedChannel -= 1; // Decrement the channel index
  if (selectedChannel < 0) {
    selectedChannel = 2; // Wrap around to the last channel
  }
}
function stopMusic() {
  if (songToPlay) {
    songToPlay.stop(); // Stop the currently playing song
  }
  playing = false;
}
function playMusic() {
  coinSound.play(); // Play the coin sound effect
  songToPlay = random(channels[selectedChannel]); // Select a random song from the current channel
  playing = true;
  songToPlay.loop(); // Start playing the selected song
}

// Drawing utility functions for UI elements
function drawChannels() {
  fill(100, 120, 100);
  rect(0, 150, 320, 70);
  fill(60, 70, 60);
  rect(0, 150, 300, 50);
  push();
  textAlign(LEFT, CENTER);
  let channels = ["English", "Classical", "Khalidiya"];
  textSize(12);
  for (let i = 0; i < 3; i++) {
    let x = 0;
    let y = 130 + 20 * i;
    noFill();
    if (selectedChannel == i) {
      fill(60, 90, 60);
      rect(x, y, 300, 15);
      fill(120, 150, 120);
      text("_" + channels[i], x - 150, y);
    } else {
      rect(x, y, 300, 15);
      fill(120, 150, 120);
      text(" " + channels[i], x - 150, y);
    }
  }
  pop();
}

// Function to draw the radio interface
function drawRadio(channel, playing = false) {
  translate(ratioPos.x, ratioPos.y);
  // Visual elements for the radio disk
  noStroke();
  fill(150, 150, 220, 100);
  circle(0, 100, 450);

  fill(20);
  circle(0, 100, 350);
  fill(200, 100, 100);
  circle(0, 100, 150);

  let channelName = channel.split("");
  push();
  translate(0, 100);
  if (playing) rotate(-frameCount / 60);
  push();
  for (let i = 0; i in channelName.length; i++) {
    rotate(TWO_PI / channelName.length);
    fill(255);
    text(channelName[i].toUpperCase(), 0, -50);
  }

  pop();
  pop();
  fill(180);
  circle(0, 100, 80);

  stroke(255);
  noFill();
  arc(0, 100, 420, 420, -PI / 2 + 0.4, -PI / 2 + 0.8);

  noStroke();
  strokeWeight(2);
  fill("#606A42");
  rect(0, 290, 500, 400, 40);
}
code with Arduino:
let loading = true;
let channels = [[], [], []]; //0 english channel , 1 - classical channel, 2 Al Khalidiya channel
let numberOfSongs = 0;
let numberOfSongsLoaded = 0;
let coinSound;
let selectedChannel;
let playing = false;
let songToPlay;
let toSend = 0;

function preload() {
  soundPaths = loadStrings("soundFileNames.txt");
  coinSound = loadSound("sounds/coin.mp3");

  // for (let i = 0; i < soundPaths.length; i++) {
  //   let words = soundPaths[i].split("_");
  //   //here we'll store sound paths in different arrays as different channels
  //   let channel = words[words.length - 2] + "_" + words[words.length - 1];
  //   switch (channel) {
  //     case "english_channel.mp3":
  //       channels[0].push("sounds/" + words.join("_"));
  //       break;
  //     case "classical_channel.mp3":
  //       channels[1].push("sounds/" + words.join("_"));
  //       break;
  //     case "khalidiya_channel.mp3":
  //       channels[2].push("sounds/" + words.join("_"));
  //       break;
  //   }
  // }
  // print(channels)
  // numberOfSongs = soundPaths.length;
  // //load every song in channel
  // for (let i = 0; i < channels.length; i++) {
  //   for (let j = 0; j < channels[i].length; j++) {
  //     channels[i][j] = loadSound(channels[i][j], () => {
  //       numberOfSongsLoaded += 1;
  //     });
  //   }
  // }
  /*
  ahlam_al_khalidiya_channel.mp3
cello_suite_classical_channel.mp3
gabl _aaarfak_al_khalidiya_channel.mp3
gymnopédie_classical_channel.mp3
i_lived_english_channel.mp3
mushfi_jorouhi_al_khalidiya_channel.mp3
overture_classical_channel.mp3
raheeb__al_khalidiya_channel.mp3
rouhe_thebak_al_khalidiya_channel.mp3
sundress_english_channel.mp3
swan_lake_suite_classical_channel.mp3
// sza_english_channel.mp3
virginia_beach_english_channel.mp3
whats_on_ur_mind_english_channel.mp3
  */

  {
    let sound = loadSound("sounds/i_lived_english_channel.mp3");
    channels[0].push(sound);
  }

  {
    let sound = loadSound("sounds/virginia_beach_english_channel.mp3");
    channels[0].push(sound);
  }


}

function setup() {
  createCanvas(600, 400);
  textAlign(CENTER, CENTER);

  //
  ratioPos = { x: width / 2, y: height * 2 };
  selectedChannel = floor(random(3));
  fft = new p5.FFT();
}

function draw() {
  background(40);
  if (loading) {
    rectMode(CORNER);
    strokeWeight(2);
    textSize(34);
    fill(255);
    text("LOADING...", width / 2, height / 2 - 20);
    noStroke();
    fill(255);
    rect(width / 2 - 150, height / 2 + 20, 300, 40);
    fill(20);
    rect(
      width / 2 - 150,
      height / 2 + 20,
      map(numberOfSongsLoaded, 0, numberOfSongs, 0, 300),
      40
    );
    if (numberOfSongsLoaded == numberOfSongs) {
      loading = false;
    }
  } else {
    //
    //draw Sound Spectrum
    let wave = fft.waveform();
    stroke(255, 50);
    noFill();
    beginShape();
    let x, y;
    for (let i = 0; i < wave.length; i++) {
      x = map(i, 0, wave.length, 0, width);
      y = map(wave[i], -1, 1, height, 0);
      curveVertex(x, y);
    }
    endShape();

    rectMode(CENTER);
    ratioPos.y = lerp(ratioPos.y, height / 2, 0.1);
    textSize(16);
    let channelName = "";
    switch (selectedChannel) {
      case 0:
        channelName = " ENGLISH SONGS ";
        break;
      case 1:
        channelName = " CLASSICAL SONGS ";
        break;
      case 2:
        channelName = " KHALIDIYA SONGS ";
        break;
    }
    drawRadio(channelName, playing);
    drawChannels();
  }
}

//functions to call from arduino's button
function keyPressed() {
  switch (key) {
    case "n":
      nextChannel();
      stopMusic();
      break;
    case "b":
      prevChannel();
      stopMusic();
      break;
    case " ":
      if (!playing) {
        playMusuc();
      } else {
        stopMusic();
      }
      break;
  }
}

function nextChannel() {
  selectedChannel += 1;
  if (selectedChannel >= 3) {
    selectedChannel = 0;
  }
}
function prevChannel() {
  selectedChannel -= 1;
  if (selectedChannel < 0) {
    selectedChannel = 2;
  }
}
function stopMusic() {
  if (songToPlay) {
    songToPlay.stop();
  }
  playing = false;
}
function playMusuc() {
  if (!playing) {
    coinSound.play();
    print("sel: " + selectedChannel);
    songToPlay = channels[selectedChannel][Math.floor(random(3))]; //random(channels[selectedChannel]);
    playing = true;
    songToPlay.loop();
  }
}

function drawChannels() {
  fill(100, 120, 100);
  rect(0, 150, 320, 70);
  fill(60, 70, 60);
  rect(0, 150, 300, 50);
  push();
  textAlign(LEFT, CENTER);
  let channels = ["English", "Classical", "Khalidiya"];
  textSize(12);
  for (let i = 0; i < 3; i++) {
    // text(channels[i],20,40+15*i);
    let x = 0;
    let y = 130 + 20 * i;
    noFill();
    if (selectedChannel == i) {
      fill(60, 90, 60);
      rect(x, y, 300, 15);
      fill(120, 150, 120);
      text("_" + channels[i], x - 150, y);
    } else {
      rect(x, y, 300, 15);
      fill(120, 150, 120);
      text(" " + channels[i], x - 150, y);
    }
  }
  pop();
}

function drawRadio(channel, playing = false) {
  translate(ratioPos.x, ratioPos.y);
  //disk
  noStroke();
  fill(150, 150, 220, 100);
  circle(0, 100, 450);

  fill(20);
  circle(0, 100, 350);
  fill(200, 100, 100);
  circle(0, 100, 150);

  let channelName = channel.split("");
  push();
  translate(0, 100);
  if (playing) rotate(-frameCount / 60);
  push();
  for (let i = 0; i < 20; i++) {
    rotate(TWO_PI / 20);
    fill(255);
    text("_", 0, -170);
  }
  pop();
  push();
  for (let i = 0; i < channelName.length; i++) {
    rotate(TWO_PI / channelName.length);
    fill(255);
    text(channelName[i].toUpperCase(), 0, -50);
  }

  pop();
  pop();
  fill(180);
  circle(0, 100, 80);

  stroke(255);
  noFill();
  arc(0, 100, 420, 420, -PI / 2 + 0.4, -PI / 2 + 0.8);

  noStroke();
  strokeWeight(2);
  fill("#606A42");
  rect(0, 290, 500, 400, 40);
}

function readSerial(data) {
  ////////////////////////////////////
  //READ FROM ARDUINO HERE
  ////////////////////////////////////

  if (data != null) {
    print(data);
    // make sure there is actually a message
    // split the message
    let fromArduino = split(trim(data), ",");
    // if the right length, then proceed
    if (fromArduino.length == 4) {
      // only store values here
      // do everything with those values in the main draw loop

      // We take the string we get from Arduino and explicitly
      // convert it to a number by using int()
      // e.g. "103" becomes 103
      let start = int(fromArduino[0]);
      let stop = int(fromArduino[1]);
      let next = int(fromArduino[2]);
      let prev = int(fromArduino[3]);

      if (start == 1) {
        print("start");
        playMusuc();
      } else if (stop == 1) {
        print("stop");
        stopMusic();
      } else if (next == 1) {
        print("next");
        nextChannel();
        stopMusic();
      } else if (prev == 1) {
        print("prev");
        prevChannel();
        stopMusic();
      }

      //////////////////////////////////
      //SEND TO ARDUINO HERE (handshake)
      //////////////////////////////////
      let sendToArduino = 0 + "\n";
      writeSerial(sendToArduino);
    }
  }
}

function keyPressed() {
  if (key == " ") {
    // important to have in order to start the serial connection!!
    setUpSerial();
  }
}
Showcase:
Struggles:
When I initially incorporated Arduino buttons into the program, I envisioned a seamless integration that would enhance the user experience by providing tangible controls for the digital jukebox. However, this integration proved to be more challenging than anticipated. The entire program malfunctioned, leading to unexpected behaviors where buttons would either not respond or trigger incorrect actions. This technical hurdle was a significant setback, as it compromised the core functionality of the project—interacting with the music playlist through physical controls.
Faced with these difficulties, I realized that a pivot was necessary to maintain the integrity and usability of the project. I revisited the drawing board, reevaluating the interfacing between the Arduino and the software. This required stripping down complex parts of the code, simplifying the communication protocols, and implementing more robust error handling mechanisms to ensure that each button press accurately corresponded to the intended action. Although this pivot was a detour from my original vision, it was a crucial learning experience that emphasized the importance of adaptability and thorough testing in the development process. The revamped approach not only resolved the issues but also reinforced the project’s functionality, making it more reliable and user-friendly.
Future Improvements:
Based on the experiences and challenges encountered with the integration of Arduino buttons and the development of the digital jukebox, several future improvements can be outlined to enhance the project further:
1. Enhanced Error Handling and Debugging Tools: Implementing more sophisticated error handling mechanisms can help identify and resolve issues more efficiently when they arise during the interaction between the Arduino hardware and the software. Additionally, developing a suite of debugging tools or visual indicators in the software can help monitor the state and health of the system in real-time.
2. User Interface Improvements: Enhancing the user interface to provide clearer feedback and more intuitive controls can significantly improve the user experience. This could include visual indicators of button presses, more responsive animations, or a more aesthetically pleasing layout that mimics the classic jukebox style.
3. Expanded Music Library and Categorization: Expanding the music library to include more diverse genres and new channels can cater to a broader audience. Implementing a more dynamic categorization system where users can create custom playlists or choose from themed channels could add a new layer of interaction.
4. Wireless Control Options: Introducing wireless control options such as Bluetooth or Wi-Fi connectivity could allow users to control the jukebox from their smartphones or other devices. This could be particularly useful for accessibility purposes and to accommodate larger venues.
5. Improved Audio Quality and Effects: Upgrading the sound output hardware or integrating software that allows for better sound equalization and effects can enhance the overall listening experience. This might include features like bass boost, echo, and balance adjustments that users can control directly.
6. Sustainability and Maintenance: Considering the long-term sustainability and ease of maintenance in the design can ensure the jukebox remains functional and enjoyable for years. This could involve using more durable materials for the hardware, making the system modular for easy repairs, or providing software updates to keep the system secure and efficient.
7. Interactive Features and Gamification: Introducing interactive features such as music trivia, user contests, or gamification elements where users can earn points or rewards for their interaction can increase engagement and provide a more entertaining experience.
These improvements aim to refine the functionality, broaden the appeal, and ensure the longevity of the digital jukebox project, making it not only a nostalgic piece but a cutting-edge feature for any social or personal space.
Arduino code:
// Define the pin numbers for the buttons
const int pinGreen = 11; // Start
const int pinYellow = 9; // Stop
const int pinBlue = 5; // Next Channel
const int pinBlack = 3; // Previous Channel

void setup() {
  // Initialize the buttons as inputs
  pinMode(pinGreen, INPUT);
  pinMode(pinYellow, INPUT);
  pinMode(pinBlue, INPUT);
  pinMode(pinBlack, INPUT);

  // Start serial communication at 9600 bps
  Serial.begin(9600);
  // start the handshake
  while (Serial.available() <= 0) {
    Serial.println("0,0,0,0"); // send a starting message
    delay(50);
  }
}

void loop() {
  // Read the state of each button
  int stateGreen = digitalRead(pinGreen);
  int stateYellow = digitalRead(pinYellow);
  int stateBlue = digitalRead(pinBlue);
  int stateBlack = digitalRead(pinBlack);
  // Serial.println(toSend);

  // String toSend;

  // Send different commands based on button presses
  // if (stateGreen == HIGH) {
  //   toSend = "start";
  // }
  // else if (stateYellow == HIGH) {
  //   Serial.println("stop"); // Command to stop the radio
  // }
  // else if (stateBlue == HIGH) {
  //   Serial.println("next"); // Command to go to next channel
  // }
  // else if (stateBlack == HIGH) {
  //   Serial.println("prev"); // Command to go to previous channel
  // }

  while (Serial.available()) {
    int fromP5 = Serial.parseInt();

    if (Serial.read() == '\n') {
      Serial.print(stateGreen);
      Serial.print(",");
      Serial.print(stateYellow);
      Serial.print(",");
      Serial.print(stateBlue);
      Serial.print(",");
      Serial.println(stateBlack);
    }
  }

  // delay(100); // Delay to debounce and prevent multiple sends
}
For my final project, I decided to create a Photo Booth that questions and criticises the act of taking an individual selfie while encouraging the processes of documenting memories with others. The purpose of the work is to discourage and eliminate the ego-centric approach behind how we make use of our smartphone’s camera. In the same way that the widespread use of smartphones has increased the awareness of responsible online practices, I wanted to create something that spoke to the importance of how we utilise this incredibly accessible method of documenting our lives. Essentially, Selfie4Two is a work that focuses on celebrating interpersonal connection through technology.
Technical Approach & Challenges
Initially, my approach in creating this Photo Booth concept was to utilise machine learning technology through an image classification model. This model would discern whether there were one or two people in the frame and whether they were holding up their phone (suggesting that they are taking a picture of themselves). I would then incorporate this model into p5js and load an ASCII webcam rendering based on what was detected, presenting question marks for one person and hearts for groups. Screenshots of the image classification model are seen below.
I was able to functionally incorporate it into p5 with some initial testing but could not effectively do so with the ASCII webcam rendering that I had made, meaning I was forced to avoid using it in order to finish the project. This certainly limited the usability of the project as well as minimising how effective the concept was conveyed. In an attempt to resolve this, I included emojis (maintaining the theme of internet culture) onto the initial webcam display that can be clicked to display the ASCII renderings.
In terms of the ASCII webcam rendering, I was able to create two variations with one being comprised of question marks and the other of hearts. These are both displayed below.
After incorporating these into my final code, however, they ran much slower and did not display correctly. Unfortunately, I could not figure out how to fix this and had to present this version of the code as my final project.
const density = " \u2661";
const density1 = " ?";
let video;
let emojiSize = 32; // Size of the emojis
function setup() {
createCanvas(window.innerWidth, window.innerHeight);
video = createCapture(VIDEO);
video.hide();
let button = createButton("reset");
button.mousePressed(resetSketch);
}
function draw() {
background(0);
video.loadPixels();
// Draw the video
image(video, 0, 0, width, height);
let emoji = "🤳🧍❔";
let emoji1 = "🤳🧑🤝🧑❤️";
text(emoji1, width / 6, height / 4);
text(emoji, width / 1.2, height / 4);
textSize(32);
textAlign(CENTER, CENTER);
// Calculate bounding boxes for emojis
let emojiBox = {
x: width / 6 - emojiSize / 2,
y: height / 4 - emojiSize / 2,
width: textWidth(emoji),
height: emojiSize,
};
let emojiBox1 = {
x: width / 1.2 - emojiSize / 2,
y: height / 4 - emojiSize / 2,
width: textWidth(emoji1),
height: emojiSize,
};
// Check if mouse click is inside the bounding box of the first emoji
if (
mouseX > emojiBox.x &&
mouseX < emojiBox.x + emojiBox.width &&
mouseY > emojiBox.y &&
mouseY < emojiBox.y + emojiBox.height
) {
coupleAscii();
}
// Check if mouse click is inside the bounding box of the second emoji
if (
mouseX > emojiBox1.x &&
mouseX < emojiBox1.x + emojiBox1.width &&
mouseY > emojiBox1.y &&
mouseY < emojiBox1.y + emojiBox1.height
) {
singleAscii();
}
}
function singleAscii() {
clear();
textSize(10);
background(0);
video.loadPixels();
fill(255, 180, 180);
stroke(255, 180, 180);
strokeWeight(1);
let asciiImage1 = "";
for (let j = 0; j < video.height; j++) {
for (let i = 0; i < video.width; i++) {
const pixelIndex = (i + j * video.width) * 4;
const r = video.pixels[pixelIndex + 0];
const g = video.pixels[pixelIndex + 1];
const b = video.pixels[pixelIndex + 2];
const avg = (r + g + b) / 3;
const len = density1.length;
const charIndex = floor(map(avg, 0, 255, 0, len));
const c = density1.charAt(charIndex);
text(
c,
map(i, 0, video.width, 0, width),
map(j, 0, video.height, 0, height)
);
}
}
}
function coupleAscii() {
clear();
textSize(10);
background(0);
video.loadPixels();
fill(255, 180, 180);
stroke(255, 180, 180);
strokeWeight(1);
let asciiImage = "";
for (let j = 0; j < video.height; j++) {
for (let i = 0; i < video.width; i++) {
const pixelIndex = (i + j * video.width) * 4;
const r = video.pixels[pixelIndex + 0];
const g = video.pixels[pixelIndex + 1];
const b = video.pixels[pixelIndex + 2];
const avg = (r + g + b) / 3;
const len = density.length;
const charIndex = floor(map(avg, 0, 255, 0, len));
const c = density.charAt(charIndex);
text(
c,
map(i, 0, video.width, 0, width),
map(j, 0, video.height, 0, height)
);
}
}
}
function resetSketch() {
clear();
background(0);
video.loadPixels();
// Draw the video
image(video, 0, 0);
push();
let emoji = "🤳🧍❔";
let emoji1 = "🤳🧑🤝🧑❤️";
text(emoji1, width / 6, height / 4);
text(emoji, width / 6, height / 2);
textSize(32);
textAlign(CENTER, CENTER);
pop();
// Calculate bounding boxes for emojis
let emojiBox = {
x: width / 6 - emojiSize / 2,
y: height / 4 - emojiSize / 2,
width: textWidth(emoji),
height: emojiSize,
};
let emojiBox1 = {
x: width / 6 - emojiSize / 2,
y: height / 2 - emojiSize / 2,
width: textWidth(emoji1),
height: emojiSize,
};
// Check if mouse click is inside the bounding box of the first emoji
if (
mouseX > emojiBox.x &&
mouseX < emojiBox.x + emojiBox.width &&
mouseY > emojiBox.y &&
mouseY < emojiBox.y + emojiBox.height
) {
coupleAscii();
}
// Check if mouse click is inside the bounding box of the second emoji
if (
mouseX > emojiBox1.x &&
mouseX < emojiBox1.x + emojiBox1.width &&
mouseY > emojiBox1.y &&
mouseY < emojiBox1.y + emojiBox1.height
) {
singleAscii();
}
}
I also intended to add an Adafruit Neopixel LED Strip through Arduino into my project in order to emphasise the experience of a Photo Booth. The LED strip would be attached to the screen and would turn on if the image classification model detected two people. As I was already experiencing issues with the code, I was unable to incorporate this into my final project despite attempts at wiring and programming it.
Improvements
Clearly, there is a lot of space for improvement within my final project. Other than improving the functionality of all the components I was unable to incorporate properly (or at all), one key area of improvement would have been testing and sharing my ideas with someone more experienced in order to gauge their feasibility. Had I known ml5 libraries tend to run slower in p5js, I may have chosen to pursue a different concept altogether.
Most importantly, this project is proof of the importance of simplifying ideas and starting to work on them ahead of time. The main issue that lead to this outcome was that I did not give myself enough time to understand these new concepts (image classification, ASCII) which naturally lead to me being unable to incorporate them successfully within a p5js sketch. Going forward, I will ensure that I set myself realistic goals and provide myself with a workable timeline by experimenting with ideas earlier on.
For this assignment, we were tasked to control an ellipse using sensor data from arduino.
For this, I’m using readings from a potentiometer.
Arduino Code
void setup() {
  Serial.begin(9600);
}

void loop() {
  int sensorValue = analogRead(A0); // Read the value from the potentiometer
  Serial.println(sensorValue); // Give P5 the value over serial
  delay(10);
}
P5 Code
let sensor = 0;

function setup() {
  createCanvas(400, 400);
}

function draw() {
  background(220);
  if (!serialActive) text("Click the screen to connect serial.", 50, 50); // display text to connect serial

  let x = map(sensor, 0, 1023, 0, 400); // map sensor to canvas
  ellipse(x, 200, 50, 50); // Draw the ellipse in the middle of the screen
}

// Serial code copied from example sketch, with some modifications

function mousePressed() {
  if (!serialActive) {
    // important to have in order to start the serial connection!!
    setUpSerial();
  }
}

function readSerial(data) {
  if (data != null) {
    // make sure there is actually a message
    // split the message
    sensor = trim(data);
  }
}

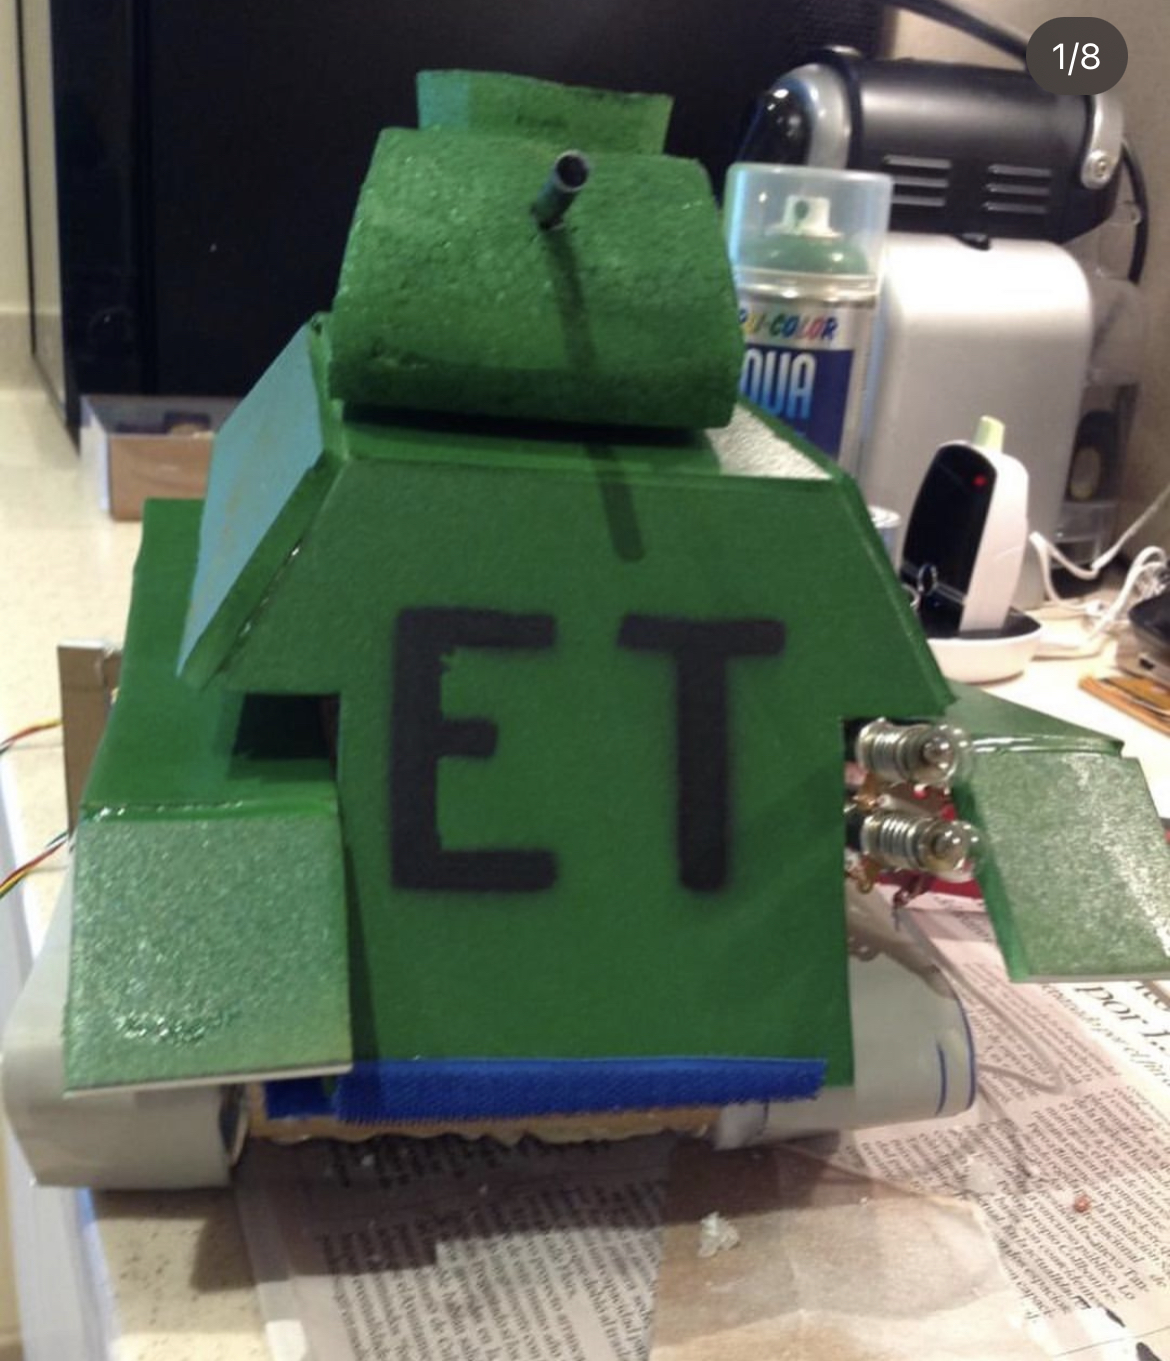
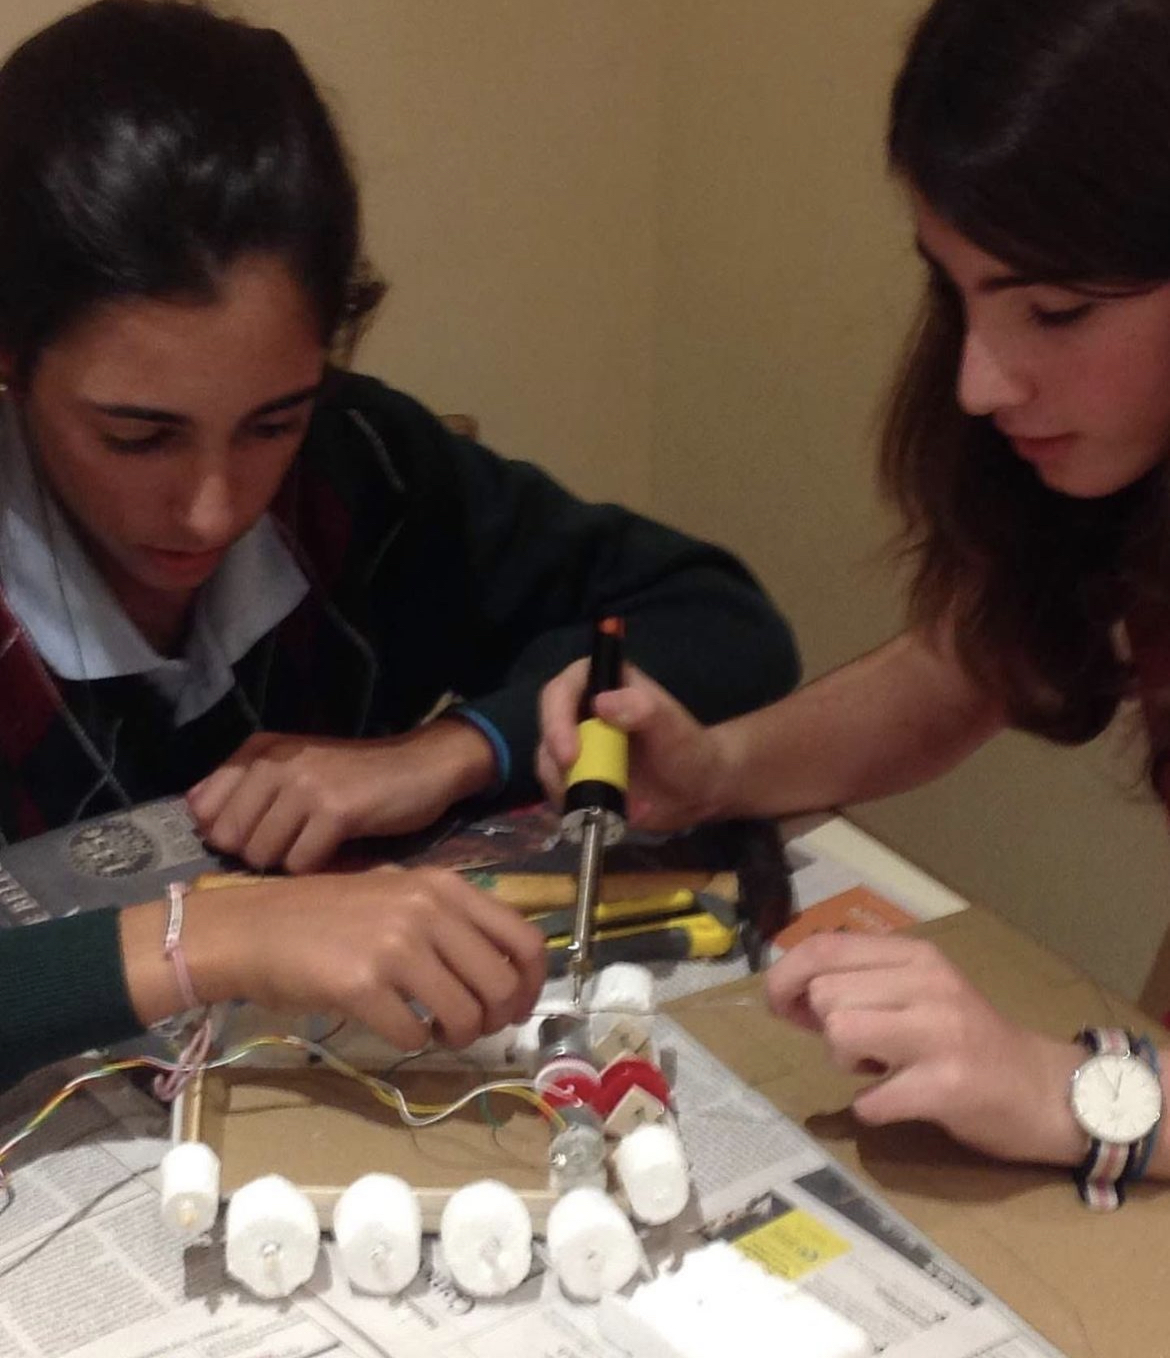
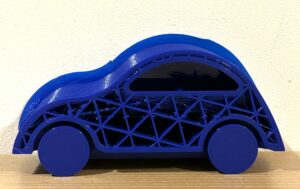
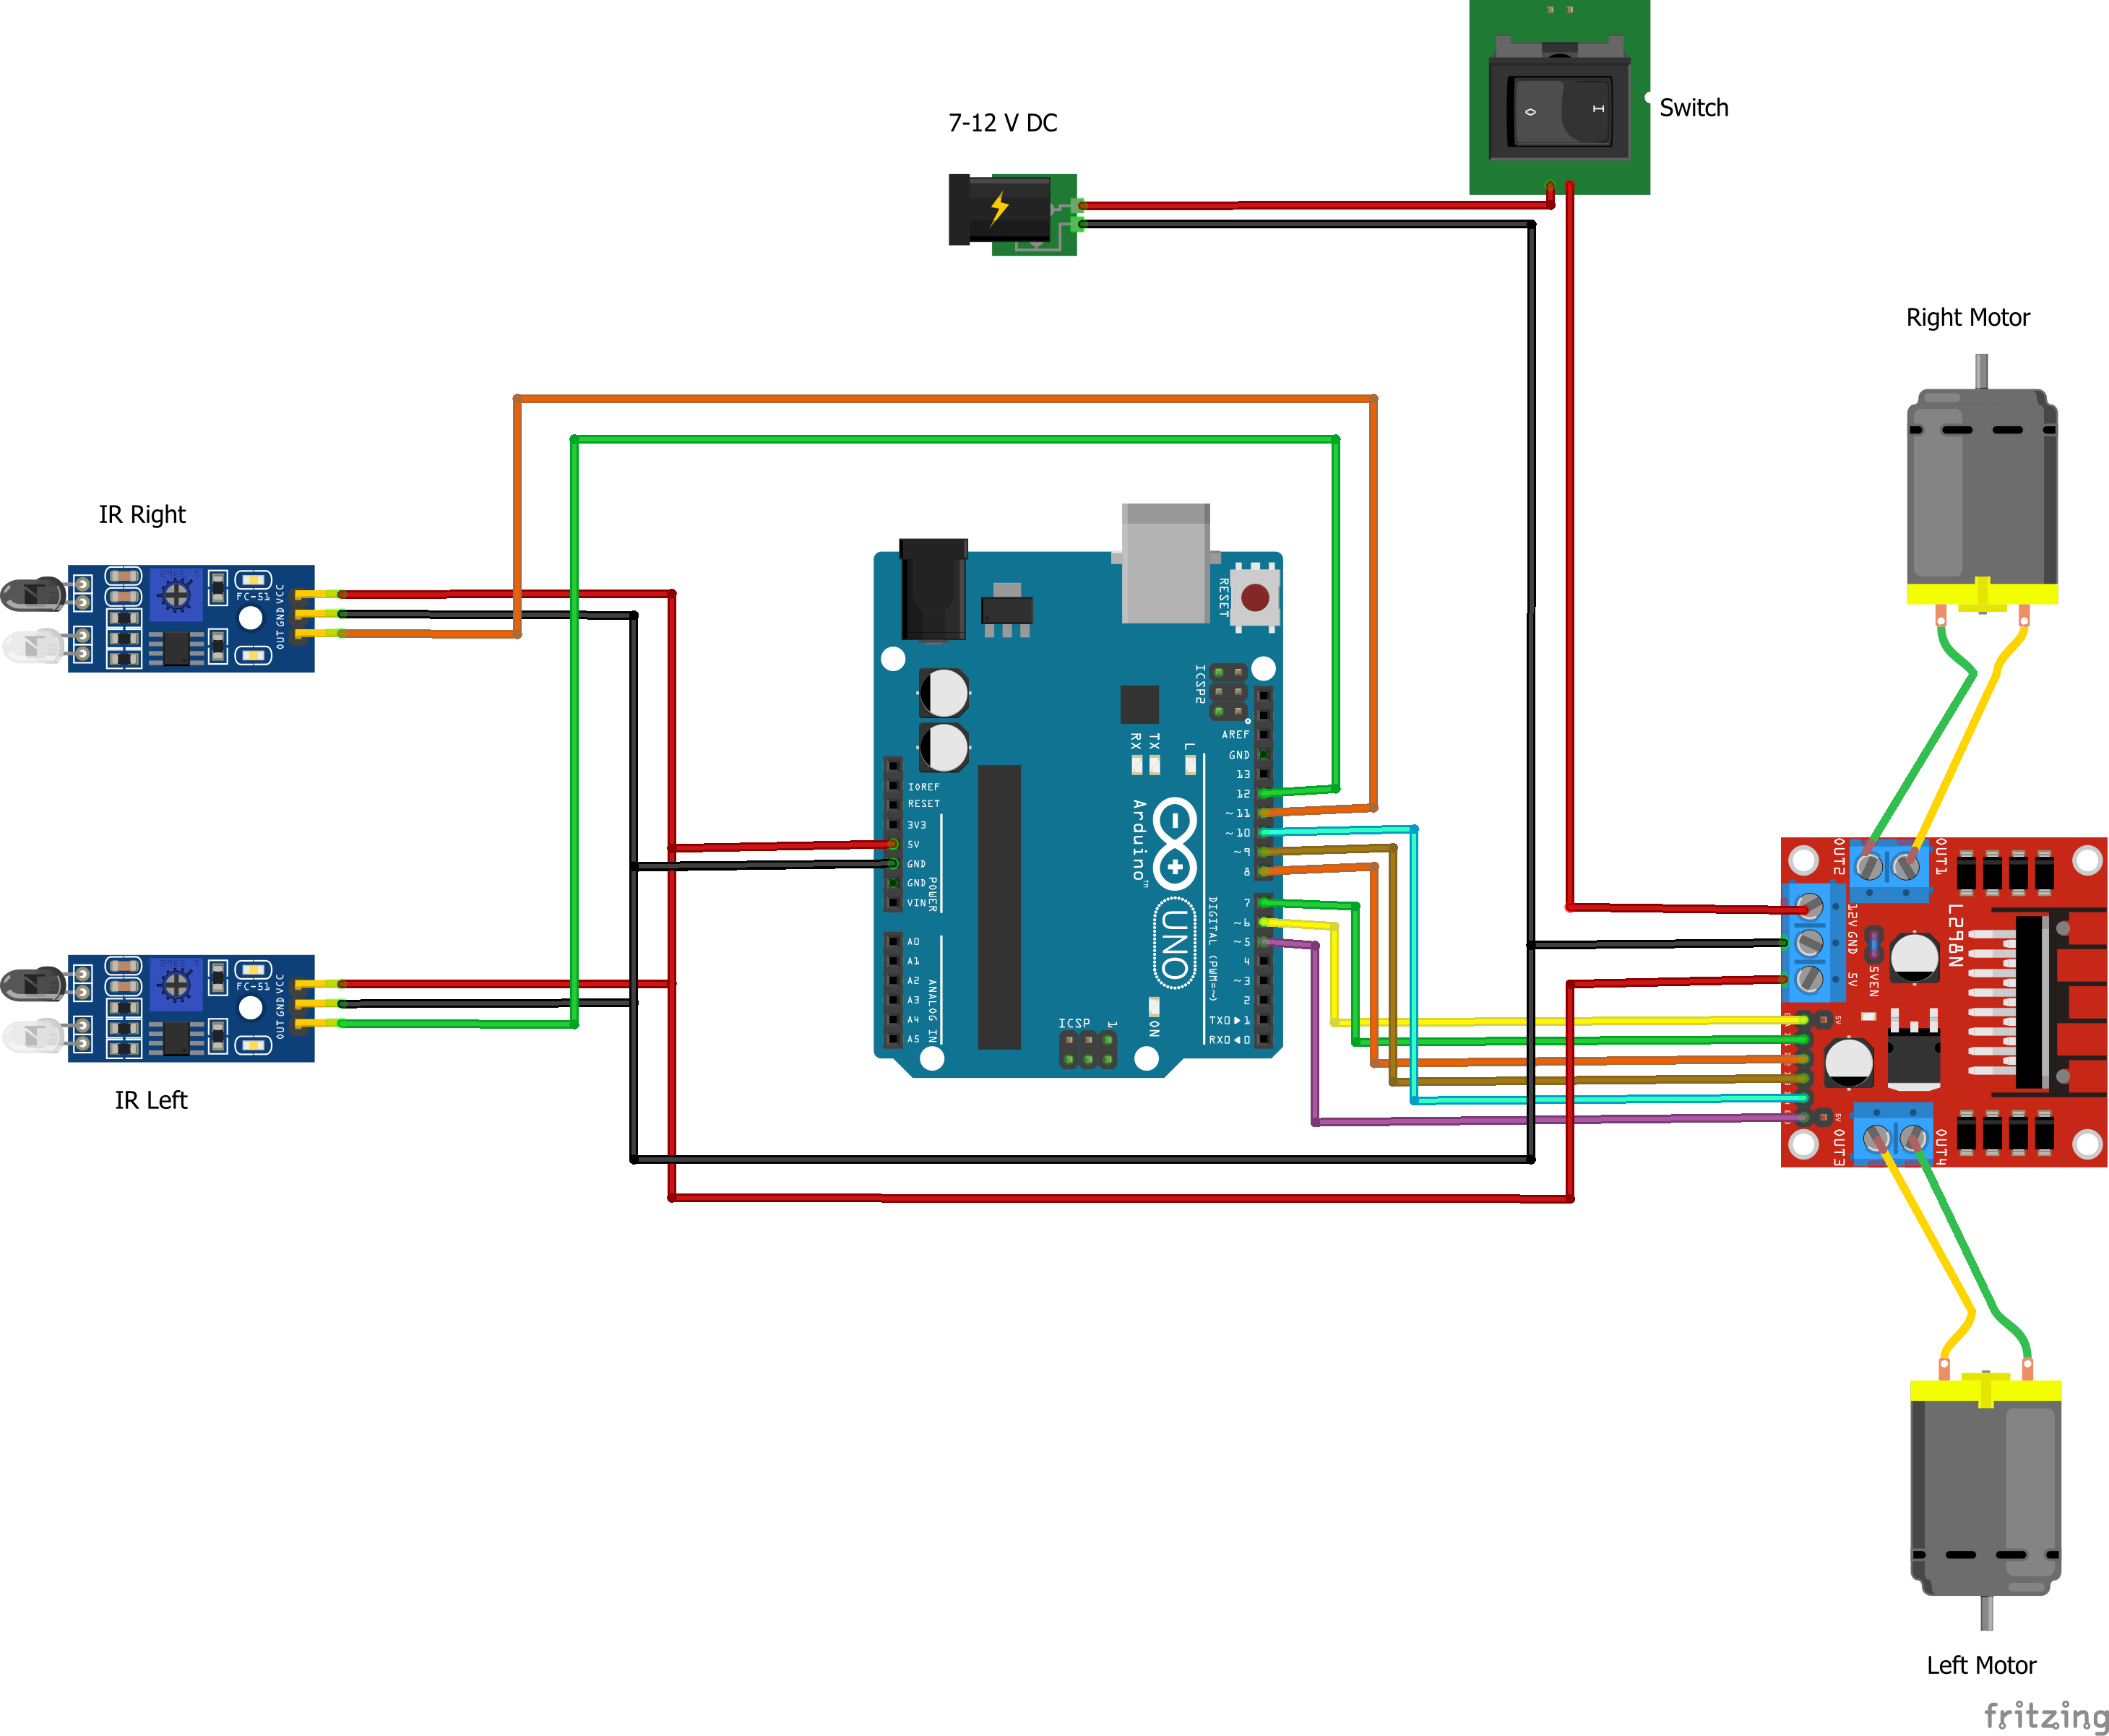
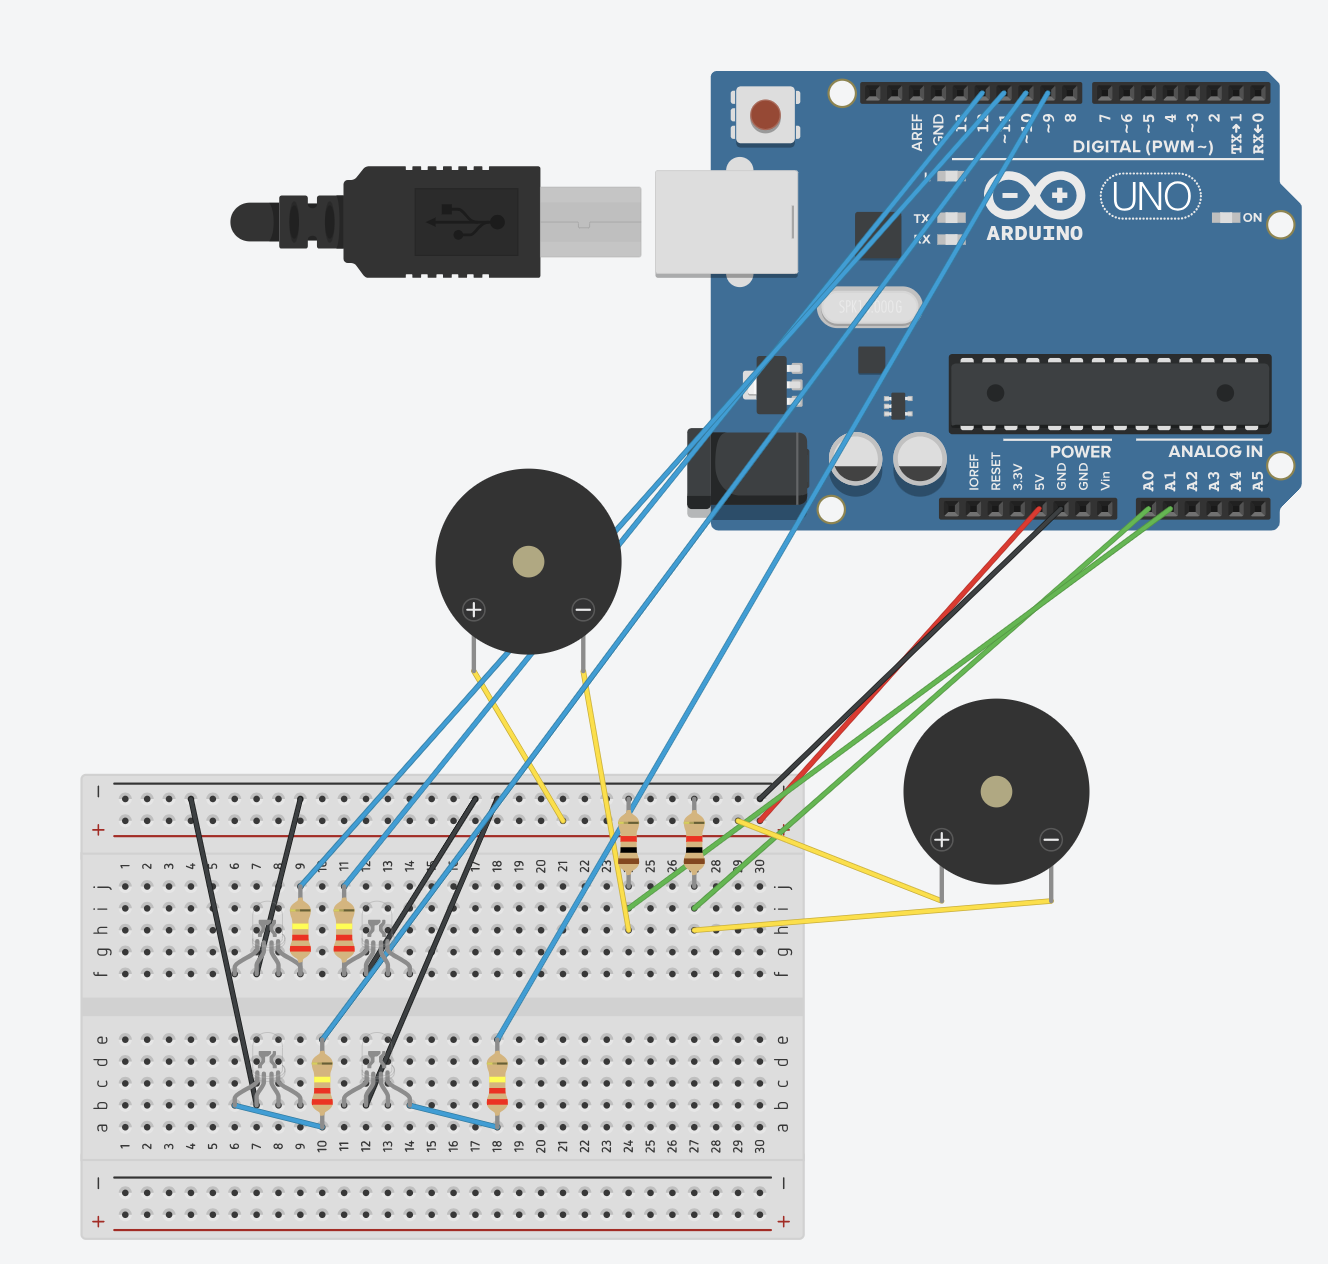
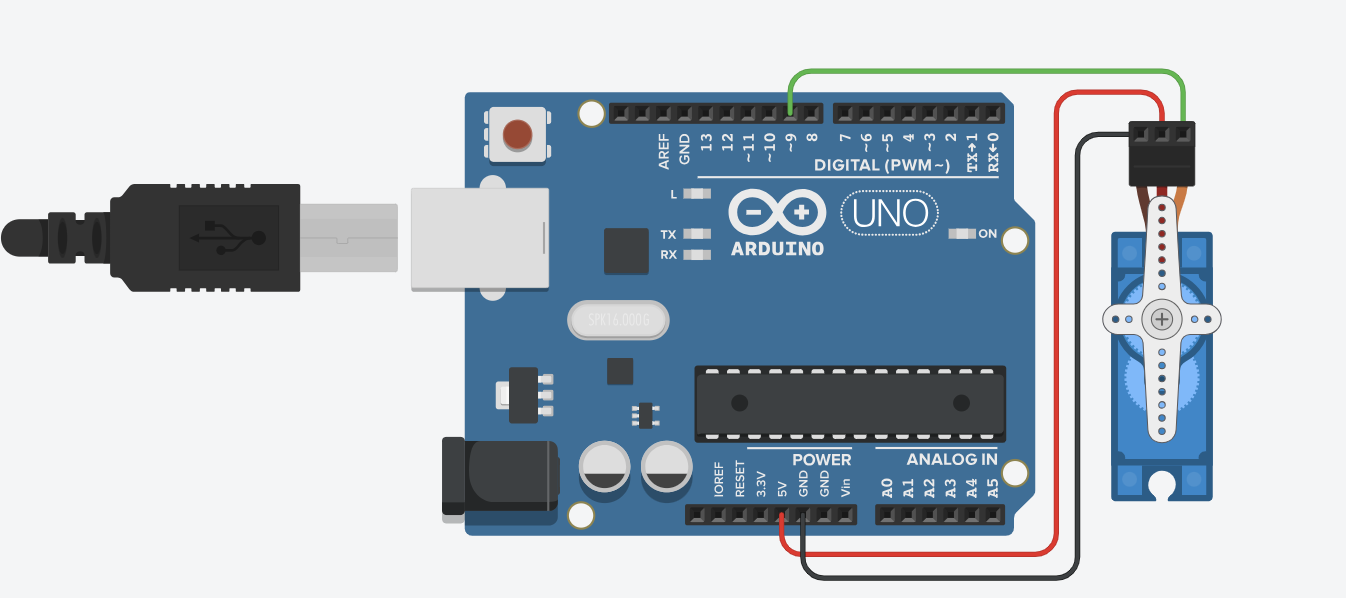
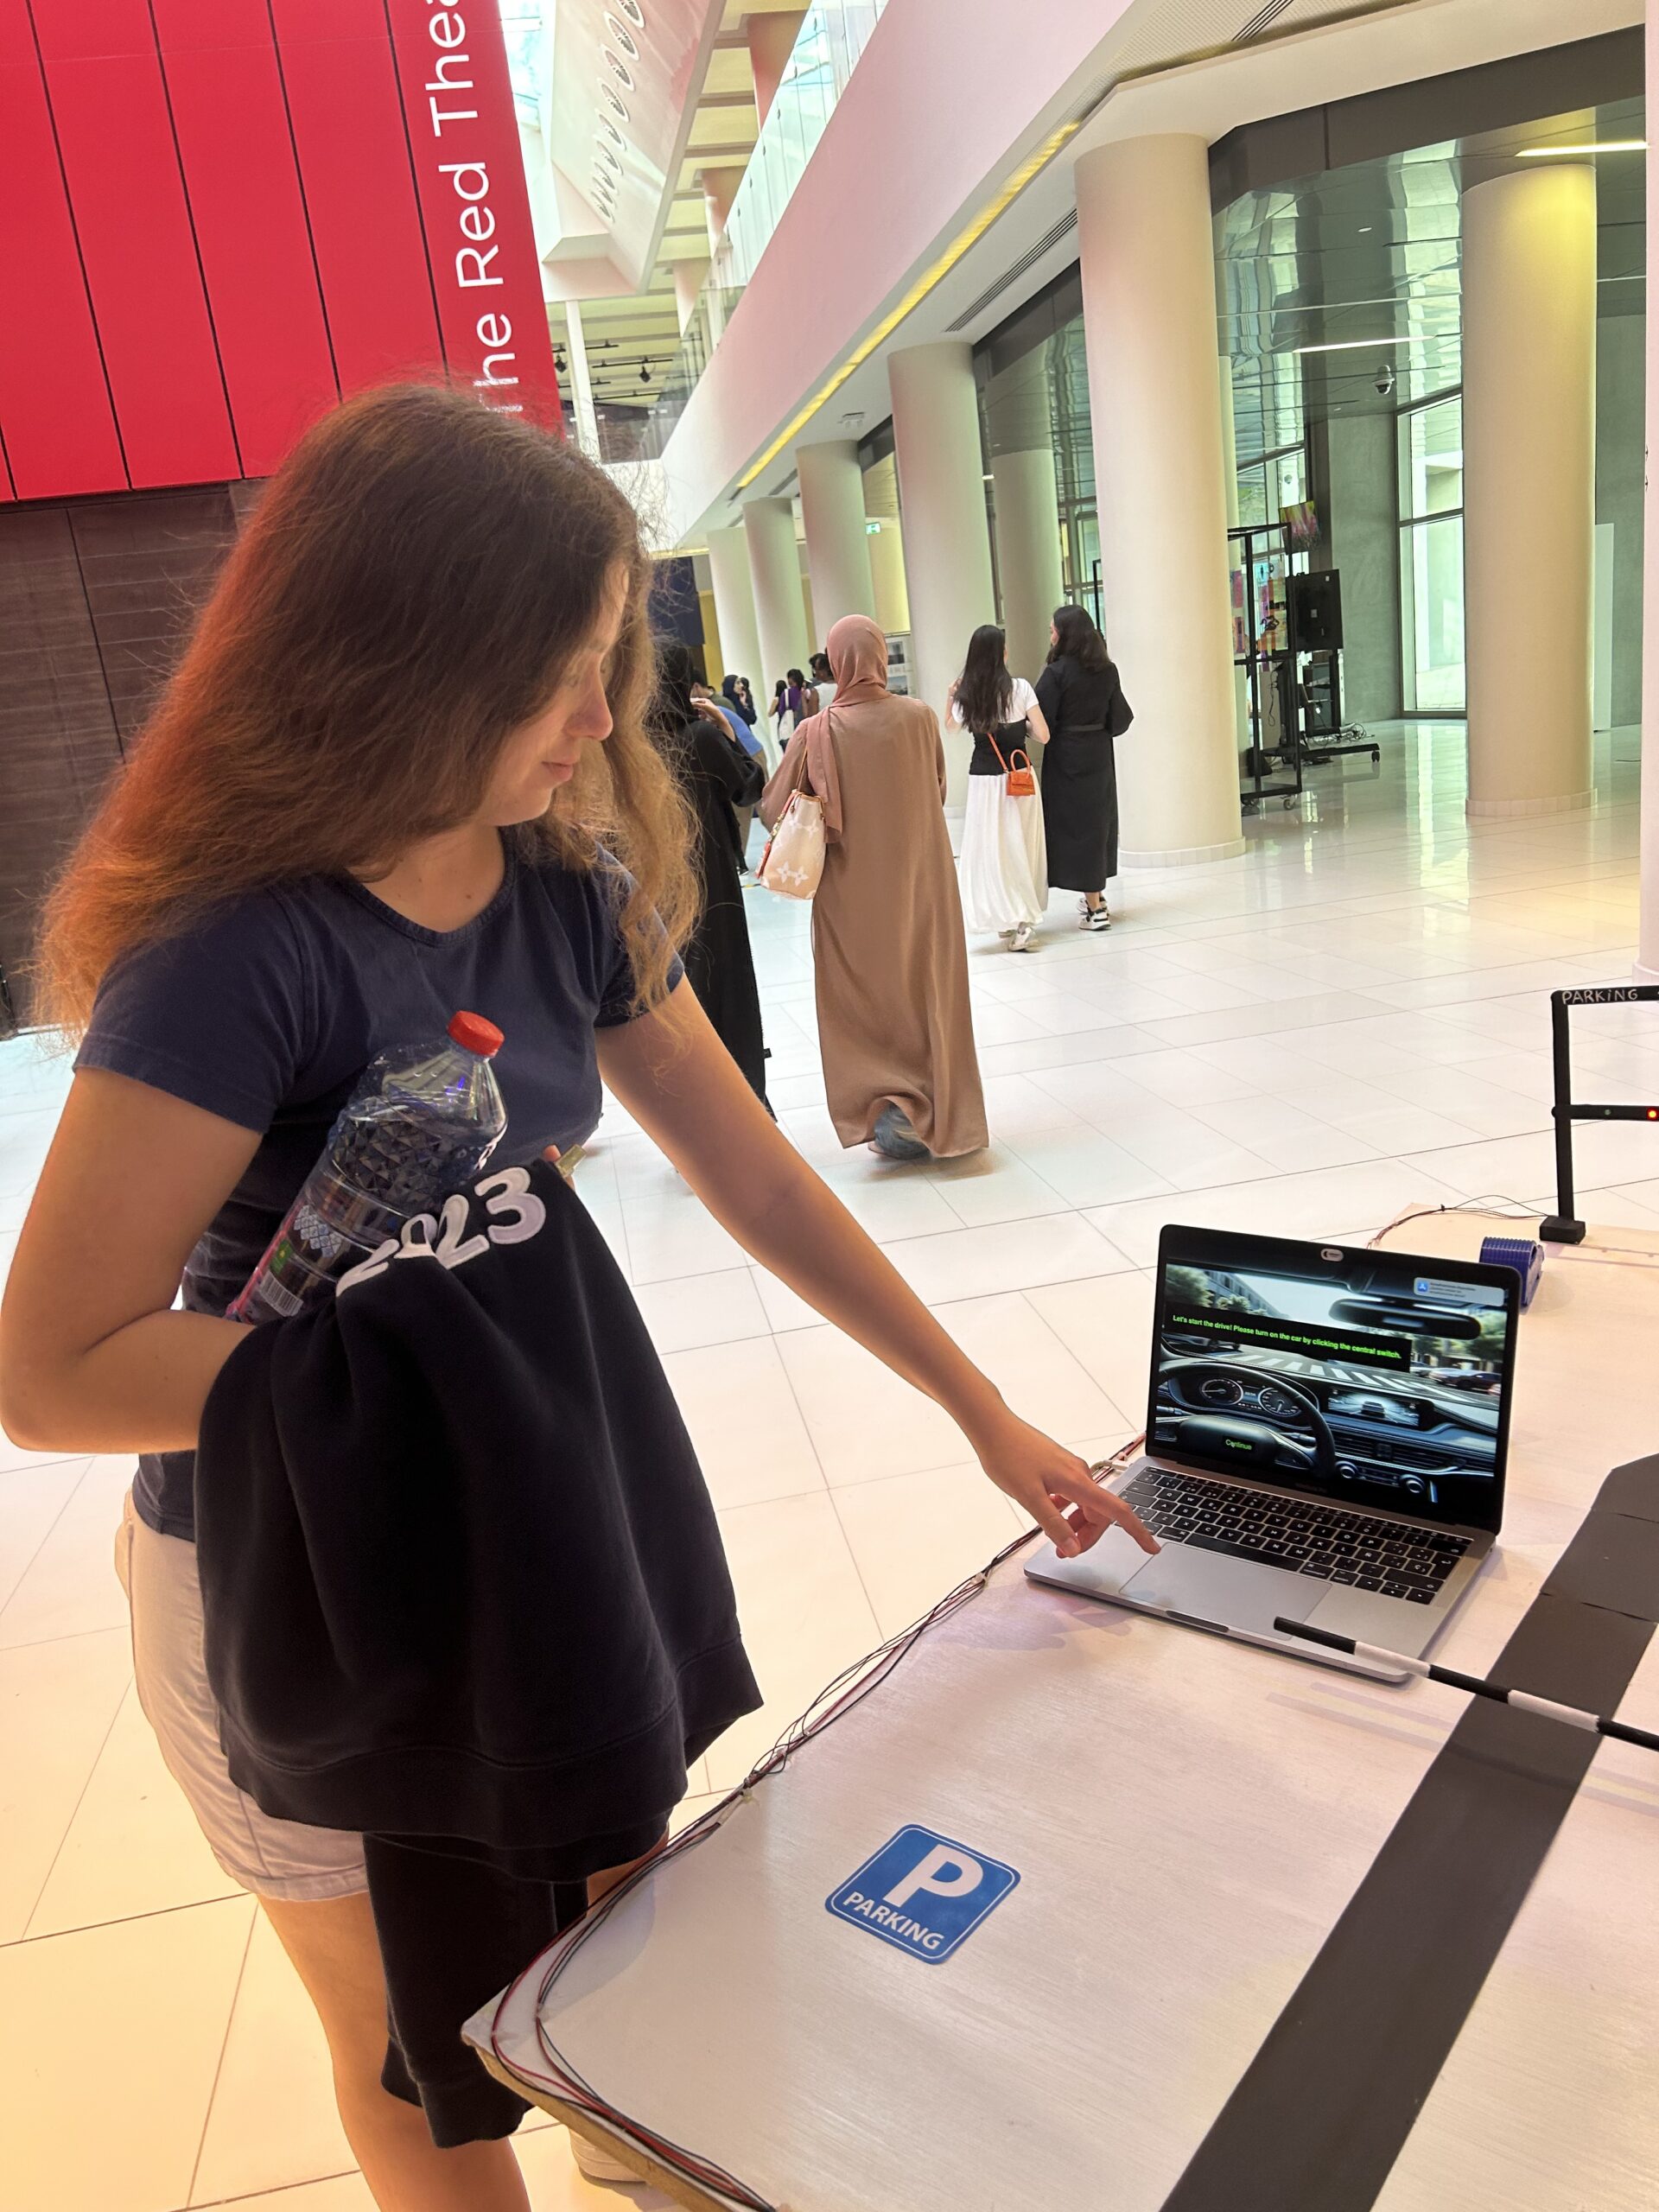
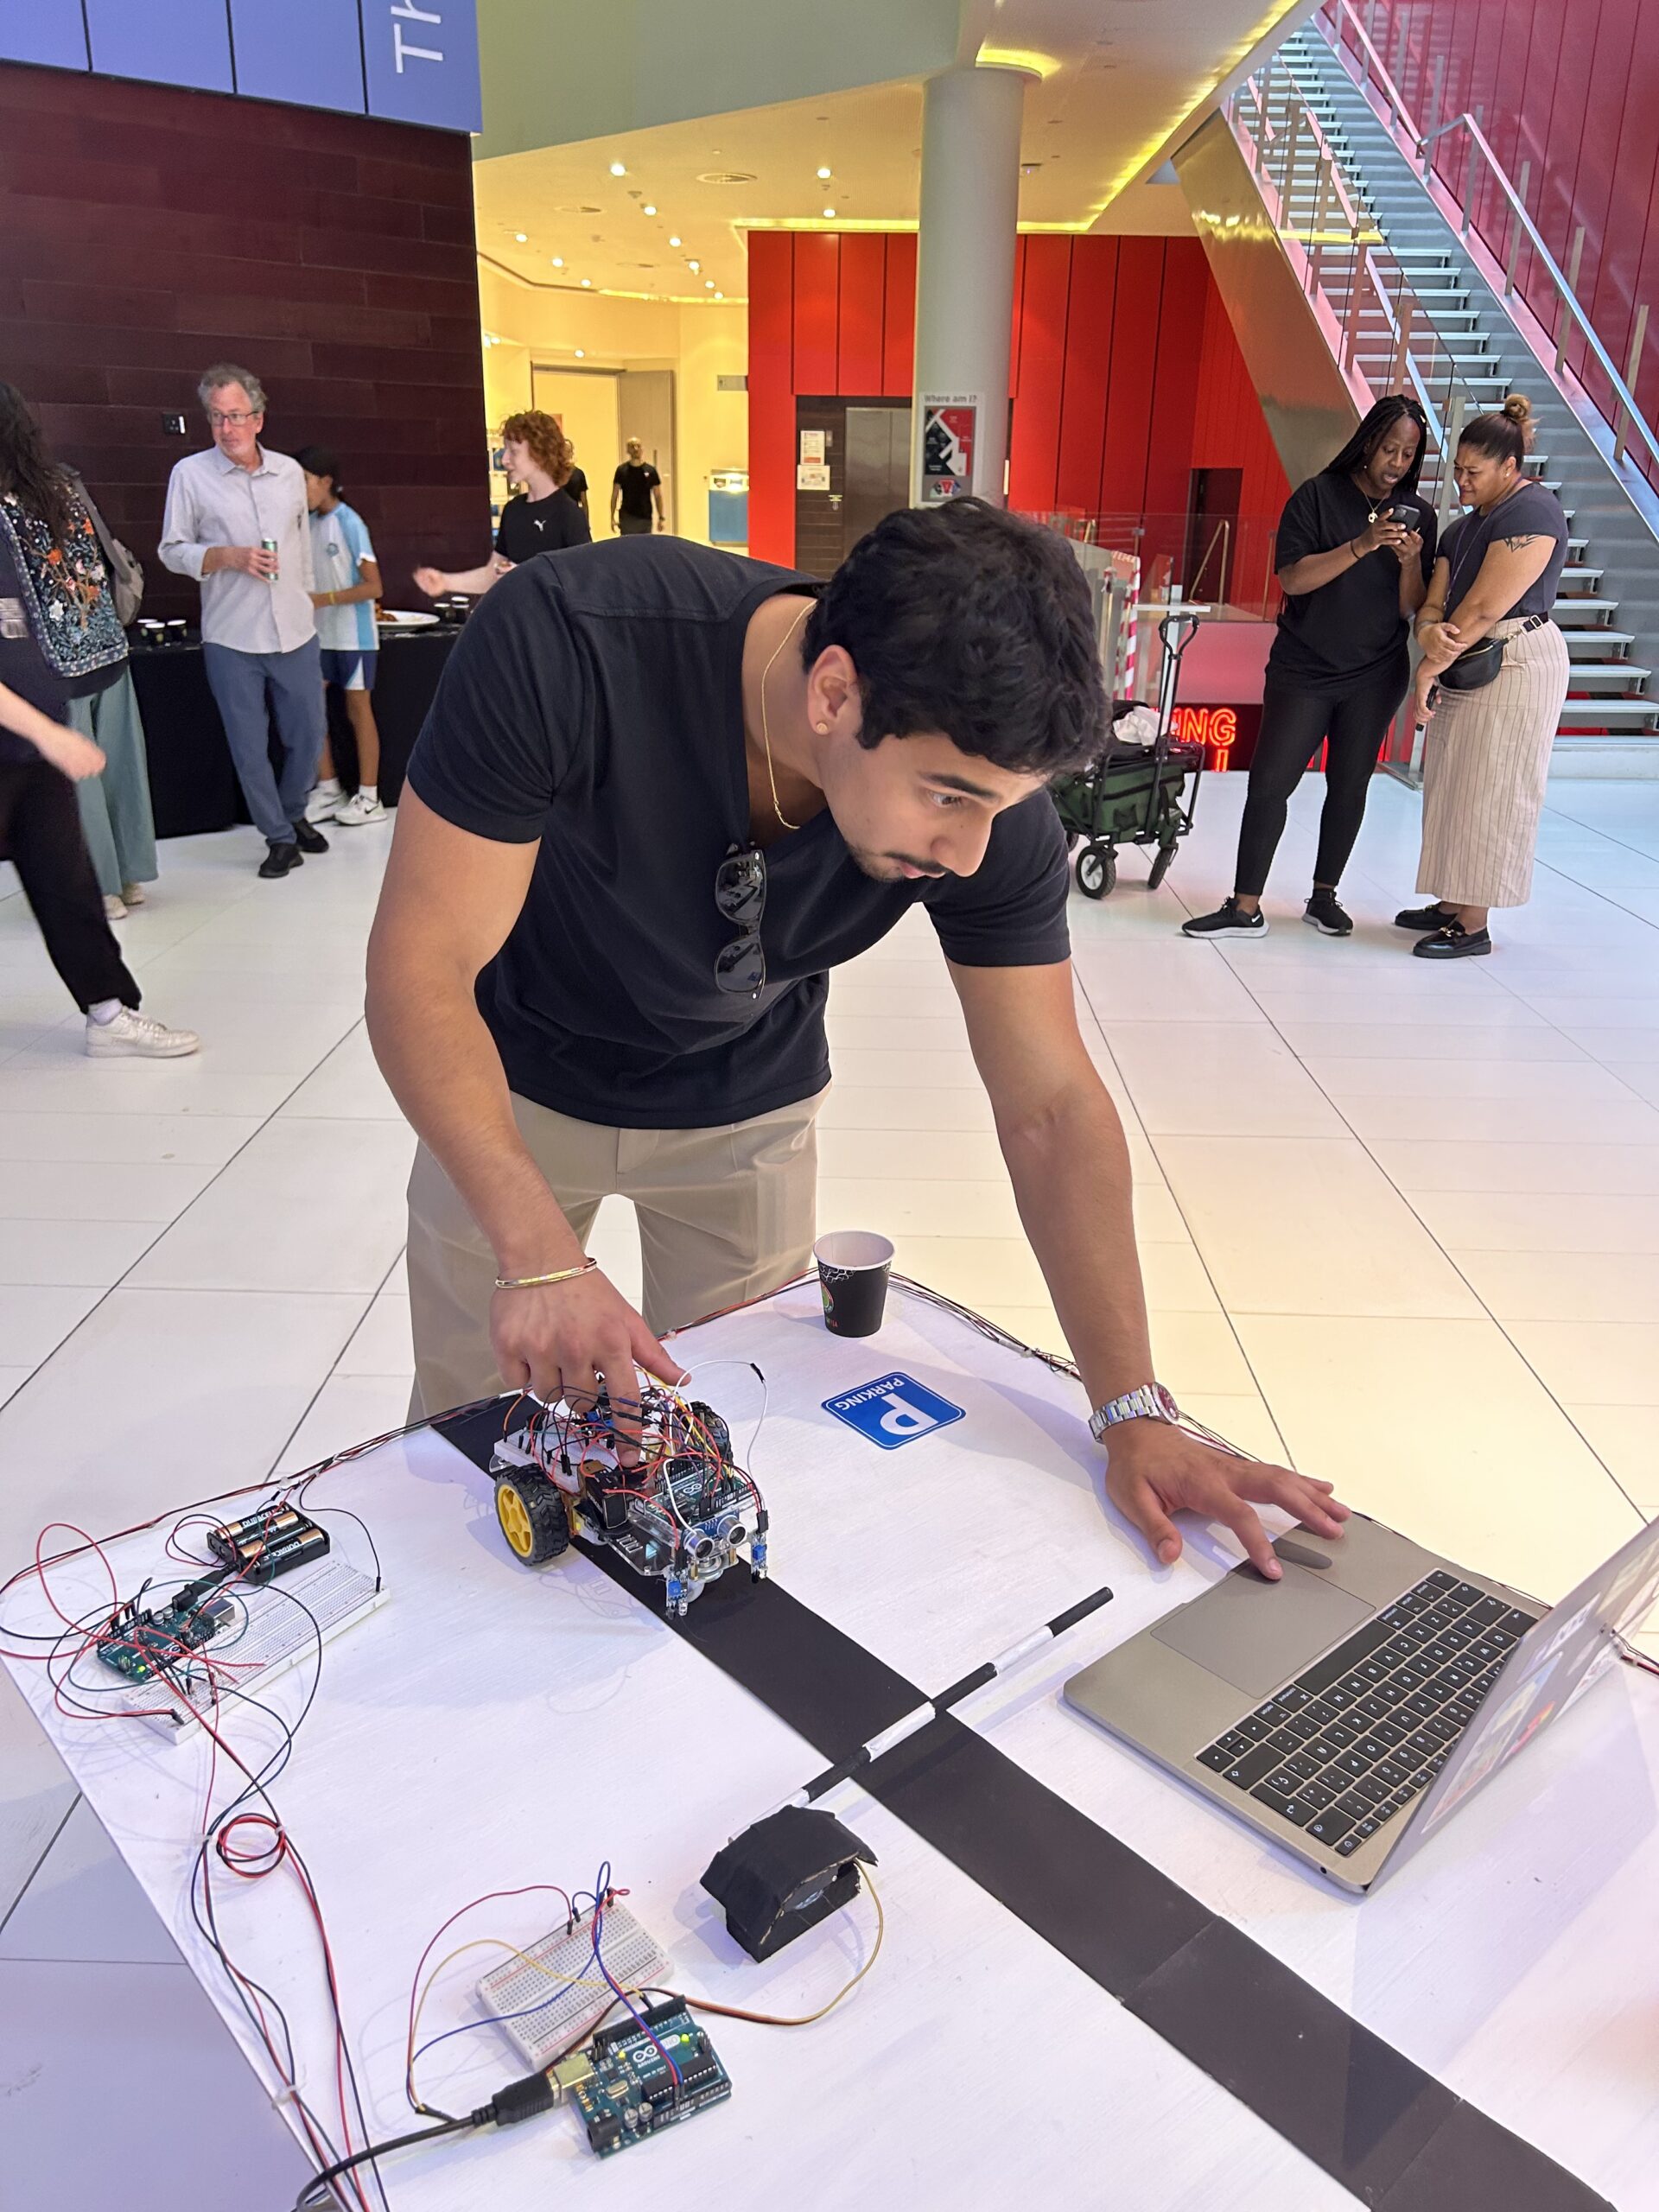
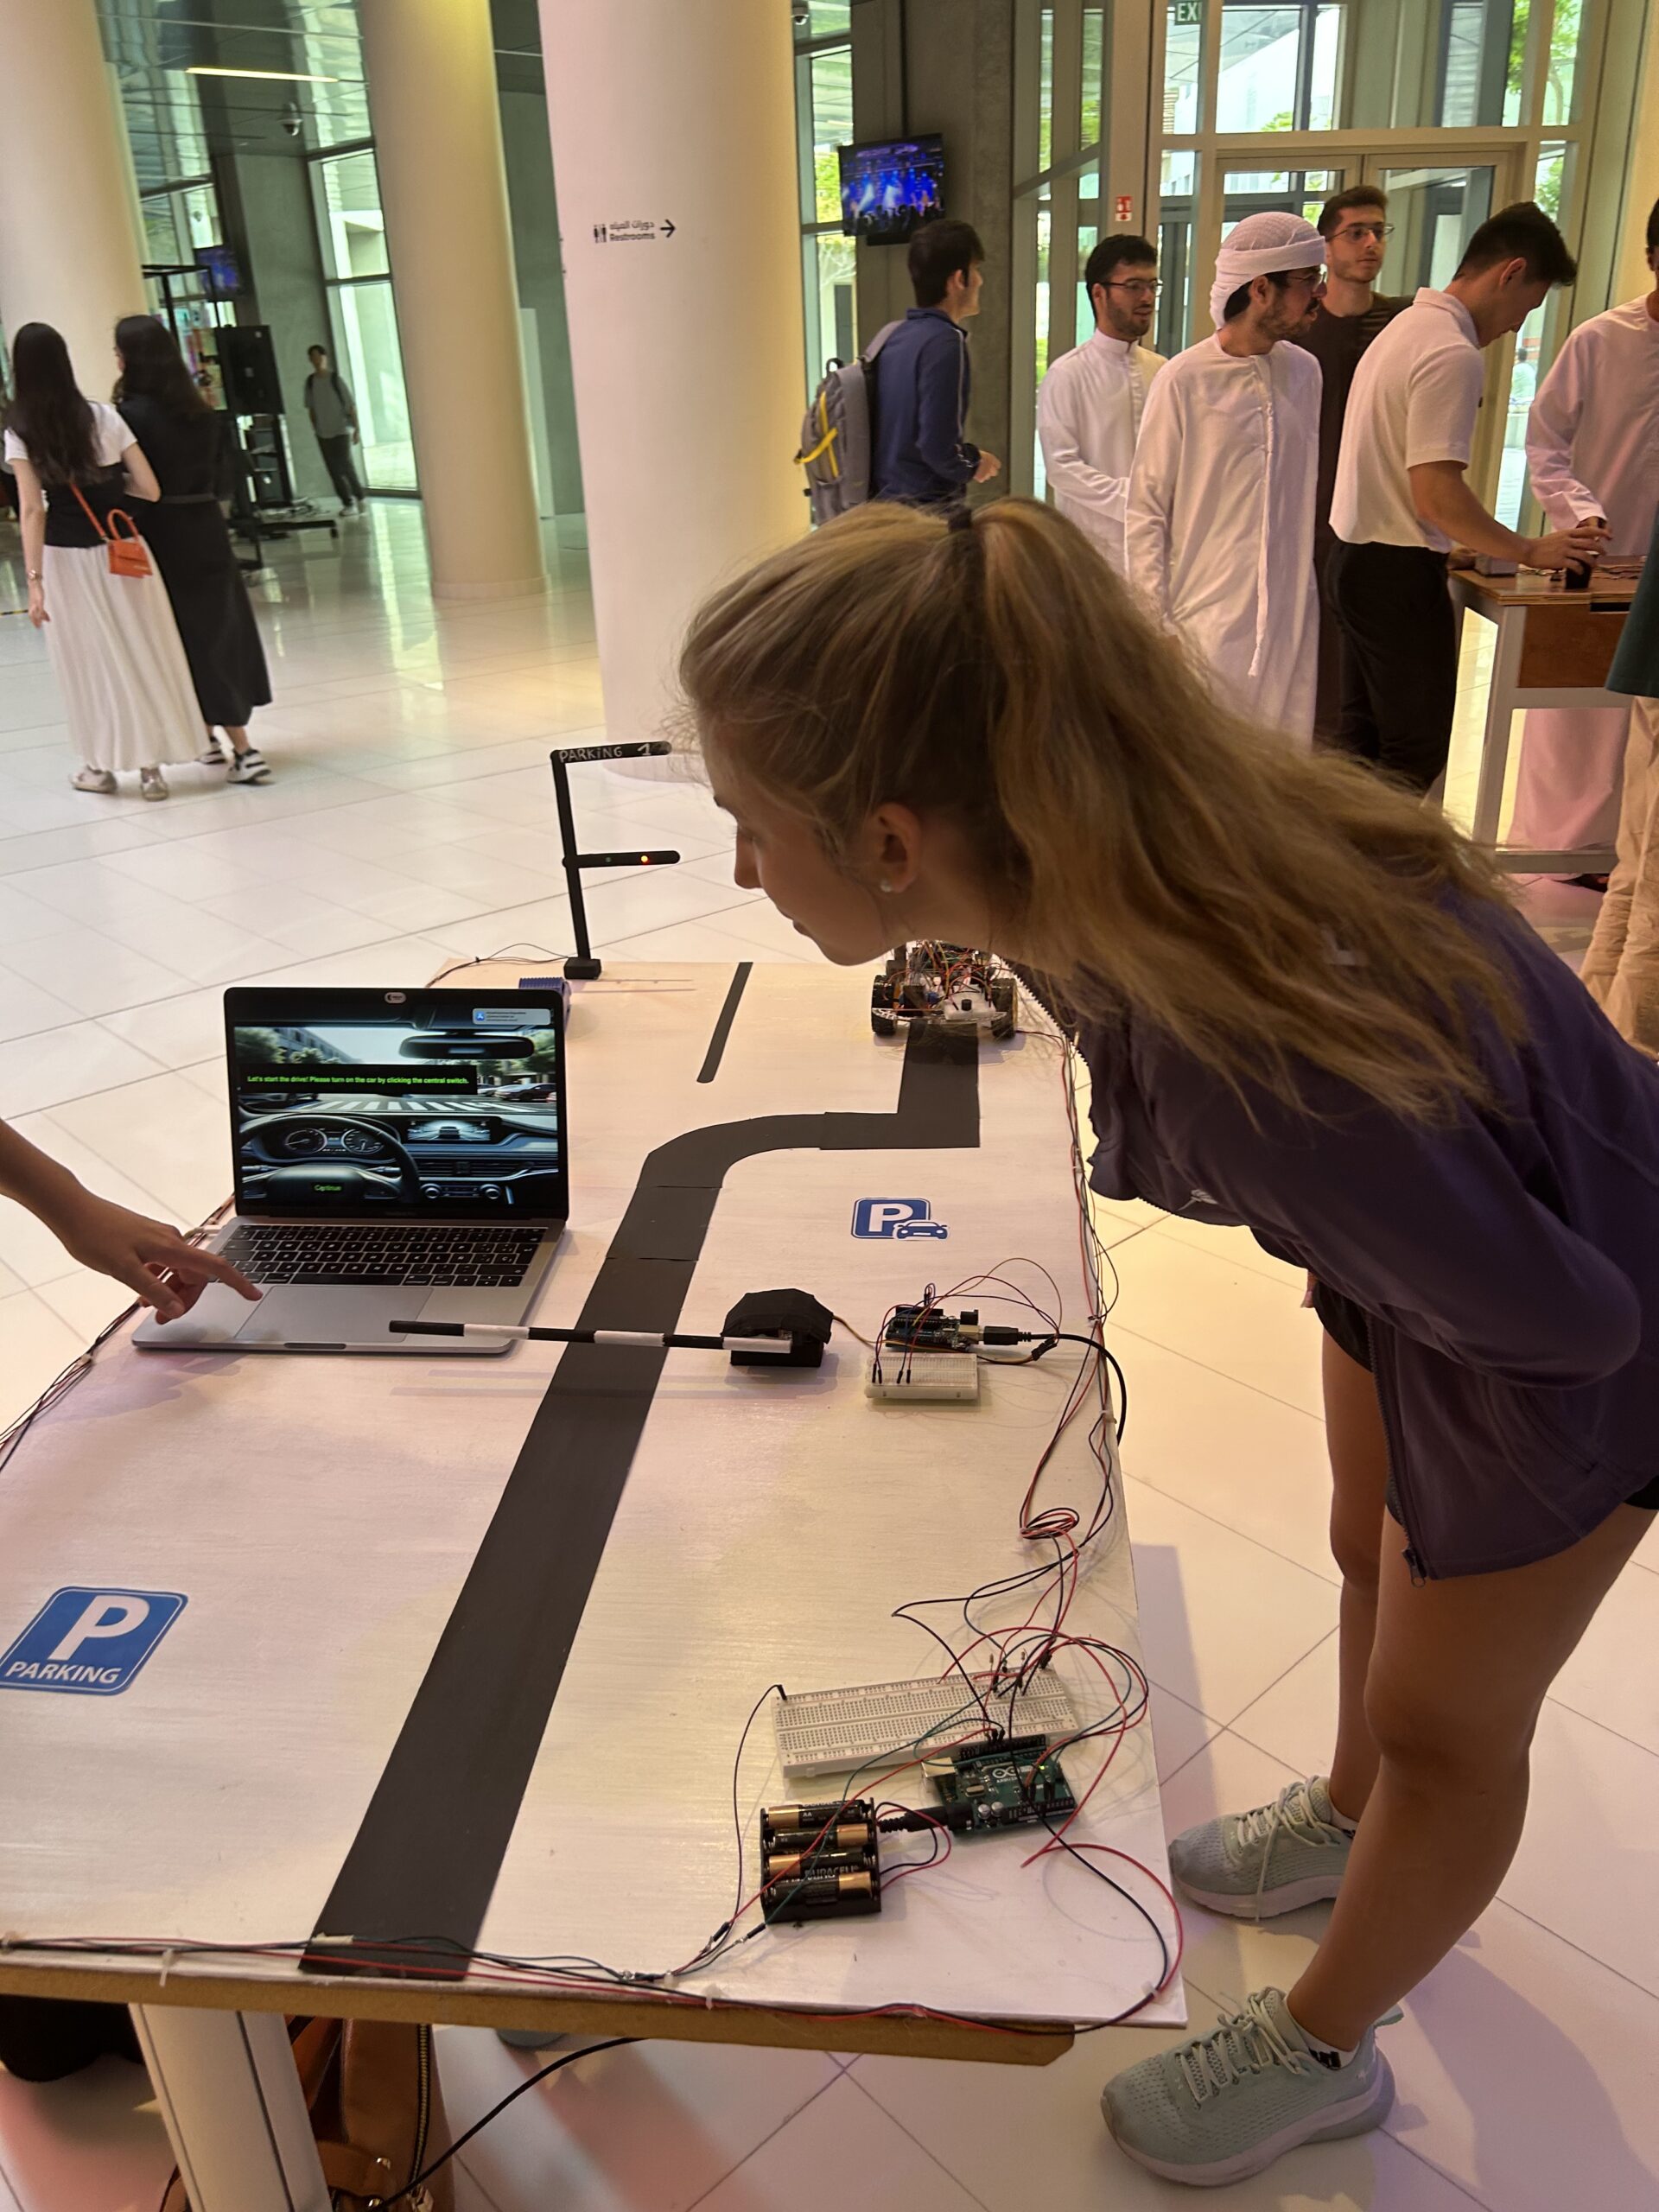
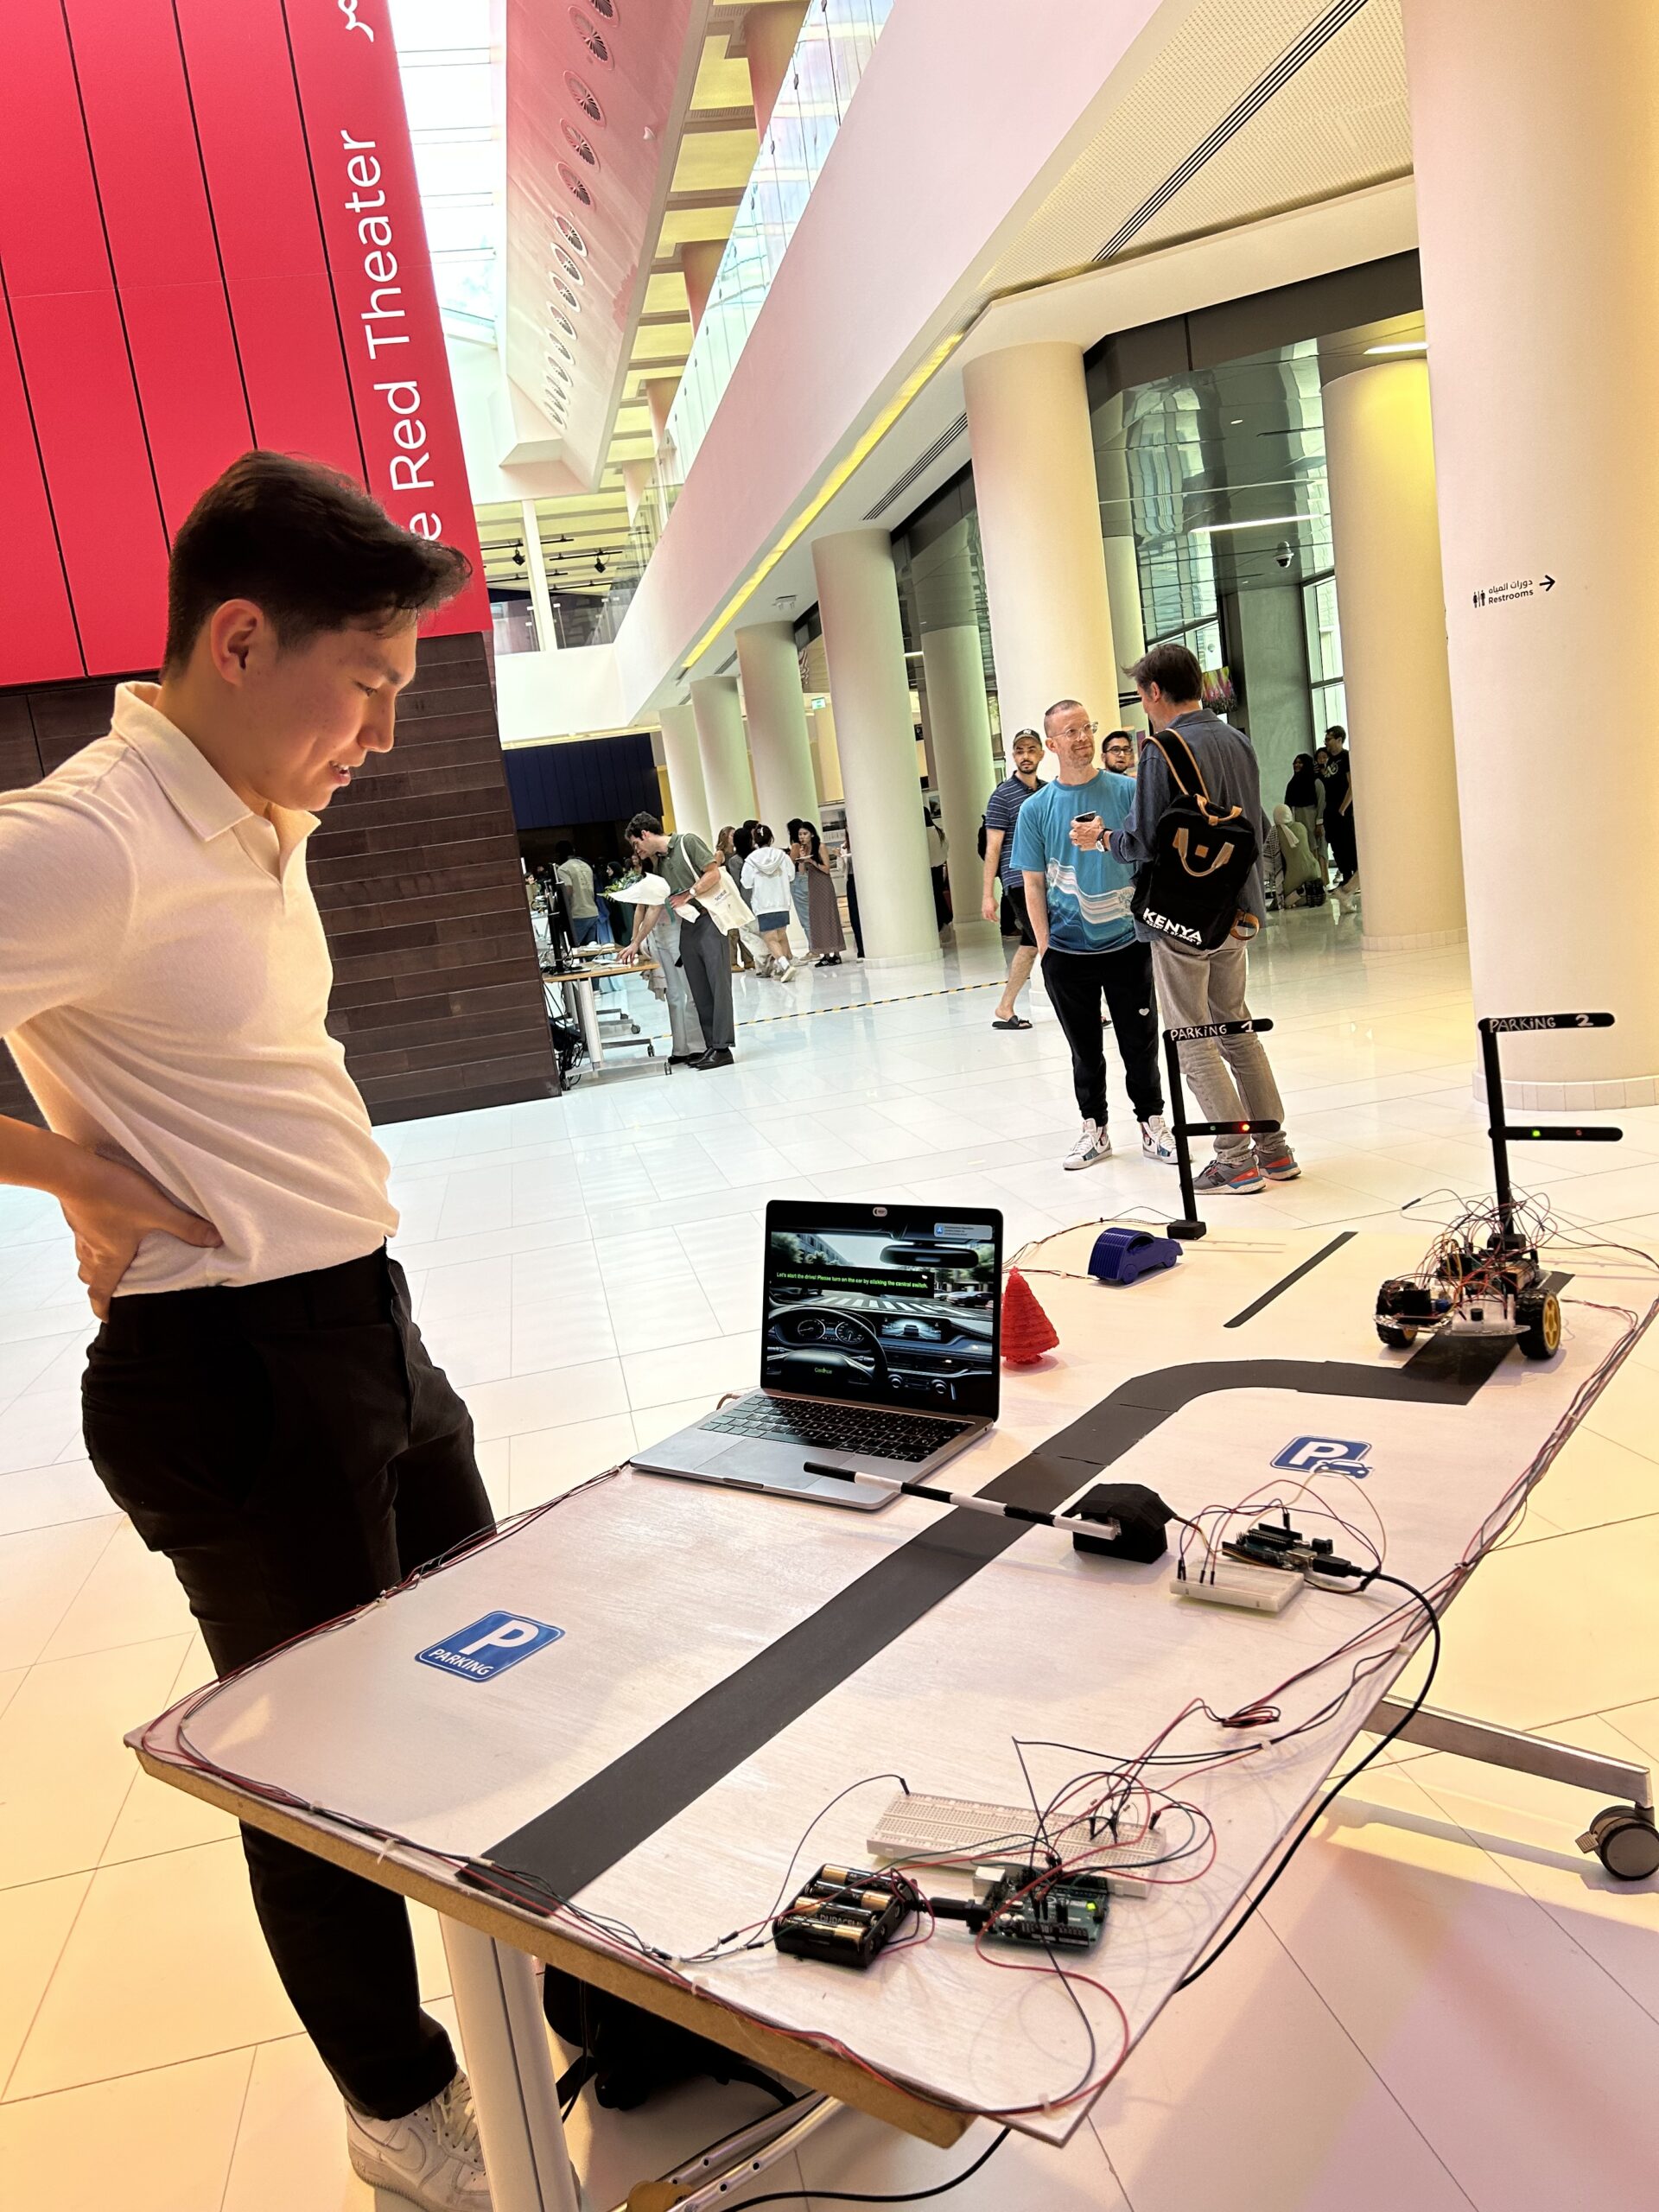
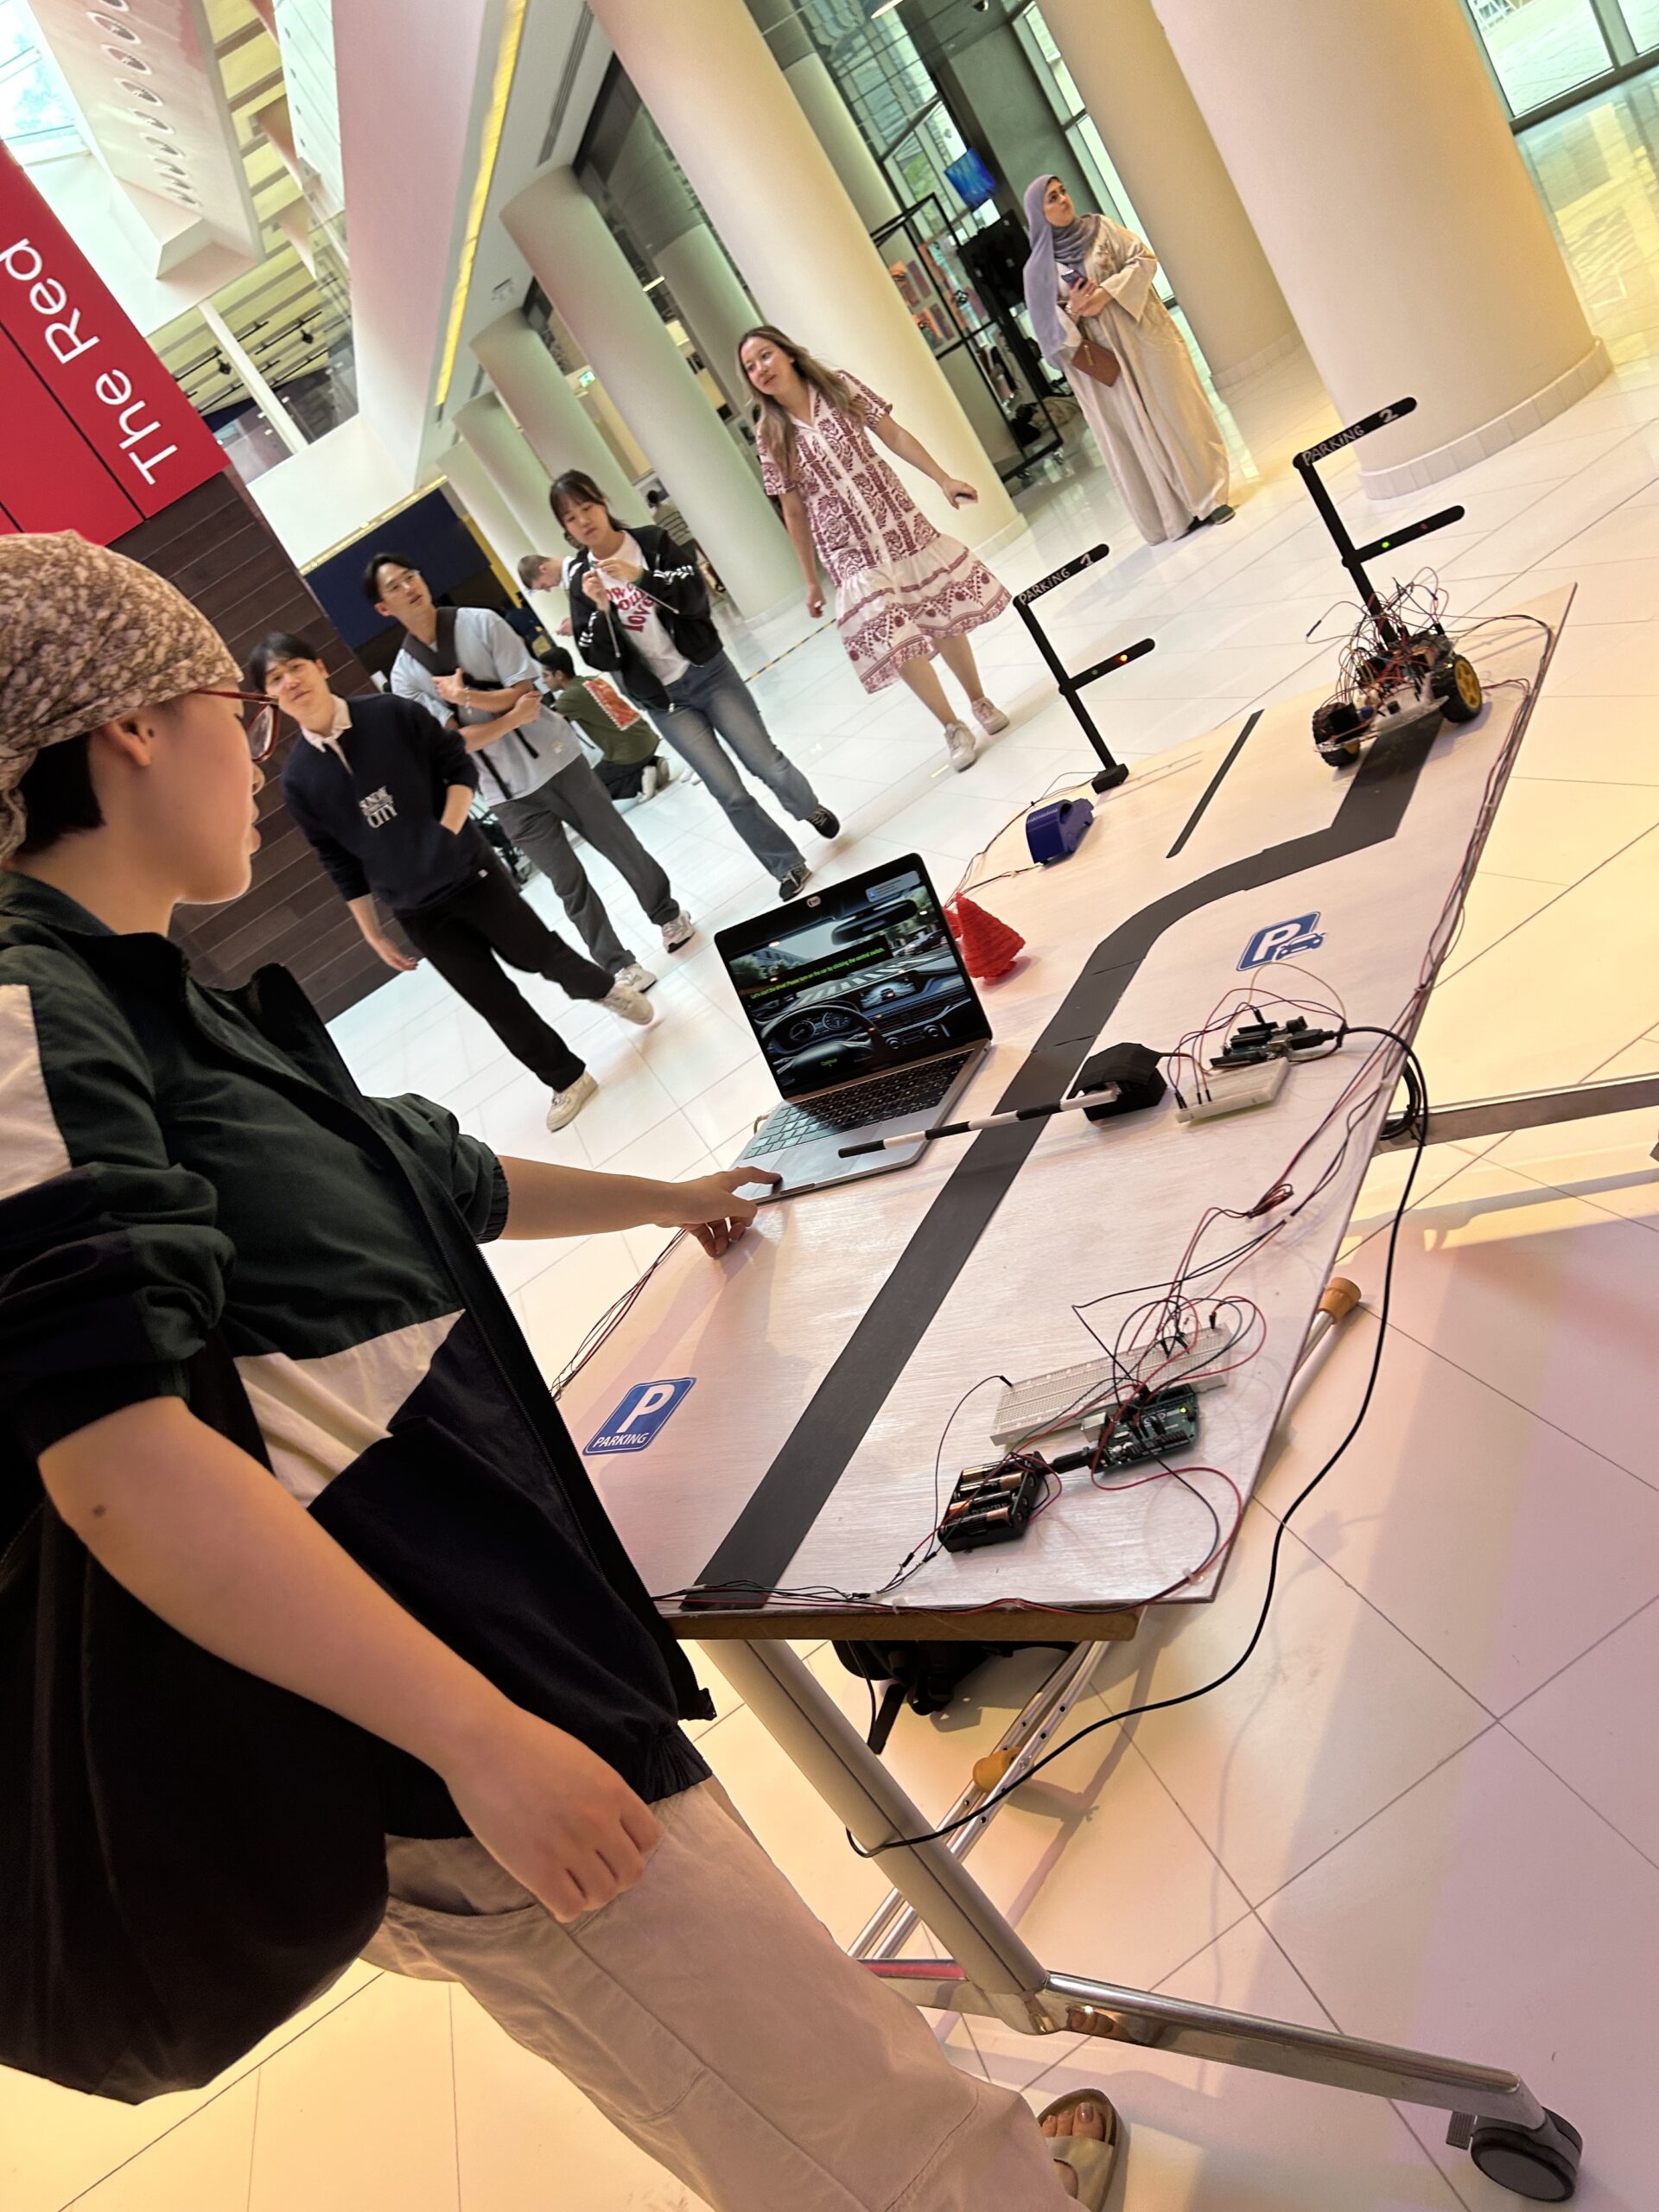
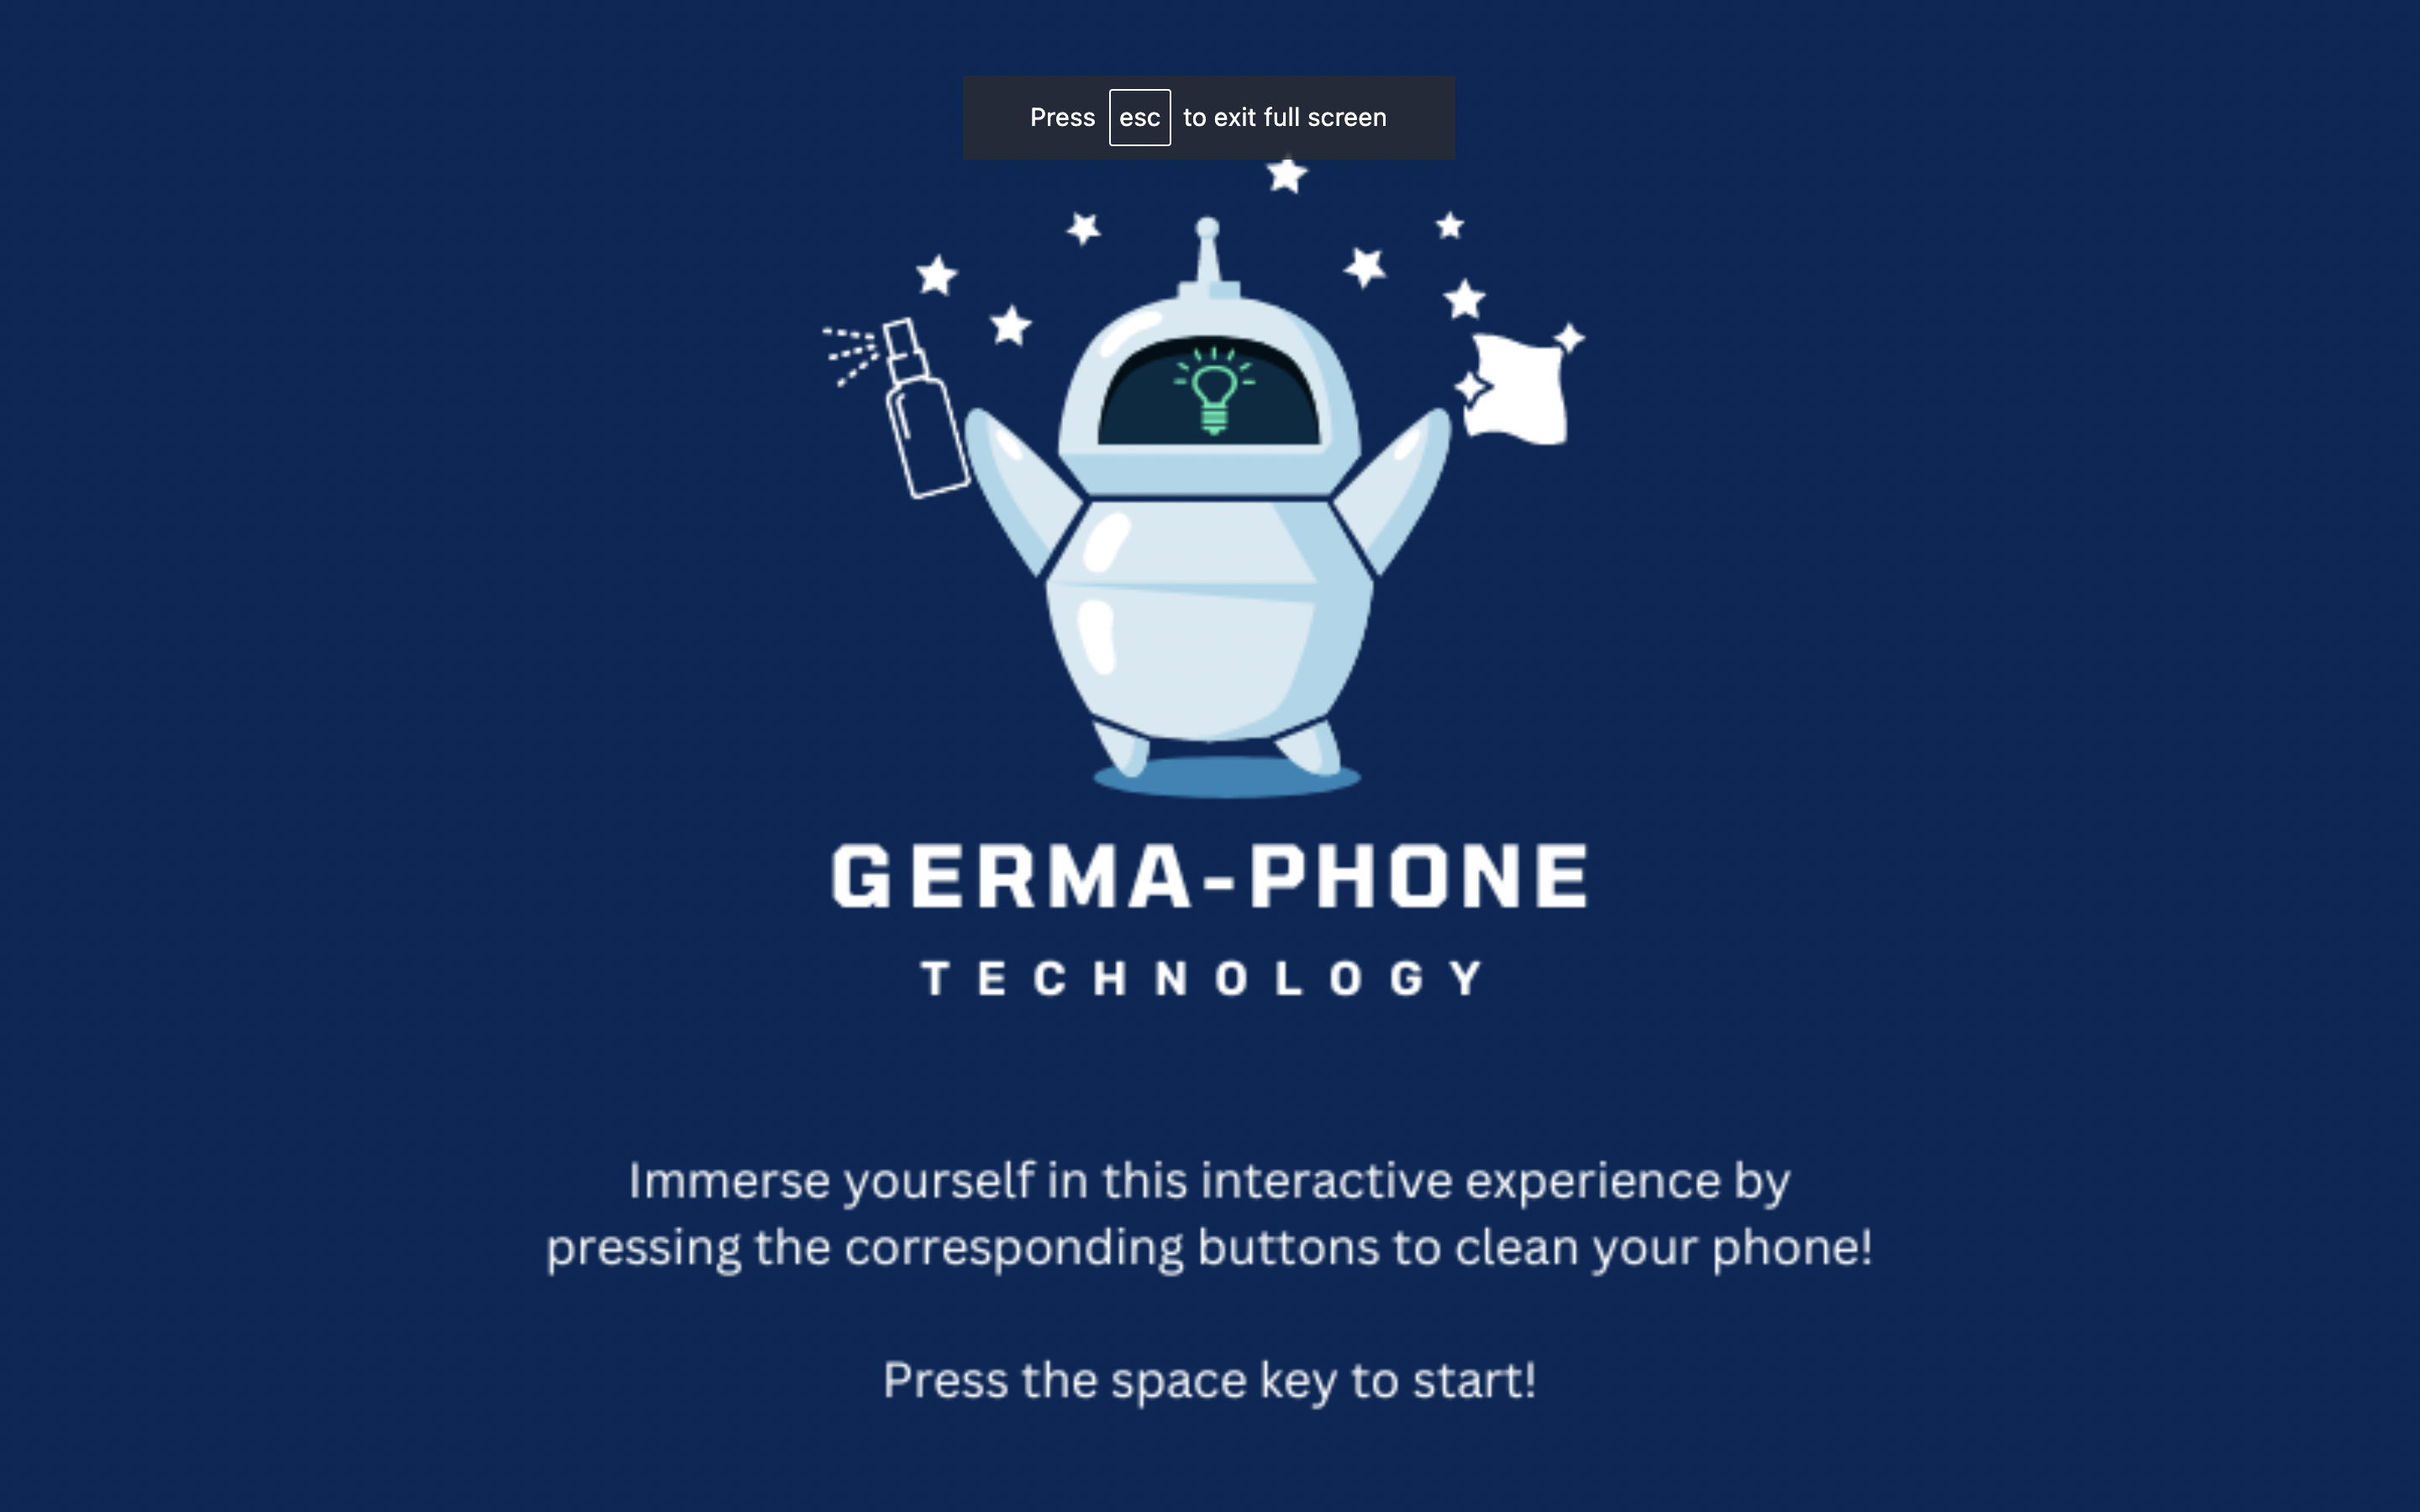

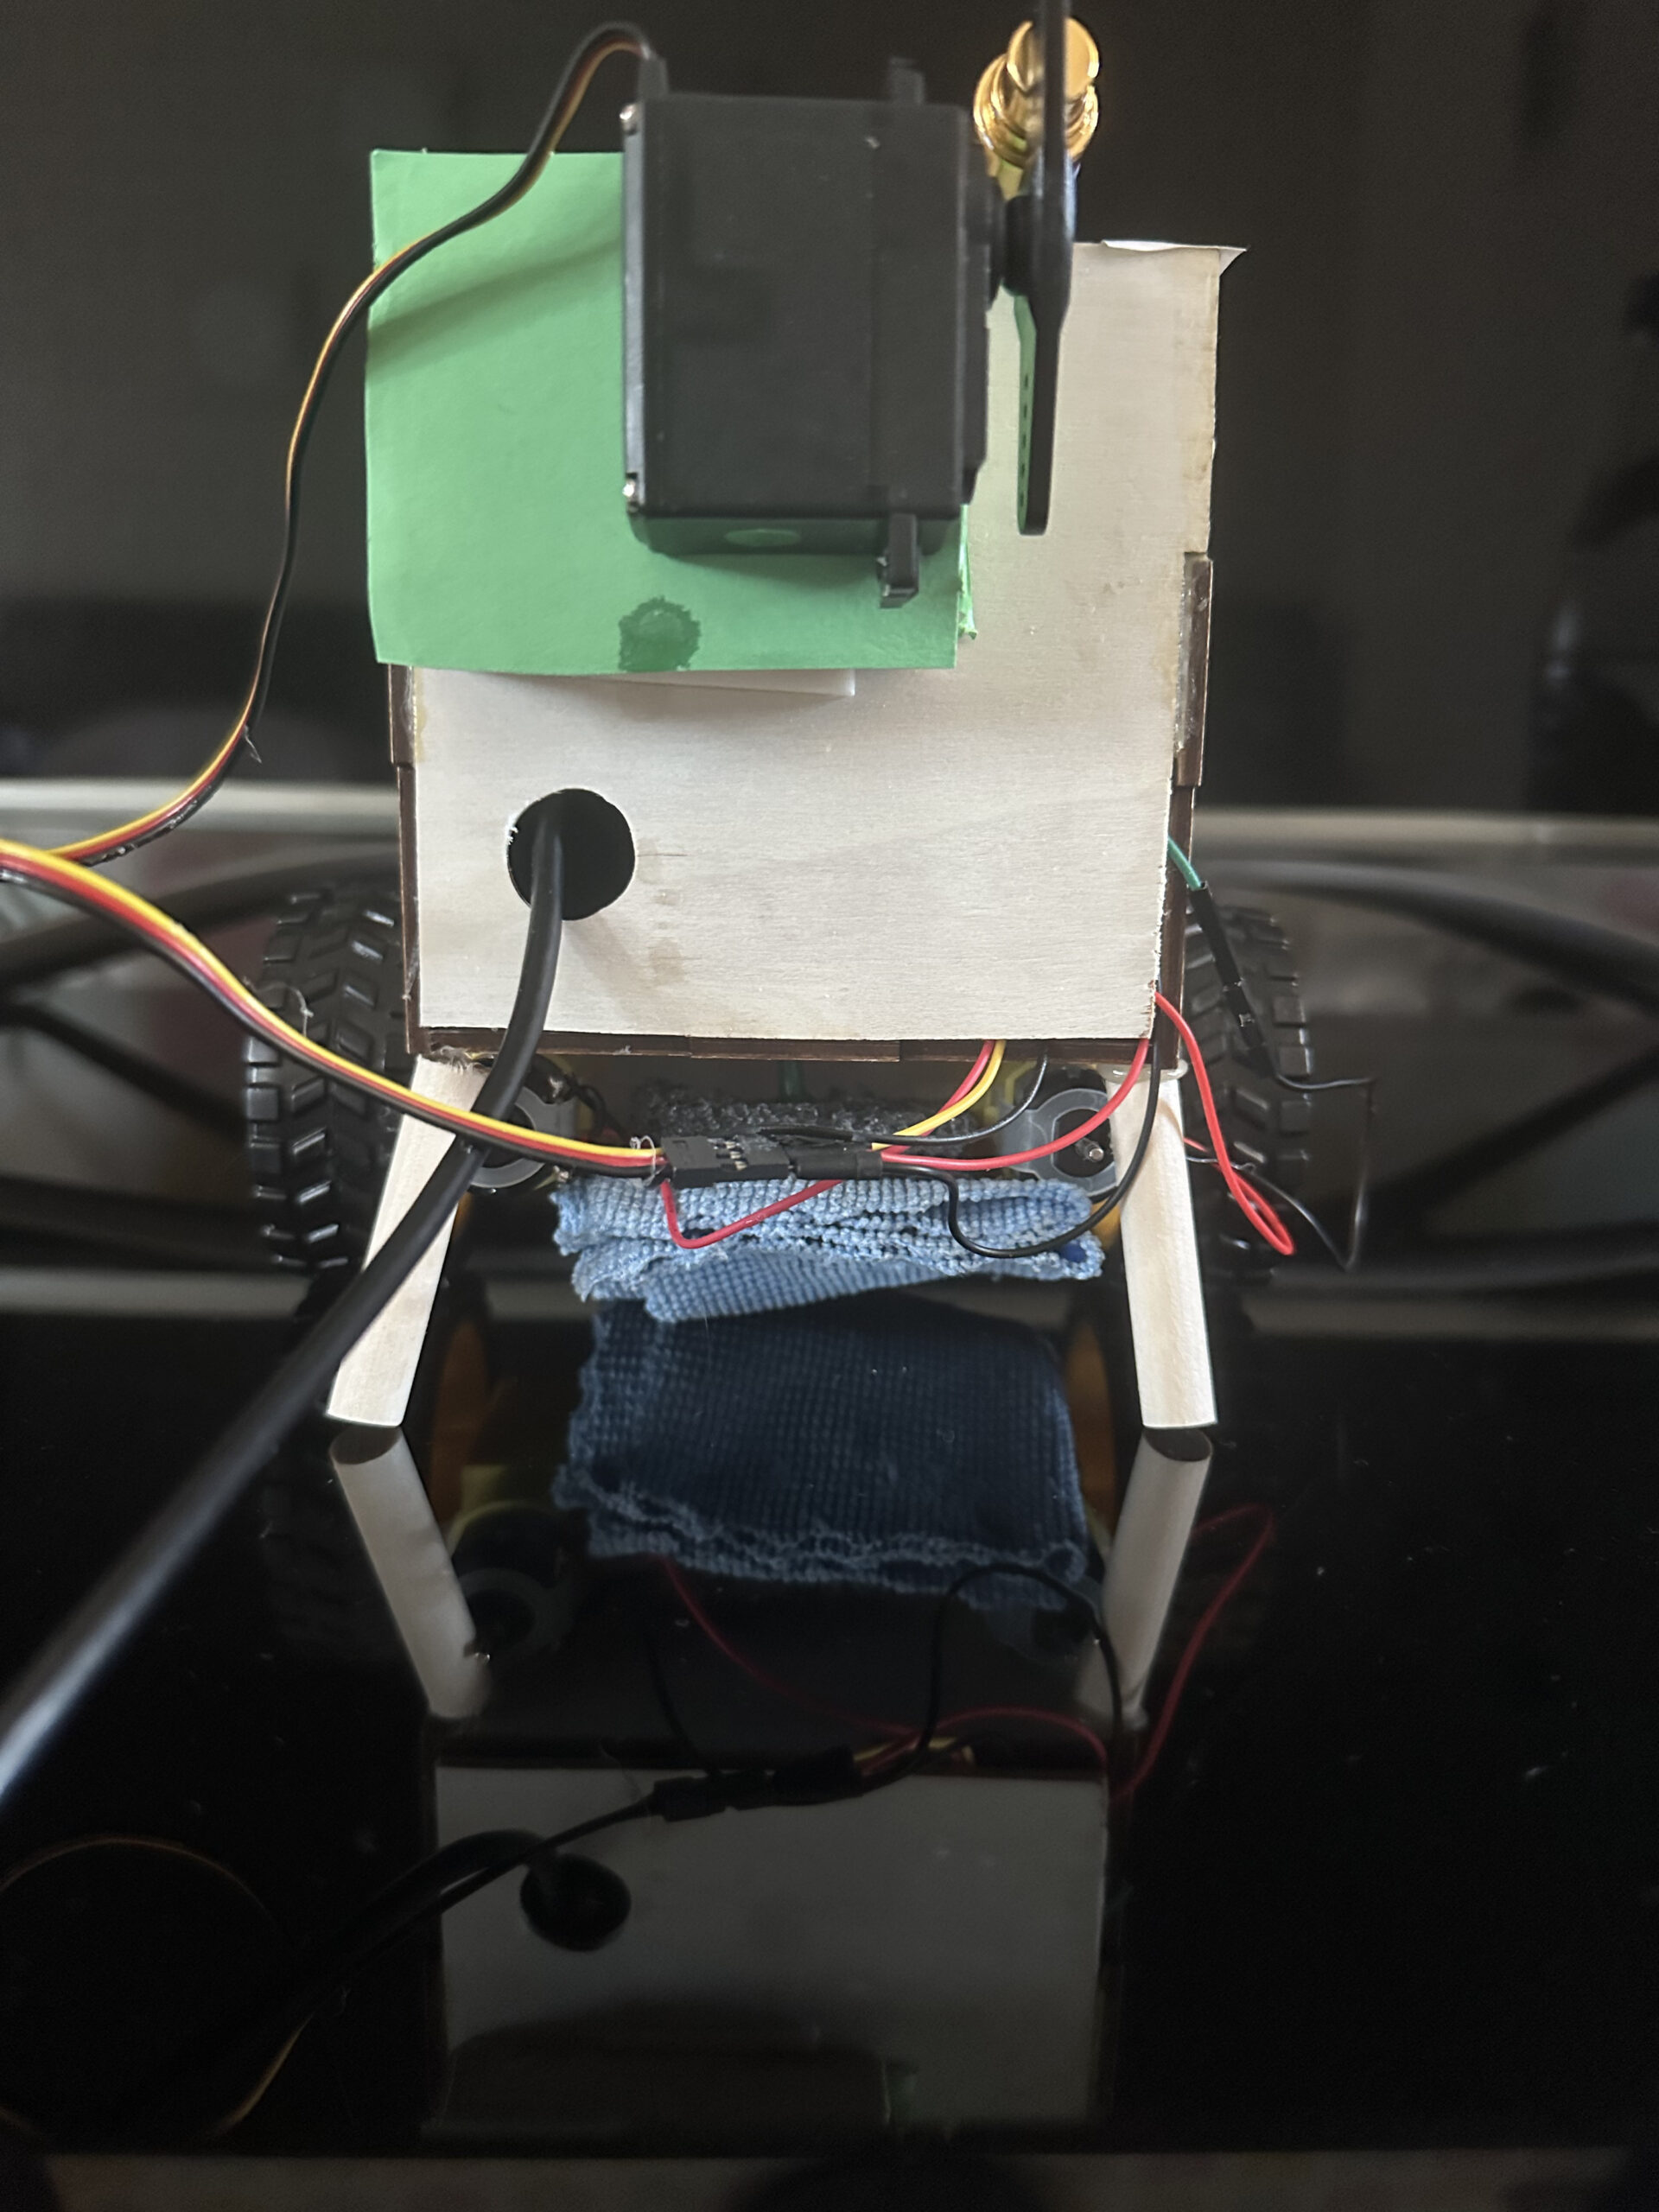
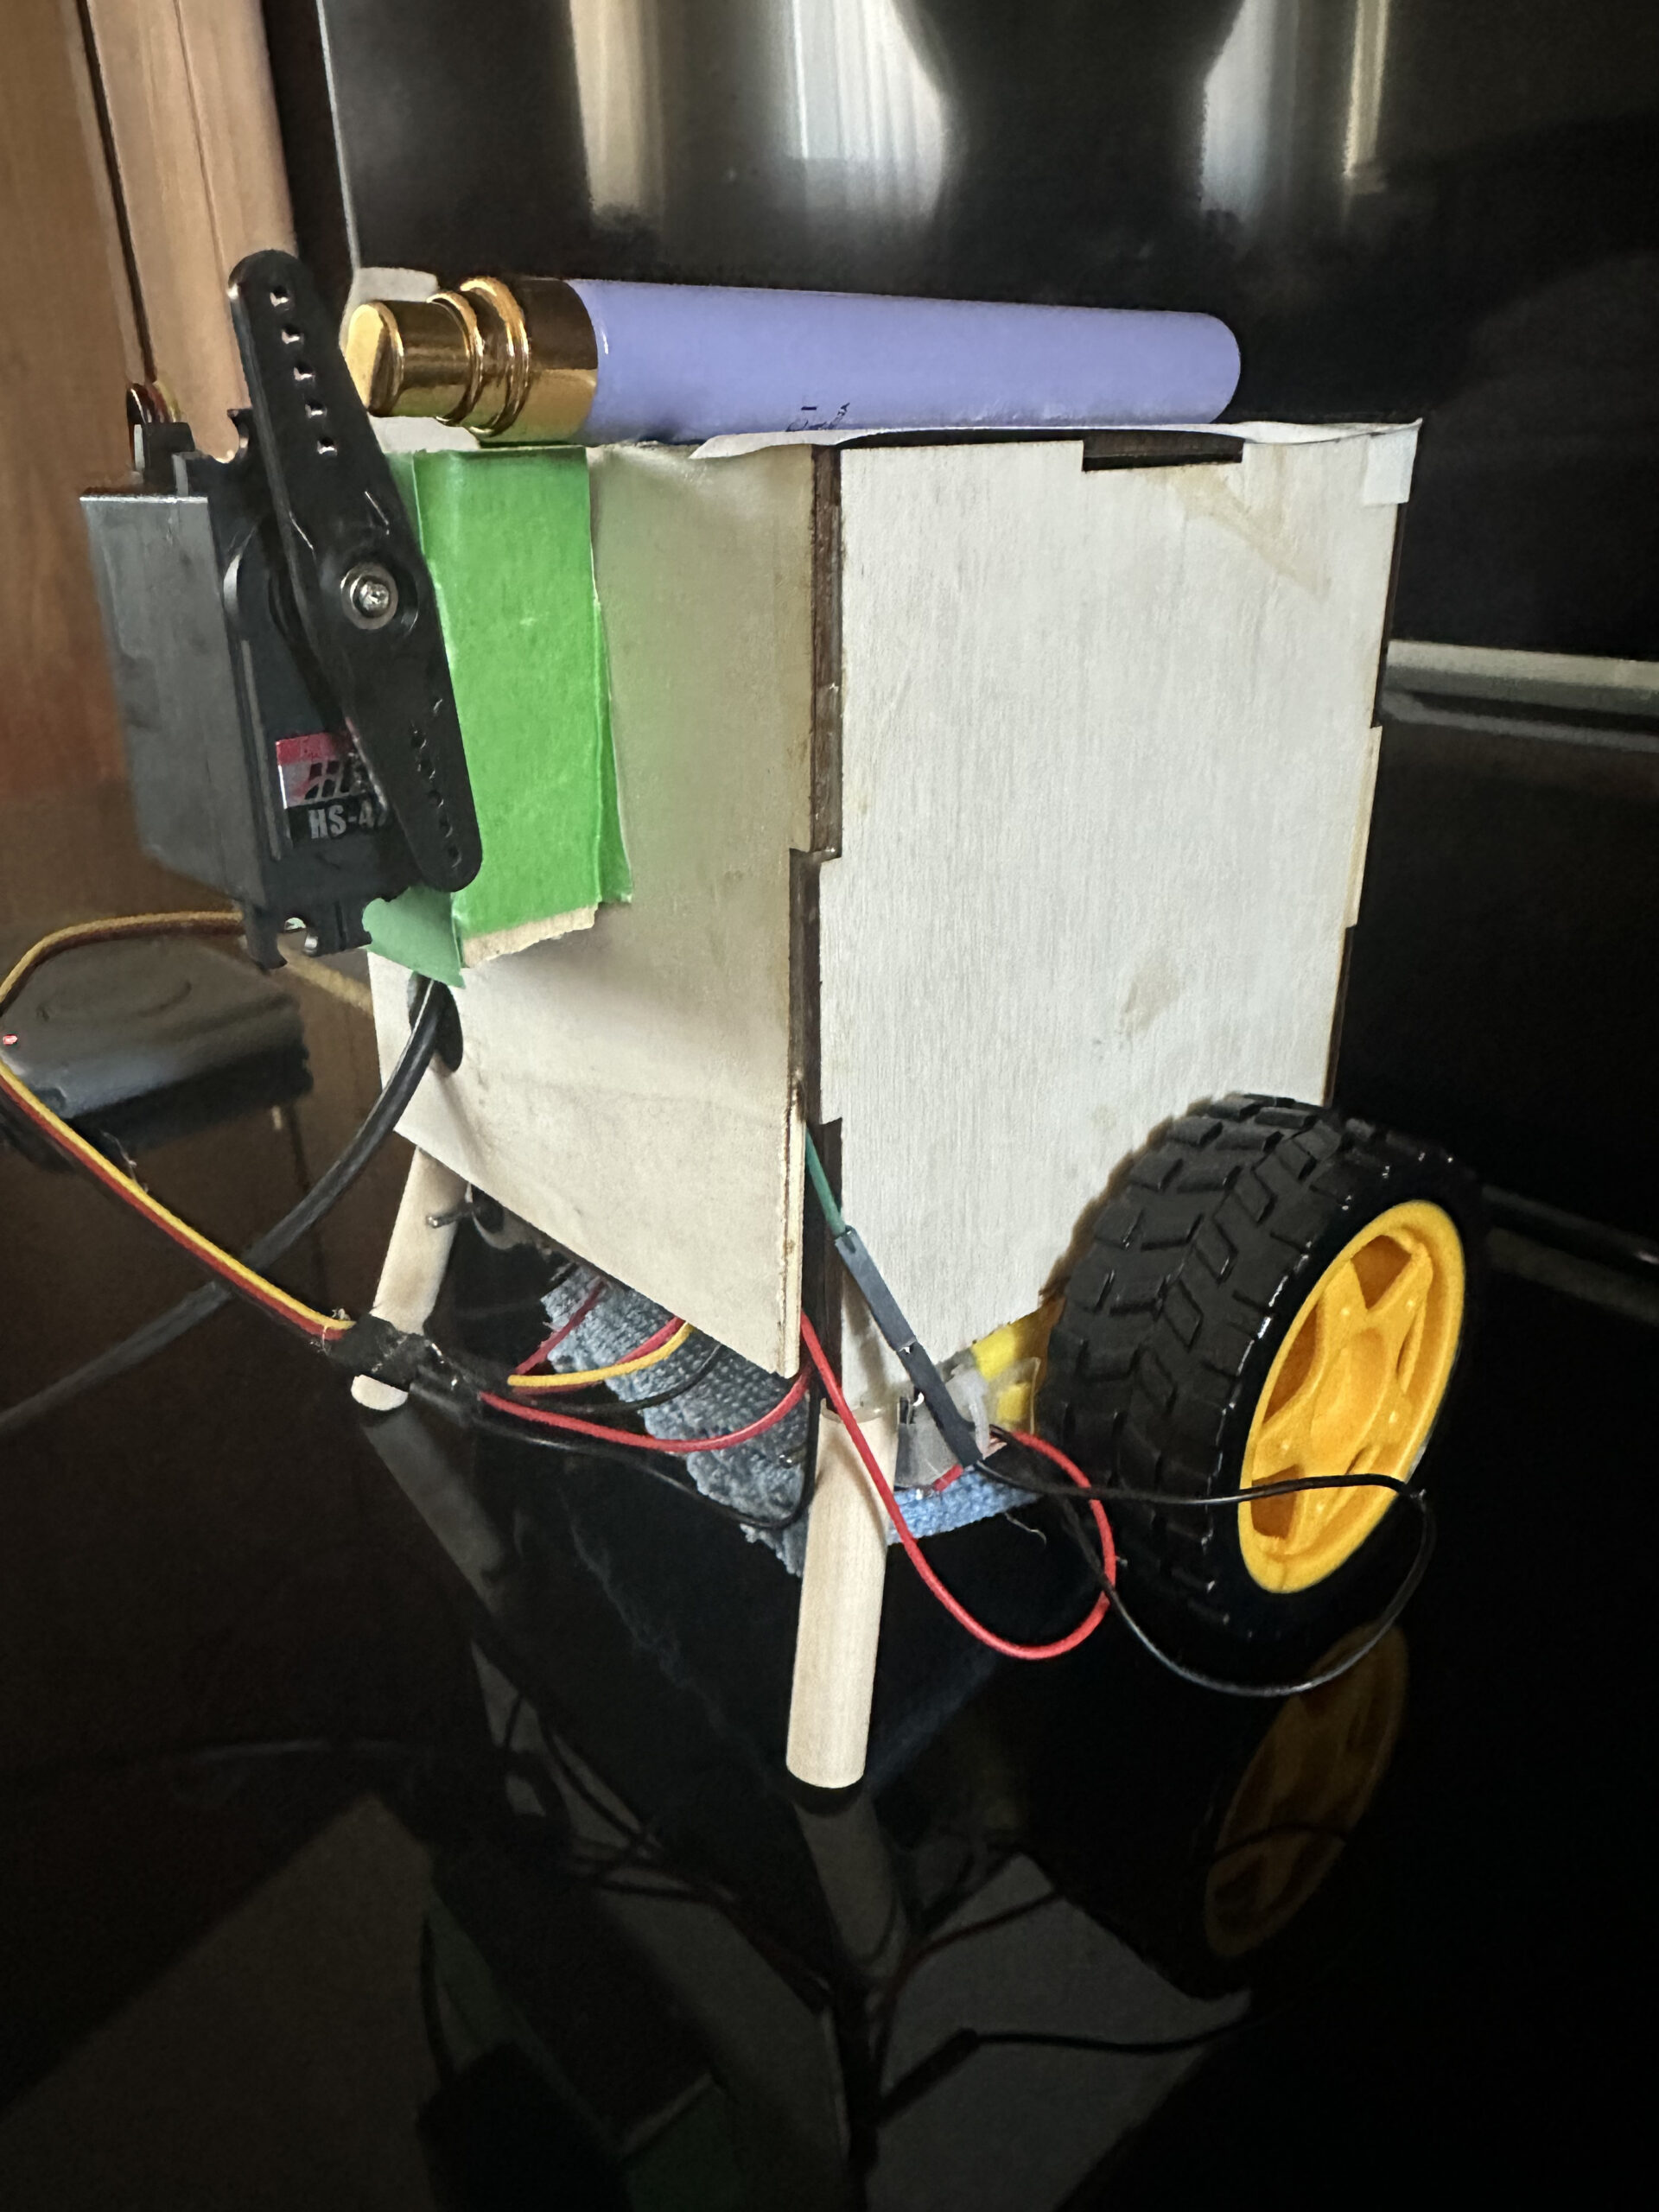
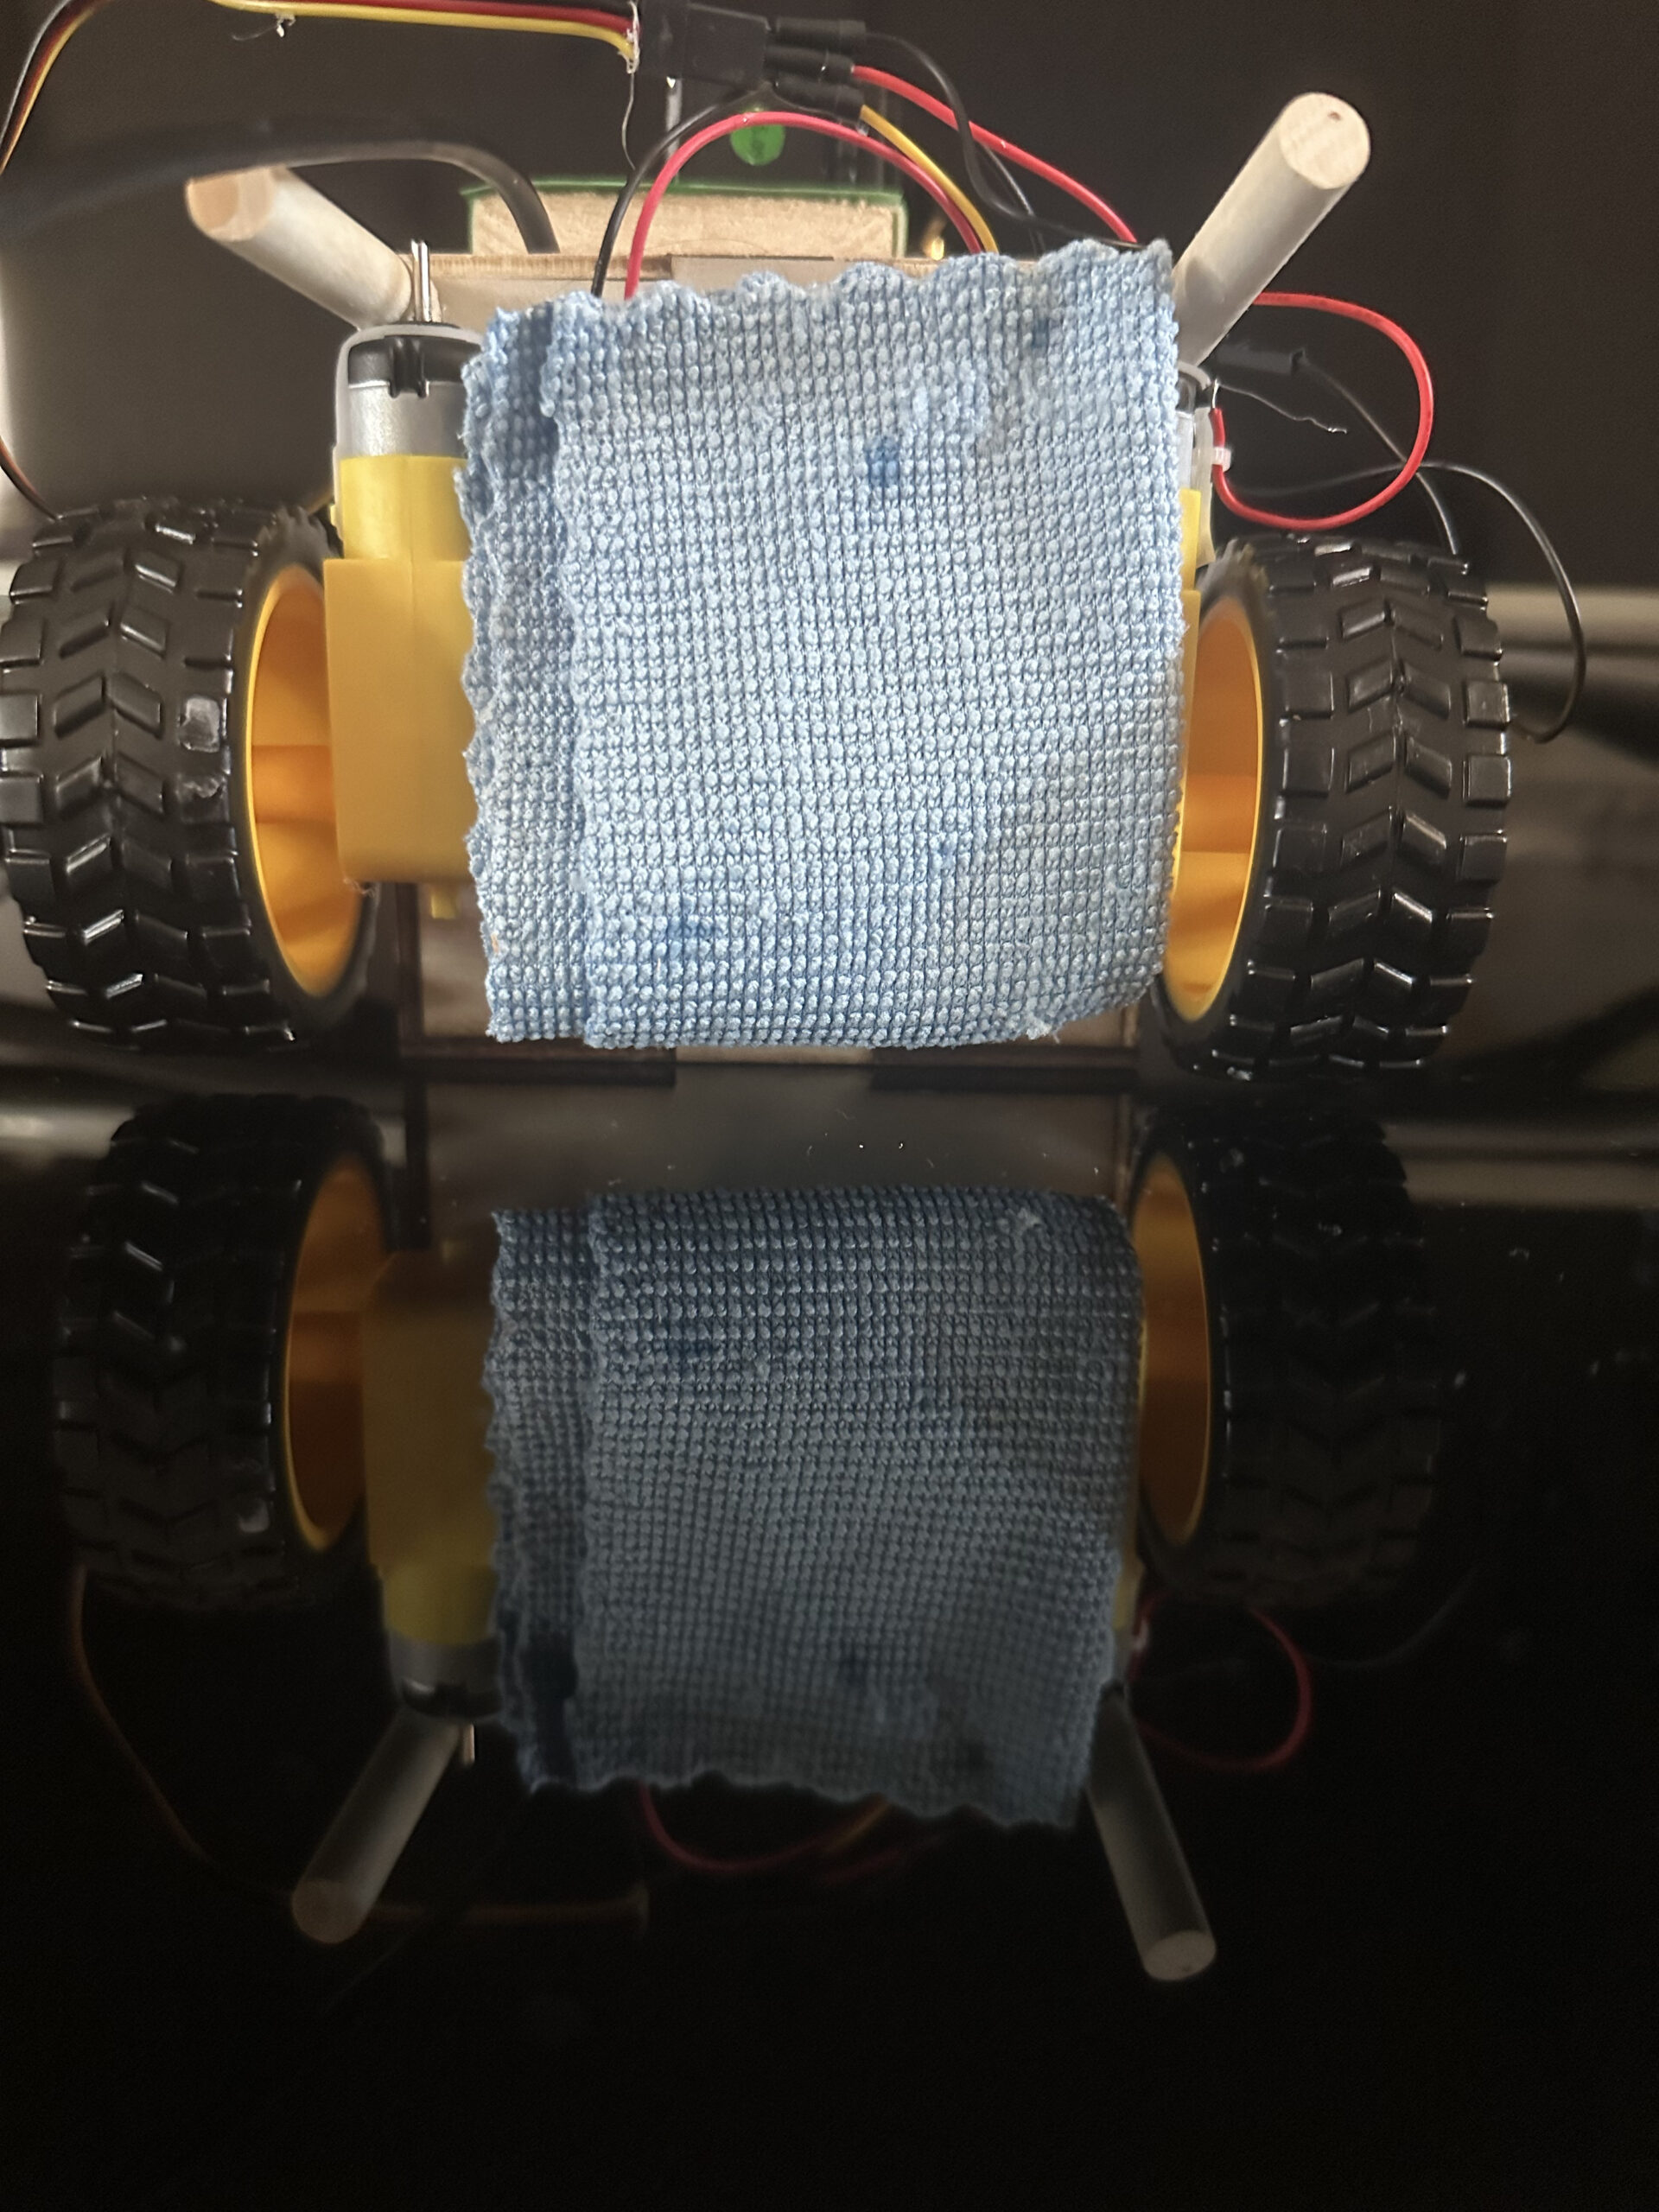
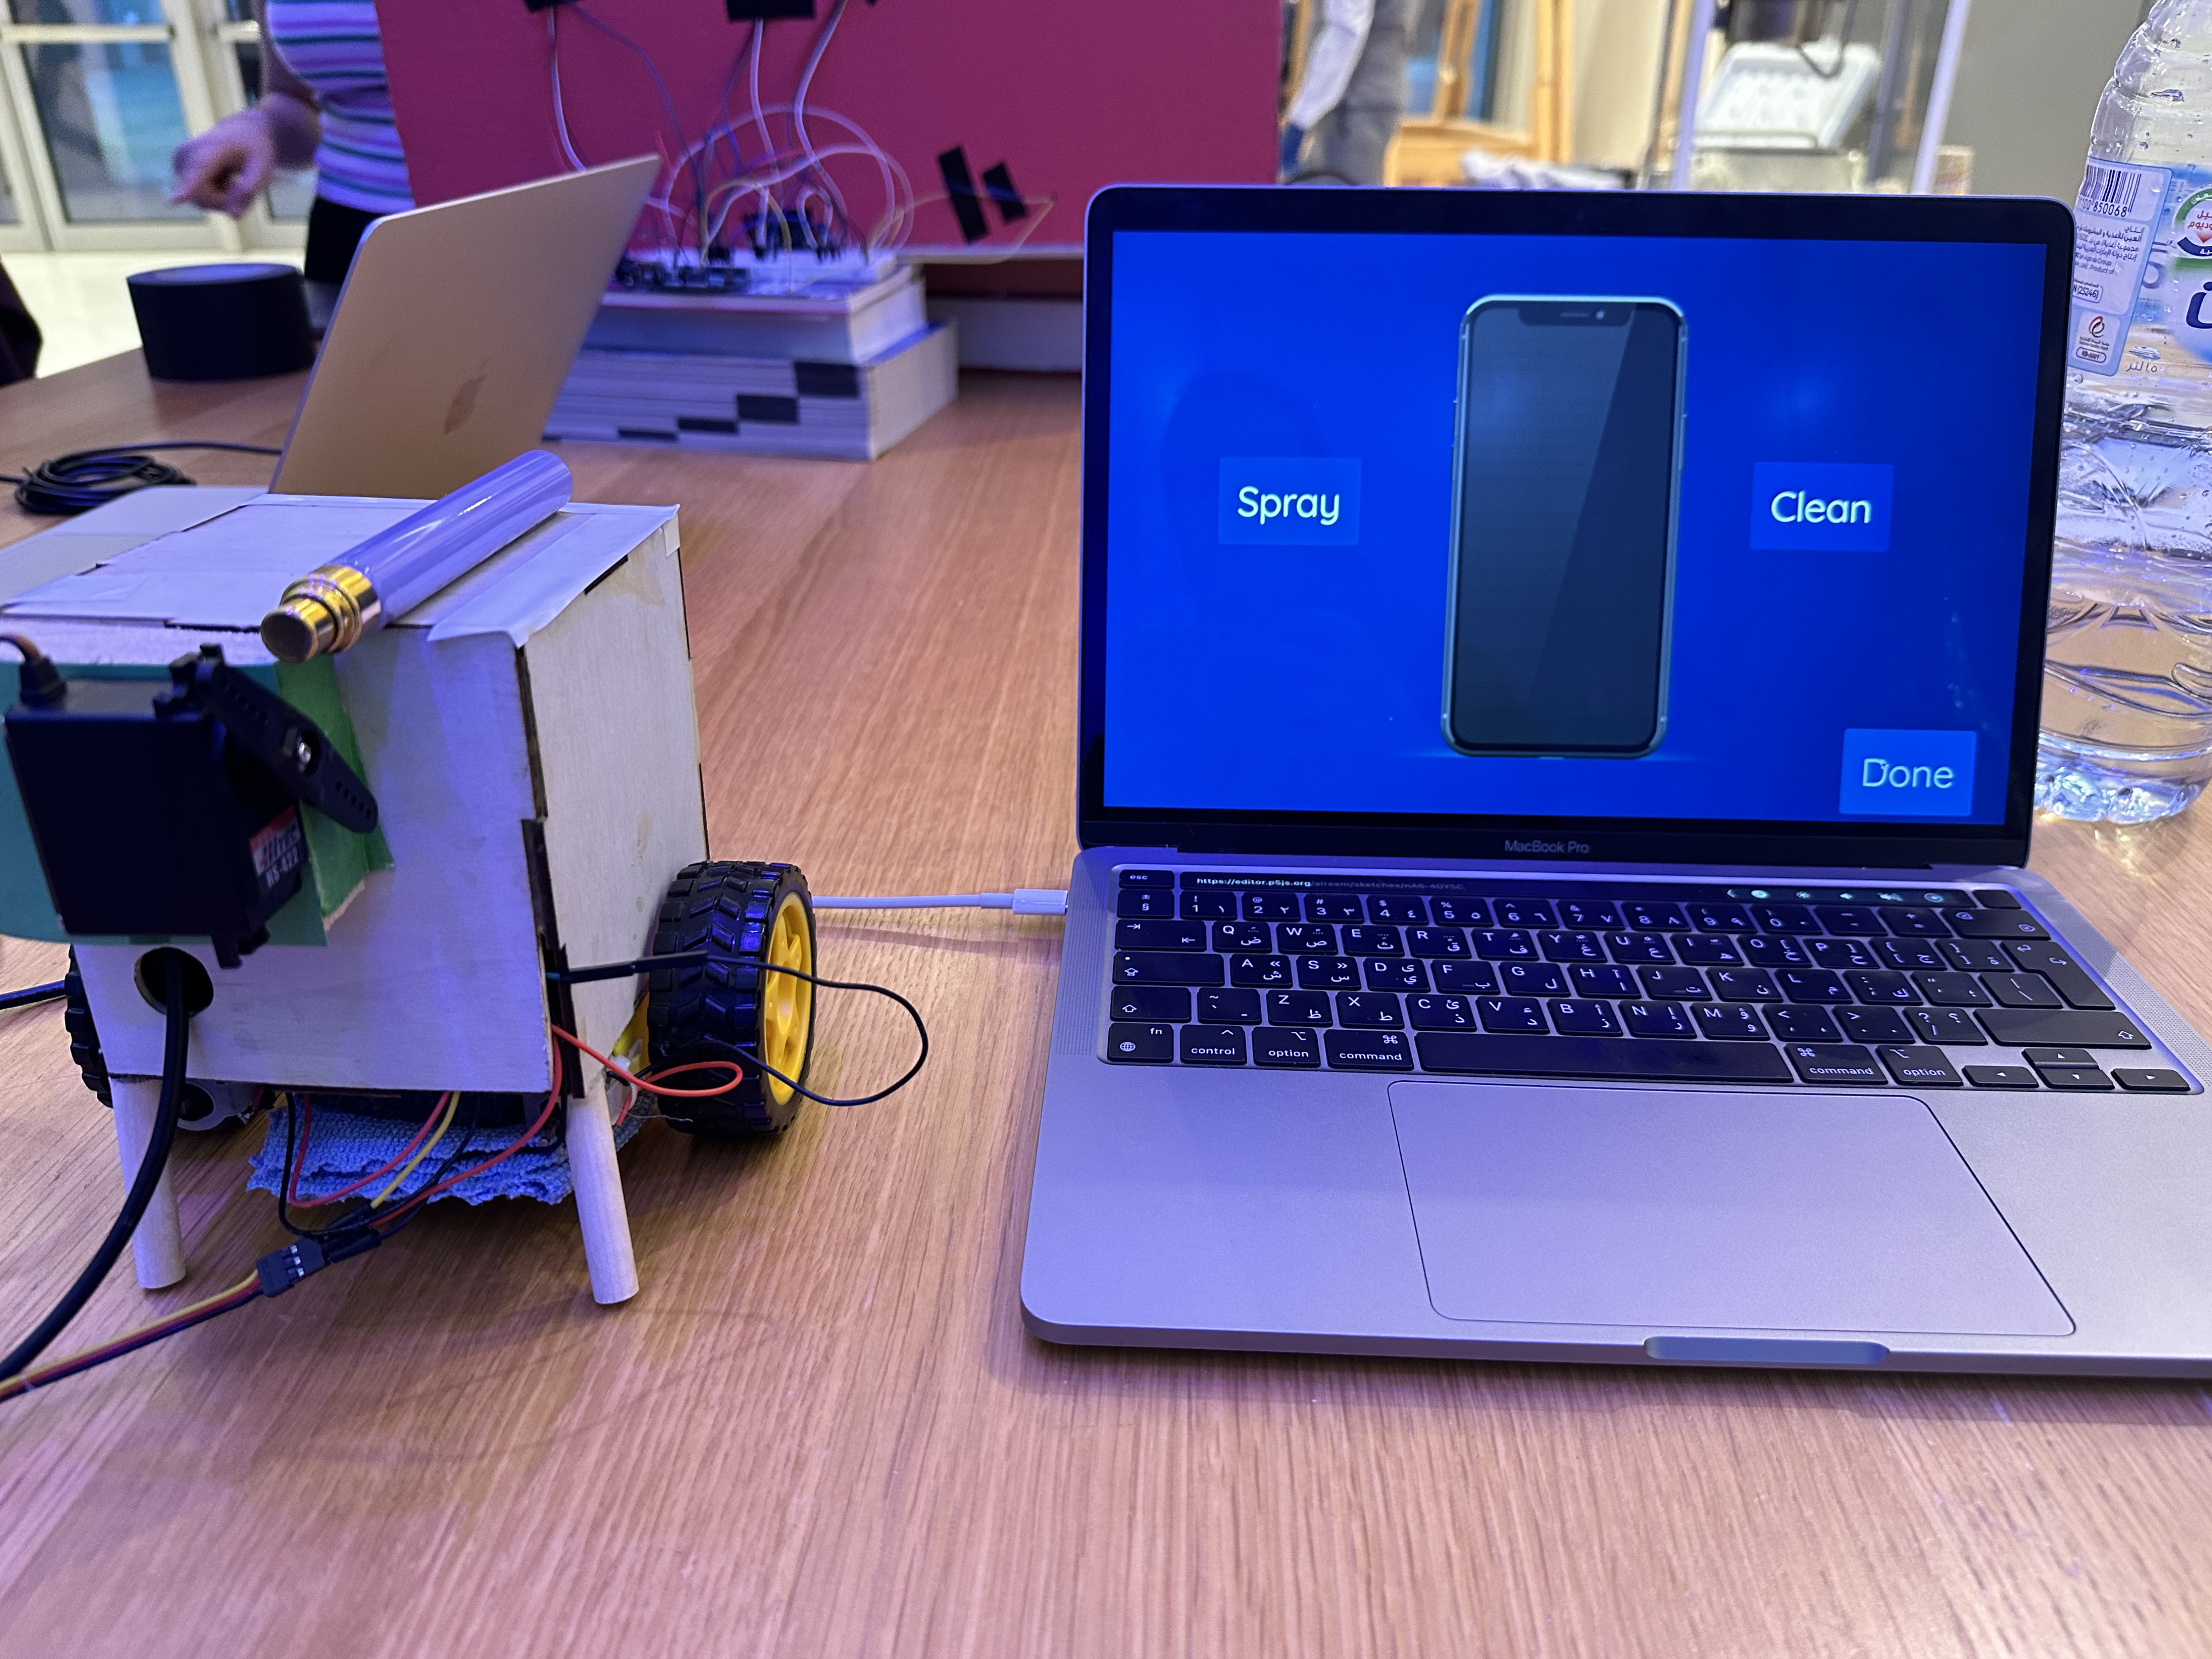
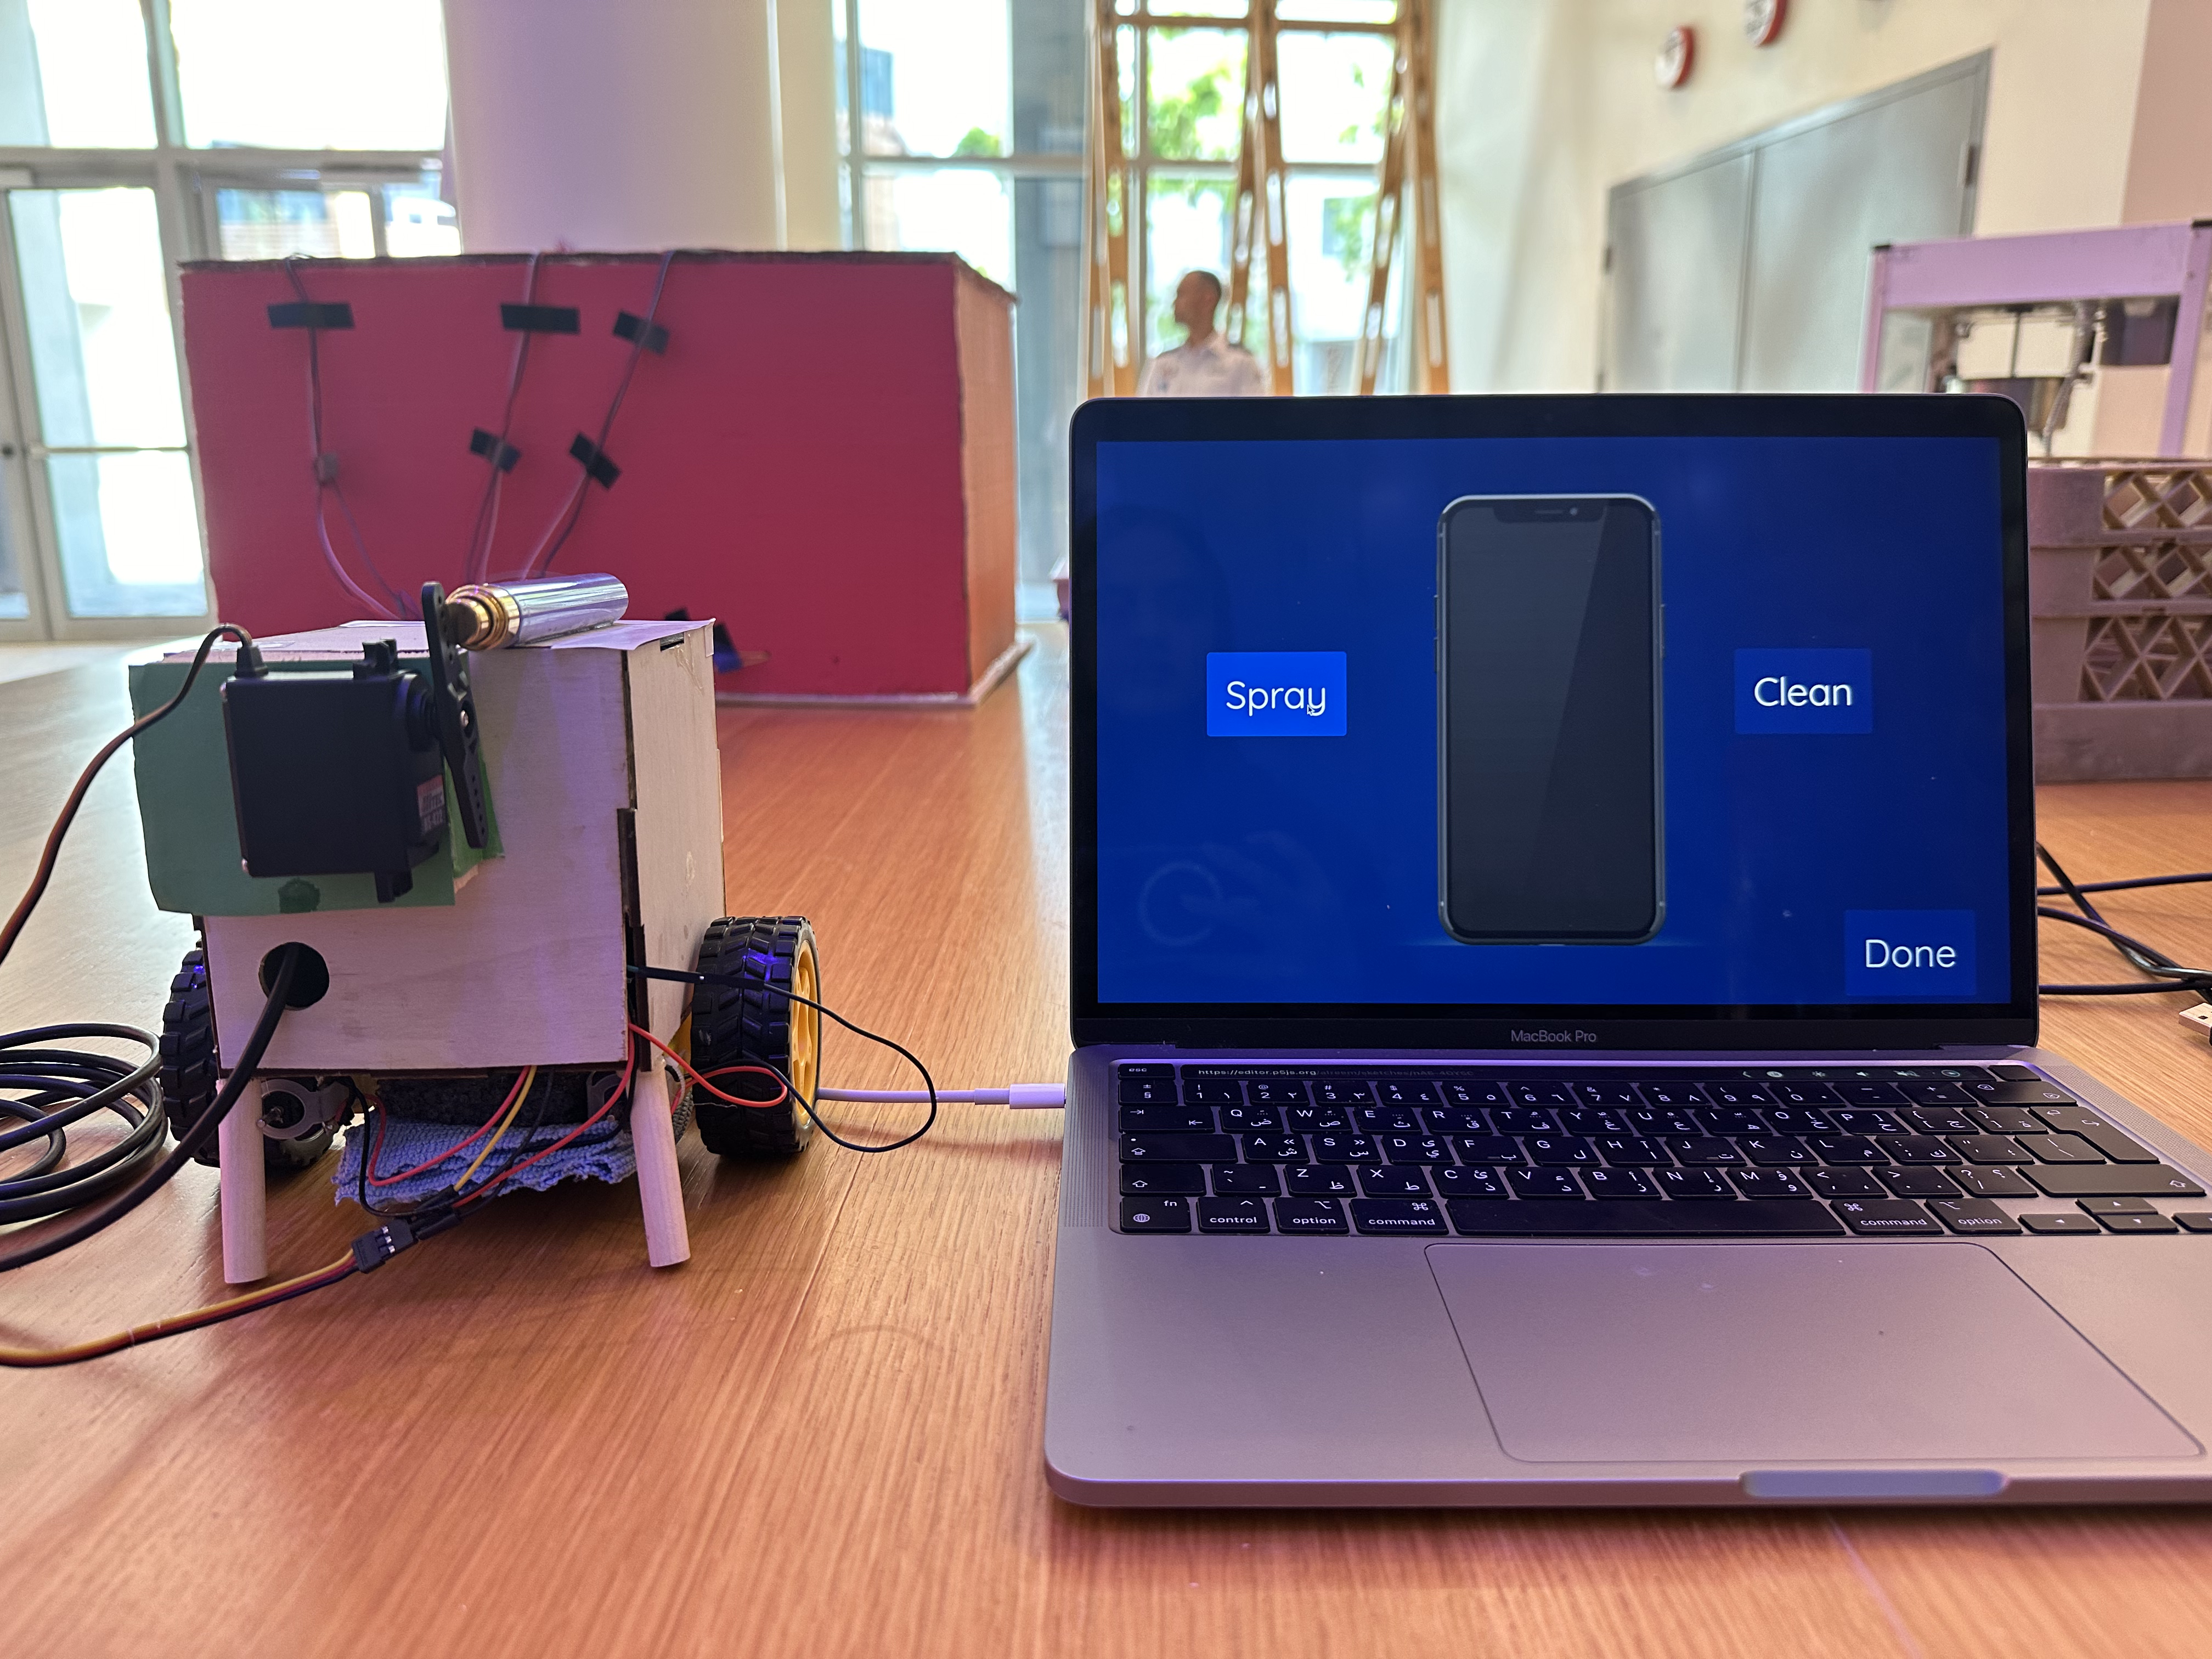


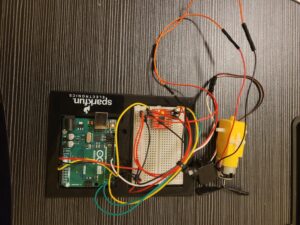
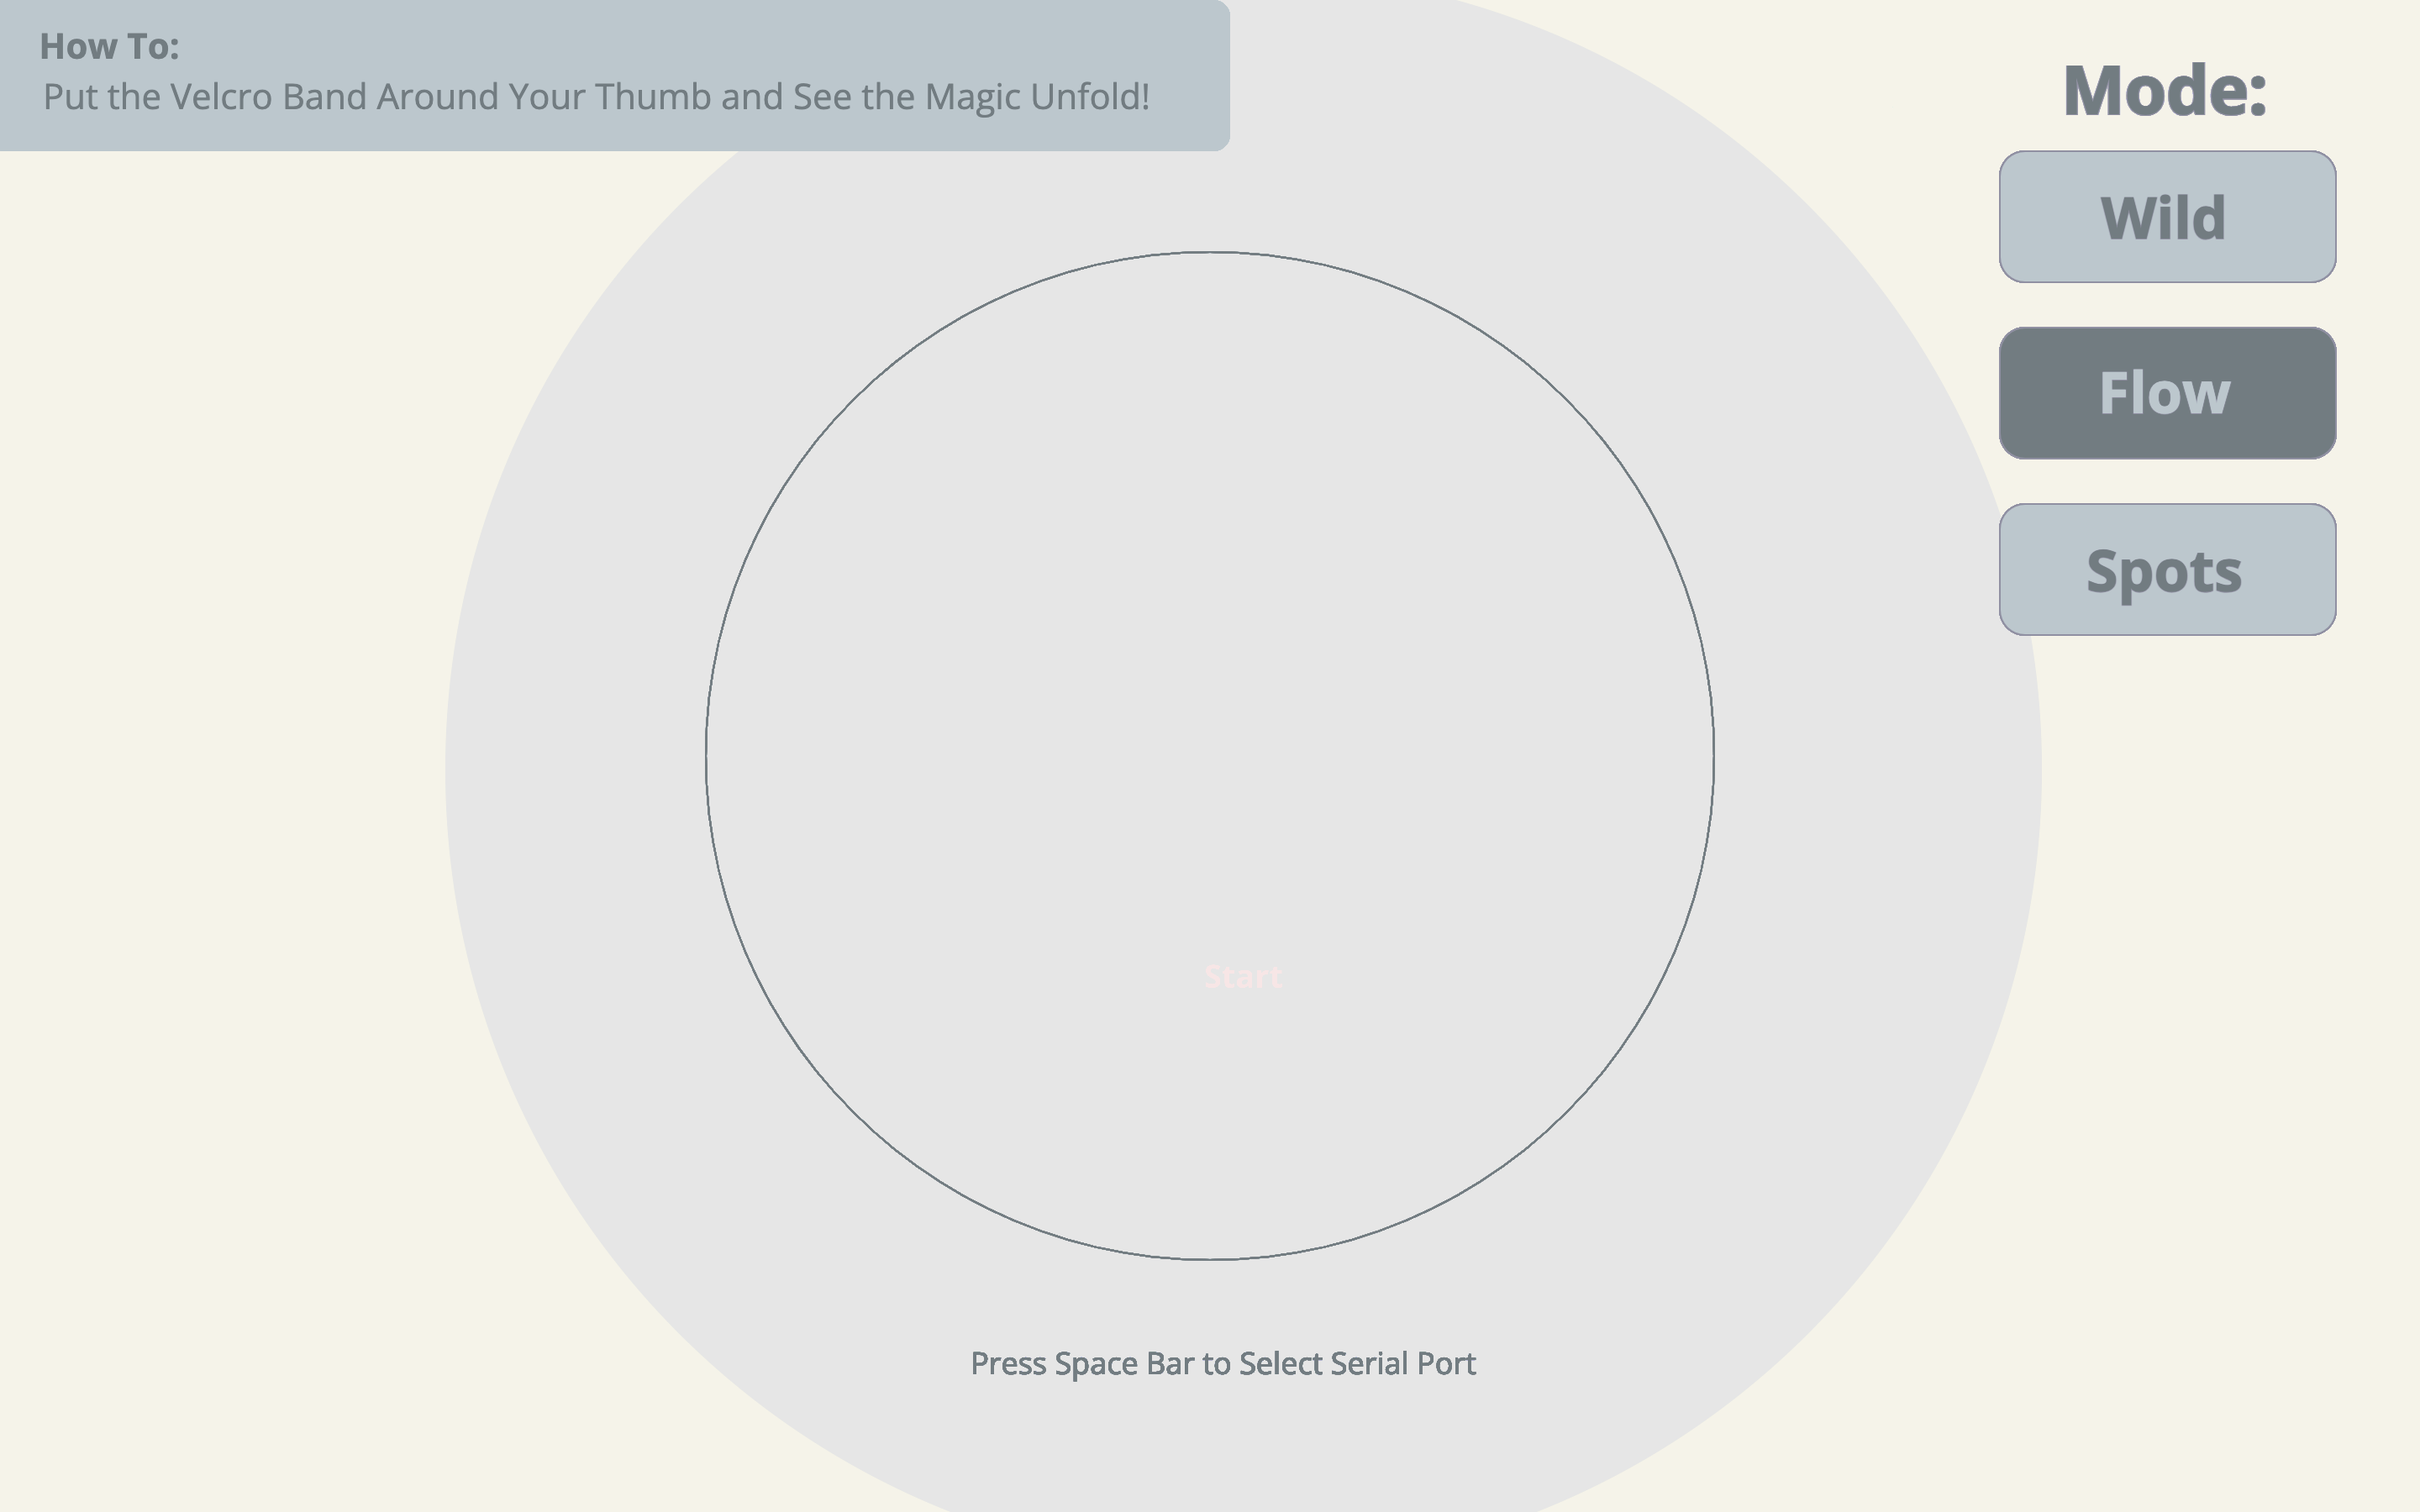
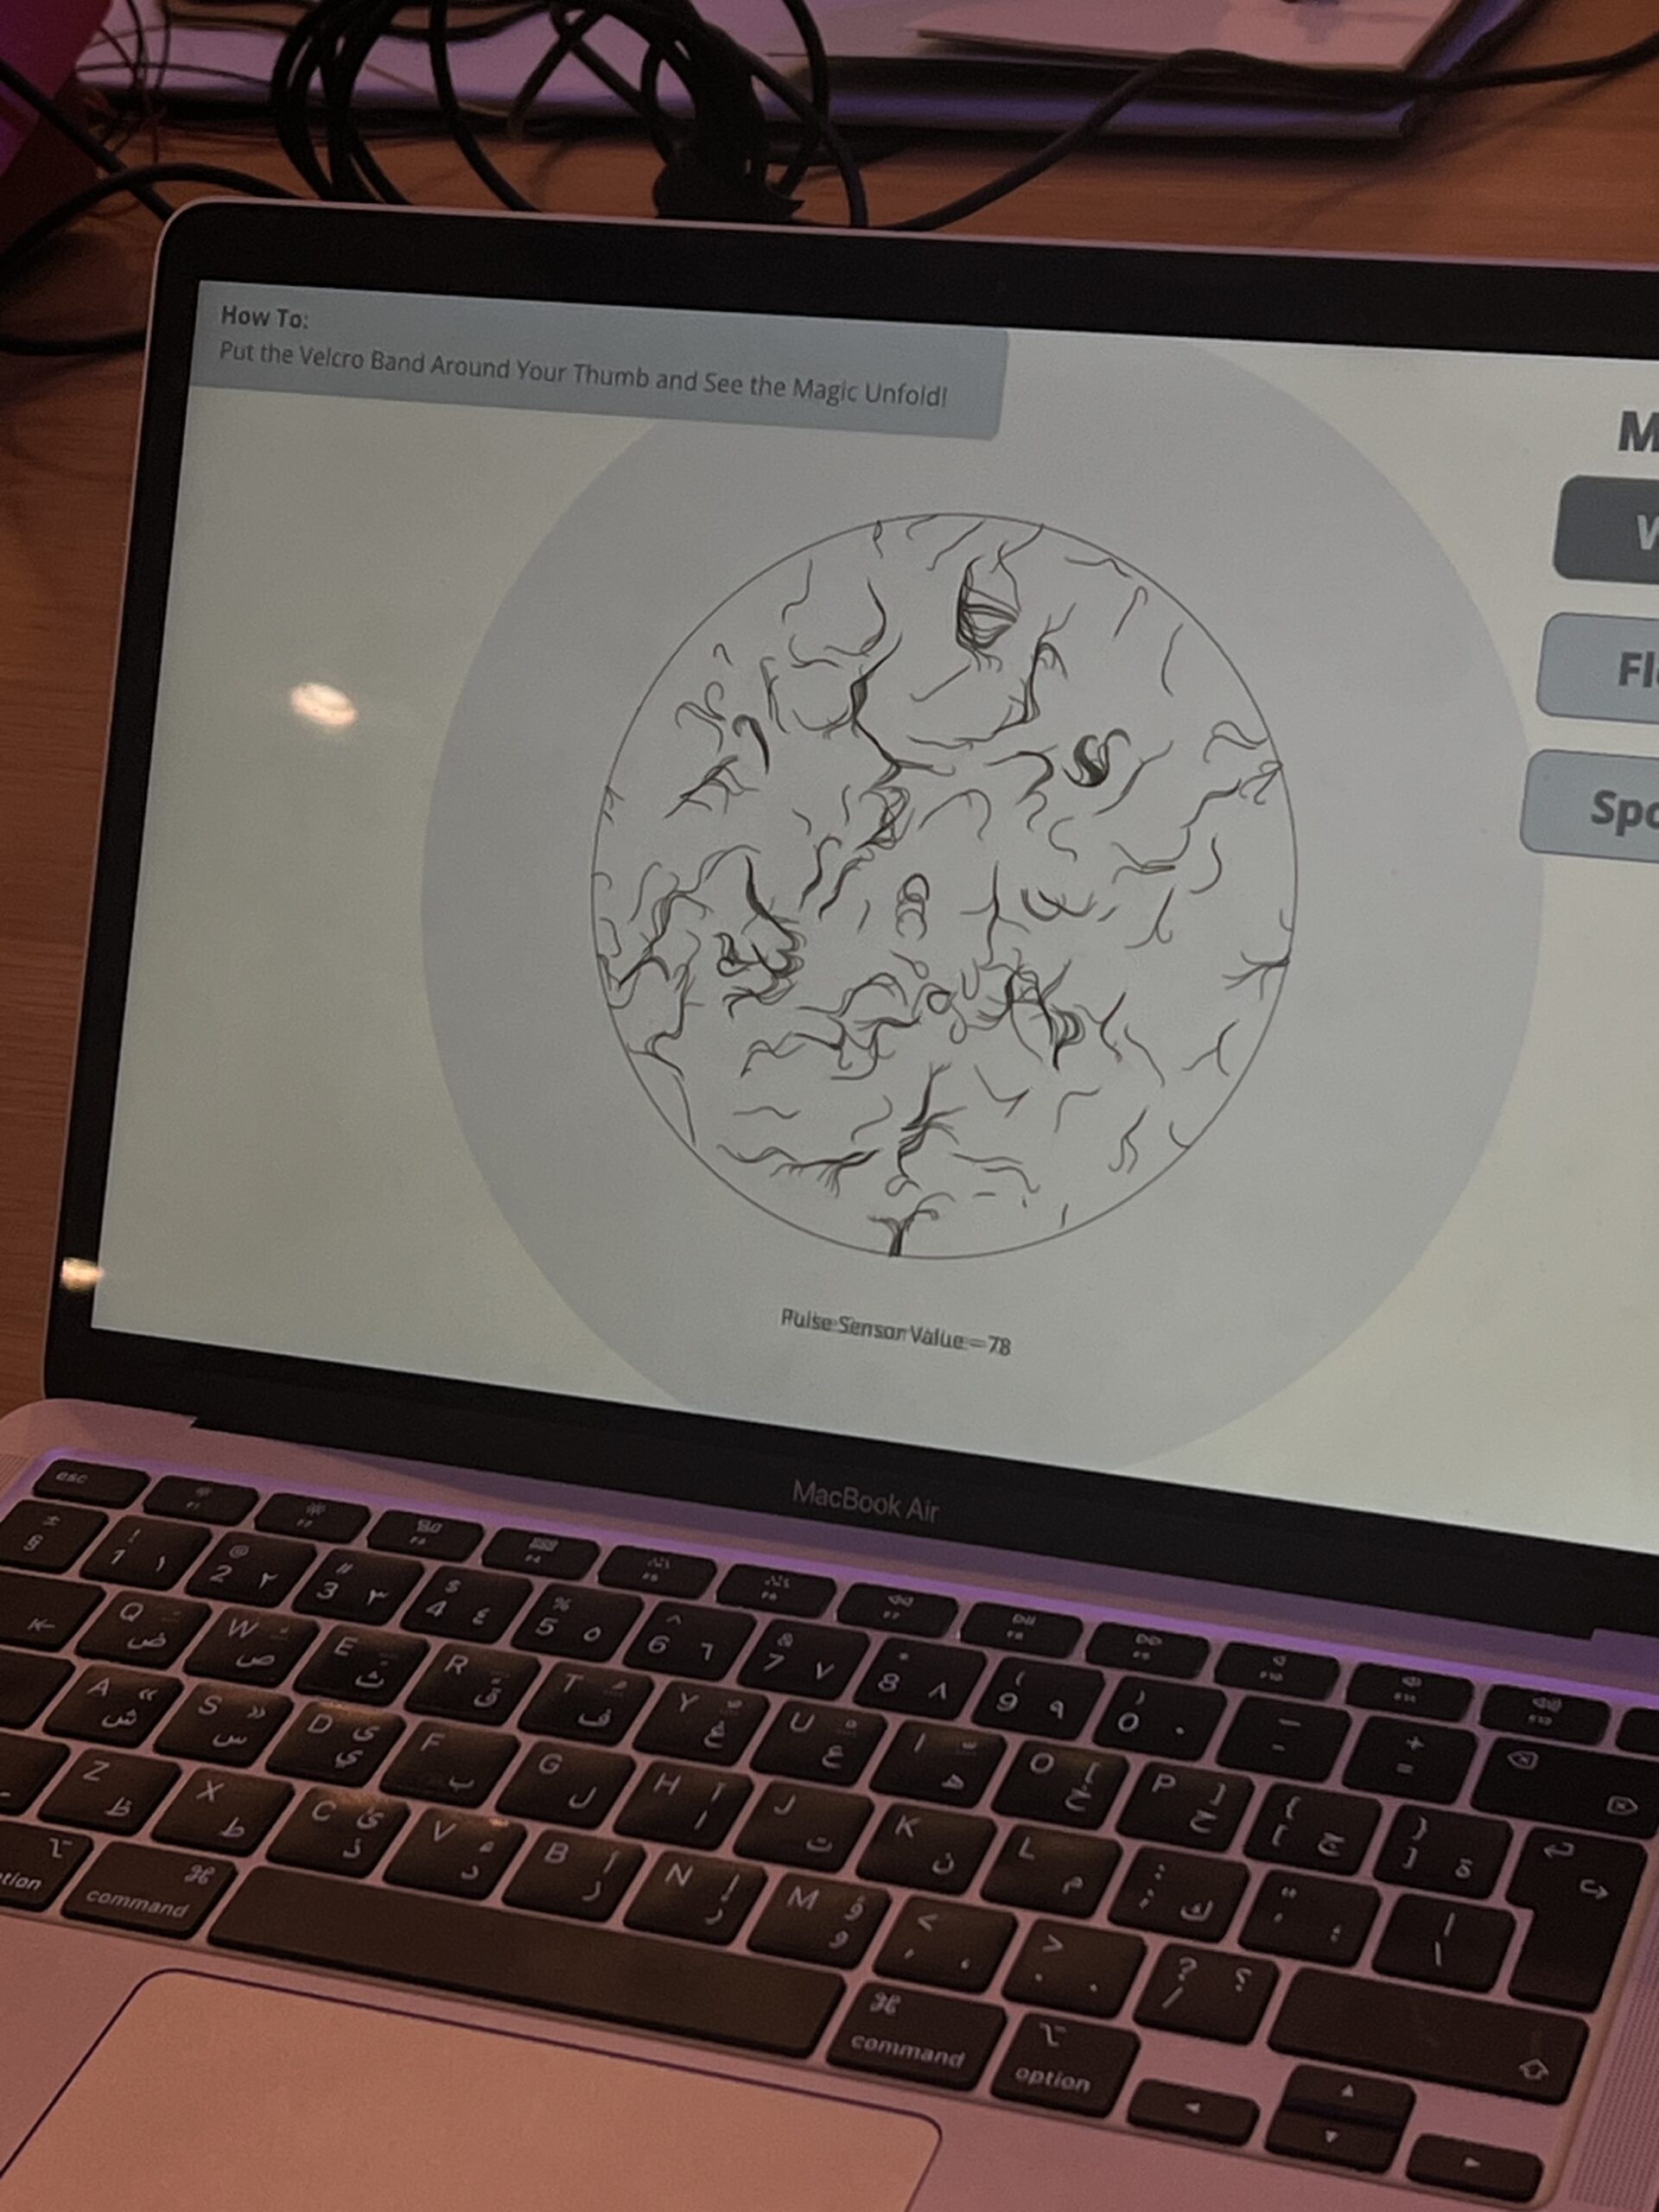
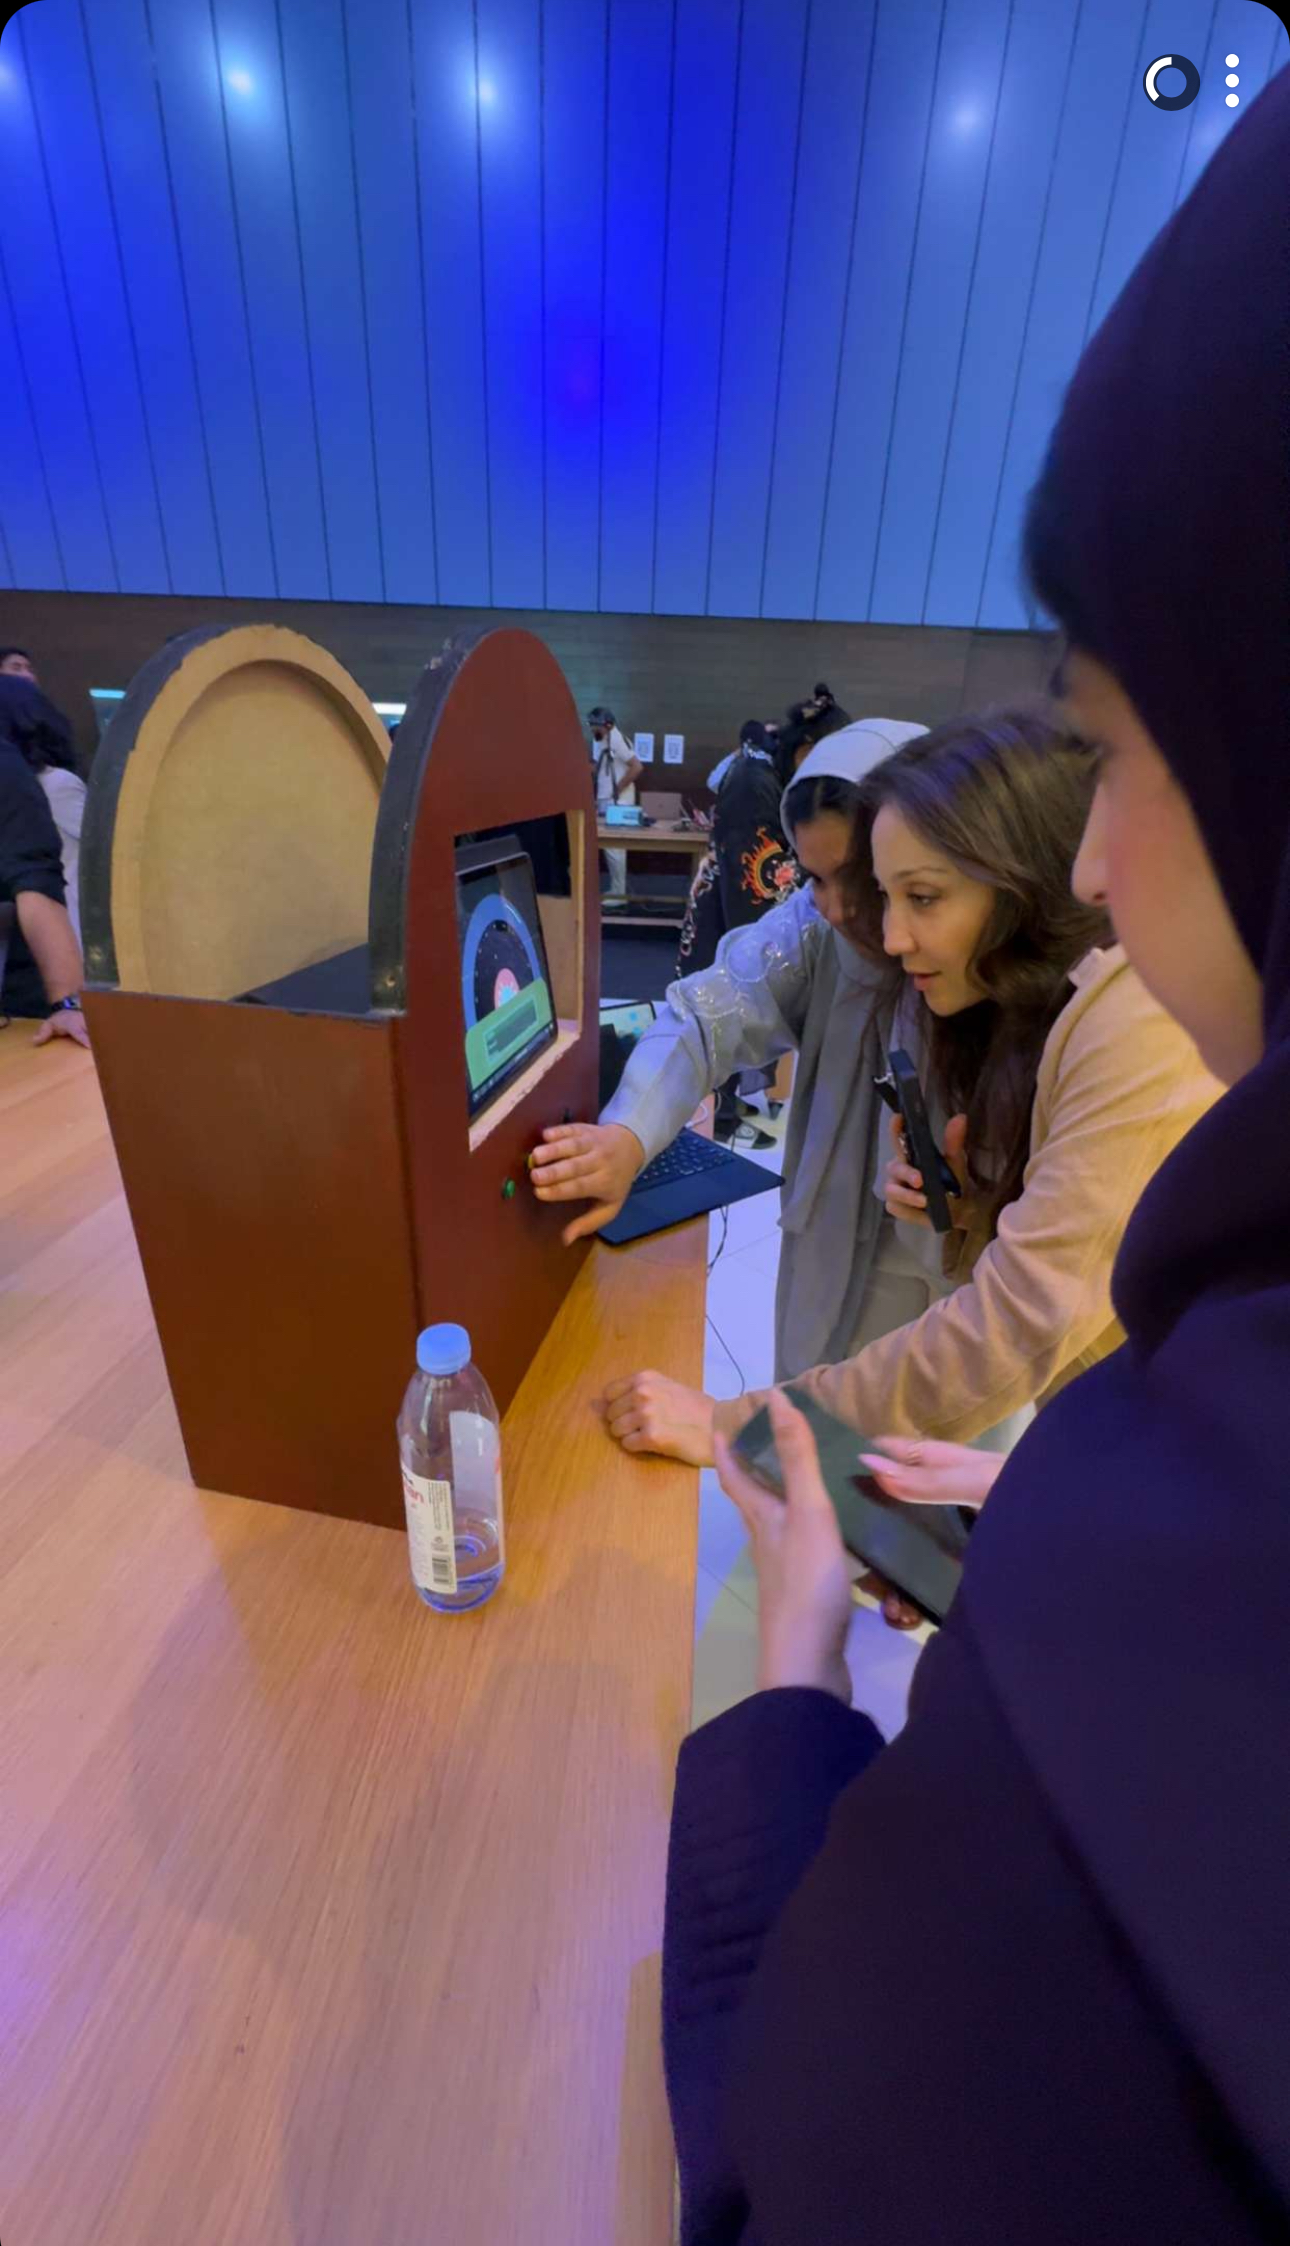


