Final Project: Remember To Keep A Little Heart..

Mega trying out my project at the Showcase.

Concept:

My primary source of inspiration was Andrew Schneider’s ‘Stars’ exhibit, as it would not be an overstatement to say that it changed my life. His method of combining technology with poetry resonated with me because he allowed me to see that what I wanted to do was possible. I also want to acknowledge how much his approach of jumping into the project before sorting out the functional technicalities inspired me. Too often, I get discouraged from starting projects because of my insecurities surrounding my computational knowledge. Schneider reminded me to approach creating the way a child would–prioritizing fun over understanding. I didn’t have to be an expert to have a vision, or to create something great.

My second source of inspiration was my favorite installation at Manar Abu Dhabi, which detected your pulse in order to make a field of light glow with your heartbeat. Both this installation and Schneider’s used technology that evoked breathtaking, light-filled phenomena. But somehow, through either words or your heartbeat, they connected these surroundings back to you, indicating a kind of macro-micro spiritual connection. I wanted my project to accomplish an effect along these lines.

A more tangential inspiration was Tiktok. Most people my age consume a large amount of reels day to day, but every once in a while, a deeper, more meaningful video will appear from the usual, mind numbing congelation that is Tiktok and Instagram reels. I would find myself being surprisingly moved, and thought it was interesting how a lot of our generation must connect to inspiration or meditative clarity through these short-form videos. Because of the small scale of my project, I wanted to achieve an emotional effect closer to that of a meditative Tiktok–short, sweet, but profound enough to make you pause and feel something before resuming daily life.

The Process, Beginning With Arduino:

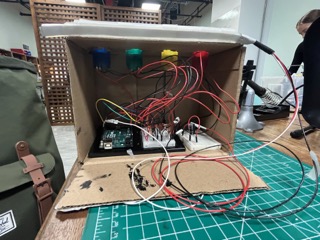
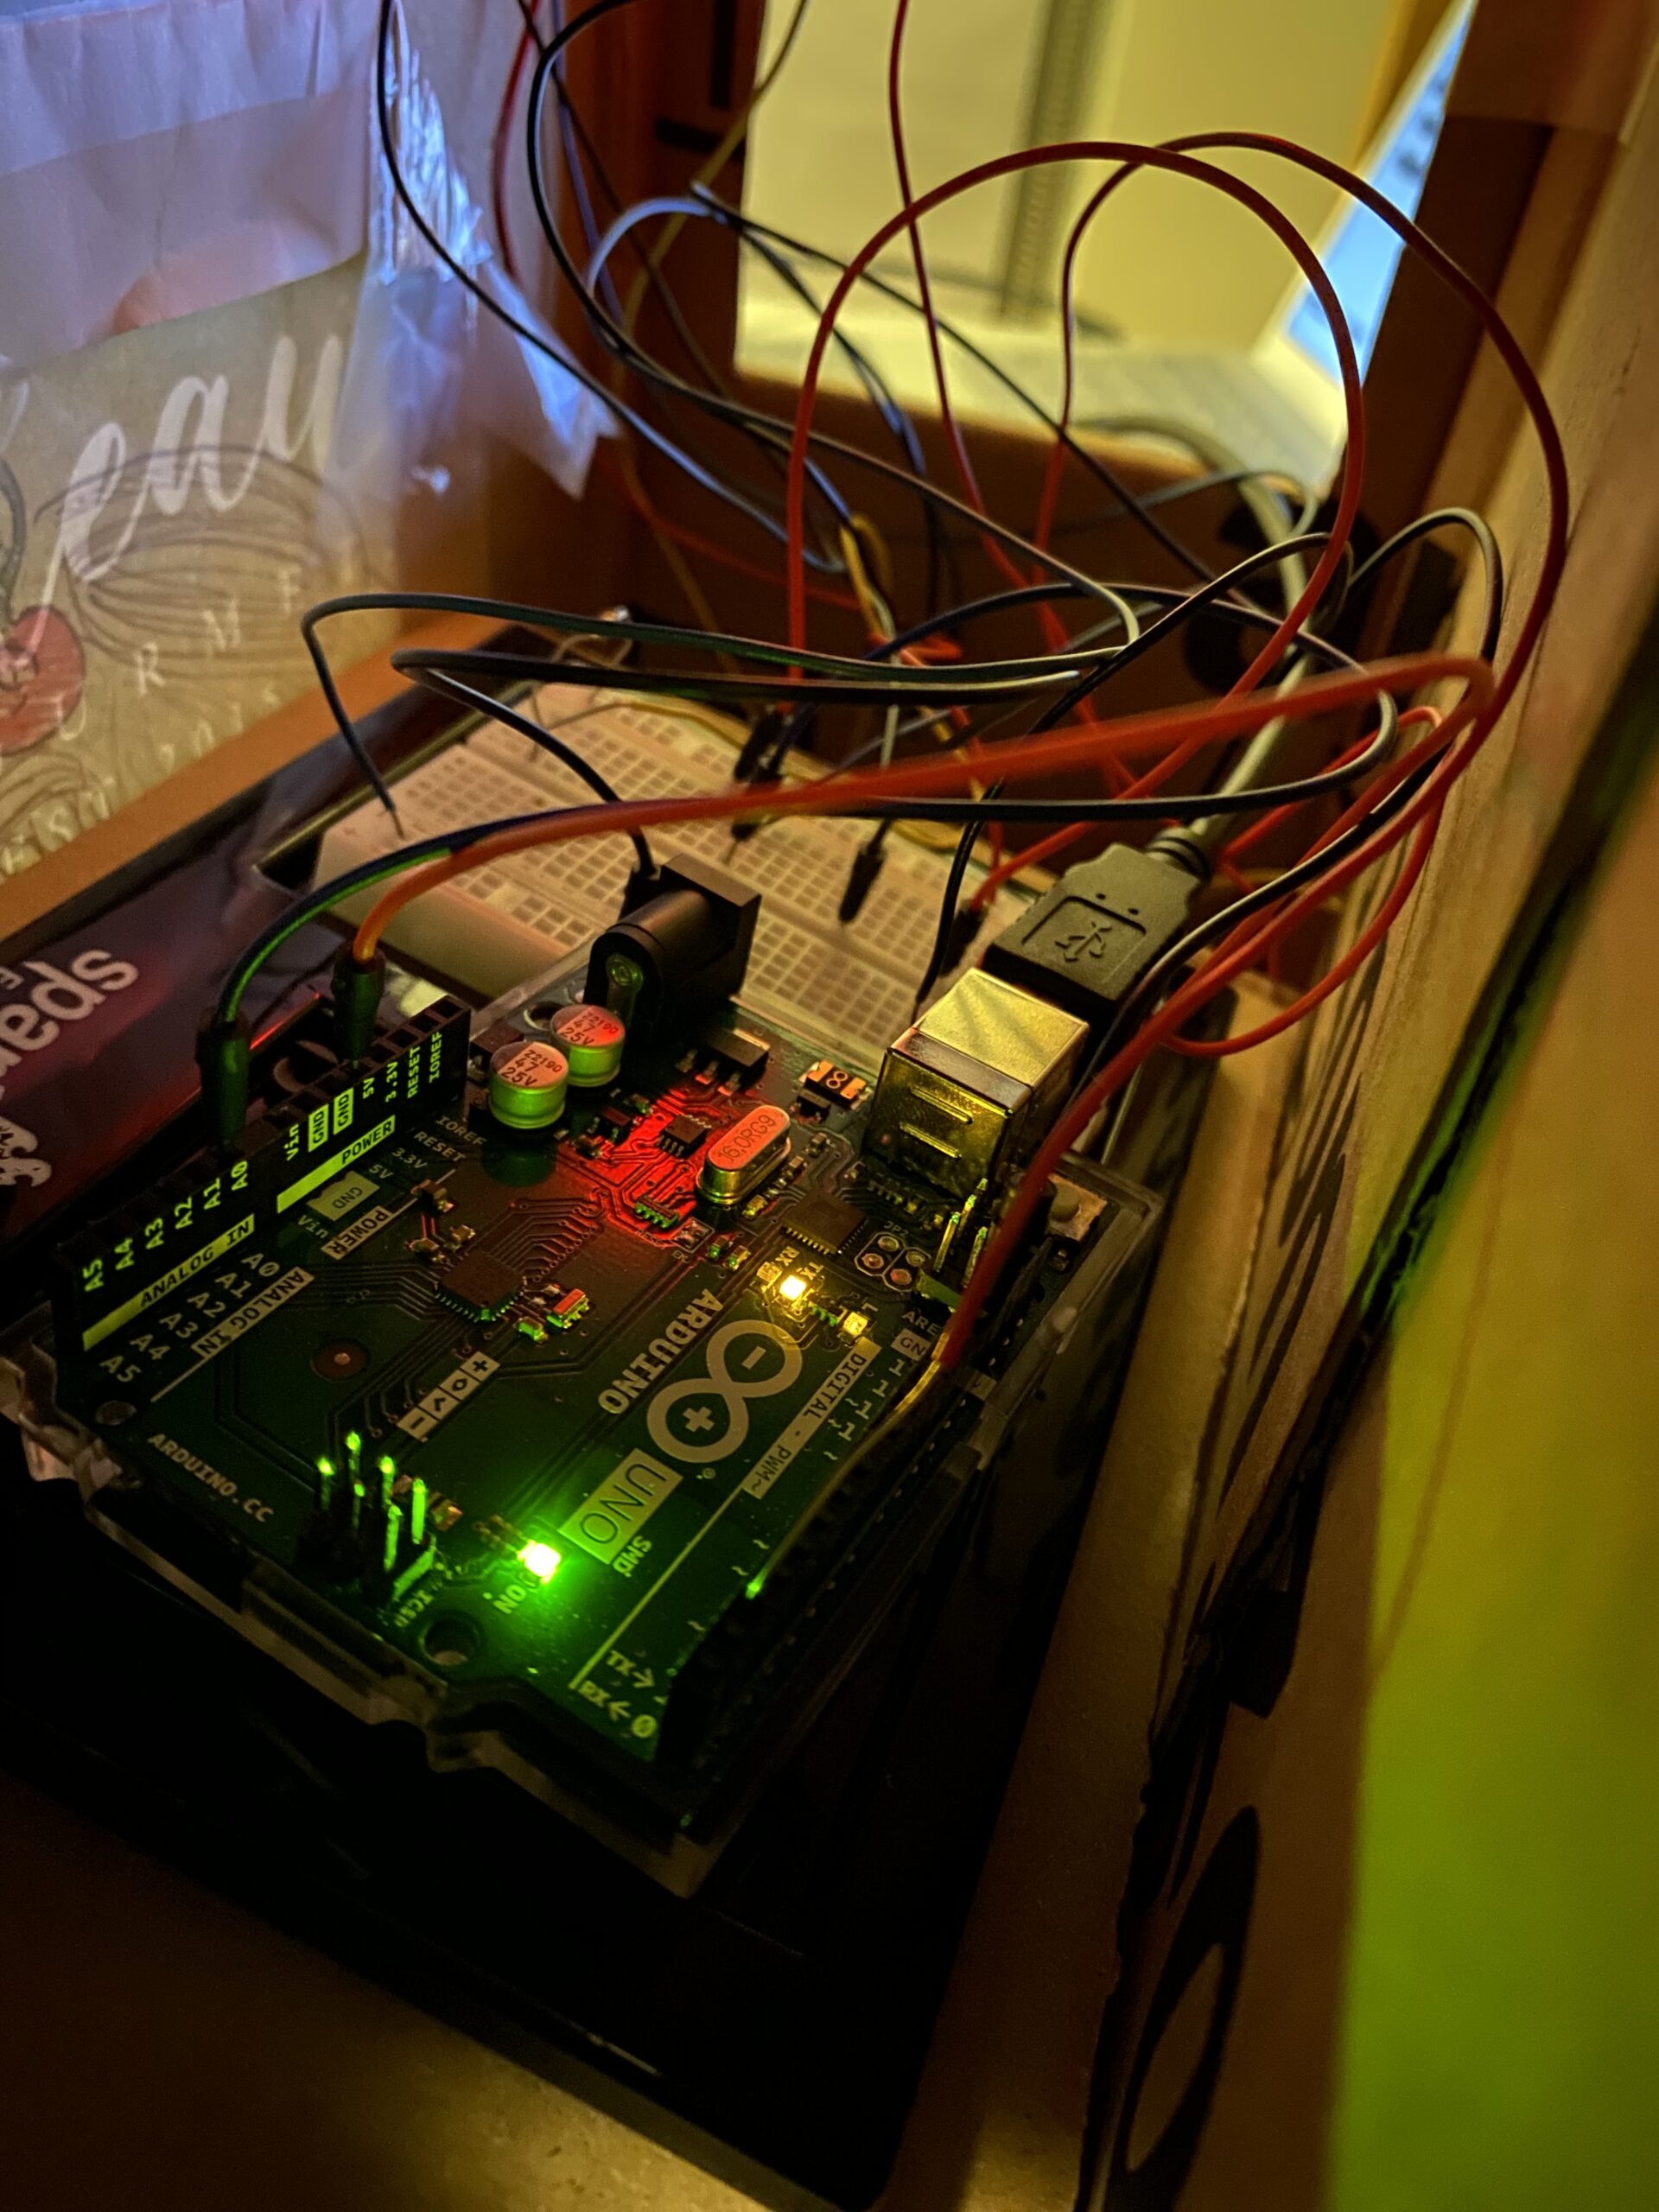
I started by tackling the Arduino part of the project. I followed a page linked here, which, thankfully, contained the exact instructions I needed. I followed the schematic they displayed, see below:

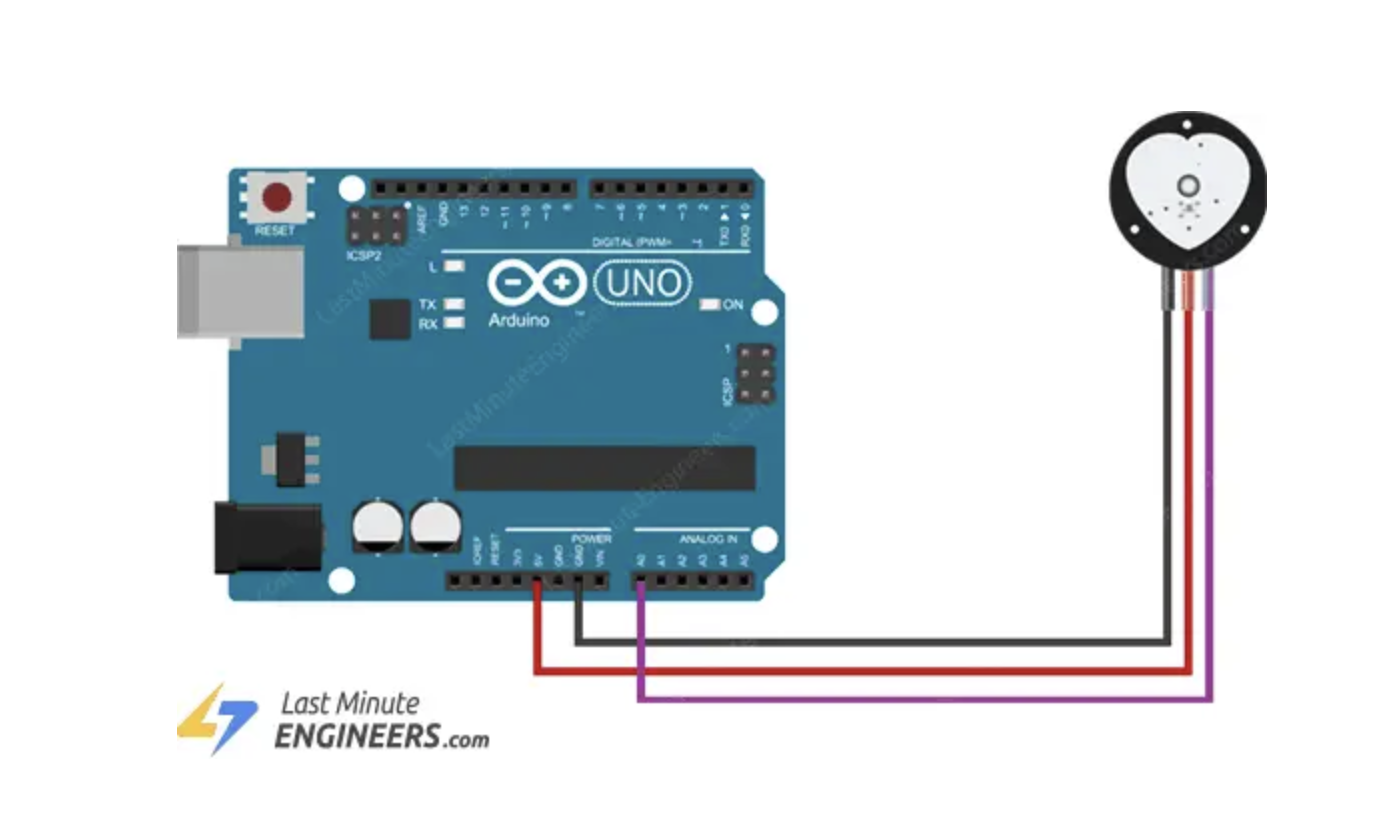
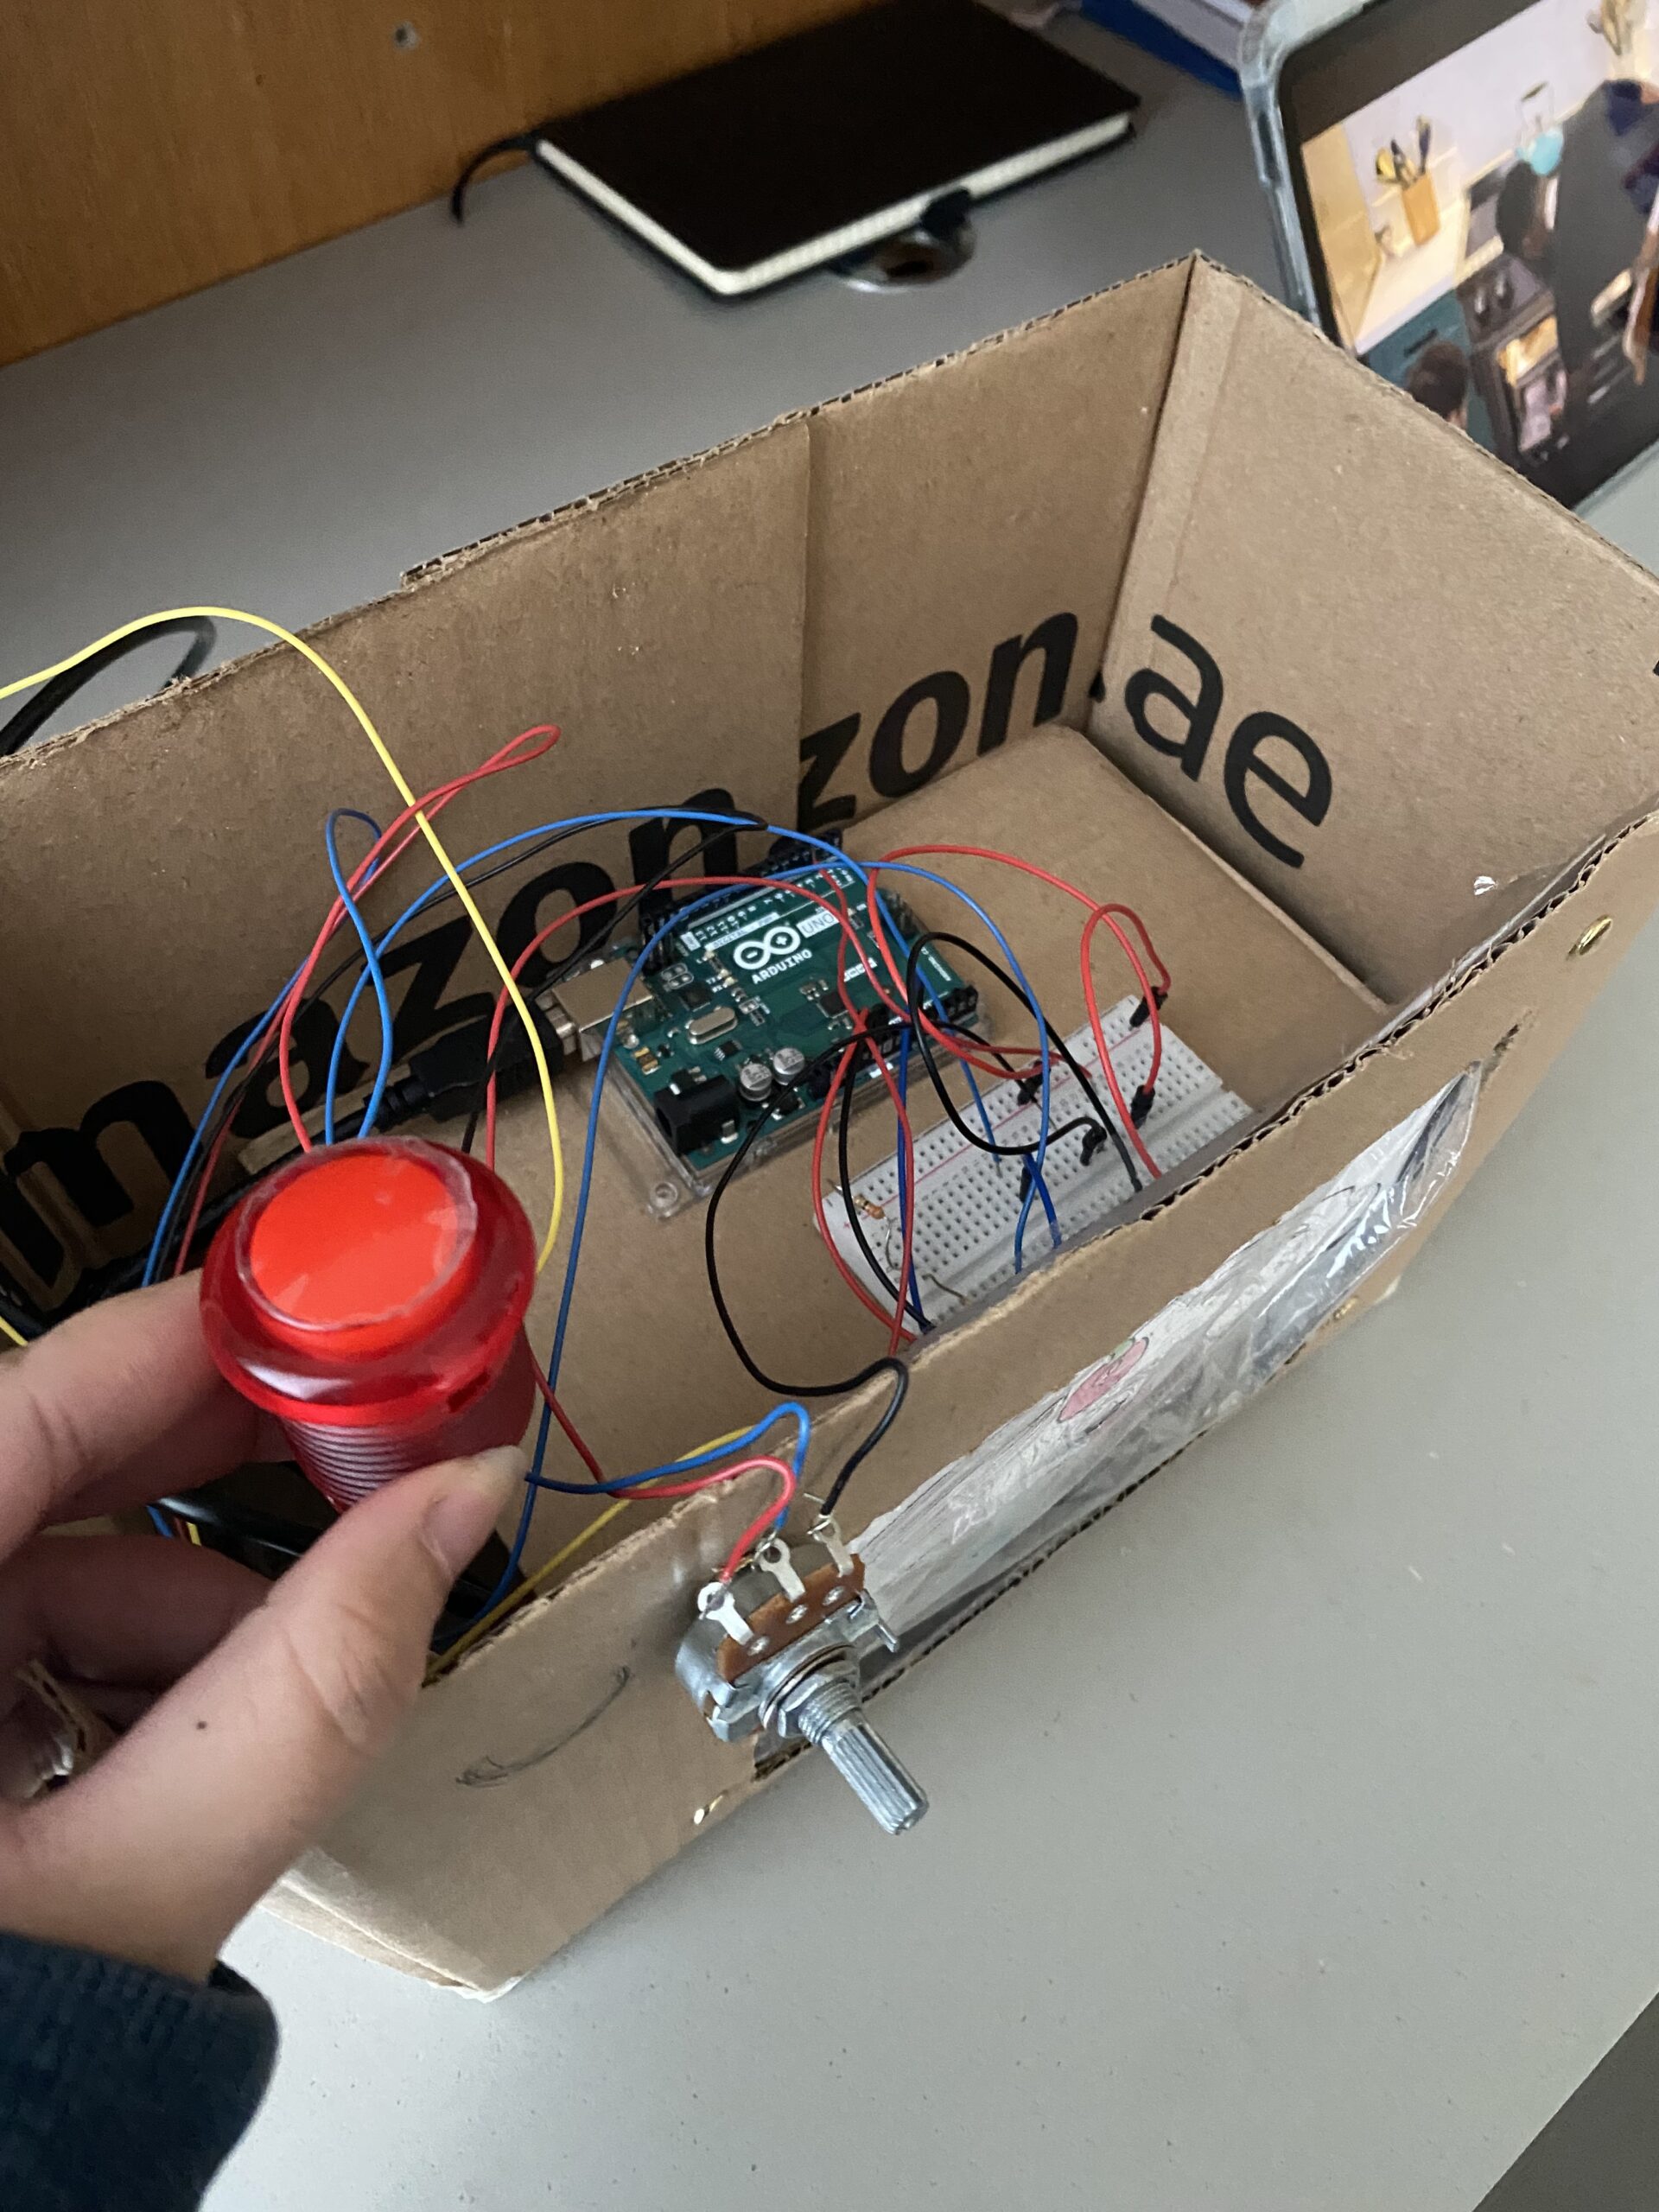
But I also drew my own schematic, here:

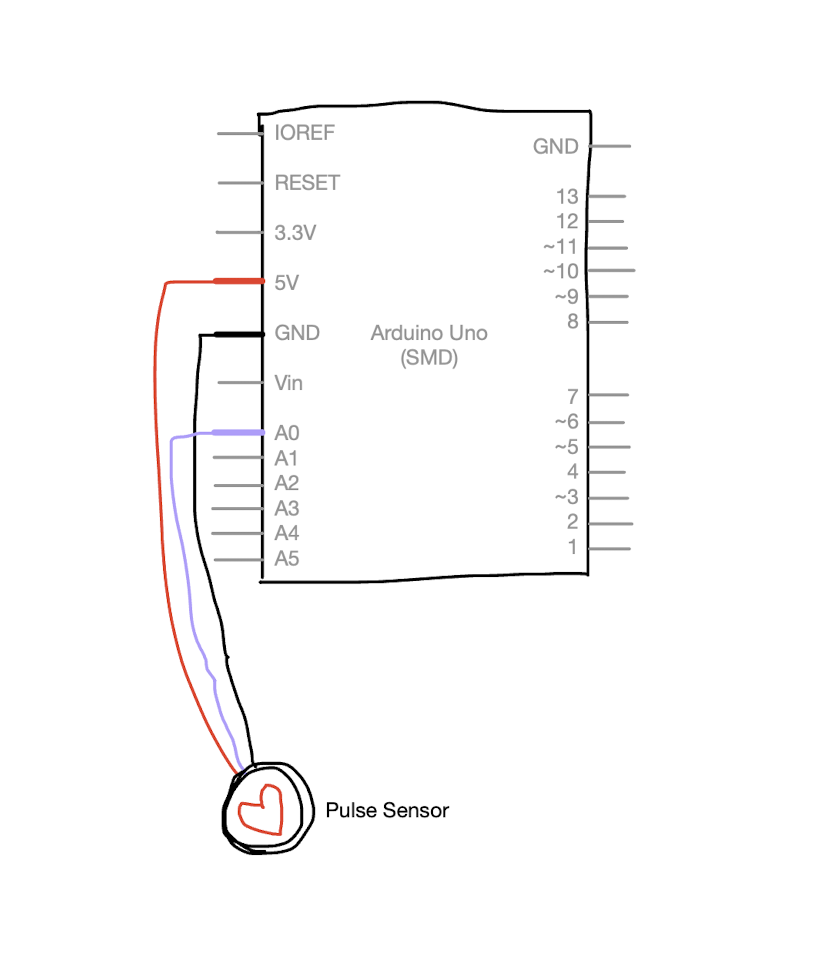
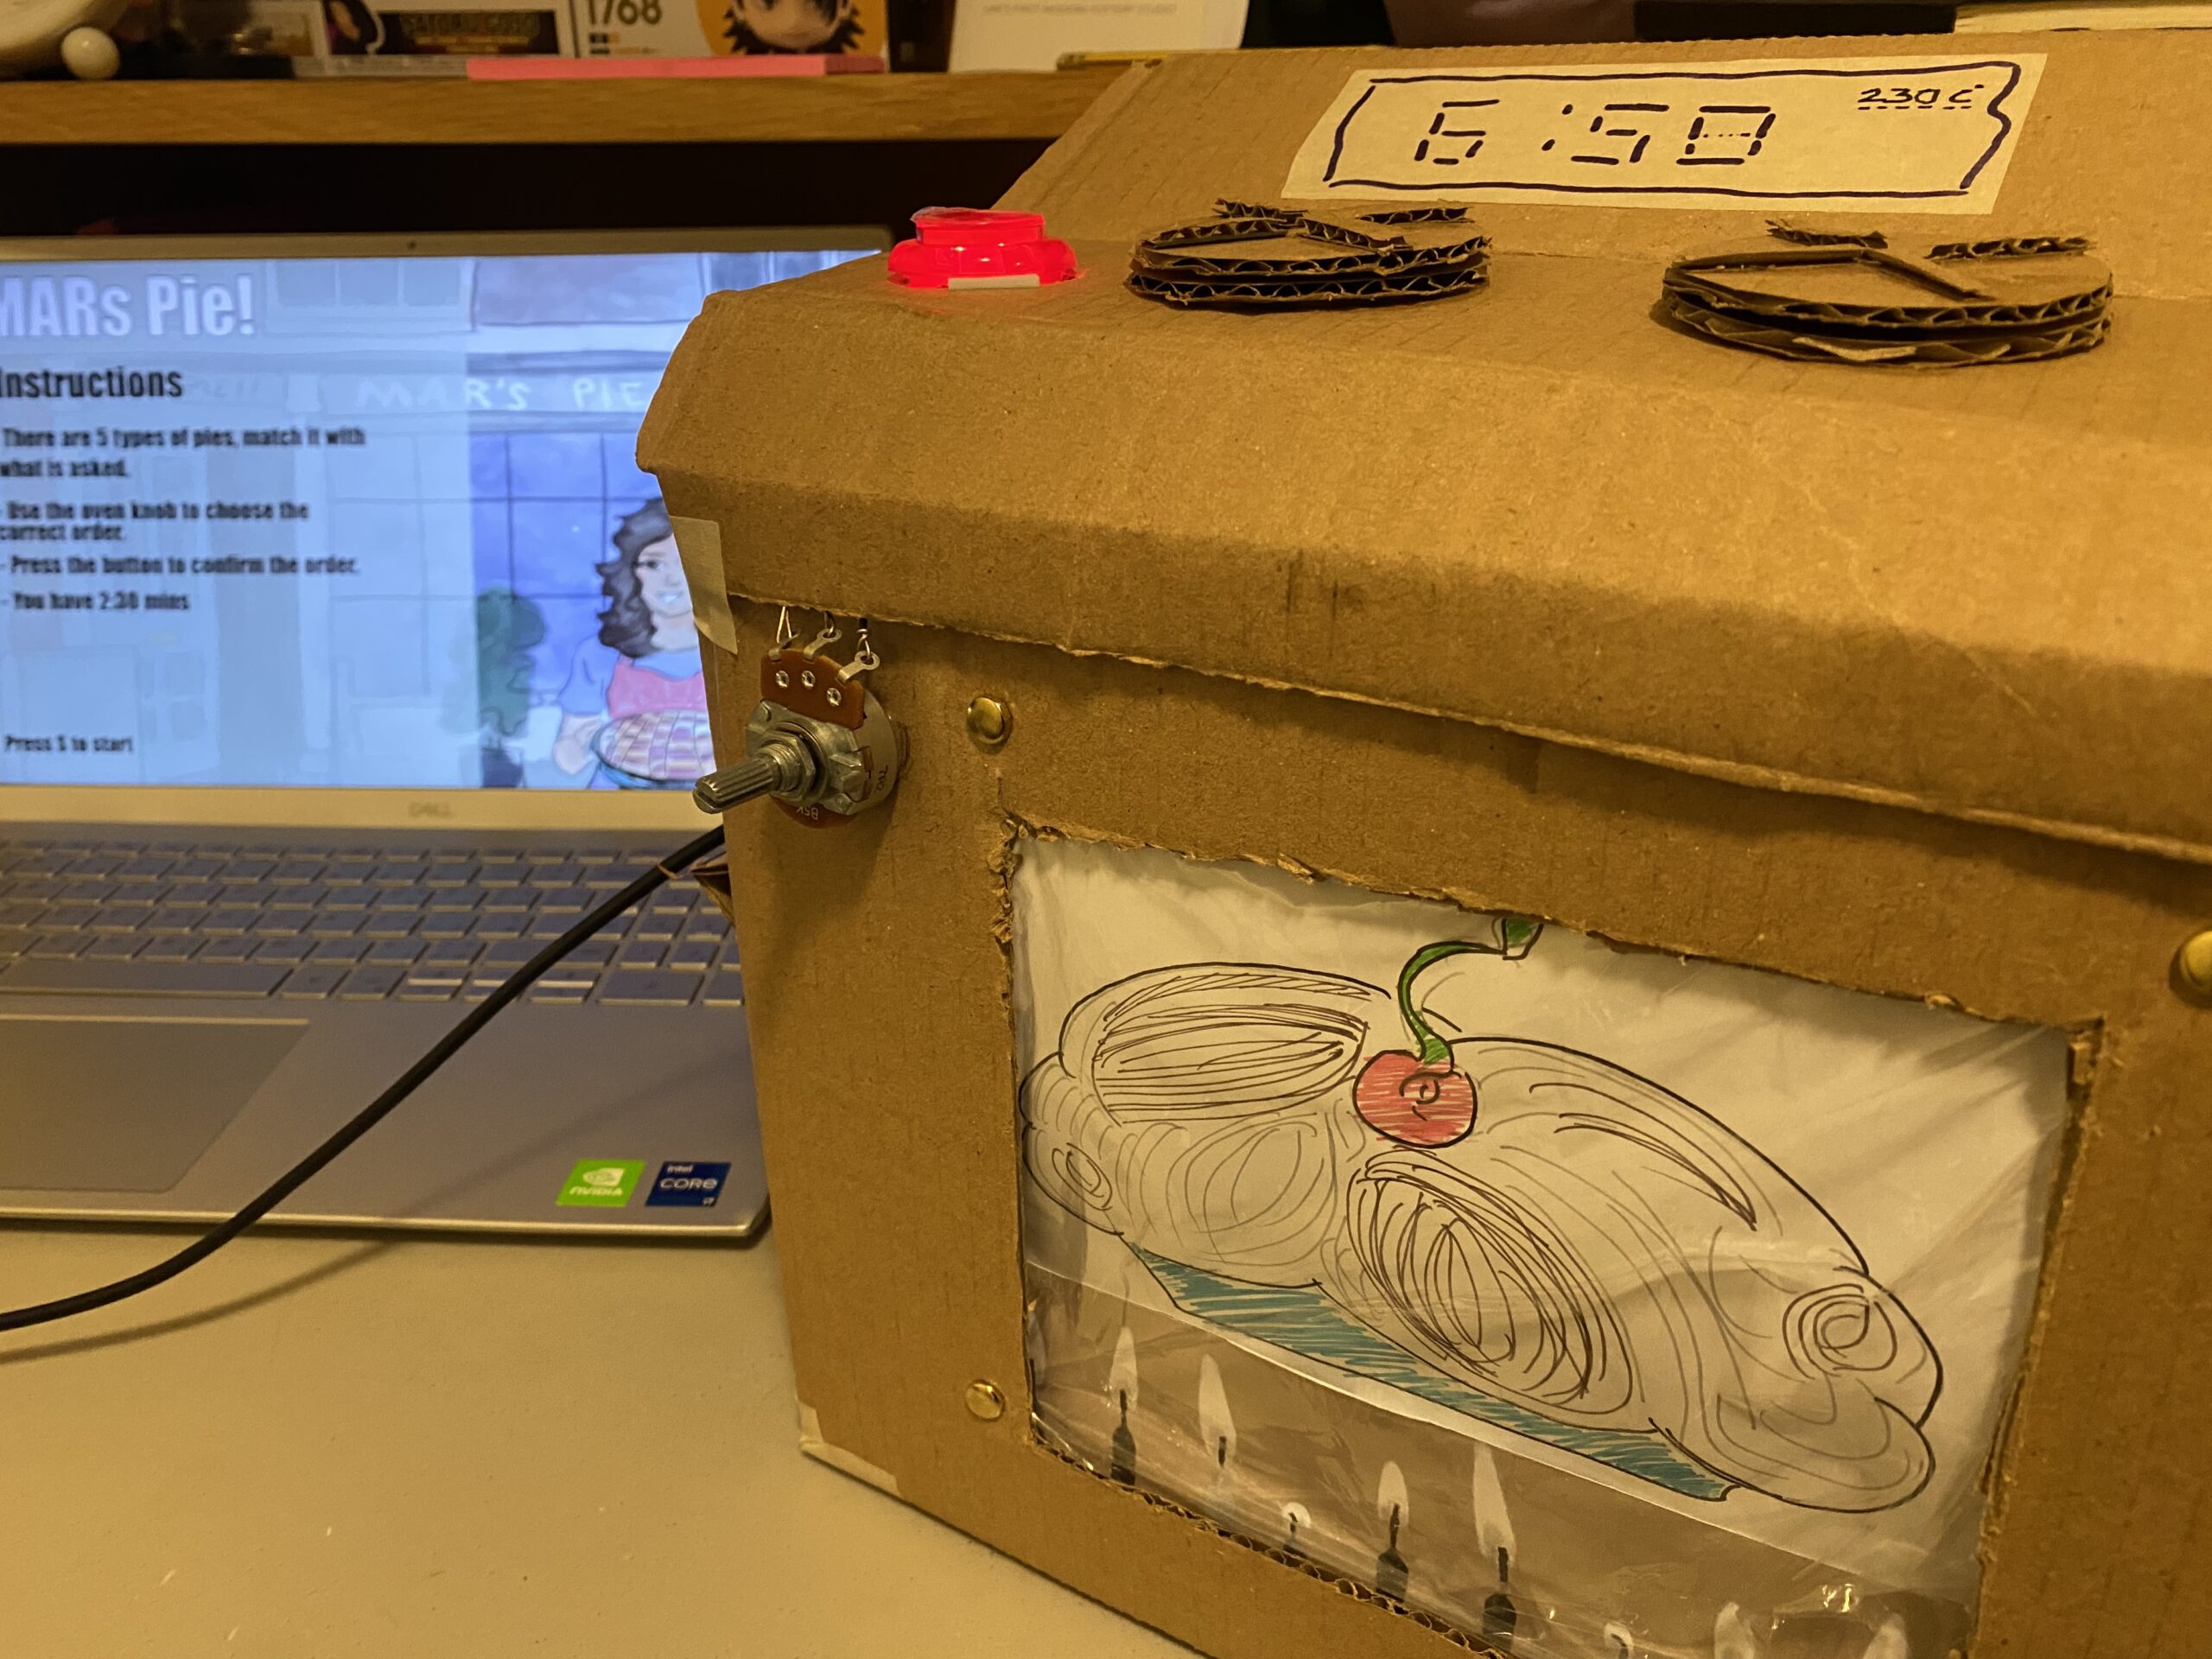
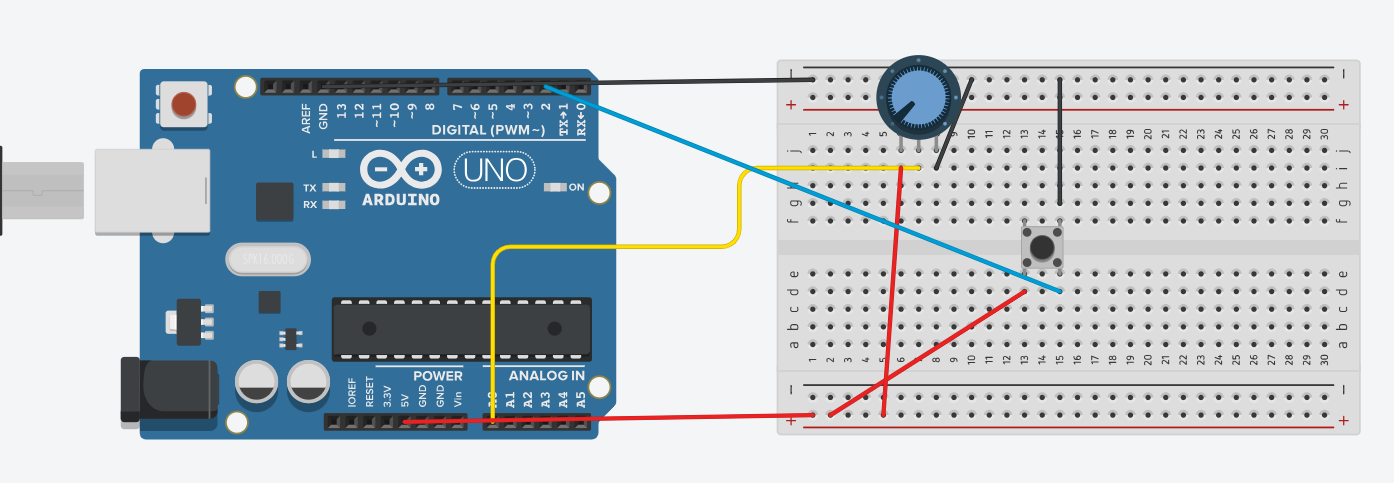
But here is an actual photograph, just to be sure:

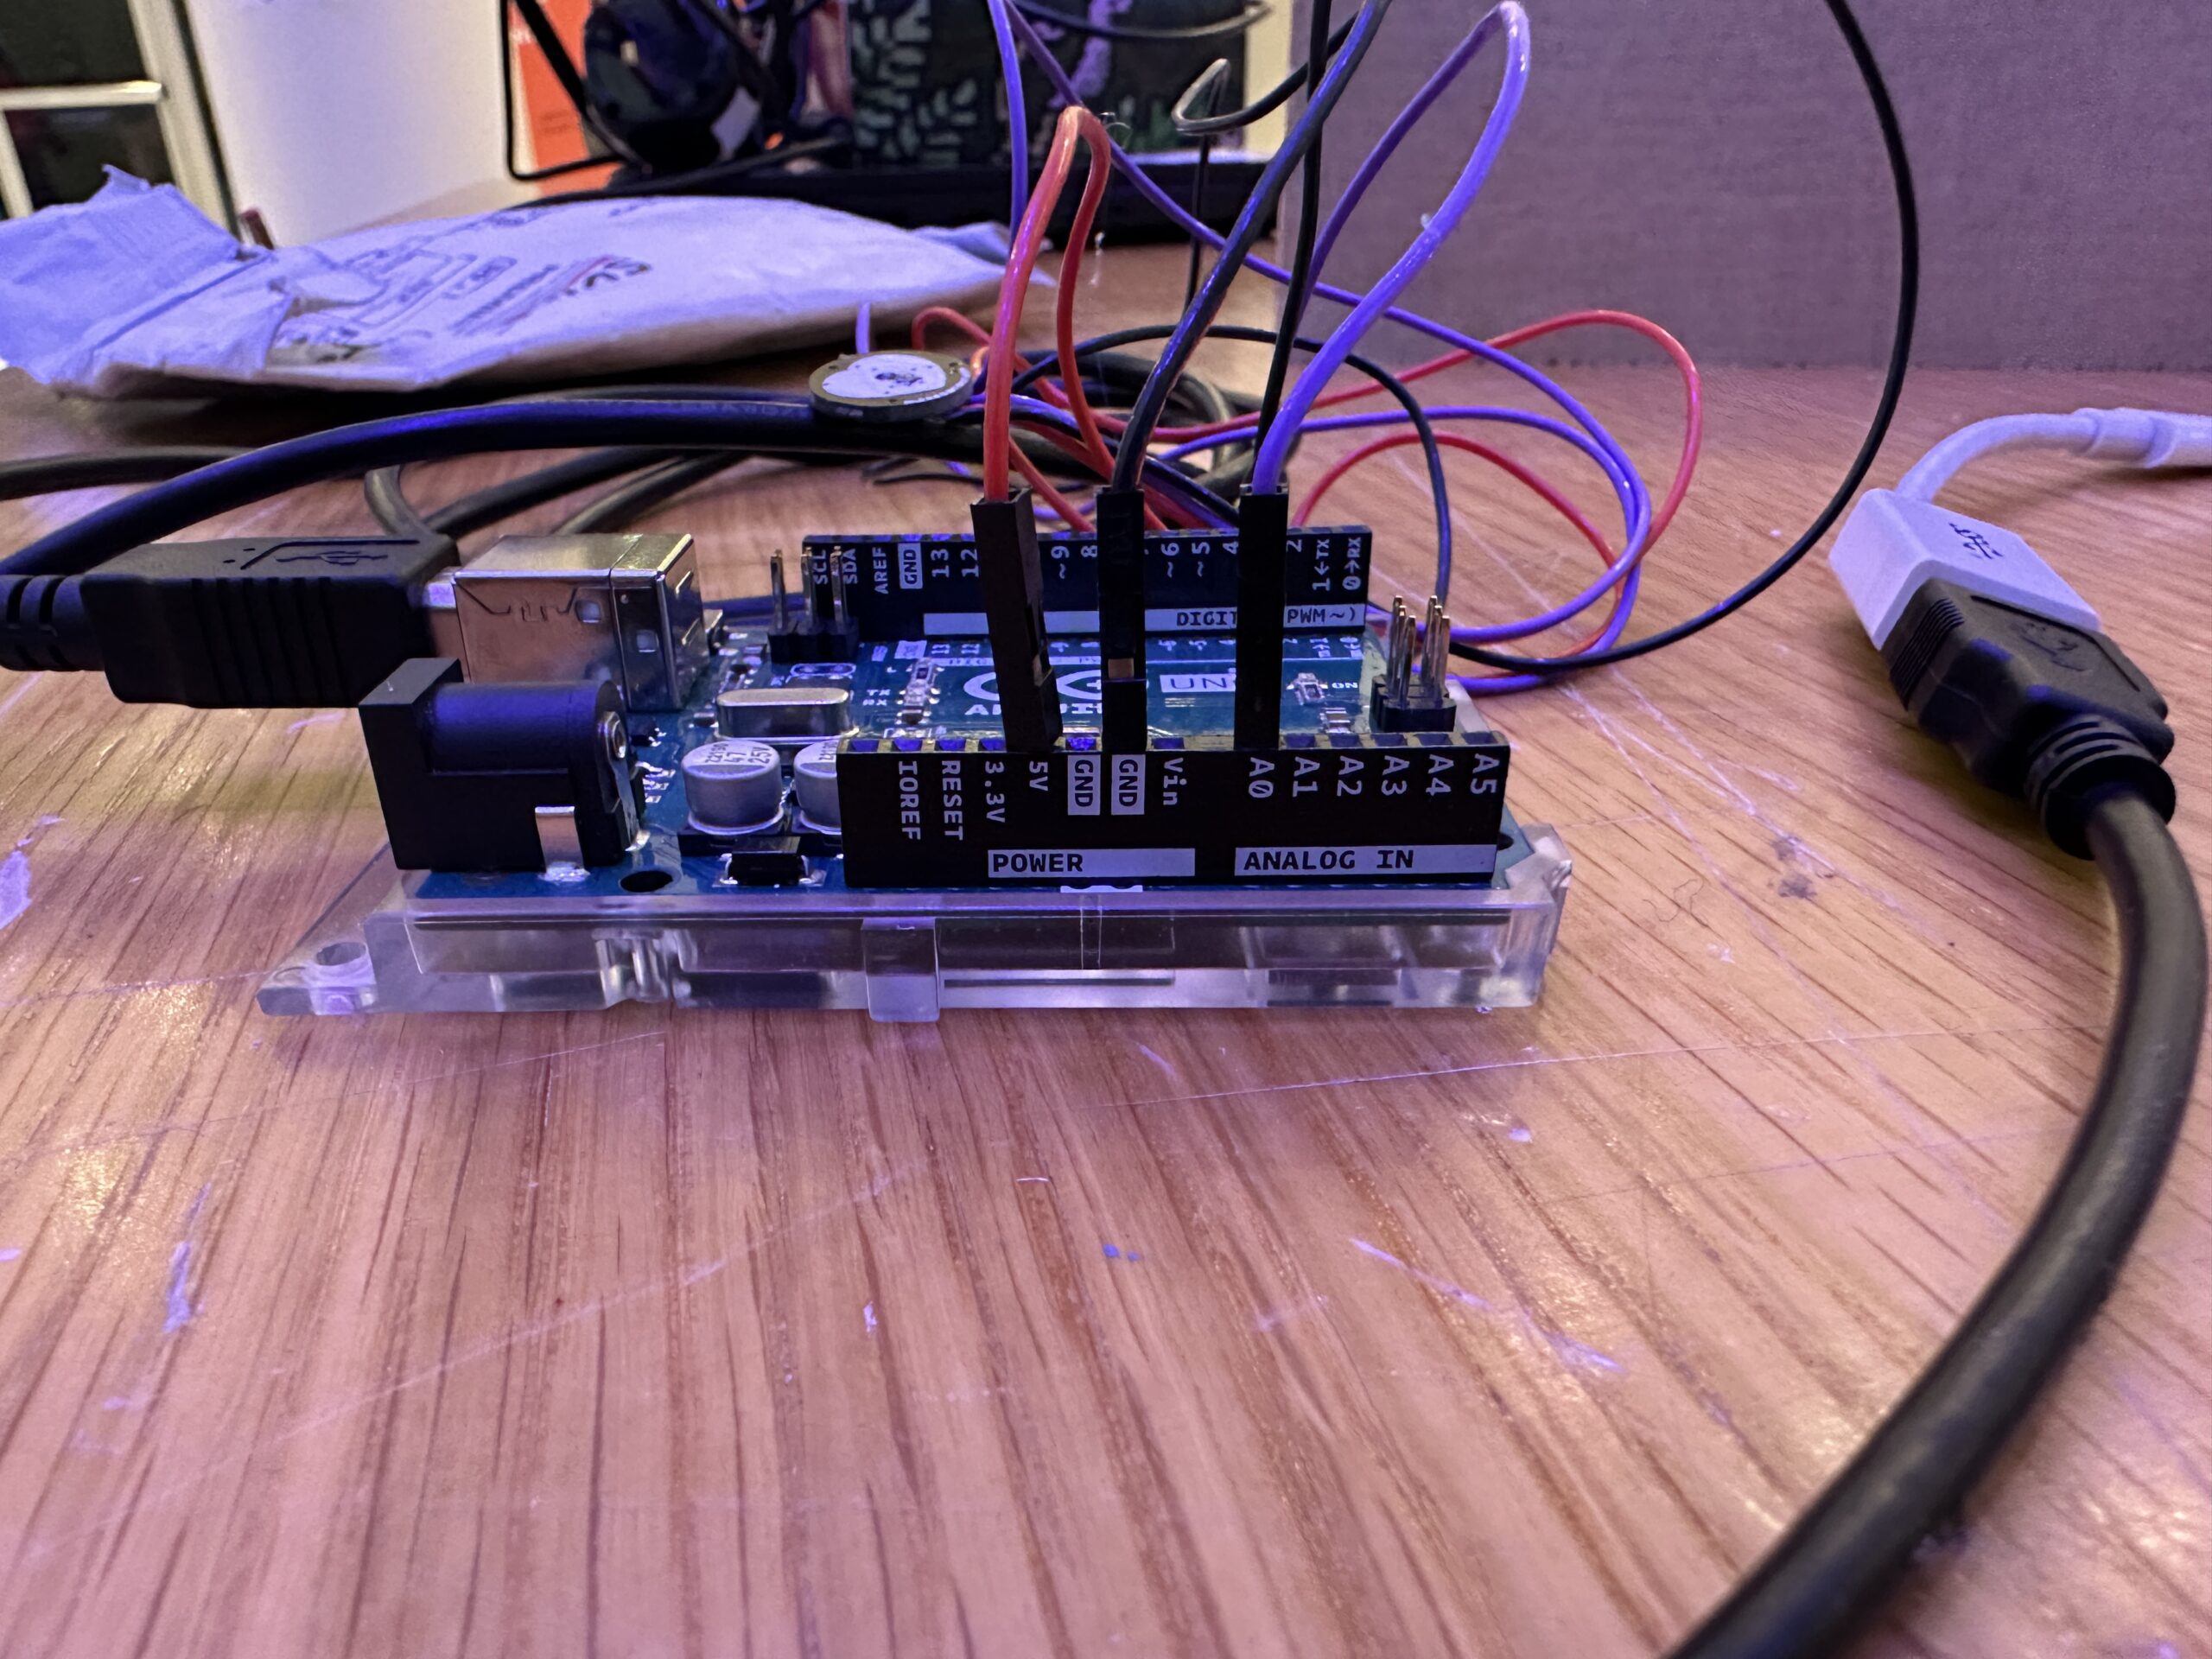
The Arduino wiring couldn’t have been more simple. And frankly, the Arduino coding wasn’t that much more difficult either. I downloaded a PulseSensor library that I found on the page and made modifications to format the code for my own objectives. Here’s the code below:

void setup() {
  Serial.begin(9600);
  pinMode(LED_BUILTIN, OUTPUT);
  // Arduino sending data to component, the green light, to light up

  // start the handshake
  while (Serial.available() <= 0) {
    digitalWrite(LED_BUILTIN, HIGH);
    Serial.println("0,0");
    delay(300);
    digitalWrite(LED_BUILTIN, LOW);
    delay(50);
  }
}

void loop() {
  while (Serial.available()) {
    digitalWrite(LED_BUILTIN, HIGH);
    int left = Serial.parseInt();
    int right = Serial.parseInt();
 // Example of parsing, where Arduino breaks down left and right components so that when it sends the code to P5JS, P5JS interprets the left and right as one so that the code can be executed smoothly 
    if (Serial.read() == '\n') {
      int pulseSensor = analogRead(A0);
// Mapping analog values to digital values so pulse sensor can be read and show up on P5JS
      int mappedPulseSensor = map(pulseSensor, 0, 1023, 0, 255);
      delay(5);
      Serial.print(mappedPulseSensor);
      Serial.print(',');
      Serial.println(mappedPulseSensor);
    }
  }
  digitalWrite(LED_BUILTIN, LOW);
}

The most important section worthy of mention is the mapping of the pulse sensor to a digital range. Apart from the voltage and ground wires, because the pulse sensor reads analog signals, I plugged the last wire into A0 and then mapped its 0 to 1023 range to 0 to 255, so that P5JS could read its detections and convert them into the pulses of the ellipse on the screen.

The Process, Continuing With P5JS:

The most challenging section of this project was the coding regarding P5JS. I started by coding a glowing ellipse and making sure that it pulsed with the readings of the sensor, linked here, but also shown below:

let rVal = 0;
let pulse = 255;
let left = 0;
let right = 0;


function setup() {
  createCanvas(600,600);
  textSize(18);
}

function draw() {
  // one value from Arduino controls the background's red color
  background(0);

  // the other value controls the text's transparency value
  fill(255, 255, 255);
  strokeWeight(0);

  if (!serialActive) {
    text("Press Space Bar to select Serial Port", 20, 30);
  } else {
    text("Connected", 20, 30);
  }
 
  
  drawingContext.shadowBlur = 80;
  drawingContext.shadowColor = color(255);
  ellipse(width/2, height/2, map(pulse, 0, 255, 10, 100))

  
}


function keyPressed() {
  if (key == " ") {
    // important to have in order to start the serial connection!!
    setUpSerial();
  }
}

// This function will be called by the web-serial library
// with each new *line* of data. The serial library reads
// the data until the newline and then gives it to us through
// this callback function
function readSerial(data) {
  ////////////////////////////////////
  //READ FROM ARDUINO HERE
  ////////////////////////////////////

  if (data != null) {
    // make sure there is actually a message
    // split the message
    let fromArduino = split(trim(data), ",");
    // if the right length, then proceed
    if (fromArduino.length == 2) {
      // only store values here
      // do everything with those values in the main draw loop
      rVal = fromArduino[0];
      pulse = fromArduino[1];
      print(pulse);
    }

    //////////////////////////////////
    //SEND TO ARDUINO HERE (handshake)
    //////////////////////////////////
    let sendToArduino = left + "," + right + "\n";
    writeSerial(sendToArduino);
  }
}

I coded the ellipse in the above section, making sure to map the diameter of the ellipse to the signals of the sensor, causing the pulsing effect. The section regarding how P5JS read the information from Arduino, but also sent information back to Arduino (see Handshake), so that Arduino and P5JS worked in tandem to make the ellipse pulse.

The Process, Continuing With P5JS:

After sorting out the ellipse pulsing, which was the main component, I began coding the stars and words I wanted to go along with the pulsing ellipse. I was really inspired by Pierre’s midterm project, because it gave that same all-encompassing starry night effect that Schneider’s installation did. I began by trying to make modifications to Pierre’s code, seen here, but I quickly realized after trying to insert the ellipse into it that coding within the constraints of WEBGL would be too difficult for me for the purposes of this project. While experimenting, I accidentally created this, which might be one of the coolest things I’ve ever made. I plan to pursue WEBGL on my own time, but I acknowledged that working within a two-dimensional realm for this project would suffice.

So, I began by coding the stars, linked here. I’ve attached the most difficult section of the code below:

function createStars() {
  for (let i = 0; i < 100; i++) {
    let x = random(width);
    let y = random(height);
    let radius = random(1, 3);
// I made the radius random within these constraints so the ellipses weren't all the same size, giving that 'starry night' effect and the illusion of distance, since I couldn't hack WEBGL
    let speedX = random(1, 3) * (random() > 0.5 ? 1 : -1); // So that the stars randomly go left and right
    let speedY = random(1, 3) * (random() > 0.5 ? 1 : -1); // So that the stars randomly go up or down 
    stars.push({ x, y, radius, speedX, speedY });
  }
}

function moveStars() {
  for (let star of stars) {
    star.x += star.speedX;
    star.y += star.speedY;

    // Makes the stars stay within the constraints of the display screen
    if (star.x < 0 || star.x > width || star.y < 0 || star.y > height) {
      star.x = random(width);
      star.y = random(height);
    }

I wanted the size to be random within the constraints of 1 and 3 so that I could give the ellipses that ‘starry night’ effect. Making their radiuses vary also gave the illusion of depth and distance, since I couldn’t hack WEBGL. I made their movement as random as I could, making them go in different directions so I could add as much dynamism to the project as possible. The focus of the project, the fixed ellipse, is not that moving and stimulating, so I knew I needed to make the stars add that layer of movement to make sure the project would be engaging.

After coding the stars, I combined the code of that with the pulsing ellipse so that I could begin adding the words.

The Result!!!!

And this was the result! Linked here, but also seen below!

let rVal = 0;
let pulse = 255;
let left = 0;
let right = 0;
let stars = [];
let ellipseVisible = false;
let starsVisible = false;
let keyPressedOnce = false;
let showAdditionalText = false;
let mPressed = false;

function setup() {
  createCanvas(2000, 1300);
  textSize(34);
  createStars();
}

function draw() {
  background(0);
  fill(255);
  textAlign(CENTER, CENTER);
  
  
//Code that ensures that the instructions for the interaction, and the serial port appear before the ellipse and stars appear
  if (!serialActive) {
    text("PRESS SPACE TO SELECT SERIAL PORT", width / 2, height / 2);
  } else if (!ellipseVisible && !starsVisible) {
    text("LIGHTLY TOUCH YOUR FINGER TO THE PULSE SENSOR", width / 2, height / 2);
  } else if (ellipseVisible || starsVisible) {
    
//Responsible for making the ellipse glow     
    drawingContext.shadowBlur = 80;
    drawingContext.shadowColor = color(255);
// Maps ellipse to arduino board, making it pulse
    let ellipseSize = map(pulse, 0, 255, 10, 300);
// Determines dimensions of ellipse
    ellipse(width / 2, height / 2, ellipseSize);
  }

// Once the ellipse and stars appear, the text taking you through the interaction appears too
  if (ellipseVisible && !starsVisible) {
    text("GIVE THE SENSOR TIME TO PICK UP ON YOUR PULSE\nBUT ONCE YOU SEE YOUR HEART BEATING, ACKNOWLEDGE\nTHAT THIS PULSE IS YOU, ALIVE AND BREATHING\n\nPress 'n'", width / 2, height - 180);
  } else if (starsVisible && !keyPressedOnce) {
// ensures that the stars appear and keep moving with each frame
    moveStars();
    displayStars();
    text("YOU ARE ALIVE AND BREATHING IN THE UNIVERSE\nLOOK AT AT ALL THE STARS\nBUT SOMETIMES, THE UNIVERSE SEEMS SO BIG\n IT'S EASY TO FEEL SMALL\n\nPress 'm'", width / 2, height - 180);
  } else if (starsVisible && !showAdditionalText) {
    moveStars();
    displayStars();
    text("BUT THE UNIVERSE IS ALIVE WITH YOU TOO\n\nPress 'v'", width / 2, height - 180);
  } else if (showAdditionalText) {
    moveStars();
    displayStars();
    text("TELL YOUR FRIENDS YOU LOVE THEM\nREMEMBER TO FEEL YOUR HEARTBEAT WHEN YOU\n LOOK UP AT THE SKY, BECAUSE SOMEDAY\nYOU'LL WISH YOU COULD'VE LIVED IT ALL OVER AGAIN", width / 2, height - 180);
  }
}

function createStars() {
// Defines speed and number of stars
  for (let i = 0; i < 100; i++) {
    let x = random(width);
    let y = random(height);
// Makes sure the stars are randomly different sizes within these constraints to give them that 'starry sky' effect
    let radius = random(1, 3);
// Defines random speed of stars within these constraints
    let speedX = random(1, 3) * (random() > 0.5 ? 1 : -1);
    let speedY = random(1, 3) * (random() > 0.5 ? 1 : -1);
    stars.push({ x, y, radius, speedX, speedY });
  }
}

function moveStars() {
  for (let star of stars) {
// After the speed of the stars has been defined, use moveStars to make sure they keep moving through the entire project 
    star.x += star.speedX;
    star.y += star.speedY;

// Makes sure stars move within the display screen
    if (star.x < 0 || star.x > width || star.y < 0 || star.y > height) {
      star.x = random(width);
      star.y = random(height);
    }
  }
}

// Ensures the stars never disappear with each changing slide
function displayStars() {
  noStroke();
  for (let star of stars) {
// Makes stars glow after key 'm' is pressed 
    if (mPressed) {
      fill(255, 255, 255, 180);
// Defines the size of the shadow that gives the stars their 'glow' effect
      ellipse(star.x, star.y, star.radius * 7);
      // for (i = 0; i < 100; i++) {
      //   ellipse(star.x, star.y, (star.radius * i * 1) / 20);
      // }
    }
    fill(255);
    ellipse(star.x, star.y, star.radius * 2, star.radius * 2);
  }
}

// My attempt to make the stars pulse, but I was okay with them simply glowing, so I never used updateStars but I kept it just in case
function updateStars() {
  let rValMapped = map(rVal, 0, 255, -0.1, 0.1);
  let pulseMapped = map(pulse, 0, 255, 1, 3);
  let pulsingFactor = map(pulse, 0, 255, 0.5, 2);

  for (let star of stars) {
    star.speedX += rValMapped;
    star.speedY += rValMapped;

    star.radius = pulseMapped * pulsingFactor;
  }
}


// These are all the instructions so that the project knows to move to the next slide when certain kets are pressed
function keyPressed() {
  if (key == " " && !serialActive) {
    setUpSerial();
  } else if (key == "n" && ellipseVisible && !starsVisible) {
    starsVisible = true;
  } else if (key == "m" && starsVisible && !mPressed) {
    keyPressedOnce = true;
    mPressed = true;
  } else if (key == "m" && starsVisible && mPressed) {
    mPressed = false;
  } else if (key == "v" && starsVisible && keyPressedOnce) {
    showAdditionalText = true;
//Code that allows one to exit our of and enter fullscreen by pressing the key 'f'
  } else if (key == "f") {
    if (!fullscreen()) {
      fullscreen(true);
    } else {
      fullscreen(false);
    }
  }
}

// How P5JS knows to read from Arduino in order to give the ellipse the pulse
function readSerial(data) {
  if (data != null) {
    let fromArduino = split(trim(data), ",");
    if (fromArduino.length == 2) {
      rVal = fromArduino[0];
//The pulse from Arduino that P5JS was able to read to make the ellipse pulse
      pulse = fromArduino[1];
    }

    let sendToArduino = left + "," + right + "\n";
    writeSerial(sendToArduino);
// If a pulse greater than 0 is detected from the sensor and the ellipse is visible, then the pulsing begins
    if (pulse > 0 && !ellipseVisible) {
      ellipseVisible = true;
    }
  }
}


// Ensures stars and ellipse stay visible when mouse is pressed 
function mousePressed() {
  if (!starsVisible && ellipseVisible) {
    keyPressedOnce = true;
    starsVisible = true;
  }
}

I commented everything, but the most difficult part of the code was definitely this section:

// Once the ellipse and stars appear, the text taking you through the interaction appears too
  if (ellipseVisible && !starsVisible) {
    text("GIVE THE SENSOR TIME TO PICK UP ON YOUR PULSE\nBUT ONCE YOU SEE YOUR HEART BEATING, ACKNOWLEDGE\nTHAT THIS PULSE IS YOU, ALIVE AND BREATHING\n\nPress 'n'", width / 2, height - 180);
  } else if (starsVisible && !keyPressedOnce) {
// ensures that the stars appear and keep moving with each frame
    moveStars();
    displayStars();
    text("YOU ARE ALIVE AND BREATHING IN THE UNIVERSE\nLOOK AT AT ALL THE STARS\nBUT SOMETIMES, THE UNIVERSE SEEMS SO BIG\n IT'S EASY TO FEEL SMALL\n\nPress 'm'", width / 2, height - 180);
  } else if (starsVisible && !showAdditionalText) {
    moveStars();
    displayStars();
    text("BUT THE UNIVERSE IS ALIVE WITH YOU TOO\n\nPress 'v'", width / 2, height - 180);
  } else if (showAdditionalText) {
    moveStars();
    displayStars();
    text("TELL YOUR FRIENDS YOU LOVE THEM\nREMEMBER TO FEEL YOUR HEARTBEAT WHEN YOU\n LOOK UP AT THE SKY, BECAUSE SOMEDAY\nYOU'LL WISH YOU COULD'VE LIVED IT ALL OVER AGAIN", width / 2, height - 180);
  }

Making the words appear in the order I wanted, without the ellipse or stars disappearing was difficult and something I had to work at for a while. I solved this by coding successive “if, else” statements and establishing this:

let starsVisible = false;
let keyPressedOnce = false;
let showAdditionalText = false;

at the beginning of the code. My friend Zion helped me extensively through this part of the coding, so thank you Zion.

After that, I just had to make the small adjustments of making the text the size I wanted, adjusting the stars to full screen, and the project was good to go. I didn’t know how to upload the song I wanted, “Stone in Focus” by Aphex Twin, as a file to P5JS, so I just played it in a Youtube tab while the project was going on.

I also made the stars glow with the ellipse when the line “BUT THE UNIVERSE IS ALIVE WITH YOU TOO” to give a sense of connection with the universe. The stars got triggered to glow after pressing the ‘m’ key.

Showcase Day:

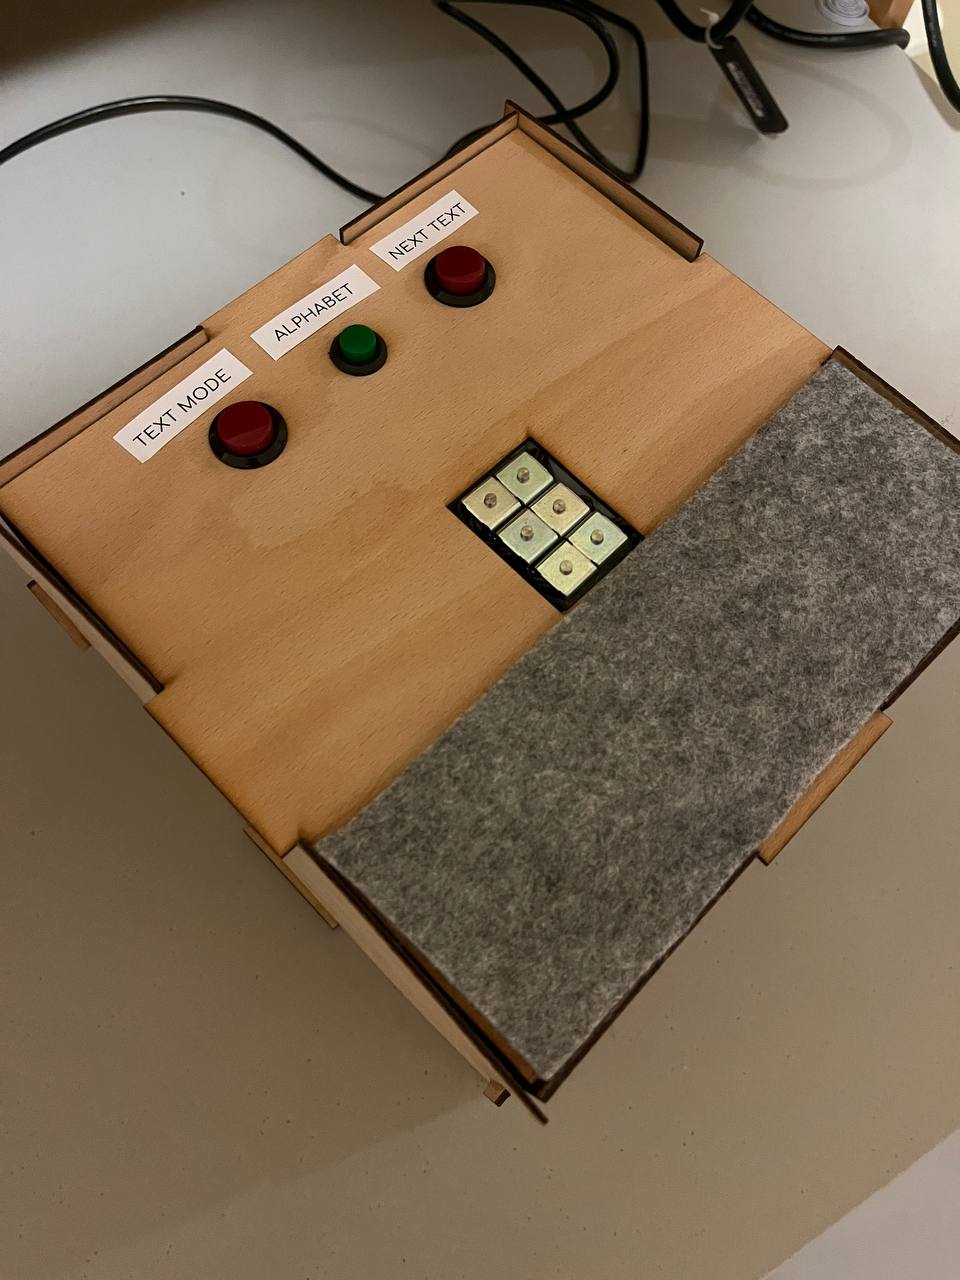
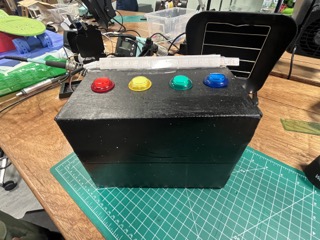
On the day of the showcase, I constructed my setup, seen here:

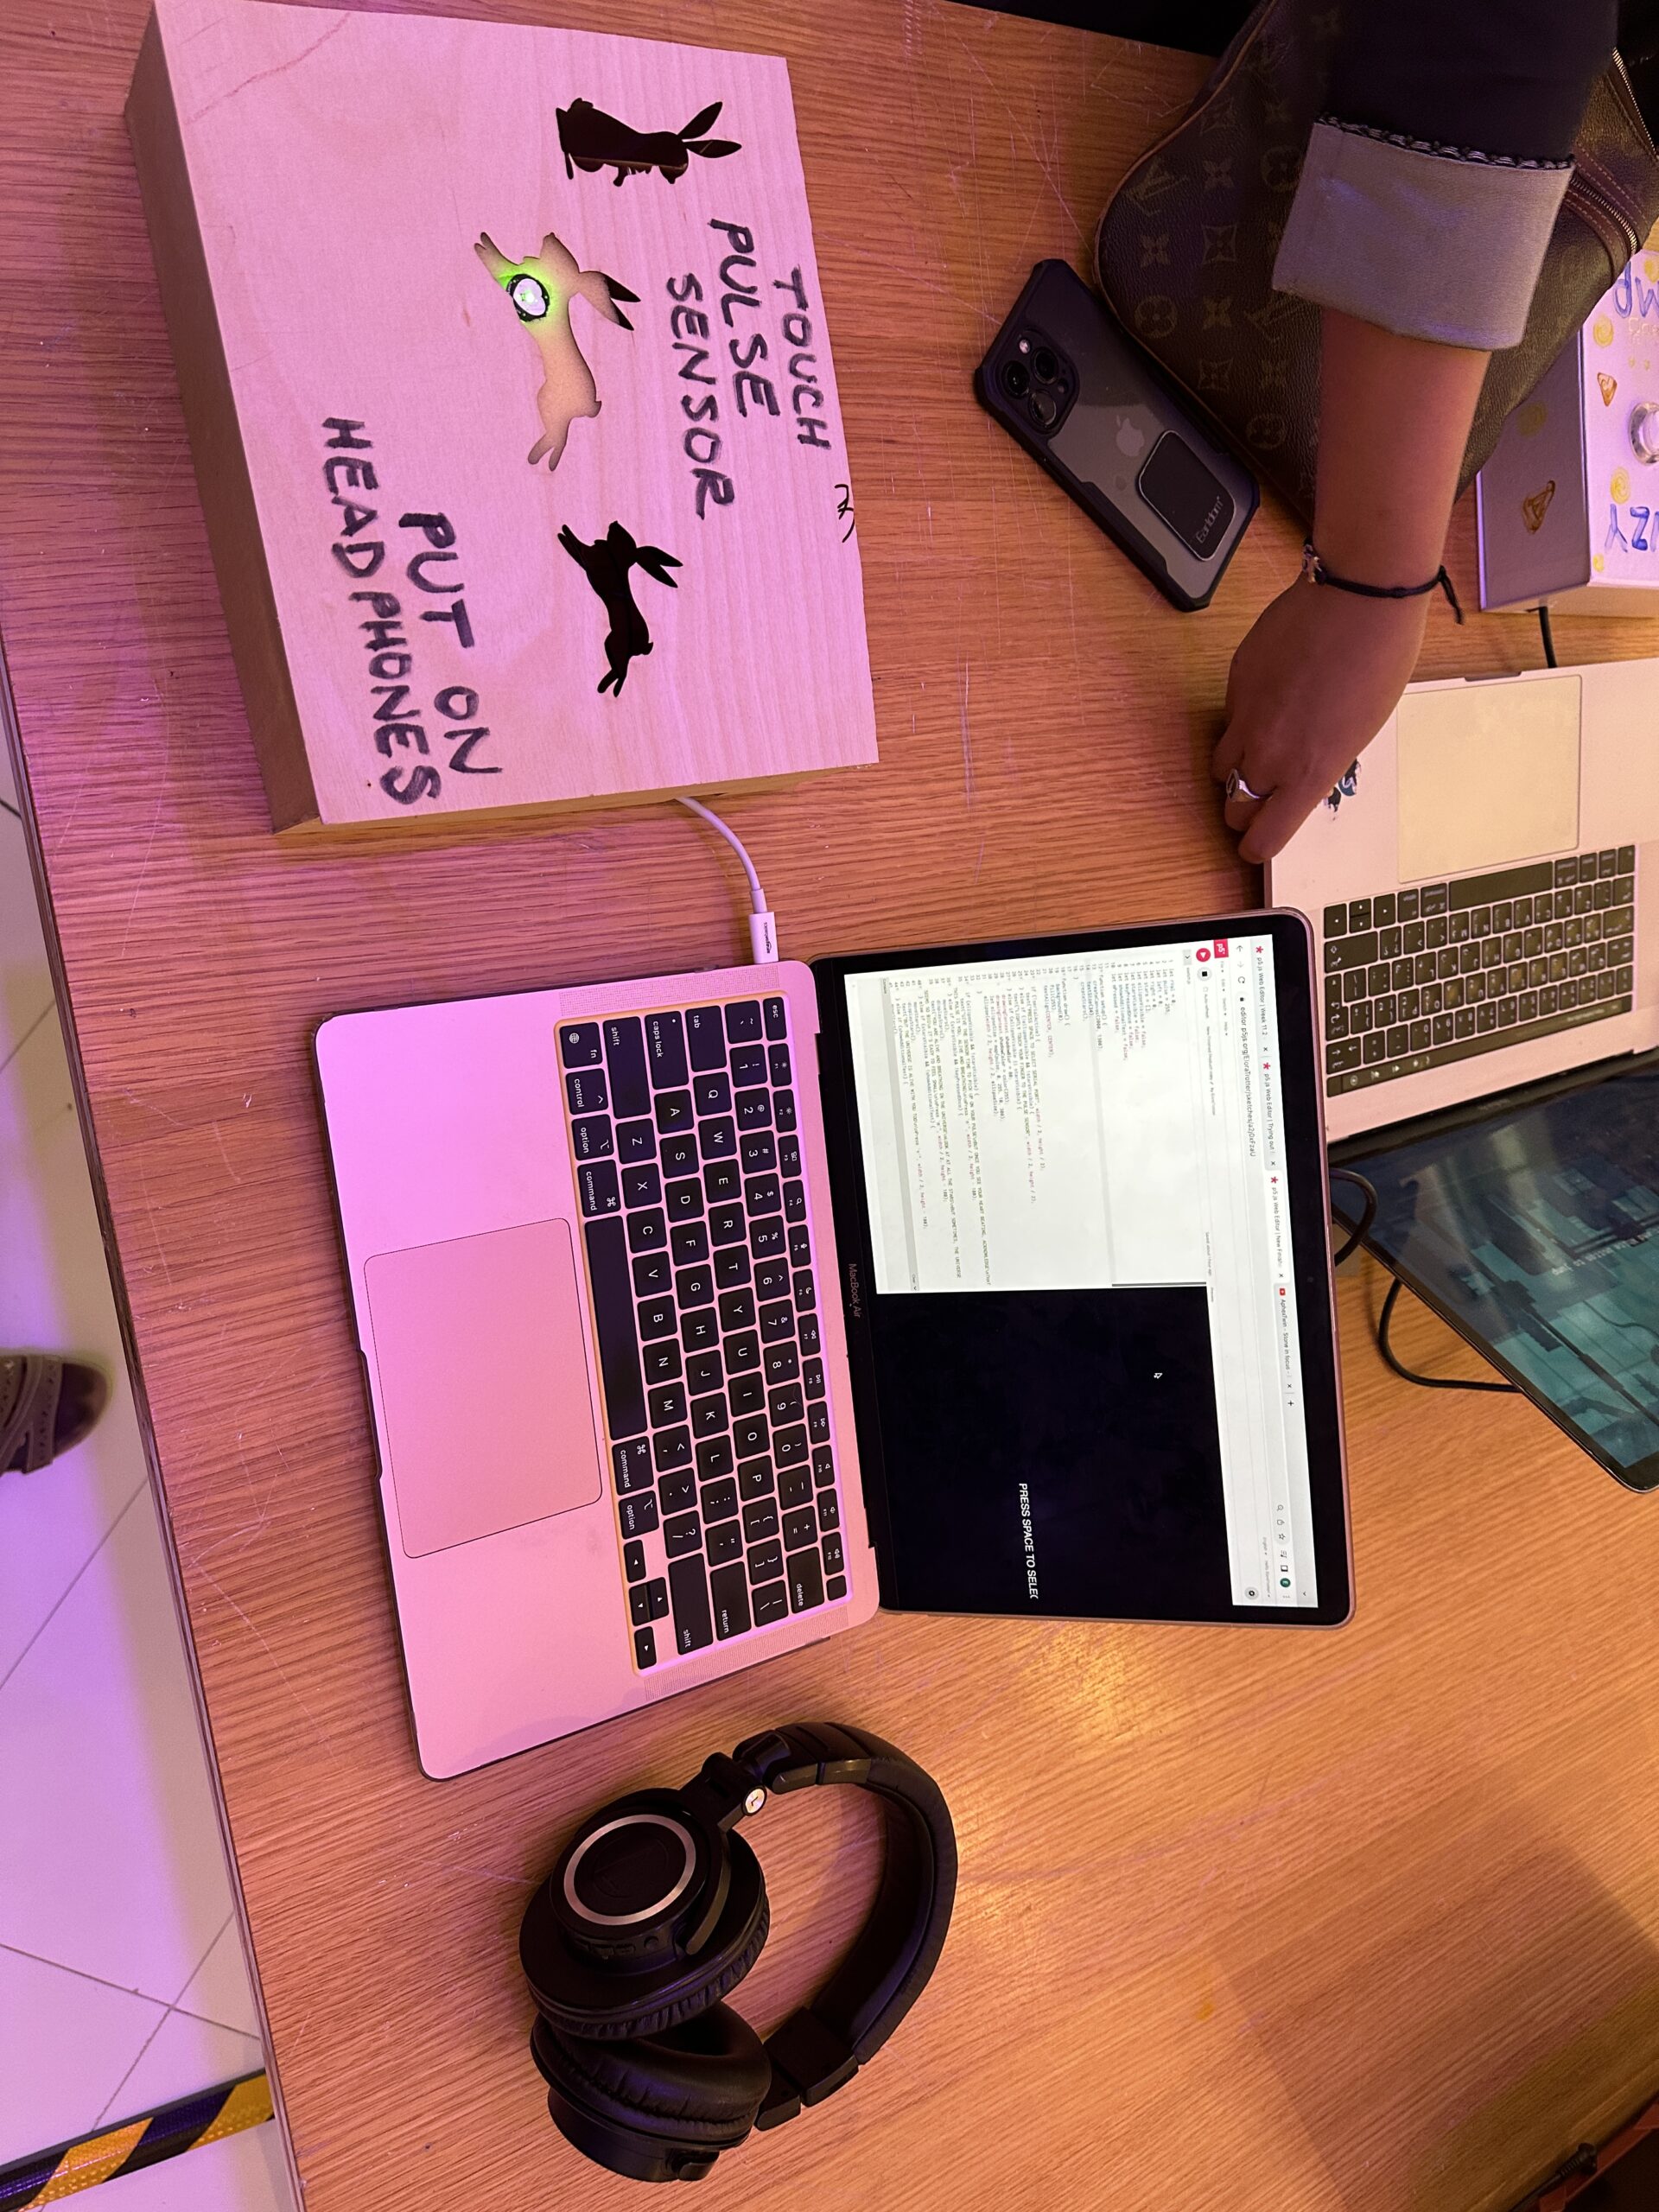
You can see the headphones that people put on to hear the music, but I want to bring special attention to the box:

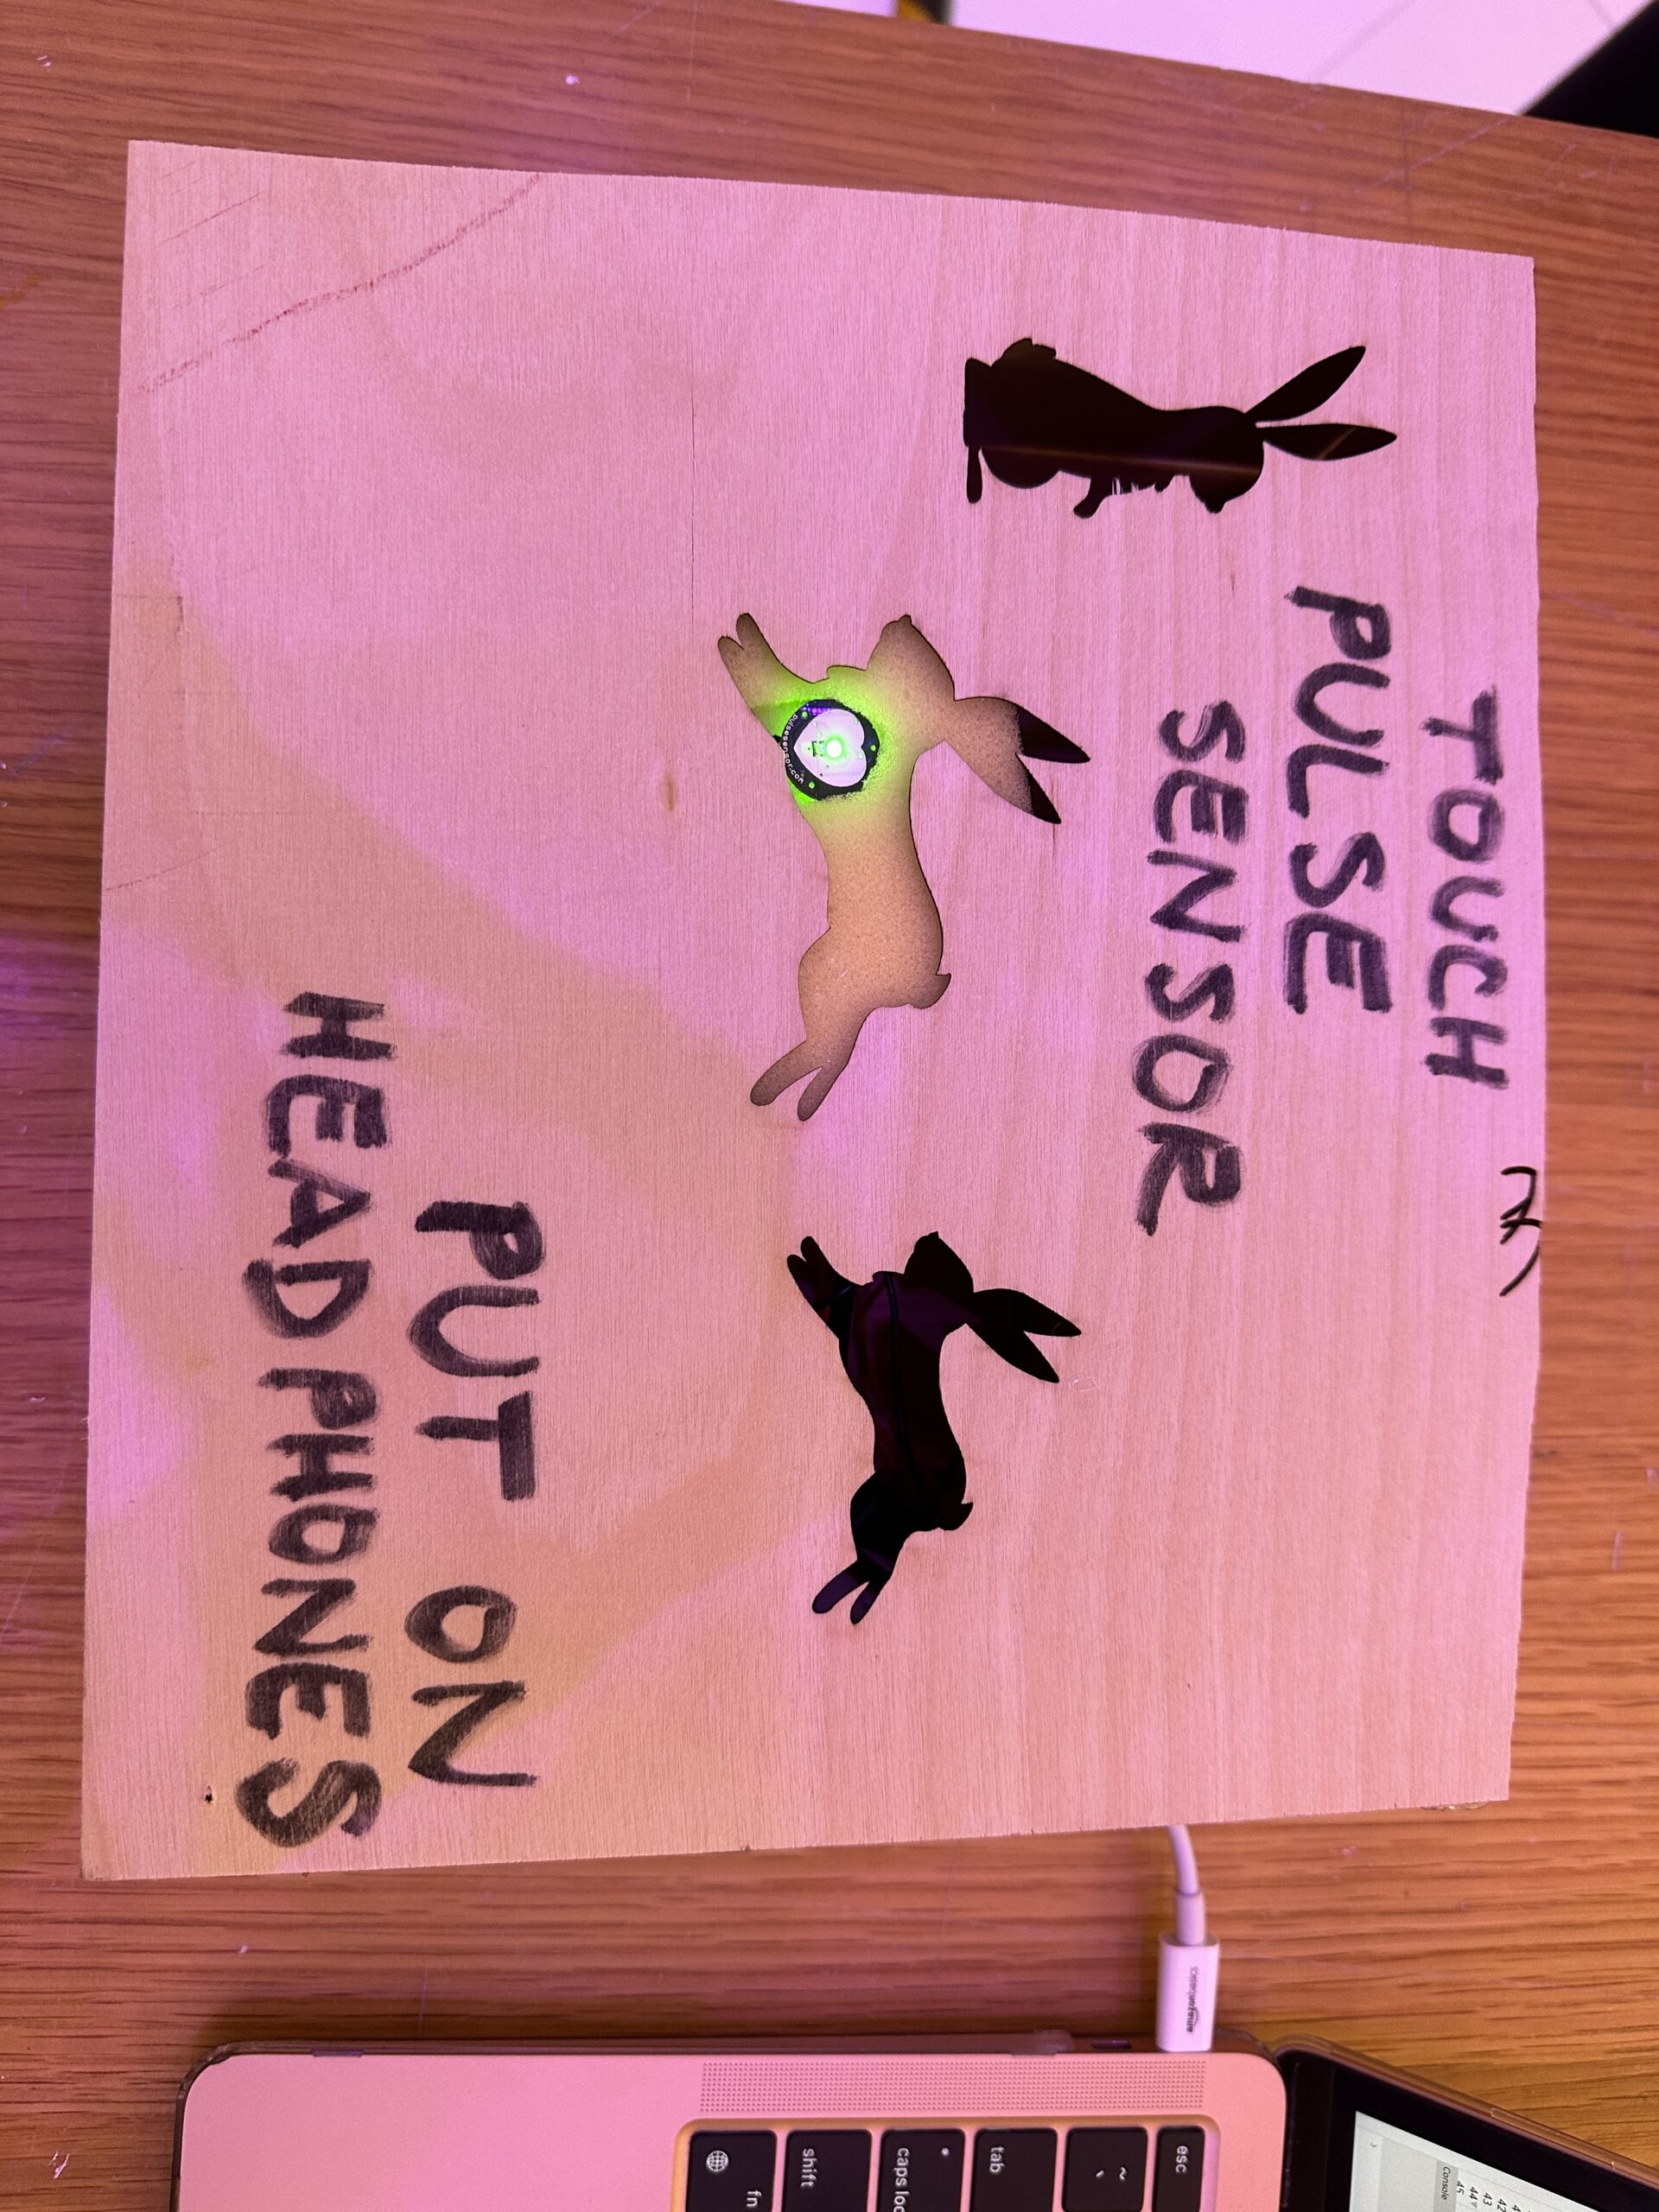
One of my biggest concerns developing the project was the unreliability of the pulse sensor itself. It would reliably pick up on a pulse but also pick up on any extra movement of your hand, making the pulse look wonky. It’s because the pulse sensor works by shining a light on your finger, and reading your pulse by the way it affects the light. So if you move your finger too much, it disrupts the pulse sensors ability to pick up on your heartbeat. At Manar Abu Dhabi, even that pulse sensor had to wait up to a few minutes before being able to get a stable reading. So, creating better pulse sensors for future interactive installations is a concern. But in order to counteract this problem, I constructed a box that the audience member could naturally rest their hands on so that the pulse sensor could pick up a more stable reading. It also looked more approachable and finished as an interactive installation.

One concern I left with though, from a design point of view, was that people tended to put their their right hand on the sensor, causing them to have to reach over with their left hand to press the keys to go through the project. I would want to make my project more convenient and interactive by fixing this issue.

Takeaways:

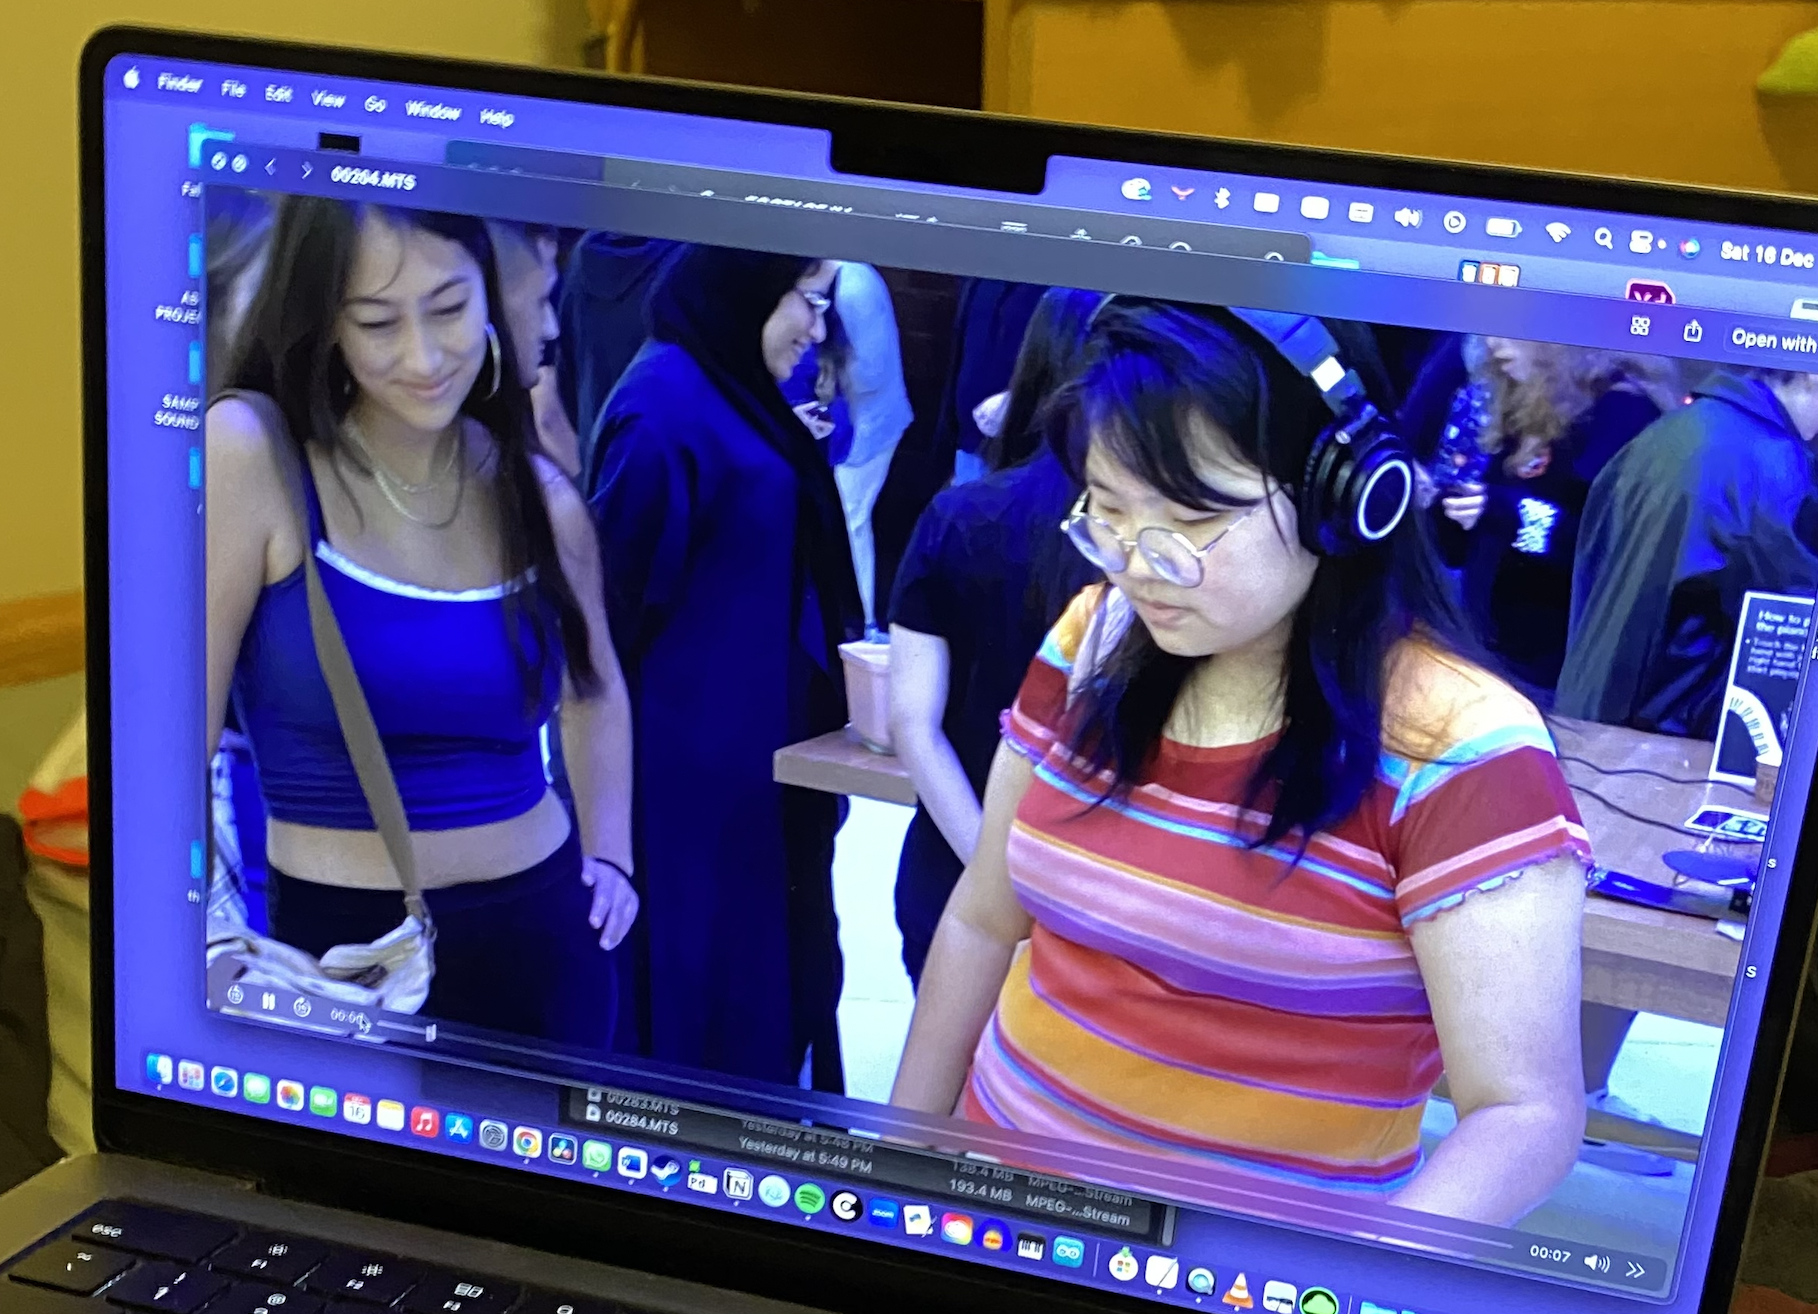
In the end, I am so proud of what I made, because I was able to capture an,  albeit small, portion of the feeling that I experienced when at Schneider’s installation and Manar Abu Dhabi. Here are some people interacting with my project:

What they’re going through, is seeing their pulse on the screen and then reading successive phrases that remind them of their connection with the universe, giving them that same macro-micro spiritual connection that Andrew Schneider’s installation gave me. One of my favorite moments was when Linda, an audience member, saw her pulse on the screen and gasped, “It’s me!” That’s the exact effect I wanted to provide.

At the beginning of this post, I posted a picture of Mega and me. After she had completed the project, she turned to me and said, “Elora, I love you.” Even though the effect was small, I had emotionally achieved what I set out to do with this project, and I am so grateful.

Final Project

Concept

As I was describing in my previous blog posts, I have created a device that allows users to learn Braille’s alphabet and numbers from 0 to 9. Additionally, I have created a functional P5 sketch that shows instructions and the letter patterns on the screen, so users would be able not only remember the pattern physically but also visually.

P5 sketch:

The upper view of the device:

How does it work?

The first thing that the user sees is the screen where the info button can be found. After clicking the button, P5 shows the instruction menu, which tells the user how to use the device.

When the user clicks the green button, the program starts working: the solenoids start moving, pushing the pins according to the letter’s pattern. Letters go in alphabetical order from A to Z. While the button is down, the Arduino pushes the solenoids, and P5 shows the letter’s pattern on the screen together with the letter itself to enhance the user experience.

In my original idea, I wanted to implement the opportunity for the users to read the texts using the Braille alphabet, but for demonstration purposes, I decided to wait with its implementation. The logic behind interpreting the text is the same as with the alphabet.

VIDEO_DEMONSTRATION

Arduino & P5 code

#define A 1
#define B 2
#define C 3
#define D 4
#define E 5
#define F 6
#define G 7
#define H 8
#define I 9
#define J 10
#define K 11
#define L 12
#define M 13
#define N 14
#define O 15
#define P 16
#define Q 17
#define R 18
#define S 19
#define T 20
#define U 21
#define V 22
#define W 23
#define X 24
#define Y 25
#define Z 26

const int solenoide_1 = 5;
const int solenoide_2 = 3;
const int solenoide_3 = 6;
const int solenoide_4 = 9;
const int solenoide_5 = 10;
const int solenoide_6 = 11;

const int buttonTextMode = 13;
const int buttonAlphabet = 12;
const int buttonNextText = 4;

int alphabet[] = { A, B, C, D, E, F, G, H, I, J, K, L, M, N, O, P, Q, R, S, T, U, V, W, X, Y, Z };

int alphabetMode = 0;  // 0 for inactive, 1 for active
int textMode = 0;

void setup() {
  Serial.begin(9600);
  pinMode(solenoide_1, OUTPUT);
  pinMode(solenoide_2, OUTPUT);
  pinMode(solenoide_3, OUTPUT);
  pinMode(solenoide_4, OUTPUT);
  pinMode(solenoide_5, OUTPUT);
  pinMode(solenoide_6, OUTPUT);
}

void loop() {

    digitalWrite(solenoide_1, LOW);
    digitalWrite(solenoide_2, LOW);
    digitalWrite(solenoide_3, LOW);
    digitalWrite(solenoide_4, LOW);
    digitalWrite(solenoide_5, LOW);
    digitalWrite(solenoide_6, LOW);
    
    int currentButtonAlphabetState = digitalRead(buttonAlphabet);

    if (currentButtonAlphabetState == 1 && alphabetMode == 0) {
      // Transition from inactive to active
      alphabetMode = 1;
    } else if (currentButtonAlphabetState == 0 && alphabetMode == 1) {
      // Transition from active to inactive
      alphabetMode = 0;
    }

    int TextMode = digitalRead(buttonTextMode);
    int NextText = digitalRead(buttonNextText);
    int thisLetter = 0;

    Serial.print(currentButtonAlphabetState);
    Serial.print(',');
    Serial.print(TextMode);
    Serial.print(',');
    Serial.print(NextText);
    Serial.print(',');
    Serial.println(thisLetter);
  

    while (thisLetter < 26 && alphabetMode == 1){
      currentButtonAlphabetState = digitalRead(buttonAlphabet);
      if (currentButtonAlphabetState == 1 && alphabetMode == 0) {
      // Transition from inactive to active
      alphabetMode = 1;
    } else if (currentButtonAlphabetState == 0 && alphabetMode == 1) {
      // Transition from active to inactive
      alphabetMode = 0;
    }
      Serial.print(currentButtonAlphabetState);
      Serial.print(',');
      Serial.print(TextMode);
      Serial.print(',');
      Serial.print(NextText);
      Serial.print(',');
      Serial.println(thisLetter);
      if (alphabet[thisLetter] == I || alphabet[thisLetter] == J || alphabet[thisLetter] == S || alphabet[thisLetter] == T || alphabet[thisLetter] == W){
        digitalWrite(solenoide_1, LOW);
      } else {
        digitalWrite(solenoide_1, HIGH);
      }
      if (alphabet[thisLetter] == A || alphabet[thisLetter] == B || alphabet[thisLetter] == E || alphabet[thisLetter] == H || alphabet[thisLetter] == K || alphabet[thisLetter] == L || alphabet[thisLetter] == O || alphabet[thisLetter] == R || alphabet[thisLetter] == U || alphabet[thisLetter] == V || alphabet[thisLetter] == Z){
        digitalWrite(solenoide_2, LOW);
      } else {
        digitalWrite(solenoide_2, HIGH);
      }
      if (alphabet[thisLetter] == A || alphabet[thisLetter] == C || alphabet[thisLetter] == D || alphabet[thisLetter] == E || alphabet[thisLetter] == K || alphabet[thisLetter] == M || alphabet[thisLetter] == N || alphabet[thisLetter] == O || alphabet[thisLetter] == U || alphabet[thisLetter] == X || alphabet[thisLetter] == Y || alphabet[thisLetter] == Z){
        digitalWrite(solenoide_3, LOW);
      } else {
        digitalWrite(solenoide_3, HIGH);
      }
      if (alphabet[thisLetter] == A || alphabet[thisLetter] == B || alphabet[thisLetter] == C || alphabet[thisLetter] == F || alphabet[thisLetter] == I || alphabet[thisLetter] == K || alphabet[thisLetter] == L || alphabet[thisLetter] == M || alphabet[thisLetter] == P || alphabet[thisLetter] == S || alphabet[thisLetter] == U || alphabet[thisLetter] == V || alphabet[thisLetter] == X){
        digitalWrite(solenoide_4, LOW);
      } else {
        digitalWrite(solenoide_4, HIGH);
      }
      if (alphabet[thisLetter] == A || alphabet[thisLetter] == B || alphabet[thisLetter] == C || alphabet[thisLetter] == D || alphabet[thisLetter] == E || alphabet[thisLetter] == F || alphabet[thisLetter] == G || alphabet[thisLetter] == H || alphabet[thisLetter] == I || alphabet[thisLetter] == J || alphabet[thisLetter] == W){
        digitalWrite(solenoide_5, LOW);
      } else {
        digitalWrite(solenoide_5, HIGH);
      }
      if (alphabet[thisLetter] == U || alphabet[thisLetter] == V || alphabet[thisLetter] == W || alphabet[thisLetter] == X || alphabet[thisLetter] == Y || alphabet[thisLetter] == Z ){
        digitalWrite(solenoide_6, HIGH);
      } else {
        digitalWrite(solenoide_6, LOW);
      }
      delay(2000);
      digitalWrite(solenoide_1, LOW);
      digitalWrite(solenoide_2, LOW);
      digitalWrite(solenoide_3, LOW);
      digitalWrite(solenoide_4, LOW);
      digitalWrite(solenoide_5, LOW);
      digitalWrite(solenoide_6, LOW);
      delay(1000);

      thisLetter++;

    }
}

The following video shows the Arduino circuit

CIRCUIT_VIDEO

P5 sketch:

Communication

In my project, I only needed one-way communication: from Arduino to P5. Arduino is continuously sending P5 the values of three buttons and the value of the thisLetter variable. This variable tells P5 what pattern and what letter it has to show while the green button is pressed.

Aspects of the project I’m proud of

First and foremost, I’m proud of implementing my original idea and making it, even though it turned out not as I imagined it at the initial stage. This project taught me how to use solenoids and how to solder. I’m proud of my persistence and that I went all the way and solved every problem along the way.

Areas for future improvement

The first thing that comes to mind, and it’s exactly what I thought about at the initial stage of the project. It is to reduce the size of the device, so it would fit the size of an index finger without the need for the whole box. But for this, I will have to use something else, not Arduino. After the demonstration, I will add the text mode, and I would like to give a user an opportunity to download the files in the folder from which Arduino would be able to read the texts and then, using the solenoids, translate them into Braille.

User testing

The idea of adding the instructions appeared while I was asking my friends to test my device. All of them firstly tried to push the solenoids inside the box like buttons, and I had to explain them that they are working differently. Then, I added the functions’ descriptions of the buttons either in P5 and on the device, which at the end of the day gave a better idea to the user of what to do, and what to expect from the program.

Another problem was that people aren’t really familiar with how to read Braille. Do you have to use the palm? Or maybe two fingers? Or one is enough? But if you show the user the best position for the hand, they admit that the device fully fulfills its purpose. Maybe I should have added the picture of the hand on the device, but the most comfortable position stills varies from person to person; therefore, I decided to give a user more freedom with finding the best position.

In user testing the device was working well, except for the times when people put too much weight on the solenoids. The 5V solenoids aren’t that strong, and they can’t push the weight of the human hand. I had to explain the users that in order to use the device properly they need to shift the center of gravity.

Sources

https://youtu.be/RfrDtAEQ95c?feature=shared

User Testing

Before completing the project, I did some user testing with a small sample of participants. Here is a video of Zion using my project:

User testing stage gave me valuable insight that was difficult to see from my perspective as the creator of the project. Here are the tips that I implemented in the final version:

  • Specifying how many stages (color inputs) there will be, helps the participant to understand the structure of the experience from the start.
  • Starting the instructions by saying what is the main thing that will be required (color input based on prompts).
  • Introducing an additional screen in between the last color input and generated gradient to build some suspension.

Are they able to figure it out? Where do they get confused and why? Do they understand the mapping between the controls and what happens in the experience?

– Everyone was able to figure it out, sometimes there would be a little confusion in the beginning due to multiple potentiometers though.

What parts of the experience are working well? What areas could be improved?

– The generative gradient tends to produce a pleasant reaction, so I would say that works well. The button perhaps is the one that is not too reliable.

What parts of your project did you feel the need to explain? How could you make these areas more clear to someone that is experiencing your project for the first time?

-I would often receive questions as to how many stages there will be in total, therefore I decided to add this information to the instructions page.

Final Project: User Testing

USER TESTING – TRIAL 1

I asked my friend to try out my program without giving any direction of what the person should do. To my surprise, they did not struggle at all and found this experience to be very engaging and fun. They were able to figure almost everything out on their own. The only prompt I would give them is that ENTER key should be pressed to take the picture first. The manipulations of hat and animal images were fairly easy, as well as inputting their own name and pressing SUBMIT button. Finally as they were happy with the result they figured out to press the CAPTURE button to save an image. I feel that the confusion with the ENTER button happened because I do not state it anywhere on the screen nor on a paper. Therefore, I decided to incorporate this detail in the code. Moreover, one major feedback I received from my friend was to allow people to take a new selfie if they wanted to. Therefore, I decided to make a reset function, so that a person engaging with my project might change their selfie if they do not like it.

USER TESTING – TRIAL 2

After building my box, and making the reset function, I decided to test my project again. Although I had specifically stated that the person should press / to begin on the screen, they did not understand it in the beginning as their attention was captured by the CAMERA image. Moreover, as I did not have any labels on the box, they were not able to identify which button and potentiometer stand for what during their first trial. Therefore, I decided to put labels on my box under each button and two potentiometers. However, as I told them that they can press a button to reset, they figured out how to use controls on their own.

Also, I would just lead them anytime I saw they were a little bit stuck. I do not think it is an issue with labels,  because all the buttons are clearly labeled in p5. I think it is a matter of understanding the whole process, for which I will have additional instructions.  Moreover, I will press / to connect the serial port myself, so participants would not need to worry about this text appearing on the screen. They would see no text when the port is connected.

IMG_5377
IMPROVEMENTS

1) I will print out the instructions for the users, so that they could first read them and then engage with the project. They could also look for the additional instructions during their engagement with the project, so that I do not need to explain it several times.

2) In general, after some time, two of my participants in the user trials were able to understand how the controls work. Nevertheless, they need some time to figure out what each control does. Therefore, adding  labels to my buttons and potentiometers would help eliminate this problem.

3) Because people do not get to see their final badge of the ID and it saves directly to my laptop, I decided to have a table where participants can write their net id and the name on the badge. So, after the IM showcase, I would be able to go back and send all of the badges to the users.

4) During the second user trial, the user mentioned that they did not want the hat, so they placed it directly on the animal. This was an interesting observation, however not all hats would suit an animal. Therefore, I decided to have more animals and more hats to choose from. As my program is working fine now, I feel that participants would find my project more engaging with a bigger choice of hats and animal images.

5) Also, I wanted to incorporate other images like sunglasses or jewelry, however, as I was doing trials, I understood that people take photographs from different distances from the camera. Someone would take a picture pretty close and some would take it far away. Therefore, I decided not to incorporate these features. Moreover, I was suggested to have an additional potentiometer to control the size of an image, which could resolve the problem I stated above, however, due to time limits I was not able to incorporate this feature. This could become a future improvement for this project.

Final project: user testing

User testing video:

I gave a user a try of the project after I finished the pairing and connection, and he was able to figure out what everything meant. He was very smart and was able to figure out what should be done even with my hints being somewhat not quite directional. Also, my intention for this project is to let the user figure out what everything does because one thing about cats is that it is hard to get what they mean, and finding out what everything is is part of the process. Eventually, my tester understood everything and had fun playing around with it.

During the testing, basically, everything turned out well. The only thing that might be improved is that sometimes when you are obviously mean towards the cat, she becomes more affectionate and happier, which should not be happening. That is also why I added to the notes that the cat’s change in emotions can be quite unpredictable. It is the problem with the AI model, so I don’t have a fix for it. Another thing is that the API only accepts three inputs per minute. therefore if the user input too fast the program might crash because the parseInt function can get nothing and the mood becomes corrupted. I couldn’t think of a way that could fix this.

For now, I think I don’t need to explain anything more because the exploration is part of the process. but I might find the need to do further explaining when giving this to a wider audience. I could add a page to the “help” button to explain the whole mechanism but I truly believe that would decrease the fun and make it really a simulator instead of an experience.

Final Project User Testing

User Testing:

After finalizing my project and creating a prototype of the box, I asked my friend to test out my code and this is a video of her trying it out.


*I am still in the process of creating a nice box for my project so it would look nicer than what is shown in the video.

  • Are they able to figure it out? Where do they get confused and why? Do they understand the mapping between the controls and what happens in the experience?

Yes, She was able to figure it out pretty easily. My project is pretty easy to understand and link the

  • What parts of the experience are working well? What areas could be improved?

Mostly, everything is working well, the only thing that might need some improvement is the sensitivity of the button because sometimes it loops through multiples rooms according to the force of the button press.

  • What parts of your project did you feel the need to explain? How could you make these areas more clear to someone that is experiencing your project for the first time?

The only part I felt I needed to explain in the beginning was that each room has a different sound file, but she managed to figure it out pretty quickly. The description on the front page explains everything and the labels on the buttons also provide some info on what each button is for.

Week 13: Final Project

Crack the Code!

In this project, I’ve developed a “Crack the Code” puzzle to unlock a wooden box. The user receives four sets of hints to guess the three-digit code required to open the safe. Using the knob and button on the box, the user inputs each digit of the code. When the correct code is entered, the box unlocks, and the user wins the chocolate candies inside! Until the correct code is guessed, the box remains locked.

Video Demonstration of the Project

Interaction Design: The user is initially provided instructions on how to interact with the box through the computer screen. The red button on the box not only enters digits but also serves as a “start” and “restart” button for the game, functioning as a navigation button.


Beginning of the game. Box is locked and instruction to start is given on the screen.
Playing the game. Entering the digits of the code.
End of the game. Box is open and the candies are inside!!!

Arduino Sketch: My implementation involves using a servo motor, potentiometer, and button. The servo motor locks and unlocks the box by turning to 90 degrees when locked and 0 degrees when unlocked. The potentiometer changes the digits when the user inputs the code, mapping different resistances to digits from 0 to 10 (mapped to 0-9 initially, but because of display issues, extended to 10). The button navigates the game or inputs digits based on the game state. These data are sent to p5.js, which in turn determines whether to open the box or not.

const int servoPin = 9;
const int buttonPin = 3;
const int potentioPin = A1;
const int ledPin = 11;

#include <Servo.h>
Servo myservo;

int potValue;
bool locked = true;
int digit;

void setup() {
  pinMode(ledPin, OUTPUT);
  digitalWrite(ledPin, HIGH);
  delay(1000);
  digitalWrite(ledPin, LOW);

  myservo.attach(servoPin);
  pinMode(buttonPin, INPUT_PULLUP); 

  Serial.begin(9600);

  // Always lock the safe at the beginning of the program
  unlock();
  delay(2000);
  lock();
}

void loop() {
  // Check if data is available to read from serial
  if (Serial.available() > 0) {
    // Read the incoming data
    String receivedData = Serial.readStringUntil('\n');
    
    // Print received data to the Serial Monitor
    Serial.println(receivedData);
    
    // Check if the received data matches 'true' (to unlock)
    if (receivedData == "true") {
      unlock(); // Unlock the safe
    } else if (receivedData == "false") {
       lock(); // Unlock the safe
    }
  }

  int buttonState = digitalRead(buttonPin);
  potValue = analogRead(potentioPin);
  digit = map(potValue, 0, 1023, 0, 10);

  // Print values to Serial Monitor in a single line
  Serial.print(digit);
  Serial.print(", ");
  Serial.print(buttonState == LOW ? "false" : "true"); // Check if button is pressed
  Serial.print(", ");
  Serial.println(locked ? "true" : "false");
}

void lock() {
  myservo.write(0); // Set the servo to lock the safe (position 0)
  locked = true; // Update the locked status
}

void unlock() {
  myservo.write(90); // Set the servo to unlock the safe (position 90)
  locked = false; // Update the locked status
}

P5.js Sketch: The primary instructions and hints are presented to the user in the p5 sketch. There are three different code sets, one of which is chosen as the code to open the box at the game’s start. I was initially planning to code different sets of hints and it was a difficult process, I changed it to three sets of codes for each game round. For wrong inputs, there’s sound and visual feedback. I aimed for fun and engaging screen slides, including real box images for clear user instructions.

The p5 sketch receives data from the Arduino potentiometer to display corresponding digits. When the game state ends, it sends a signal to Arduino to open the box, and the servo motor complies.


In this project, I’m particularly proud of the box I’ve created. Despite the door hinges don’t function perfectly as intended, the box maintains a good overall shape. The box is made out of ply wood. Creating the box involved learning Adobe Illustrator to sketch precise and accurate measurements for the wooden parts, which was a challenging but rewarding process.

Cut out frame sketch of the box

For future improvements, placing the Arduino board inside the box is important thing to do. It was part of the initial plan, but due to incorrect box measurements the Arduino couldn’t fit in the box. Moreover, improving the box door for sturdiness is crucial. I am also considering to add background sounds for screen feedback interactions and that would enhance the overall experience. 

Overall, the project was an enjoyable and rewarding process, and I learned a lot more about merging creative design, technical use of Arduino and P5.js, and problem-solving to deliver an engaging and interactive experience.

User Testing- Puzzle Picture


It was pretty exciting to see my roommate and friend dive into the project I’ve been working on. They handled it surprisingly well, navigating through most of it without needing any pointers from me. That’s a good sign that things are intuitive. Most parts of the project seemed to flow smoothly for them, but the joystick part caused a bit of confusion. This is something I would need to focus on especially for those who aren’t familiar with sliding puzzles. I’m sure making that clearer would make it more user-friendly and increase useability. Once I explained the basic instructions—reading the guidelines and hitting the right buttons—they seemed to sail through the rest. Straightforward instructions can really make a difference. There are definitely some areas I want to improve. The shuffling aspect of the puzzle needs tweaking. Sometimes, it gets all twisted up in a way that makes it impossible to solve. It’s on my list of things to work on. Also, those key press functions need fixing. Having to stop and restart the whole thing instead of a simple button press for a restart can be a hassle. So these are things that I am definitely working on for improvement. But overall, I’m pretty proud of where the project stands. It feels good to be at a comfortable point, just needing a few tweaks to make it even better. Excited to keep refining it.

(Final) Final Project: Documentation

Now that it’s *actually* completed, I can post the actual documentation! Introducing my final project: “StarScape”.

Concept:

For my midterm project, I made a retro game, so this time I wanted to make something more artsy, i.e. focused more on the display and visuals, rather than having a linear progression of events that have an end-goal. Personally, my favorite type of interactive art installations are the ones that make use of lights (some very primitive part of my brain still goes “Wow” like a child when I see lights turn on and off). Especially inspired by N O W I S W H E N W E A R E (the stars), I wanted to make a piece that simulates the stars and has a corresponding display of lights.

The interaction is relatively straightforward: the user presses the Arcade buttons, which will trigger a corresponding movement on the screen and a light sequence on the RGB strip.

Implementation:

Hardware:

Four arcade LED buttons, and a NeoPixel RGB Strip

Software:

For this project, I used p5.js and the Arduino IDE.

In the p5.js code, there is a Galaxy object that contains all the particles (and has the methods that trigger the changes). Everytime the code detects that the user has pressed a button on the Arduino, the repective method for that button is called. Each method (jitterParticles, jitterParticlesCloser, moveParticlesInHeart, moveParticlesInSpiral) does two things: move the particles around, and change their colors.

The p5.js code is scattered across three files:

particle.js:

// Reference: https://p5js.org/examples/simulate-particles.html


// this class describes the properties of a single particle.
class Particle {
// setting the co-ordinates, radius and the
// speed of a particle in both the co-ordinates axes.
  constructor(x, y, particleColor, strokeColor){
    // this.x = random(-rangeBuffer, width + rangeBuffer);
    // this.y = random(-rangeBuffer, height + rangeBuffer);
    this.particleColor = particleColor;
    this.strokeColor = strokeColor;
    this.x = x;
    this.y = y;
    this.r = random(1,5);
    this.xSpeed = random(-2,2);
    this.ySpeed = random(-1,1.5);
  }

// creation of a particle.
  createParticle() {
    noStroke();
    fill(this.particleColor);
    circle(this.x,this.y,this.r);
  }

// setting the particle in motion.
  moveParticle() {
    if(this.x < 0 || this.x > width)
      this.xSpeed*=-1;
    if(this.y < 0 || this.y > height)
      this.ySpeed*=-1;
    this.x+=this.xSpeed;
    this.y+=this.ySpeed;
  }

// this function creates the connections(lines)
// between particles which are less than a certain distance apart
  joinParticles(particles) {
    particles.forEach(element =>{
      let dis = dist(this.x,this.y,element.x,element.y);
      if(dis<85) { 
        stroke(this.strokeColor);
        line(this.x,this.y,element.x,element.y);
      }
    });
  }
  
  //make the particle move in a specific direction
  moveInDirection(xMovement, yMovement) {
    this.x += xMovement;
    this.y += yMovement;
  }

}


galaxy.js:

let jitterAmount = 5; //the distance particles jitter
let jitterIterations = 5; // Number of jitter iterations

//variables for the particles colors
let galaxyColor = "rgba(200,169,169,0.5)"; //White
let galaxyStroke = "rgba(255,255,255,0.04)";
let heartColor = "rgba(255, 100, 100, 0.5)"; //Pink
let heartStroke = "rgba(255, 150, 150, 0.04)";
let spiralColor = "rgba(184, 134, 11, 0.5)"; // Dark Golden 
let spiralStroke = "rgba(255, 215, 0, 0.04)";
let convergenceColor = "rgba(100, 149, 237, 0.5)"; // Blue
let convergenceStroke = "rgba(173, 216, 230, 0.04)";
let scatterColor = "rgba(60, 179, 113, 0.5)"; // Green color
let scatterStroke = "rgba(173, 255, 47, 0.04)";

// function that calculates the center of the particle cluster
function calculateCenter(particleArray) {
  let centerX = 0;
  let centerY = 0;
  for (let i = 0; i < particleArray.length; i++) {
    centerX += particleArray[i].x;
    centerY += particleArray[i].y;
  }

  centerX /= particleArray.length;
  centerY /= particleArray.length;

  return [centerX, centerY];
}

class Galaxy {
  constructor() {
    this.num = 350; //number of particles in the galaxy
    this.rotationSpeed = 0.002;
    this.radius = max(width / 2, height / 2);
    this.particles = [];
    this.centerX = 0;
    this.centerY = 0;
    this.beforeMovement = [];

    // initialize the particles to be scattered across the canvas in a circular distribution
    for (let i = 0; i < this.num; i++) {
      let angle = random(TWO_PI); //generate a random angle btwn 0 and 2π radians
      let r = sqrt(random()) * this.radius; // random radius (limited to the MAXRADIUS of the distribution)
      //calculate the x and y coordinates for the particle based on polar coordinates (angle and radius), converting them to Cartesian coordinates
      let particleX = width / 2 + r * cos(angle);
      let particleY = height / 2 + r * sin(angle);
      //add the particle to the array
      this.particles.push(
        new Particle(
          particleX,
          particleY,
          galaxyColor,
          galaxyStroke,
          "rgba(255,255,255,0.04)"
        )
      );
    }

    let center = calculateCenter(this.particles);
    this.centerX = center[0];
    this.centerY = center[1];
  }

  //move the entire cluster in a specific direction
  moveGalaxy(xMovement, yMovement) {
    for (let i = 0; i < this.particles.length; i++) {
      this.particles[i].moveInDirection(xMovement, yMovement);
    }
  }

  moveGalaxyRandom() {
    for (let i = 0; i < this.particles.length; i++) {
      // Generate random movement for each particle
      let xMovement = random(-2, 2); // Random movement along the x-axis
      let yMovement = random(-2, 2); // Random movement along the y-axis
      this.particles[i].moveInDirection(xMovement, yMovement);
    }
  }

  //move the entire galaxy downwards
  moveGalaxyDownwards() {
    let iterations = 0;
    let prevPositions = [];
    function moveDown(particleArray) {
      if (iterations < 30) {
        // Adjust the number of iterations as needed
        for (let i = 0; i < particleArray.length; i++) {
          if (iterations == 0) {
            prevPositions.push([particleArray[i].x, particleArray[i].y]);
          }
          particleArray[i].y += 2; // Move particles downwards
        }
        iterations++;

        setTimeout(() => moveDown(particleArray), 10);
      }
    }

    moveDown(this.particles);
    this.returnToOriginalPositions(prevPositions);
  }

  //return the particles to the position that they were in before a certain position was enacted
  returnToOriginalPositions() {
    for (let i = 0; i < this.particles.length; i++) {
      let direction = createVector(
        this.beforeMovement[i][0] - this.particles[i].x,
        this.beforeMovement[i][1] - this.particles[i].y
      );
      this.particles[i].x += direction.x * 0.1;
      this.particles[i].y += direction.y * 0.1;
    }
  }

  //rotate the galaxy
  // Function to rotate the galaxy by a given rotation speed
  rotateGalaxy(rotationSpeed) {
    // Loop through all particles in the galaxy
    for (let i = 0; i < this.particles.length; i++) {
      // Calculate the angle between the particle's position and the center of the canvas
      let angle = atan2(
        this.particles[i].y - height / 2, // Y-component distance from the center of the canvas
        this.particles[i].x - width / 2 // X-component distance from the center of the canvas
      );

      // Add the rotation speed to the angle to rotate the particle
      angle += rotationSpeed;

      // Calculate the distance from the particle to the center of the canvas
      let radius = dist(
        width / 2, // X-coordinate of the center of the canvas
        height / 2, // Y-coordinate of the center of the canvas
        this.particles[i].x, // X-coordinate of the particle
        this.particles[i].y // Y-coordinate of the particle
      );

      // Update the particle's position based on the new angle and radius
      this.particles[i].x = width / 2 + radius * cos(angle);
      this.particles[i].y = height / 2 + radius * sin(angle);
    }

    // Calculate the new center of the galaxy based on the updated particle positions
    let center = calculateCenter(this.particles);

    // Update the center X and Y coordinates of the galaxy
    this.centerX = center[0];
    this.centerY = center[1];
  }

  // Function to jitter (move randomly) particles within a given limit
  jitterParticles() {
    let iterations = 0; // Variable to track the number of iterations for jittering
    let prevPositions = []; // Array to store previous positions of particles

    // Inner function to perform the actual jittering of particle positions recursively
    function jitter(particleArray) {
      if (iterations < 10) {
        // Perform jittering for 10 iterations
        for (let i = 0; i < particleArray.length; i++) {
          // Store the previous positions of particles before jittering
          prevPositions.push([particleArray[i].x, particleArray[i].y]);

          // Move particles randomly within a specific range (jitterAmount)
          particleArray[i].x += random(-jitterAmount, jitterAmount) * 4;
          particleArray[i].y += random(-jitterAmount, jitterAmount) * 4;

          // On the first iteration, randomly change the color of some particles
          if (iterations == 0) {
            let changeColor = random(0, 1);
            if (changeColor > 0.5) {
              particleArray[i].particleColor = scatterColor; // Change particle color
              particleArray[i].strokeColor = scatterStroke; // Change stroke color
            } else if (changeColor < 0.3) {
              particleArray[i].particleColor = galaxyColor; // Restore particle color
              particleArray[i].strokeColor = galaxyStroke; // Restore stroke color
            }
          }
        }

        iterations++; // Increment the iteration count
        // Use setTimeout to call the jitter function recursively after a delay of 10 milliseconds
        setTimeout(() => jitter(particleArray), 10);
      }
    }

    // Start the jittering process for the current set of particles
    jitter(this.particles);

    // Save the positions of particles before the movement for reference
    this.beforeMovement = prevPositions;

    // Calculate the new center of the particle set after jittering
    let center = calculateCenter(this.particles);

    // Update the center X and Y coordinates of the particle set
    this.centerX = center[0];
    this.centerY = center[1];
  }

  // Function to jitter particles upwards within a given limit
  jitterParticlesUpwards() {
    let iterations = 0; // Variable to track the number of iterations for jittering upwards

    // Inner function to perform the upward jittering of particle positions recursively
    function jitterUpwards(particleArray) {
      if (iterations < jitterIterations) {
        // Perform upward jittering for a specified number of iterations
        for (let i = 0; i < particleArray.length; i++) {
          // Move particles randomly within a specific range horizontally (x-axis)
          // Move particles upwards by adjusting the y-coordinate (subtracting from y-axis)
          particleArray[i].x += random(-jitterAmount, jitterAmount) * 4;
          particleArray[i].y -= random(0, jitterAmount) * 4; // Adjusting y coordinate to move particles upwards
        }

        iterations++; // Increment the iteration count
        // Use setTimeout to call the jitterUpwards function recursively after a delay of 10 milliseconds (adjustable)
        setTimeout(() => jitterUpwards(particleArray), 10); // Adjust timeout as needed for speed
      }
    }

    // Start the upward jittering process for the current set of particles
    jitterUpwards(this.particles);
  }

  jitterParticlesCloser() {
    let iterations = 0;
    let prevPositions = [];
    function jitterCloser(particleArray) {
      if (iterations < jitterIterations) {
        for (let i = 0; i < particleArray.length; i++) {
          prevPositions.push([particleArray[i].x, particleArray[i].y]);
          let xOffset = random(-jitterAmount, jitterAmount) * 0.4;
          let yOffset = random(-jitterAmount, jitterAmount) * 0.4;

          particleArray[i].x += xOffset * 0.5; // Adjust x-coordinate to bring particles closer
          particleArray[i].y += yOffset * 0.5; // Adjust y-coordinate to bring particles closer
        }
        iterations++;
        setTimeout(() => jitterCloser(particleArray), 10); // Adjust timeout for speed of jittering
      }
    }

    jitterCloser(this.particles);
    this.beforeMovement = prevPositions;
  }

  jitterParticlesTowardsCenter() {
    let iterations = 0;
    let totalIterations = 7;
    let jitterAmnt = 5;
    const convergenceRate = 0.05; // Rate at which particles converge towards the center
    // console.log("woooo big function");
    function jitter(particleArray, centralY, centralX) {
      // console.log("woooo function");
      if (iterations < totalIterations) {
        // console.log("woooo iterations");
        for (let i = 0; i < particleArray.length; i++) {
          // Calculate distance to the center
          const distanceX = centralX - particleArray[i].x;
          const distanceY = centralY - particleArray[i].y;

          // Move particles closer together
          particleArray[i].x += random(-jitterAmnt, jitterAmnt) * 6;
          particleArray[i].y += random(-jitterAmnt, jitterAmnt) * 6;

          // Move particles towards the center
          particleArray[i].x += distanceX * convergenceRate;
          particleArray[i].y += distanceY * convergenceRate;

          if (iterations == 0) {
            let changeColor = random(0, 1);
            if (changeColor > 0.5) {
              particleArray[i].particleColor = convergenceColor;
              particleArray[i].strokeColor = convergenceStroke;
            }
          }
        }
        iterations++;
        setTimeout(() => jitter(particleArray, centralX, centralY), 0.5); // Adjust timeout as needed for speed
      }
    }

    jitter(this.particles, this.centerX, this.centerY);
  }

  explodeParticles() {
    let iterations = 0;
    const explodeIterations = 30; // Adjust the number of iterations for the explosion

    function explode(particleArray) {
      if (iterations < explodeIterations) {
        // Calculate the center of the galaxy (average position of all particles)
        let centerX = 0;
        let centerY = 0;

        for (let i = 0; i < particleArray.length; i++) {
          centerX += particleArray[i].x;
          centerY += particleArray[i].y;
        }

        centerX /= particleArray.length;
        centerY /= particleArray.length;

        for (let i = 0; i < particleArray.length; i++) {
          // Move particles away from the center of the galaxy
          let deltaX = (particleArray[i].x - centerX) / 15;
          let deltaY = (particleArray[i].y - centerY) / 15;

          // Adjust the particles' positions
          particleArray[i].x += deltaX * 0.1; // Adjust the factor to control the speed of explosion
          particleArray[i].y += deltaY * 0.1; // Adjust the factor to control the speed of explosion
        }

        iterations++;
        setTimeout(() => explode(particleArray), 10); // Adjust timeout as needed
      }
    }

    explode(this.particles);
  }

  moveParticlesInHeart() {
    let iterations = 0;
    let prevPositions = [];
    let heartIterations = 30;

    function moveTowardsHeart(particleArray, heartParticles) {
      if (iterations < heartIterations) {
        for (let i = 0; i < heartParticles.length; i++) {
          prevPositions.push([particleArray[i].x, particleArray[i].y]);

          // Calculate the movement towards the heart shape
          let targetX = heartParticles[i].x;
          let targetY = heartParticles[i].y;

          // Update particle positions towards the heart shape
          particleArray[i].x += (targetX - particleArray[i].x) * 0.4; // Adjust the animation speed as needed
          particleArray[i].y += (targetY - particleArray[i].y) * 0.4; // Adjust the animation speed as needed

          particleArray[i].particleColor = heartColor; // Change the color to red during animation
          particleArray[i].strokeColor = heartStroke; // Change the stroke color to blue during animation
        }

        iterations++;
        setTimeout(() => moveTowardsHeart(particleArray, heartParticles), 10); // Adjust timeout as needed for speed
      }
    }

    let heartParticles = []; // Define heart shape particles here

    // Calculate heart shape particles as before
    let spacing = 15; // Adjust this for the heart shape

    for (let angle = 0; angle < TWO_PI; angle += 0.1) {
      // Calculate x and y coordinates for the heart shape using mathematical functions
      let x = 16 * pow(sin(angle), 3);
      let y = -(
        (
          13 * cos(angle) - // First circular pattern
          5 * cos(2 * angle) - // Second circular pattern with twice the frequency
          2 * cos(3 * angle) - // Third circular pattern with three times the frequency
          cos(4 * angle)
        ) // Fourth circular pattern with four times the frequency
      );

      // Scale the coordinates by a spacing factor
      x *= spacing;
      y *= spacing;

      // Shift the heart shape to the center of the canvas
      x += width / 2;
      y += height / 2;

      // Store the calculated x and y coordinates as a vector in the heartParticles array
      heartParticles.push(createVector(x, y));
    }

    moveTowardsHeart(this.particles, heartParticles);

    this.beforeMovement = prevPositions;
    let center = calculateCenter(this.particles);
    this.centerX = center[0];
    this.centerY = center[1];
  }

  moveParticlesInSpiral() {
    let iterations = 0;
    let prevPositions = [];
    let spiralIterations = 35;

    function moveTowardsSpiral(particleArray, spiralParticles) {
      if (iterations < spiralIterations) {
        for (let i = 0; i < spiralParticles.length; i++) {
          prevPositions.push([particleArray[i].x, particleArray[i].y]);

          // Calculate the movement towards the spiral shape
          let targetX = spiralParticles[i].x;
          let targetY = spiralParticles[i].y;

          // Update particle positions towards the spiral shape
          particleArray[i].x += (targetX - particleArray[i].x) * 0.4; // Adjust the animation speed as needed
          particleArray[i].y += (targetY - particleArray[i].y) * 0.4; // Adjust the animation speed as needed

          particleArray[i].particleColor = spiralColor; // Change the color to red during animation
          particleArray[i].strokeColor = spiralStroke;
        }

        iterations++;
        setTimeout(() => moveTowardsSpiral(particleArray, spiralParticles), 10); // Adjust timeout as needed for speed
      }
    }

    let spiralParticles = []; // Define spiral shape particles here

    // Calculate spiral shape particles
    let spacing = 10; // Adjust this for the spiral shape
    for (let angle = 0; angle < 6 * PI; angle += 0.1) {
       // Calculate x and y coordinates for the spiral shape using trigonometric functions
      let x = angle * cos(angle) * spacing + width / 2;
      let y = angle * sin(angle) * spacing + height / 2;
      spiralParticles.push(createVector(x, y));
    }

    moveTowardsSpiral(this.particles, spiralParticles);

    this.beforeMovement = prevPositions;
    let center = calculateCenter(this.particles);
    this.centerX = center[0];
    this.centerY = center[1];
  }
  
  //function to actually draw the galaxy
  drawGalaxy() {
    for (let i = 0; i < this.particles.length; i++) {
      this.particles[i].createParticle(); // Create a single particle
      this.particles[i].joinParticles(this.particles.slice(i)); // Join the created particle with others
    }
  }
}

sketch.js:

//background music source: https://freesound.org/people/Seth_Makes_Sounds/sounds/701610/

let numParticles = 200;
let nightParticles;
let portConnected = false;
let showStartScreen = true;
let font, font2;
let bgMusic;

//variables to store data from Arduino board
let redAction = 0;
let blueAction = 0;
let yellowAction = 0;
let greenAction = 0;

//flags to check if the action was performed
let redActionPerformed = false;
let yellowActionPerformed = false;
let greenActionPerformed = false;
let blueActionPerformed = false;

let lastInteractionTime = 0;
const idleTimeThreshold = 60000;

let amp;


//start screen for user
function startScreen() {
  textFont(font);
  textSize(80);
  fill("white");
  let message = "StarScape";
  // console.log(width, height);
  let textW = textWidth(message);
  let textH = textAscent() + textDescent();


  let centerX = width / 2;
  let centerY = height / 2;

  // Set text alignment to center and display the text
  textAlign(CENTER, CENTER);
  text(message, centerX, centerY);

  textFont(font2);
  textSize(20);

  let captionX = centerX;
  let captionY = centerY + 80;

  text("Click anywhere to begin. Click again to restart.", captionX, captionY);
}

function preload() {
  soundFormats("mp3", "ogg");
  bgMusic = loadSound("/sounds/bgMusic2.mp3");
  font = loadFont("fonts/NewYork.otf");
  font2 = loadFont("fonts/AppleGaramond-LightItalic.ttf");
}

function setup() {
  //responsive canvas set to the dimensions of the window
  createCanvas(windowWidth, windowHeight);
  //initialize particles
  nightParticles = new Galaxy();
  //loop the music
  bgMusic.loop();
  amp = new p5.Amplitude();
}

function draw() {
  background("#0f0f0f");
  
  if (showStartScreen) {
    startScreen();
  } else {
    //if red button pressed, particles jitter + scatter
    if (redAction && !redActionPerformed) {
      nightParticles.jitterParticles();
      redActionPerformed = true;
    //if yellow button is pressed, particles cluster together
    } else if (yellowAction && !yellowActionPerformed) {
      nightParticles.jitterParticlesTowardsCenter();
      yellowActionPerformed = true;
    //if the green button is pressed, particles form a heart
    } else if (greenAction && !greenActionPerformed) {
      nightParticles.moveParticlesInHeart();
      greenActionPerformed = true;
    // if blue button, the particles form a spiral
    } else if (blueAction && !blueActionPerformed) {
      nightParticles.moveParticlesInSpiral();
      blueActionPerformed = true;
    }
    
    //the particles are continuously rotating, with a speed proportional to the amplitude of the music
    let vol = amp.getLevel();
    let pSpeed = map(vol, 0, 1, 0, 0.005);
    nightParticles.rotateGalaxy(pSpeed);
    nightParticles.drawGalaxy();
  }
}

function readSerial(data) {
  ////////////////////////////////////
  //READ FROM ARDUINO HERE
  ////////////////////////////////////

  if (data != null) {
    // make sure there is actually a message
    // split the message
    let fromArduino = split(trim(data), ",");
    // console.log(fromArduino);
    // if the right length, then proceed
    if (fromArduino.length == 4) {
      // only store values here
      // do everything with those values in the main draw loop

      // We take the string we get from Arduino and explicitly
      // convert it to a number by using int()
      redAction = int(fromArduino[0]);
      yellowAction = int(fromArduino[1]);
      greenAction = int(fromArduino[2]);
      blueAction = int(fromArduino[3]);
      
      //reset the actionsPerformed to false everytime data is read from the arduino
      redActionPerformed = false;
      yellowActionPerformed = false;
      greenActionPerformed = false;
      blueActionPerformed = false;
    }

    //////////////////////////////////
    //SEND TO ARDUINO HERE (handshake)
    //////////////////////////////////
    let sendToArduino = "\n";
    writeSerial(sendToArduino);
  }
}

function mousePressed() {
  //first, connect the port
  if (!portConnected) {
    setUpSerial();
    portConnected = true;
  } else {
    //after port is connected, use mouse press to start (and restart)
    showStartScreen = !showStartScreen;
    //if the game is restarting, create a new instance of Galaxy class
    if (showStartScreen) {
      nightParticles = new Galaxy();
    }
  }
}

The Arduino code sets up the serial connection with the p5.js sketch, and then reads the data from the buttons. After detecting a button press, it sends it to the sketch. After sending it to the sketch, it triggers a light sequence on the strip. The code in the Arduino IDE:

#include <Adafruit_NeoPixel.h>
#include <avr/power.h>


unsigned long previousMillis = 0;
const long interval =250; 


#define PIN_NEO_PIXEL 10  // Arduino pin that connects to NeoPixel
#define NUM_PIXELS 13    // The number of LEDs (pixels) on NeoPixel

#define DELAY_INTERVAL 250  // 250ms pause between each pixel

int arcadeBtnRed = 5;
// int arcadeLEDRed = 13;
int arcadeBtnYellow = 4;
// int arcadeLEDRed = 13;
int arcadeBtnGreen = 3;
int arcadeBtnBlue = 2;

int neoPixelPin = 10;

int redAction = 0;
int blueAction = 0;
int yellowAction = 0;
int greenAction = 0;


Adafruit_NeoPixel NeoPixel(NUM_PIXELS, PIN_NEO_PIXEL, NEO_GRB + NEO_KHZ800);

// Adafruit_NeoPixel strip = Adafruit_NeoPixel(24, neoPixelPin, NEO_RGBW + NEO_KHZ800);

void heart(){
  NeoPixel.clear();

  // unsigned long currentMillis = millis();
  // turn pixels to green one by one with delay between each pixel
  for (int pixel = 0; pixel < NUM_PIXELS; pixel++) {           // for each pixel
    NeoPixel.setPixelColor(pixel, NeoPixel.Color(255, 50, 150));  // Pink color: Red=255, Green=50, Blue=150
    NeoPixel.show();                                           // send the updated pixel colors to the NeoPixel hardware.

    delay(60);  // pause between each pixel
  }
}


void spiral() {
  NeoPixel.clear();
  int centerPixel = NUM_PIXELS / 2;  // Center of the LED strip
  int startPixel = 0;  // Starting pixel

  for (int i = 0; i < NUM_PIXELS / 2; i++) {
    NeoPixel.setPixelColor(startPixel + i, NeoPixel.Color(255, 165, 0)); // Set color to golden (RGB: 255, 215, 0)
    NeoPixel.setPixelColor(NUM_PIXELS - 1 - i, NeoPixel.Color(255, 165, 0)); // Set color to golden (RGB: 255, 215, 0)

    NeoPixel.show();
    delay(100); // Adjust the delay to control the speed of the spiral

    // Fade out the previously lit LEDs
    NeoPixel.setPixelColor(startPixel + i, NeoPixel.Color(0, 0, 0)); // Turn off the LED
    NeoPixel.setPixelColor(NUM_PIXELS - 1 - i, NeoPixel.Color(0, 0, 0)); // Turn off the LED
  }
}


void jitterIllusion() {
  NeoPixel.clear();
  for (int i = 0; i < 50; i++) {  // Repeat the jitter effect multiple times
    for (int pixel = 0; pixel < NUM_PIXELS; pixel++) { // Loop through each pixel
      // Set a random shade of green for each pixel
      NeoPixel.setPixelColor(pixel, NeoPixel.Color(0, random(256), 0)); // Random green shades (RGB: 0, random value, 0)
    }

    NeoPixel.show(); // Show the updated colors
    delay(50); // Adjust the delay to control the speed of the jitter illusion
  }
}

void gentleWaves() {
  NeoPixel.clear();
  int duration = 5000; // Duration of the wave effect in milliseconds
  int waves = 5; // Number of waves to display

  for (int i = 0; i < duration; i += 50) { // Time loop
    float phaseShift = (float)i / duration * 2 * PI * waves; // Phase shift based on time for wave effect

    for (int pixel = 0; pixel < NUM_PIXELS; pixel++) { // Loop through each pixel
      // Calculate a blue value based on a sine wave to create a gentle wave effect
      int blueValue = (sin(phaseShift + (float)pixel / NUM_PIXELS * 2 * PI) + 1) * 128; // Adjust the amplitude and offset as needed

      NeoPixel.setPixelColor(pixel, NeoPixel.Color(0, 0, blueValue)); // Set the pixel color with varying shades of blue
    }

    NeoPixel.show(); // Show the updated colors
    delay(50); // Adjust the delay to control the speed of the gentle waves
  }
}

void allWhite() {
  NeoPixel.clear();
  for (int pixel = 0; pixel < NUM_PIXELS; pixel++) {
    NeoPixel.setPixelColor(pixel, NeoPixel.Color(40, 40, 40));  // Set all pixels to white (RGB: 255, 255, 255)
  }
  NeoPixel.show();  // Show the updated pixel colors
}


void setup() {
  // put your setup code here, to run once:
  Serial.begin(9600);
  // pinMode(LED_BUILTIN, OUTPUT);
  pinMode(arcadeBtnRed, INPUT);
  pinMode(arcadeBtnYellow, INPUT);
  pinMode(arcadeBtnBlue, INPUT);
  pinMode(arcadeBtnGreen, INPUT);
  // pinMode(arcadeLEDRed, OUTPUT);

  NeoPixel.begin();  // INITIALIZE NeoPixel strip object (REQUIRED)
  // NeoPixel.clear();
  // strip.begin();
  // strip.show();
  // start the handshake
  while (Serial.available() <= 0) {
    // digitalWrite(LED_BUILTIN, HIGH);  // on/blink while waiting for serial data
    Serial.println("0,0,0,0");        // send a starting message
    delay(300);                       // wait 1/3 second
    // digitalWrite(LED_BUILTIN, LOW);
    // delay(50);
  }
}

void loop() {
  
  while (Serial.available()) {
    if (Serial.read() == '\n') {
      redAction = digitalRead(arcadeBtnRed);
      delay(5);
      blueAction = digitalRead(arcadeBtnBlue);
      delay(5);
      greenAction = digitalRead(arcadeBtnGreen);
      delay(5);
      yellowAction = digitalRead(arcadeBtnYellow);

      Serial.print(redAction);
      Serial.print(',');
      Serial.print(yellowAction);
      Serial.print(',');
      Serial.print(greenAction);
      Serial.print(',');
      Serial.println(blueAction);
    }
  }

  if (redAction) {
    jitterIllusion();
  } else if (yellowAction) {
    gentleWaves();
  } else if (greenAction) {
    heart();
  } else if (blueAction) {
    spiral();
  } else {
    allWhite();
  }
}

What I’m particularly proud of

I’m proud of the methods in the galaxy class… it took me a while to figure out how to code the movement of the particles in a way that looks satisfying. I’m also proud of the overall aesthetics (most people’s first reactions were to comment on how the sketch *looked* before they even interacted with it).

Reflections and Future Improvements

I love the idea of my piece, but, in its current scope I don’t think its full potential has been realized. I think the concept would be much more impactful if there were much more lights, or if it was designed to be within an art installation where the lights are all around the user (similar to Andrew’s piece). If I were given the opportunity to expand the piece to be as such, it would be closer to the original thing I envisioned. Regardless, I’m happy with how it turned out and though its small, I think it still captures the essence of what I wanted to do.

Final Project Second Draft: Mar’s Pie Shop

Concpet:

I love baking, and I enjoy baking games. For my final project I decided to make a pie shop… Throughout my journey in Intro to IM, I made sure to always add a piece of me in every assignment and project. This final one is especially dear to me because I was able to finalize it after hard work. As well as being able to add my art in it (background and pie images). I think it goes well together and I’m proud of it.

FUN FACT: I have never had pie in my life!!!

Highlight OF MY Code in P5.js:

-Function to check the correct match

function submitAnswer() {
  // Define the expected ranges for each statement
  const rawRange = [0, 200];
  const undercookedRange = [201, 400];
  const perfectRange = [401, 600];
  const overcookedRange = [601, 800];
  const burntRange = [801, 1023];

  let expectedRange;

  // Determine the expected range based on the current sentence
  switch (currentSentence) {
    case "I would like a raw pie to bake at home.":
      expectedRange = rawRange;
      break;
    case "I like my pie extremely soft.":
      expectedRange = undercookedRange;
      break;
    case "I want a perfect pie!":
      expectedRange = perfectRange;
      break;
    case "Crispy around the edges!!":
      expectedRange = overcookedRange;
      break;
    case "BURNT IT >:D":
      expectedRange = burntRange;
      break;
  }

  // Check if the current image range matches the expected range
  if (x >= expectedRange[0] && x <= expectedRange[1]) {
    // Increment the score for a correct match
    score++;
    
  ding.play();

-Different screen pages:

if (gameState === "start") {
  drawStartScreen();
} else if (gameState === "playing") {
  displayFoodImage();
  displayTimer();
  textSize(24);
  fill(255);
  text("Score: " + score, width - 100, 30);
} else if (gameState === "end") {
  // Display results in the end screen
  textSize(210);
  fill(255);
  text("Your Score: " + score, width / 2, height / 2);
  playAgainButton.show(); // Show the button on the end screen
}
else {
  // Draw other game elements here
  playAgainButton.hide(); // Hide the button if not in the end state
}

Arduino IDE Code:

int potPin = A0;      // Potentiometer connected to analog pin A0
int buttonPin = 2;    // Digital button connected to digital pin 2

void setup() {
  Serial.begin(9600); // Set the baud rate to the same value as in p5.js
  pinMode(buttonPin, INPUT_PULLUP); // Set the digital button pin as input with internal pull-up resistor
}

void loop() {
  int potValue = analogRead(potPin); // Read potentiometer value (0 to 1023)
  int buttonState = digitalRead(buttonPin); // Read button state (HIGH or LOW)
  Serial.print(potValue); // Send potentiometer value to p5.js
  Serial.print(',');
  Serial.println(buttonState); // Send button state to p5.js

  delay(550); 
}

Components:

-LED Button

-Potentiometer

OveN Prototype and schematics:


User Testing:


Challenges:

  • Many challenges were faced with the coding part.
  • Button wasn’t working to confirm answers and also change the requests of the order.
  • Sometimes the images controlled by the potentiometer would not show, or not change.
  • I also had some issues with serial connection because of the wirings

Future Imporvements:

  • I hoped to be able to make the game restart without having to exit full screen.
  • Make the prototype a little prettier
  • Fine-tune the difficulty level based on user feedback. Adjust timer durations, scoring mechanisms, or image recognition ranges to make the game challenging yet enjoyable.
  • Introduce new challenges or power-ups to add variety to the gameplay.
  • Ensure that the game is responsive and looks good on various screen sizes.