
CONCEPT
For this assignment, I have made a game called “code name: Purple”. The player is presented with an RGB LED that changes color based on the reading from a photosensor. The goal of the game is to press a button when the RGB LED turns the right shade of purple, which may be not discernable to the eye, so the only way for the player to find out is to play around with the photosensor and check by pressing the button. If the button is pressed at the right photoresistor value, a green LED lights up, indicating that the player has won. If the button is pressed at the wrong photoresistor value, a red LED lights up, indicating that the player has lost.
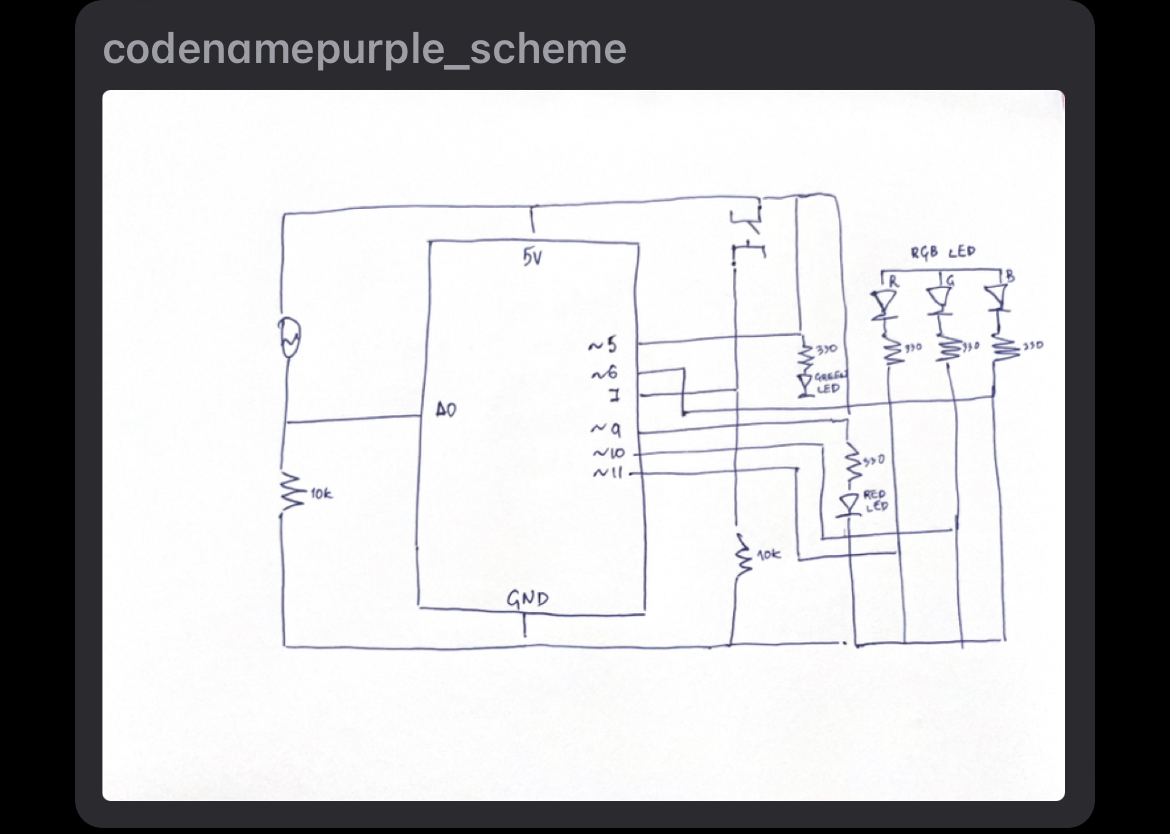
IMPLEMENTATION
I faced several challenges while setting up the circuit. Initially, I had difficulty understanding the pin mapping for the RGB LED and the photosensor. I had to refer to the documentation and online resources to understand how to wire these components to the Arduino. After some trial and error, I was able to successfully wire the components and read the analog values from the photosensor.
Another challenge was in getting the timing of the button press just right. Initially, I had set a fixed delay between the LED turning purple and the button press is registered. However, this did not work well as the timing varied depending on the ambient light level. I had to modify my code to dynamically adjust the timing of the button press based on the current color value of the LED. After some experimentation and tweaking, I was able to get the timing of the button press just right, and the game was fully functional.
Below is the full code.
// define pins
int redLED = 9;
int greenLED = 5;
int rgbRed = 11;
int rgbGreen = 10;
int rgbBlue = 6;
int btnPin = 7;
int photoPin = A0;

// variables
int redVal = 0;
int greenVal = 0;
int blueVal = 0;
int photoVal = 0;
int btnState = 0;

void setup() {
  // set pins
  pinMode(redLED, OUTPUT);
  pinMode(greenLED, OUTPUT);
  pinMode(rgbRed, OUTPUT);
  pinMode(rgbGreen, OUTPUT);
  pinMode(rgbBlue, OUTPUT);
  pinMode(btnPin, INPUT);

  // initialize serial communication
  Serial.begin(9600);
}

void loop() {
  // read the photoresistor value
  photoVal = analogRead(photoPin);

  // map the photoresistor value to RGB LED color values
  redVal = map(photoVal, 0, 1023, 0, 255);
  greenVal = 0;
  blueVal = map(photoVal, 0, 1023, 255, 0);

  // set RGB LED color
  analogWrite(rgbRed, redVal);
  analogWrite(rgbGreen, greenVal);
  analogWrite(rgbBlue, blueVal);

  // read the button state
  btnState = digitalRead(btnPin);

  // WIN CONDITION
  // if RGB LED is the right shade of purple
  // ranges: 210 < red value < 220, 40 < blue value < 50
  if ((redVal >= 210 && redVal <= 220) && (blueVal >= 40 && blueVal <= 50)) {
    // if button is pressed when correct -> light the green LED
    if (btnState == 1) {
      digitalWrite(greenLED, HIGH);
      digitalWrite(redLED, LOW);
    }
    // if button not pressed
    else {
      digitalWrite(greenLED, LOW);
      digitalWrite(redLED, LOW);
    }
  }
  // LOSE CONDITION
  // if RGB LED is not the right shade of purple
  else {
    // if button is pressed when wrong -> light the red LED
    if (btnState == 1) {
      digitalWrite(greenLED, LOW);
      digitalWrite(redLED, HIGH);
    }
    // if button is not pressed
    else {
      digitalWrite(greenLED, LOW);
      digitalWrite(redLED, LOW);
    }
  }

  // print values to serial monitor
  Serial.print("Photoresistor Value: ");
  Serial.print(photoVal);
  Serial.print("\t Red Value: ");
  Serial.print(redVal);
  Serial.print("\t Green Value: ");
  Serial.print(greenVal);
  Serial.print("\t Blue Value: ");
  Serial.print(blueVal);
  Serial.print("\t Button State: ");
  Serial.println(btnState);

  delay(100);
}
VIDEO DEMO
If the video window doesn’t show, use this link to see the demo of the game.
REFLECTION
Moving forward, there are a few things that I would add to improve the game. I would add a display that shows the player’s score and progress, to add a bit more feedback and motivation. Some audio feedback, such as a sound effect for when the button is pressed at the right time, would have been nice. I would also consider adding some power-ups that would make the game easier or more difficult. One example of such is a power-up that would make the RGB blue and red value ranges wider, allowing for less precise button presses.