HW Week 3 – OOP Art in p5js

Inspiration

I had quite an intensive day and one of the fun parts of it was actually solving puzzles and playing games in a pair for one of the student capstone experiments I participated in. One of the games resembled tic-tac-toe for me and I used to love playing it. With the homework assignment based on the use of classes and arrays, I tried to recreate the game in a basic setting using p5js.

The product

I am overall satisfied with the technical aspect of the code but I as look closer at the visual implementation I think it needs a strong improvement here to be somewhat ‘artsy’ at least to a minimal extent. I want to develop it a bit further playing with design and making it more interactive.

Since I thought that just X and O were completely boring, I decided to switch them simply to IM and CS to draw a winner in this friendly ‘competition’ between majors.

Challenges

For me, it was getting used to the implementation of how to apply a function for each cell in p5js. It was a bit confusing since I am more used to retrieving code functions into separate blocks, yet this implementation looks tidier.

this.cells.forEach(function (cell) {
  if (cell.r == r && cell.c == c && 0 == cell.v) {
    cell.t = t;
    if (turn == "IM") {
      cell.v = 1;
    } else {
      cell.v = -1;
    }
  }
});

Summary

I have used 2 classes for the Tic-Tac-Toe game: Board and Player, and I believe this assignment was useful to me in regards to practising OOP code writing. It was also quite a while since my last game implementation, even a basic one like this. The aspect that I think I really need to work on more is the visual representation of the game and making it more creative in the sense of design. Yet, this was a fun and useful experience of implementing.

Generative Art_Aaron

class generativeArt { //class to generate art on canvas
  constructor() {
    this.move_art = -200;
    this.xRot = 0.01; //rotation speed about the x-axis
    this.yRot = 0.01;//rotation speed about the y-axis
    this.drawBox();//
  }

  drawBox() { //function to draw rotating intertwined boxes 
    push();//give the box the below properties till it meets pop
    rotateX(frameCount * this.xRot); //rotate about x-axis
    rotateY(frameCount * this.yRot); //rotate about y-axis
    stroke(0);
    noFill();
    box(3, 3, 30); //draw box
    //second box
    rotateX(frameCount * this.xRot);
    rotateY(frameCount * this.yRot);
    stroke(255, 255, 255);
    noFill();
    box(3, 3, 30);
    pop(); //resets the box properties to its original properties
  }

  art() { //function to create rotating boxes at different locations on the canvas
    for (let i = 10; i < 1000; i += 50) {
      for (let j = 20; j < 1000; j += 100) { 
        push();
        translate(j - i, i); //translate the box to different positions determined by i and j
        this.drawBox();
        pop();
      }
    }
    
    for (let i = 10; i < 1000; i += 50) {
      for (let j = 20; j < 1000; j += 100) {
        push();
        translate(i, j - i); //translate the box to different positions determined by i and j
        this.drawBox();
        pop();
      }
    }
    for (let a = -350; a < 350; a += 30) {
      push();
      translate(a + 10, (this.move_art+= 0.001)); //translate the box to different positions determined by a but moves the boxes down the y axis
      this.drawBox(20, 50, 10);
      pop();
    }
  }


}

function setup() {
  createCanvas(700, 400, WEBGL);
  background(220);
  my_art = new generativeArt();
}

function draw() {
  my_art.drawBox();
  my_art.art();
}

//inspiration

//from the previous homework created using boxes in 3D.

//challenges faced:

//I had a difficulty in navigating the 3D space difficulty in resetting the movement from the top of the canvas.
//Also, it was a hustle figuring out how to make sure the boxes stay in a fixed position

Week 3: Fireworks

Overview:

For this assignment, I tried to utilize the concepts of object-oriented programming (such as classes and arrays) to create a generative artwork with an element of randomness and interactivity.

Concept:

I was looking at different forms of generative examples on the Internet and got inspired by this generative art created on processing. So, I decided to imitate fireworks by programming the instances of objects (in my case, circles) to follow a specific movement aimed at creation an effect of explosion and dispersion as in the below photo.

I tried to choose bright range of colors to fit the concept of fireworks, and I  also added the trail at the end of the particles to create a slow dispersion effect. For this, I manipulated to opacity of the background, setting it to 90. The user can also interact with it by choosing the origin of the fireworks, which, in turn, changes the background color to different dark shades of red and green.

Code:

Even though this animation may not be that realistic because the particles were following a symmetrical path, I am still proud of how the explosion effect at he beginning and a random dispersion that follows turned out to be. The part of the code that is responsible for these is the update() function that calculates the movement of particles and adds and element of randomness.

Here’s the code for the reference:

//function to calculate the lcoation and movement of circles
 update(){
  
   //after the circles reach the pre-defined boundaries i.e. after the first explosion occurs
   if(this.x>this.xMax || this.y>this.yMax || this.x<this.xMin || this.y<this.yMin){
     
     //user can change the origin of the salute by clicking on the screen
     if(mouseIsPressed == true){
       
       this.x=mouseX
       this.y=mouseY 
       
       //when they click the screen, the background color will also change to random shades of red and green to resemble the sky during the fireworks show
     background(random(0,100),random(0,100),random(0,100),opacity);
     }
     
     //in times when the user doesn't click on the scree, the origin of fireworks will be determined by the randomn() function
     else {
       this.x=random(0,400)
       this.y=random(0,400) 
     }
     
   } 
   
   //make the circles move on a specific manner
   this.x+=this.xspeed;
   this.y+=this.yspeed;   
 }

Future Improvements:

As I’ve mentioned above, one of the improvements for this code to create a more realistic firework imitation would be to make the particles follow not such a strict symmetric path. Also, instead of making them move in the straight line, it would be a good idea to make them move on an arc, accelerate when falling and decelerate when exploding. I tried to incorporate these concepts to this code as well, however I faced few challenges during the process, especially when making the particles fall to the ground imitating an arc-like movement.


Week 3 – Art with Classes

After going through a creative block, I finally managed to create this:

Below is the code for the project:

let stars =[];
let rockets=[];


function setup() {
  createCanvas(600, 700);

  for (let i = 0; i < 100; i++) {
    stars[i] = new Star(random(width), random(height), random(1, 5));
  }
  
  rocket = new Rocket(width / 2, height, 5);
  moon = new Moon(500,100,50);
  
  // Add mouse click event listener
  mouseClicked = function() {
    let x = mouseX;
    let y = mouseY;
    let rocket = new Rocket(x, y, 5);
    rockets.push(rocket);
  }
}

function draw() {
  background(1,22,64);
  
  //Drawing the stars
   for (let star of stars) {
    star.show();
   }
  //Drawing the moon
  moon.show();
  
  //Drawing the rockets
  for (let i = 0; i < rockets.length; i++) {
    rockets[i].update();
    rockets[i].show();
  }
}

//Class making the randomized stars in the background
class Star {
  constructor(x, y, size) {
    this.x = x;
    this.y = y;
    this.size = size;
  }

  //Drawing the stars
  show() {
    stroke(255);
    strokeWeight(this.size);
    point(this.x, this.y);
  }
}

//Making the moon
class Moon {
  constructor(x, y, diameter) {
    this.x = x;
    this.y = y;
    this.diameter = diameter;
  }

  show() {
    //The main body
    noStroke()
    fill(254, 252, 215);
    ellipse(this.x, this.y, this.diameter, this.diameter);
    
    // Adding shadows
    fill(234, 232, 185);
    ellipse(this.x + this.diameter / 4, this.y, this.diameter / 2, this.diameter / 2);
    ellipse(this.x+5 - this.diameter / 4, this.y + this.diameter / 4, this.diameter / 2, this.diameter / 4);
  }
}


//Class making the rocket
class Rocket {
  constructor(x, y, velocity) {
    this.x = x;
    this.y = y;
    this.velocity = velocity;
  }

  update() {
    this.y -= this.velocity;
  }

  //Body of rocket
  show() {
    
    //Flames
    noStroke()
    fill(255,185,0)
    ellipse(this.x,this.y+35,20,60)
    
    //Side fins
    fill(30,144,255);
    arc(this.x,this.y + 36,40,40,PI,0,CHORD)
    
    // Body
    fill(255,0,0)
    ellipse(this.x,this.y,30,80)
    
    //Windows
    fill(255);
    ellipse(this.x,this.y-12.15,15)
    fill(255);
    ellipse(this.x,this.y+6.15,15)
    
    //Front fin
    fill(30,144,255);
    ellipse(this.x,this.y+32,5,30)
    
  }
}


I went through a creator’s block for a couple of days meaning I could not think what I should make for a project. Then one morning, during my CSO class, we watched a case study on a rocket ship: the Ariane 5. This gave me the idea of creating a rocket taking off into space as my project.

I’m especially proud of how my stars and rocket turned out. I always enjoyed looking at the night sky due to the presence of stars above and wanted to make sure the stars in my project would look at least somewhat pretty and I am quite happy with how they turned out. the rocket ship took some experimenting, but I finally settled on this design which gives a more cartoonish look, but I believe was the best one I made.

In the future, I can definitely add more by animating the flames in order to breath more life into the rocket. I also wanted to add sound effects, but I could not find any suitable sound effect for my rocket so ended up scrapping that idea though I am more than happy to revisit that in the future.

Assignment 3: OOP Generative Art

Concept:

I was very intrigued with our discussion last on chaotic pieces of art and as I walked around campus for inspiration for this assignment, I noticed that a lot of things in nature are quite chaotic. For instance, tree branches sprout in no particular order or even cobwebs have no particular pattern to them. I wanted to mimic my work through replicating these chaotic traits in nature.

Usually, I go over the top and add some cool interactivity or motion in my assignments, but this time I wanted to keep it simple and draw a still portrait so the viewer can take their time and digest the piece of art.

Thought Process and Code

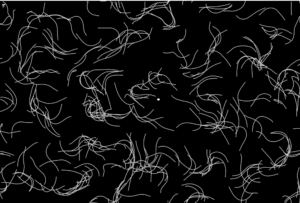
For this assignment, I decided to draw a chaotic cobweb. I found the shape at which webs were made quite random and intriguing, hence the reason why. Most of the time, spiders tend to make ordered shapes but sometimes it gets chaotic and completely random. I wanted to mimic that randomness.

My initial instinct was to simply draw a bunch of random lines all over each other and that each line would have a random length and random angle of rotation on the cavas when I draw them.

class Web { 
  constructor() {
    this.string_len = random(init_length/2, init_length);
    this.string_ang = random(init_angle/2, init_angle);
  }
  
  drawLines() {
    line(0, 0, 0, this.string_len);
    translate(0, this.string_len);
  }
}

Hence, I drew this, but the preview that came out was essentially just the screen covered. You couldn’t see any lines all you could see was a blank screen and even when I tried using the noLoop() function, it wouldn’t pause it at the correct frame.

Hence, I thought maybe I should add some initial structure to it, hence I created an InitializeWeb() function which would take in the initial number of lines, length of the lines and angle of the lines (all of which are global variables to which the user can change). This function essentially starts to create a bunch of “string” objects from the Web class to create the overall Web structure.

Like all cobwebs, there’s a focal point, so I translated to the center of the canvas and planned to draw an initial set of lines from the center (at random angles). I would do this by creating new objects called “string” of type Web which would have its length and angle parameters as per the constructor.

function setup() {
    createCanvas(600, 600);
    angleMode(DEGREES);
    noLoop();
}

function draw() {
    background(0, 0, 40);
    translate(width/2, height/2);
    InitializeWeb(init_length, init_num, init_angle);
}

function InitializeWeb(length, num, angle) {
    stroke(255, 80, 80);

    for (let i = 0; i < num; i++) {
      push();
      rotate(random(0, 360));    
      string = new Web(length, angle);
      Spread(string, length, angle);
      pop();
    }
}

Then I would draw the lines using the Spread() function where I continue to spread out lines throughout the canvas.

Ideally, I wanted this function to be inside the class as the variables and manipulations inside the function are to deal with the string object. However, it seems that p5js does not support recursion of functions within class definitions. Hence, I just created this function outside of the class.

Post Edit: I did not realize you could call the functions within a class through the “this” keyword, hence yes, you can use recursion of functions within classes. I was just unaware. In this case, I would use this.spread() as a function within the class rather than just another regular function.

function Spread(string, len, ang) {
  string.drawLines();
  
  len *= shrink_factor;
  ang = random(ang-30, ang+20);
  
  if (len > webbyness) {
        push();
        rotate(ang);
        Spread(string, len, ang);
        pop();

        push();
        rotate(-ang);
        Spread(string, len, ang);
        pop();
    }
}

The idea of Spread() is to recursively draw the lines and i’d continuously shrink the length of the lines by some factor. While the length isn’t bigger than a variable I like to call “webbyness” which is kind of like how thick the web structure is, then it will keep printing lines. Eventually, the canvas would be filled with a web like structure which is what I wanted to achieve.

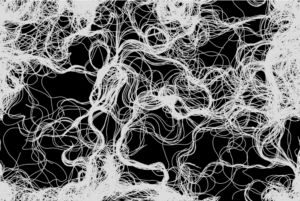
Final Piece:

Concluding Thoughts and Improvements:

Overall, I think the piece looks very chaotic and like I lot of emotion and things are going on in it. It replicates that cobweb like structure and evokes some strange emotion to it even though it’s a still image which actually makes me pretty happy.

I feel that perhaps the density of the webbyness could’ve been evenly distributed throughout the canvas as an improvement.

Also to add some sense of movement if I wanted to, perhaps add some blinking or glistening/fading effects to enhance the emotion and mystery that comes out of my piece.

HW3: Generative Art Using OOPs and Perlin Noise

Inspiration

This code is inspired by a video from “The Coding Train” channel on YouTube. The video shows how to create a flow field simulation using particles that follow the flow of a vector field.  It uses Object-Oriented Programming, arrays, and Perlin noise to create flow field particles that look very aesthetically pleasing.

Concept

The concept behind the flow field simulation is that particles move according to a vector field, which defines the direction and magnitude of the flow. The vector field is generated using noise, so that the flow is not predictable and creates a natural, organic look. The particles follow the flow field by calculating the angle of the vector at their current position, and adjusting their velocity and position accordingly.

Implementation

The implementation of the code involves creating a Particle class to represent each particle in the system. This class contains a number of methods to control the particle’s motion. The update() method updates the velocity and position of the particle based on its acceleration. The follow() method uses the particle’s current position to find the corresponding vector in the flow field and apply it as a force to the particle. The display() method draws a line from the particle’s current position to its previous position, and the updatePrev() method updates the previous position to be the current position. The resetParticles() method checks if the particle has gone out of bounds and wraps it back to the other side of the canvas if it has.

The main setup function generates the flow field and creates the particles. The flow field is generated by dividing the canvas into a grid of cells, and then generating a random vector for each cell. The number of columns and rows in the grid is calculated based on the size of the canvas and the scale factor, s. The setup() function also creates the particles by creating new instances of the Particle class and adding them to the particles array.

The draw() function updates the flow field and the particles. First, it updates the noise offset to create a smoothly changing flow field. Then, it loops through the grid and calculates a new angle for each cell based on the noise function. This angle is converted into a vector, which is stored in the flowfield array. Next, the function loops through the particles, and for each particle, it calls the follow() method to apply the corresponding flow field vector to the particle. Then, the update() method is called to update the particle’s velocity and position based on its acceleration. Finally, the display() method is called to draw the particle and the resetParticles() method is called to wrap the particle back to the other side of the canvas if it has gone out of bounds.

// Class for a particle that moves based on a perlin noise flow field
class Particle {
  constructor() {
    // Initial position of the particle at a random point on the canvas
    this.pos = createVector(random(width), random(height));
    // Initial velocity set to (0, 0)
    this.vel = createVector(0, 0);
    // Initial acceleration set to (0, 0)
    this.accel = createVector(0, 0);
    // Maximum speed that the particle can move
    this.maxV = 4;
    // Store the previous position of the particle
    this.prevPos = this.pos.copy();
  }

  // Follow the flow field vectors
  follow(vectors) {
    // Calculate the grid position of the particle
    let x = floor(this.pos.x / s);
    let y = floor(this.pos.y / s);
    let index = x + y * cols;
    // Get the force vector at that grid position
    let force = vectors[index];
    // Apply a force to the particle's acceleration
    this.accel.add(force);
  }
  
  // Update the position of the particle based on its velocity and acceleration
  update() {
    // Add the acceleration to the velocity
    this.vel.add(this.accel);
    // Limit the velocity to the maxV
    this.vel.limit(this.maxV);
    // Add the velocity to the position
    this.pos.add(this.vel);
    // Reset the acceleration to (0, 0)
    this.accel.mult(0);
  }

  // Display the particle as a line connecting its current and previous position
  display() {
    stroke(220);
    strokeWeight(1);
    line(this.pos.x, this.pos.y, this.prevPos.x, this.prevPos.y);
    this.updatePrev();
  }

  // Update the previous position of the particle
  updatePrev() {
    this.prevPos.x = this.pos.x;
    this.prevPos.y = this.pos.y;
  }

  // Check if the particle has gone outside the canvas and wrap it around if necessary
  particleReset() {
    if (this.pos.x > width) {
      this.pos.x = 0;
      this.updatePrev();
    }
    if (this.pos.x < 0) {
      this.pos.x = width;
      this.updatePrev();
    }
    if (this.pos.y > height) {
      this.pos.y = 0;
      this.updatePrev();
    }
    if (this.pos.y < 0) {
      this.pos.y = height;
      this.updatePrev();
    }
  }
}

Challenges

One of the challenges in this project was figuring out how to create a smooth flow field that changes over time. This was achieved by using the noise function to generate random values for each cell in the grid. By updating the noise offset in the draw() function, the flow field smoothly changes over time, creating a dynamic and interesting visual.

Another challenge was figuring out how to apply the flow field vectors to the particles in a way that creates a believable and visually appealing motion. This was achieved by dividing the canvas into a grid of cells and using the particle’s position to find the corresponding flow field vector. The particle’s velocity is then updated based on this vector, creating a believable motion that follows the flow of the flow field.

Reflection

This project was a fun and interesting exploration of particle systems and flow fields. By creating a simple system of particles that follow a flow field, it is possible to create a wide variety of dynamic and visually appealing patterns. The use of the noise function to generate the flow field allows for a high degree of control over the motion of the particles and the overall visual appearance of the system. This project was a valuable learning experience, and it has given me a deeper appreciation for the potential of particle systems and flow fields for creating dynamic, organic and engaging visuals using object-oriented programming, arrays, and Perlin noise.

Reference

Sketch Link: https://editor.p5js.org/swostikpati/full/-KXM2Ag3s

Assignment 3 – OOP Generative Art

In this assignment, I decided to create an abstract form of art. I started off with generating a dynamic art piece featuring circles that appear and disappear from the screen over time. To make them appear prettier, I made them multi-colored, translucent, removed their stroke, and gave them different sizes. To give the circles these characteristics, I made a separate circle class to continuously generate more circles and then start to delete them once their number reached greater than a hundred.

Once the basic step was achieved, I wanted to make the canvas and art more interactive. I decided to make the circles bounce off the edges of the canvas when the space bar is pressed while the initial effect is still maintained. To do this, I made a move function in the circle class which is activated when the Space Bar is pressed. This effect was achieved by reversing the speed when the circles touch the edge. However, it took me a while to refine the if condition to ensure the bouncing effect was clearly understandable.

The circles start off randomly placed on the canvas and move and bounce off the edges when the space bar is pressed. When the mouse is clicked, all the circles form a line and start to spin around the center of the canvas. The swirling motion of the circles and the changing colors could represent a tornado or a whirlwind, creating an abstract and mesmerizing image. As we discussed chaos and randomness in class, I wanted to create an art piece which had both these elements. The dynamic motion of the circles creates a sense of chaos and unpredictability, while the synchronized spinning adds a touch of order and harmony.

PRESS SPACE AND MOUSE CLICK TO INTERACT

One challenging aspect of this code is the mathematical calculation involved in the spinAround method. This method uses trigonometry to update the position of the circle based on its angle, ensuring that it spins smoothly around the center of the canvas. After trying multiple different way of making the circles spin, with the help of this formula that I found online, I was able to achieve the spinning effect. Keeping track of the angle, position, and movement of each individual circle is also a challenge, but the use of classes and arrays helped to solve this problem. I really enjoyed making this art piece and therefore kept adding more interactivity to better understand these fundamentals.

OOP – Aigerim

Inspiration

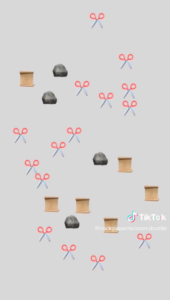
For this assignment, I recreated my own version of the Rock, Paper, Scissors game I saw on TikTok. Having spent a little too much time watching it, I wanted to create my own version of it that is scalable and in which the simulation can be played over and over again.a simulation of rock paper scissors game

The Product

Overall, I am very happy with the outcome. The code design underwent many changes as I added new features and removed the useless ones, for example, I started off with 3 different classes for Rock, Paper, and Scissors but realized that the code was a bit redundant and reduced it to one Obj class.

Challenges

//function to check for collision of two objects (thisO and all the other objects)
function checkCollision(thisO) {
  for (let i = 0; i < obj.length; i++) {
    //check the distance between the two objects
    let d = dist(thisO.x, thisO.y, obj[i].x, obj[i].y);
    //if the two objects are within close proximity and are not the same apply the rock paper scissor rules
    if (d <= thisO.size / 2 + obj[i].size / 2) {
      //thisO.dx = -thisO.dx;
      //thisO.dy = -thisO.dy;
      //obj[i].dx = -obj[i].dx;
      //obj[i].dy = -obj[i].dy
      if (obj[i].id == "📄" && thisO.id == "🗿") {
        thisO.id = "📄";
      } else if (obj[i].id == "✂️" && thisO.id == "📄") {
        thisO.id = "✂️";
      } else if (obj[i].id == "🗿" && thisO.id == "✂️") {
        thisO.id = "🗿";
      }
    }
  }
}

One of the biggest challenges was figuring out how to detect the collision between my objects, for which I ended up calculating the distance between all the objects at a given time and checking if that distance is less than the radius of my object. Another challenge is to make the collisions smooth without having two objects cross each other, which I am yet to work out. Apart from that, it was a really fun project to work on, and very entertaining to see which one will win every time I run it!

Assignment 3: Generative Art!

Concept

For the Third Assignment, my aim was to incorporate everything we have learned in class such as Arrays, collisions, and Classes, and use it to create an engaging piece of art. Initially, I planned to create a intricate animation, but realized that it was beyond the scope of the assignment. So, I settled on creating an animation that would pique the viewer’s interest and leave them wondering about how it was created.

I started off with replicating an in-class example of dropping snowflakes, which were reproduced, and I thought of replacing that with colored circles over a black background. This did look interesting, but seemed a bit basic – the circles were originally only rebounding from the walls (edges of the canvas). So I developed it further such that they collide with each other and exchange their speeds to seem interesting. Then, developing it further, I added a Neon Image on top of it and exchanged the images on collision as well.

I achieved a mixture of Chaos, but order. Everything had its set path – an order to follow. However, a lot of order among multiple objects that were not coordinated amongst each other caused Chaos. This is something I drew as an inspiration from an in-class discussion.

Embedded Canvas

The assignment outcome is attached as an embedded sketch as follows:

Try pressing the ‘m’ key! (In case it does not work, make sure to have clicked on the canvas)

Code

// Note: Press 'm' to view a messy functionality

let circles = []; //Array to store the circles
let noCircles = 20; //Number of circles that appear on the screen
let messup=false; //To enable the messy functionality

//Function to preload the graphics. This would load all the graphics before the setup function is run
function preload() {
  purple_img = loadImage('purple.png');
  green_img = loadImage('green.png');
  red_img = loadImage('red.png');

}

function setup() {
  createCanvas(400, 400);

  // Create objects of the class Circle and store them in an array
  for (let i = 0; i < noCircles; i++) {
    // A random positioning and size of each circle     
    let r = random(10, 30);
    let x = random(0, width-2*r);
    let y = random(0, height-2*r);


    // Check if a circle with the same position and size already exists
    let overlap = false;
    for (let j = 0; j < circles.length; j++) {
      let distance = dist(x, y, circles[j].x, circles[j].y);
      if (distance < r + circles[j].r) {
        overlap = true;
        break;
      }
    }

    // If there is no overlap, create a new circle
    if (!overlap) {
      circles[i] = new Circle(x, y, r);
    } else {
      i--;
    }
    
    // The above code blocks avoid any colliding circles being drawn in the initial stages
    
  }
}

function draw() {
  background(0);

  // Display objects in the array and update their position
  for (let i = 0; i < circles.length; i++) {
    circles[i].update();
    circles[i].display();

    // Check for collisions between circles
    for (let j = i + 1; j < circles.length; j++) {
      if (circles[i].collidesWith(circles[j])) {
        // If the messup functionality has been set, a different collision resolve function is called
        if (messup==true){
          circles[i].resolveCollisionWeird(circles[j]);
        }
        else{
          circles[i].resolveCollision(circles[j]); 
        }
      }
    }
  }
}

// Circle object
class Circle {
  constructor(x, y, r) {
    this.x = x;
    this.y = y;
    this.r = r;
    this.speed = random(1, 5);
    this.dx = random(-this.speed, this.speed);
    this.dy = random(-this.speed, this.speed);
    // A Number that checks the image_type to choose from the 3 types that we have
    this.image_type = int(random(1,4));
  }

  
  display() {
    // The circle image is displayed, depending on the image it got allotted in the constructor
    if(this.image_type%3==1){
      image(green_img, this.x, this.y, this.r*2, this.r*2);
    }
    else if(this.image_type%3==2){
      image(purple_img, this.x, this.y, this.r*2, this.r*2);
    }
    else{
      image(red_img, this.x, this.y, this.r*2, this.r*2);
    }
  }

  update() {
    this.x += this.dx;
    this.y += this.dy;

    // Check for collisions with the edges of the canvas
    if (this.x + this.r*2 > width || this.x < 0) {
      this.dx = -this.dx;
    }
    if (this.y + this.r*2 > height || this.y < 0) {
      this.dy = -this.dy;
    }
  }

  // Checks for collision with one another
  collidesWith(other) {
    // Calculates the distance between the current object and other objects
    let distance = dist(this.x, this.y, other.x, other.y);
    // If it is less than a threshold, it has collided!
    return distance < this.r + other.r;
  }

  // Once a collision is detected from the above function, the following function is called. It changes the speed of each, changes the image type with the other
  resolveCollision(other) {
    let tempX = this.dx;
    let tempY = this.dy;
    this.dx = other.dx;
    this.dy = other.dy;
    other.dx = tempX;
    other.dy = tempY;
    other.image_type = this.image_type;
  }
  
  // The following block of code was a modification of the above function which did not seem to work as I wanted it to, however it actually did something more artsy and interesting that I wanted to keep it as a hidden functionality to play with!  
  resolveCollisionWeird(other) {
    let angle = atan2(other.y - this.y, other.x - this.x);
    let overlap = 
        (this.r + other.r) - dist(this.x, this.y, other.x, other.y);
    this.x += cos(angle) * overlap / 2;
    this.y += sin(angle) * overlap / 2;
    other.x -= cos(angle) * overlap / 2;
    other.y -= sin(angle) * overlap / 2;
    
    let tempX = this.dx;
    let tempY = this.dy;
    this.dx = other.dx;
    this.dy = other.dy;
    other.dx = tempX;
    other.dy = tempY;
  }
  
}

// In the case that the key 'm' is pressed, the collision works differently.
function keyPressed(){
  if (key == 'm'){
   messup=true; 
  }
}


Problems

A small problem that I ran into was an issue where some of the images were colliding up to a point where an overlap could be observed. Since I started off with ellipses instead of the images, I was using their centre as a reference point, however, changing that to an image caused a shift in the reference point, which was now the top left of the image. This caused multiple issues including the one mentioned in the beginning of this paragraph.

It may not be noticeable to everyone, however I tried to resolve the issue and instead came up with something chaotic. You can press ‘m’ to see that!

The full canvas is linked here.

Week 3: Generative Art using OOP

Concept

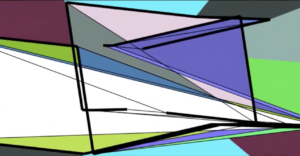
For this assignment, I was inspired by the piece we looked in class by Manfred Mohr, titled “space.color.motion”, that showed the projection of higher dimension object in 2D.Link to the artwork: space.color.motion

I did not implement any mathematical functions, simply because I am not aware of them, but I tried mimicking the actions of the shape. It did turn out to be completely different, but the properties of the shapes are somewhat retained in my approach like the overlapping of shapes onto the other and the change in shape. Some properties I added in was the varying opacity of the shape color and the rotation of the shapes.

Code

As part of the requirement for the assignment, I used a class called Shape which has parameters that represent four points for a quadrilateral. These points are random and create a random quadrilateral on the canvas. The display() function creates the quadrilateral and fills in a random color and a random stroke weight to the shape. The color has varying opacity, which I implemented through the .setAlpha in-built function for color. Finally, the rotate_() function rotates the shape with the axis of rotation at position (0, 0).

class Shape {
  constructor() {
    // the shape is a quadrilateral, so require four points.
    // these points are random and one is in the range of 'vary' with respect to one another.
    this.x1 = random(width);
    this.y1 = random(height);
    this.x2 = random(this.x1 - vary, this.x1 + vary);
    this.y2 = random(this.y1 - vary, this.y1 + vary);
    this.x3 = random(this.x2 - vary, this.x2 + vary);
    this.y3 = random(this.y2 - vary, this.y2 + vary);
    this.x4 = random(this.x3 - vary, this.x3 + vary);
    this.y4 = random(this.y3 - vary, this.y3 + vary);
    
    // random color for the shape.
    this.clr = color(random(255), random(255), random(255));
    
    // random stroke weight for the shape
    this.strWeight = random(2, 7);
    
    // changes the opacity of the shape to a random value. Gives a glass-like illusion to the shape
    this.clr.setAlpha(random(255));
  }
  
  display() {
    strokeWeight(this.strWeight);
    fill(this.clr);
    
    // Creating a quadrilateral.
    quad(this.x1, this.y1, this.x2, this.y2, this.x3, this.y3, this.x4, this.y4);
  }
  
  rotate_() {
    // stops the rotation when the mouse is clicked as the angle becomes constant
    if (!mouseIsPressed) {
      angle+=0.00001;
    }
    rotate(angle);

  }
}

I tried to mimic the movement of the edges as in the original, but it proved to be very difficult. I smoothened the movement with the use of noise, and rotated the objects so that we get varied shapes and images.

Notice that the rotate_() function rotates the objects only if the mouse is not pressed. If we press the mouse, the shapes stop rotating and start jittering. The shape changes its shape randomly. This random movement comes from the combination of noise and random functions with a change in the sign of the movement. If the sign is negative, the points would move left or up, and if the sign is positive, the points would move right or down. However, this movement is restricted to certain extent, such that the shapes do not move too far away from the visible part of the canvas. This was implemented with the following limit_point function.

function limit_point(i) {
    // limits the movement of the point. It keeps the shape with in a random range of 100 to 200 pixels of the canvas. In other words, it does not let the corners of the shape go beyond the canvas width or height plus some pixels in the range 100 to 200.
    if ((shapes[i].x1 > width + random(100, 200)) || (shapes[i].x1 < 0  - random(100, 200))) {
      sign_x1 *= (-1);
    }
    if ((shapes[i].y1 > height + random(100, 200)) || (shapes[i].y1 < 0 - random(100, 200))) {
      sign_y1 *= (-1);
    }
    
    // does the same random movement for another point/corner of the shape
    shapes[i].x2 += noise(random(-jitter+93, jitter+88)) * sign_x2;
    shapes[i].y2 += noise(random(-jitter+10, jitter)) * sign_x2;
    if ((shapes[i].x1 > width + random(100, 200)) || (shapes[i].x2 < 0 - random(100, 200))) {
      sign_x2 *= (-1);
    }
    if ((shapes[i].y1 > height + random(100, 200)) || (shapes[i].y2 < 0 - random(100, 200))) {
      sign_y2 *= (-1);
    }
    
    // does the same random movement for another point/corner of the shape
    shapes[i].x3 += noise(random(-jitter+89, jitter+23)) * sign_x3;
    shapes[i].y3 += noise(random(-jitter+45, jitter+48)) * sign_y3;
    if ((shapes[i].x1 > width + random(100, 200)) || (shapes[i].x3 < 0 - random(100, 200))) {
      sign_x3 *= (-1);
    }
    if ((shapes[i].y1 > height + random(100, 200)) || (shapes[i].y3 < 0 - random(100, 200))) {
      sign_y3 *= (-1);
    }
    
    // does the same random movement for another point/corner of the shape
    shapes[i].x4 += noise(random(-jitter+5, jitter+88)) * sign_x4;
    shapes[i].y4 += noise(random(-jitter+76, jitter+34)) * sign_y4;
    if ((shapes[i].x1 > width + random(100, 200)) || (shapes[i].x4 < 0 - random(100, 200))) {
      sign_x4 *= (-1);
    }
    if ((shapes[i].y1 > height + random(100, 200)) || (shapes[i].y4 < 0 - random(100, 200))) {
      sign_y4 *= (-1);
    }
}

This function takes in the index of the shapes array as an argument and limits the points of a quadrilateral with in a random range of 100 to 200 pixels from the edges of the canvas.

The draw function then simply runs all the functions on the shapes created in the setup function.

function draw() {
  background(123);
  
  for (let i = 0; i < shapes.length; i++) {
    
    // displays all the shapes
    shapes[i].display();
    
    // rotates all the shape with respect to (0,0)
    shapes[i].rotate_();
    
    // limit the movement of the points of a shape
    limit_point(i);
  }
}

The background was chosen such that the shapes would pop out and as an aesthetic measure. As part of the interactivity in the project, I added the functionality of adding new shape whenever a mouse click is registered. The shape created has a random position and might not be visible on the canvas right away but is created and is visible when the canvas rotates.

function mouseClicked() {
  // creating a new shape when the mouse is clicked
  shapes[shapes.length] = new Shape();
}

Further improvements

While I was trying to rotate the objects, I tried to rotate them such that all the shapes rotated with a different axis. However, the implementation using the push() and pop() function did not work as expected. This could be one of the improvements I could make in the future.

The inspiration for the project had very smooth movements, while mine is not as smooth. I could work on the smoothness as well.