
Inspiration/idea:
This idea came from me really missing my dog back home:(
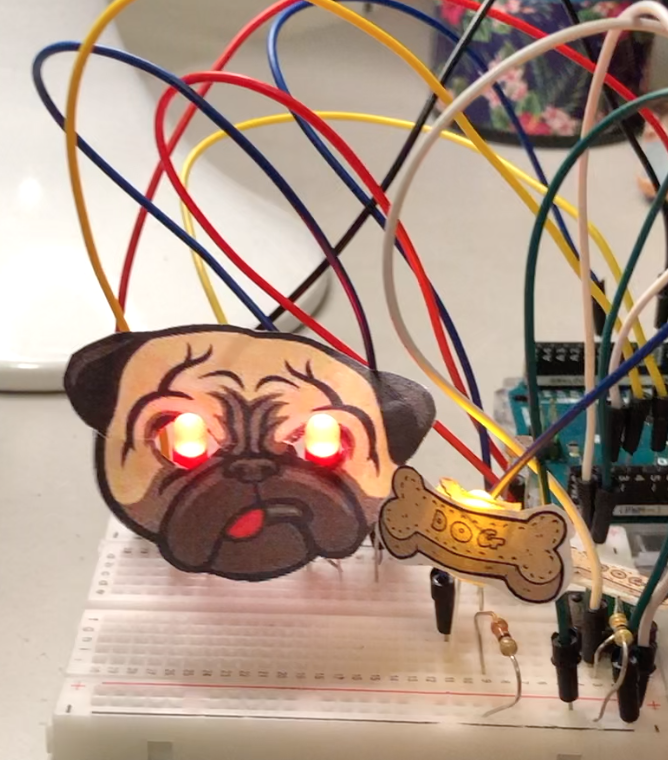
If you are a dog owner you know they get really upset/angry when you stop petting them/being near to them. So I decided to use the ldr sensor (analog sensor) to imitate the motion of petting/being near to the dog. The dogs eyes start being lit up with red led light which portray the dogs anger, then when you get closer and touch the ldr sensor the dogs eyes stop glowing (he stops being mad). The touching of the sensor is like touching or petting the dog. Another option to make the dogs eyes stop glowing is giving him a treat which is portrayed using a yellow led light, when you click on the button (digital sensor) you give the dog the treat so his eyes stop glowing and he isn’t upset anymore!
Process:
First of all I wanted to get the more difficult part of the process out of the way which is the ldr. I used the basic way to make an ldr, and followed the steps on our blog. Then I used constrain (map) in order to get the led lights to dim and brighten up all the way. Where I map the values from half the max until the max of the photocell readings into 0 -> 255 so that as they increase the brightness increases, and constrain that within 0 to 255. hence fulfilling the analog fashion needed for the project. This is the video of the ldr sensor working alone before continuing the rest of the project.
I also extrapolated the power and the ground to the rest of the board using two jumper wires, in order to give myself extra space to work with. There I put the button digital switch to control the idea of the treat. The button is used to switch off the eyes as well and the yellow led with the treat on it, hence presenting the digital fashion needed for the project.
Finishing touches:
In order to show the story in a more creative way, I printed out images of the dog and the bone and made the led lights to be the eyes of the dog. And stuck the image of the bone to the yellow led light and the button itself to make it clear that pressing the button means giving the dog a bone.
Struggles:
First of all, I face a struggle in the beginning where my ldr sensor was not working at all, I talked to professor Aaron about it and it turns out the actual ldr was not working so I substituted it for another one and it worked, this took up a lot of my time. Another problem I faced was that I couldn’t get the leds to work with the ldr and button simultaneously, then I was able to figure it out by adding the analog write and digital write in an if statement as seen below:
int currentButtonState = digitalRead(buttonPin);
Serial.println(currentButtonState);

  // if the button is currently being prssed down, AND during the last frame is wasn't pressed down
  if (currentButtonState == HIGH && prevButtonState == LOW) {
      // flip the LED state

       ledState1 = !ledState1;
    ledState2 = !ledState2;
  }
      if (ledState1 == HIGH && ledState2 == HIGH) {           //if the bulbs were previously off then were turned on by button

      int ldrValue =analogRead(A0);                  //store reading from photocell
      int brightness = constrain( map(ldrValue, 596, 850, 0, 255), 0, 255);       //map the values from half the max until the max of the photocell readings into 0 -> 255 so that as they increase teh brightness increases, and constrain that within 0 to 255

Serial.println(ldrValue);

    analogWrite(ledRight, brightness);             //change output of sun bulb accordingly
    analogWrite(ledLeft, brightness);
    digitalWrite(ledPin, ledState2);//change output of moon bulb accordingly
    }
 else {
    digitalWrite(ledRight, ledState2);
    digitalWrite(ledLeft, ledState2); //make bulbs's state = LOW, hence turned off
    digitalWrite(ledPin, ledState2);

    }

    prevButtonState = currentButtonState;
Also, another struggle I face was that the led light was not dimming and lighting up the way I wanted it to, in order to fix that I used constrain(map) and added the values I needed in order to make the led fully light up and dim down with the ldr.
Final result:
Code:
int buttonPin = 2;

int ledPin = 6;


int prevButtonState = LOW;


int brightness;
int ledLeft = 3;
int ledRight = 5;
int ledState1;
int ledState2;


void setup() {


 pinMode(ledPin, OUTPUT);

pinMode(ledRight,OUTPUT);
pinMode(ledLeft,OUTPUT);
pinMode(buttonPin, INPUT);
Serial.begin(9600);
}

void loop() {


delay(20);


int currentButtonState = digitalRead(buttonPin);
Serial.println(currentButtonState);

  // if the button is currently being prssed down, AND during the last frame is wasn't pressed down
  if (currentButtonState == HIGH && prevButtonState == LOW) {
      // flip the LED state

       ledState1 = !ledState1;
    ledState2 = !ledState2;
  }
      if (ledState1 == HIGH && ledState2 == HIGH) {

      int ldrValue =analogRead(A0);                  //store reading from photocell
      int brightness = constrain( map(ldrValue, 596, 850, 0, 255), 0, 255);       //map the values from half the max until the max of the photocell readings into 0 -> 255 so that as they increase teh brightness increases, and constrain that within 0 to 255

Serial.println(ldrValue);

    analogWrite(ledRight, brightness);
    analogWrite(ledLeft, brightness);
    digitalWrite(ledPin, ledState2);
    }
 else {
    digitalWrite(ledRight, ledState2);
    digitalWrite(ledLeft, ledState2);
    digitalWrite(ledPin, ledState2);

    }

    prevButtonState = currentButtonState;


  }