Assignment #3 – Code – ☆Manic! At The Disco☆

For this assignment, I wanted to create a visual experience inspired by orange, purple, pink, and yellow club lights:

I love how the lights all stem from one source, but I did not want to limit myself to that, so I thought I could create some sort of tridimensional effect with trailing that could better represent the “feeling” of experiencing those club lights.

So I created a line class and made 10 lines (with bezier curves) that all begin at (0,0) with varying speeds. I also lowered the background alpha to 10, as transparency allows for trails, which I wanted in order to create this dynamic effect. I tried multiple shapes, but ended up opting for bezier curves. The points for the bezier curves all follow the same line, which is why there is no “curve” per se. However, the movement of the bezier curves looked much nicer than that of the lines, which is why I chose that. The bezier curves also emphasized the 3D effect better than the lines.

Every once in a while, then, the lines meet around the top corner, reproducing the effect of disco lights, before each going their own way once again:

For the colors, I created an array of five different colors which I then incorporated into a linear interpolation function in order to create a gradient:

With the help of ChatGPT, I set two data points, “this.currentColorIndex” and “this.nextColorIndex”. For the first, I randomized from the array so that the first color of each line varies. The second data point set the following color, incrementing the index of the previous “current” color by 1, ensuring that the “next” color that appears depends on the previous color.

this.currentColorIndex = floor(random(colors.length)); // set the starting color of each line as a random color from the "colors" array
this.nextColorIndex = (this.currentColorIndex + 1) % colors.length; // ensure the "next" color for each line depends on the initial randomized color
this.lerpAmount = 0; // begin with no interpolation

Then, in the display function inside the class, I set three variables: “currentColor”, “nextColor”, and “displayColor”, in which I set the data from above. The first two variables are then implemented in the third, which is itself incorporated in the stroke function. Altogether, this is what allows the lines to be displayed in the different colors.

display() {
  let currentColor = color(colors[this.currentColorIndex]); // setting the "current" color variable
  let nextColor = color(colors[this.nextColorIndex]); // setting the "next" color variable
  let displayColor = lerpColor(currentColor, nextColor, this.lerpAmount); // setting the "display" color variable
  stroke(displayColor);
  strokeWeight((this.x + this.y) / 40);

Finally, I created a last function called “updateColor” in which I set the linear interpolation amount and create an “if” function for it to reset (and hence for the colors to keep varying).

updateColor() {
    this.lerpAmount += 0.04; // linear interpolation amount to define the speed of the transition

    if (this.lerpAmount >= 1) { // when linear interpolation amount exceeds 1, reset it to 0
      this.lerpAmount = 0;
      this.currentColorIndex = this.nextColorIndex;
      this.nextColorIndex = (this.nextColorIndex + 1) % colors.length;

Overall, I really enjoyed creating this code. It was definitely hard as last week’s material was a bit dense, but it was good practice. I wanted to incorporate an “if mousePressed” function for the colors to change to a different color palette, but for some reason, it would lag after some time and the sketch would just freeze. That is something I would like to work on for another time, though!


Assignment 3 – Laser Skull

Inspiration:

I was inspired by a game that I used to play a few years ago: Quadropus Rampage. In the game, the final boss, which I unfortunately still could not defeat, is a head that can shoot laser to attack. Here is an illustration:

Therefore, I wanted to make something similar and I went for the skull. Similar to the first assignment of making a portrait, I made the skull using simple shapes available in p5.js. Then, I transformed the code into the class Skull so that I can easily manipulate the size of the skull as well as its position.

Next, I added the laser shooting from the skull eyes. I created a laser function in the Skull class and draw a line from the skull’s eyes position to the mouse position. The skull will only shoot laser if the mouse is pressed. Below is the code for the Skull class:

class Skull {
  constructor(posX, posY, scaleObj) {
    this.posX = posX;
    this.posY = posY;
    this.scaleObj = scaleObj;
    this.dirX = 2;
    this.dirY = -1;
  }
  
  //skull drawing
  show() {
    
    //head
    drawingContext.shadowBlur = 0;
    strokeWeight(0);
    fill("cyan");
    ellipse(
      this.posX * this.scaleObj,
      this.posY * this.scaleObj,
      100 * this.scaleObj,
      60 * this.scaleObj
    );
    rectMode(CENTER);
    rect(
      this.posX * this.scaleObj,
      (this.posY + 30) * this.scaleObj,
      70 * this.scaleObj,
      25 * this.scaleObj
    );

    //skull eyes
    fill("black");
    circle(
      (this.posX - 20) * this.scaleObj,
      this.posY * this.scaleObj,
      15 * this.scaleObj
    );
    circle(
      (this.posX + 20) * this.scaleObj,
      this.posY * this.scaleObj,
      15 * this.scaleObj
    );
    
    //skull mouth
    fill("black");
    rect(
      this.posX * this.scaleObj,
      (this.posY + 33.5) * this.scaleObj,
      3.5 * this.scaleObj,
      18 * this.scaleObj
    );
    rect(
      (this.posX - 15) * this.scaleObj,
      (this.posY + 33.5) * this.scaleObj,
      3.5 * this.scaleObj,
      18 * this.scaleObj
    );
    rect(
      (this.posX + 15) * this.scaleObj,
      (this.posY + 33.5) * this.scaleObj,
      3.5 * this.scaleObj,
      18 * this.scaleObj
    );
  }
  
  //laser starts from the eyes
  laser(x, y) {
    stroke("white");
    strokeWeight(4);
    drawingContext.shadowBlur = 10;
    drawingContext.shadowColor = color("red");
    line((this.posX - 20) * this.scaleObj, this.posY * this.scaleObj, x, y);
    line((this.posX + 20) * this.scaleObj, this.posY * this.scaleObj, x, y);
  }
  
  //constant movement
  update() {
    if (this.posX * this.scaleObj > width || this.posX < 0) {
      this.dirX *= -1;
    }
    if (this.posY * this.scaleObj > height || this.posY < 0) {
      this.dirY *= -1;
    }

    this.posX += this.dirX;
    this.posY += this.dirY;
  }
}

Furthermore, I reused the Ball class in the previous class to make this as an interactive experience. Every time the skull successfully shoot down 1 ball, a new ball will appear and the background color will randomly change.

Also, since I wanted to add the scale much later on, I have to add it for every function I used which is quite time consuming. Therefore, I think for every class I will add a scale component just in case I want to change any dimension.

Reflection:

I want to add much more interactivity such as users can control the skull by mouse. Furthermore, I want to add obstacles and enemies to the game so that it can be more similar to the game that I played.

Below is the canvas:

Assignment 3 – Reading on Interactivity

I found myself pleasantly surprised by the author’s voice throughout the text. This was definitely not something I expected from an academic text. The exploration of the concept of “interactivity” really got me thinking on if my understanding the idea with the text.

I was unsurprised that a fridge was considered interactive. I always assumed that there are definitely different levels to interactivity, and although a fridge would be on the lower spectrum of that, the fact that it is there, and you can do stuff with it make it, like anything else, interactive. Even a rock can be interactive if you put your mind (or muscle) to it.

In the end, I think I disagree with the author’s idea of what interactive is. I don’t think there needs to be two living things for interaction to take place. In fact, even a non-living thing can interact with something living, such as the case for a virus. Even more so, we see interaction between humans and AI on a level which the author’s definition does not account for.

In the end, perhaps the term “interactive” needs some reevaluation in today’s context. Maybe AI stands as the true form of non-human interaction, while everything else falls somewhere on a spectrum between participation and genuine engagement.

Week 3 Reading Response: Don’t Just Hear, Listen. Don’t Just Look, Watch.

Chris Crawford’s “The Art of Interactive Design” was such a mind-engaging reading for me. While exploring the text, I noticed a specific emphasis on how a work or piece of art is interactive. It’s not a simple yes or no anymore, it’s about the intensity of interactiveness. Whether a text engages you mentally or physically. Crawford’s insights into user interface design and player psychology have broadened my understanding of the complexities involved in creating interactive experiences. The text made me start recalling all the previous conversations I’ve ever had, and what I could have done to be more interesting in replying or holding a talk. It has prompted me to reconsider the role of storytelling in ways that are beyond normal talking or hand gestures.

I also think Crawford’s extensive experience in the video game industry justifies his perspectives. Studying the mind of a player, I see that it aligns with how users interact with digital interfaces in today’s cutting-edge technology. However, while the text is informative, I feel as though there might be a lack of some principles being discussed in the interactive design contexts. Moreover, Crawford’s specialization in the video game industry enriches the text with practical examples and specific insights, and it may also introduce a bias towards gaming viewpoints. I am left questioning whether the principles outlined are universally applicable or if adaptations are necessary for different interactive design contexts.

Assignment 3 – Fireworks

This project draws inspiration from the visual spectacle of fireworks displays, aiming to simulate the explosive bursts of color and light seen in real fireworks shows.

Overall Concept:
The artwork aims to simulate the vibrant and dynamic nature of fireworks displays. Each burst of particles represents a fireworks explosion, with colorful particles shooting outwards and leaving behind fading trails. The animation creates a mesmerizing display reminiscent of real fireworks shows.

Special Functions:

  1. setup(): Initializes the canvas and sets up the environment for drawing.
  2. draw(): Continuously updates and renders the scene, creating the effect of fireworks bursts.
  3. createParticles(): Generates new particles to simulate fireworks bursts.
  4. updateAndDisplayParticles(): Updates and displays the existing particles, including their movement and trails.
  5. createRandomVector(min, max): Helper function to create a random vector within a given range.
  6. createRandomColor(): Helper function to generate a random color for the particles.
  7. createRandomTrailColor(baseColor): Helper function to create a random trail color based on the base color of the particles.
  8. Particle class: Represents a single particle in the simulation. Includes methods for updating its position, displaying the particle, displaying its trail, and checking if it’s visible within the canvas.

Problems Encountered:

  • Ensuring smooth performance while maintaining a large number of particles.
  • Balancing the appearance of the particles and their trails to achieve a visually appealing effect without overwhelming the viewer.
  • Managing the lifespan of particles and their trails to prevent excessive resource consumption.

Assignment 3 (production 3) – Windows desktop!

The nostalgic interactive window displays and desktop backdrops that many of us cherish from our early years serve as the inspiration for this digital artwork assignment. My creative imagination has been deeply impacted by the joy and simplicity of those early interactive experiences, where one could lose hours exploring the graphical user interfaces of outdated operating systems and watching screensavers. This project started as an exercise in the classroom where we were to animate some balls and make them travel around the screen to look like they were bouncing off its edges. This exercise inspired me to create something new and dynamic that is similar to the old screens, while also bringing back fond memories of them.

I wanted to create an experience that would preserve the spirit of the effervescent Windows screensaver while adding contemporary interactive aspects. The idea was to design a dynamic canvas that, in response to human interaction, fills with bubbles, creating a lively and entertaining space evocative of a screensaver.


I wanted the bubbles to appear anytime the mouse was touched to make it more interactive. Therefore, I employed a mouse-press function that, based on the mouse’s position on the cavas, produced bubbles. Then, in order to make the entire piece more dynamic and creative—just as I was fascinated by the Windows screen when I was a youngster, so too would this pique kids’ interest in the labor of love that goes into creating it—I randomized a number of factors, including size, pace, and even the colors of the bubbles.

The code that I have is a lot similar to the one we had in class the only changes that I did is that I created an array to hold all the randomly generated bubbles in. This is the Bubbles file that has the class that generates the bubbles:

class Ball {
  // Constructor to initialize new Ball
  constructor(x, y, xspeed, yspeed, size) {
    this.x = x; // Ball x-coordinate
    this.y = y; // Ball y-coordinate
    this.xspeed = xspeed; // Ball speed in x-direction
    this.yspeed = yspeed; // Ball speed in y-direction
    this.size = size; // Diameter of ball
  }

  // Method to update ball position based on its speed
  move() {
    this.x += this.xspeed; // Update x-coordinate by x-speed
    this.y += this.yspeed; // Update y-coordinate by y-speed
  }

  // Method to change ball direction if it hits the canvas wall
  bounce() {
    // Checks if ball hits left or right edge of canvas
    if (this.x + this.size/2 > width || this.x - this.size/2 < 0) {
      this.xspeed *= -1; // Reverse x-direction speed
    }
    // Checks if ball hits top or bottom edge of canvas
    if (this.y + this.size/2 > height || this.y - this.size/2 < 0) {
      this.yspeed *= -1; // Reverse y-direction speed
    }
  }

  // Method to display ball on canvas
  display() {
    stroke(255); 
    strokeWeight(0); 
    fill(random(255), random(255), random(255)); // Sets fill color to random color
    ellipse(this.x, this.y, this.size, this.size); // Draws ellipse with specified size
  }
}

Then, I had the createBubble function in draw() so that every bubble that is created is randomized over and over again. This is the code for that:

// Initializes empty array to hold all Balls 
let balls = []; 


function setup() {
  createCanvas(600, 600); 
}


function draw() {
  background(0); 
  
  // Loops through each ball in balls array
  for (let ball of balls) {
    ball.move(); 
    ball.bounce(); 
    ball.display(); 
  }
}


function mousePressed() {
  createBall(); // Calls createBall function to create new Ball 
}


function createBall() {
  // Sets new ball's position to current mouse position
  let x = mouseX; 
  let y = mouseY;
  // Generates a random speed for new ball in both x and y directions
  let xspeed = random(-5, 5); 
  let yspeed = random(-5, 5);
  // Generates random size for new ball
  let size = random(10, 50); 

  // Creates new Ball object with specified parameters and adds it to balls array
  balls.push(new Ball(x, y, xspeed, yspeed, size));

I think a way to make this even better is to make the bubbles look more realistic like the bubbles in the windows server.

Assignment 3: UP! House by Sihyun Kim

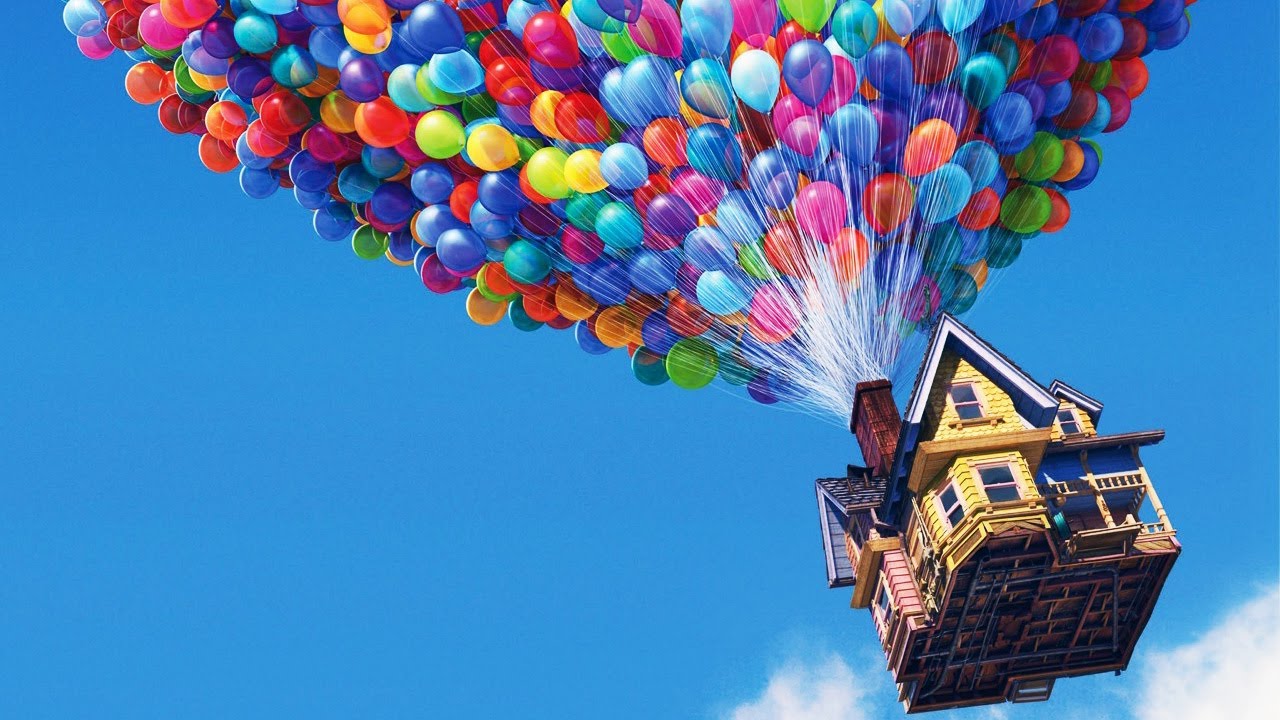
As soon as I saw the instructions for this assignment that I have to utilize object-oriented programming and arrays, I thought of depicting balloons. More specifically, I reminded myself of the flying house of the Pixar movie called “Up” released in 2009. So, inspired by the flying house in this movie, I decided to recreate the flying house in this assignment. Attached below is the image of a flying house from “Up” which I was inspired by. 
For this assignment, I have created 3 classes, which were Balloon, House, and Cloud class. Each class contains attributes and functions needed for each object to be created.  

Balloon Class

class Balloon {
  constructor(x, y, height, colors) {
    this.balloonPosition = createVector(x, y); //position of the balloon saved as a vector for convinience
    
    this.balloonHeight = height; // height of the balloon
    
    this.balloonWidth = height * 0.8; //width of hte balloon; maintaining the balloon shape through making height is greater than the width
    
    this.balloonLift = createVector(0, -random(0.5, 1.5)); // random variable in between 0.5 to 1.5 for lifting the balloon
    
    this.balloonColor = random(colors); //picking the color of the balloon randomly from the color array
    
//determining the tilt factor of the ballon based on the x position of the balloon
    if (x < 180) {
      this.tilt = random(-PI / 8, -PI / 18); // tilting towards left
    } else if (x > 200) {
      this.tilt = random(PI / 18, PI / 8); //tilting towards right
    } else {
      this.tilt = 0;// does not tilt
    }
  }
  
  drawString(chimneyY){
    stroke(220);// color of the balloon string
    strokeWeight(1); //thickness of the string
    
    //setting up a reference point for rotation (bottom center)
    let x0=0; //x-coordinate of the bottom center relative to the (not tilted)balloon's center
    let y0=this.balloonHeight/2;// y-coordinate of the bottom center below the (not tilted) balloon's center
    
    //getting the rotated x and y coordinates of the center of the tilted balloon by applying the rotate formula 
    let rotatedX = x0 * cos(this.tilt) - y0 * sin(this.tilt);
    let rotatedY = x0 * sin(this.tilt) + y0 * cos(this.tilt);
    
    //Adding the rotatedX value to the original position of the balloon to obtain where to start the balloon's string
    let stringStartX= this.balloonPosition.x+rotatedX
    let stringStartY= this. balloonPosition.y+rotatedY
    
    //drawing the string
      line(stringStartX, stringStartY, 174,chimneyY-100)// the end of the string will be the same to show that the string is connected to the chimney 
    
    //  variables for drawing the knots(triangle)
    
    let baseSize= 50 // base size for the largest balloon
    let adjustment = (this.balloonHeight/baseSize)*5// changing the adjustments based on the size of the relative size of the balloon
    
    //calculating the triangle vertices by the balloon size 
    let vertexX1 = stringStartX - adjustment;
    let vertexY1 = stringStartY + adjustment;
    let vertexX2 = stringStartX + adjustment;
    let vertexY2 = stringStartY + adjustment;
    let vertexX0 = stringStartX; // Top vertex (string start point)
    let vertexY0 = stringStartY;

    // rotating vertices around the top vertex
    let rotatedVertexX1 = vertexX0 + (vertexX1 - vertexX0) * cos(this.tilt) - (vertexY1 - vertexY0) * sin(this.tilt);
    let rotatedVertexY1 = vertexY0 + (vertexX1 - vertexX0) * sin(this.tilt) + (vertexY1 - vertexY0) * cos(this.tilt);
    let rotatedVertexX2 = vertexX0 + (vertexX2 - vertexX0) * cos(this.tilt) - (vertexY2 - vertexY0) * sin(this.tilt);
    let rotatedVertexY2 = vertexY0 + (vertexX2 - vertexX0) * sin(this.tilt) + (vertexY2 - vertexY0) * cos(this.tilt);

    // drawing the rotated triangle (knot)
  noStroke();
  fill(this.balloonColor); // setting fill same color with the balloon for the triangle 
    triangle(rotatedVertexX1, rotatedVertexY1, rotatedVertexX2, rotatedVertexY2, vertexX0, vertexY0-3);
  }
  drawBalloon() {
    push();//saving the current drawinf style settings and transformations
    translate(this.balloonPosition.x,this.balloonPosition.y);// moving the origin to the balloon's position
    rotate(this.tilt);//rotating the canvas by the balloon's tilt angle
    fill(this.balloonColor);//setting the color to fill the balloon
    ellipse(0,0,this.balloonWidth,this.balloonHeight)//drawing the balloon at the new origin
    pop(); //restoring the previous drawing style settings and transformations
  }
  
update(){this.balloonPosition.add(this.balloonLift);// adding the lift vector to the balloon's position vector
}

}

As attached above, within the Balloon class, there are three functions: drawString(), drawBalloon(), and update(). The drawString() and drawBalloon() functions are functions that are responsible for drawing the string attached to the balloon and the balloon itself. I originally planned to draw a string within the drawBalloon() function as well. However, whenever I tried to do so, due to the order of the execution, the code’s output was not what I expected to see. Hence. I made the drawString to draw the string and the know of the balloon separately. 

For the drawBalloon() function, it was not particularly hard for me to code this part, as I just had to implement the ideas of rotating a shape and drawing a shape which we learned during one of our first lectures to code. 

However, for the drawString() function, it was quite challenging. It took me quite a while to figure out to ensure that the string and the knot of the balloon were located correctly on the bottom center of the balloon even after tilting the balloon itself. After struggling for a few minutes, I realized that I could use the sin() function and cos() function, which are built-in functions of p5, to figure out the “changed” bottom center of the balloon. More specifically, I was reminded of the coordination rotation formula, which I learned back in high school. Since we know the angle of rotation, through implementing coordination rotation formulas, I was able to easily figure out what is the changed x and y positions of the bottom center of the rotated balloon.  

For the update() function, which is responsible for raising the balloons, I have simply added the balloon lift vector to the balloon’s position vector. The update() function was one of the reasons why I decided to utilize the createVector() in the first part of the code. I wanted to make mine as concise as possible. Hence, to prevent making repetitive lengthy code, I decided to create the createVector(). As shown in the code snippet above, the lift factor is determined randomly between 0.5 and 1.5. I made the lift factor to be randomized because I wanted the balloons to have different speeds so that it would look more natural and it would help look like the balloons dragging the house above.

Cloud Class

drawCloud(){
  fill(255);//white color for the cloud
  noStroke();
  //creating several ellipses to form a cloud shape
  ellipse(this.cloudPosition.x, this.cloudPosition.y-10,70,50);
  ellipse(this.cloudPosition.x, this.cloudPosition.y-10, 70, 50);
  ellipse(this.cloudPosition.x + 10, this.cloudPosition.y + 10, 70, 50);
  ellipse(this.cloudPosition.x - 20, this.cloudPosition.y + 10, 70, 50);
  ellipse(this.cloudPosition.x+40, this.cloudPosition.y+10, 70,50);    
}


Within the cloud class, I have created the drawCloud() function to draw a cloud. As shown in the snippet above, I have illustrated the cloud by combining 4 ellipses. I have made the ellipse’s position to be random. So, every time we replay the code, the position of the cloud changes. 

House Class

update() {
  this.houseY -= 0.5; //liftingthe house
}

drawHouse() {
  
  // house body
  fill("#64b9dd")
  rectMode(CENTER);
  rect(this.houseX, this.houseY, 120, 60);

  // roof and other details
  fill("#84797b")
  quad(140, this.houseY - 90, 257, this.houseY - 90, 278, this.houseY - 30, 119, this.houseY - 30);
  fill("#fccc65")
  triangle(215, this.houseY - 110, 185, this.houseY- 30, 255, this.houseY - 30);

  // mini house body
  rectMode(CORNER);
  fill("#f3a07f")
  rect(200, this.houseY - 30, 40, 60);
  
  //door 
  fill(255)
  rect(154, this.houseY-10,30,40)
  stroke("#84797b")
  strokeWeight(8)
  point(175,this.houseY+10)
  strokeWeight(4)

  // windows
  noStroke()
  fill(255)
  rect(208,this.houseY-70,20,25)
  rect(207, this.houseY - 20, 25, 35);
  stroke( "#84797b")
  line(209,this.houseY-60,227,this.houseY-60)
  line(219, this.houseY - 19, 219, this.houseY + 14);
  line(207, this.houseY - 3, 232, this.houseY - 3);

  // chimney
  noStroke()
  fill("#84797b")
  rect(166, this.houseY-100, 20, 10);
}


There are 2 functions: drawHouse() and update(). As the names of the functions suggest, the drawHouse() function is responsible for drawing the house itself while the update() function is responsible for moving the house upward. For drawHouse(), I have utilized simple shape functions such as quad(), triangle(), rect(), and line() to draw the house. For the update() function, similar to the mechanism I used for the update() function of the Balloon class. I have deducted the lift factor of 0.5 to the y position of the instance of this class. 

In Main Sketch

In the main sketch, I have created the objects of the Balloon class, House class, and Cloud class. For Cloud class and Balloon Class, in which I had to create multiple objects, I created empty arrays and stored each object of the class to the respective array using the for loops. For the Balloon objects, I randomized the x and y positions of the object, the size of the balloon, and also the color of the balloon. But I’ve set a range when randomizing the x and y positions to ensure that the balloon is always created above the house. Also, for the Cloud class, I have randomized the x and y positions of the object and the size of the balloon. 

//function adding a new balloon when the mouse is pressed
function mousePressed() {
  //Checking if the mouse is pressed above a certain height relative to the house
  if (mouseY < house.houseY - 110) {
  // Add a new balloon at the mouse position with a random size and color
    balloons.push(new Balloon(mouseX, mouseY, random(20, 50), colors));
  }

One of the key parts of the main sketch-which I am particularly proud of- is the mousePressed. I have let a new Balloon be generated when the mouse is clicked. However, a new Balloon will be generated if and only if the y position of the mouse is above the house. I have set the initial number of balloons generated when the code is played to 90 balloons. After a few clicks of the mouse, when the number of balloons is more than 100, then the balloon and house will start rising. 

The Final Output

Mouse click above the house to add more balloons! Once there are more than 100 balloons, the house and balloons start rising 🙂

Reflection and Areas of Improvement.

Overall, I enjoyed working on this assignment. Although it was quite challenging to code as there were lots of things that I had to consider, it was very fun and interesting to apply arrays and classes together to create objects. I also loved how the usage of classes and arrays could make the code way simpler and more concise. For the areas of improvement, I think I can perhaps make the balloons pop when they reach the end and make the house fall when the number of balloons decreases. Also, I could make the house and balloons not only move up but also left and right using the keyboard arrows. 


Assignment 3 – Ramiel

In week 3, we learned arrays, functions, and object-oriented programming. Originally, I was trying to make Tetris because the concept was tied to using arrays and OOP. During practice, I encountered an error with my box() function, where the console referred to a built-in p5js box() function.

I became curious and decided to check out the reference pages. It turns out that the box() function generates a three-dimensional shape box using WEBGL. After some testing and playing around, I decided that I wanted to make a geometric shape using these simple shapes.

The concept is inspired by Ramiel from the popular show, Evangelion, a diamond-shaped being. Using rotation functions, I can achieve this look.

All Ramiel Scenes — EVANGELION:1.11 YOU ARE (NOT) ALONE. - YouTube

Ramiel. Evangelion 1.0 you are (not) alone.

I also experimented with sin and cosine functions that resulted in a particular pattern using texts for the background. I tried implementing a way to change the direction of the text wave, but it was more difficult than I imagined so I scraped the idea.

Mouse click to add more cubes, BACKSPACE to remove one.

The best part of the code that I liked is the pulsing effect for the cube using a very simple sin function. Overall, the project was fun and a challenging one that I enjoyed while experimenting with p5js.

display(){
    var pulse = this.size + sin(this.theta*1) * this.pulseAmplitude;  
    fill(0, this.objColor, 200);
    box(pulse);
    this.theta += 0.13;
  }

References & Tutorials

p5.js Web Editor | Circle Pulse (p5js.org)

p5.js Web Editor | Particle Waves (p5js.org)

reference | box() (p5js.org)

Reading Response to “The Art of Interactive Design”

Chris Crawford’s definition of interactivity in his book, “The Art of Interactive Design,” led me to rethink what is considered “interactive.” In the very first pages, Crawford mentions that he believes the term “interactive” has been overused and that “we’ve lost track of the word’s true meaning.” I very much agree with Crawford, as I also found myself frequently using the word “interactive” without a clear understanding of what interactivity really is. At the start of the reading, I realized that I had utilized the word “interactive” everywhere without having a clear idea of its meaning, as I could barely define “interactivity” by myself. Moreover, the reading’s mention of printed books and movies as instances where the term “interactivity” is misapplied made me think that the term is often oversimplified and misused in various domains. I questioned why the term “interactivity” had been so misapplied and oversimplified in various domains. Then, I thought that the reason behind these misapplications and oversimplifications was perhaps because “interactivity” was poorly defined in the first place. So, this reading also made me reflect on the importance of having a clearly structured definition.

In this reading, Crawford defines interactivity by making an analogy to a two-way conversation in which two actors alternately listen, think, and speak. I think the essence of his definition is the presence of giving back and forth. It should not be only one entity that is “reacting” to something or someone, but rather, there should be a reciprocal reaction. This made me think that the most important aspect of interactivity is the presence of a reciprocal process of listening, thinking, and speaking.

This reading also made me think about the key difference between user interface design and interactivity design. I believe that both are similar as they are both user-centric designs. However, I think it is the approach that makes them different. While user interface design is focused on “optimization” for efficiency, interactivity design focuses on the creation of a holistic interactive experience that incorporates both form and function. Also, one of the key aspects that makes interactivity design differ from user interface design is the “thinking” element that Crawford mentions while explaining his definition of interactivity. I think interactive design focuses on having an approach that considers the user’s cognitive engagement.

Assignment #3 – The Interactable and Unpredictable Portrait

For this assignment, once again, I proceeded with going abstract, but I tried to get inspired by Dan Croll’s Music Video “Tokyo”  which is animated by Simon Landrein (sadly, the video is blocked in the UAE). This video has a different approach to animating, as it contains all the visible elements inside a frame, which is also inside another frame (YouTube’s video player on this occasion). It is an interesting approach, and I wanted to try to replicate it.

Tokyo - EP - EP by Dan Croll | Spotify
Dan Croll’s Album Cover for “Tokyo EP”

Once I could replicate the frame borders with the use of line(), I noticed that it would not be enough for what I wanted to do, because if figures were drawn, they would also be displayed outside the frame. So to hide the rest of the figures, I employed rect() to cover all areas behind the drawn lines, and thus, the same technique as in the video is possible. I first started with the idea that I wanted to make the edges of each frame interactable and all the contents inside the portrait change, but soon it proved not only to be challenging, but very time-consuming, so I discarded the idea and thought about going for a different approach.

Since the assignment required me to create a “generative artwork,” I once again thought about the past week’s material, as it involved creating art with the use of algorithms and subsystems. And not only that, but I decided to once again go with the use of figures, which are, on this occasion, more interactable.

The user is free to use the mouse to interact with the canvas. If the mouse is pressed outside the frame borders, it will create new figures and a bit of an illusion; figures are emerging off the scene. And if the mouse is pressed inside the frame, two things will happen: the colors will change, and the figures will approach slowly, depending on where the mouse is. Furthermore, if the user clicks continuously inside the frame, the figures will disperse randomly.

The part of the code that I feel most proud of is where most of the interaction with the figures happens, which is this code block:

//This is to help with creating new figures, move and change color.
if (mouseIsPressed){
  
  //Collision detection outside portrait.
  if ((mouseX > 0 && mouseY > 0) && (mouseX < frame.w/8 && mouseY < frame.h) || (mouseX > frame.w/1.15 && mouseY > 0) && (mouseX < frame.w && mouseY < frame.h) || (mouseX > 0 && mouseY > 0) && (mouseX < frame.w && mouseY < frame.h/8) || (mouseX > 0 && mouseY > frame.h/1.15) && (mouseX < frame.w && mouseY < frame.h)){
    createfigure();
    } else {
      
    //Move figures to current mouse position if the cursor is inside the portrait.
    for (let i = 0; i < figure.length; i++){
      if (figure[i].x != mouseX || figure[i].y != mouseY){
        if (figure[i].x < mouseX){
          figure[i].x += 5;
        }
        if(figure[i].x > mouseX){
          figure[i].x -= 5;
        }
      
        if (figure[i].y < mouseY){
          figure[i].y += 5;
        }
      
        if(figure[i].y > mouseY){
          figure[i].y -= 5;
        }
        
      //Change color of items depending on mouse position.
      figure[i].color1 = mouseX;
      figure[i].color2 = mouseY;
      figure[i].color3 = mouseX+mouseY;
      }
    }
  }
}

In this code, an if statement is first used to ensure that the mouse is, indeed, outside the canvas to create figures with the function createfigure(). If the condition is not met, a for loop and many if statements are used to assure that the array is fully checked for each object (or figure) inside it and to then modify the attributes like X and Y position, and color. This is to be able to move them while also changing the color with the position of the mouse on the screen.

For future assignments, I will try to go for a more artistic approach and not that many uses of figures, since art can be employed in many ways rather than just going full abstract.