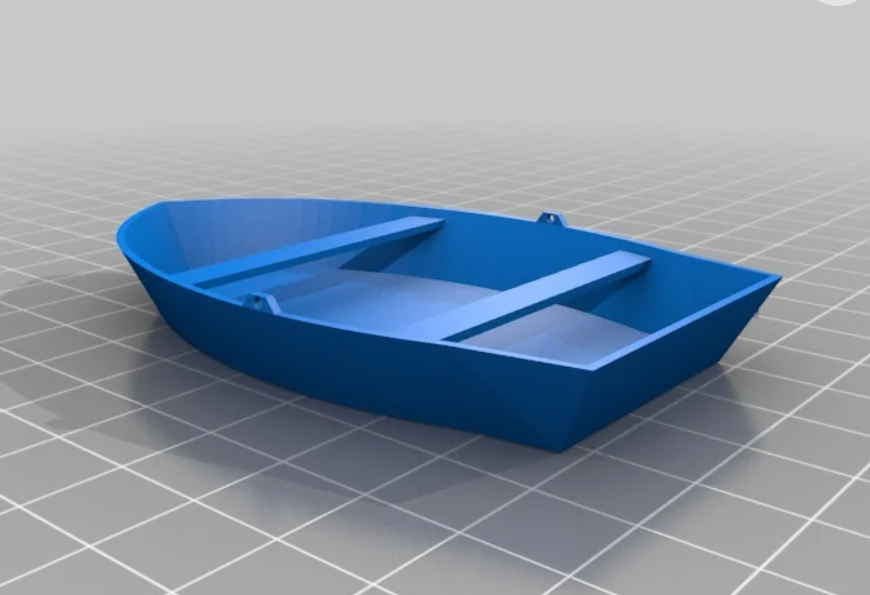
Personally, I liked this reading. The article Design meets Disability, mentions points which I hadn’t previously considered but are intuitive. While the author gave multiple examples of designs that were made to be more accessible while not highlighting one’s disability there were a few that stood out to me.
The most obvious product which is meant to help people with a disability are glasses. Like the article mentioned people don’t view glasses the same way as a wheelchair or a crutch or an arm sling. People see glasses as aesthetically appealing and as someone that wears glasses I haven’t seen as it as a disability either. I believe that the reason for this is mostly that glasses are very commonplace but that also they can be both aesthetically appealing and discrete.
The theme of aesthetically appealing and discrete is consistent for designs that are meant to also help those with a disability. The author mentioned the iPod but really it made me consider a previous reading we had. The previous reading discussed how something that is aesthetically appealing can be helpful for creativity and that people are willing to overlook small details. I wondered if a product that may not be as technically advanced as another can still sell more if the user-experience is far greater. I think this has already been shown to be the case with the Macintosh, and Macs in general, but also the iPhone which has a cult-following (including myself). While some people stick to the iPhone because of the apple ecosystem being very convenient I think a lot of people (and I am speaking from anecdotal experiences) like the user-interface both because it is intuitive and aesthetically appealing whilst being discrete, and because they have been using it for such a long time that it’s inconvenient to change. Many android phones have better features and some are cheaper and yet people, like myself, still choose to buy an iPhone.
Going into the final project now I want to try to make the design aesthetically appealing and keep certain parts discrete depending on the function. For example any buttons or switches that should be used by the players will be easy to see and everything else will hopefully add to the aesthetic whilst not being distracting. Hopefully I can have this done before user-testing so that I can change it before the final deadline if needed.
Make something that uses only one sensor on Arduino and makes the ellipse in p5 move on the horizontal axis, in the middle of the screen, and nothing on arduino is controlled by p5
let rVal = 0;
let alpha = 255;
let left = 0; // True (1) if mouse is being clicked on left side of screen
let right = 0; // True (1) if mouse is being clicked on right side of screen
let xPos = 0; // Position of the ellipse
function setup() {
createCanvas(640, 480);
textSize(18);
noStroke();
}
function draw() {
// one value from Arduino controls the background's red color
background(255, 255, 255);
// Update the position of the ellipse based on the alpha value
// Mapping alpha to the width of the canvas
xPos = map(alpha, 0, 1023, 0, width);
// Draw an ellipse that moves horizontally across the canvas
fill(255, 0, 255, 255); // Same mapping as the text transparency
ellipse(xPos, height / 2, 50, 50); // Position ellipse at center height with a diameter of 50
if (!serialActive) {
text("Press Space Bar to select Serial Port", 20, 30);
} else {
text("Connected", 20, 30);
// Print the current values
text('rVal = ' + str(rVal), 20, 50);
text('alpha = ' + str(alpha), 20, 70);
}
}
function keyPressed() {
if (key == " ") {
// important to have in order to start the serial connection!!
setUpSerial();
}
}
function readSerial(data) {
if (data != null) {
let fromArduino = split(trim(data), ",");
if (fromArduino.length == 2) {
rVal = int(fromArduino[0]);
alpha = int(fromArduino[1]);
}
let sendToArduino = left + "," + right + "\n";
writeSerial(sendToArduino);
}
}
Production 2
Make something that controls the LED brightness from p5
let rVal = 0;
let alpha = 255;
let left = 0; // True (1) if mouse is being clicked on left side of screen
let right = 0; // True (1) if mouse is being clicked on right side of screen
let xPos = 0; // Position of the ellipse
let ledState = false; // To toggle LEDs
function setup() {
createCanvas(640, 480);
textSize(18);
noStroke();
}
function draw() {
// one value from Arduino controls the background's red color
background(255, 255, 255);
// Update the position of the ellipse based on the alpha value
// Mapping alpha to the width of the canvas
xPos = map(alpha, 0, 1023, 0, width);
if (!serialActive) {
text("Press Space Bar to select Serial Port", 20, 30);
} else {
text("Connected", 20, 30);
// Print the current values
text('rVal = ' + str(rVal), 20, 50);
text('alpha = ' + str(alpha), 20, 70);
}
text("Then, press A to flash the police lights.",20, 100)
//Edit the code below
// Toggle LED state every frame if space is held down
if (keyIsDown(65)) { // 32 is the ASCII code for space
ledState = !ledState;
if (ledState) {
left = 1;
right = 0;
} else {
left = 0;
right = 1;
}
}
// Edit the code above
}
function keyPressed() {
if (key == " ") {
// important to have in order to start the serial connection!!
setUpSerial();
}
}
function keyReleased(){
if (key == "a") {
left = 0;
right = 0;
}
}
function readSerial(data) {
if (data != null) {
let fromArduino = split(trim(data), ",");
if (fromArduino.length == 2) {
rVal = int(fromArduino[0]);
alpha = int(fromArduino[1]);
}
let sendToArduino = left + "," + right + "\n";
writeSerial(sendToArduino);
}
}
let velocity;
let gravity;
let position;
let acceleration;
let wind;
let drag = 0.99;
let mass = 50;
let rVal = 0;
let alpha = 255;
let left = 0; // True (1) if mouse is being clicked on left side of screen
let right = 0; // True (1) if mouse is being clicked on right side of screen
let serialSetup = false;
// Declare a variable to store the time at which to trigger the action
let triggerTime = 0;
function setup() {
createCanvas(640, 360);
noFill();
position = createVector(width / 2, 0);
velocity = createVector(0, 0);
acceleration = createVector(0, 0);
gravity = createVector(0, 0.5 * mass);
wind = createVector(0, 0);
// Set the trigger time to be 5 seconds after setup runs
triggerTime = millis() + 5000;
textSize(20);
}
function draw() {
// Check if the current time has passed the trigger time
if (millis() >= triggerTime && !serialSetup) {
serialSetup = true;
}
push();
fill(0);
if (!serialSetup) {
text("Simulation starts in 5 seconds. Press a to set up serial.", 20, 50);
}
pop();
if (serialSetup) {
background(255);
let windtext = "";
if (alpha < 300) {
wind.x = -1;
windtext = "Wind : Right";
} else if (alpha > 800) {
wind.x = 1;
windtext = "Wind : Left";
} else {
wind.x = 0;
windtext = "No wind.";
}
push();
fill(0);
text(windtext, 20, 50);
pop();
applyForce(wind);
applyForce(gravity);
velocity.add(acceleration);
velocity.mult(drag);
position.add(velocity);
acceleration.mult(0);
ellipse(position.x, position.y, mass, mass);
if (position.y > height - mass / 2) {
velocity.y *= -0.9; // A little dampening when hitting the bottom
position.y = height - mass / 2;
console.log(
"Bounce! Position Y: " + position.y + ", Velocity Y: " + velocity.y
);
left = 1;
} else {
left = 0;
}
}
}
function applyForce(force) {
// Newton's 2nd law: F = M * A
// or A = F / M
let f = p5.Vector.div(force, mass);
acceleration.add(f);
}
function keyPressed() {
if (keyCode == LEFT_ARROW) {
wind.x = -1;
}
if (keyCode == RIGHT_ARROW) {
wind.x = 1;
}
if (key == " ") {
mass = random(15, 80);
position.y = -mass;
velocity.mult(0);
}
if (key == "a") {
// important to have in order to start the serial connection!!
setUpSerial();
}
}
// This function will be called by the web-serial library
// with each new *line* of data. The serial library reads
// the data until the newline and then gives it to us through
// this callback function
function readSerial(data) {
////////////////////////////////////
//READ FROM ARDUINO HERE
////////////////////////////////////
if (data != null) {
// make sure there is actually a message
// split the message
let fromArduino = split(trim(data), ",");
// if the right length, then proceed
if (fromArduino.length == 2) {
// only store values here
// do everything with those values in the main draw loop
// We take the string we get from Arduino and explicitly
// convert it to a number by using int()
// e.g. "103" becomes 103
rVal = int(fromArduino[0]);
alpha = int(fromArduino[1]);
}
//////////////////////////////////
//SEND TO ARDUINO HERE (handshake)
//////////////////////////////////
let sendToArduino = left + "," + right + "\n";
writeSerial(sendToArduino);
}
}
One of the many things I appreciated about this week’s reading is how expansive and detailed its exploration of the relationship between design and disability is. Indeed, for a long time, designing for disability, as a discipline or practice, was brushed aside and accessibility was achieved merely by asking what augmentations need to be introduced to allow certain groups of people with disabilities the ability to use a platform or a product. The chapter begins by examining products built for those with disabilities and the role of fashion and artistic designers in normalizing and destigmatizing these products, effectively engulfing designs for those with disabilities into the wider culture of “mainstream” fashion. This latter inclusion affords people with disabilities both the luxury of choice and the long-awaited pleasure of finally being seen, both of which are things most people take for granted. We can see this sentiment reflected in the desire of athlete and model Aimee Mullins to find prosthetics that are “off-the-chart glamorous.” Incorporating artists in conversations about design for disability, which have been largely dominated by those with clinical and engineering backgrounds, is imperative in finding the sweet spot between functionality and aesthetics. I believe it is, however, important that those who are designing for disability are keen on involving the target user in their design process – the same way they would be if they were designing for any other target audience.
Interweaved within this aforementioned discussion is an emphasis on language. Integrating such designs into fashion means integrating them into a larger system of cultural artefacts, one of which is language. I enjoyed the delineation of the linguistic evolution of “spectacles” to “eyewear”. “Patients” become “wearers”. The term “HearWear” is proposed in place of “hearing aids.” These are illustrations of how designers can actively contribute to changing cultural and societal outlooks, which is an essential prerequisite for actualizing inclusion.
One belief I held prior to reading this chapter was that designs had to be universally inclusive. After all, what is so difficult about ensuring that we have a multimodal interface that can accommodate all users? What I failed to realize is that additive complexity, as was pointed out by the article, would potentially create unintended inaccessibility. The idea of designing appliances and platforms that are effectively “flying submarines” is bound to leave us with an influx of products that are overly intricate, but with subpar performance in any singular task. It seems like what we need is a diversity of robust designs and products, for each type of user, that can perform their intended tasks optimally with elegant simplicity. We can only begin to reframe how we think of designing for disability – designing for inclusion – by inviting more than just engineers, whose aim is merely to achieve functionality and problem-solving, into the conversation.
For my final project, I am creating a cooking game that engagingly explores Palestinian culture. The dish created is “Mansaf” with the help of “Teta” meaning grandma. The game will consist of several tasks for the dish. The visuals will be on p5 and so will the instructions. I will use several sensors such as a button, joystick, and motion sensor… to complete the cooking tasks. Through audio, visuals, and the hands-on game experience I think the outcome will be very interesting. Of course, some challenges will include p5 and Arduino communication which is why I’ll address them early on.
We connected the Arduino to the P5 sketch using a serial monitor. We did this by downloading a Javascript app from the P5 serial library which acts as an intermediary to allow p5 to access hardware via serial port: available here. This has both access to the javascript browser and connected Arduino. The code below is responsible for declaring variables, handling serial communication (events such as (connection, port listing, data reception, errors, port opening, and closing.), and storing data. To complete the connection we used the code below:
let serial;
let latestData = "waiting for data";
let ellipseX; // Variable to store the x-coordinate of the ellipse
function setup() {
createCanvas(400, 400);
serial = new p5.SerialPort();
serial.list();
serial.open("/dev/tty.usbmodem101");
serial.on('connected', serverConnected);
serial.on('list', gotList);
serial.on('data', gotData);
serial.on('error', gotError);
serial.on('open', gotOpen);
serial.on('close', gotClose);
}
function serverConnected() {
print("Connected to Server");
}
function gotList(thelist) {
print("List of Serial Ports:");
for (let i = 0; i < thelist.length; i++) {
print(i + " " + thelist[i]);
}
}
function gotOpen() {
print("Serial Port is Open");
}
function gotClose() {
print("Serial Port is Closed");
latestData = "Serial Port is Closed";
}
function gotError(theerror) {
print(theerror);
}
function gotData() {
let currentString = serial.readLine();
trim(currentString);
if (!currentString) return;
console.log(currentString);
latestData = currentString;
}
The x-coordinate of the ellipse is specified by ellipseX, which is updated based on the sensor data in the gotData() function. This allows the ellipse to move horizontally across the canvas based on the sensor readings.
// Update the x-coordinate of the ellipse based on the sensor data
ellipseX = map(parseInt(latestData), 0, 1023, 0, width);
}
function draw() {
background(255);
fill(0);
// Draw the ellipse at the middle of the screen with dynamic x-coordinate
ellipse(ellipseX, height/2, 50, 50);
}
Demo:
Task 2: Use p5 to change LED brightness.
et rVal = 0;
let alpha = 255;
let upArrow = 0;
let downArrow = 0;
function setup() {
createCanvas(640, 480);
textSize(18);
// Replaced Space bar with an actual Button for Serial Connection c
const connectButton = createButton('Connect to Serial');
connectButton.position(10, height + 30);
connectButton.mousePressed(setUpSerial); // Call setUpSerial when the button is pressed
}
function draw() {
background(map(rVal, 0, 1023, 0, 255), 255, 255);
fill(255, 0, 255, map(alpha, 0, 1023, 0, 255));
if (serialActive) {
text("Connected", 20, 30);
let message = upArrow + "," + downArrow + "\n";
writeSerial(message);
} else {
text("Press 'Connect to Serial' button", 20, 30);
}
text('rVal = ' + str(rVal), 20, 50);
text('alpha = ' + str(alpha), 20, 70);
}
// Decided on keyPressed as it is more straight forward
// Up Arrow Key turns the light on
function keyPressed() {
if (keyCode === UP_ARROW) {
upArrow = 1;
} else if (keyCode === DOWN_ARROW) {
downArrow = 1;
}
}
// Down Key turns the light off
function keyReleased() {
if (keyCode === UP_ARROW) {
upArrow = 0;
} else if (keyCode === DOWN_ARROW) {
downArrow = 0;
}
}
// This function will be called by the web-serial library
// with each new *line* of data. The serial library reads
// the data until the newline and then gives it to us through
// this callback function
function readSerial(data) {
////////////////////////////////////
//READ FROM ARDUINO HERE
////////////////////////////////////
if (data != null) {
// make sure there is actually a message
// split the message
let fromArduino = split(trim(data), ",");
// if the right length, then proceed
if (fromArduino.length == 2) {
// only store values here
// do everything with those values in the main draw loop
// We take the string we get from Arduino and explicitly
// convert it to a number by using int()
// e.g. "103" becomes 103
rVal = int(fromArduino[0]);
alpha = int(fromArduino[1]);
}
//////////////////////////////////
//SEND TO ARDUINO HERE (handshake)
//////////////////////////////////
let sendToArduino = left + "," + right + "\n";
writeSerial(sendToArduino);
}
}
Demo:
Task 3:
Code Snippet:
if (!bounced) {
bounced = true; // Update bounce state
} else {
bounced = false; // Reset bounce state
}
} else {
ledState = 0;
}
I have three ideas for my final project, each emerging from my interdisciplinary interests.
The first idea I would like to propose is creating a Sign Language Glove, aimed at facilitating communication and improving accessibility for individuals who are deaf or hard of hearing. I shall limit it to fingerspelling using the alphabet for now. The glove will incorporate flex sensors on each finger to detect bending movements. Arduino will process this data and send the finger configurations to a p5.js sketch, which will interpret the gestures and recognize the corresponding letters of the alphabet.
The p5.js screen will display the recognized letters visually and audibly using text-to-speech. Additionally, users will have the option to input letters via a keyboard to display the corresponding Sign for it on the screen. This interactive system enables individuals that use sign language to have two-way communication with non-sign language users effectively.
I initially thought of using American Sign Language (ASL), but the issue is a lot of the signs have the same finger positions, and it will be difficult to differentiate the signs.
An alternative is using Indian Sign Language, which uses two hands, but can overcome the above issue. However, this adds complexity of checking 10 finger configurations.
My second idea is conducting a psychology experiment utilizing p5.js for the visual presentation of stimuli and Arduino for participant response collection. I aim to design either Perception experiments, such as Visual search tasks, which involve participants searching for a target stimulus among distractors, or Cognition experiments, which may involve memory tasks, where participants memorize and recall sequences of stimuli presented, or face recognition tasks, where participants identify familiar faces. In these experiments, the p5.js sketch will display visual stimuli, while Arduino buttons will serve as response inputs.
Eg, in the visual search tasks, the p5.js screen will display each of the trials and participants will use buttons connected to the Arduino board to indicate when they have found the target stimulus. Arduino will record response times and accuracy.
At the end of the experiment session, participants will be able to view their performance metrics and compare them to group averages or previous trials. This setup allows for the seamless integration of psychological experimentation with interactive technology, facilitating data collection and analysis in a user-friendly manner.
For my third project idea, I propose creating an interactive system that generates music from art! The user will be able to draw on the p5.js canvas, creating their unique artwork. The system will then analyze this artwork pixel by pixel, extracting the RGB values of each pixel. These RGB values will be averaged to create a single value for each pixel, which will then be mapped to a musical note. Additionally, the system will detect sharp changes in color intensity between adjacent pixels, indicating transitions in the artwork. These transitions will determine the length of each note, with sharper changes resulting in shorter notes. The coordinates of each drawn point can influence the tempo or volume of the music, to make it sound better. Once the music composition is generated in p5.js, it will be sent to Arduino, where a piezo buzzer will play the music in real-time. This interactive system lets users create their own art and music.
While I found the reading’s focus on human capabilities to be a very insightful perspective concerning interaction design, I found its focus on the use of hands to be both limiting and outdated.
In the past several decades, technologies have developed with the consideration of hands as human’s main ‘capability’. We type, swipe, scroll, hold and even move devices with our hands in order to generate a given output – this has become second nature to us.
However, I believe that the future of immersive and seamless human-centred design revolves around moving beyond this. I feel that the utilisation of other physical human inputs can be used to maximised interaction design, both from the perspective of immersion and ease of use.
An example of this being used to provide seamless experiences for users is the use of facial recognition to unlock smartphones. By taking advantage of the front camera’s natural position when a user picks up their device, designers have been able to eliminate the tedious action of typing in a passcode or scanning a thumbprint.
Conversely, full-body immersion has been utilised in game consoles such as the Xbox Live and Wii. In these cases, sensors were put in use to revolutionise how players interact with games, effectively deconstructing the notion that playing video games is a lazy and inactive process. Despite the minimal success of these consoles, the application of full body immersion seen in them can be used as a reference for other interactive experiences such as installations and performances.
For this assignment, my point of departure was to experiment with creating a sense of range and tonality with the buzzer as opposed to producing singular notes. I feel that the easiest two options would have been to do so by linking the frequency (pitch) produced by the buzzer to either a light sensor or an ultrasonic sensor. As we’ve seen in class, light is very difficult to control, so I opted for the latter.
As the input taken from the ultrasonic sensor updates quickly and at small increments, the sound produced by the buzzer becomes interestingly distorted and non-standard. To me, it suited the aesthetic of a suspenseful scene in a Sci-Fi thriller film. This led me to consider adding a more mechanical sound to complement the buzzer and create an almost chaotic result. To do this, I incorporated the use of a servo motor which varies the BPM of its 180 degree movement based on the same input taken from the ultrasonic sensor.
Ultimately, I enjoyed this assignment as it acts as an example that ideas can come naturally through experimentation. One aspect I feel could be developed is the application of the servo itself as I could potentially vary the surfaces that it rotates on (as briefly shown in the video) to produce different results.
Below is the code, a video of the circuit with just the buzzer and a video of the complete circuit.
#include <Servo.h>
const int trigPin = 9;
const int echoPin = 10;
const int buzzerPin = 11;
const int servoPin = 6;
Servo servoMotor;
int servoAngle = 0;
unsigned long previousServoTime = 0;
unsigned long servoInterval = 0;
void setup() {
pinMode(trigPin, OUTPUT);
pinMode(echoPin, INPUT);
pinMode(buzzerPin, OUTPUT);
servoMotor.attach(servoPin);
Serial.begin(9600);
}
void loop() {
// Send ultrasonic pulse
digitalWrite(trigPin, LOW);
delayMicroseconds(2);
digitalWrite(trigPin, HIGH);
delayMicroseconds(10);
digitalWrite(trigPin, LOW);
// Measure the time it takes for the pulse to return
long duration = pulseIn(echoPin, HIGH);
// Calculate distance in centimeters
float distance = duration * 0.034 / 2;
// Map distance to BPM (Beats Per Minute)
int bpm = map(distance, 0, 100, 100, 200);
// Move the servo motor back and forth
unsigned long currentMillis = millis();
if (currentMillis - previousServoTime >= servoInterval) {
servoMotor.write(servoAngle);
previousServoTime = currentMillis;
servoInterval = 60000 / bpm; // Convert BPM to interval in milliseconds
// Increment or decrement the servo angle
if (servoAngle == 0) {
servoAngle = 180;
} else {
servoAngle = 0;
}
}
// Output distance and BPM to the serial monitor
Serial.print("Distance: ");
Serial.print(distance);
Serial.print(" cm, BPM: ");
Serial.print(bpm);
Serial.println(" beats per minute");
// Generate buzzer tone based on frequency
int frequency = map(distance, 0, 100, 100, 500);
tone(buzzerPin, frequency);
}
As a photographer, I am inclined towards lens-based imaging. Because of this, the use of computer vision piqued my interest after being introduced to us earlier in the semester. In turn, I have decided to center my final project around the use of computer vision
Concept:
I will look to create a digital mirror which is, at first, heavily abstracted and almost visually illegible. The user is prompted to take a picture of themselves with their phone using the mirror. After raising their phone, the program will detect its presence and make the digital mirror clearer.
The work aims to highlight the common subconscious desire many of us have to take pictures of ourselves in reflective surfaces, in which case the affordance of any reflective surface becomes that of a mirror. Based on this, I present this work with the question – what if there was a mirror made only to take selfies with.
p5js and Arduino:
Naturally the computer vision, programming and ml5 implementation will all happen on p5js. I initially struggled to come up with how Arduino can be incorporated. However, considering the work’s purpose is to allow users to take selfies, I thought of wiring up a ring light (or any small, soft light source) to the Arduino in order to enhance the user’s experience. This light would be turned on only if a phone is detected by the program. In order to ensure functionality, I would need to connect the circuit to a stronger source of electricity than my computer. I also need to look into the different options that would allow me to connect the light to the Arduino physically.
For my Final Project I have thought about the Idea of creating a small boat which we would be able to control with our hands.
Okay okay I agree that is very very plain but stay with me while I explain exactly what my plan is and how I will combine the Arduino with p5.js.
My idea is to 3d print a boat bed which would accommodate the Arduino and some batteries which would be used to power a DC Motor which would have a fan on it. I want to attach the DC Motor to a Servo motor just so I am able to change directions easier.
For controls I want to use a specific Ultra-Sonic sensor which we have available in the Connect2 booking system. This will determine if the boat will go to the left or right, faster or slower.
Finally, by connecting the Arduino to p5js. I’m planning to display the speed, and direction of the boat – kind of like a dashboard in a car.