Assignment 9 – Reading Response 2 (Physical Computing’s Greatest Hits (and misses))

Reading this text made me realize that creativity in physical computing doesn’t always mean coming up with a brand new idea, it can be just as interesting to take something familiar and make it your own. Projects like theremin-style instruments or drum gloves keep showing up repeatedly, but each version reflects the person who built it. I used to worry that picking a common idea would make my work seem unoriginal, but now I see that it’s more about how you approach it. Even if something’s been done before, there’s always room to add your own twist or explore a new angle. That actually feels kind of helpful, knowing I don’t have to reinvent the wheel to make something meaningful.

What also stood out to me was how these projects go beyond just being technical, they’re about how people interact with them. Whether it’s something playful like a tilty table or something more emotional like a remote hug device, each project invited a different kind of connection. Even the ones that seemed purely visual, like video mirrors or waving grass, sparked curiosity. It made me think that physical computing is really about creating experiences, not just building stuff. That realisation was exciting, because it means there’s room for personality, emotion, and fun in the work I create.

Assignment 9 – Reading Response 1 (Making Interactive Art: Set the Stage, Then Shut Up and Listen)

Reading this peice made me pause and rethink how I approach interactivity. I’ve definitely been guilty of overexplaining my work, or failing to consider what an inexperienced user might try to do with, most notably in our midterm projects for this very course. It was easy to tell the audience of these projects exactly what they were supposed to do as opposed to watching them actually use it and naturally interact with it. But this reading reminds me that interactive art isn’t about controlling the outcome. It’s about inviting possibility. The idea that the artwork is just the beginning of a conversation really stuck with me. It shifts the focus away from self-expression and toward shared experience, which honestly feels more generous, and more exciting.

What stuck with me the most was the reminder to “listen”. To actually observe what people did, how they interacted, what they didn’t do, and keep that in mind for future projects. We can’t control how people will react to things, but we can control our reactions to them. Letting go of control isn’t easy, but it might be the most meaningful part of the process overall.

Week 9 – Physical Computing’s Greatest Hits (and Misses)

“Physical Computing’s Greatest Hits (and Misses)” was like a fun tour through some of the most popular themes in interactive media projects and I appreciated how he didn’t just list the types of projects such as theremin-like instruments, drum gloves, tilty tables, video mirrors, etc. but really dug into why these ideas come up again and again.

What stood out to me most is how familiar many of these projects feel. Even if I haven’t built them myself, I’ve seen a lot of them or even thought about similar concepts. Igoe makes a great point that just because something’s been done before doesn’t mean you shouldn’t try your own take on it. There’s always room for originality in the way we approach or remix old ideas.

His section on LED fetishism was especially relatable and I feel like every beginner, including me, gets a little too excited about blinking lights. But even those simple projects can be meaningful with the right context.

I also liked his honesty about the limitations of certain projects. For example, waving over a sensor or watching yourself in a video mirror might be cool for a few seconds, but the interaction doesn’t always have depth. On the other hand, ideas like drum gloves or tilty controllers succeed because they connect more directly with natural, intuitive gestures.

Overall, Igoe’s piece made me think more critically about interaction design, not just what’s cool or visually interesting, but what’s actually meaningful to the person using it and I’m hoping that’s something I’ll carry into my own work.

Week 9 – Making Interactive Art: Set the Stage, Then Shut Up and Listen

This reading honestly made me rethink how I approach interactive stuff. Igoe’s whole “don’t interpret your own work” thing called me out in the best way. I’m definitely guilty of wanting to explain every little thing, and giving context for everything. But his point is solid, if you tell people exactly how to engage with your piece, you’re not really giving them space to explore or react on their own.

I liked how he described interactive art as starting a conversation, not just delivering a monologue. You build the thing, set the scene, give people some hints, and then let them do their thing. His comparison to directing actors was kind of perfect too. You don’t hand someone a script and say “now cry here and feel sad exactly like this.” You give them room to figure it out. Same goes for interactive art, you’re building the set and handing out props, but the audience gets to decide what it all means.

I think that idea of stepping back and letting go of control is both a little scary and kind of exciting. People might totally misinterpret what you were going for, but they might also surprise you in a good way. So yeah, I’m definitely keeping this in mind as I start making things, give just enough direction to spark curiosity, then let people make it their own.

Week 9 – Reading Response

Reading “Physical Computing’s Greatest Hits (and Misses)” was strangely comforting and inspiring at the same time. It helped me realize that a lot of the ideas I thought were already “done” or cliché—like using sensors to make interactive gloves or LED-based projects—are actually important milestones in learning and creativity. I used to feel discouraged when I saw someone else had already made something similar to what I had in mind, but this piece reframed that completely. It emphasized how each version of a repeated idea can still be fresh and meaningful when approached from a personal or unique angle. I found myself especially drawn to the “Fields of Grass” and “Things You Yell At” themes—they really match how I want people to feel something tactile or emotional when they interact with my work. This gave me permission to play, iterate, and remix existing concepts without feeling like I have to reinvent the wheel just to be valid.

That sense of permission and openness carried over into “Making Interactive Art: Set the Stage, Then Shut Up and Listen,” which really shifted how I think about authorship and control in interactive work. I’ve always felt the need to guide viewers to the “correct” meaning, but Tigoe’s argument for stepping back and letting the audience complete the piece through their own actions hit me hard. It reminded me that the most memorable interactions I’ve had with art happened when I could explore it freely, without being told what to think. The comparison to directing actors—offering intentions instead of rigid instructions—really reframed how I might approach building experiences. I’m beginning to see interactive art less like a fixed statement and more like a space for dialogue, where the audience brings the work to life and creates meaning in real time.

Week 9 – Making Interactive Art: Set the Stage, Then Shut Up and Listen

In the article, Tom Igoe talks about making interactive art and stresses that the artist’s role is to set up the experience and then step back. He explains that once the piece is in front of people, it should speak for itself without the creator needing to guide or explain everything. I thought this was a really powerful idea because it shifts control from the artist to the audience. It made me realize that true interaction happens when people can explore and react in their own way, not when they are being told exactly what to do. Igoe’s comparison of interactive art to setting a stage rather than delivering a message really stuck with me.

One thing that made me think more deeply was when he pointed out how important it is to listen to how people actually use and react to the work. Sometimes what users do might not match what the artist imagined, and that is okay. In fact, it is part of what makes interactive art exciting. It raises an interesting question though: if an audience interacts with a piece in a completely different way than intended, is the art still successful? I liked how the article encouraged flexibility and openness, and it reminded me that in interactive work, letting go of control is not a weakness but a strength.

Week 9 – Physical Computing’s Greatest Hits (and misses)

Tom Igoe’s article about physical computing shows how the field has grown through different projects, with some being very successful and others not working out as well. I found it really interesting how he talks about the importance of human interaction in successful projects, like the “Public Broadcast Cart” and “Topobo.” Igoe suggests that when creators make technology that is too complicated or focused only on being impressive, they lose the human connection that makes physical computing special. This made me think about how easy it is for people to focus on making something flashy instead of creating something meaningful or easy to use.

One thing I was wondering about is how Igoe decides what counts as a failure. He mentions that some projects are too self-centered or confusing for users, but I thought maybe even complicated projects could inspire new ideas for others. I also found it important when he talked about “learning by doing.” It shows that physical computing is not just about building cool devices, but about experimenting, failing, and trying again. It made me realize that failure can be just as helpful as success when creating something new. I liked how the article celebrated creativity but also reminded us that keeping people in mind is the most important part.

Reading Response 6 – Physical Computing & Interactivity (Week 9)

Reading 1: Physical Computing’s Greatest Hits (and misses)
When I read through the list of projects, I felt a mix of excitement and a bit of doubt. I love seeing new ideas for sensors, LEDs, and simple mechanical parts. At the same time, I wondered how many of these projects really make people stop and play. The drum glove idea made me smile, but I also thought: will users want to keep playing after the first try? The remote hug example hit me hard. It showed how a simple sensor could carry emotion across a room. I pictured my own version, maybe using a small motor to squeeze a pillow. That felt more personal than flashing lights. I also liked the “fields of grass” sensors. It made me think about how we touch the world around us. I realized that each project is more than a gadget. It is a way to connect our bodies with code. This reading reminded me to pick one idea, try it out, and see how people react. I don’t need the flashiest tech. I just need to build something that invites a smile or a question. And then I need to watch and learn from their moves.

Reading 2: Making Interactive Art: Set the Stage, Then Shut Up and Listen
When I read this piece, I realized that sometimes I talk too much about my projects. I write long instructions or guides. But here, the author says to set things up and then be quiet. That idea felt strange at first. I’m used to explaining every detail. I worry people will miss the point if I don’t. But I also saw how much freedom it gives to users. They can try things their own way. I thought about a demo I did for my capstone last month. I spent five minutes showing how to use the application I have built. After that, no one tried new ideas. Next time, I will just ask the users to open the app and try it out on their own, no directions. I will step back and watch. I will take notes on what people try first and what they ignore. I will let them find their own path. I feel nervous but also curious. This reading taught me that good design is a conversation, not a lecture. If I can listen, I will learn more than if I just tell. I feel excited to see what I will learn. I think this small change will make my work more alive. I’m ready to try this and see what surprises come up.

Week 9: Analog input & output

Video demo link : https://drive.google.com/file/d/1KHeKfNwfINI-l48dOEf03Td8BbLoIRbe/view?usp=drive_link

Hand-drawn schematic:

For this assignment, I set out to build a simple system using both a digital and an analog sensor to control two separate LEDs. My chosen components were an LDR (light-dependent resistor) for the analog input and a push button for the digital one. I liked the idea of mixing natural input (like ambient light) with a more deliberate human interaction (pressing a button) to affect two types of light output.

To keep things manageable, I started with just the LDR and one LED. The goal was to make the LED change brightness based on how much light the sensor picked up. I wired the LDR as part of a voltage divider, connected it to an analog input pin, and ran a basic analogRead() loop to see the values coming in. From there, I used the map() function to translate the light readings (from 0 to 1023) into PWM values (0 to 255) for controlling LED brightness. I also inverted the mapping, so the LED would get brighter when it was darker — which just felt more intuitive, like a night light.

Once that was working, I added the digital side of things with a simple push button. Pressing the button would turn a second LED on, and releasing it would turn it off. Simple on/off logic with digitalRead() and digitalWrite() did the trick. It was satisfying to see both LEDs responding to such different kinds of input — one gradual and ambient, the other instant and tactile.

One of the challenges I ran into was just getting reliable readings from the button. At first, it was behaving erratically because I forgot to use a pull-down resistor. Once I added that in, everything stabilized. I also realized pretty quickly that without any sort of filtering or delay, the analog LED could flicker a bit depending on the room lighting, so I added a small delay(100) to smooth things out a little.

const int ldrPin = A0;              // LDR connected to analog pin A0
const int buttonPin = 2;            // Push button connected to digital pin 2
const int ledAnalogPin = 9;         // PWM LED pin
const int ledDigitalPin = 12;       // On/off LED pin

void setup() {
  pinMode(buttonPin, INPUT);
  pinMode(ledAnalogPin, OUTPUT);
  pinMode(ledDigitalPin, OUTPUT);
  Serial.begin(9600);
}

void loop() {
  int ldrValue = analogRead(ldrPin);        
  int brightness = map(ldrValue, 0, 1023, 255, 0);  // Brighter in darkness

  analogWrite(ledAnalogPin, brightness);

  int buttonState = digitalRead(buttonPin);

  if (buttonState == HIGH) {
    digitalWrite(ledDigitalPin, HIGH);
  } else {
    digitalWrite(ledDigitalPin, LOW);
  }

  delay(100);
}

Looking back, the most satisfying part was seeing the analog LED respond in real-time to light changes. Just waving my hand over the sensor and watching the LED slowly brighten gave a cool sense of control — like making a light react to shadows. It reminded me of automatic lights in stairways or hotel lobbies, except mine was sitting on a breadboard.

In the future, I’d like to swap the button for a capacitive touch sensor or maybe even a motion detector, so the LED lights up when someone walks by. Or take the LDR further by combining it with an RGB LED that changes color depending on how dark it is — there’s a lot of room to build from this foundation.

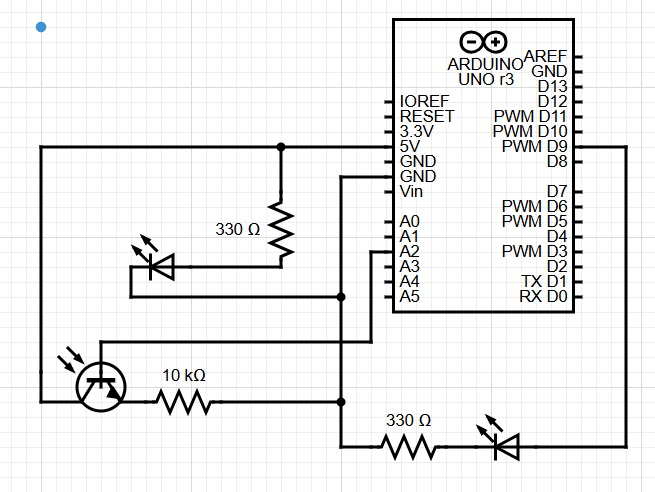
Assignment 9: Analogue and Digital

For this week’s assignment, we were tasked with controlling two LEDs using analogue and digital means. For my project, I decided to utilize the photoresistor to control one of the LEDs.

The idea was to have one LED controlled by a button, while the second LED would change its brightness depending on how much light the photoresistor detected. This works through the photoresistor sitting next to the first LED, so when it turns on, the second LED gets dimmer, and vice versa.

The components I used were:

  • Arduino Uno
  • Breadboard
  • Wires
  • 2 LEDs
  • 2 330 ohms resistors
  • 1 button switch
  • 2 10k ohm resistors
  • 1 photoresistor

Video of the circuit:  https://drive.google.com/file/d/18Y1VjX12o3Z_u9x9rxtTDF2E-SOxcpOG/view?usp=sharing

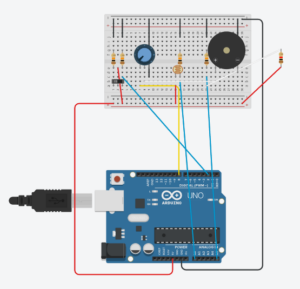
Schematic:

The code:

const int buttonPin = 2;    // Button input pin
const int led1Pin = 8;      // LED1 (button-controlled)
const int photoPin = A0;    // Analog input for photoresistor
const int led2Pin = 9;      // LED2 (brightness controlled by light)

void setup() {
  pinMode(buttonPin, INPUT);      // Set button pin as input
  pinMode(led1Pin, OUTPUT);       // Set LED1 pin as output
  pinMode(led2Pin, OUTPUT);       // Set LED2 pin as output
  Serial.begin(9600);             // Start Serial Monitor for debugging
}

void loop() {
  int buttonState = digitalRead(buttonPin);   // Check if button is pressed

  // Control LED1 based on button
  if (buttonState == HIGH) {
    digitalWrite(led1Pin, HIGH);  // Turn on LED1 if button is pressed
  } else {
    digitalWrite(led1Pin, LOW);   // Otherwise, turn it off
  }

  // Read the light level from the photoresistor
  int lightLevel = analogRead(photoPin);  // 0 (dark) to 1023 (bright)
  Serial.println(lightLevel);            
  // Convert light level into LED2 brightness (invert it!)
  int brightness = map(lightLevel, 0, 1023, 255, 0);
  brightness = constrain(brightness, 0, 255); // Make sure value stays in range

  analogWrite(led2Pin, brightness); // Set brightness of LED2

  delay(10);  // Small delay
}

The coding was probably the hardest part, as I was struggling with having the photoresistor convert the binary values into a values that would be suitable for the resisitor, and would show a noticeable decrease in brightness in the second LED.

Overall, this was an interesting project, and I was able to better understand some functions within the Arduino IDE program and the way a photoresistor could be utilized.